Edge Sharpening Under £10
Today I thought I might share with you how in my day to day I often take 10 edge tools from dull to maximised sharpness levels in somewhere around five minutes max. I do also sharpen tools individually too because, after all, they rarely all dull at once. I know hand on heart that I have striven to be as truthful as I know with you all about what it takes to sharpen edge tools with minimal effort and time. I have also striven not to diss other so-called experts in woodworking, sales outlets, and manufacturers. The truth is that I decided never to take sponsorship or other forms of remuneration when I started to have a more public face and I have the freedom to endorse whoever or whatever I feel might help you. Truth matters and without sharp hand tools, you cannot complete good work. This post is about what you really need to sharpen your edge tools with minimal fuss and the lowest cost yet without compromising quality.
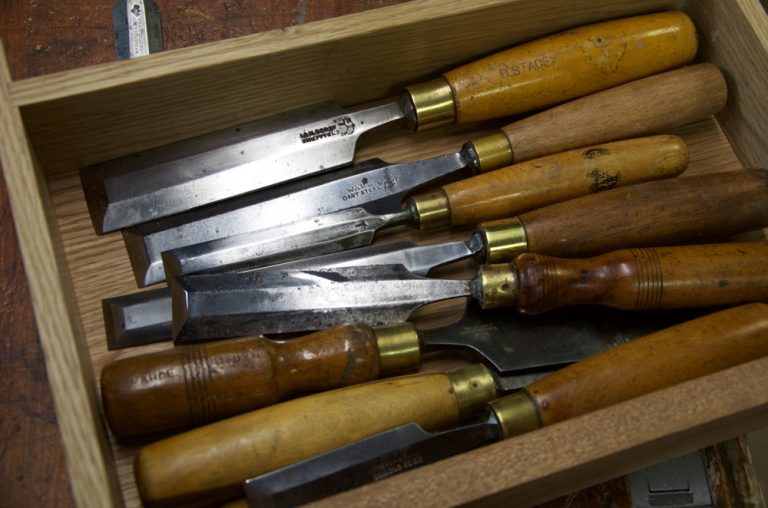
My most commonly used chisels are my 1″, 3/4″, and 1/2″. Anything smaller stays sharp much longer because I generally use them so much less. I also have two 1″ chisels going at the same time. The two planes I use are the #4 and the #5 and then my two flat-bottomed spokeshaves. But often, maybe twice a week, I will take all of my chisels and planes from my two work areas, the garage, and the big teaching and research workshop. That way I will do them all at the same time. This doubles the number to somewhere around 12-14 edge tools. The place I do 95% of my work is in the garage workshop. It’s a convenience issue to have the same tools in my teaching area as I do in the garage space.
By saying I take my edge tools from ‘dull to maximised sharpness levels‘ I mean from them still cutting reasonably well but not with the super-crisp sharpness I get from beingly freshly sharpened at 10,000 grit with a beautifully polished edge. I say this because sharpening is not something you should be lazy or neglectful about. I wish that there was some regimen that popped up to remind us to sharpen after so many minutes of use–a Fitbit???!!! But of course, there really isn’t. There is however a sensitive area we can cultivate that triggers our willingness to resharpen and that is the unwillingness to labour unnecessarily as we respond to the awkwardness brute force always demands. I also know through experience that a plane needs sharpening after not that many minutes, whereas a chisel generally goes for considerably longer. Sharpening a plane you are using should be repeated every ten or fifteen minutes, of course, that’s in my view and it will depend on several other factors too–wood density and hardness, silica in the wood, things like that. Usually, my edge tools are still cutting well enough to keep going but I have adopted a policy of, ‘don’t wait until it’s too late,‘ sharpen up earlier rather than later because it takes so much more effort to sharpen badly worn cutting edges than to engage a strategy of regular maintenance as an investment in the ease and pleasantry of using tools with sharp edges.
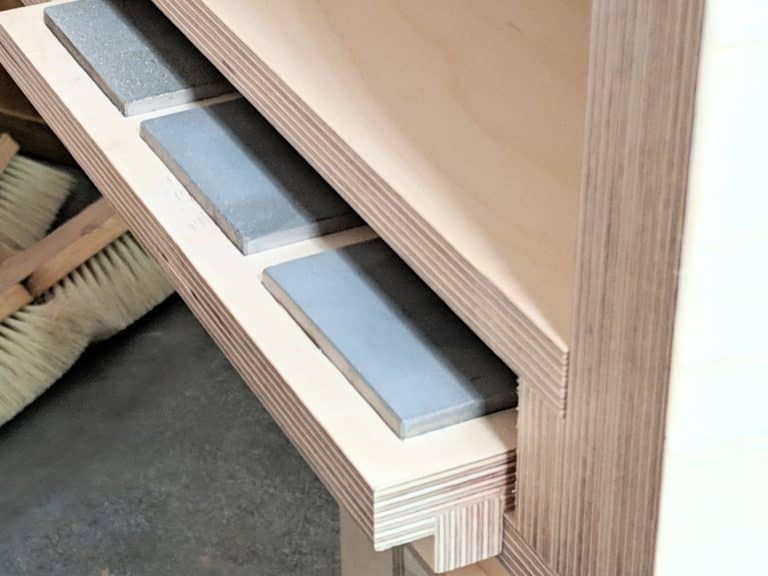
My system of sharpening has remained relatively unchanged for decades. I have found nothing more effective or better in any other offering. I generally rely on three abrasive levels to take me through to a final stropping level at 10,000 grit using a buffing compound on a leather strop. I still use three diamond plates held on plywood as my preferred abrasion type because the plates stay flat, cut steel fast and are readily retrievable as a ready-to-go for use with near-zero set up from a shelf at the left-hand end of my workbench. They also give me the cleanest sharpening system, which I find important for my working environment.
A comment recently confirmed my own growing concerns that anyone just starting out in woodworking might well be reluctant to spend £150 and more on any kind of sharpening system and that includes plate glass, film abrasive, diamond sharpening plates and any and all-natural or manmade whetstones or whatever. Often they look to tool and equipment sellers for information and that can be the most confusing place to turn to for several reasons not the least of which is that they are selling stuff and not makers. So, the cost can be just too much to expect if you go to the wrong source for information. That means it can be prohibitive for a large percentage of people. I reconsidered how to better help any amateur with their plight to take the most important step in woodworking–sharpening their edge tools. Owning, sharpening and using only sharp tools is always and forever a non-negotiable. You must have sharp edge tools, saws, etc. I knew if it was me that I would not spend £150 on the setup until I absolutely knew without a doubt, that I would become a serious and competent woodworker. Truth is, you can’t postpone beginning to sharpen. Even if you buy sharp tools to start out, within a very short time, even minutes or so sometimes, there is a good chance they will have lost their edge on a knotty area or wiry grain somewhere. You can’t know that until you understand what sharpness really is and that only comes by experiencing a sharp edge.
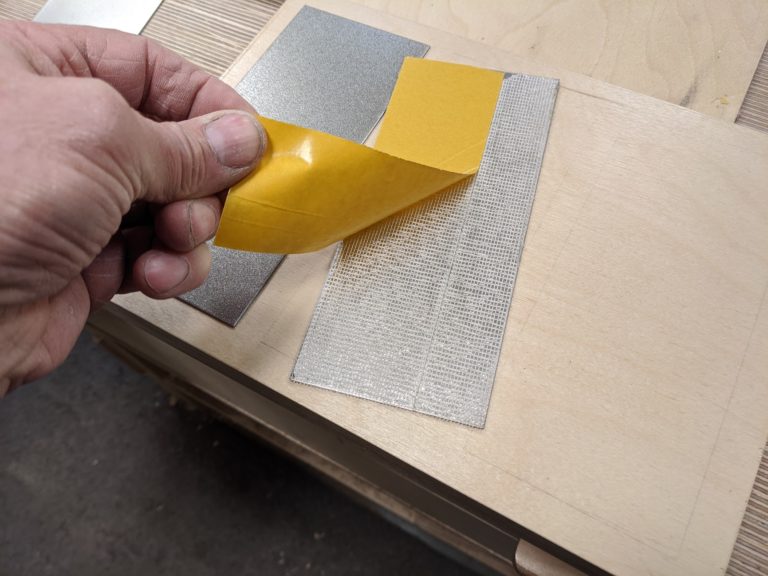
I decided to buy in some thinner diamond plates I had found that were made in China. I knew that if the plate was fairly thin that they could be pulled and held to flatness by adhesive or double-sided tape. I’d decided that thick steel plates were no more guaranteed to be flat than simply gluing thin plates to a good grade of 3/4″ plywood. It proved true. See the video below.
The plates came in and I have been using them now for a month’s worth of daily grinding and I am certain of this one thing, I probably do sharpen up more than 99% of woodworkers and that is not obsessing about it at all. These plates have worked just as well as any other types of plates including the most expensive offered, so I am continuing with them until I wear them out altogether. Hazarding a guess, they should last as long as the more expensive plates based on this one reality. The grit particulate governs the thickness of the abrasive by the particulate size itself. If that is the case, we have solved the issue of the fastest, most efficient and economic system of sharpening our edge tools for all right from the get-go. Also, even though my plates are as flat as the thinnest feeler gauge in my metric gauge set, to sharpen an edge does not require a dead flat surface, it’s just a good place to shoot for and that’s all. Having given this the amount of thought I have it’s a win-win situation because no one can really lose. Why? Well, if the plates have already sharpened dozens of hand tools several times over for about 30 days, and most woodworkers might only be able to work four hours a week, my days divided by four hours means the plates should give you 24 four hour slots in the workshop. Six months’ worth of sharpening. The plates cost less than £10 remember.
When the plates came in I knew it wouldn’t matter if they weren’t dead flat because gluing them down to a substrate would make them as flat as the substrate. These plates would indeed give me the abrasive I needed to reestablish the 25-30-degree bevel. 3/4″ birch, 13 ply plywood pretty well guarantees a perfectly acceptable level of flatness. By the time mine were adhered down and tested with a straightedge they were so flat my thinnest feeler gauge would not enter between the straightedge and the surface at any point.
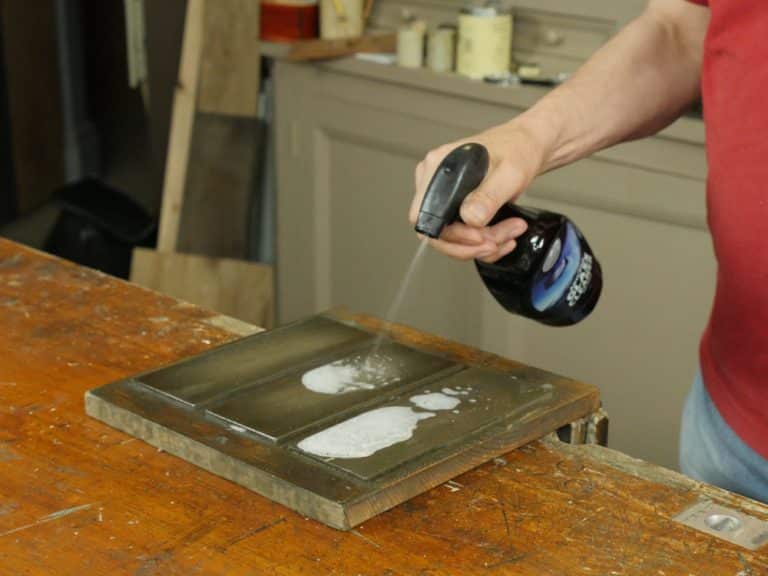
I set them out with a 1/2″ distance from one long edge, 1/2″ from each side (short edges) and a 1/2″ gap in between. I allowed 3/4″ from the edge that would be nearest to me. I added a 34″ by 3/4″ strip to the fore-edge and simply glued and screwed this un place. Before installing the plates I coated all surfaces with three coats of waterbased varnish. This will keep the surface cleanable with a wipe from a dampened wipe.
My new strop takes care of the final buffing and polishing out. Whereas just gluing down leather works adequately, I thought for just a little more effort I would enjoy its looks all the more and thereby just feel better about. You can see how to make one here. It’ll take you 20 minutes, that’s all, and it will last you for a lifetime, I’m sure.
This brings me to a final piece I have added into the system but it needs just a little explanation. My advocacy for three diamond plates remains unchanged. One thing has influenced my introducing a level of abrasive that needs regular changing and that is a cloth-backed abrasive belt. Whereas I bought a roll of 5″ wide cloth-backed abrasive produced by Klingspor and bought from Germany, you can buy a 4″ abrasive belt sander belt that works just as well. The grit I suggest is 150-grit. I found that the 250-grit diamond plates soon lose their aggressive abrading quality but that it is still highly effective as a finer grade (somewhere around 300-400 would be a good estimation). Abrasive belts also lose their aggressiveness but I calculate that using a 2″ wide by 6″ long section of the belt will sharpen about 10 plane sharpenings before I need to move over or down the belt. My 150-grit abrading, roughly 24″ long belt or length and 4-5″ wide, will, therefore, sharpen 80 X 2″ to 2 3/8″ wide plane irons before I need to change and this is a very aggressive and productive abrasive very capably reestablishing that initial 25-degree bevel. The cost of this section of abrasive costs around £1 per belt. After that, there is no gain at all to using abrasive paper or film and of course, the diamond plates may well serve most woodworkers for months possibly years, if not decades. It becomes tedious and intrusive as well as time-consuming to change out abrasive paper and film. In my initial look at reintroducing an aggressive abrading level, I used abrasive paper. I found that the corner of the chisel could and would easily rip the paper so I tried a belt sander belt instead and that resolved the issue. Between the cloth-backed abrasive and the plywood support, I added a sheet of 3mm hard sign plastic. This evened out the surface and made the action even smoother. The plywood support can be lifted to the benchtop in a single move with the abrasive kept in place with three spring clips. The video in this blog shows how everything works in action.
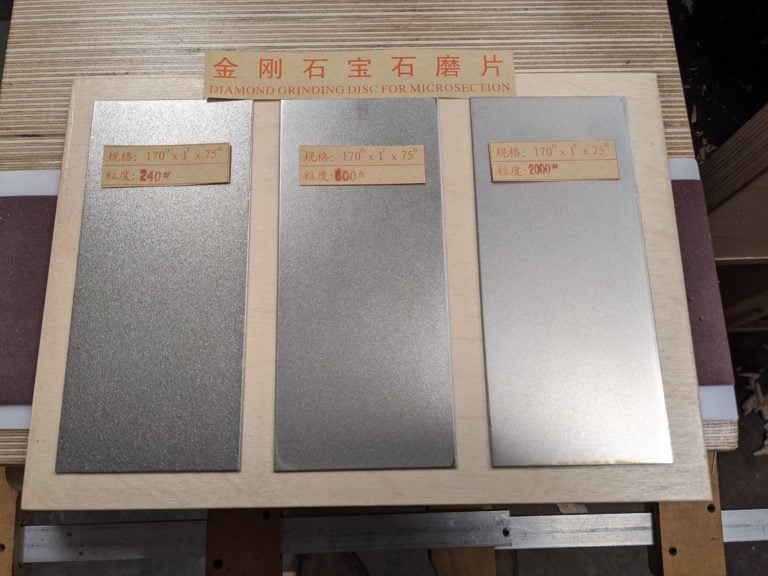
The plates I bought were all made in China and looked identical even though they came from three different suppliers. The surfaces looked the same as any diamond plates I have seen and used. I used eBay, Amazon, and Aliexpress and found this heading took me to the plates: 80-300 grit thin diamond polishing plate sharpening stones.
I found no difference between the plates though the prices varied from £3.40 to £9, but I believe, under close scrutiny, they were all from one manufactory. They measured all the same at 17cm x 7.5cm / 6.69″ x 2.95″, enough for any and all sharpening of edge tools. If you do try a set of these with me, please let me know how they are after you’ve used them for a while.
I found on Amazon that they also sell a 150 grid plate. Do you think the combination 150/240/600/1200 makes sense?
I found that you do not need anything under 240 (unless you really have some tools in bad shape). Almost ll my tools are yard sale/flea market finds (so I have done a lot of grinding).
How long do the diamond plates last? ( not the ones from China).
I’ve had my plates for almost 15 years and they show no signs of wear.
I have some of the China ones that have lasted 5 years of moderate use.
Since my shop is in-between Projects ( no lumber til the end of the month..) now taking the time to clean, re-rust, oil up, wipe down….and just general upkeep of the shop……Some needed wee bit more than others…..maybe a couple repairs as needful.
Hi Paul,
How do you feel about an extra course diamond plate, followed by a Norton India oilstone, then a strop with buffing compound?
All fine, really, what’s important is that people serious about woodworking can get their tools ultra-sharp without buying into the sharpening hype that has become so pervasive. Buy good plates if you have the money and these if you don’t, or these even if you do so that you can evaluate where you want to go. I must say, it has been most helpful to make this suggestion and so far I see no compromise in their functionality.
All fine, really, what’s important is that people serious about woodworking can get their tools ultra-sharp without buying into the sharpening hype that has become so pervasive. Buy good plates if you have the money and these if you don’t. I must say, it has been most helpful to make this suggestion and so far I see no compromise in their functionality.
A few years ago (or more) when I first started watching Paul and saw his video on “How to sharpen chisels with diamond stones”. I wanted a sharpening system like his (I was using sandpaper glued to glass). I didn’t know that he had inset the diamond plates in the plywood; so I looked all over the internet for plates that looked like his. All I could find was the expensive thick ones or the thin ones he shows above. I would stop the video and try and figure out what size his were because they didn’t look like the thick ones (didn’t think about inseting them). I couldn’t find what I thought was the ones he was using anywhere, and the thin ones were far less expensive, so I thought I would give them a try. They did work for a year or so and then I saw something from him that showed me he was using the “real” diamond plates, the thick ones. I wanted to be like Pauls and decided that I was ready to purchase The thick ones and install them according to the new video Paul put out on making the diamond plate holder.
I haven’t used the other, thinner plate since. One of the plates did fall off because the glass cleaner broke down the tape adhesive but that is an easy fix. I do think the thicker plates keep the abrasive better and longer than the thin ones. I did get sharp tools using the thinner plates. Nowadays I get far better results, but I think it is because I’m myself am better at sharpening. As Paul says in one of his videos “It’s a poor man who blames his tools.” I do think this is a good way to go for those on a budget. For some reason, I think I will stay with the thicker plates when the ones I’m using wear out. I can’t really say why other than they just feel better using them.
Good to know but wish this came sooner. I wanted to save money and saw these plates. But reviews were all over the place. Of course the good 5 star reviews are all from the 1st day, but the bad reviews were months later where the grit fell off etc. But I already purchased the DMT stones
I have had particulate come off premium plates costing 20 times the price of these, so there are no guarantees. As I said in one response, my one month of use is a year for most so well worth the money rally. I’m sure you won’t regret the DMT but we will see which lasts the longer.
What a timely post Paul!
I had set myself a goal of buying the diamond plates before the end of June and set some money aside each fortnight towards their considerable cost (around $350 Australian).
However, when I first went looking for them a year ago, it was clear that I could not afford them then and bought three of these thin plates from ebay just as you have. After twelve months, I have decided to replace them and it cost me around AUD30. I think they are excellent value.
I could probably just buy the 1200 plate, as this is the only one that really needs to be replaced, but for $30 and free shipping, a complete set seemed a good idea.
I may get twelve months or more out of the new set, and will not worry about the more expensive ones until they wear out. Who knows the exchange rate may have improved by then. At the moment it’s heading south.
Just to throw an idea out there: cheap plates for the coarse and medium, higher end for the fine plate. Then one could invest in better plates over time.
I bought smaller (6”) diamond stones made by DMT. Just wide enough for my plane irons and just long enough so that I can use a guide. For a hobbyist, they should work just fine for years. Sharpening takes a bit longer since I can’t do long strokes, but in general they work just fine. Each stone cost NOK 660, while the 8” cost around NOK 1290 at the time. I will replace them, but they will continue to serve me well in other areas of the shop.
Oh, and the stones are a thin plate with lots of holes, mounted on a GRP base. Flat as can be.
All roads leads to Rome…
I certainly never liked the holey plates and really, these thin plates all the way through to 3,000 are very nice, even and flat, so not sure why not to just try them at £3.89. Long term will be the truer test but these plates are definitely the way to go for those starting out and those venturing into diamonds too.
I bought three of these about two months ago and have been using them daily, with no problems whatsoever. I’m going to continue until they wear out.
They’re well worth the money in my opinion, especially when you see (very) similar ones selling for £70+ each. I’d recommend anyone buys them for a cheap and effective sharpening solution.
I have been using similar cheap plates for some time and they are doing truely great job. I have glued them using double-sided tape to glass plates, which then i attached to holder smilar to Paul’s. I am using set of 240/600/1200 grit and a bigger one with 180 grit which works fine for oil and water stone, plane blade backs and plane soles flattening etc.
Hello everyone.
I have used the thin china made plates for almost a year now, due to budget constraints, and glued them on 10 mm plywood. Grades 250-600-1200 plus compound on leather strop. I suppose these plates won’t last as long as the DMT or Eze Lap ones, but for my small use (a few hours of woodworking a week), and the price, they are perfect.
I had also bought a 80 grit, but this one wore out very quickly after a few uses ; and a 3000 grit, but I don’t use it anymore, no need to.
I also found faster, to just strop the tool I’m using 10 times on the leather every 10 minutes of use, without using the plates, just to get a fresh and nice edge again without having to interrupt myself too long, each woodworking session being time limited. Then I do a full sharpening session every couple of hours.
How characteristic that Paul is still trying to innovate something so foundational and something that he’s developed his system to perfection because it bothered him that it’s too expensive. What a teacher!
I am never sure which motivates me the most, countering the misinformation of entities selling and making or my wanting desperately to make sure such entities don’t con those who would benefit from sincerity. Truth is that three grits of wet and dry on a piece of plywood will get a good sharp edge a dozen times for a cost of less than £2 without buying extra thick, float glass, special film abrasive, fancy rigs for holding the tools and so on. I recall countering things like extra-thick plane irons that don’t chatter on one site as if they were offering something superior when the planes didn’t chatter in the first place. ALl quite disingenuous really. At least this way a hundred more woodworkers can take the first step towards discovering whether they like woodworking or not without that £150 price tag before the even buy the tools they need to get going.
Another good read. I have the thicker ezelap diamond plates but could only afford the narrower 2″ plates. I have been using them for over two years now and love them. The narrower plates require some adjustment in the way you sharpen plane irons, which can make it a little more difficult but they do the task at hand . So on reading this post I have ordered myself 3 plates on aliexpress. The three plates 240, 600 and 1200 grit worked out at just over £8 . This can be reduced further as a first order, as aliexpress gives a discount coupon for new users. I considered the 150 grit plate but remembered paul saying the abrasive quality reduces through use, so i will go with pauls method of using sanding belts to re- establish the bevel. After all Paul has been doing this for over 50 years, it would be counter productive not to listen to his advice. I look forward to receiving my new plates and putting themnthrouhj they’re paces. Thanks Paul for the insight.
Hello Paul,
on the weekend i did some sharpening with my EZE-LAP diamon stones and i realised some wierd resistance on my extra fine stone when sharpening the flat face of a wide chisel (I dont have these stones for too long). I took me some time to figure out that the stone is not perfectly flat and i found on “https://www.fine-tools.com/ezelap-diasharpener.html” a text saying: “Note: These EZE-LAP diamond sharpeners are not really suitable for dressing water stones or chisel faces because the flatness can deviate by up to 0.3 mm (measured with a feeler gauge on a granite measuring table). For optimal flatness we recommend you use Atoma diamond sharpening plates. Otherwise EZE-LAP diamond sharpeners are not subject to any restrictions.”
Would you recommend rather buying a new stone or only using half of the stone which is flat. Or would you suggest to just keep on using it ?
My answer in diamond plates is that for sharpening you don’t really need flatness unless you are initialising a tool and that means flattening the sole or the flat face of an edge tool. It’s unfortunate that people don’t realise that once a flat face has been initially achieved that face need never touch abrasive again. It’s a one-off process and that can even be done on any flat surface with abrasive paper. The bevel side needs to be fairly flat from side to side and I have yet to find a diamond plate that is not straight that way. Along the length it doen’t matter how hollow or bellied it is.
I will add this about flatness in what I have found. Initially i purchased a double sided water stone, and it worked ok at first. But what I found when using the cheap honing guide that everyone sells is that the narrow wheel of the guide would dig a groove into the softer side of the stone, and the plane iron or chisel would slowly turn this groove into a wider more dished groove. So after a few sharpenings my irons and chisels were sharp on the edges but not the center off the coarser side, then i would switch to the harder side that stayed flatter and then that stone would just hone the center since it stuck out a little further. So i had an iron that was somewhat partially sharp but an absolute nightmare to try to tune the plane. I know you recommend freehand but I still am using the training wheels. After switching to the DMT plates its a night and day difference in sharpening everything.
Thank you for trialling these plates, I’d seen them advertised but was dubious about their quality. I shall now order some.
I bought a cheap four sided block in a plastic carrier, with four grades of plate from Aldi a number of years ago. I think it cost around £10 at the time which was a fraction of what others were charging. I’ve still got it and still use it, maybe I was lucky but it’s sharpened hundreds of times. I took your advice about using glass cleaner as a float. I did eventually buy a £30 2000 grit plate for final finishing, but the initial work on chisels and planes is still handled by the Aldi 4 sided block.
I’ve never tried water stones, but they seemed messy and expensive. Before diamond plates I’d still achieved great results with oil stones, but diamond plates are so easy and fuss free to use. I reckon it’s the final strop work that takes tools to the peak level.
I have been using very similar Chinese ones for a while. Not a very good quality, in some place the “diamond paint” came off but still using them and sharpen my tools. When they wear out completely I will go for EZE lap.
I’ve tried the water stones and while they do the job they are messy, expensive, time consuming and a pain to store in a water bath. Then you have water all over your steel so it’s an extra step to make sure the tool is protected from rust.
I was wondering if it was just me that noticed the coarse diamond plate seemed to lose its abrading power but now I understand I should just use abrasive paper for that step which I have around anyway. Maybe that’s why I sometimes have a problem raising a burr.
Tom, I have the DMT 8″ stones and I reckon it took me maybe 50 or more sharpenings on this stone before it started to cut properly. I think the first few sharpenings on it would cut really quickly, but then it soon dropped off – so much that I thought I’d wore it out. Now (~50 sharpenings later) it can quickly establish a new bevel no problems. However, Paul’s abrasive paper method would be the best bit for this stage. I use this method mostly, unless it’s a smaller chisels.
Regards Adam
Jeff,
I just today received four of these plates from a source I found on Ebay. Here is a link:
https://www.ebay.com/itm/Thin-Polish-Diamond-Plate-Sharpening-Knife-80-3000-Stones-Whetstone-Square-US/254509494431?ssPageName=STRK%3AMEBIDX%3AIT&var=554192109504&_trksid=p2057872.m2749.l2649
Very cheap, and they arrived fairly quickly from China. They are identical in labelling to the ones Paul features in the article (clearly, he’s on to something!), and I’m looking forward to trying them out! It was the low cost that propelled me to try out my first diamond sharpening; I had been holding out until I could afford the “best” ones. It’s my trust in Paul Seller’s judgement that made these worth the try. (Thanks!)
Be aware: mine came in a simple padded envelope, and one of them was very slight bent on one corner. I found it easy to gently ease it back to nearly flat, and I’m pretty sure the double-sided tape will finish the job.
Thanks Chuck…this band of woodworkers are good people to know!
Where can a North American get the thin diamond plates and are they monocrystalline or polycrystalline and does that even matter?
Basically plates with monocrystalline diamonds are more expensive and wear slower than polycrystalline.
I had an Axminster brand double sided 400/1000 grit plate. If they have put monocrystalline diamonds on it, they surely would have mentioned it in the description. Axminster didn’t, so I assume the used polycrystalline diamonds. That plate served me well for around 3 years. The use case was 4 plane irons and 4 chisels twice weekly and due to the lack of knowledge with too much pressure in the beginning.
Now it found it’s place in the workshop of my father and will serve me there when I visit my parents. They grit isn’t as aggressive as in the beginning, but it still works.
The replacement for that double sided plate are three Atoma plates (400/600/1200) with a similar concept like Mr. Sellers’ “thin plates on a flat surface” completed with a 140 grit plate for restoring and a strop.
Those thin plates also bring in the opportunity to glue them on defined non-flat surfaces. I think that could be an advantage when sharpening non-straight edges like on gouges…
E.
Thanks E!
I bought 5 DMT plates from XX coarse to XX fine. I spent a small fortune on them even with a discount. I figured I must need. They are high quality and I am pleased with them, but really, I just want a sharp edge, not scary sharp or whatever fetish is introduced by the marketers…now I have more skill, I don’t use all of them so much…unless I want a shiny metal surface. The XX Coarse is good for fixing garden tools that I’ve dented on a rock or reprofiling a bevel.
does anyone use a charged buffing wheel
to keep a very keen edge?
michael in bx
Hi. I’m looking for some sharpening system and I think your set up will suit me fine. I apologise for my ignorance but I wondered what the significance of the leather strop is given that it’s abrasive quality can be virtually nil?
The strop is charged usually with aluminum oxide or chromium oxide basically green stuff set into a bar of wax. The wax is crayonlike and you rub the wax stick or block on top of the leather then draw your tool bevel across the strop. Couple of things happen: the wax holds tiny abrasive particles that wear at the steel edge burr. Also the leather is pliant and the steel burr fatigues and slowly wears away from the edge. One WWMC video shows Paul pulling the wirelike edge off a tool. I did the same and it was a cool feeling finally understanding sharpness.
The strop is the ideal material for charging with what we call buffing compound. Buffing compound is an abrasive used to polish a variety of materials ranging from plastics to bone and hardwoods like ebony and rosewood to the whole range of metals. Basically it is an abrasive suspended in a cake. That cake can be anything from waxy to chack like, depending on its application. The speed of wheel abrading as in industry means you can obtain a super high polish in seconds. We can use the same material for polishing our edges and this can take them to the very sharpest edges depending on the size of the particulate. Colour is the industry standard for identifying particular abrasives in block form suited to particular tasks, ie, soft metals like gold and silver might use a red coloured block and might be known as rouge. The brown, known as tripoli, is used for general purpose buffing also on softer metals like brass, copper, aluminum and various pot metals. The green that I use is a steel polish but you can use it on all other metals. I use the silverline brand which works well for me and is inexpensive too.
Which stropping “compound” do you use? I know there are several different ones/grades. The green one is all that I have ever seen/used but don’t think it is as fine as 15.000.
Aloha Paul,
People [dishonest people] think of ways to fool others and these people think they’re being ‘sharp-witted’.
Cheese is sometimes graded as ‘sharp’.
The looks of a ‘new car’ are said to be ‘sharp’.
The change in the weather is as well labeled ‘sharp’ when it is extreme in its change.
As woodworkers, we run into splinters that stab us to bleeding.
But today’s post, you prove just how ‘sharp’ it is to put a keenly sharp edge to our tools without a stab to our pockets!
Thank you and Mahalo,
Mark Baker
Hi, Paul, your video made me wonder about a few things regarding the first super abrasive step:
1. How often would you use that? Before every sharpening like your video implicitly suggests? Your text suggests otherwise, that it’s only to restablish the 25 degree bevel. That block is huge.
2. How important is the 25 degree bevel if we are sharpening a 30 degree convex edge anyway?
Thanks!
1. I use it each time I abrade. The suggestion that you can just go to the strop or a finer level rather than the coarser abrasive makes no sense because the finer you strop and the more often without reestablishing the main bevel the rounder the edge becomes and the more you will need to coarse-abrade later. The block is 5″ wide and you can see a 14″ long section. I use 2″ wide by 6″ travel at a time so I can coarse abrade (around 25-degrees) the bevel of a cutting iron 40 times before moving along to the next 5″ by 14 ” section.
2. The reason we go to the 25 degrees is just to get the ‘heel’ of the bevel out of the way that’s all. If you don’t do it in an ongoing way you will ultimately need to do much more later on. The convex is developed from the 30-degree on the finer stones as a sort of trail-off and that develops the macro-camber of the convex shape I love.
“The suggestion that you can just go to the strop or a finer level rather than the coarser abrasive makes no sense because the finer you strop and the more often without reestablishing the main bevel the rounder the edge becomes and the more you will need to coarse-abrade later.”
Ah! Of course! This makes sense but I’d never thought about it. I’ve been ‘touching up’ from time to time with the 1200 stone and then stop but will now stop this practice. Only the other day I had to re-establish the bevels on some chisels and had no idea why… now I know. Thanks, Paul.
Regards Adam
Oops… I meant to say, “I’ve been ‘touching up’ from time to time with the 1200 stone and then STROP…”
Hi Paul. A while ago I bought a set of these sharpening plates to stop using sandpaper. But after a few uses I noticed some scratches, then I stopped using them and came back to sandpaper until I could afford “proper” diamond stones. Did you noticed something like that? Does it matter?
Thanks in advance.
Not so far. They seem to have a lot of support from others having used them for a year or two too. I am more than happy if they last a year though, that beats almost everything anyway.
Good. Thanks!
I’ve been using these cheap plates for 2 and half years. I bought a set and glued it on a piece of glass for support, I have replaced these set after almost a year and a half, not because the plates were worn out but because I wanted to make something that looked more “professional”. I bought a second set a piece of alluminum, cut 3 pieces of alluminum as big as the plates and 1 cm thick and glued the plates on the supports with double sided tape. I have been using these “poor man diamond plates” for almost a year and they still cut fine.
Sorry for my bad english.
Cheers from Italy
I have used a very rough grit (maybe #60?) Glued to plywood with super glue for perhaps 5-6 years. It has been treated to some hard work, grinding new bevels and removing beards on old axes and steel wedges, flattening old dished oilstones etc. Jobs that I would not use an expensive diamond plate for. It cost maybe 4 pounds with shipping from China.
Despite the rough grit and rough work, it had held up admirably with no loss of diamonds and no real loss in cutting power (apart from the initial breaking in which also occured to my more expensive versions)
Hi Paul,
I have been using your sharpening methodology for quite some time now and I have found it not only highly efficient for putting a good and most importantly, a lasting edge on my tools, I have also found it very economic. As such I have become somewhat Apostolistic regarding your method and I have demonstrated to many of my co workers by taking a bench chisel that was used and abused for years and turned it into a woodworking scalpel. And I agree wholeheartedly that you should put your tools on a “Sharpening Schedule”, especially if you are going to be using certain tools on a regular basis.
I have used cheap diamond plates ,6: x 2.75″ x 1/16″ from China in grits of 200,400,1000,and I have used them on a LOT of tools of O1 and O2 steel for six months and they are still very effective . The WHOLE set was only $15CAD on ebay . true they are not as good as the DMT ones of which I have a couple BUT they are still very effective and cost comparison to silicon carbide wet and dry they are MUCH,MUCH cheaper in the long run .It is good advice from Paul to buy the thin 1mm plates and glue them to plywood or a cheap marble tile . Why pay for 1/4 : steel ?
I have been using the ‘Chinese’ plates for over 2 years now, and they are still doing the job as well as when they were new.
I have a set of these inexpensive plates as well, 240, 600 and 1200 grit, for over 2 years now. Glued to a plywood base. Still working like a charm.
I have the Trend double sided diamond plate – a 300 and 1000 grit side. That, plus a strop has been a great and economical starting point, though my tools do lack that mirror polish, but cut great for my needs right now. As I progress in this journey my need for an extra step has me ready to pick up an extra fine plate when my birthday comes around. My question is – when you have made a holder to keep your diamond stones in, do you wipe everything down after using them? I rarely see a ton of swarf buildup on your plate holders in your videos, however, the piece of wood that I’ve just been sitting my plate atop while sharpening is nearly completely black with swarf buildup. Maybe I’ve been using too much glass cleaner that it just can’t help but spill out all over. I do wipe down the stones after each use. Not a big deal or anything, but just want to see from you, because I will plan to make a plate holder for two stones when I get that extra fine one. Thank you for your continued mentoring and generosity with your knowledge, Paul. I’ve gleaned so much value from it. There needs to be a ‘Sir’ before your name!
And there it is – on my second read through of the article the part about a varnish for the plate holder so that it can be wiped down registered.
I like this plan.
$15.70 AUD delivered
Hi Paul,
Shen here from South Africa. Would you mind sharing a link for those Chinese Diamond Plates…
With our exchange rates, the DMT diamond plates costs way to much:-)…
Thanks Paul
How funny – after your sharpening series at the start of February I decided it was time to get some diamond plates. Not having the budget for the EZE-Lap (and they seemed to be out of stock everywhere) I thought I’d gamble £10 and buy these exact same plates from Ebay. The first ones I ordered arrived in a few days and came in the same packaging as yours, headed “Diamond grinding disc for microsection”, whatever that means.
I stuck them to some plywood with double sided tape and they worked fine to sharpen my chisels, planes and I also did my woodworking knife, penknife and later all the kitchen knives in the house!
Been using them since for sharpening chisels and planes with no issues whatsoever. I am also using a solution of 1 part baby shampoo to 100 parts water (1 teaspoon in 500ml water) instead of the automotive glass cleaner, it seems to work fine and is cheaper too.
About 2 weeks after I ordered another set of plates from eBay (I thought for some knife sharpening it would be useful to have a set that aren’t all fixed to the same board, and they were so cheap!). These ones haven’t arrived yet, I presume they have been delayed by all the coronavirus issues in China. So be aware that anyone ordering now may face a bit of a wait.
Poor-mans tools, S&J (Far East origin) panel saws, Aldi chisels, to say nothing of renovating old tools (planes) and now another alternative diamond plate, Paul you are seemingly constantly looking for effective value for money alternatives and passing your discoveries on to a wider audience who might benefit. Your integrity, honesty and willingness to share knowledge is fantastic. This is especially so in these days of corporate con artists and individuals who have hidden agenda’s. You’ve been constantly thanked so many times (all deserved) within the blog posts but again I would like to add my thanks as well. I am glad you receive no payment or gratuities from tool manufacturers or distributors for exactly the reasons you give, it means you are free to give an honest opinion – good and bad. This is all part of the reason I eagerly await your blog posts and check every day, my subscription to your Masterclass I hope goes a little way in supporting what you do.
In this current worldwide pandemic situation may I wish everyone the chance to come out the other side safely, I suppose a period of self isolation could include more time at the garage workbench. It will help to take our minds off this scourge.
Of late, the videos in these blogs can’t be watched by me. The links to them have the circles with diagdiagonal lines through them.
Thanks
Darrel
Same here Darrell,
I have to go to youtube and search for the wording to be able to watch it there.
Ditto to Darrel’s comment above. I just get blank areas between the text. Still photo display ok but I presume the blank areas are where a video should be.
I tried lapping the back of a bunch of irons ( stanley 3, 4, 6, 40 and 18) to a mirror polish with two of these made in china thin diamond plates, 120 and 60 grit.
It took a lot of hard work, and really for nothing because I started watching Paul’s videos and realized I didn’t need that much flatness.
I pretty much wore out the 60 grit, but that was with many hours (in total, I only could stand it for half an hour at a time) and that was against the entire plate.
I also have a 500 grit plate, and that has worked fine.
I mount them individually on strips of MDF with a hardwood bumper at each end, to hold them in place without tape or glue.
Another advantage of these is that they are much lighter than the thick diamond plates. I sometimes need to do a bit of work on site and the thick plates add a lot of weight to my tools.
More a comment on the times we find ourselves in than anything specific to this post … but the hour or two I spend in my garage workshop now & again has always been a source of both mental & physical therapy . Right now I (and I guess many others) feel that’s gonna be more important than ever. I hope everyone here stays safe and finds a little peace with plane or chisel in hand.
I finished the frame of my coffee table today which brought me to making the panels. Half way through the second panel I noticed how my #4 was not cutting as smooth and crisp as the first one. I remembered this blog, sharpened up, and finished the panel with enjoyment.
“…found that the corner of the chisel could and would easily rip the paper so I tried a belt sander belt instead and that resolved the issue. ”
What I do, and this will solve the same problem, is to not let the coarse work reach the edge. I use 120 grit to keep the heel down, usually around 20 degrees. That work stops maybe 1/16 or more away from the edge. I then progress through the normal set of stones. Even then, I stop the first of the three, the coarse EZ lap/DMT, shy of the edge.
The outcome from this is that the deep scratches from the coarsest stones rarely reach the edge and the finer stones work at the edge every time. If you look at my bevel, there is a progression of scratches from “good heavens, he works with that?” at the heel to moderate scratches in the middle and polish at the tip. I find this saves work. It may be too complex to start out with for someone learning to sharpen.
Because of the shallow heel, I find I can resharpen a few times with just the finer stones. I may get a freebie on the finest stone or even the strop once or even twice, then a couple times on the two finest. Now, to be clear, on each of these, I hit the heel with the 120, but it is like doing a wheelie on a bicycle…it is quick hogging with attention but little fuss. So, while I’m doing those quick resharpenings, the heel is growing towards the tip and, every now and then, I take the extra care to really get back to where I started so that I never make a thick edge.
Honestly, I think what I’m doing is using two intersecting cambered bevels, one shallow and scratchy and the other polished. The heel is low, 20 to 25, and the tip is at the working angle, 25 to 35 depending upon what I’m doing. I don’t want to get into an argument over whether is is a microbevel. 🙂
By the way, regarding coarse vs. fine diamonds and buying fancy for the fine grits: I think it may be the other way around. Can someone confirm, but my understanding is that it is difficult to make large diamond particles that aren’t clumps of smaller particles which rapidly break down to a fine grit. That’s why there weren’t any coarse grits early on. So, really, it is probably the coarse plates that are expensive. I really had to shell out to get the 120 grit diamond plate, but I know I’m going to do this work for a long time. I’m still holding my breath hoping it retains its coarseness. So far so good, but the sensible thing would be the belt Paul suggests in most cases.
Way ahead of you Paul, after seeing the cost of the plates you used in your YouTube series, and being a total newbie, I opted for a set of these to get me started, blooming marvellous. I knew they were doing a good job by the amount of plasters I was going through 😂
Good reading.
Thank you everyone.
Paul,
I was waiting to see if you would ever mention these. Just ordered them this morning.
Paul,
I the beginning for me was a sheet of float glass with wet and dry stuck on using double sided tape. I got the glass for free, but decent wet & dry cost me more than the price for these plates. To find out that not all wet & dry is the same.
I look forward to the revolution when my plates arrive early April. Happy to share my experiences as I learn to use these plates.
I can’t believe it! Those sharpening plates from China are the exact same ones I bought off eBay over 18 months ago (they took about 6 months to arrive!!) when trying to replicate your sharpening station for my chisels and plane. I still haven’t used them, partly as I’m only an occasional woodworker for my own DIY jobs around the house. Also I took one look at them when they arrived and decided against it as I thought that they looked poor quality and might actually cause more harm to my blades than good! If you’re happy with them though, then I will give them a go. I see your finest grit is 2000. I bought 240, 800 and 1200. Is 1200 grit fine enough for my final sharpen? (Baring in mind I’ve also invested in a leather strop and some green polishing compound!) 🙂
Thank you Paul! Going to try this. Not financially able to get the diamond stone set up so really happy to see an entry alternative for cheap. Wanting to enjoy my tools, which is difficult when they are not sharp and I haven’t had much success with the sand paper and glass method.
Hope you are well! Thanks again!
I still take ny India stone to work, it gets my chisels and planes sharp enough to work on houses ! I do have a couple of ezelap plates, that I have had for some years, no idea what they are cutting to now, my superfine must be Ultrafine !
Making tools hair cutting sharp is an interesting game, will play with the thin
diamond plates next !
Hi everyone, can someone please share the a link to these Chinese diamond plates, Please….
Well, as per usual, your endorsement has brought the stampede and run them right out of stock for the sizes needed. I’ve noted the search/listings and will see if they come back around so I can gift a set mounted as you have. Thank you for always seeking and sharing the fastest and most accessible means to a high quality end with your followers.
Where did you get them from, and what size are they?
Finished my plate holder for the thin one’s today, initialized the back of one of my new chisels 240, 600 then 2000. But all I am left with is 240, 600 and a bit of shiny steel all the diamonds came off with ease. Good job they are cheap, I won’t give up I will get the 1200 and try again.
I have been using a set of the Chinese plates for a couple of years now – I mount mine individually on paddles kind of like a strop, but that’s just my preference. A couple of things I would note
* They need the backing plate – I played with my first one without & distorted it almost instantly
* The course ones sometimes have a rouge diamond sticking up at the edge that will score your tool – run something hard down the corner just to knock it off before you take your good tools to it
* The finest ones seem to lose their diamonds – I have one now that is just a metal plate – but £3 each so who cares.
* There are some _tiny_ ones out there for the same price – check the size
I like them enough that I have just bought a couple more to mount on better backers than I made the first time, that must be about 2 years after buying the first set and only the really fine one has become unusable.
I bought the coarse one, 240. But after one hour of use it isn’t coarse any more. Then again I had the same issue with the eze lap stone, but it took longer. But this is why you opted for the clothes sandpaper to solve for this.
I am not sure why you include the eze lap version in this because if what you say is true why not give them the benefit of the doubt and send it back for a replacement our refund. I am still using one 240 grit after five years I can guarantee maybe only
A handful of woodworkers would match my length of time sharpening up. I have owned ten of their plates and never had an issue.
I had decided to redo my sharpening kit so ordered 3 of these thinner plates, a box of leather offcuts and some silverline green buffing compound on Amazon. Plates were packaged exactly like Paul’s – either same maker or same distributor. Delivery of plates were estimated at 6 weeks; came in 3. Only issue I could have had was thin packaging as the postie just plopped them through the letterbox. But thankfully I had a towel down on the quarry tiles because I over watered my plants. I’ll make a few different strops now and find my preference.
At that price the plates were worth a punt. We’ll see. (Now I’ll need to get around to putting a plates shelf under my bench top like Mr S.)
Wow. I’m blown away by this alternative. I’ve been looking into diamond sharpening for ages but as alot of people could never afford to get the plates plus buying a router plane to make the sharpening holder. Now I have a clean way to get a great edge to my tools. Thanks you.
Does anyone know where I can by these from? I’m based in the UK…
Tried three of these after reading your post, Paul.
As mentioned, tbey need a substantial backing plate but with that done, they make for a very convenient and affordable sharpening system.
Thanks very much for pointing us towards these Paul, it’s made a huge difference to how i work.
Also thank you for all that you do and may I wish you and yours health and happiness for the future.
I have always enjoyed watching Mr. Sellers sharpen darn near any thing, as he is so straightforward about the entire process! No muss, no fuss, no long involved process and especially no faffing about. His entire approach to the art and craft of woodworking (and I suspect even towards life?) is just so pragmatic. It seems modern life is full of making a big ‘to do’ about so many things, it is just so refreshing to see a person doing what needs to be done and getting on with things. I struggled with sharpening a bit, finding decent kit was also a problem but I have a good teacher here, and the best part is these methods really do work. Thank You!!
Still going strong after 1 month of daily use.
I have got the same plates and attached them to float glass with ordinary double sided tape, however by the end of the first plane iron sharpening they were sliding around on the glass and came off. Does anyone have a recommendation for how to stick them to the glass so they won’t come off until I want them to? Thanks
The Chinese-made diamond plates will cost you around £4 each and do a thousand sharpening more. That would be my suggestion. paper is uneconomical and tiresome. The glass deal is a little outdated and impractical if you are serious for long term results and it is expensive money and time-wise long term. Search my blog here https://paulsellers.com/2020/03/edge-sharpening-under-10/
Hi Paul,
yes, i got the Chinese plates on your recommendation and tried to stick them on some float glass that I already had with double sided tape. It would appear that the glass cleaner I was using broke down the adhesive on the tape and the plates came off and were sliding around. I did manage to achieve a much better sharpness on these that I had with the paper, just need to find a way to keep them stuck down
Many thanks
James
Ah, then just use contact cement. Nothing shifts with that. The kind we use for plastic laminate. Comes in a tube or a can, either way.
perfect, I will give that a bash. Much obliged
Ordered the plates the day I read this blog ( 11 March ). I have been using water stones for over 20 yrs, now they’re dried out… The plates are much faster and easier to use. I glued mine on a piece of granite from an old stone grill.
320/600/1200/2000 and green compound strop. Mirror finish.
They get a lot of use as I have to sharpen up every few minutes when planing sapele, rosewood or ebony. Time to sharpen up: about two minutes? (the strop taking longest). Preparing the water stones (flattening etc…) takes longer.
No fear of breaking one, gouging one… No mess. Brilliant.
What type of glue did you use?
Try using double sided tape on each end only. I seen Paul’s use it on one of his episodes
I found the 240 grit plate I have seemed to wear very quickly. I wonder if that is normal for them to wear for the first few sharpens, unless I’m unlucky?
with the cheap plates, I find that yes, they wear very quickly initially, but then ‘settle’. another thing I’ve found is that it’s possible to scratch the grit off completely if you’re not careful. I recently sharpened an awl which was quite hard and it left a mark on the 240 grit plate I use for rough sharpening. it didn’t leave a mark at all on the better quality 400 grit ‘solid’ plate. it seems to me that the bonding isn’t as good
Is it “cheap” plates or ‘less expensive‘ or ‘low cost‘ plates? There is a difference here. Mylow cost plates in all gritt=s are holding up well after almost four months to date. My Aldi, ‘low cost‘ chisels are still as good as when I bought them after nearly ten years of daily use and then to the twenty sets I bought for the student classes! Imagine paying £8 for four chisels for a German-made chisel with hornbeam handles.
Hornbeam is my favorite wood…hard as a nut and beautiful from tree to finished product. I once built a longbow out of it and the bugger would take abuse like no other. I want Aldi chisels now and Chinese stones! The PS Effect will raise the prices im off to Amazon to get them quick!
I might suggest something different here. I think that with the larger diamonds to top angular points fracture more readily and in a sense, create a sort of plateaued top which is less aggressive than when newly’cut’. The bevel of the tool then rides to surface of diamonds but they do still cut. My Chinese plates are all still working fine after three months of using them and they work as well as DMT and EZR-Lap, I must say.
Hi Paul,
Hope you are well. I’m very new to this (you’re a god send btw thank you!!) and must say coming up with a sharpening solution has been giving me some anxiety given the cost of the EZE-Lap system! I so wanted to buy cheaper Chinese plates but just assumed they’d be rubbish. Delighted to hear they’re working out for you and I will be giving them a go. Will be nice to swap from constantly ripping wet and dry paper and hopefully my work will improve as I’ll be more inclined to sharpen up more frequently!
A question on strops – are there any particular rights or wrongs when buying leather? Or can I even cannibalise an old leather jacket?
All the best
Dave
I missed this post originally but will offer this now anyway. As a beginning woodworker eighteen or so months ago, I investigated the thick steel sharpening plates and found they were not readily available in Australia, and the few places that carried them charged around AUD $180 for them (each!!!). I could buy three direct from the US for around AUD 350 including freight I think (around 175 pounds).
So I did , in fact, purchase very similar thin plates to those you have found (on ebay), for probably AUD 30,and have used them since with no real sign of wear to my inexperienced eye. I set them up much as you have for your thicker plates but glued on.
I continue to think about the thick plates but after reading your post, maybe I will just keep my money.
Hi Paul, I have been following you for the last few years and enjoying your videos. I decided to order these thin diamond plates from China but after waiting for 2 months with no luck cancelled my order and they gave me a refund. Lo and behold a month later they arrived in my post office box. I stuck them on to plywood with double sided tape and also made a leather strop. What a wonderfully fast and efficient way of sharpening up. Goodby sandpaper!Thanks again Paul.