Handling the Future Makes Us Different!
I have rehandled many planes in my time. Once, sadly, very sadly, I even used a power router to reshape the tote. I hated it! I hated the handle, the process, the method! I felt robbed, robbed by myself, I should never have done it, I binned it, along with the negative experience. I would never do it again and especially since I developed the method for making both front knob and handle completely by hand.
Natalie is editing my amateur videography to make me look good. It will be going out soon but rest assured, anyone making this tote and the knob with no more than rasps, coping saws and a couple of other hand tools is in for a very unique sense of satisfaction! This I know!
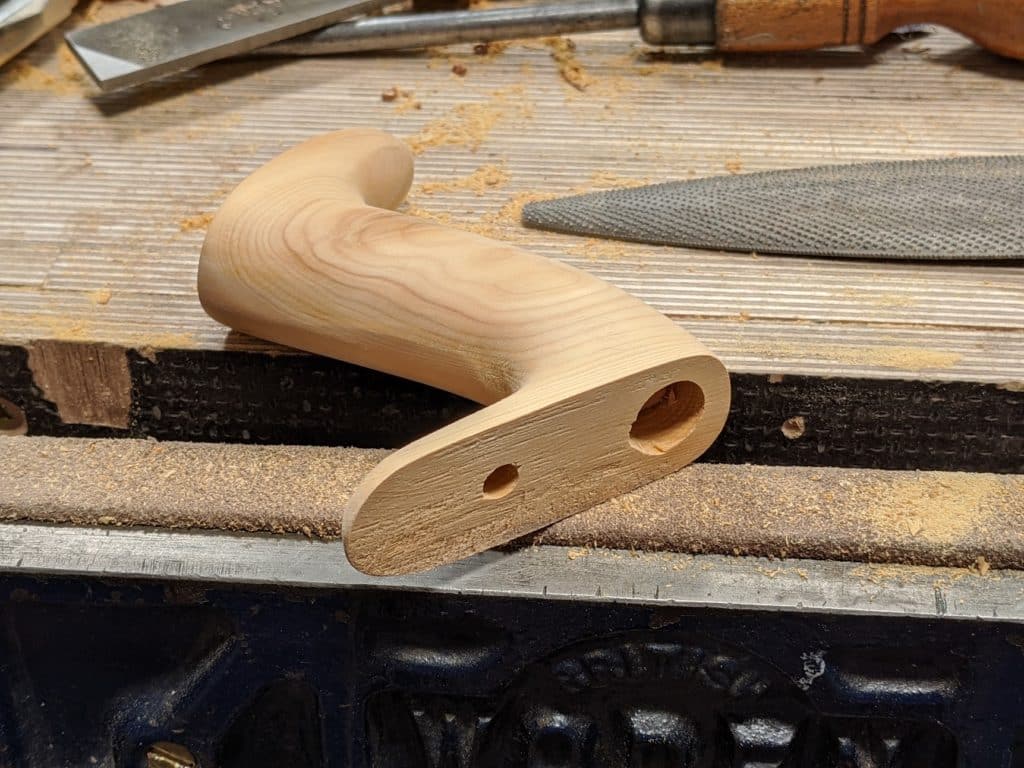
Just as we need to rethink how we live into the future, we should rethink how we develop what we think can only be done by machine. The competition is not like the race track where the winner is the fastest to complete the work. Often, we simply dismiss the process as being of little if any value and look only at speed. It’s true, it is simple to turn the front knob for the plane. Five minutes of non-challenging work with a deep flute gouge and you’re done. I have spent my whole life challenging myself to improve my skills and speed. It has not been wasted time.
The videos for these will be out soon on woodworkingmasterclasses.com for everyone and anyone to watch for free. Go to the site here and subscribe. It’s free and you don’t get bombed with stuff afterwards. Also, there are hundreds of free videos surrounding projects and tools, help guides and so much more there for you to enjoy.
If you are a beginner in the craft of hand tool woodworking or woodworking at all we have a sister site called Common Woodworking which is our way to pay it forward. We cover everything from projects to tool buying and techniques and once again it is absolutely free. Join us please; we are here to help!
We arrived to inspire the future!

I’m very excited to see these videos. I have a 3 planes of the Stanley #4 variety (one English Stanley, and two Miller’s Falls which I like very much as well. The handles work, but I have arthritis in my fingers, and I would like to have a handle which is a little more comfortable — I hope these videos will help me achieve that goal. Thank you, Paul, for all that I have learned from you, and for all that I still hope to learn from you in the future.
We are of course interested in the making process but also in what makes a tote comfortable and the right size knowing of course, that ultimate refinement is a question of personal feeling.
Thank you in advance.
Sylvain
Twice now I’ve noted that you advise not to lay down the plane on its side but I’ve always done exactly that. That was the advice I got decades ago but I always did it very gently, trying not to disturb the adjustment.
Doesn’t setting it down on the sole run the risk of dinging the edge of the iron?
Genuinely confused so for now I’m putting it down upright with a bit of scrap under the forepart of the sole.
Putting down your plane on the workbench will not harm the blade. It’s planing that does. Did you ever consider NOT to plane because it dulls the blade?
Teachers maybe were concerned students would put their planes on top of rules, chisels and what not… but then again sharpening is the remedy (which they then would have to do…). Leaving your car parked too long in the same spot is bad for your tires. Do you park your car on its side?
Paul, i double dog dare you to build your new house of furniture ONLY with your handmade tools and film it with a camera made of wood. Then make a movie out of it. The only machines allowed: ripping on the b-saw. Soup to nuts, right down to the brass tacks. A masterclass on self-reliance!
I would donate $100 US ($200 canadian) probably 50 euro to the mission.
PS: the poorman’s tools suggest they are of low quality…i saw the pig tail shavings frok the rebate plane and they look & work better than the boutique over-engineered tools u can buy from most companies. I think of the tools as handmade: the highest badge of honor! This series is fantastic. When i make my tools i will sell my commercial tools and recoup a lot of money for my family.
I have written many times on this RS. I too received the same instructions–in school! When I left school, entering the true realms of woodworking, I found that all of the craftsmen I worked with and under never ever laid their planes on their side. Just how would the planes get a damaged edge at the workbench? Only if they aid it on its side. A stray square placed awry, another plane. The craftsman always knows where he places his plane as he sets it down. Prior to 1932 all pictures and images in my research showed planes standing upright. It was in schools where this LAW was made a rule. Kids slapped planes down anywhere and on top of other metal tools. Laying it down on its side emphasised the need for care and that is all it ever did.
Thank you for that. It does make perfect sense. If the teacher is the same person who has to do the maintenance he won’t want generations of spotty herberts chucking them down any old how!
So the lesson seems to be however I set them down to do so with care. Which I do anyway.
Thanks again.
My daughter happened to see me putting my plane straight down and corrected me on it. One of her friends who is a woodworking teacher had told her that one should never do that. She explained to me that I should always lay it on its side. I responded something about this being a common misconception and she simply smiled sarcastically and shook her head at me. «Well, he is a teacher with a Masters degree», she said. «You are not». I couldn’t think of anything to say.
You learned from a man who made his living using a plane and was taught by men who made their living by using the planes. Your teacher was taught how to teach so he could make a living. Learn from those who do and always question those who teach but don’t do.
The most rewarding things I’ve built seem to come in two bins. One bin is for things I did for the first time (for me the clock project which now hangs in my shop to remind me that I can do this, and that my wife is waiting :-). I haven’t yet reached the skill level where reward comes from giving something I made to someone who loves it.
The other bin is the feeling I get when I use tools I built myself. It was so cool when I realized that the tool tote I built was working really well for carting tools from the shop to the garden for fence building.
Building a tool gives me a deeper understanding of how that tool works. It also gives me a sense of being connected to the past where people had little choice but to build their own. There is also the satisfaction of using a hand made thing. Lastly, there is the feeling of independence (or perhaps self reliance) that comes knowing that if needed you can do it your self.
So I whole heatedly recommend folks build some of the Poor Man’s series of tools on the Master Class and Common Wood working sites.
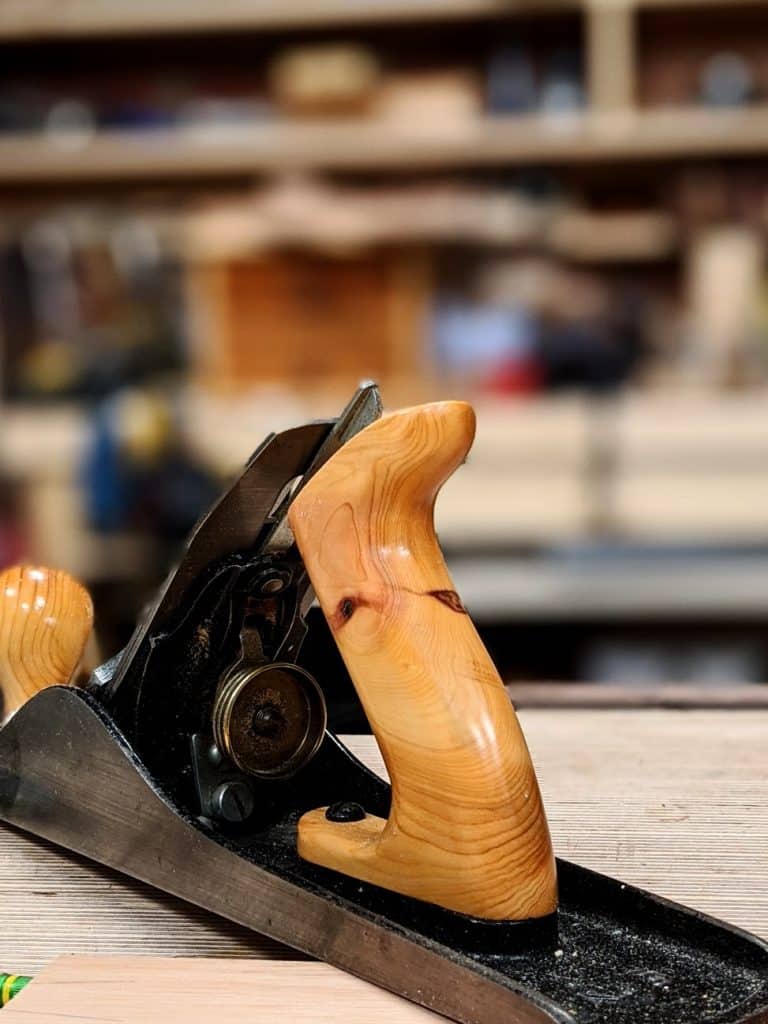
Great idea for a video. Love the yew light wood on the plane. Looks great!
Ihave been wondering about this possibility for a while so I am very much looking forward to this series.
Can’t wait to see the video. I’ve got an old Stanley no.4 that is great. I want to replace the rear tote and knob.
Even though I think I could make a very good handle for my planes, having dabbled in the knife making realms a good deal, I am looking forward to this! I fixed a Sargent plane (no 6 size) with a split handle. Put in a spline to reinforce, but it cracked again. The spline, however, kept the handle together – but it twists ever so slightly. I also have a cheap Stanley handyman plane with plastic handles, which actually works extremely well sans the feeling of plastic. I will make new handles for that one as well. So this is something I will wait eagerly for! 🙂
I’ve ‘restored’ a couple of number 4s that belonged to both of my Grandfather’s. Neither is pristine as they both had a working life, one Grandfather being a joiner and the other a bricklayer who did his fair share of joinery in the building trade and moved onto woodworking in retirement. Both rear totes have seen better days with a glued repair on one and a corner missing on the other.
I’m especially looking forward to this so I can make new ones. What kind of timber works for this? Just so I can find some offcuts ready for the video’s being released.
Is there a list of suitable woods. I have never seen yew where I live, and the beech I can get here warps and twists. Not sure the best thing to use here.
Anyone had any success laminating wood to make a handle? I have loads of beech left over from disassembling our childrens cot (mostly chewed and drawn on so not saleable). It’s all smaller dimension stuff. Thinking of laminating the small pieces into a block.
I made a tote for a friend out of laminated purple heart sandwiched between two walnut pieces with its grain 90 degrees off of the walnut’s.
I didn’t take a picture but it came out pretty and sturdy. The walnut’s grain was oriented fore-aft (along the plane’s long axis) and the purple heart grain was oriented vertically.
Shooting boards are very useful for trimming edges accurately but planes used on their sides are not comfortable things . A number 4 will seem a bit cramped. There is no particular hand position to recommend. But if you use a 4 1/2 plane , the thumb can sit very nicely behind the frog and the fingers have plenty of room tucked around the frog .
Along with a few packets of coping saw blades came a hefty catalogue from Axminster Tools. Looking at the planes pages there was a shooting board plane specifically deigned for that purpose . —- Only £507.50.
That sound great. Cannot wait.
I had already a go at making two handles for no 4 one line. As d one maple. I guess not the wood of choice but that’s what I had at the time. I was and still am happy with them fit nicely and comfy, made them thicker than the standard and not symmetric so to fit my hand as I felt it should.
Had issue with the screw hole. Had to drill it since don’t have a brace yet. But worked at the end.
Never attempted to do the knob. Lol
Thx To master Paul Seller now we will know how a pro does it. 🙏
I made one out of some rosewood a few years ago. I was just getting into woodworking. A plane i bought had a very badly beaten handle so i made a new one. I made it to fit me. But now i e used planes for a few years i know need to reshape it. I was not pointing my index finger using my planes so nothing fitted. Changed my hand position my tote is not as nice now. Love that i can just get out the rasp and refine it. Keep up the videos aiways a pleasure seeing a master at work.
I will watch this with interest, not that I have any planes with broken handles, (apart from my dad’s old number 4, and that’s staying like that !) but I like watching Paul making something useful. and I might do it one day.
I recently made (with hand tools) a replacement tote handle for a Stanley #5. I customized it to fit my hand perfectly. It was a great experience. The problem that I now have is that the slightly larger tote that I made requires a longer screw to attach it, and I cannot find any screws with the thread pattern that Stanley used on its Hand planes. So for now, I am stuck using the broken handle that I had hoped to replace.
Deepen the larger top-whole so the brass nut reaches the screw then plug the whole (and brass nut) with another very broad screw just for looks?
I’m surprised you can fit the oversized tote without compromising the use of the alignment lever 🙂
I’ve been gifted with oversized hands and am always trying to find ways to customise a tote which would allow me to curl all four fingers without missing bits of knuckles, for now I’m content with keeping my indicator pointing to where the plane should go.
I have to say just how happy I was to see these projects and posts! I started in to hand tools for these very reasons, and I had neither the space nor the money to replace all of my aging woodworking machines. I always knew pieces like plane and saw totes could be made by hand, I just didn’t know anybody who had the skill to do that (or show me how to do that either). Part and partial of sourcing old hand tools is the repair and fettling of them once we actually find them, and repairing or reshaping them just goes with the territory. Thank you for showing us the way and the skills to do just these projects, now if I could only find some lovely yew like that I’d be set.
Hi Paul,
can I ask you what kind of Wood are you using for the Handle of your planes? Can I use Olivewood for Handles?
In Addition are you using only Stanley Typ 16 Planes or which Typenumber do you prefer?
Many thanks for replying!
Greetz! Stay healthy!
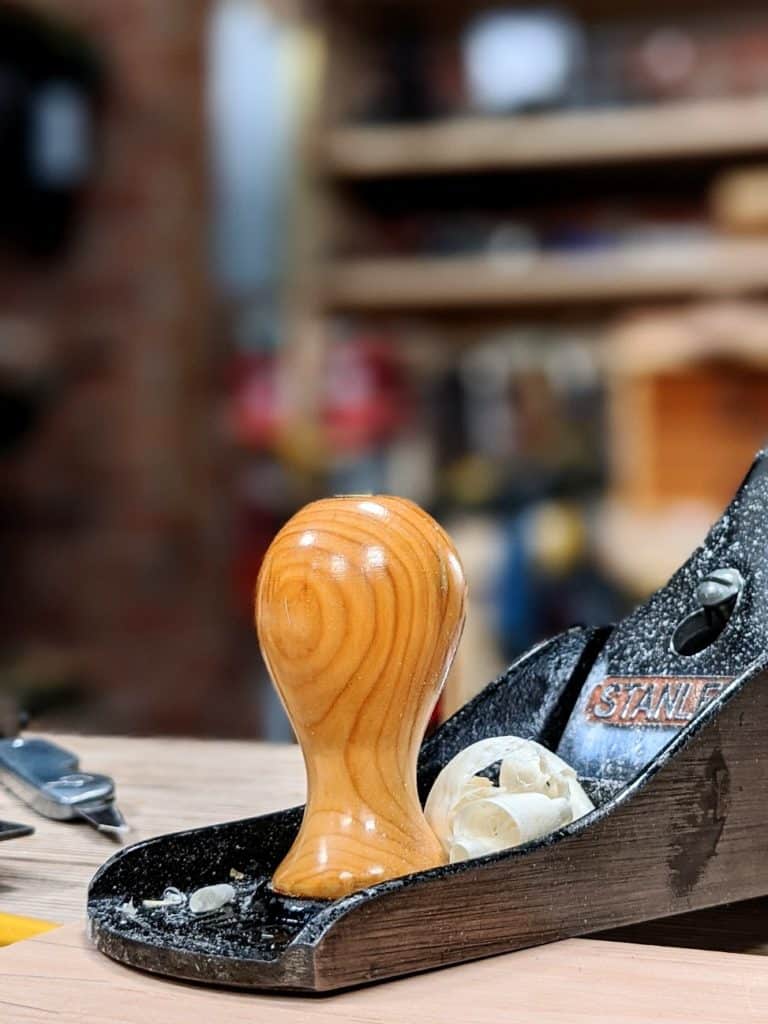
I used Yew but Olive wood will make a lovely handle too. I don’t get into Stanley numbers and I just use what comes to hand.
Mid June in the middle of global crisis I broke my wrist and was looking for small projects to fill my time. Enlarging my plane collection was one thing I could do without leaving the house. A few eBay purchases and I had a couple of old Stanley’s to work on. Much rust and grime was removed to reveal very solid and sounds planes. The 4 1/2 needed new tote and knob. Being in Western Australia I had to choose jarrah as material. Set to work with hand tools and knocked out both in a Sunday afternoon even with a cast on my wrist.
Now a few months later I look at my plane, because it truely is mine now and back on that day with fond memories of an afternoon spent in the shed.
I definitely don’t think I would feel the same way if power tools were involved and I couldn’t have cleaned it up with a broom either. 😬