Toolbox Build Update
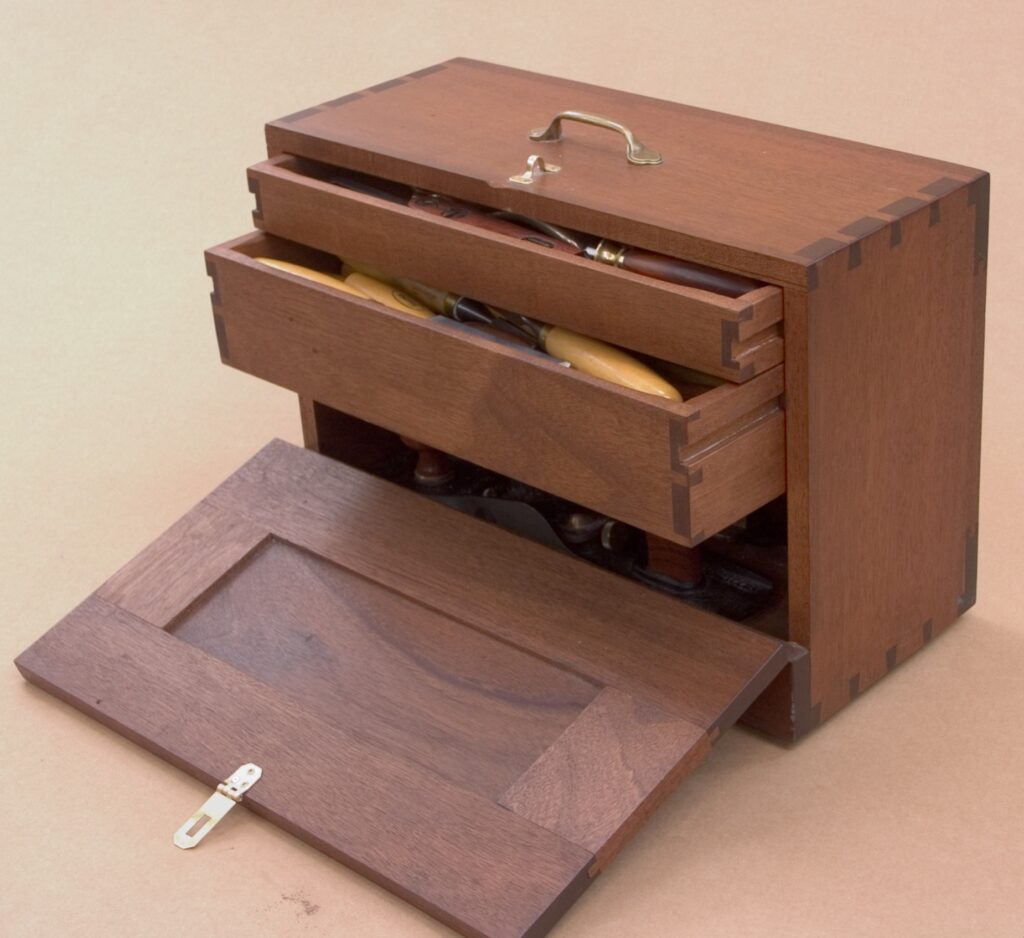
In making my toolbox design I have made two side by side. The mahogany one is made from a vintage dining table that would not be suitable for any home for a few reasons and not the least of which was user damage resulting in broken joints. The wood in this one is simply superb to work. The cost at the charity shop was so minimal I had no choice but to buy. I have done this several times and actively pursue such pieces for the wood alone. Two or three tables like this can make a fairly sizeable project and indeed an unstained dining table with a more trendy look if wanted.
Buying secondhand wood is a matter of choice. I am building a new project over the winter ready for the spring and I will build it in sectional units to transport it when done.
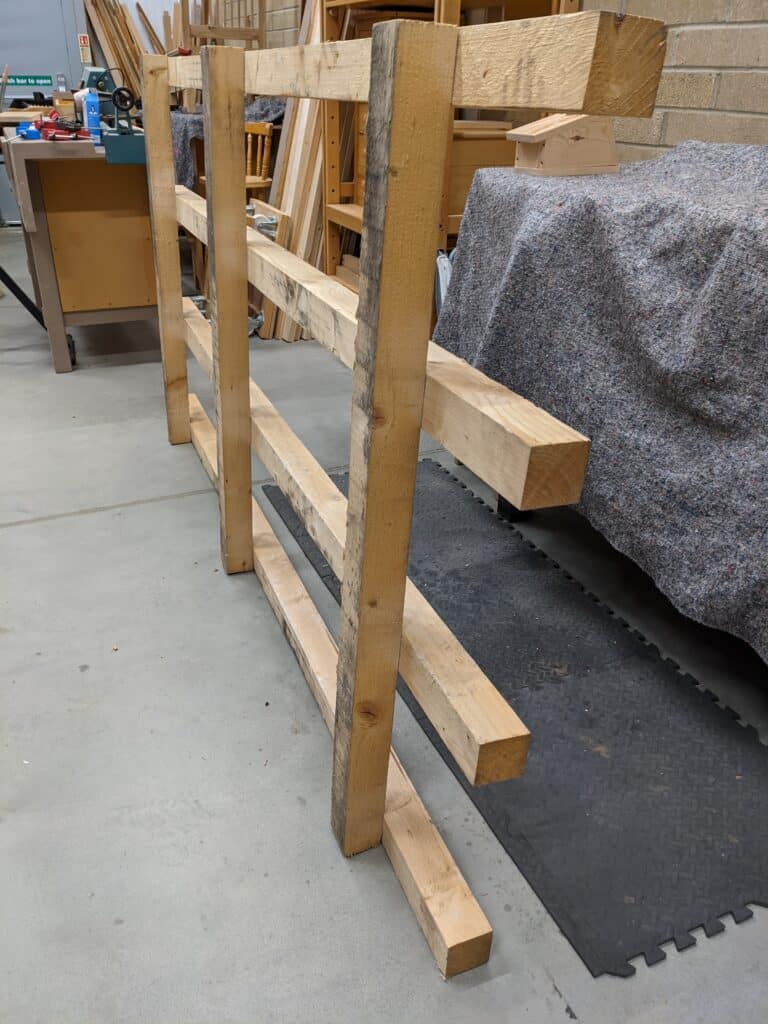
Here you can see 3″ x 3″ eight-footers and then 3″x 3″ four-footers. Standing by a skip filled with 1/2″ plasterboard, this pallet was homeless. Over the months I have reused abandoned pallets for my outdoor work as you may have seen. In a given week a hundred pallets can be had for the taking. I hear constantly that you need special equipment to take them apart and that they are a beast to dismantle. That is not the case at all. Most pallets can be dismantled easily and in my view should be a part of the DIY process. It is nothing to do with money or time, it is to do with the process of living. I do visit a recycling center periodically because they occasionally have some woods in stock that I might want or need in the future or for a project I am working on. Most of this wood comes from them simply dismantling unwanted furniture. This for me then is just another element of DIY so I look for my own way to make that happen.
The bandsaw features highly in resizing my stock. It speeds up the process and especially when I want to thin down a 10″ wide board down to 3/4″ from 1″. Each of the toolboxes has 25 pieces so 50 resized pieces in this case would prohibitive time wise. It is also a lot of physical work to rip widths and thicknesses.
I have really enjoyed making the toolboxes, as I always do and always will. I can’t believe how my mind went back to the first one I made all those years ago, the one in pine in the middle, but then too, especially, the one Joseph and I made In Tulsa, Oklahoma when the woodworking show used to visit there in the early months of the year. Even without ripping the wood to size it is still a workout to hand plane the thicknesses to dead size and to raise the panels. One thingI took notice of is just how many times I found myself breathing hard, as though I had just been running for half an hour. I have learned to treasure this and especially so with my diabetes levels at a near perfect 6.2 and a BMI at the same levels. I have no aches and pains, feel limber all the time and of course have total flex throughout my body. In January I will be 71 years old remember!
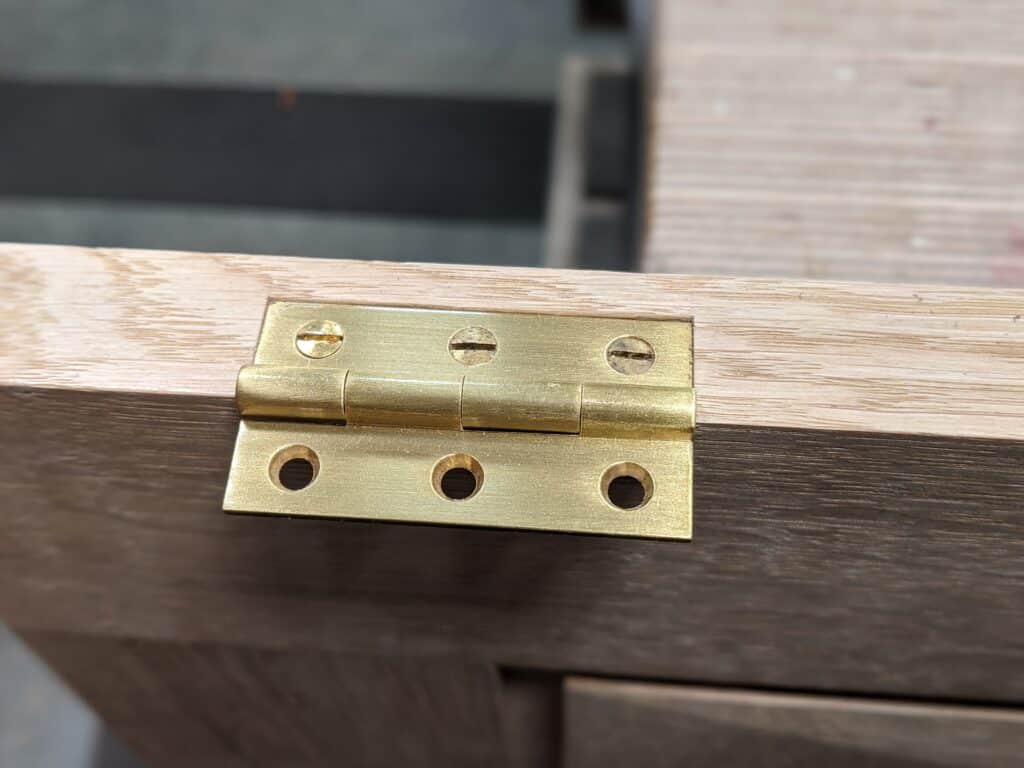
So recessing the hinges and filming the making has yet again been pure joy. It’s been like this for 55 years of my making. I have worked in just about every western wood there is and spending a third of my lived life in Texas gave me Osage orange and Mesquite, Pecan, Live oak and Ashe juniper to say nothing of Texas ebony and a few others. To the man who asked my why I didn’t repeat the box in pine for the lighter weight I say this. I already have one in pine, my audience is perfectly capable of choosing their wood for their use and oak gave me the joy of making in an alternative beautiful wood. Ash would be very nice as would cherry. This is the joy of woodworking, choices!
And let us not forget: oak smells wonderful when working it. 🙂
Paul, it would be very nice to see a video where you resaw a board (on the band saw) and the steps you take from there to a board ready for use. Maybe a short film without (much) comment, just to demonstrate how little work there really is.
As a bonus, I am sure we’ll get pearls along the way, such as how the plane is held, navigating a patch of difficult grain and such. I do own a planer/thicknesser, but last week I got a Stanley No.7 in the mail. I do not plan to use it as a secondary dust collector!
There are lots of videos on the subject out there, but I think there still is something to learn. Especially taking a piece of wood from an old table and converting it to a plank ready for further refinement. I would love to see the whole journey.
Paul, you gave me the great idea to look for free wood. I have saved thousands of Kroner (hundreds in GBP, I use NOK) over the last months thanks to you! I built a concrete retaining wall for a terrace. Apart from buying sand and gravel (I got the cement for free!), I paid for the screws and the rebar. The form was made from free wood. I salvaged all that I could for another project. I also used wood from some disposable pallets to cover up some elm slabs I have on sticks. Looks tidier that way. The cost was the screws.
I am very fond of upcycling; not only does one save money, but we do a small but important part in preserving the environment too. Makes me feel good.
Check out Paul’s youtube channel. He has several free videos on prepping stock form various sources including the wood pile.
I know about the videos already out there, but I thought it would be interesting to see his process from “second hand store reject” to a board ready for use, including band saw work. Not only to see a different take on the subject, but also to clearly show that machines can be useful. There’s quite a bit of snobbery flying around and it sometimes seems that people are almost ashamed of their power tools – when Mr. Sellers has stated on numerous occasions that he find power tools useful in certain areas or situations. Aside from that, I think it could be useful for many woodworkers to see how machines can be useful for part of a task and hand tools for the rest.
Such as resawing a repurposed board with a band saw, then planing it to final dimension with a hand plane. A video that shows in real time how long it really takes. Should be a fairly short one. 🙂
Anyway, just an idea. But based on what I see in several Facebook groups, such a video would open the eyes of many. Some of which think that the answer to life, woodworking and the universe comes in black and green and can be mistaken for a game. Cost as much as my big floor standing band saw too…
Just do not pour epoxy on it in the end…
“Some of which think that the answer to life, woodworking and the universe comes in black and green[…]”
They are obviously mistaken. Every holistic woodworker worth his salt knows that the Stanley #42 fills that role.
Information please on sharpening of wood turning chisels. ie angles and honing etc.
Dennis, have a look at Paul’s videos. There’s a lot of information sharpening, all given in Paul’s inimitable no nonsense style. If you haven’t got his Essential Woodworking Handbooks book, I can wholeheartedly recommend it.
I can’t believe how quickly you get these things done. Can’t wait to see the videos!
I have the tops from 15+ oak drop leaf or gateleg tables. A wonderful source and cheap if they’re stained or marked. Seasoned for 80-100 years! I bought a 7′ ash wardrobe at auction in September for £6 inc buyers premium. Three lovely ash planks, a 4′ bevelled glass mirror and beautiful thin pine and oak boards from the drawer sides, bases and back panel. The wardrobe was broken and nobody was interested otherwise. All this and it’s recycling, win win as they say.
Hi Paul
What fits in the toolbox, exactly?
Certainly not a full size saw?
Pax,
Jeff
As Jeffery mentioned, I too would like to see the tool box “unpacked” to see what fits and how easily tools can be “gotten at” without unpacking the entire chest.
Me three? I’m still in the process of organizing tools, and there’s always the question of what goes on open shelves vs. on dedicated racks or cabinets vs. in a drawer…
I have been doing this for years. Most of my wife’s garden tables and potting tables are made of pallets, some with rollers mounted to move around. In this country (the Netherlands) most cities allow large discarded items to be collected from the doorstep. Recently dismantled a complete side-table constructed from Wengé which is now being used in various projects. Re-cycling stuff is my way of life. I am a building engineer/ architect involved in restoration and solving technical issues for thers, but spending hours in the workshop gives me the energy.
Tool storage has become a real problem for me, since getting the woodworking had tool bug I’m fast upgrading storage of the ever increasing collection of previously unloved and neglected hand tools I have purchased during lockdown. Recently I crafted a large shelf to go under my main bench, its now full! Thoughts have turned to tool boxes, home crafted ones, but just what size do you make them? How many? Are they mobile or fixed on a bench(taking up room)? Mr. Sellers, I blame you!
I recently completely redesigned the garage, building very large and deep shelves. I also have a Dutch tool chest I built that sits on casters right next to Paul’s bench ans shop table. It moves as I need it to move.
I completely emptied the Dutch chest, and made a rule that a tool could only enter when I actually used it. Two chisels, a square, and a hammer were the first residents. A Bailey #4 and a marking guage entered next. Then a back saw and Japanese saw went in the clips on the inside of the upraised lid.
It’s been two months now, and I have done several projects. What amazes me is how few tools have actually won a spot in the Dutch chest. I really don’t use that many, just use them over and over. The Dutch chest has a lot of room left in. there.
“Trabalhei em quase todas as madeiras ocidentais que existem…”
South American woods too?
Sorry, correcting:
“I have worked in just about every western wood there is…”
South American woods too?
“The cost at the charity shop was so minimal I had no choice but to buy.”
That’s the problem I often have with charity shops too. Especially when it comes to tools I already have multiple of, but… just look at that price tag! It’s nearly for free! And so yet another bit of wood or rusty steel gets dragged home.
I imagine that’s how cat ladies end up with all those cats. (or lifestyle-woodworkers with all those routers. I ran out of fingers trying to count them all in the photo of your previous post of the book update).
On a more serious note, I very much like that tool cabinet and intend to build one out of some bits of oak I have from old kitchen cabinets. 45 years ago my father built those cabinets, now I’ve taken them apart and saved the wood for re-use. Am at the moment more busy with carpentry than cabinet making though, but still try to incorporate your techniques and tools whilst doing so. I’ll admit that a plywood box to hold a fan and control electronics for ventilation isn’t nearly as exciting as a a mahogany toolbox (if only for the smell of the wood), but at least I get to play with knifewalls, chisels and my wooden handrouter making housing joints. Though simple screwed buttjoints would probably also suffice….
“ran out of fingers”… playing with the table saw, have we? My oh my!
LOL! As I always say, “Where would ‘Gallows Humor’ be without the occasional hangin’?”.
When recycling wood this way from old furniture how do you safely remove the finish ? Is it OK to use a hand plane to strip off the old finish ? Any safety / health issues to consider … Thank you
Most old furniture is waxed with beeswax or coated in shellac, a natural finish with zero toxicity. Shellac, excreted by the lac bug, is what is used on children’s candy to give it shine. Only when you introduce chemical strippers, completely unnecessary, does toxic waste come into the equation. More modern finishes, lacquers, and such are a different story. Old furniture, unless painted with lead-based paints, can be stripped with denatured alcohol and an abrasive pad or steel wool. I usually just plane or scrape the surface off. It’s fast and efficient.
Here in Chile the “shellac” we have the most access to is the natural resin from the Pinus araucaria tree. It comes in flakes also, and judging from it’s edible pine nuts, I guess it is harmless too.
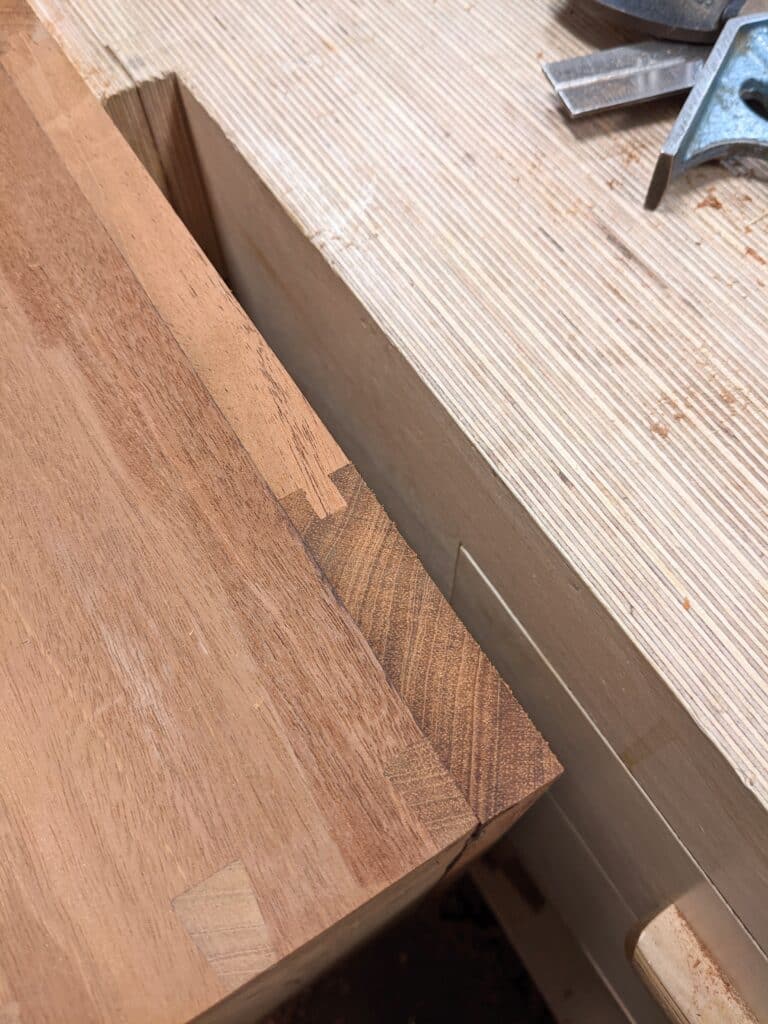
That haunched tenon and the groove look like they have grown into each other! Accurate and elegant, it is so inspiring!
That Tulsa show was the last time I saw you Paul .We talked and discussed you your son and I going to dinner but we never got around to it. I’m so glad that at 71 and 72 we are still productive in the shop. John Sweet
I’ve rescued a number of tables and headboards from the curb in the past. (Not this year.) One of the headboards had apparently hand-carved endposts, which I’m thinking will turn into table legs at some point; maybe the apron can reuse the mortises so I don’t have to try to hide them.
I still need to finish insulating and re-confiuring the basement workshop, so I can go back from carpentry to woodworking.
Recycling by re-using is surely second nature to most woodworkers. All those I know have their own cache of treasured timber, even if there’s not much in it. I also have a box of small scraps of timber dating back 30-40 years. None are big enough for a project, but who knows when you’ll only need an oddment to cut Wedges, make a handle, buttons…
Pleased to read about the bandsaw! There are indeed times when you need a helping hand rather than a workout!
I’ve been looking at old furnature as a source of wood for a while now. Will have to think about a band saw for resizing.
I did make a bench entirely from reclaimed lumber. 100 year old barn wood out here in western Canada. Cost was under $100. Has a lot of nail holes but the wood cleaned up great with my hand planes.
Keep up the good work thanks for the inspiration.
Paul,
I am curious as I learn more about wood and how to work with the grain; my father used to tell me that when making a tabletop or any large wood surface you need to alternate the heart side and sap side so that as the wood expands and contracts with moisture the overall piece stays relatively flat. My question then becomes how do you plane with the grain when it changes as you move from plank to plank on the glued up surface?
P.S. Thank you so much for all you have taught me in your videos!!
Rick
Rick, I am afraid this seems to be the more common practice but I have found it if little value in my work. If wood is seasoned and dried down to the relative atmosphere if the zone it will live its life in it rarely moves by any appreciable amount. I have never had an issue with my work and I do not flip boards for any other reason than how they will look side by side. Go ahead, push the boundaries. many of them are outdated anyway. Before long we will all be laying our planes on their sides again!
Dear Mr. Sellers,
Let me ask a disruptive question. You say “The bandsaw features highly in resizing my stock. It speeds up the process”.
I have been reading your blog for a few months and I’m really surprised regarding the consistency between you general argumentation against machines and your use of the bandsaw, that is also a noisy dusty dangerous power tool. Why do you make an exception for the bandsaw and not the power plane or router? Doesn’t thsi defeat your argumentation against power tools? If we start using power tools, where to stop?
The statements “Paul Sellers deters power tools” and “thou shall place thy plane on its side” probably comes from the same book…
He might not be as clear all the time on this as he should (nor should he need to be either), but I have never gotten the impression that Mr. Sellers shuns power tools at all. But as he so often points out – and he is in good company here – hand tools are cheaper, safer and usually the fastest choice over power tools.
In my opinion, the band saw and the pillar drill / drill press are two vital tools in a shop. You do not NEED them, but for what they can do they are versatile beasts:
The band saw can do any through cut, eliminating the need for a table saw for the most part. The table saw can cut dadoes / rabbets / grooves, but there’s hand tools for that (a chisel takes a bit longer, but does it nicely). In fact, cutting a dado on the table saw – or with a power router for that matter – often needs refining to be perfect. What do you use? A handheld router plane!
It can also rip stock, saving both time and energy. I have two daughers, age 2 and 4. I simply do not have the time to rip down boards, plane them and dimensioning them. Not if I plan to actually convert the boards into an object.
The pillar drill can be used do drill holes at consistent angles and depths, you can use it as a makeshift spindle sander and so on. You can work to very tight tolerances if you do any metal work and you can hog out huge amounts of material with big forstner bits in a hurry (a task a chisel does just fine, of course).
To me, the planer / thicknesser also plays an important role. I use it to get stock to near final dimension. A quick pass with the No.4 smoother, and the piece is ready for joinery. As stated before, I do not have the time to do this manually since my shop time is limited. But I do flatten and dimension some times. Especially on small pieces where my machines are too big or too impractical.
This is the message I have taken from Mr. Sellers and other woodworkers I follow. For years, I followed other content creators (I will not call them woodworkers anymore) that rely on machines for everything. That goes to great lengths creating jigs and setups that enables the use of a power tool, leaving me wanting to _scream_ towards the screen “just use the hand plane to the line, you donut!”. Going a bit Ramsay there. My apologies.
Do use power tools. But use them wisely. If you do a certain task very often, look for the tool that can aid you. Not do it faster, because why should something you enjoy be made to go faster? But aid you. If you make table tops all the time, a biscuit joiner, a Festool Domino or a Plano glue press setup might be a worthwile investment. If you do a lot of welding, an ESAB unit might make your hobby even more fun – but for laying two or three seams a year, most hobbyist machines works just fine.
You can make the same argument against certain hand tools. You do not _need_ a Stanley 78 rebate plane; it is easy enough to chisel a rebate by hand. But chiseling a rebate on 4 sides of a panel is not my idea of fun, so it is either the rebate plane or the power router. The latter is something I would be very reluctant to do for lots of reasons…
Just don’t you DARE placing the plane on its side! THAT is something Mr. Sellers argues against! 😀
PS: Let us not go in the direction of purists that sights down their nose at projects that does not meet their hand-made criterias! Nothing is either black or white. Let us not conclude that since Paul emphasises hand tools, he therefore must be against the use of power tools. I have never heard or read anything that would give me the impression that he dislikes power tools at all, but I do not want to speak on his behalf of course.
This is entirely my own opinions, which is based on what Mr. Sellers and several other experienced woodworkers has taught me in addition to my own, admittedly limited, experience.
https://paulsellers.com/2011/05/cutting-big-tenons-by-hand/
Hello Francois,
I have answered this in a blog post just now. I thought it deserved a fuller answer.
Hello Paul,
I answered you in the next blog post. Thank you for this interesting debate and all you generosity in teaching us your knowledge and insights.
Regards
I often find wood at apartment dumpsters. Often times they will toss tables, chests, pine shelving. I like a bargain and I can’t afford new. I rarely find exotic wood but I once found an entire bedroom suite of some lovely maple. I now have some wonderful bathroom cabinets for zero cost to me.
Everyone keeps talking about pellet wood. It won’t be long before their price becomes a burden
I felt moved to add a comment on splitting pallets, over the years I’ve made various sheds, garden storage boxes, compost bins etc. Dismantling pallets is not always an easy job, when they’ve been nail gunned together with ring shank nails into knotty 4″ blocks they won’t budge and some times can be dangerous, nails get left in blocks of wood for you to stand on !
I have a special pallet breaker tool and various other bars and still end up splitting more than I save and then there’s all the de nailing, oh what fun !
I am looking forward to this video series and hoping that I have acquired enough skills to be able to build it. Thanks for sharing so much knowledge with us!
I think tnis is a wonderful and beautiful project. But once filled, I probably couldnt carry it around. Was thinking how to alter for maybe a kitchen tools or supplies sitting on the counter.
Hi Paul! I have a question: I’ve seen you use screws on some things, like your workbench shelves and other shop fixtures. How do you decide when to use a screw (or something like a brad nail) and when to use joinery?
Looking forward to seeing the toolbox build series!
I have relied on screws throughout my working life and use them regularly enough to unite two pieces of wood one to another where I feel appropriate and necessary. Purists might despise this, but I am not a purist in the same way I do not use mortise chisels nor wooden mallets in general because I find them clumsy, awkward and less direct than say my Thorex 312 hammer and my mortise chisels. I can achieve much faster speeds and accuracy using my bevel edged chisels and the Thor.
Screws have pulling power where hand-driven nails, in general, do not. But nails have their place too. In situations like nailing fence boards or classing to walls, nails are fast and effective. They can be retightened should they work lose and then=y are inexpensive. Screws have changed greatly through the years with self-drilling tips and so on and then too the Philips head making them almost slip-proof. I use them where they are generally unseen. I would be less likely to use them where they are visible unless the whole piece is very utilitarian. Though people say they have no pulling power in end grain they do, just not as much as in face-grain. In such cases, I go for a longer screw and this has always satisfied my needs. As with everything woodworking, finding a balance is key to success.