Why Shrink?
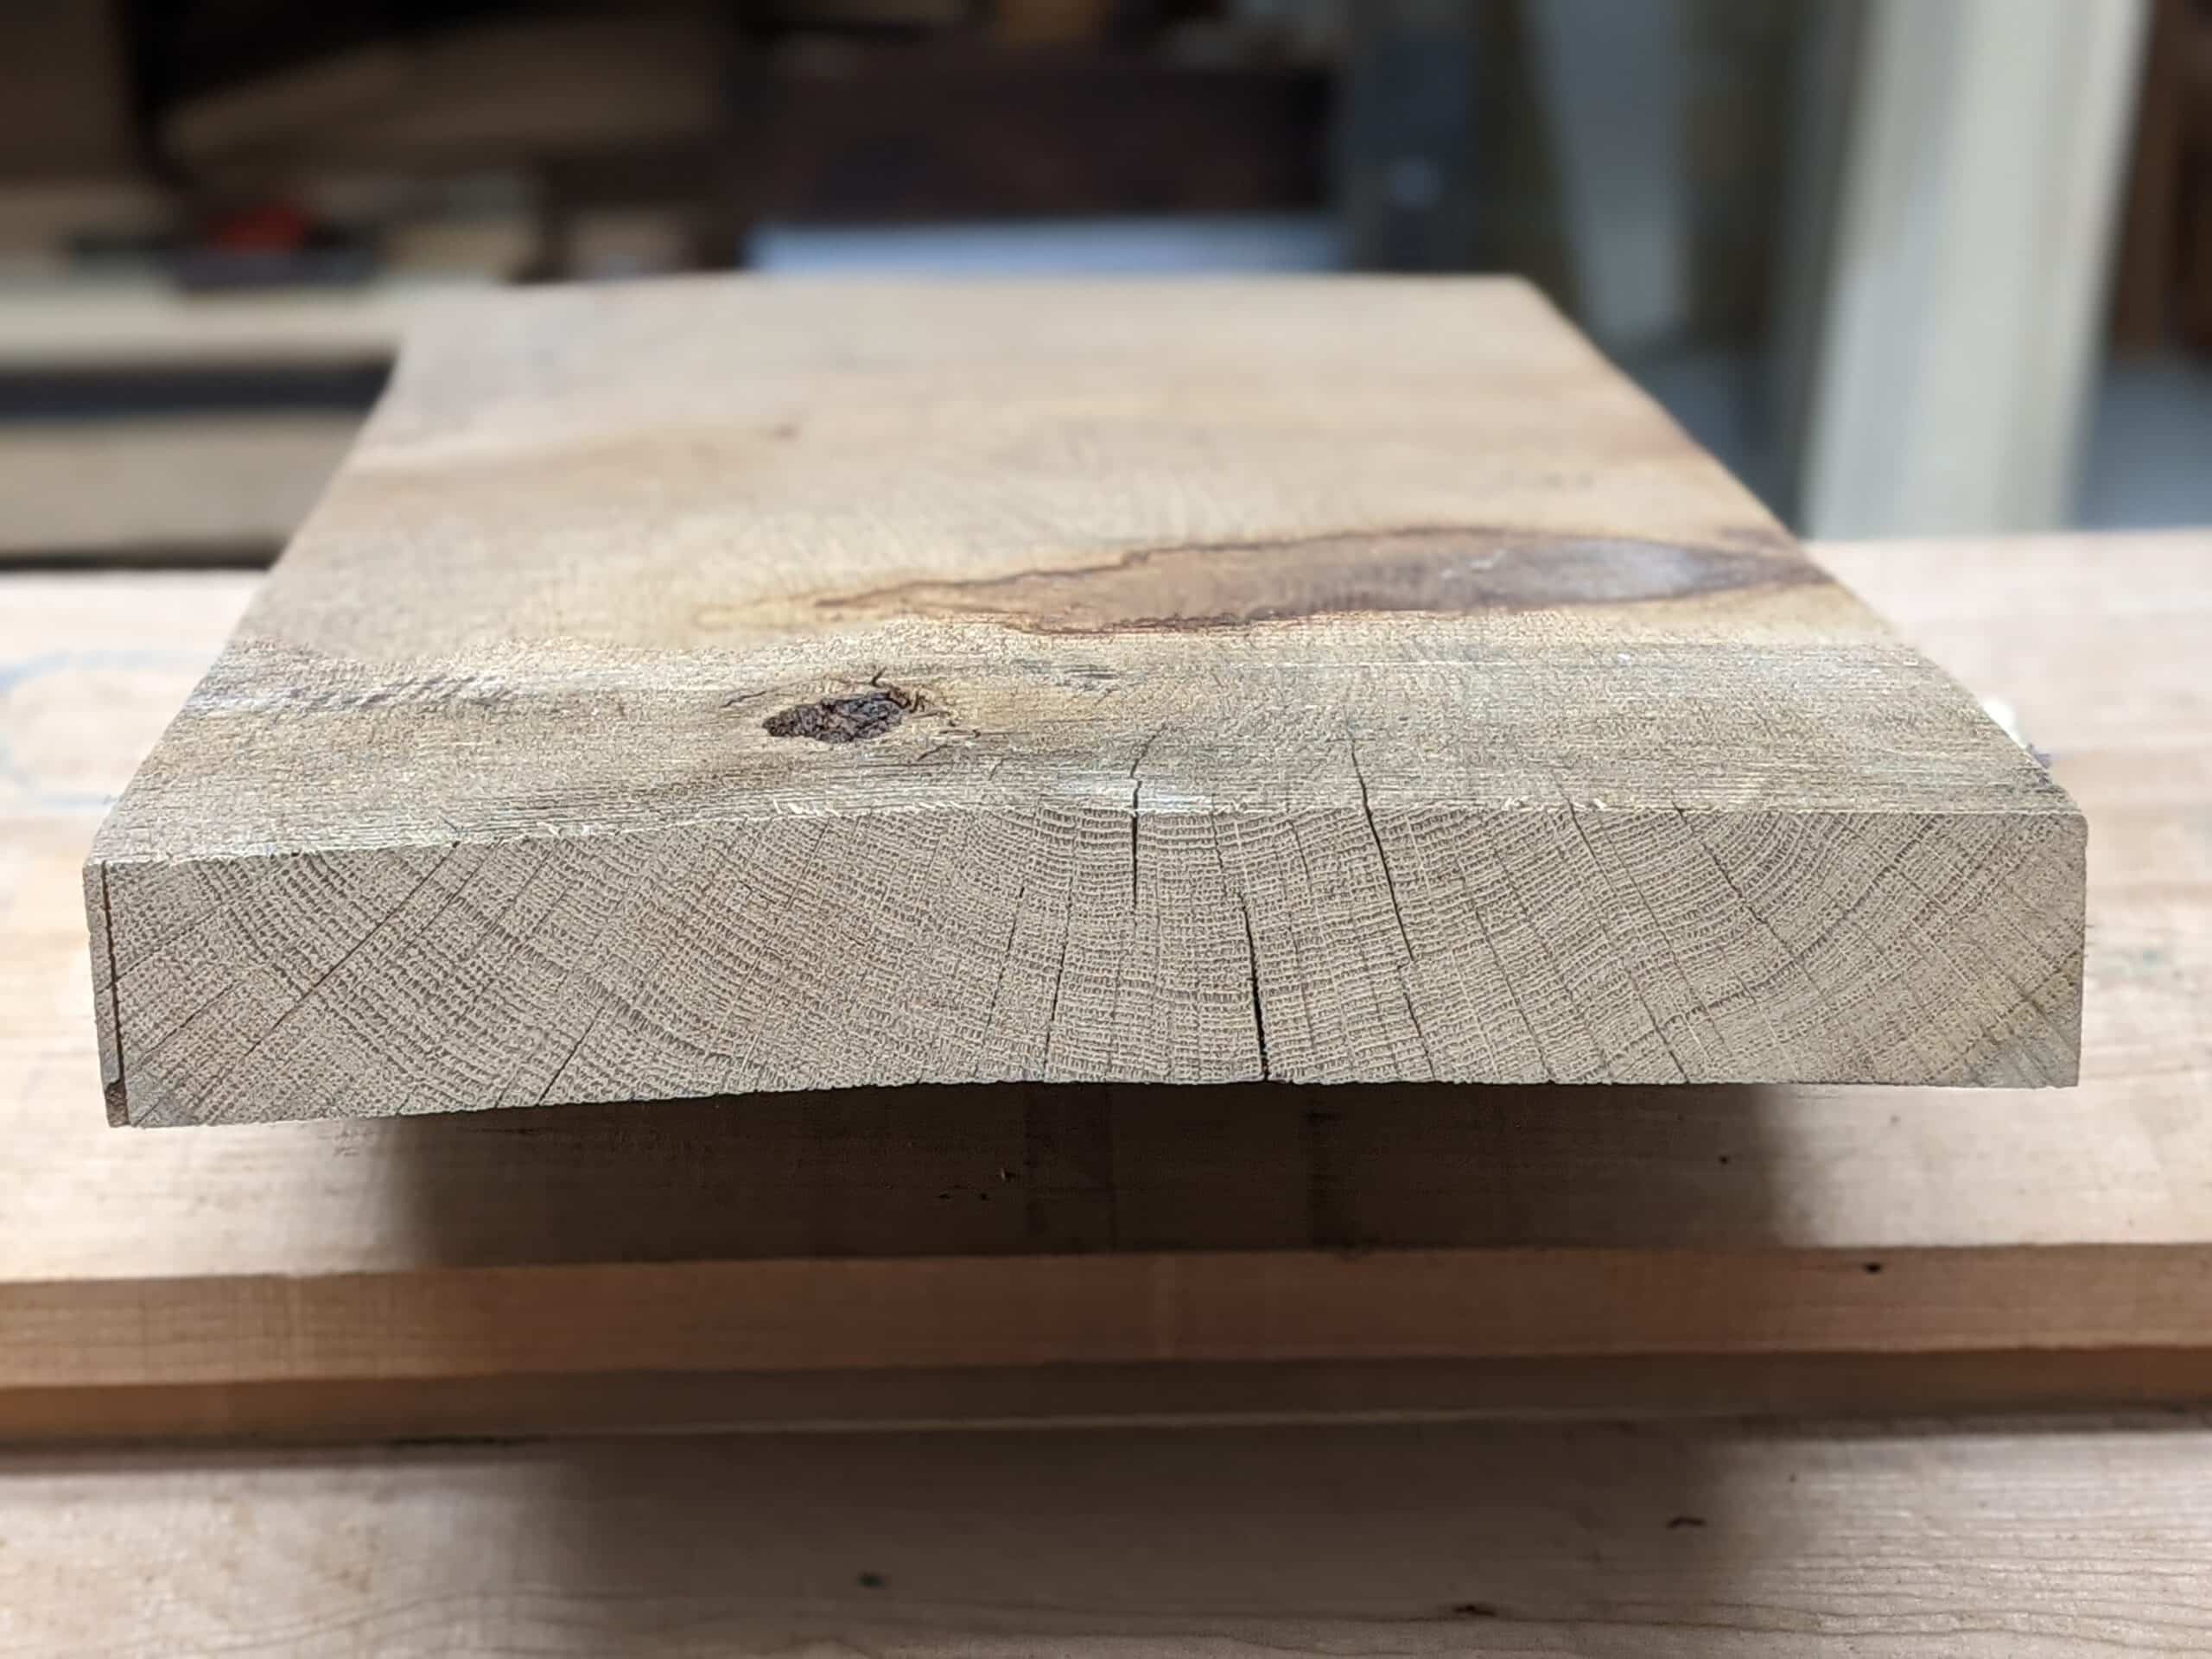
It is all too easy to use the word shrink as a catchall for all wood movement. To say you understand that wood shrinks and swells according to atmospheric moisture levels surrounding that particular section of wood only describes a small percentage of what happened, what is happening and then what can ultimately happen. Wood movement is often misunderstood because it is so governed by the atmosphere surrounding it and its unpredictability even within itself as a single length and stick of wood. Sections of wood, even within a single length, can and does expand differently because it invariably has various intervals of density changes and it’s this that often causes the variations that subsequently affect the wood.
A knotted area some distance from any and all knots will have various levels of density and may well absorb or release moisture differently in each of the adjacent areas. Knowing what to expect becomes central to our considerations at the bench and also in the yard and racks of our supplier, but, at best, it will always be unpredictable. For the main part, we all want to avoid difficult and awkward grain. Therefore we must work with the grain, the knots and the various stresses and strains of the wood to maximise the possibility of a good outcome.

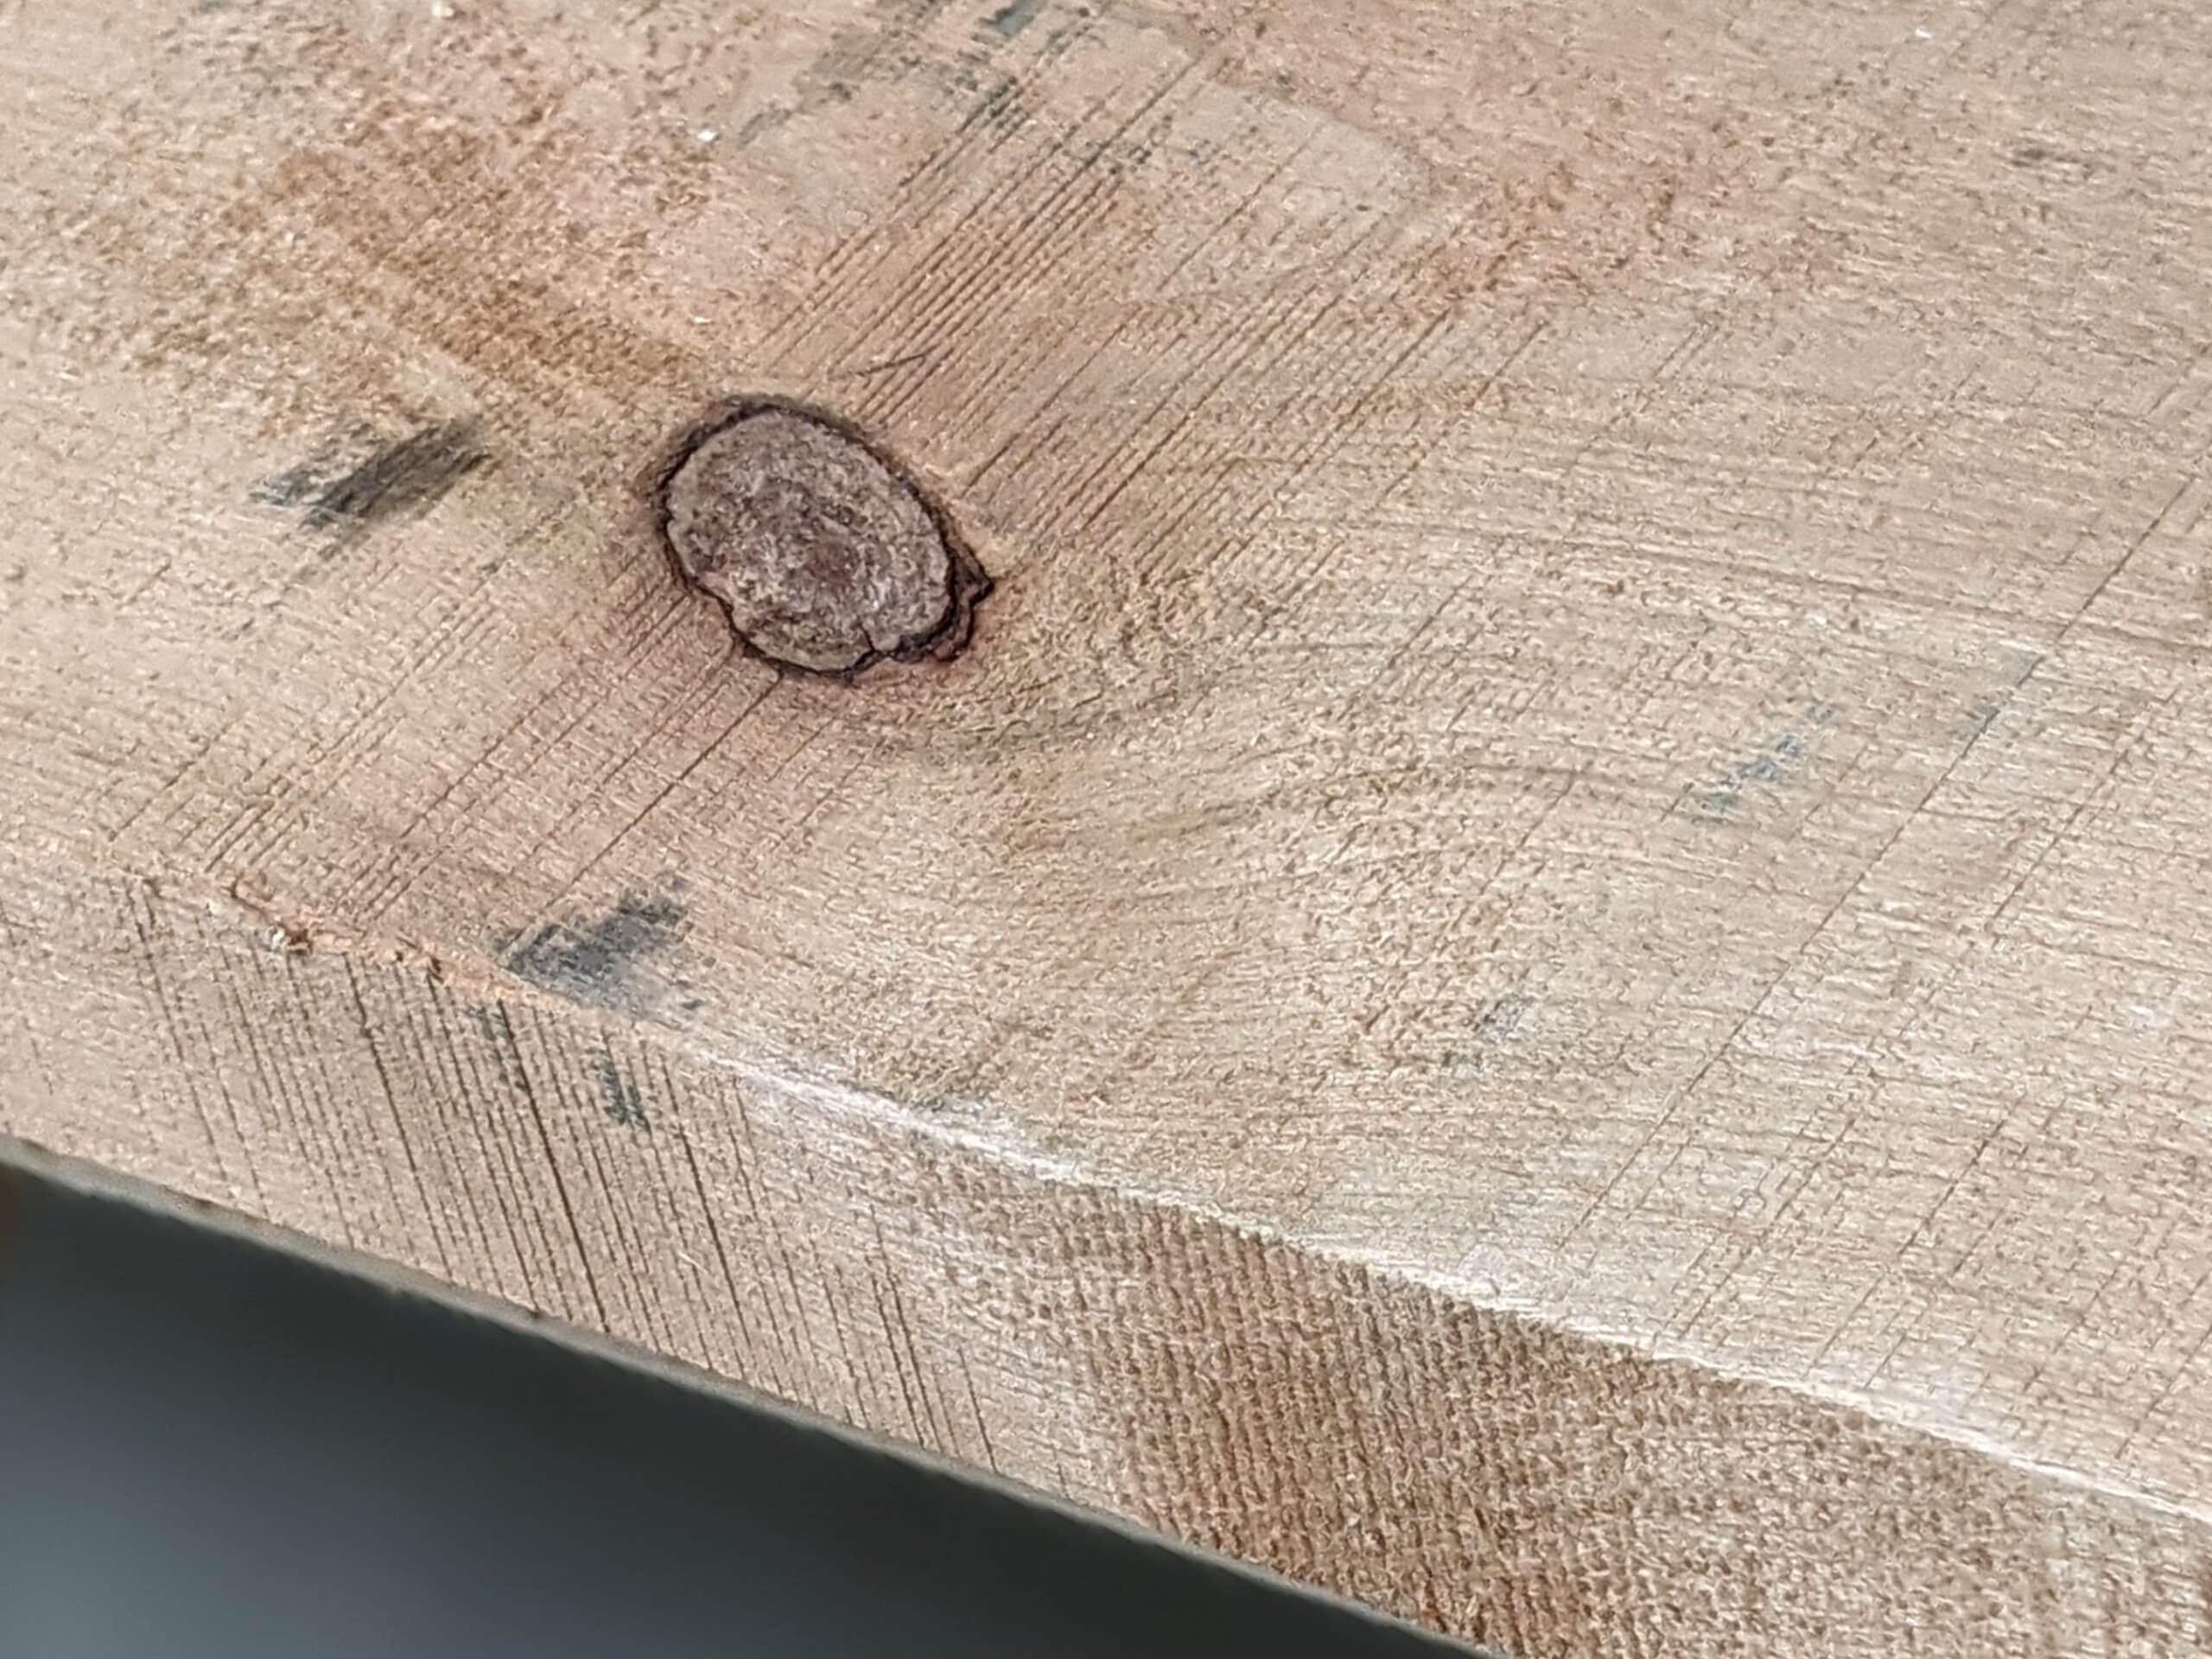
The surface textures left from the industrial saw leaves telltale ‘calf licks’ or ‘cowlicks’ in the surface of a board. Just as in human hair, these cowlicks show that sub-fibres in the grain of that section of wood have a momentary shift in grain direction. At this level, there is no way of knowing exactly which direction this change has taken and even in a subconscious consideration of the overall condition of the wood, we might decide to reject such aboard.

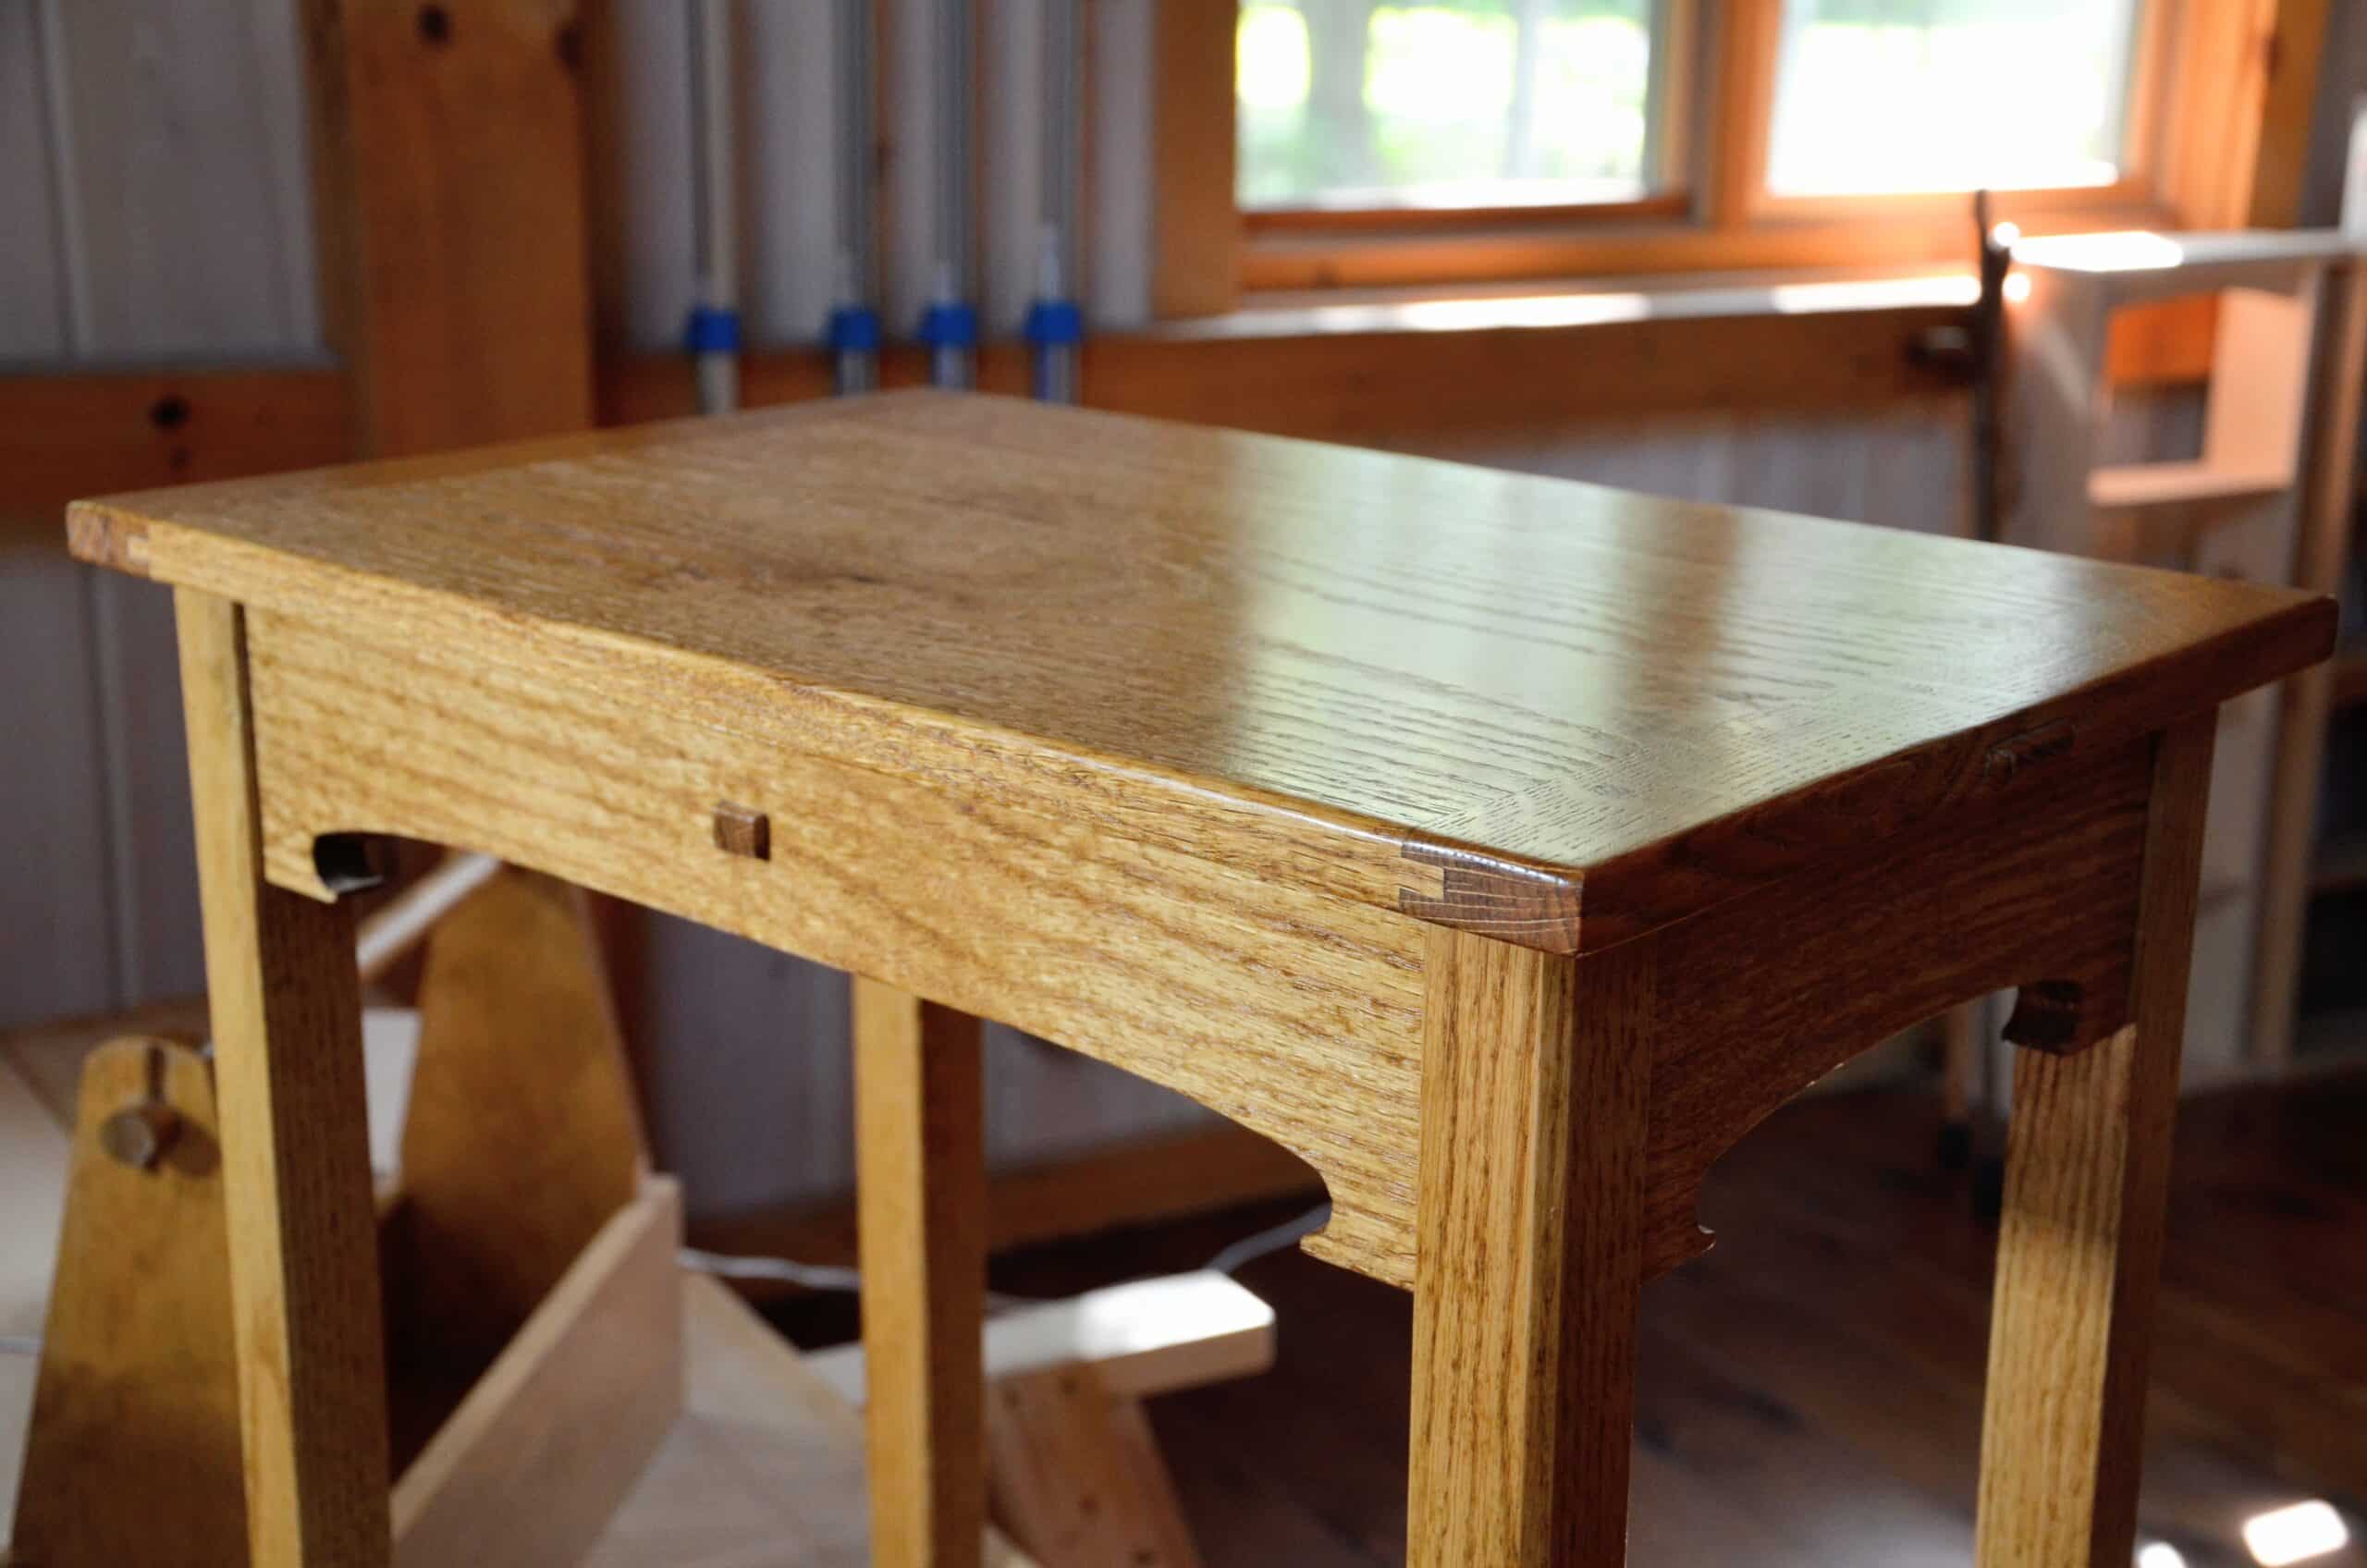
In this piece above I should technically have rejected this section of wood but I wanted to persevere despite knowing the grain surrounding the knot would emanate into the joint areas and cause me difficulty. The wood was very dry at 5% and yet it still shrank to a level that I could feel the pin’s slight protrusion. In this piece, I, liked it. In others, I might not.
If we see that wood shrinkage is indeed diversely variable throughout its length, width and thickness, and then too within its species and without, we understand that there will be unpredictabilities we must learn to work with too. This is not a choice. We must try to predict an outcome which can be like predicting the weather and in some ways, it is that too because weather changes, how often a family takes showers how much it cooks food, sweats and more, will affect our precious wood. To get into this is complicated beyond need. Sapwood and heartwood shrink and expand at different rates, often resulting in conflicting levels when the wood finally reaches some kind of equilibrium in its final home space. By the time this happens, the wood becomes ‘set’ and little will change without reworking the surfaces to straighten and level everything by the removal of wood.
In most cases, our wood is ultimately constrained by additional elements used in construction, the glued areas, jointed areas and then additional constraining influences such as turn buttons to the undersides of tabletops, or bread-board ends. Now, I say constrained but I am always surprised by how much or how little wood can be held in check (no pun here). I have a tabletop made years ago that was crowned round and pulled down with a single turnbutton quarter of an inch. It went flat and stayed flat and when I released the turnbutton screw the tabletop remained flat.
Using the principle of flipping boards to change the orientation of growth rings for a tabletop or wide panel has become common practice for all. Whereas it is an acceptable practice, it also more necessary for commercial products rather than the home craftsman or individual artisan like myself. The best way to prevent excessive distortion will be through an attempt to severely prevent the moisture from entering and leaving the wood. Drying down to 5% means the only way for it to go is to expand. Expansion is less likely to result in cracking. Applying many coats of a finish like polyurethane varnish, a surface skin if you will, disallows or slows down quick ingress of both spilled and atmospheric moisture such as water as humidity, steam and spillage. Oil finishes and others also serve to slow down uptake of water into the fibres and some manage this better than others.
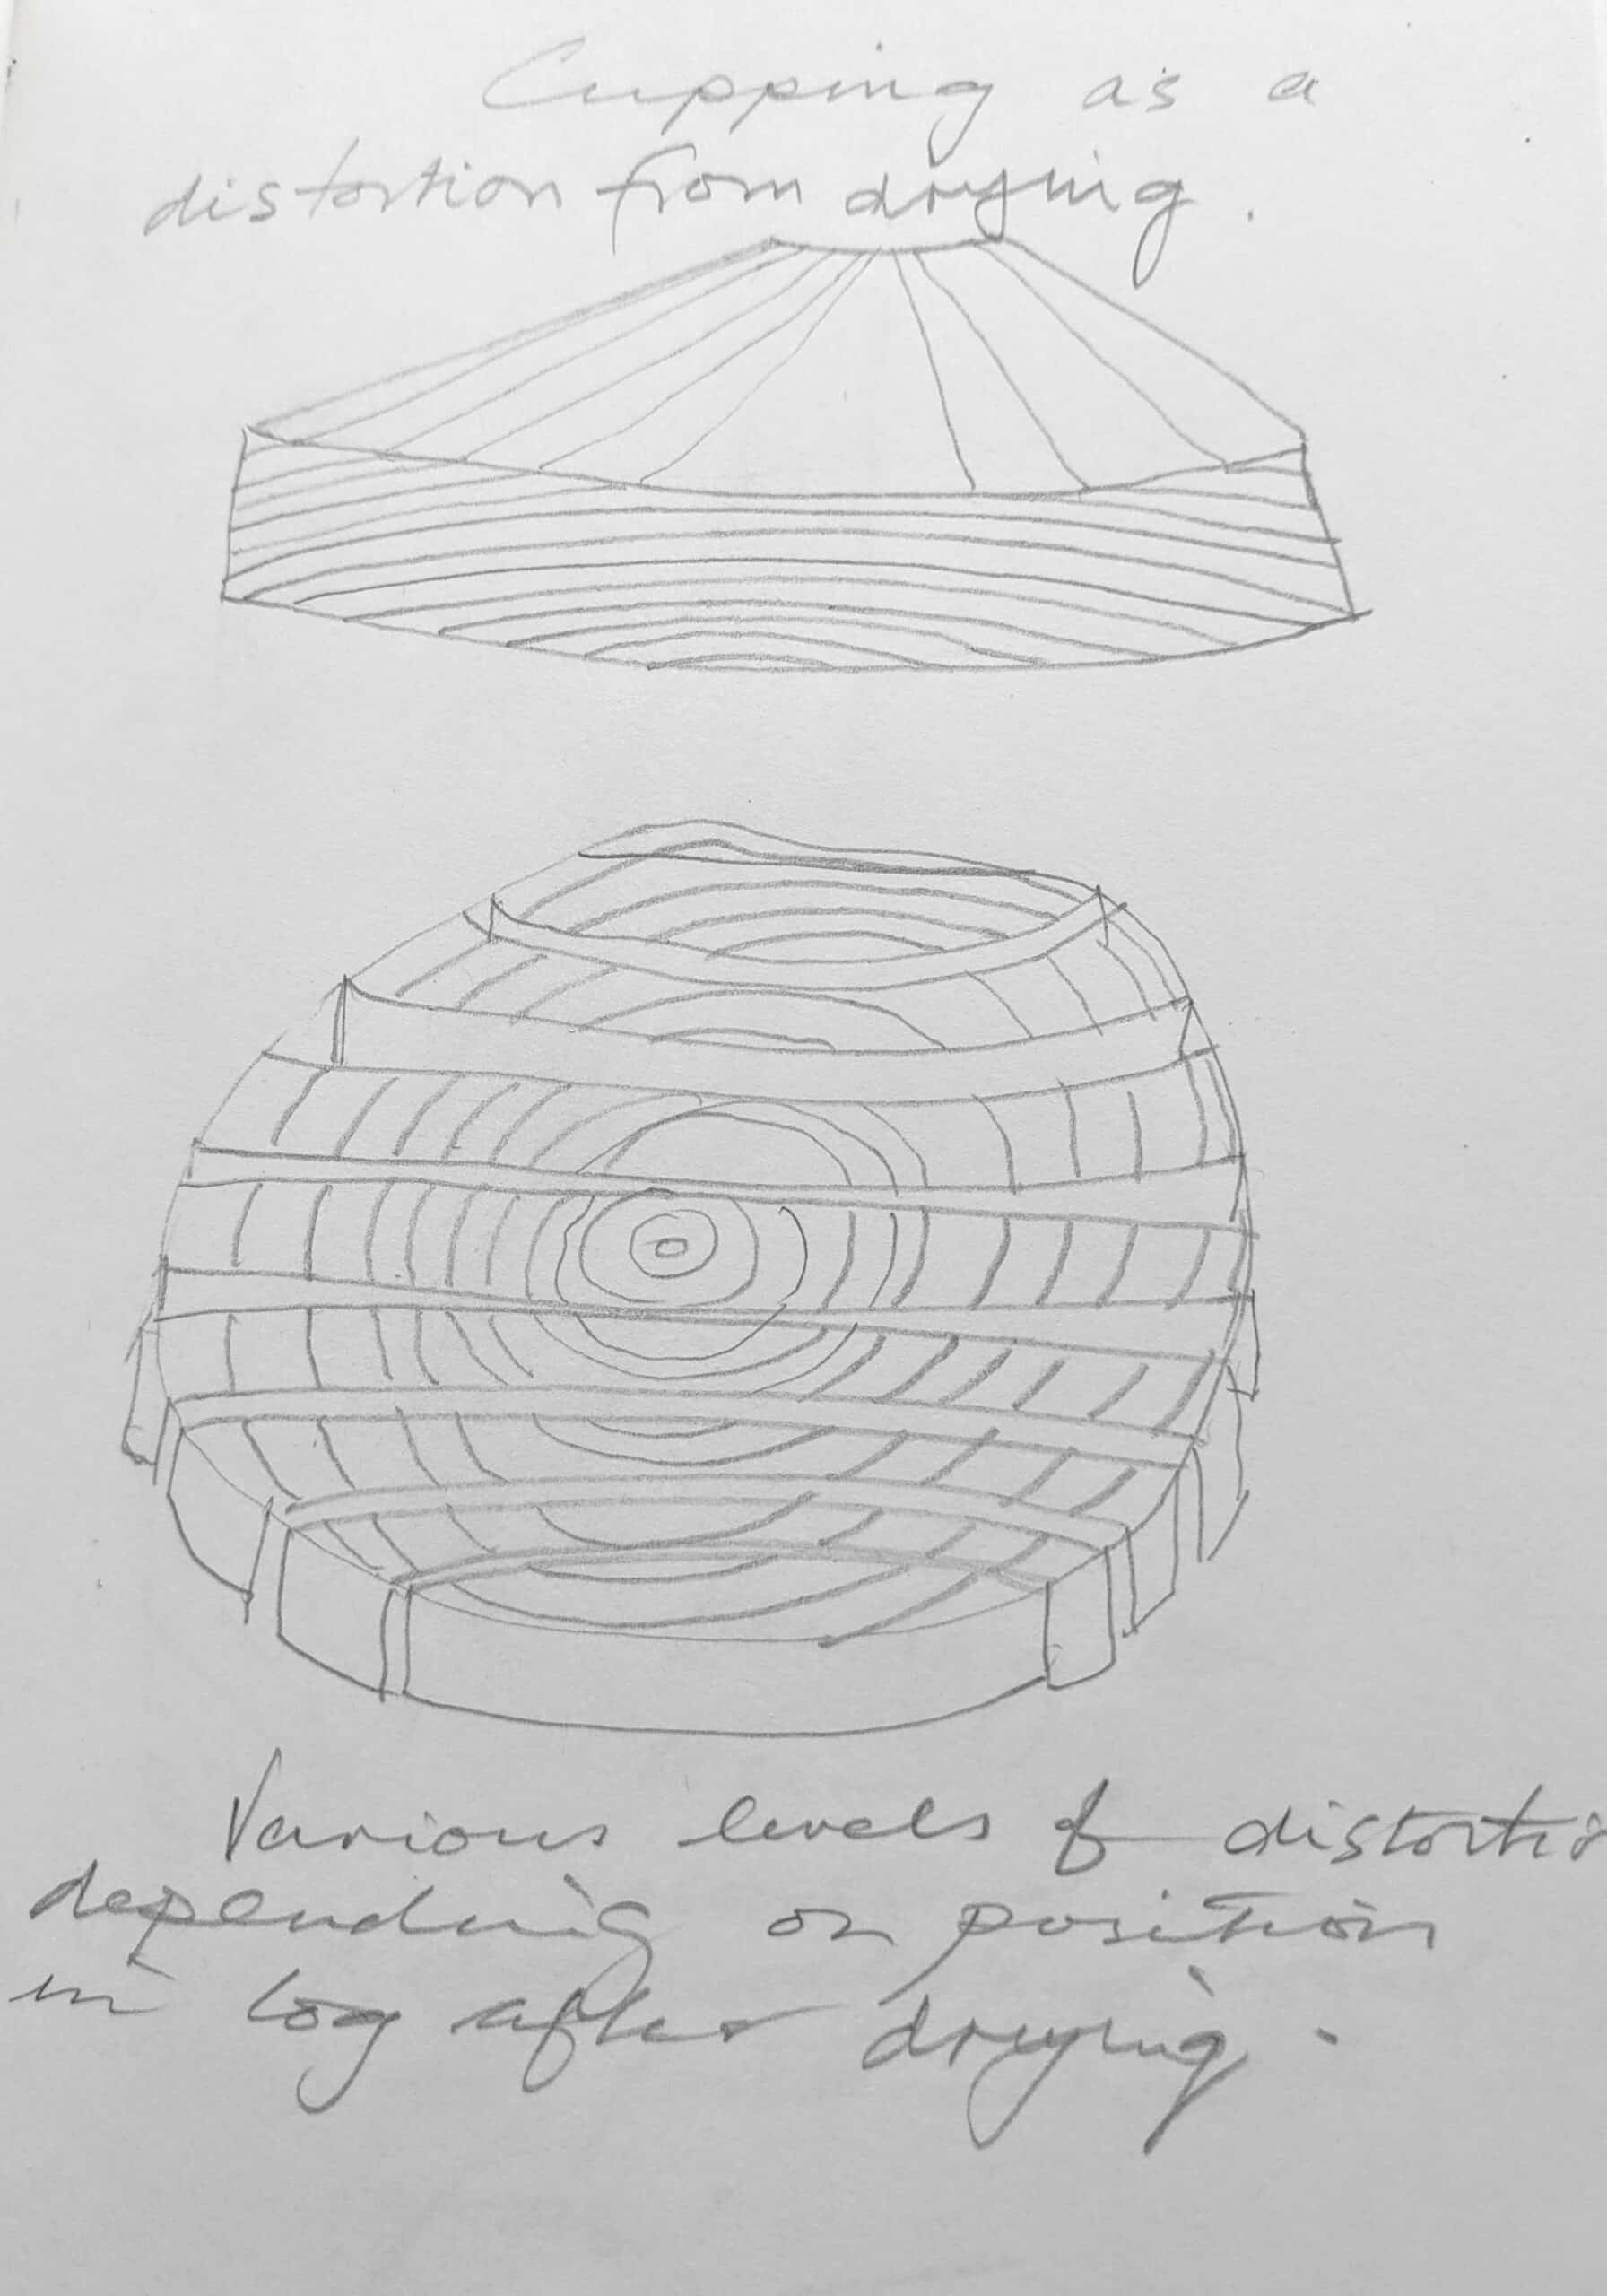
The drawings will show what can happen by alternating growth rings and also keeping them in the same plain.

The top drawing shows the alternating presentation while the bottom one shows what happens when all the growth rings in separate boards are oriented the same way.
I prefer not to use the practice because such a technique works best with narrow sections of wood rather than the wide boards I prefer. In most cases, should the board curve in a continuous arc, the arc can readily be pulled to flatness without overstraining the wood. We often do this with a tabletop to say a table apron where we use turnbuttons or enclose the edges of a panel into a grooved frame.
Seasoning wood by air- and kiln-drying is to effectively reduce the probabilities of major shifts and changes subsequent to our working our material. In essence, we preshrink our wood ahead of time and of course, this takes time. By gradually reducing the moisture levels within all the fibres of the wood the wood becomes much more stabilised. For those of us at this end of the spectrum, it is usually enough to know that the wood is dried down to around 7-10%. The main reason that we dry our wood down before we work it is that there will be major consequences to the overall work after we are done.

Additionally, drying substantially reduces the weight of the wood, increases its strength, stops fungal attack and allows us to glue surfaces and finish our work with external wood finishes. Any and all of these conditions, if left unchecked by drying, will result in severe deterioration at many levels. Even taking care of our fundamental duty to use well-seasoned wood before we start, we cannot usually predict and control the environment in which the final work will sit. We just do our best. Accepting the natural benefits of working and living with real wood is still far better than resorting to the use of MDF and particleboard. I can live with the slight variations of surface differences knowing that my work is real wood, real woodwork and that what I made will easily last for a couple of hundred years.

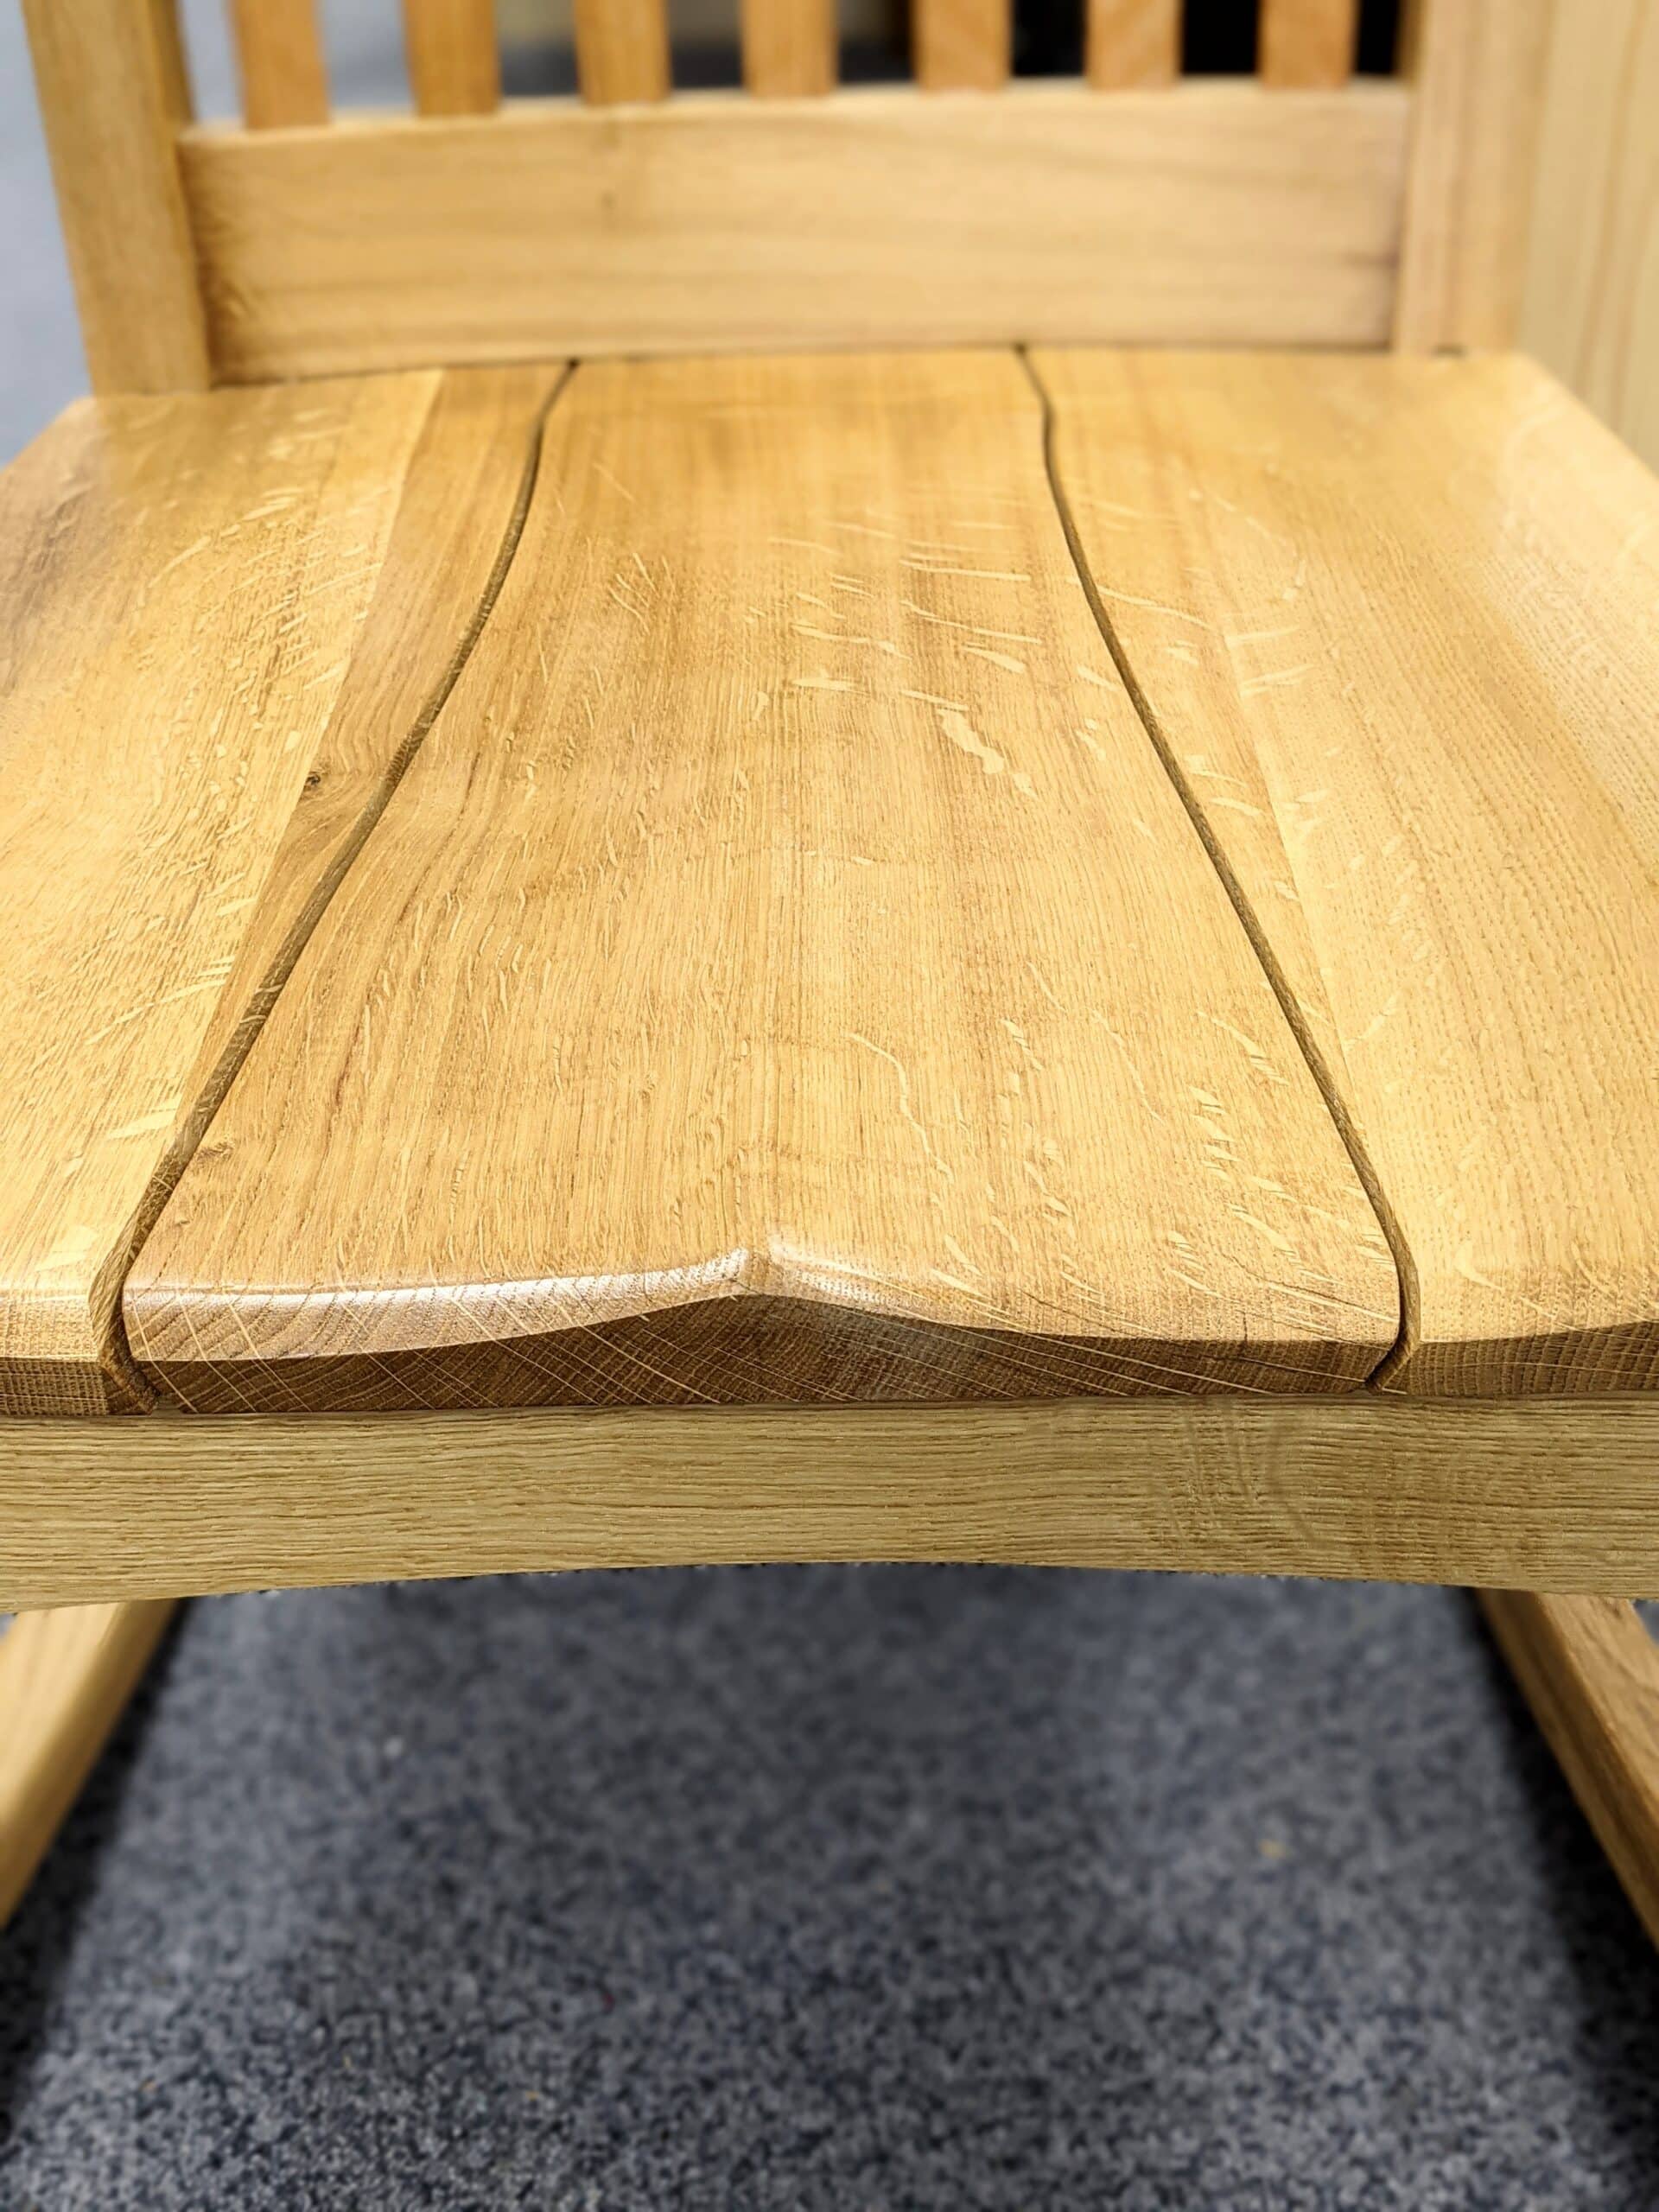
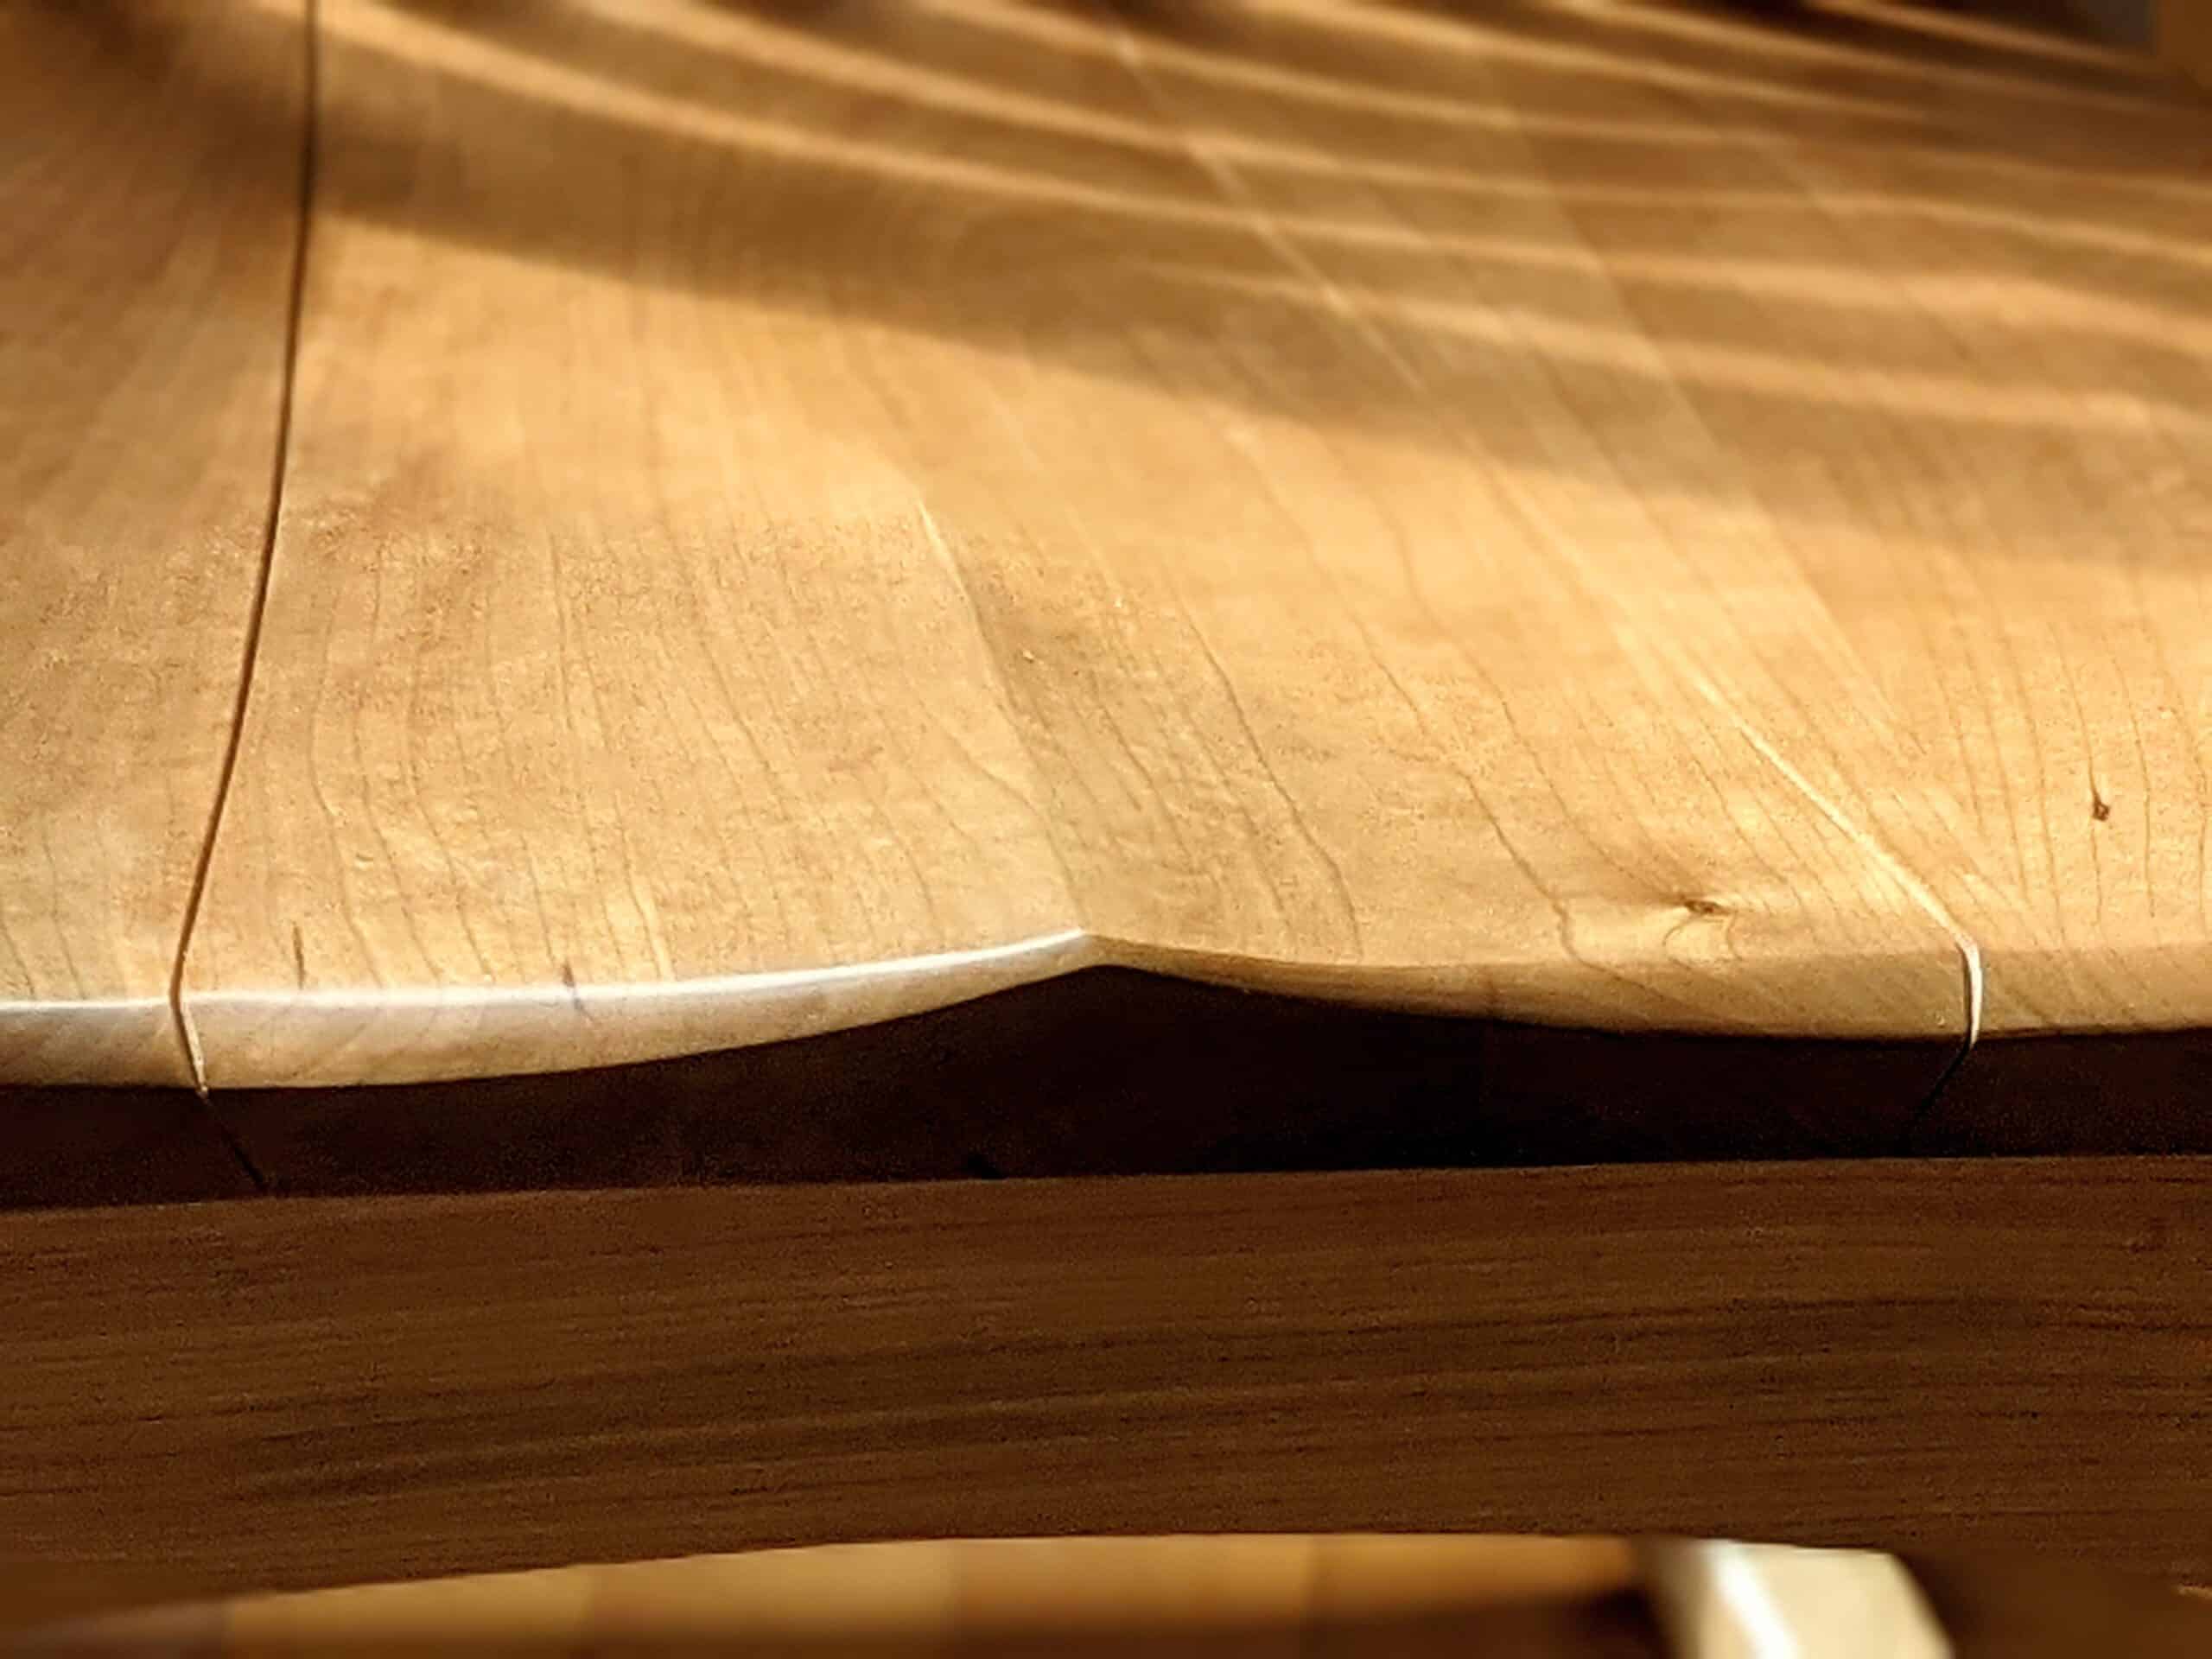
The timber yard usually stocks dried wood. Even so, we must go the extra mile and make sure that our newly attained wood is acclimated in a suitable environment. Wood dried down to 5-7% will readily wick up atmospheric moisture to double those levels in just a few weeks. Shrinking our wood for good reason can soon be negated by damp and wet working environments. My shop in my garage is dry. This is worth dealing with early on in establishing our workshop. A benefit of a wood-framed, shed-type workshop is that you can line it, insulate it and thereby best maintain humidity levels. Older bricks and mortar buildings can retain high levels of water in the bricks and concrete floor. Dry-lining will help here, together with a wooden floor on top of the concrete. My recent addition to my garage workshop is stick framed, insulated all around and then lined with plywood panels. It’s easy to keep dry and it is here that wood is best stored. Even so, my oak rocking chair with its spit seat continued to shrink after it was completed three months ago. I am glad it added the angled split seat design element because had I not the seat would indeed have likely cracked. On the other hand, my cherry rocker seat expanded to close the gaps I made.
So you will see that, whereas the expansion and contraction of wood is inevitable, we can counter its impact on our work by accepting facts and then, of course, working with it in consideration of our purchasing, stowing, working and delivery.
Wow! Thank you for showing us the way those different woods responded. Most of us tinkering sorts haven’t made enough, let alone two pieces of the same design out of different wood, to be able to see how wood can respond so differently. What an amazing material to learn to handle!
This series of prepping wood and this particular article is pure gold! I’ve recently made a small side table from an old red oak plank that had lots of defects. From what I can deduce, case hardening and a too rapid drying rendered the board a beast. However, I managed to make a rather nice table top out of it. I made some ebonized legs and aprons with bridle joints from another plank, but the top provided a little lesson for me about wood movement.
In under a week after I placed the table in our living room, some minor cracks presented themselves. The table top was pristine when I brought it in from the shop. I keep my shop at 40-45% relative humidity with a dehumidifier, and the plank was WELL seasoned – I’m guessing at least 10 years, probably more. I got it from a woodworking company that shut down several years ago.
I filled some hairline cracks and a knot with black epoxy to stabilize the areas – I did not have enough material otherwise, so had to make do with what I had. It is a prototype table anyway, and I may very well have to make a new top for it.
Understanding why and how these things happens, is important. The tiny cracks in my new table was not really unexpected, so I did not think much of it. If the cracks develop further, I might get an opportunity to try a bowtie inlay or two. Or I’ll plane off the varnish, restock the kindling pile and make a new top.
These articles is fenomenal! Understanding how wood works is important, and we’ll enjoy the hobby even more.
As for interesting results when wood dries: I’m expecting quite a lot of “learning moments” when I start digging through my huge stack of quarter sawn white oak I have on sticks. I felled, slabbed and stickered the tree a little over a year ago, and I’ve seen some wild deformations around some of the knots on a few of the planks. I’m guessing there’s more of that hidden in the stack. Can’t wait to find out! A year or two left….
Sometimes when I’m walking past the stack and get a whiff of oak perfume, I’m reminded of something Paul said in a video once: “if you pay for the oak, I’ll do it in oak”. 🙂
“Challenge accepted”. 🙂
Why did one of the seats expand while the other contracted, even though they had the same moisture content to start with?
I never gave a thought as to how wood might act differently along it’s length.
This is what makes woodworking so interesting….and challenging!
I never liked alternating the grain on large surfaces but it was how I was taught in high school woodshop. You always got the wrong pattern on the top of a surface. Thing is we had nice wide boards but we ripped them narrow so we could alternate the grain! Now I look back on it we wasted a lot of nice wood and didn’t learn much in the process. Worse the instructors didn’t know any better either.
Received twelve 5/4s white oak boards for free, for transporting much more to a friend’s home, after he had a tree fell for lumber. I let them dry in my basement, with dehumidifier running the last seven months. A neighbor told me they will check. They did. I ripped three boards today from a single 20″ wide one, with the center full of knots, knots that popped out, and checking cracks. I didn’t see use for all that warped/knotted piece except firewood. But the other boards will get joiner/planer work and then ripped down more. Hope to make an oak knife block for a wedding present out of it. But your info and tips about wood shrinking could not have been timed better!
Years ago while studying to be an aircraft mechanic we were taught to store wooden propellers horizontally. The reason being that the most moisture would settle to the lower side of the prop. For long term storage it was recommended to rotate the props 180 degrees every six months.
This was required to try and maintain the proper balance of the prop.
I was very struck by the method of assembling the boards with continuous gentle curvature, rather than alternating for “cancellation”. Pulling down the continuous arc will put the top surface into compression, reducing the possibility of cracks opening up there.
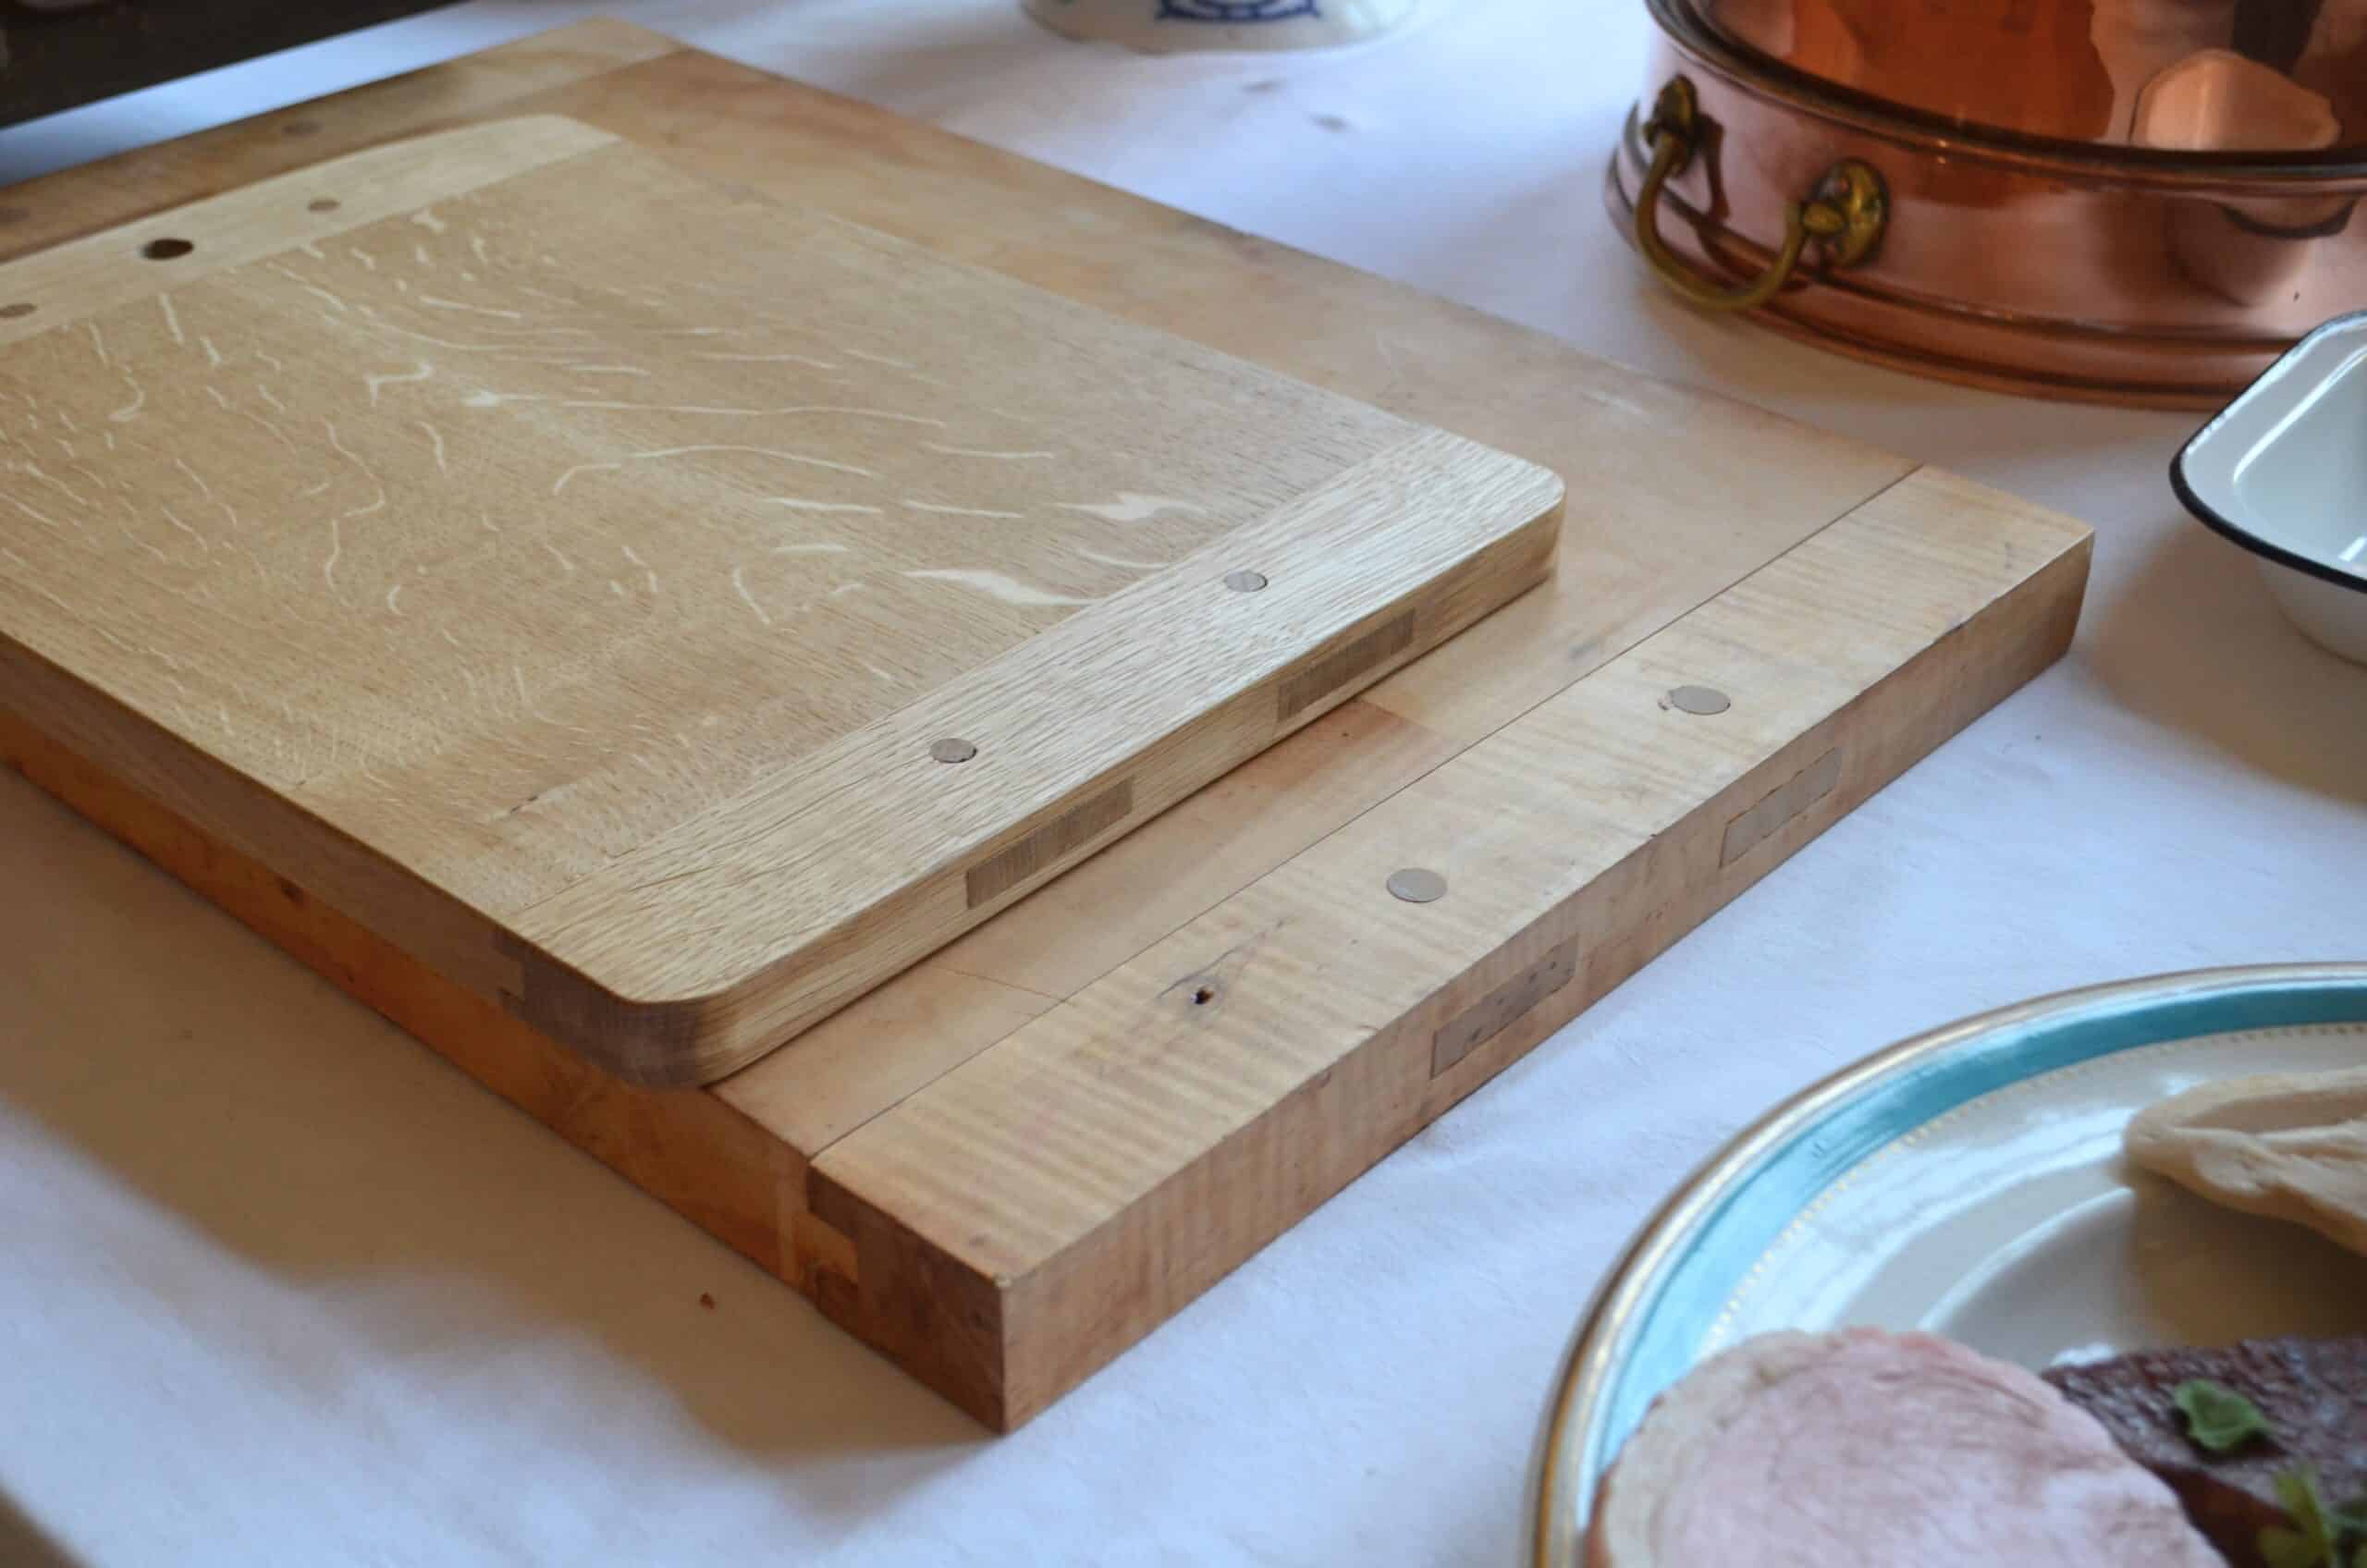
I fell in love with the breadboarded cutting boards.
I will do my own. Thanks,
Gérard
I am new to the world of woodwork and I’m finding your blogs, videos and tutorials a great source of help.