How to Build a Workbench – Leg Frame Mortises (part5)
NOTE:Just so you know, this is an older workbench series. Paul has a newer Workbench series. If you are interested in the updated version of Paul’s workbench please click the button down below. This page links to a cutting list, tools list, FAQS and much more.
Chopping the mortise holes
I have chopped mortise holes by the thousands for nearly 50 years. I think that proper mortise chisels, register chisels and even the lighter weight firmer chisels are too heavy and counter the weight of the mallet or chisel hammer.

Throughout my five decades of working wood every day I have used only regular bevel-edged chisels. That’s also all I ever saw my mentors use throughout my apprenticeship. Other woodworkers and gurus of woodworking will challenge this, but I find them fast-cutting, highly efficient and economical, but, equally important, inexpensive. Based on that, I now offer this and a method of chopping mortises where the two go hand in hand. As I said, it’s worked for me for five decades and I have found no other method that works as well for me. Try it and see how you feel.
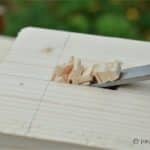
Firstly, make certain your chisel is sharp enough to chop mortise holes. I sharpened up at the beginning and chopped all the holes with no need for further sharpening.
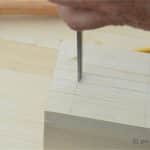
With the hole delineated, I start at one end and begin with a gentle chop against the line, taking care not to drive the chisel too hard and move my limit line.
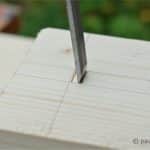
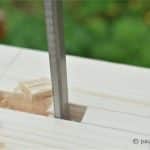
In the second phase I turn my chisel around and start about one third along. This time, instead of the chisel being perpendicular, the actual bevel is perpendicular. 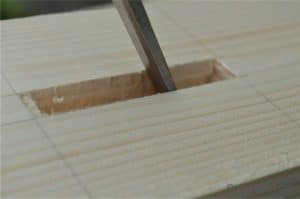
If you want only one vise in the bench then both leg frames are identical and can be developed in the same way. In my case I want a tail vise at one end and so I have lowered the top rail by two inches. This allows the vise screw thread to pass over the top rail and under the bearer without structurally weakening the rail and the bench.
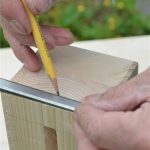
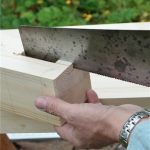
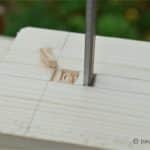
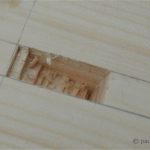
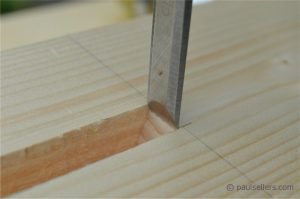
So, with both mortises cut, I now mark the walls of the haunch area.I can either use the mortise gauge at the same setting I used for the main mortise or mark them with pencil lines as shown. I used a chisel to mark the depth of 1/2″. Now I cut the walls of the haunch section of the mortise using a handsaw, down to the depth line. I chisel out the waste with the ½” chisel.

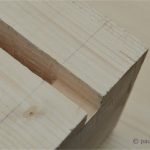
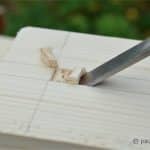
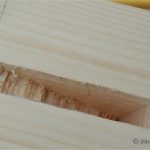
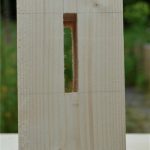
The top mortise hole with the haunch recess now looks like this.
Tenons next; two types, one with roundovers, the other a haunch.
Paul,
It is almost 10PM here and I am tempted to go into my garage and start chopping a few mortises! This is a great series of posts on a very practical and much needed accessory (who doesn’t need an inexpensive yet great workbench?). I love it when you debunk the need for expensive tools and I really wish I had come across this information four years ago when I started. It was quite an insight to learn that you don’t need $400 planes with 1/4 inch thick blades. Now you are telling me I don’t need to buy all those fancy chisels (In preparation for building this bench, I have been trawling ebay and craigslist for used mortise chisels)! I have a bunch of Marples chisels and I am ready to give it a try early morning.
BTW, I am totally buying your philosophy here. This indeed is real woodworking! And, very fulfilling! I love the idea of doing something by hand and acquiring new skills in the process. Your posts are a constant source of inspiration and your kind answers to our questions is truly humbling.
Thank you and I hope to read many more posts in a similar vein!
PM
I think that the important thing is that we are chopping mortise holes not beating into them or worse still chewing into them like a rat.
Sensitivity and accuracy are one and the same thing in that we become attuned to all things surrounding our work, which means when to sharpen our tools, precise cutting no matter the tool, consciousness of surroundings, materials and the tools themselves. There is a unique symbiosis taking place as we become increasingly aware that our work in wood is not so much a hobby at all but responding to our vocational callings. That it’s more likely to be our real job we are answering the call to rather than the one we do to make money. I think when we see that the job we work to make money is our part time second job and that our real job is in the basement or garage in the evenings and on weekends, the sooner we will find fulfilment and stop feeling guilty because we are enjoying “going off to work”.
I know that most people are not going to make a career change because it’s impractical, but I think getting the right perspective adds a balance we might not otherwise benefit from seeing.
Hi Paul,
I understand your thoughts perfectly. I truly respect those, such as yourself, who choose to follow their true calling and I wish life wasn’t so demanding as to make us do things we really don’t want to.
BTW, what do you think drilling holes to get rid of most waste in the mortise? I have done it in the past but the paring process was fussy. I haven’t chopped a mortise using your method yet but it seems like the process is going to be simpler and gets you a clean enough mortise that requires little paring.
Thanks
I did it when I was younger but always found it messy too. On super huge tenons I would use that method, but it actually takes only five to ten minutes to chop each of these mortises and they are really clean when done so I don’t really advocate hole drilling first. The other things is it’s so very boring!!!
I tried cutting mortises with a 1 inch chisel and it was a great method but I couldn’t get a really clean holes like you did in the video. My walls were very messy. The dang chisel kept twisting in my hand. The mortises were 3.5 inches deep.
I’ll keep at it because it is fast!
If you are in the USA I can recommend the Narex chisels. In the UK I can recommend Sorby chisels though they are not cheap. You can also buy Narex premium chisels from: http://www.toolsandtimber.co.uk
Thats fantastic. Thank you.
Paul, what angle do you grind your chisels too? Also, when chopping Oak or other hardwoods do you find you need to sharpen more often? I had a 30 degree angle, but the end of the chisel looked like ah alligator chewed oh it after a few mortises in oak. thank you for the fantastic book and DVD’s!
A chisel shouldn’t edge fracture in any wood when ground at 30-degrees. I suppose we have to find out if it is actually edge fracturing or folding. Folding means that it has no strength, fracturing means usually the maker failed to find the balance between hardness and toughness.. What make are they? That will help me evaluate.
Right I’ve cut my first ever mortise today and I have to say the first on wasn’t the best. How ever I have learn a valuable lesson, well it works for me. If you set yourself up so you are looking down the leg it a lot easier to line up the chisel so it is perpendicular. My first mortise was done from the side and I was out by a about 3mm in the middle where the holes met. Then made a real mess pushing through from one side. However I think I have got to acceptable by the third mortise. Attached mortise 1,2,3
Hmm still having issues meeting in the middle is this a common problem for beginners. I’m out by about 2 mm. The outside sides are square and parallel and my marking is fine. I went back and re measured 🙂 I’m hoping that having a gap in the middle of the mortise wont cause too much of a problem as most of it will be filled with glue. To be on the safe side I’v stuck my first leg frame with epoxy resin as this will fill the gaps better.
Looking forward to the pleasure of getting this right !
No, this is just a through tenon only. No need for the haunch because it is surrounded all four sides by solid wood. There is a 2″ space and then the bearer goes on top of the legs and spans a gap that allows the vise mechanism to pass in between.
That’s what I thought but wanted to make sure. How is the vise attached to the side of the bench? On the front it goes through the apron but on the side did you construct something to hold it or is it screwed into the benchtop? By the way I’ve got all my wood planned and ready. This weekend I plan on making my first mortises and tenons. Thanks so much for sharing with us.
The vise coach bolts from the underside and I use #14 Screws through the face of the inside jaw too. As you follow the post you will see that I allow the wooden vise jaws to run past the metal jaw. This allows me to fixe the liner to the bench apron; with a packer cut to fit between the apron and the jaw.
Hi Paul; I’m a bit confused as there isn’t an apron on the side for the tailvise. You mention ‘as you follow the post’ and I’ve looked at all the parts of the series and didn’t find the details of the side vise.
Sorry, I was addressing fixing the vise in an apron face. It’s no different fro the tail vise. Just screw through into the end of the bench top and same coach bolting or even carriage bolts as for face vice to underside of bench.
I was wondering when I cut mortise and tenons by hand, why my boards are not at ninety degrees to the mortise. I have tried cutting my tenon on the table saw. I have also used your mortise guide to get the outside wall square. Just wondering why my peices have trouble coming together.
Hi Paul. My bench is progressing well, albeit slowly. The YouTube’s combine with this blog make it so clear. My first two mortises were good, but I’ve just completed the third and it’s not so good. In the centre there was a step of around 2 mm on each of the opposing sides of opposing walls, for about the middle 15 mm of the mortise slot. I presume this is because I wasn’t holding the chisel perpendicular when chopping one of the two sides? The layout is square and identical on each face. I’ve flattened each internal step with the chisel, but now consequently have a hollow in the centre of each mortise face, about 20 mm in diameter. Will this matter? Should I put some extra glue inside the mortise when I glue up, to fill the space? I suppose I could enlarge the mortise and make a bigger tennon, but that might be inaccurate too since I would be just paring it wider with the chisel. Not too keen on remaking the whole leg. Thank for your advice Paul (or anyone else). Rob
Nope, just glue it up and it will hold just fine. The bench is the practice you need and it will hold up just fine.
Thanks Paul. That’s reassuring to know.
Paul – after watching your videos and reading your blog for many months now, as well as practice with sawing, chopping and planing, I finally decided to attempt the workbench build as a vacation project. My best material choice was southern yellow pine (most appropriate for Georgia here in the US!), which I have both sawed and then planed beautifully with my no. 4 Stanley. I have mostly heart wood from some very mature trees – some nearly 50 years old by the growth rings.
But then came the part I was actually the least concerned about, but which has proven extremely difficult – cutting the mortises. Despite being sharp enough to cut paper, my chisels were damaged by the SYP, and the amount of material I could displace extremely small despite following your method as closely as possible. I had previously done well with both white pine and red oak – so much so that I wasn’t concerned about this part! Fortunately, I have only worked on scraps as additional practice before risking my laminated legs, but I’m unsure how to proceed.
I have searched far and wide for advice on chiseled mortising in SYP, and other than discovering that it’s difficult to handle with a chisel, I’ve found no real solutions. It seems that the hardness of the dark rings is extreme, with some of them measuring as wide as 5 mm in my stock. In the interest of getting my bench done, I’m considering power tools and squaring up the mortises, but at 3.5 inches deep, that won’t be a simple task, either.
My chisels are Dewalt, and nothing fancy, but seemed better than others I found in stores. Might there be an edge hardness issue? I’m inclined to think not, because a second set of inexpensive ones, equally sharp, behaved exactly the same. It’s like I was just compressing the fibers rather than cutting them. I think that the edge is rolling vs. chipping based on what you commented to another reader.
Any expert insight would be greatly appreciated!
Oh boy, what a challenge those mortises are! Like other novices stated I can’t seem to get the holes to line up and meet exactly in the middle. I’m using big box store Douglas Fir. On the last one I used a guide board clamped parallel to the side of the mortise so my chisel went in straight. Still had problems with chisel drift as the annual rings in the wood are tough and cause the chisel to twist. My admiration for Paul’s skill has grown ever so much more now that I’ve tried it myself.
Doubt won’t leave me that 1/2 chisel is sufficient. But if you say so, then I will try. I think it’s my poor experience tells. And I want to try a Drawbore Mortice and Tenon in each joint. What do you think, isn’t it. I think adds strength at the same time and I will try this joint?
What do you think about it?
Best regards
It is definitely sufficient and drawbore will work fine too. But you can make the tenon thicker no problem too. I am doing that right now with a bench I am building.
Thanks a lot