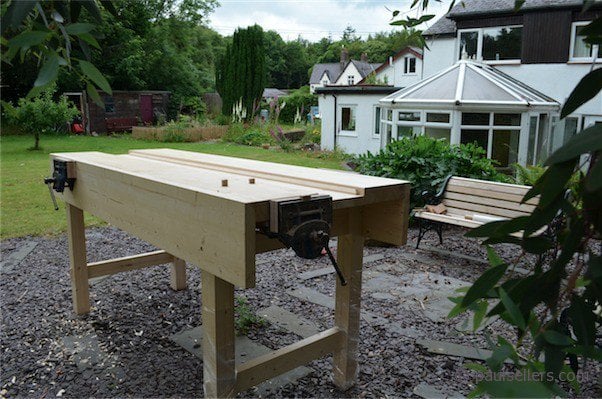
I would like to briefly discuss the size of bench you choose to make. I know it’s important to you and it must of course be fit for purpose, your purpose. My son Joseph, the violinmaker, uses a short bench three feet long. He has the same Record vise that holds stock for working and he also uses the benchtop and apron to clamp his materials to as he works them. Violinmakers plane the final thickness of their violin sides (bouts) to 2mm thick, cello walls are 4” wide and a similar thickness. They plane them to within thousandths of an inch of thickness using highly figured maple. His bench is two feet deep. The depth of the bench I made is for a freestanding bench. Of course were it intended to stand against a garage or basement wall it could still be the same depth, but without the second apron vise. Sawing dovetails on a bench is lightweight joinery. If all you are doing is making boxes then you need little more than that. If you are cutting a 10” tenon, then that’s a different story. At a show once I was asked to demonstrate using a 3’ square joinery bench. I could tell immediately that for others the bench might work, but for my work there was no way it would. I need weight, yes, but more than that I needed a footprint size that would counter the leverage and torque I would apply throughout aspects of my masterclasses. I required a bench sitting dead squat in place. The bench I used was identical to the one I us in the UK and US schools for students to work from. They measure around 2’ x 5-6’ long and 38” tall. So if you want a bench for a confined area that will work. The bench I just made is classic, a little longer than needed normally, but can readily accommodate myself and an apprentice, which is what I want. In my view, 5-6’ long should be adequate for anyone. All dimensions and sizes remain the same except for the aprons, well and benchtops. The final decision of course will e up to you.
In an upcoming series we will be adding drawers, shelves and cupboards to either side. These features too can be adapted to smaller benches. Meanwhile you have the step by step for the bench. More video will be released for the purpose of technique and so on soon.
NOTE:Just so you know, this is an older workbench series. Paul has a newer Workbench series. If you are interested in the updated version of Paul’s workbench please click the button down below. This page links to a cutting list, tools list, FAQS and much more.
I wanted to thank you for the step-by-step on the new workbench. Your posts are timely as I have finally collected all of my tools, settled into a new house, and just got the lumber to start on my bench. After the bench I’ll begin your course via book and DVD. I’ve decided to stick with the bench you described in the book as a start. While I have the space for the 3’x8′ bench, I figure it will be good to see how I work and what I work on most of the time ( my dream is to make a japanese style dining table – we’ll see how a 3’x5′ dining table can be made using a 2’x5′ workbench) before making something bigger. And it is best to just begin!
Wonderful beginning series. I can’t wait read the next series on adding drawers, shelves and cupboards to the workbench.
I finished laminating the legs, bench top and tool well. Yesterday I flattened the underside of the bench top. I can’t wait to finish it.
BTW, I am considering switching to the method of sharpening you use. It appears once your hand is trained to hold the chisel or iron at 30 degrees the rest is pretty natural. Currently I am using waterstones and a jig. I would like to get rid of the setup time and mess. Thank you again.
Brandon Avakian
Paul I am enjoying your Blog and Pod Cast Video’s very much, thank you for taking the time and sharing your methods. I am about to start building your bench design and haven’t totally decided wethere I need ( 2 ) slabs or ( 1 ) slab as shown in your book. I also have a Record 52E that I have had for years so i might as well use it. I also intend to use holdfasts and incorporate a planing stop as well. Any thoughts or ideas wethere 1 or 2 slabs to be used ?
Thanks again I am so glad I have discoverd you.
Steve
What is the purpose of the apron? Does it add stability or does it have a purpose while working? I am trying to find a simple bench like this one, with a well, not bigger than 5 feet and I am having a hard time.
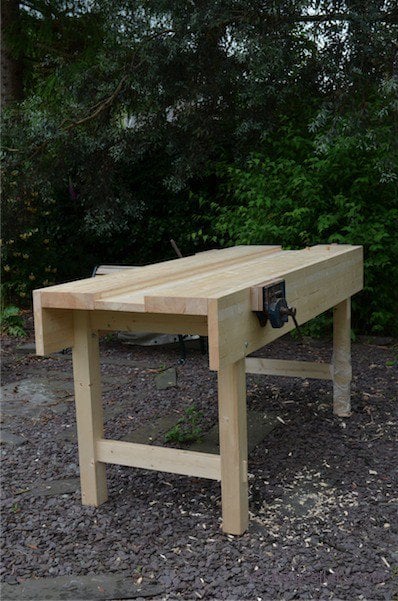
Just follow the steps and you’ll get there. Its the single most fantastically simple bench I have ever worked at without going over the top. Anyone can build this one and no craftsman worth his salt can ………well, we won’t go there. If you go to my YouTube video and watch them from start to finish you will know that you can make it. Yes, the aprons give it stability, but more than that even, because the apron is glued to the front edge of the bench top the top is so solid there is no bounce anywhere along the length of the bench.
Hi Paul, thanks for taking the time to reply.
I am no craftsman, yet. I hope to become one, and I have confidence that I can learn thanks to the great length you went through to make all this amazing material available.
But I have to admit that, even though going through your workbench series of videos, it does seem a doable project, it is definitely out of my league for now.
I just need a solid table to start. I have found two German benches that look very similar to yours, they are just missing the apron, and this is why I was asking what was its purpose. Maybe one day I will get around building my own bench, but for now I will need to let my money do the work to bring me to a place where I can actually start practicing with smaller pieces.
In case you wonder, these are the two benches I like. The Ulmia #2 — http://www.ulmia.de/images/Hobelbaenke/Schreinerhobelbank_2.jpg — and the E.C. Emmerich — http://www.hobbylegno.biz/it/banco-da-falegname-ece-produzione-tedesca-mm-1700×640.html
Thanks again for giving so much back to the community.
// Francesco
Both benches look like they are from the same manufactory and either will work for you.
Hi Francesco,
I think you might already have build your Workbench, but for everyone else…
When I build my Workbench i literly had no woodworking skills, i never used a Handplane, i didn’t had anything near a good tool… my Handplane was so cheap it had no chipbreaker a large mouth and a sole from sheet metal( not even near to being plane…) my saw was as dull and cheap as you could get it, my chisels were the Aldi chisels(they are good chisels thou..) sharpend with sandpaper to 400 grit what was enough to get my chisels and my plane sharp enough to Build my bench. As a marking gauge i used two pices of wood glued together like a T with a nail hammerd in different positions…
But my workbench is super solid and now that i got a good handplane the benchtop is perfectly flat too. So this should show that anybody can build himself a workbench that last more than a lifetime…
Hi Paul,
I realize this is an older thread, but I’m sure there are others that might have similar questions.
I want to build a version of the bench in your book for making violins and cellos. You mention that your son’s bench is 2′ deep and I’ve seen other luthiers with benches on the order of the same size. However, elsewhere on your blog, I recall you saying that you had seen laminated benchtops that size split over time.
Any recommendation on the widest one should go in making a laminated benchtop? I was planning to make a benchtop that was 24″ wide and then have a small well board behind it (really love the idea of a well).
Thanks for all your helpful advice – learned tons watching your videos and reading your books.
I am sorry if I gave the impression that they would ALL split, that’s not necessarily always the case but very likely movement will be an issue. I knew a person who made wider laminated tops for a living and he had issues he hadn’t considered. He sent them to different regions in north America and this resulted in problems because different parts of the USA are far less constant than say we have here in the UK where humidity is pretty much at a constant and much less variable than other regions of the world. My living and working in the USA for 25 years gave me an appreciation for climate changes and differences too. In Arizona for instance a 2 foot wide bench top or tabletop is going to shrink if it hasn’t had its moisture taken down to say 6%, whereas sending it to east Texas it will need to be at least 12-15% otherwise it will expand 1/4″.
For safer stability with regards to shrinkage, you must remember that a bench top that wide may want to shrink by 1/2″ or indeed expand 1/4″ and woods like Maple, Ash, Oak and other hardwoods are the worst offenders. My suggestion is that you laminate your bench top and stand it on end in the atmosphere you plan for it to live. for a couple of months if possible and allow movement to take place before bolting or screwing anything together. Then re-flatten and rework the benchtop to a final flatness and things should be just fine. An alternative that works well is to run a loose tongue between two 12″ bench tops to close off an expansion and contraction gap. Keep the tongue to the top so you can clean out the gap out as and when needed; say 1/2″ down and a 1/2″ plywood tongue would work well for this. This gives a greater stability too. Also, keep your laminations to no more than 1 1/2″ as this gives greater resistance to movement in laminations. In the USA I have used whats called a gluelam garage header for benchtops. It’s thick at 3 1/2″ and usually can be had in lengths 8′ and on up to 16′.
Thanks so much for the timely reply – your teaching heart is really on display.
First off, I plan to use spruce or pine for the benchtop, whichever I can get in 2×3″ without rounded corners.
Second, I live in Colorado, so very dry.
If I just made a single 24″ laminated section that was glued to the apron, that should meet the intent of your suggestion correct? Only one side of the benchtop would be secured – the rest of it (and the well board) should be free to move, correct?
Thanks.
Comments are closed.
Privacy Notice
You must enter certain information to submit the form on this page. We take the handling of personal information seriously and appreciate your trust in us. Our Privacy Policy sets out important information about us and how we use and protect your personal data and it also explains your legal rights in respect of it. Please click here to read it before you provide any information on this form.

I wanted to thank you for the step-by-step on the new workbench. Your posts are timely as I have finally collected all of my tools, settled into a new house, and just got the lumber to start on my bench. After the bench I’ll begin your course via book and DVD. I’ve decided to stick with the bench you described in the book as a start. While I have the space for the 3’x8′ bench, I figure it will be good to see how I work and what I work on most of the time ( my dream is to make a japanese style dining table – we’ll see how a 3’x5′ dining table can be made using a 2’x5′ workbench) before making something bigger. And it is best to just begin!
Wonderful beginning series. I can’t wait read the next series on adding drawers, shelves and cupboards to the workbench.
I finished laminating the legs, bench top and tool well. Yesterday I flattened the underside of the bench top. I can’t wait to finish it.
BTW, I am considering switching to the method of sharpening you use. It appears once your hand is trained to hold the chisel or iron at 30 degrees the rest is pretty natural. Currently I am using waterstones and a jig. I would like to get rid of the setup time and mess. Thank you again.
Brandon Avakian
Paul I am enjoying your Blog and Pod Cast Video’s very much, thank you for taking the time and sharing your methods. I am about to start building your bench design and haven’t totally decided wethere I need ( 2 ) slabs or ( 1 ) slab as shown in your book. I also have a Record 52E that I have had for years so i might as well use it. I also intend to use holdfasts and incorporate a planing stop as well. Any thoughts or ideas wethere 1 or 2 slabs to be used ?
Thanks again I am so glad I have discoverd you.
Steve
What is the purpose of the apron? Does it add stability or does it have a purpose while working? I am trying to find a simple bench like this one, with a well, not bigger than 5 feet and I am having a hard time.
Just follow the steps and you’ll get there. Its the single most fantastically simple bench I have ever worked at without going over the top. Anyone can build this one and no craftsman worth his salt can ………well, we won’t go there. If you go to my YouTube video and watch them from start to finish you will know that you can make it. Yes, the aprons give it stability, but more than that even, because the apron is glued to the front edge of the bench top the top is so solid there is no bounce anywhere along the length of the bench.
Hi Paul, thanks for taking the time to reply.
I am no craftsman, yet. I hope to become one, and I have confidence that I can learn thanks to the great length you went through to make all this amazing material available.
But I have to admit that, even though going through your workbench series of videos, it does seem a doable project, it is definitely out of my league for now.
I just need a solid table to start. I have found two German benches that look very similar to yours, they are just missing the apron, and this is why I was asking what was its purpose. Maybe one day I will get around building my own bench, but for now I will need to let my money do the work to bring me to a place where I can actually start practicing with smaller pieces.
In case you wonder, these are the two benches I like. The Ulmia #2 — http://www.ulmia.de/images/Hobelbaenke/Schreinerhobelbank_2.jpg — and the E.C. Emmerich — http://www.hobbylegno.biz/it/banco-da-falegname-ece-produzione-tedesca-mm-1700×640.html
Thanks again for giving so much back to the community.
// Francesco
Both benches look like they are from the same manufactory and either will work for you.
Hi Francesco,
I think you might already have build your Workbench, but for everyone else…
When I build my Workbench i literly had no woodworking skills, i never used a Handplane, i didn’t had anything near a good tool… my Handplane was so cheap it had no chipbreaker a large mouth and a sole from sheet metal( not even near to being plane…) my saw was as dull and cheap as you could get it, my chisels were the Aldi chisels(they are good chisels thou..) sharpend with sandpaper to 400 grit what was enough to get my chisels and my plane sharp enough to Build my bench. As a marking gauge i used two pices of wood glued together like a T with a nail hammerd in different positions…
But my workbench is super solid and now that i got a good handplane the benchtop is perfectly flat too. So this should show that anybody can build himself a workbench that last more than a lifetime…
Hi Paul,
I realize this is an older thread, but I’m sure there are others that might have similar questions.
I want to build a version of the bench in your book for making violins and cellos. You mention that your son’s bench is 2′ deep and I’ve seen other luthiers with benches on the order of the same size. However, elsewhere on your blog, I recall you saying that you had seen laminated benchtops that size split over time.
Any recommendation on the widest one should go in making a laminated benchtop? I was planning to make a benchtop that was 24″ wide and then have a small well board behind it (really love the idea of a well).
Thanks for all your helpful advice – learned tons watching your videos and reading your books.
I am sorry if I gave the impression that they would ALL split, that’s not necessarily always the case but very likely movement will be an issue. I knew a person who made wider laminated tops for a living and he had issues he hadn’t considered. He sent them to different regions in north America and this resulted in problems because different parts of the USA are far less constant than say we have here in the UK where humidity is pretty much at a constant and much less variable than other regions of the world. My living and working in the USA for 25 years gave me an appreciation for climate changes and differences too. In Arizona for instance a 2 foot wide bench top or tabletop is going to shrink if it hasn’t had its moisture taken down to say 6%, whereas sending it to east Texas it will need to be at least 12-15% otherwise it will expand 1/4″.
For safer stability with regards to shrinkage, you must remember that a bench top that wide may want to shrink by 1/2″ or indeed expand 1/4″ and woods like Maple, Ash, Oak and other hardwoods are the worst offenders. My suggestion is that you laminate your bench top and stand it on end in the atmosphere you plan for it to live. for a couple of months if possible and allow movement to take place before bolting or screwing anything together. Then re-flatten and rework the benchtop to a final flatness and things should be just fine. An alternative that works well is to run a loose tongue between two 12″ bench tops to close off an expansion and contraction gap. Keep the tongue to the top so you can clean out the gap out as and when needed; say 1/2″ down and a 1/2″ plywood tongue would work well for this. This gives a greater stability too. Also, keep your laminations to no more than 1 1/2″ as this gives greater resistance to movement in laminations. In the USA I have used whats called a gluelam garage header for benchtops. It’s thick at 3 1/2″ and usually can be had in lengths 8′ and on up to 16′.
Thanks so much for the timely reply – your teaching heart is really on display.
First off, I plan to use spruce or pine for the benchtop, whichever I can get in 2×3″ without rounded corners.
Second, I live in Colorado, so very dry.
If I just made a single 24″ laminated section that was glued to the apron, that should meet the intent of your suggestion correct? Only one side of the benchtop would be secured – the rest of it (and the well board) should be free to move, correct?
Thanks.