Today in my workshop – sharpening a tenon saw
This week I have two workshops as well as a few people finishing off their rocking chairs. It’s wonderful being there and seeing the work come together at the different levels. It’s a small group of seven woodworkers that find excitement at the cutting edge of a plane and a chisel. A saw that didn’t work today but tripped and jarred mid-cut drew them around my bench. I pulled a flat file over the teeth three or four times. I didn’t count. As the file passed over the teeth my fingers traced the sides of the saw to guide me evenly either side of the plate. I glimpsed the speckled light from the flat-topped teeth and gauged by eye their failing over-set width. The sharpness was equal to the cut in oak or ash and even dense-grained woods known to resist the cutting edge and yet unequal shape would beset the saw with each stroke.
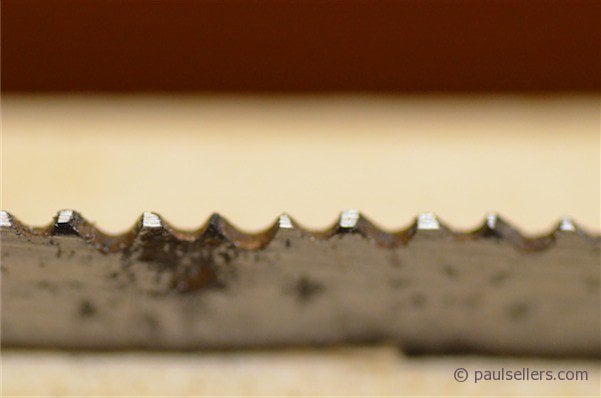
I passed the saw in its test. It cut the wood of oak and then of pine with a fineness now renewed. This old Spear and Jackson tenon saw with 9 1/2 teeth per inch is large toothed for a tenon saw of 12”.
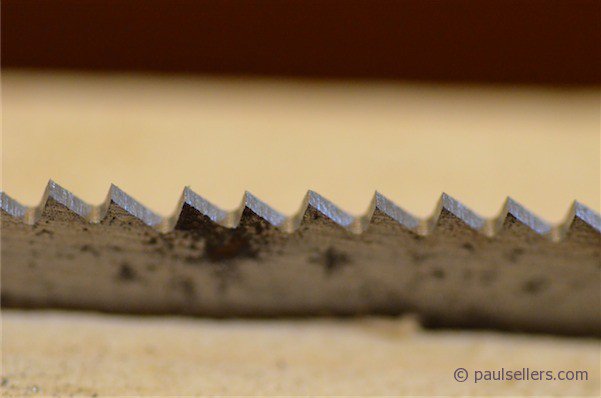
this wasn’t the saw. This was one a restored a few months ago in the US, but the images show flat tops and that’s what I wanted you to see.
The below picture is the restored teeth.
Thanks for reminding me Paul!
I’ve bought a tenon saw and nest of saws from Michael (azmica90405) on ebay and they are truly amazing. However, I really need to learn how to get this right myself. Which file for the teeth, etc… i have some other saws that I’d love to bring back myself, some Disston acme 120s, D8 rip, Disston #4, and a Spear & Jackson tenon saw. I need to spend some time with that chapter of Working Wood and practice on a little Disston panel saw that I got for $8 until I get it right.
I think this upcoming video and my blog will really help you with your saws. Glad to be of help.
Thanks Paul. Is the upcoming video mentioned out yet? I can’t seem to find it.
Thank you Paul. Been around wood working since the age of seven and never once tangled in the ‘dark arts’ of saw doctoring. But I tried it, on your advice. Bought an old, battered ‘Disston’ 12″ tenon saw for $5 at a market (with a file saw thrown in) and gave it a whirl. Shaky at first, cautious – lost count a few times and had to start again. The ‘progressive’ rip pattern needed some concentration, but after a while my new old saw, now clean, serviceable and sharp is cutting the best tenons I’ve ever made; and, I may add , I’ve cut a fair few. Anyway, long story short – I was intending to discard ‘cheap’ saw I’d bought for a particular job – it it now a very real, true rip-saw, deadly sharp, accurate and a pleasure to use. I cannot begin to tell you the pleasure learning that small skill has brought me. Thanks again.