For more information on the router plane, see our beginner site Common Woodworking.
Part II
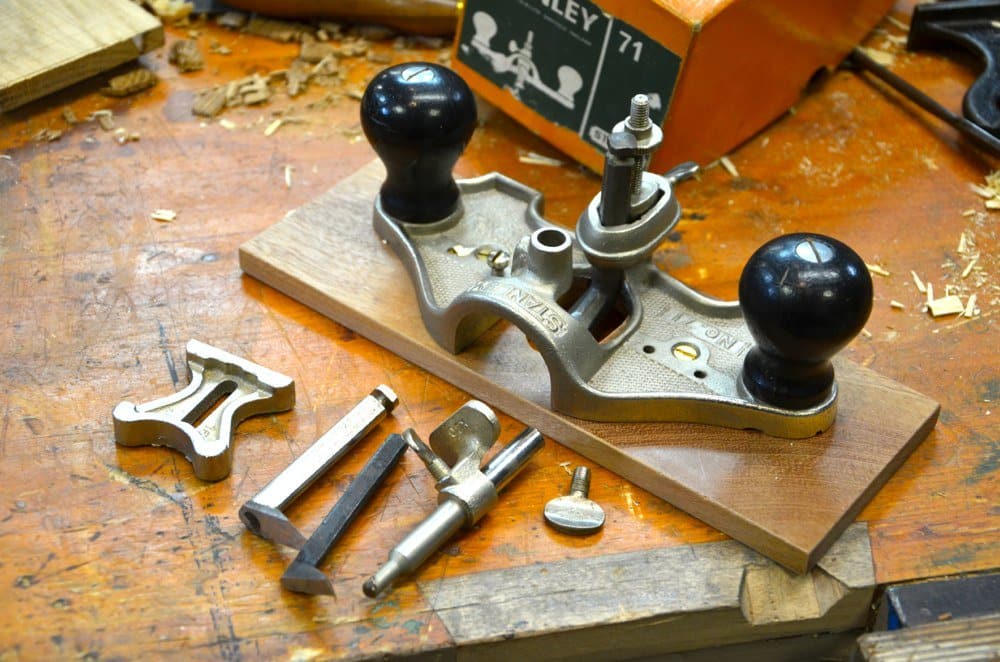
The 071 or 71 router plane has several uses but the primary use of this specialised plane is to guarantee the depth of different types of recesses. It’s the essential tool of hand tool users and surface trims just about everything from inlay recesses to housing dadoes and levelling depths of sliding dovetails and the cheeks of tenons.
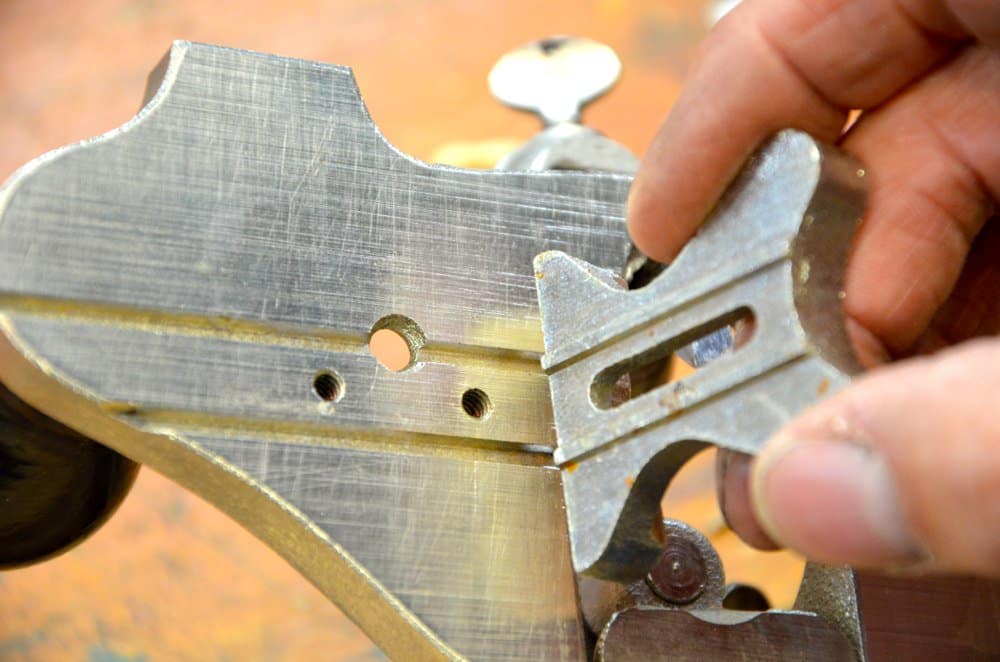
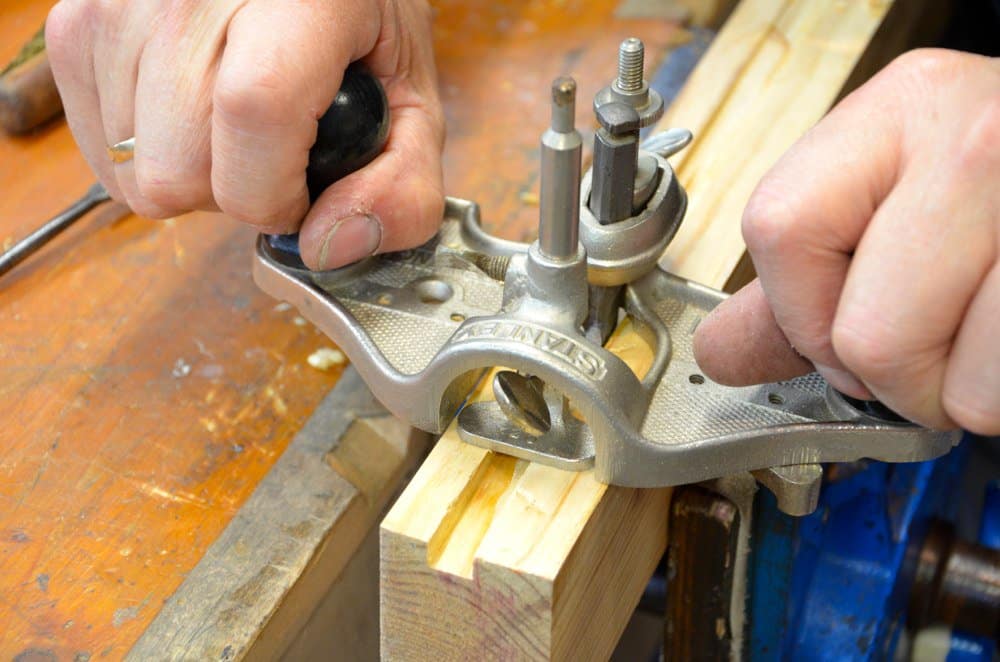
The tool comes with additional accoutrements as you can see above, enabling different functions for the plane’s use. The fence fits to the underside of the plane and is two-ended. One end of the fence piece gives a parallel squarely rectangular edge to the fence and the opposite side end a two-point contact fence that facilities turns on the edge of curved work. The fence is adjustable and locks into two square grooves running each side of the blade along the sole. Loosening and tightening the setscrew into the sole secures the fence for use. It’s best to use the fence when running the blade along a narrower recesses to keep the plane square and parallel to the wall of the work if necessary.
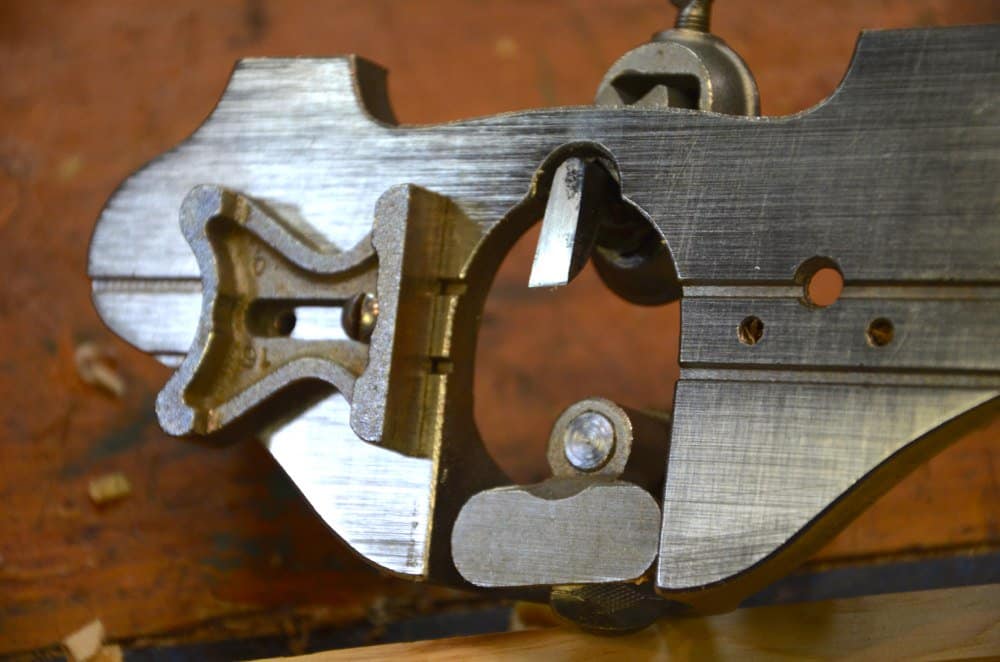
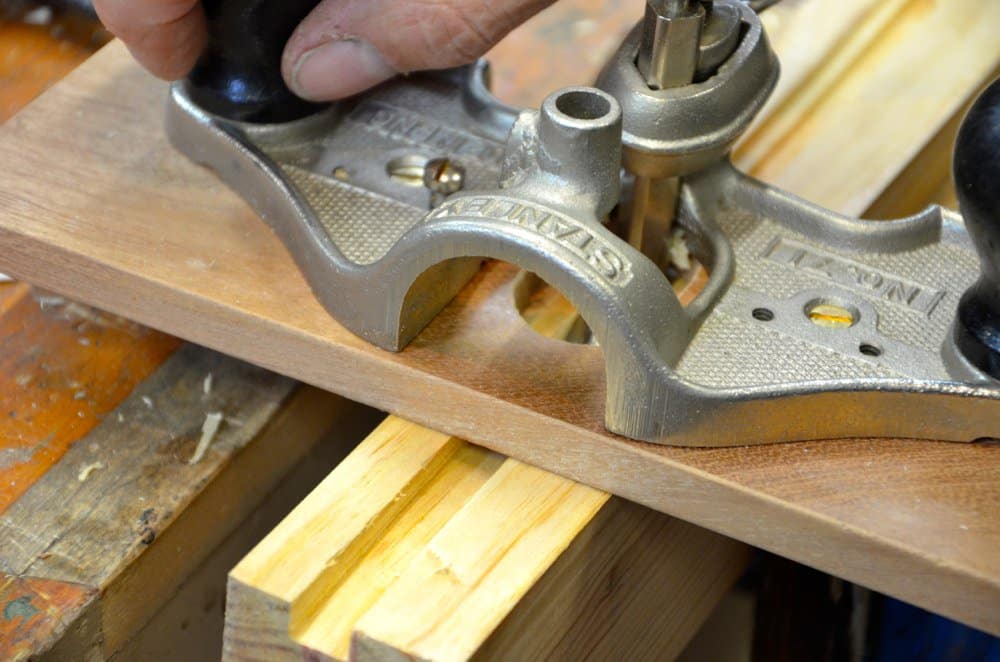
Because of a horseshoe shape in the sole that splits most of the forepart of the sole into two halves the plane sole is effectively useless on narrow sections of wood. On such narrow work, with no fore part before the blade, running grooves trips the plane forward because there is nothing to stop the plane from tilting in the direction of the cut when the cutting edge of the blade grabs the wood. Stanley developed an additional unit that locks a post stem into the body of the plane which then holds a shoe to align an auxiliary section level with the sole to fill in the gap between two halves of the sole.
This piece then rides the edge of the board along with the flat of the rear of the plane. In addition, the depth rod that holds the shoe can be used alone inside a groove to align the blade and prevent the cutter from digging into the walls whilst at the same time restraining the plane from digging any deeper thanfractional increments. This effectively works as an additional sole depth guide for grooved work and the rod itself has two diameters, one for wider grooves and one for narrow ones.
We often use both the fence and the depth rod and shoe in conduction with one another to ensure accuracy in the work. The depth rod used alone can follow the rim of inlay recesses to guide the narrow cutter or the smoothing cutter around shaped work too.
Adding a Wooden Sole
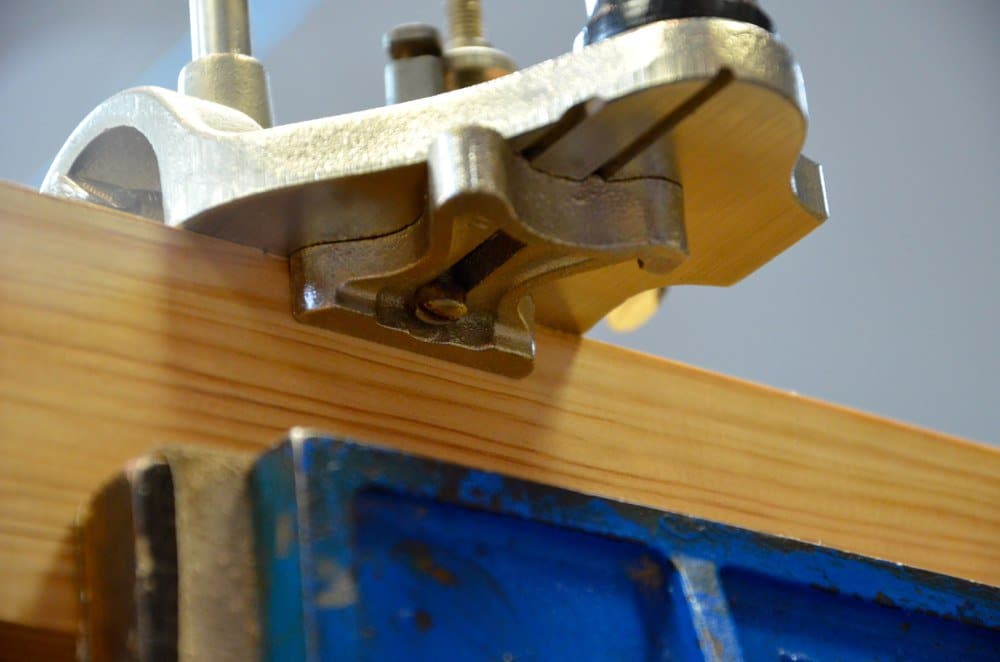
It’s quite common to add a wooden sole for general work because sometimes the metal sole on wood tends to mare the surface of the material being worked. Wood on wood works best and makes the sole smooth and free of fence grooves, screw holes and so on that tend to grab shavings that can further mar the surface of the work too. When working wide recess areas, wider than half the plane sole width, we use an auxiliary sole to extend the base so that the router plane can traverse the surface area and be used to trim the recess perfectly to depth. Making an additional sole piece also enables us to use the plane without the additional shoe on narrower work (Pic above). The plane operates more smoothly with the wooden sole.
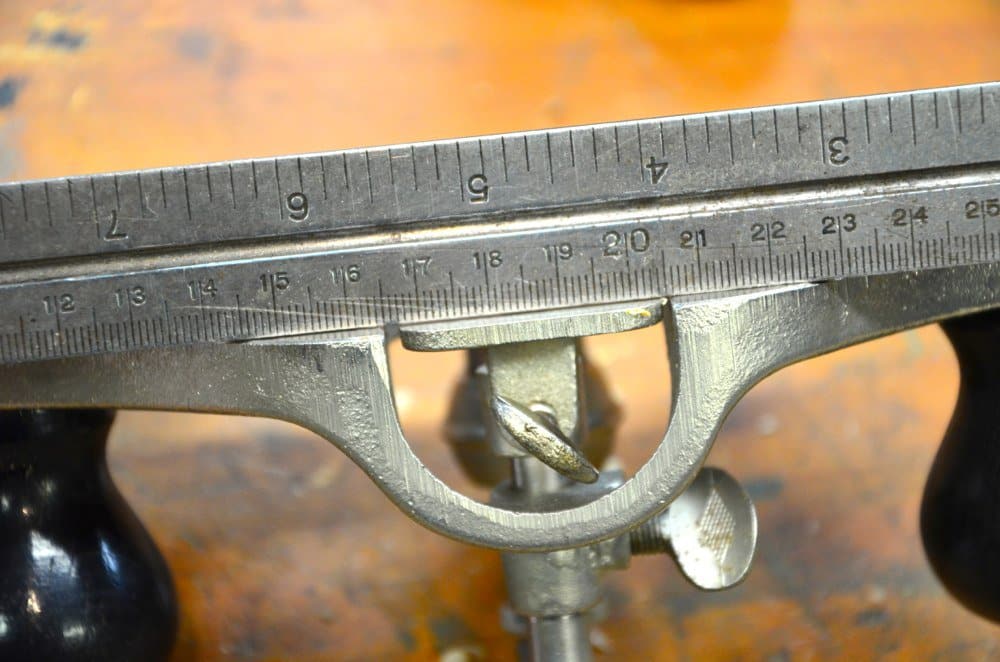
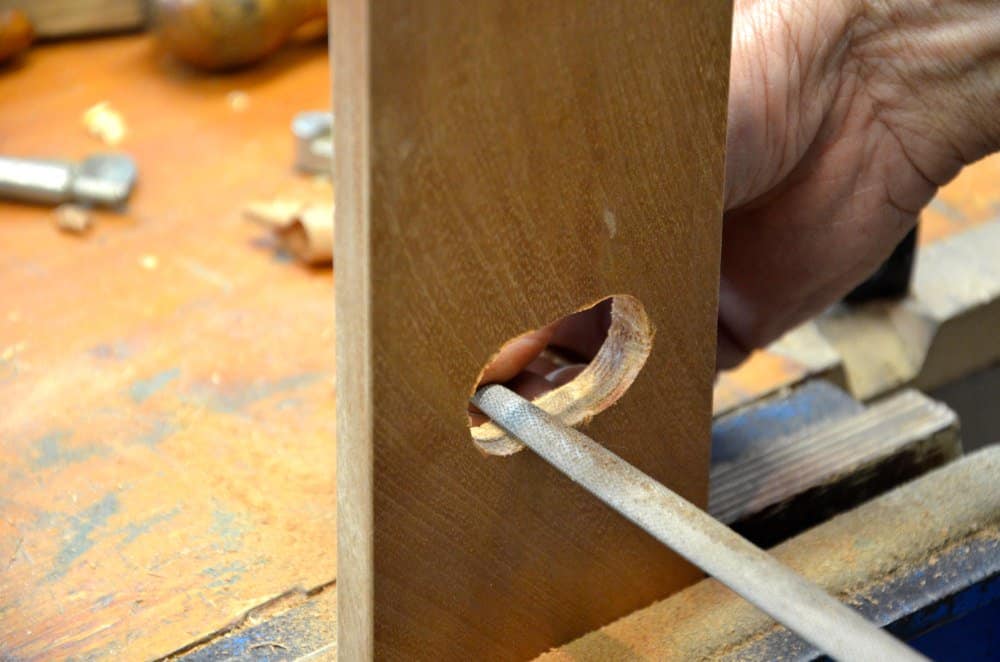
To make the wooden sole choose section of wood12mm (1/2”) thick and to a size that suits the task in hand. Bore two holes 1” in diameter38mm (1 1/2”) on centre and remove the excess with a rasp or chisel.
Screw the base to the sole of the plane by passing screws through the sole into the base piece.
Sometimes, often, router planes bought secondhand have lost the parts you need to have the plane fully functioning. Adding the wooden sole means you can also screw fences or guides to the sole. This also works well.
25 Comments
That additional fence information was very helpful Paul for those unfamiliar. I have a Record 071 that I bought in 1972 that is my favorite user router. All parts intact including the original cardboard box. You must remember the book “Planecraft” that Record put out in 1959 and was reprinted in the U.S. by Woodcraft Supply Co. in 1972. The best little hand planing book for anyone but I assume it may be no longer in print.
Thanks Paul. I found an old 71 at a garage sale (missing some parts) so the idea of adding a secondary wood base solves my missing parts problem. Awesome. I will have to make one this weekend. Keep up the great work
Dallas
I am about to put up part III in the series.
I recently bought a 71 for $10 and realized only after using the plane for a couple of days that the depth stop in the front that was originally attached
to the horseshoe shaped opening was missing. We I looked more closely, I noticed the roughness where it had broken off. A few days ago, when looking at a new Lie Nielsen router plane, it surprised me that they had not included that part in their version.
Alfred
I have an earlier model #71 with out the blade adjuster and bought the after market blades from Lee Valley, ( Veritas ). The plane took a little getting use to as far as adjusting the height but works just fine, and have not had any reason to use the spear point blade as of yet but have it if needed.
Now I do need to make an auxiliary wooden sole which I could have used a few times. But I built Paul’s “poor mans router” which solved that problem.
Steve
I was interested to read the comments about the book Planecraft – Hand Planing by Modern Methods from 1959. I picked up a copy of this about 20 years ago and it was the Fifth Impression dated 1953 . It was first published in 1934 with other impressions in 1943, 1945, 1950. A real bargain at £2.25 from a local second hand bookshop that, unfortunately, has now closed. Its a terrific book and the previous owner has put collection of pages about other Record products inside the cover. One can only guess what he was thinking as the pages are all hand-sown together in an order that defies description. It does however include Bull Nose rabbet planes # 077, 076, 075, 077A, 1366 and a 3 in 1plane No 311. So it adds to Paul’s list.
Hi Paul,
First, I know you hear it a lot but thank you! I have followed many of your recommendations as I’ve been developing as a woodworker and your advice on tools and techniques have played a huge role in my growth.
I’m going to add a wooden sole to my router and have a couple questions. I apologize if you’ve addressed these previously but looking over Essentials as well as your blogs and videos I haven’t seen these specific questions.
1. What tolerance should I shoot for on thickness. I get dead straight on the sole, but dead parallel doesn’t seem realistic for me. Are we talking hundredths or thousandths with the caliper?
2. Grain direction, I notice you have the grain running perpendicular to the cutter is that planned or happenstance?
3. Wood choice, I’m not sure but yours looks like mahogany, I was thinking cherry, but I have a lot of oak, have you found one to perform best?
4. Do you finish the sole, and if so oil or shellac?
Any advise is greatly appreciated and thanks again for everything you do!
Mike
You will need to be more specific on one and two, Mike. Wood choice would be to find a fairly stable wood such as cherry, maple, any of the mahoganies and ok might not be a first choice but would work OK. I don’t finish the sole as any finish tends to diminish the quality of the friction-free element of wood on wood.
Thanks Paul!
1. I’ll be milling to 1/2” thickness by hand and using a digital caliper to measure my accuracy. Obviously dead on is ideal, but maybe not realistic. When I measure thickness at different points of the sole is there a margin of error that is acceptable?
2. Since a big benefit of the wood sole is reduced friction, I would have thought that aligning the wood’s grain in the same direction that you push the router would give the biggest benefit. In the images of your sole, the grain is running more perpendicular to the direction you push the router. I wondered if the grain direction is irrelevant to performance or if there is another factor that would cause you to choose to run the grain perpendicular.
Thanks again for your help!
Mike
The evenness of thickness makes little if any difference to the functionality in relation to routing down sub surfaces. Just get it as close as a thin shaving. The wood going cross ways to the long axis is strongest and offers the greater rigidity so that is the best way to go. You are right, there is no relevant improvement orienting the other way.
Thanks Paul,
I made one from cherry this morning and it turned out great! I wanted to mention how cool it is that despite the amazing growth of your fanbase and additions of new forums and teaching methods that you are still so committed to answering questions from random woodworkers like me from across the world. Thank you!
I know it has been a while since you have lived in the States but I want to wish you and your family a Happy Thanksgiving.
Thanks for all that you and your team do!
Mike
Dear Paul,
I bought recently a Record #71 at eBay UK. Some pieces have been lost (the shoe and the fence washer). So I intended to make a wooden sole.
I was wondering if the Spanish walnut would be a good choice.
Thanks in advance for your response.
grover
Dear Paul im going to be making a wooden sole for my router and wanted to ask whether grain direction of the wood is important or does it not matter. Also i will be using be using beech. What do you think?
Thanks
The grain should run with the long axis of the plane for strength and stability. Beech would be perfect.
Lovely! thanks for your quick reply Paul. So as i understand as i hold the plane in front of me as i were to use it, the grain of the sole should run horizontally?
I recently purchased a router plane for my under construction workbench as i follow every video with anticipation for the next one. I understand i will be soon needing it for the aprons!
Trying to get ready for that!
Thanks again
Tassos
Greetings Paul!
I absolutely love the blog and your Youtube videos and it sure has helped me find confidence in learning wood working skills.
I have been bitten by the antique hand tool bug and after buying a few Stanley Bailey planes I found my first Miller Falls #67 Hand Router this morning in an antique store. I wasted quite bit of wood today learning how to use it.
Thanks for all your tips
Jerry
views from the other side of the bench!
Hi,
Can you tell me the size of the fence screw? I have a couple of Stanley 71’s but missing the fence screw. It looks like they are whitworth but not sure and the pitch gauges are too big to fit into the hole.
I had some problems getting enough thread length to hold a 1/2″ mahogony sole to a veritas router and it came apart when I was routing out the large housings for the workbench. In the end I got two brass thread inserts (7mm long) and epoxied them in and held the router to them with countersunk brass machine screws. I think the inserts were originally for plastic mouldings.
Thanks for that info I just made one today from sapelle and I was wondering if it would hold or not. I had a plan forming in my mind of morticing in a piece of oak in the sections to take a screw if the sapelle doesn’t hold up. Now I have another option.
Hi Paul,
Any recommendations on a Stanley 71 open or closed throat routers? Of the antiques I’ve seen on eBay, that stop you show for you to complete narrow work is rarely still part of the kit. Therefore is the closed throat a better option? Or find an open throat and make a wooden base? Finally, is it better to get a new Veritas since you recommended those in another blog?
Thank you sir!
I don’t altogether find the open throat any more handy because the routers are all best used with a wooden sole attached so as not to mar the wood being worked and it has less friction. The open throat was for the end of stopped dadoes so that no wood jammed between the fore edge of the closed throat and the end of the dado which can damage the edge of the dado and if it is visible can look ugly.
By adding a half inch thick wooden sole to the bottom of the Stanley 71 router I have reduced the depth my router will remove material to. The blade now only reaches to about 1/32″ shy of 1/4″. Any tenons or that are deeper than that cannot be paired while using the sole. Seemingly most places where the sole seems to be useful (i.e. The Work Bench) have shoulders on the tenons that are 3/8″ in depth. Is there a longer iron or a remedy for this? Is it obvious and I’m missing something? I didn’t think putting a wooden sole on less than 1/2″ would be very sturdy. I could plane the sole back down to 3/8″ but that would not solve the need to reach to a depth of of the tenon on the work bench build. Any thoughts or suggestions?
On the adjustment stem is the adjuster. Turn the adjuster upside down and this gives you added depth.
Paul,
Thanks so much for the reply! I just got around to checking the reply and came to that conclusion after examining your pictures in the blog post and staring at mine for almost tan hour to examine any difference. I knew it had to be a simple fix. I can now remove material a hair over 1/2 inch. Thanks again for all the knowledge, videos, wonderful blog posts and thoughtful content.
Comments are closed.
Privacy Notice
You must enter certain information to submit the form on this page. We take the handling of personal information seriously and appreciate your trust in us. Our Privacy Policy sets out important information about us and how we use and protect your personal data and it also explains your legal rights in respect of it. Please click here to read it before you provide any information on this form.
Want a roundup of Paul’s latest posts each week? We’ve got you covered.


That additional fence information was very helpful Paul for those unfamiliar. I have a Record 071 that I bought in 1972 that is my favorite user router. All parts intact including the original cardboard box. You must remember the book “Planecraft” that Record put out in 1959 and was reprinted in the U.S. by Woodcraft Supply Co. in 1972. The best little hand planing book for anyone but I assume it may be no longer in print.
Thanks Paul. I found an old 71 at a garage sale (missing some parts) so the idea of adding a secondary wood base solves my missing parts problem. Awesome. I will have to make one this weekend. Keep up the great work
Dallas
I am about to put up part III in the series.
I recently bought a 71 for $10 and realized only after using the plane for a couple of days that the depth stop in the front that was originally attached
to the horseshoe shaped opening was missing. We I looked more closely, I noticed the roughness where it had broken off. A few days ago, when looking at a new Lie Nielsen router plane, it surprised me that they had not included that part in their version.
Alfred
I have an earlier model #71 with out the blade adjuster and bought the after market blades from Lee Valley, ( Veritas ). The plane took a little getting use to as far as adjusting the height but works just fine, and have not had any reason to use the spear point blade as of yet but have it if needed.
Now I do need to make an auxiliary wooden sole which I could have used a few times. But I built Paul’s “poor mans router” which solved that problem.
Steve
I was interested to read the comments about the book Planecraft – Hand Planing by Modern Methods from 1959. I picked up a copy of this about 20 years ago and it was the Fifth Impression dated 1953 . It was first published in 1934 with other impressions in 1943, 1945, 1950. A real bargain at £2.25 from a local second hand bookshop that, unfortunately, has now closed. Its a terrific book and the previous owner has put collection of pages about other Record products inside the cover. One can only guess what he was thinking as the pages are all hand-sown together in an order that defies description. It does however include Bull Nose rabbet planes # 077, 076, 075, 077A, 1366 and a 3 in 1plane No 311. So it adds to Paul’s list.
Hi Paul,
First, I know you hear it a lot but thank you! I have followed many of your recommendations as I’ve been developing as a woodworker and your advice on tools and techniques have played a huge role in my growth.
I’m going to add a wooden sole to my router and have a couple questions. I apologize if you’ve addressed these previously but looking over Essentials as well as your blogs and videos I haven’t seen these specific questions.
1. What tolerance should I shoot for on thickness. I get dead straight on the sole, but dead parallel doesn’t seem realistic for me. Are we talking hundredths or thousandths with the caliper?
2. Grain direction, I notice you have the grain running perpendicular to the cutter is that planned or happenstance?
3. Wood choice, I’m not sure but yours looks like mahogany, I was thinking cherry, but I have a lot of oak, have you found one to perform best?
4. Do you finish the sole, and if so oil or shellac?
Any advise is greatly appreciated and thanks again for everything you do!
Mike
You will need to be more specific on one and two, Mike. Wood choice would be to find a fairly stable wood such as cherry, maple, any of the mahoganies and ok might not be a first choice but would work OK. I don’t finish the sole as any finish tends to diminish the quality of the friction-free element of wood on wood.
Thanks Paul!
1. I’ll be milling to 1/2” thickness by hand and using a digital caliper to measure my accuracy. Obviously dead on is ideal, but maybe not realistic. When I measure thickness at different points of the sole is there a margin of error that is acceptable?
2. Since a big benefit of the wood sole is reduced friction, I would have thought that aligning the wood’s grain in the same direction that you push the router would give the biggest benefit. In the images of your sole, the grain is running more perpendicular to the direction you push the router. I wondered if the grain direction is irrelevant to performance or if there is another factor that would cause you to choose to run the grain perpendicular.
Thanks again for your help!
Mike
The evenness of thickness makes little if any difference to the functionality in relation to routing down sub surfaces. Just get it as close as a thin shaving. The wood going cross ways to the long axis is strongest and offers the greater rigidity so that is the best way to go. You are right, there is no relevant improvement orienting the other way.
Thanks Paul,
I made one from cherry this morning and it turned out great! I wanted to mention how cool it is that despite the amazing growth of your fanbase and additions of new forums and teaching methods that you are still so committed to answering questions from random woodworkers like me from across the world. Thank you!
I know it has been a while since you have lived in the States but I want to wish you and your family a Happy Thanksgiving.
Thanks for all that you and your team do!
Mike
Dear Paul,
I bought recently a Record #71 at eBay UK. Some pieces have been lost (the shoe and the fence washer). So I intended to make a wooden sole.
I was wondering if the Spanish walnut would be a good choice.
Thanks in advance for your response.
grover
Dear Paul im going to be making a wooden sole for my router and wanted to ask whether grain direction of the wood is important or does it not matter. Also i will be using be using beech. What do you think?
Thanks
The grain should run with the long axis of the plane for strength and stability. Beech would be perfect.
Lovely! thanks for your quick reply Paul. So as i understand as i hold the plane in front of me as i were to use it, the grain of the sole should run horizontally?
I recently purchased a router plane for my under construction workbench as i follow every video with anticipation for the next one. I understand i will be soon needing it for the aprons!
Trying to get ready for that!
Thanks again
Tassos
Greetings Paul!
I absolutely love the blog and your Youtube videos and it sure has helped me find confidence in learning wood working skills.
I have been bitten by the antique hand tool bug and after buying a few Stanley Bailey planes I found my first Miller Falls #67 Hand Router this morning in an antique store. I wasted quite bit of wood today learning how to use it.
Thanks for all your tips
Jerry
views from the other side of the bench!
Hi,
Can you tell me the size of the fence screw? I have a couple of Stanley 71’s but missing the fence screw. It looks like they are whitworth but not sure and the pitch gauges are too big to fit into the hole.
I had some problems getting enough thread length to hold a 1/2″ mahogony sole to a veritas router and it came apart when I was routing out the large housings for the workbench. In the end I got two brass thread inserts (7mm long) and epoxied them in and held the router to them with countersunk brass machine screws. I think the inserts were originally for plastic mouldings.
Thanks for that info I just made one today from sapelle and I was wondering if it would hold or not. I had a plan forming in my mind of morticing in a piece of oak in the sections to take a screw if the sapelle doesn’t hold up. Now I have another option.
Hi Paul,
Any recommendations on a Stanley 71 open or closed throat routers? Of the antiques I’ve seen on eBay, that stop you show for you to complete narrow work is rarely still part of the kit. Therefore is the closed throat a better option? Or find an open throat and make a wooden base? Finally, is it better to get a new Veritas since you recommended those in another blog?
Thank you sir!
I don’t altogether find the open throat any more handy because the routers are all best used with a wooden sole attached so as not to mar the wood being worked and it has less friction. The open throat was for the end of stopped dadoes so that no wood jammed between the fore edge of the closed throat and the end of the dado which can damage the edge of the dado and if it is visible can look ugly.
By adding a half inch thick wooden sole to the bottom of the Stanley 71 router I have reduced the depth my router will remove material to. The blade now only reaches to about 1/32″ shy of 1/4″. Any tenons or that are deeper than that cannot be paired while using the sole. Seemingly most places where the sole seems to be useful (i.e. The Work Bench) have shoulders on the tenons that are 3/8″ in depth. Is there a longer iron or a remedy for this? Is it obvious and I’m missing something? I didn’t think putting a wooden sole on less than 1/2″ would be very sturdy. I could plane the sole back down to 3/8″ but that would not solve the need to reach to a depth of of the tenon on the work bench build. Any thoughts or suggestions?
On the adjustment stem is the adjuster. Turn the adjuster upside down and this gives you added depth.
Paul,
Thanks so much for the reply! I just got around to checking the reply and came to that conclusion after examining your pictures in the blog post and staring at mine for almost tan hour to examine any difference. I knew it had to be a simple fix. I can now remove material a hair over 1/2 inch. Thanks again for all the knowledge, videos, wonderful blog posts and thoughtful content.