Making a frame saw
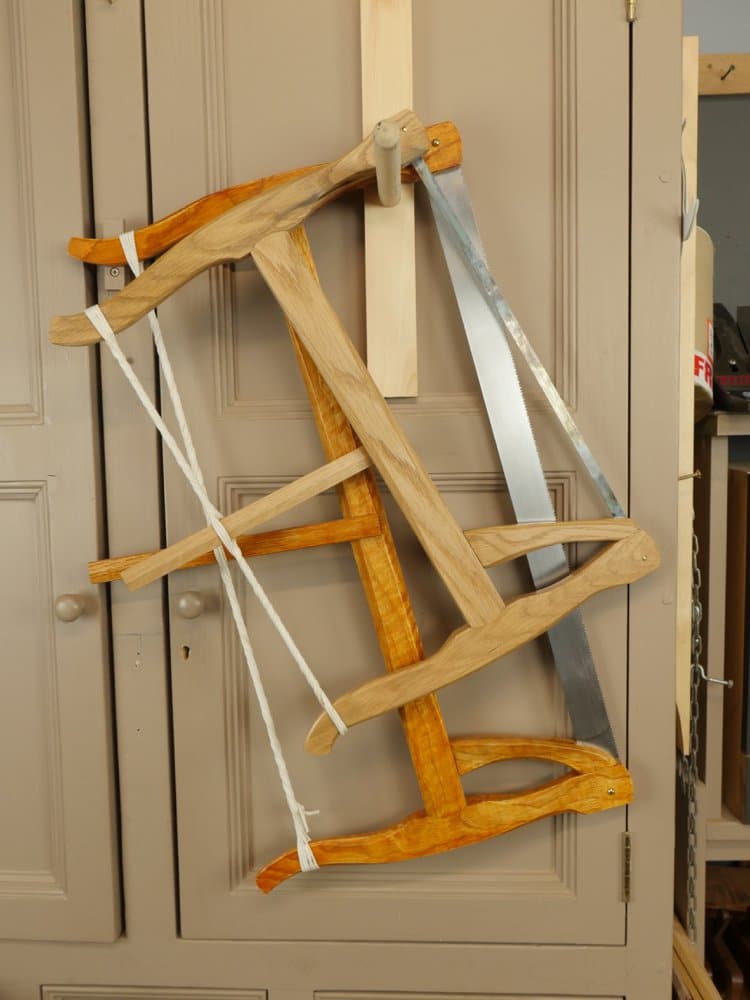

Here is the video to walk you through the steps. Two hours work and you should have it.
Here is the video to walk you through the steps. Two hours work and you should have it.
Comments are closed.
You must enter certain information to submit the form on this page. We take the handling of personal information seriously and appreciate your trust in us. Our Privacy Policy sets out important information about us and how we use and protect your personal data and it also explains your legal rights in respect of it. Please click here to read it before you provide any information on this form.
Want a roundup of Paul’s latest posts each week? We’ve got you covered.
Great video! Can you give some more information on blades for the frame saw?
Paul, awesome video. I look forward to making one. Thank you.
Paul, you have not convinced me yet! what specific advantages does this saw have over the normal armoury of european saws we use ?
I have had a compass/turning saw on the wall for twenty odd years and never had the need to use it. Of more interest to me is that I’ve just been given a set of moulding planes and have to find somewhere to store them let alone sharpen and use them ! Thank you again for your videos and your pleasant quiet style
SJR
For one the blade tension allows for a thinner blade and because it is stretched I found that it gave a straighter cut than say with my tenon saw. It was marginal but it was there. Two, I get a greater depth of cut than a tenon saw. Three, it is not to be compared with a handsaw as in panel-type saw really as it is a joinery saw. Four, push and pull in the same saw. Five longer stroke for large tenons. I could go on.
I would say here that with this saw as a hand made, home made, it makes it available internationally, in poorer countries, to young people and it is just an alternative, that’s all. It is also DIY, which I think is great too.
I’d like to have my high school shop students make this saw for themselves. I have a lot of broken bandsaw blades in my shop- any issues with cutting those up to length, sharpening them, and salvaging them to use for blades for this saw?
Thanks!
Sometimes the blades have metal fatigue if run for a long time. Also, the tooth pattern can be too aggressive, but it is worth a try. I bought a Milwaukee metal cutting bandsaw blade that did not have the waves in it from Home Depot and got a pack of three that gave me 6 blades for $17. But these are not the wide blades seen in the YouTube video. They do cut well though.
Ah, another opportunity to work on my joinery skills …and end up with another useful tool.
I just finished building your mallet and was looking for a project to employ it on.
I’ve never used a frame saw for joinery, I have used an old buck saw for cutting firewood, the thinner blade is an asset for either one I’m sure. I’m really looking forward to this project.
Thank you Paul
Paaul,
Another great oldie! I use to watch Tag Fried with his. I’d say “What’s that for?” It reminds me of my bow saws although they have very aggressive blades. Thanks!
“I’ve just been given a set of moulding planes”
I wish I had that problem. The sharpening and using them would not be a problem.
Thank you so much for this Paul, I have been holding off on a number of projects till this was posted. I keep losing the bids on nice tenon / back saws on ebay, so I have been wanting this DIY option for a while now. I have a couple of questions, do you prefer the wide or the thinner blade? I see you have two different options in the picture and I wondered which is your preference and why. And what exactly are the blades we should be looking for? Thanks.
I have used both and they both seem to me to work equally well. The wide one is a bought blade from Dieter Schmidt Fine Woodworking in Germany or Highland Woodworking if in the USA. The other is a metal cutting bandsaw blade available without wavy edge. I buy them with 14ppi and 18ppi and use them for different tasks. You can rip and crosscut just fine with either. You can also use this blade for a metal hacksaw too. Oh, and it works for limbing saw work in the garden too.
Hi Paul I was trying to figure out which saw blade to get from Dieter Schmidt and I got a little confused as they seem to be sizing the saws with a pitch value (like 5mm for example). I wasn’t sure what that equates to in points per inch or teeth per inch. Would you mind sharing the product code or description of the one you purchased as it looks like they do a lovely job of cutting your dovetails.
One inch is 25.4 mm. If tooth pitch is 5mm, there are 25.4 / 5 = 5.08 teeth per inch.
Great answer! You just convinced me to make my own (when I got the convidence to do it that is). Thanks for inspiring us on a daily base, thanks for teaching a way of live!
Hi Paul,
Thank you for this project.
I can remember an old “menuisier” (all in once carpenter, furniture maker, etc.) in a village near my grandmother place. These villages were living in complete autarky until WWII. There were also a guy making “shoes” (in fact clogs – all in wood and “galoches” = a shoe with a wooden sole … I don’t know how the exact English words for these both). I was going there and collect curly shavings for the fire.
This old guy was using uniquely wooden planes and frame saws. He was calling the metallic planes “American planes” because they came there with the American soldiers at the end of WWII. The same, he was calling a hand saw an “American saw”.
Just a remark about the video (as well as the one on the same subject on the masterclasses) : the exposure is quite a lot too dark. It is difficult to see it normally directly on the web. I’ve to download it to be able to adjust the brightness to be comfortable with it.
Older videos were fine from this point of view.
Regards
Jean-Luc
That’s an interesting point about the brightness, I haven’t found that however. Maybe just check your monitor is calibrated from black to white, they tend to darken off with age (that’s assuming you’re watching this on a computer).
Hi,
It is not a monitor problem as other files are correctly displayed *now*.
I’ve a colorimeter (Spyder) and I check the profile every month.
A real profle is not needed for this kind of video but it is a way to see how it drifts.
For sure it drifts but I’ve just compared at the same time 2 different video.
Jean-Luc
Hello, Paul.
I watch your films and I am full of admiration for your knowledge and abilities.
I noticed that in this recording bit cheated. 🙂 In the film in 15:41 minutes, you measure the distance between the arms saw. The element your left mounting hole of the blade is on the inner side. Then I plotted the arc. In the following part of the film, the opening is on the outside. So right.
Regards.
Grzegorz
P.S.
Sorry for the mistakes. I do not know English and those written using Google Translate. D
Thanks, Paul; another excellent video.
Could you comment on any differences in making a frame saw vs. a bow saw for doing curved work? (I am trying to make the move to all hand tools, and the bow saw seems to be the only reasonable bandsaw alternative.)
Not a bow saw. A bow saw is a simple, crude, cheap, very inaccurate garden tool on a steel bow. The frame saw – this one – on the other hand, is a very effective, accurate, tried and true tool with fine tuning on blade tension. Never mistake the two.
You can work out the formula quite easily. In your example you have 1tooth / 5mm, and there is 25.4mm / 1 inch. multiply those two together and you get 25.4tooth*mm / 5inch*mm. Since we have mm both in the numerator and denominator, those cancel out and we are left with 25.4tooth / 5inch, which calculates to 5.08TPI.
In general you can thus use the fromula:
25.4/p = T
to convert between pitch p in mm to T in TIP.
Thanks stein!
Ah fair enough
Have you tried other browsers? I know, for photos, at least, each different viewing software reads the color profile differently, and some make it look too dark, or too saturated, et cetera. I imagine videos might behave similarly, though I really don’t know.
I would say if he’s profiling his monitor every month with a device like a spyder (it’s an external colour reading device) I’d say it’s unlikely that it’s his browser. However he obviously cares and notices shifts in colour and contrast more than the average person given that he goes to the effort of calibrating so often.
Paul, did you have to do any sharpening/set alterations to the metal cutting band saw blades or are they good to go, then sharpen as needed? Also will a standard twist drill work for the drilled hole?
No and yes. No to resharpening and changing pitch and no, twist drills drilled just fine. I have know the steel to be too hard on occasions in the past so there are no guarantees.
Thanks Paul. Will pre-order the blades, they’re not in stock at the store. Anxious to get at it this weekend. I see that in the US, Home Depot has a Milwaukee 2 blade and a 3 blade pack. The 2 blade has hardened teeth, 3 blade pack does not. Something to take notice of if purchasing from there in the US.
Thanks so much for this video Paul, it is wonderful and I plan on making one of these saws soon. Unfortunately, it looks like the cutting list is not available. I can sort of guess, but I’d be bit more confident going in if I could find the cutting list. I’m guessing the sides are 1x2x16ish and the stretcher is 1×1.5×20?
Get your blade first, and then do your layout. The blade decides the proportions of the saw. Longer blade means taller uprights to get sufficient tension on the blade.
Wonderful DIY video Paul. This was the very type of saw I started out with in ’94 for my apprenticeship, and I still have all 3, although I have to replace a broken upright on one of them – tension got too hard.
Just as you would with english back/panel/carpentry-saws, I have a ripsaw (2 1/2′), a coarse cross cut saw (2 1/2′) and a finer crosscut saw for trim work (2′).
These saws are a bit different though. To save weight and keep strength up, the uprights are thin pieces of beech going through holes/slots/mortices in the beam (spruce/fir). To accommodate deeper cuts than the distance between the beam and the blade, and also for clearer sight on the blade, the blade is mounted on two round knobs morticed into the uprights, and the blade again mounted on thin strips of metal to these knobs, so the blade will in fact rotate freely 360degrees until presented with tension.
As for history, a saw like this is perfect for traveling, as it comes apart easily, does not take up much space, and will hold different blades. This along with the fact that costs of blades could be kept down due to the minimum amount of steel in each blade, made it the perfect companion for the traveling journeyman in continental Europe.
Best regards
Martin
…because of the swiveling blade it will actually rip a 6×12 in half. Full length. Show me a backsaw able to do that. If it’s out there, I’m sure it will not fit in my toolbox.
For the dimensional lumber, is the standard American 3/4″ x 1 1/2″ (1 x 2) fine vs. the 7/8″ x 1 3/4″ for strength and stability? Otherwise I would have to by 2×2 which is really 1.5 x 1.5″ and rip them down to proportion.
Yes, it’ll work fine.
Thank you Paul. I also picked up 5/4 board; why not try both!
would like to find the wider blades; source?
https://www.highlandwoodworking.com/bow-saw-frame-saws-blades.aspx
There are some 1 1/2″ blades here.