Plane questions answered-Bent plane irons.
For more information on planes, see our beginner site Common Woodworking.
The questions I will be answering in the upcoming blog series were posed as a result of my inviting them two months ago. You sent in over 300 the last time I looked and every one of them was good. Most of the questions are indeed answered in my new book Essential Woodworking Hand Tools out shortly so if you want details please click and add your name here.
Question:
Are the Stanley Plane Irons any different depending on where they are made. US V’s Eng. And Second Most of the Stanley Planes I buy the iron is bent at the tip I suppose from where its been attached to the chip Breaker for so long. So this creates a problem for me when I go and try to lap the backs Its almost always hollow from the tip and about 3/16″ back.
I have found that by the time I get it flat that Ive removed so much metal now I have a problem with the chip breaker making a good solid contact on the iron. Would it be ok to turn the chip breaker over and attach it to the other side of the blade then flatten and polish it up before sharpening the bevel. I tried this yesterday on a #4. It had a full blade , never been sharpened but it had been sitting somewhere since the early 1900’s with the chip breaker attached so i didn’t want to abrade off all that metal just to get it flat and polished at the tip. Any suggestions on this?
Answer:
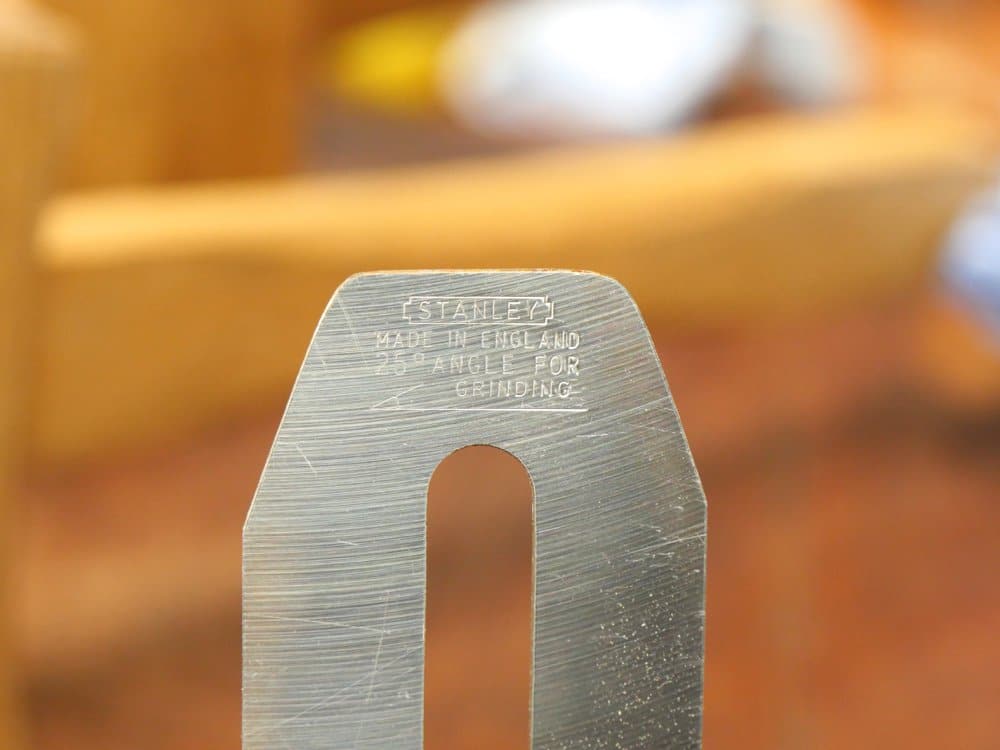
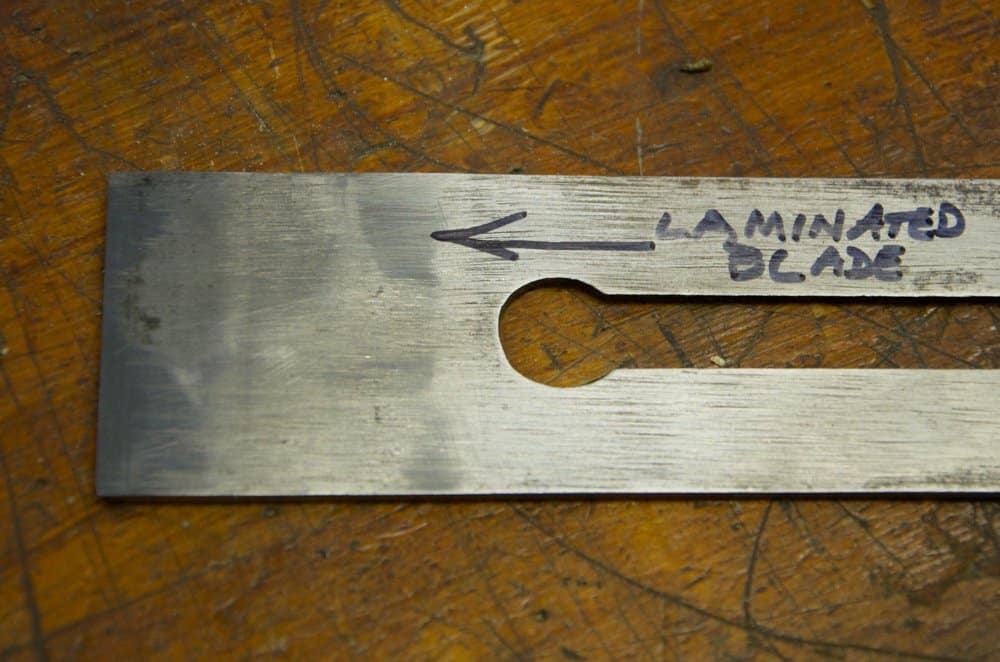
As far as I know and have experienced there is no difference between UK and US Stanley cutting irons in terms of quality and functionality. Having traveled so much and living extensively on two continents I have learned that very country in the world boasts having the best steel industry so take your pick. Some irons were made using laminated steel and these plane irons were indeed hard, but they stopped making them after a decade or so.
With regards to the two parts of the cutting iron assembly causing the bend in the cutting iron, this is not likely at all. Both components have spring in them and will easily tolerate the slight tensioning between the two parts. In fact, that was the very in-tension of the early manufacturers of the Stanley plane irons. It is more likely that user owners bent their own plane irons for whatever reason though. I recently bought some new plane irons made here in the UK, Stanleys, and they were indeed ground flat.
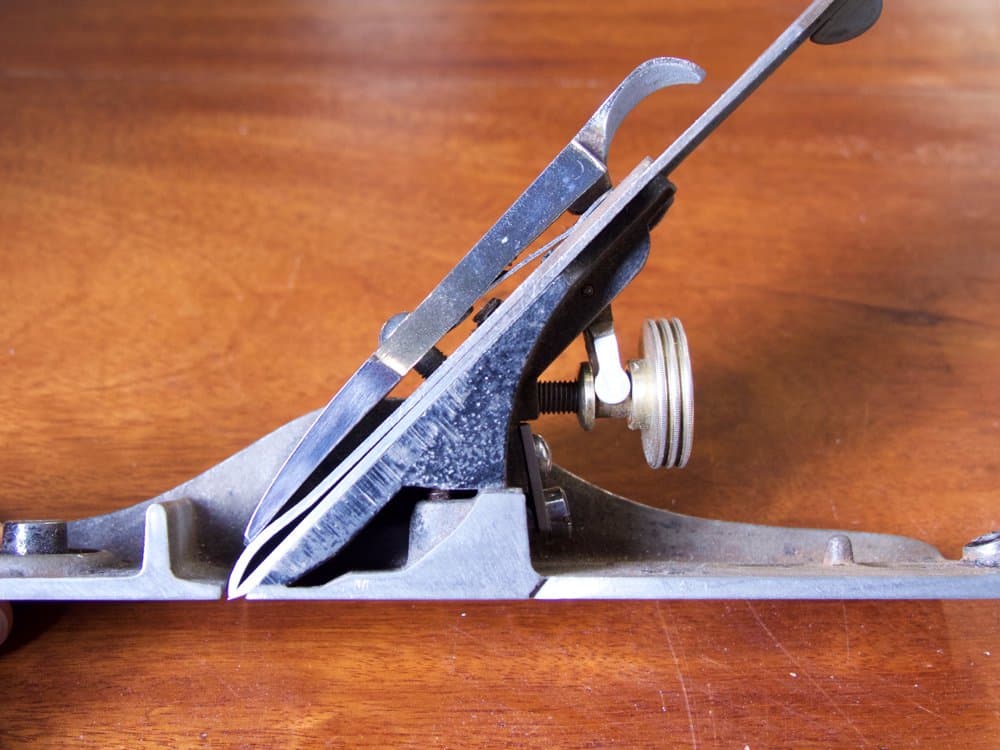
Look at this. I took a clifton plane iron from a brand Clifton plane and took a straightedge to the iron with the StaySet cap iron on the blade. The bend in the iron was then 1/32″. I did the same with a Lie Nielsen and that one bent a little more also. Loading them in a conventional plane and adding normal clampdown pressure from the lever cap they both conformed to the flatness of the bed of the frog regardless of the frog type. No plane iron is flat once the cap iron is applied with normal pressure of tightening the setscrew as tight as you can to unite the cutting iron assembly.
So, when you look at the normal pressures applied by the lever cap to the cutting iron assembly (the cap iron and cutting iron assembled), and notice that when the lever cap is indeed set and clamped down, the whole of the assembly is conformed to the frog. This is the same no matter the frog type, the maker or the thickness of irons. The only reason we need the flat face of the cutting iron to be near to flat is that it is easiest to get the cutting edge to the abrasive. Beyond that the full assembly of the iron in the plane conforms it readily to the task of planing perfection. You don’t technically or practically need dead flatness to the large flat face of your irons so I think that is quite freeing.

I haven’t experienced what you are saying you are having as a general rule and certainly not on such a high frequency level, but fear not, the answer is just one or two good hammer blows away. 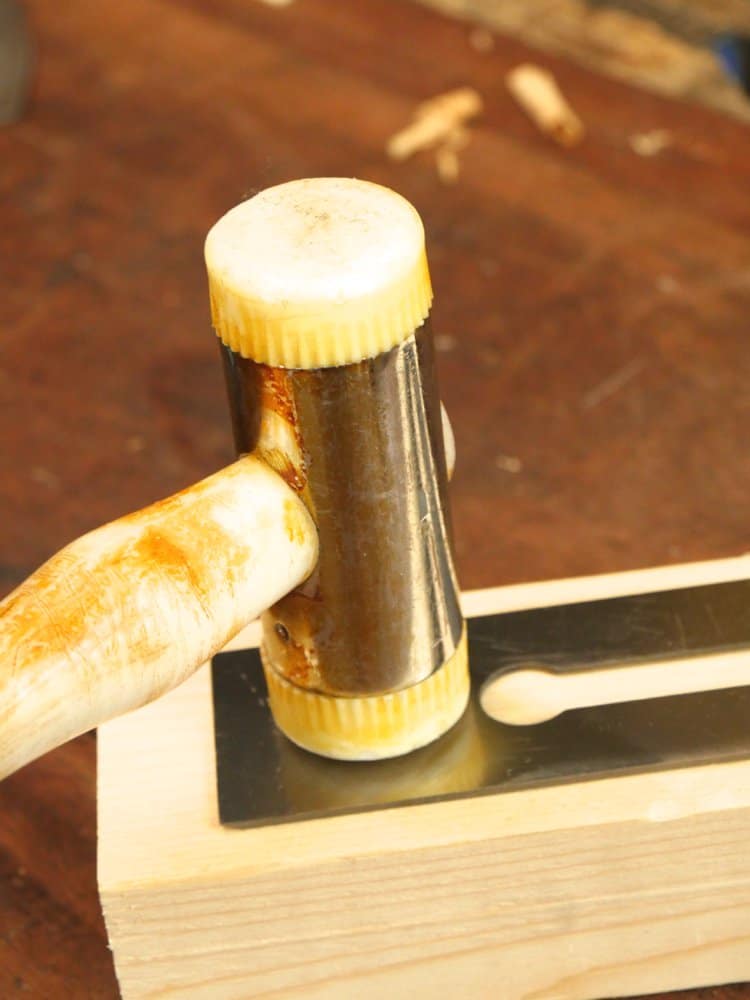

I have also added a packer of 1/8″ of softwood as shown and this gives excellent results too. in this case I wanted something more direct. The blade ended up with a beautiful even bend of a couple of though from the centre hole to the cutting edge. In six strokes on the 1200-grit diamonds I had a beautiful cutting edge that cut through the dross. 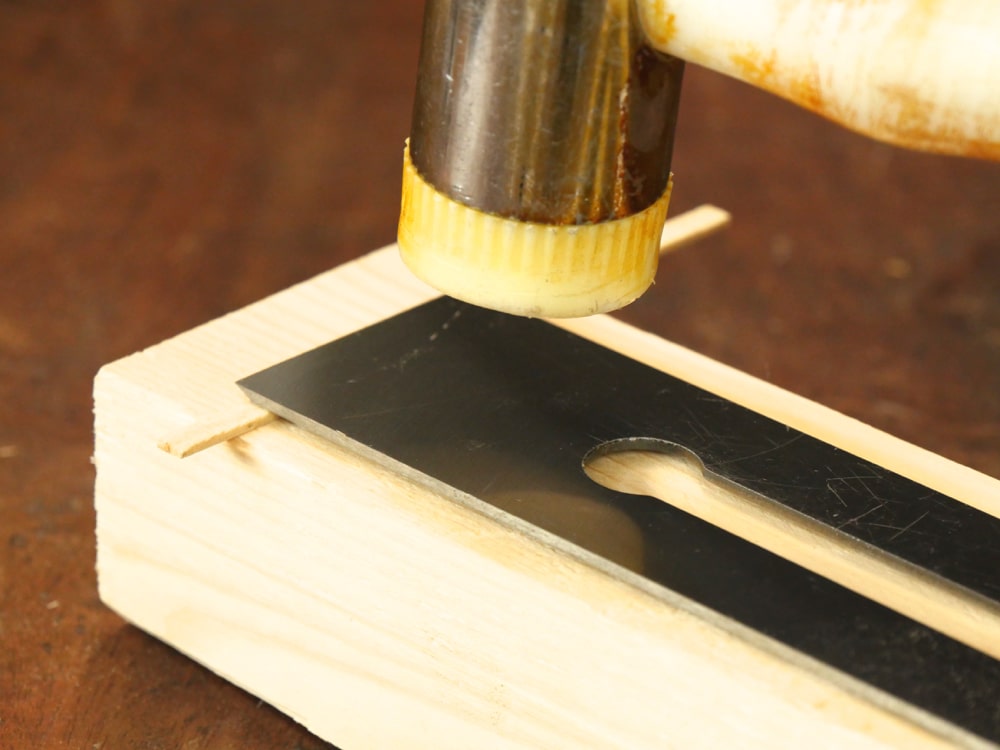
No more willy waving
The real issue though is this. There has evolved an obsessive compulsion for flatness when it comes to plane soles and irons, mostly it’s been manufacturers doing a bit of willy waving. Whereas a few people like passing time abrading steel to perfected flatness, there are then the majority who just want a sharp plane to work their wood with and there is space for both camps. In manufacture this mostly started three decades ago and then the magazines started too. Before that everyone just got on with sharpening. Anyway, there is your answer and the end of wasted hours spent abrading steel away to nothingness.
Remember, again, question authority. Don’t lay your planes on their side, it might be bad for them!!

I have found that the actual design of older plane irons actually included a small amount of hollow to the flat of the plane iron (similar, but not as pronounced as Japanese irons and chisels). An example of this is now available from Ray Isles in England. They are also a bit thicker. I am using these in my Stanley Smoother and my Craftsman Jack planes wight exceptional results – they take a great edge (O-1 tool steel), and do not require the effort to retain a “dead-flat” plane iron back….
My view has always been that it’s the smooth shiny surface on the ‘back’ of the iron (actually the front – the side the cap iron bears on in a bevel down plane) that lets you get a sharp edge by honing the bevel, single convex or micro-bevel to your preference. The rest of the iron only has to be the right shape to fit securely to the frog (and that’s the other side of the iron), and nothing else. This is the same with old chisels, there is no need to polish the blade all the way up to the handle, only the last half inch or so needs to be polished, so you can hone up to a flat surface to get a straight sharp edge. How you achieve that is up to you . . .
I think people are steadily coming to this conclusion generally. It’s not really new it’s hundreds of years old. It just takes some of us a little longer to get it, me included.
“WIlly waving”. I like that! Though I suppose that Willy is necessary, otherwise the 1 in 100 or 1000 new products or techniques that are truly useful would not see the light of day.
What I truly appreciate about your advice is that you do not abandon the “old ways” automatically in favor of the new, while being open (skeptical until proven) to new advances such as diamond plates. Thank you!
Can the “hammer trick” be used to revive a plane iron that has been dropped on it’s top over the years? The bend in the iron prevents it from being adjusted without major force on the adjustment nut, possibly damaging the whole assembly. I have a few ebay finds with this condition and don’t want to have to replace with expensive new steel and chuck the nice old irons.
Yes, there is no problem generally straightening a bent blade and the irons are only hardened for the first 1 1/2″ so it should straighten easily.
I know this is an old thread, but I am hoping to do this to a rare original iron in an I Sorby #4 I just won. I hate to do any more damage to something this uncommon, but it is not usable as is. The front part of the blade that are under the iron and cap are relatively, but there is a big curve that starts as soon as there is exposed blade above the frog.
This is probably aesthetic then, I assume. This is always a risk, but the upper end of the plane irons is not usually hardened and so should bend with a rubber hammer. It’s hard to say what will happen and as the plane is rarer you might want to really feel after it. I think it would be OK but it’s a personal thing really.
Thanks Paul. I also noticed the plane body and frog are Japaned red where they meet each other. Do you leave the finish or clean the surfaces that are usually machined and I often abrade flat and smooth on Stanley’s
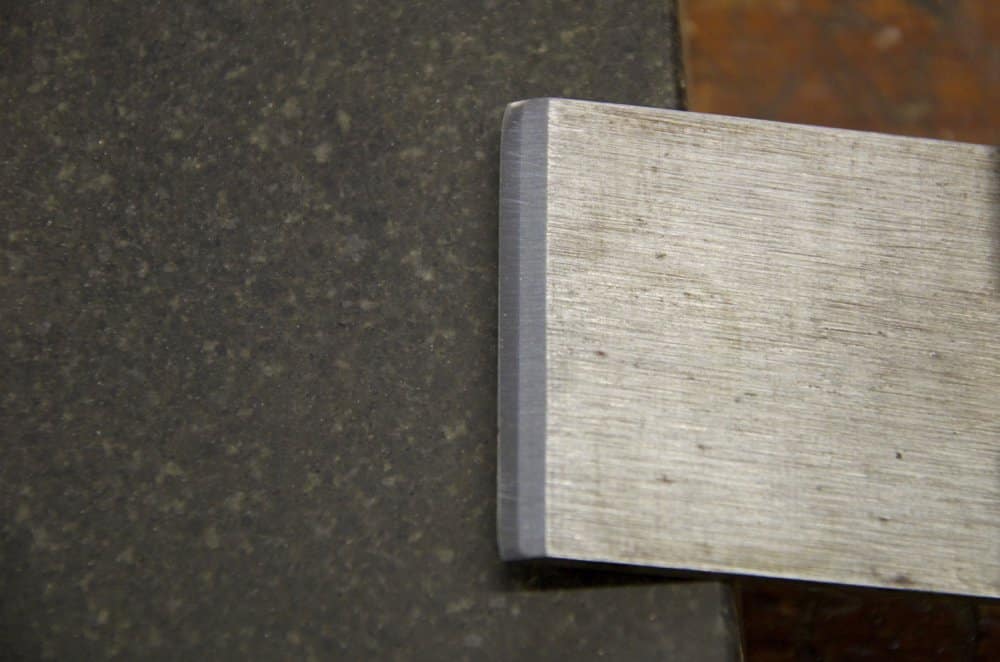
You might want to think twice before whacking a laminated iron in attempt to straighten it. A couple of months ago I was straightening the blades for my early Stanley 45 and had the unpleasant experience of snapping a 5/8 wide blade. The laminated steel is enough harder that it doesn’t always respond positively to hammer blows and yes, I was using a nylon faced hammer and the blade was indeed support on soft wood.
It is doubtful that anyone will actually come across a laminated Stanley blade though. I only came across one in my 50 years, so I doubt generally it is likely, but thanks for your input there.
Can’t wait to try this out… I just opened an eBay-UK Iron I picked up for my No.5 only to find it fairly out of true. Sounds like this method will also help speed away the pitted portion near the tip.
As always, Thanks again Paul
(and everyone who participates in this community!)
I tried the nylon hammer trick on an old record blade with great success, then I tried it an old Woden blade and the blade shattered. I think I was using same amount of force for each blade and 2 -3 strikes on each blade.
Wish it was the record one that broke as I have a spare one. The Woden is one of my favourite planes and I know any good quality blade will do the job………….but a bit annoying anyhow.
Any suggestions gratefully received as to what I might be doing wrong as the results on the record blade were very helpful.
One too many Weetabix for breakfast????
Cheers ed
No, it’s because it was a Woden iron. Harder throughout the iron. Are you on the UK or the US Ed. I probably have a Woden iron kicking around.
Hi Paul,
I’m in Cambridgeshire, UK,
Thanks so much, if you had one spare i would be very grateful to purchase it as Woden planes do not seem to be common and I would like to keep it original, its a 2″ blade I broke for a No5
I did not realise about hardness of the blade but it did seem to take more time to sharpen initially than my other older plane blades which I suppose I should have picked up on in the first place but then everything is easier in hindsight.
I’ll email you my contact details.
Thanks so much
Ed
No problem and no need to pay either.
Paul, is it OK to store planes laying on their soles on a wooden surface and having irons non-retracted?
If you are storing your plane without use for more than a couple of days I would say make sure to raise the front end off the shelf using a 1/4″ by 1/4″ stick so that air can circulate between the sole and the shelf. For regular users this is not usually a problem. on the corner of my bench I have a stick as said and then a piece of tightly felted carpet so I plonk my out of use planes on there. If inside a cupboard perhaps leave the door open for added circulation too.
Oh, and no need to retract the irons either. I never have in 50 years and nothing has ever harmed them.
Andrew, I think so, as long as you’re not too concerned about the surface itself. I’ve been doing that with my Stanley No.4 since I got it and never had a problem.
I have two different plane irons and both of them with a slight belly that is rather difficult to remove. I tried to correct them using a hummer, but even after a number of very heavy blows both irons had the same problem.
I place a thin strip of wood under the leading edge of the cutting edge sometimes if encounter an issue like that and that has worked fine so far. Someone here did say that they had an issue with a plane iron breaking though, so not sure what to say on that. I have never had an iron break.
The iron on my ratty, restored #3 Record plane was bent, I discovered after reading this and realizing that this was the cause of the lateral adjuster being very difficult to adjust: not enough room between bent iron & top of tote handle. I was surprised how easy it is to bend the iron (I expect this one was dropped upside down in the past, and perhaps never used again, I found it rusting in a poly bag of water and other rusty tools at a carboot sale – it looked disgusting, like a goner). My first couple of taps over corrected it. It doesn’t need much force.
Thanks Paul! Your response is really helpful and it speaks “experience”! I really appreciate all your efforts to keep us “newbies” educated.
Yes! Thank you for your response and for being so engaged with us all! It’s rare to find these days.
Try hitting the iron closer to the hole rather than the edge. I had the same problem in that the hammer blows were to close to the edge of the iron.
I suggest one hit at a time until you see results which will give you confidence and an idea of how hard and how many blows.
You want a slight bend in the iron and my mistake was to try to dish the very end of the iron.
Once you get it right you will laugh at the simplicity of the procedure.
Regards
Steel has memory, so even though you have initially straightened the iron by hammering, it will tend to bend back to the bent shape. Cyclists know this, which is one of the reasons for aluminum wheels.
Not with just the pressure from the setscrew in the cap iron once bent to straightness though. I have never known this happen from so small an amount
Hello Paul, I’ve spent a week or so reading all the related blogs just so I didn’t ask this question and have you cover the subject all over again. I’m really bad at typing what Im thinking , my brain works way to fast for my fingers.
I’m trying really hard to get my Stanley B.P. Bench planes to work to the best of their ability and there is just a couple more issues I have that I don’t know what to do.
if I’m right you are saying that once the cap iron and iron is tightened down there will be a slight bend but when you put it in the plane and lock down the lever cap it will conform to the frog.
But, On a few of my 4’s there is still quite a bit of a gap between the frog and the blade . So my first question is what could be causing this and how would I fix it?
And Second , how can I assure that I’m getting a good contact between the frog and the planes body. I’ve noticed that where the bottom of the frog meets the planes body one side will be lower than the other thus causing the blade to make contact with the wood before the other side can.
I’m aware you have the lateral adjuster but some of these are way to much out of kilter. Is this caused from years of movement issues and possibly use of the tool or a Manufactor defect. Some of these planes have never even been used. Can I put the frog in a jig or honing guide and clean the frogs feet up at the 44 degrees.Is this possible, But then you have the problem of where the frog sits on the bed wouldn’t you have to lower that as well. What would be your method to try and resolve these type issues if you don’t mind me asking. I’ve asked a couple plane manufactures if they could clean up those areas so the frog would seat tightly, but I’m sure you could imagine at the response I received back concerning that.
I’ve noticed that a freshly sharpen iron will make up for some deficiencies but just as soon as you loose that keen edge the problem just re appears. And what I mean by that is after I try to adjust the frog laterally to center it in the planes body whit a freshly sharpened blade it works fine for a few strokes or so but the after the blade dulls a little I can feel something move and then I have to re adjust the lateral adjuster but my quality of cut is lost .
I hope this is making sense. It’s hard for me to explain when I don’t really know what all these parts are called . Or how to explain the problems Im having.
It might be easier just to ask when you buy a 80 90 year old plane what are the issues that you run across and how do you go about resolving them. I just want to make sure that I have a well tuned plane so as I continue to practice using them that it’s only my skill level that I need to work on and not the tool that’s preventing me from improving.
Thank you so much for your time and for teaching us what you have learned over the years.
Chris
A regular plane iron should keep its edge for longer than you are describing so I wonder if the steel has lost its tempering. This can happen by burning the steel on a grinder and it may not be you that did but a previous owner.
I cannot imagine the kind of issues you are saying are happening to you. You don’t say whether you have flattened the frog or that the frog is lined up well with the incline of the fore edge of the rear aspect of the sole. The leading edge of the frog should be aligned with this edge. I am not reading this consideration in your comment. You say this is happening with several number 4s which surprises me because it has never happened to on e of the hundreds I have worked on which makes me wonder if it is you that is doing something and not the plane itself.
No you do not need to do much if anything the underside of the frog generally unless you have a bum casting, but you seem to have all of your 4s this way so that is most impprobable.
Im Sorry Paul I didnt notice that you had replied. Yea I know its difficult for me to ask questions sometimes because its hard to describe what Im seeing. My Irons hold there edge fine. I think lol. I dont use a grinder on cutting tools except My tormek on my turning tools. . Paul, There are two problems Im having. One is The blade when installed and the lever cap locked down there is light showing in between the blade and the frog. Is that normal or should it lie flat against the frog. Im told at LN that I need to send some of my Bench planes to them because he is telling me there should be no light between the iron and the frog when Installed and locked down with the lever cap.
Now I have played with the position of the frog moving forward and back to just to make sure that the iron is not hitting the bottom of the planes. So I know thats not the problem On my LN planes or my older Stanley Planes. When He told me that about my LN planes I was thinking that maybe it should be that way on all Bench planes so That’s why I was asking you about this.
And second Im not so sure that Im getting a good solid contact between the frog and the plane down where the frog meets the plane at the mouth..
So What I wanted to know is what can you do about that. A couple of my #4;s were brand new They had never been used so that’s why I was wondering if it was possibly a factory defect.
Paul I got ran over in Atlanta, GA in 2001 and Im not as sharp as I used to be. I know what Im trying to say but I cant get it to transfer to my fingers when typing.
Thats one reason why I have had such a hard time learning this craft. because I do not like asking questions for this reason.
Ive asked you more questions in one year than in the whole eight years Ive been woodworking..
Im sure its frustrating for you to try and help but cant figure out what it is Im talking about. Im so sorry about this. Its ok, I can just read your blogs and hopefully someone else will ask the questions I need to know and then I can get my answers. Thats what Ive been doing all this time, mainly.
Im sure there is a simple solution to my issues. When I sharpen I check for squareness as I go just so that I keep them from getting out and so that I generally only have to adjust the lateral adjuster a little bit each way which ever is needed.
If I could figure out how to upload pictures then Im sure that would help tremendously.
But thank you for trying to help meI do appreciate it.
Chris
It’s no trouble to try to help here so keep on keeping on. I will give some more thought to this and see if I have an answer.
Hear, Hear! -L
Actually, this was meant in reply to “Momist” above! -L
also the steels “memory” will be altered when it has been honed. Removing the outer most layer of steel as you do when honing the back of the iron removes a portion of the steel that is under the most stress, thus relaxing it. If you wanted to you could heat the steel to realign the molecular structure, relieving the stress from compression and stretching…just saying.
aluminum is lighter than steel, less energy to get spinning.
Hello Paul, I’m not trying to repeat myself or go backwards here but last night I got so frustrated whith my Planes that I’m almost at my end game here. Paul , I own every Plane that LN makes , I own two complete sets of WW1 & WWII era Stanley’s. And only one plane does the blade conform or sit Flat on the frog. All the rest you can see straight through the other side between the blade and the frog. After looking at the picture you are showing me in the blog of the blade dead flat on that frog. I think this is and has been my main problem all along. The problem is I can’t find what’s holding them off the frog. I sent my #4 to LN and Deneb is going to look at it Today. All there is or could be is the Yoke, the chip breaker screw or the frog itself not flat. But Ive flatten the frog checked it with a straightedge . Not my new planes Im going to let LN do those but my Vintage Planes.
The blade needs to sit flat on the frog, Right? What I don’t understand is that you say that you have never had that problem but it’s on all my Planes that confuses the heck out of me. If I plane say an edge of up to 3/4″ wide I get micro thin shavings but If I try to plane a larger surface it’s no going to happen. It’s hard to explain I’m sure you know what I’m trying to say but it feels terrible trying to Plane. Any resistance in the iron and it feels like it’s moving up and down in and out of the wood fibers. I don’t know how to explain it but it’s not right and it’s not my sharpening. Last night I spent an hour and a half lapping and honing a new old stanly iron right out of the box of six . The ends at the cutting edge were bent down towards the bevel side so I took my thorax and a 3/32 flat stock hit the blade to bend it back straight and it snapped in half. I paid $175.00 for thes irons. The seller said he would refund my $ if I wanted it but I don’t understand why it did that. But regardless I need to get my planes set up right. What have you found to be the usual problem when the blade sit up off the frog. Paul I have to get these planes right in order to move forward here. I have to be missing something here somewhere. But where. If I knew how to upload a picture then I would. I only know how to send them via email or text. If a picture would help let me know. Thank you for all your help.
Chris
it’s hard to answer all of your issues Chris. If the same thing is happening to all of your planes then it does seem it may well be something that you are doing or overlooking. if they were indeed in my hands i know it will be resolved in a few minutes. 5,000 miles is too big of a gap to say what’s wrong. As I have said, I have never known a problem like the one you describe and I never came across a plane by Stanley or Record that could not be fixed in a few minutes. I am sure Deneb will give you help. Best for now.
I also snapped a vintage blade. I would urge readers to exercise caution when using this technique on plane irons that they care about. Small differences in hardness may be the problem, I don’t know, but I am disappointed that I broke my plane blade. I hit the blade on pine, but maybe I did something wrong?
I may be a bit dense but I have broken two of the rare size No. 5 1/2 irons trying this technique. I do one hit and it isn’t good enough, So I try again and they both brake right at the keyhole to the edge. I even use the same hammer as Paul! The only difference is I just do it on the bench top instead of the pine (bench is DF). On the second one, I kept telling myself, “this is the way Paul said to do it. I almost cried when I broke the last one (literally)
Now I just abraid so I don’t waste the limited supply of those hard to find irons.