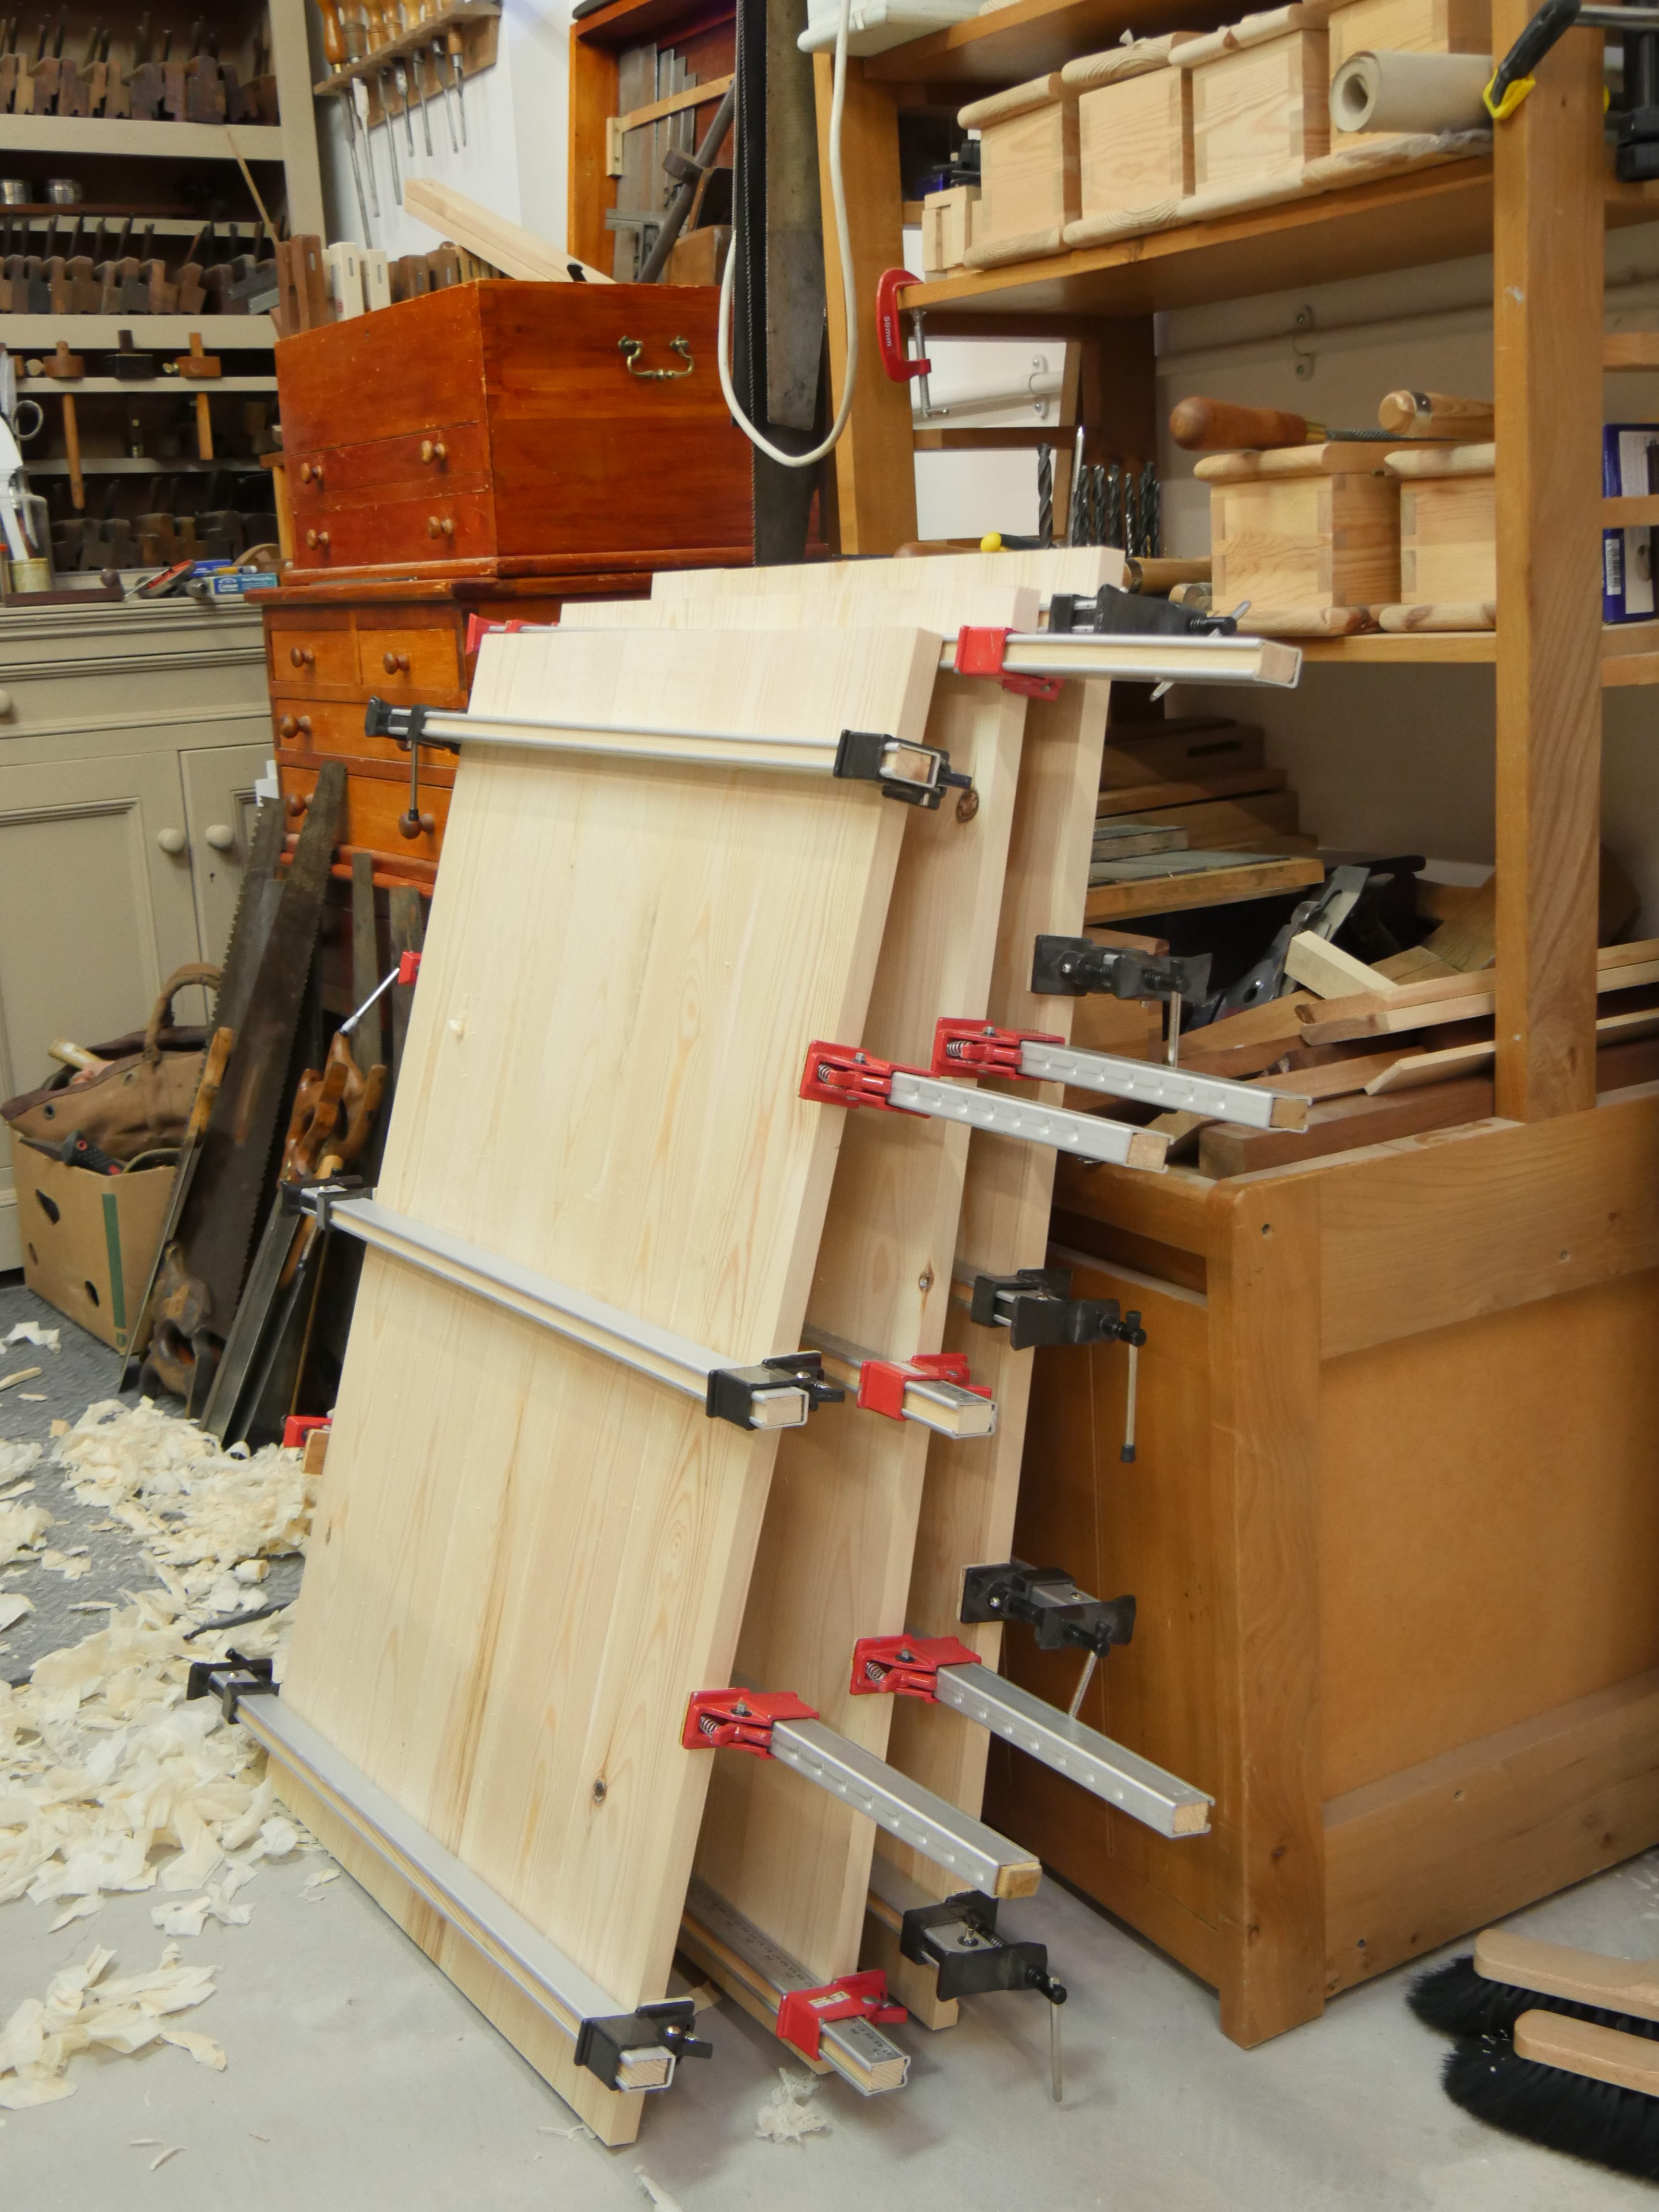
Screwfix Sash Clamps Upgraded (UK)
For more information on sash clamps, see our beginner site Common Woodworking.
When I lived in the USA I discovered a line of sash clamps made for Harbor Freight, a US chain supplying DIY building and engineering products, mostly low-end quality. The clamps were made from extruded aluminium boxing with an alloy head and shoe and whereas they were not at all a top quality, they were lightweight and strong enough for most work. I used them there for a decade or so and they were adequate. Unfortunately the clamp heads were made of some low grade alloy with air holes throughout and so where the head connected inside the alluminium extrusion they periodically snapped, and regularly enough to be an issue. That said HF replaced without question no matter how often you took them back or when you bought them. It was on these clamps that I perfected my retrofitting techniques and whereas I could do nothing about the snapping heads, I could beef up the clamps as I have blogged before and make them function much better. For the then $5 price tag they were a bargain.
When I returned to live here in the UK again I latched on to an almost if not identical model made for sale here. Some were made by a company distributing tools and equipment called Hilka with red heads and then I turned to the Screwfix chain supplier whose clamps had two main differences to the USA Harbor Freight versions. The painted components were coloured red for Hilka and black for Screwfix respectively instead of turquoise, and the clamping heads were made from steel and did not snap no matter the torque I placed on them. I preferred the Screwfix models. The problems associated with these clamps in their raw, straight-from-the-store condition, and there are many suppliers attaching their names to them, just like Harbor Freight, is the lack of factory finessing for a refinement level guaranteeing functionality out of the box. Of course the cost factor determines such things and I am sure Screwfix fixes pricing by dictating what they will pay. Anyway, below are the steps they need to make them function. And I know it is shameful to put out a product that needs more refining to function proper;y after manufacture and Screwfix should indeed be quite ashamed to send clamps out with such minor requirement for a well made product but they do. If you do however take the steps following, and add a little reasonable maintenance from time to time, the clamps will serve you very well for years.
Step 1: Remove the sliding or free clamp shoe…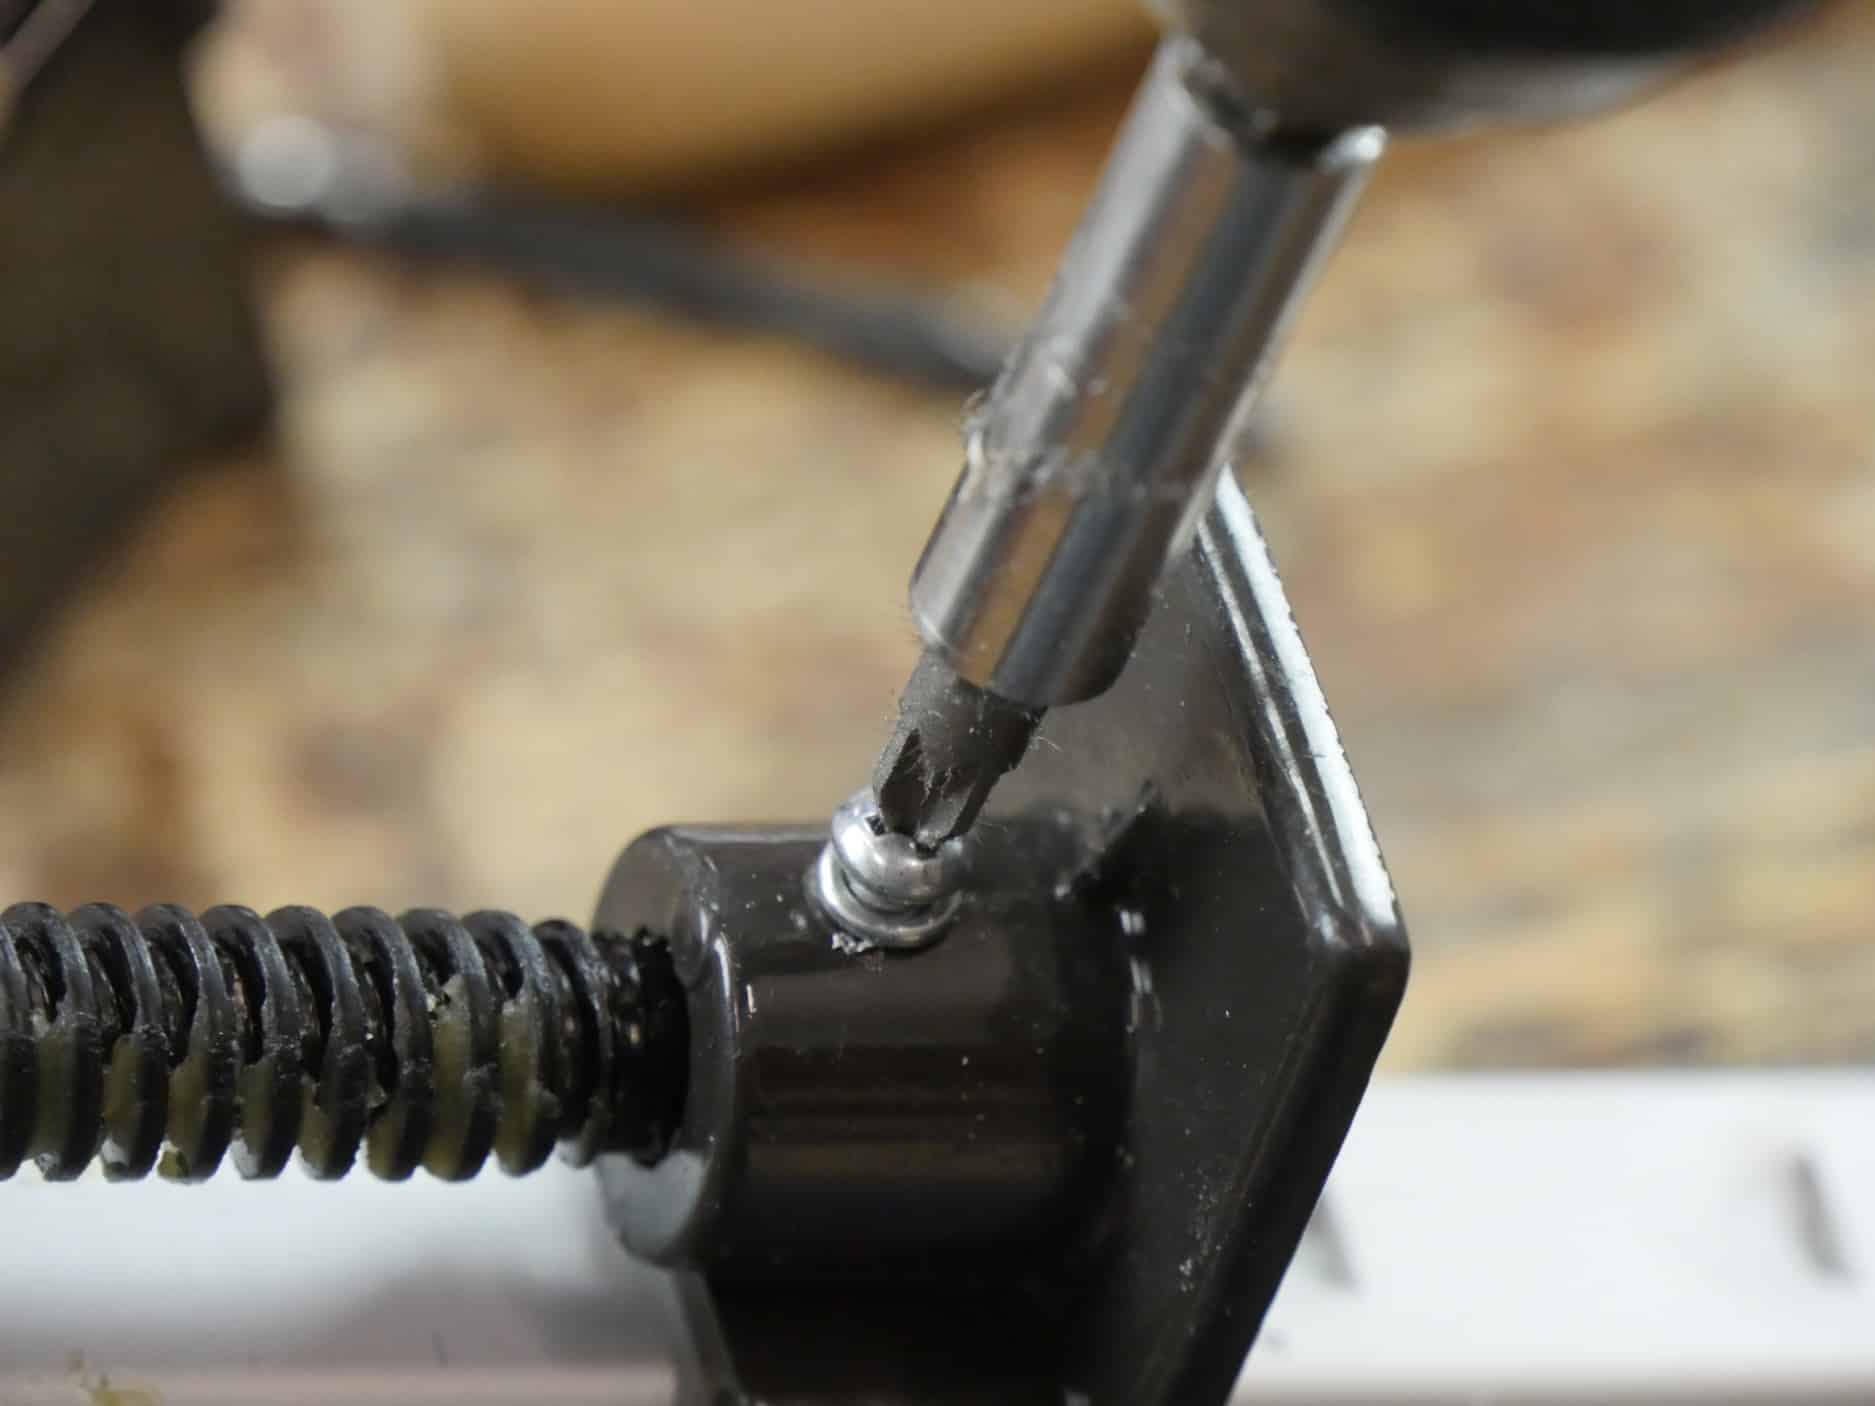
…and the clamp head.
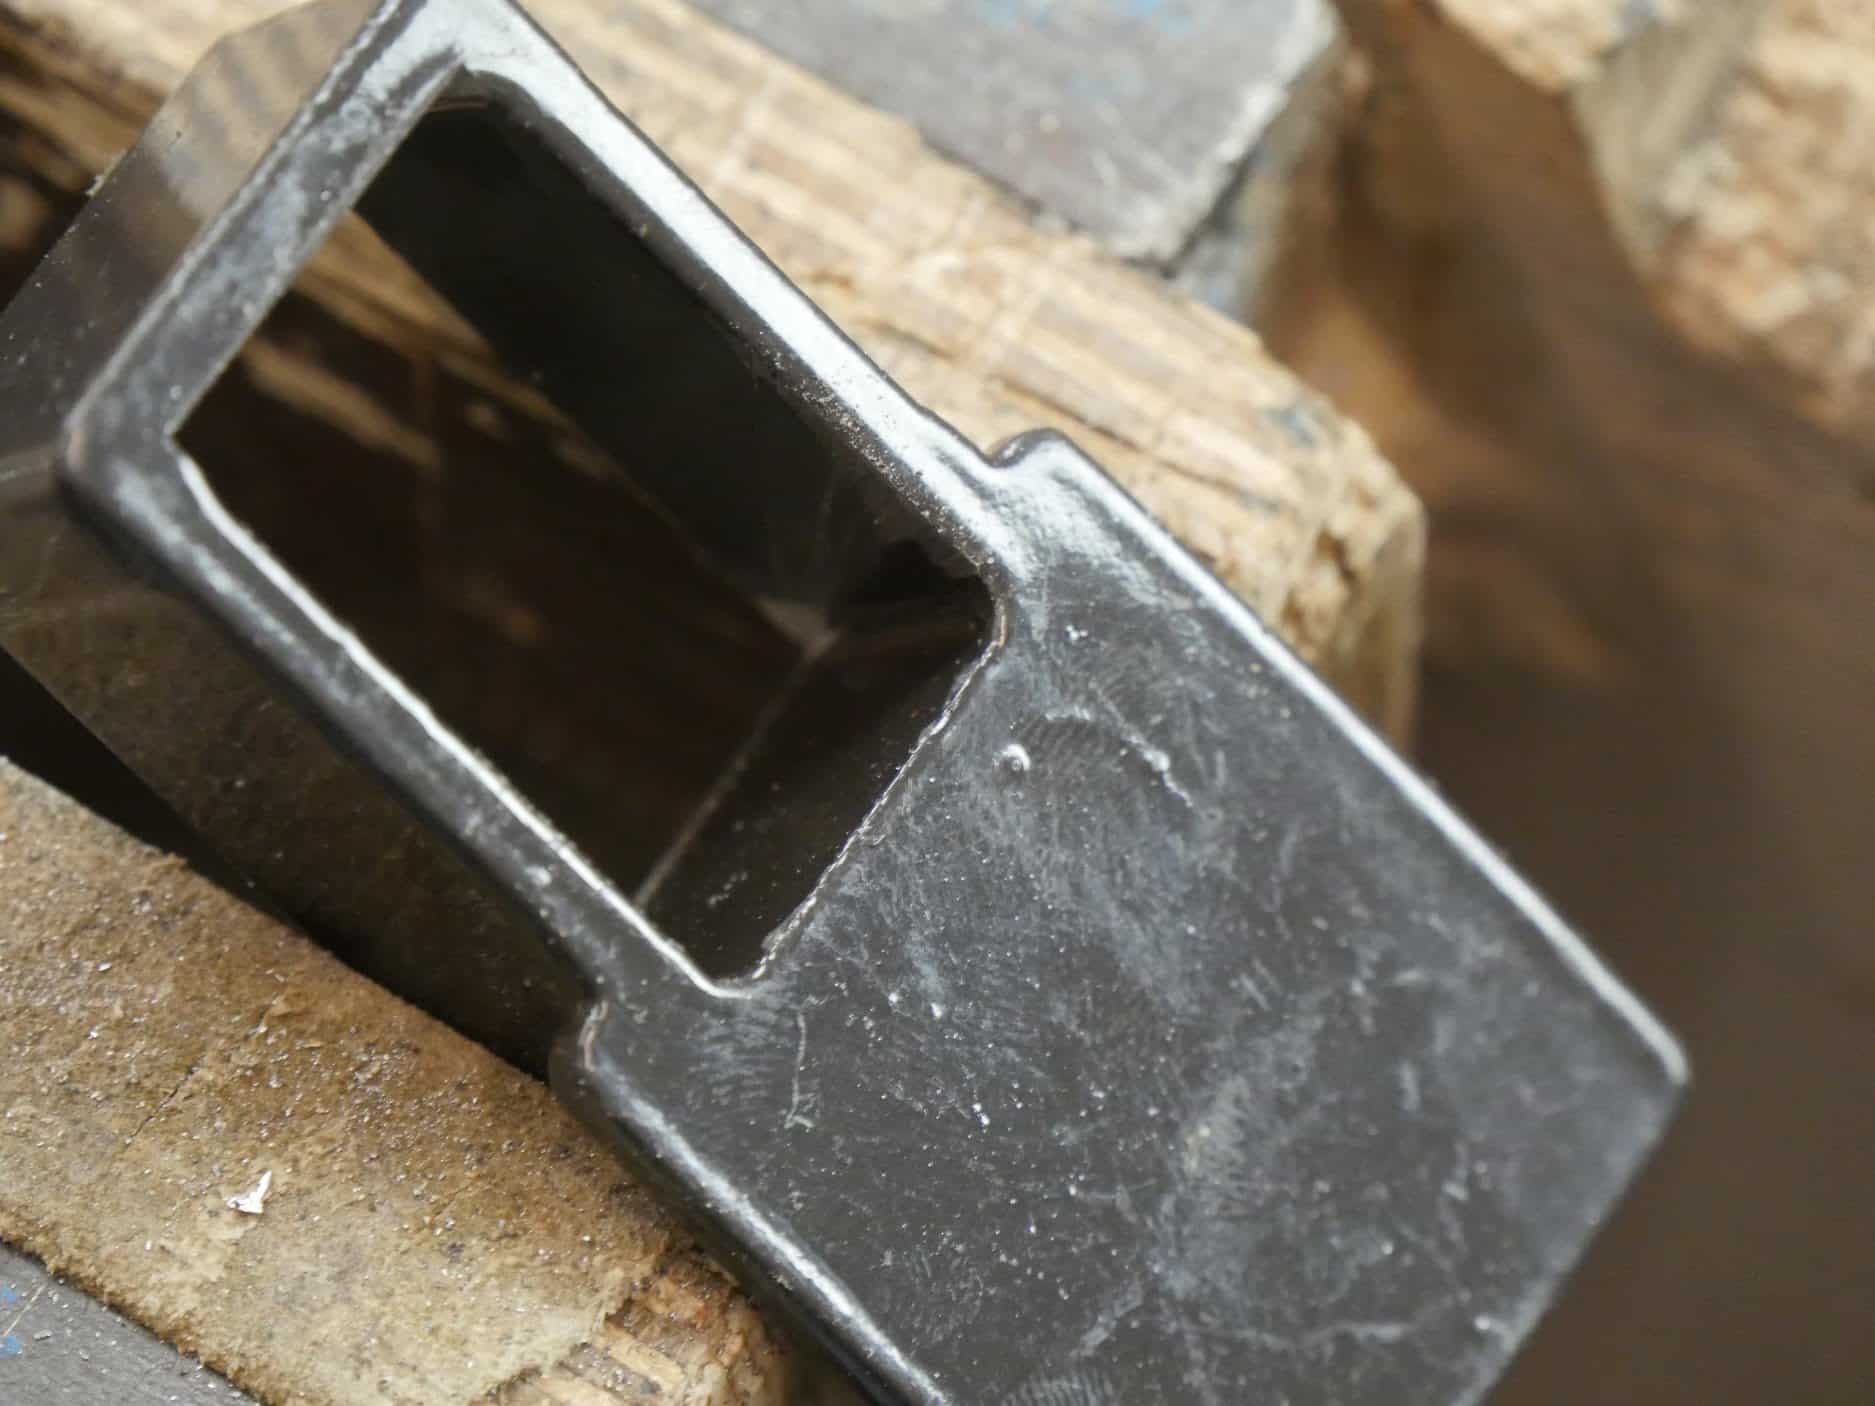
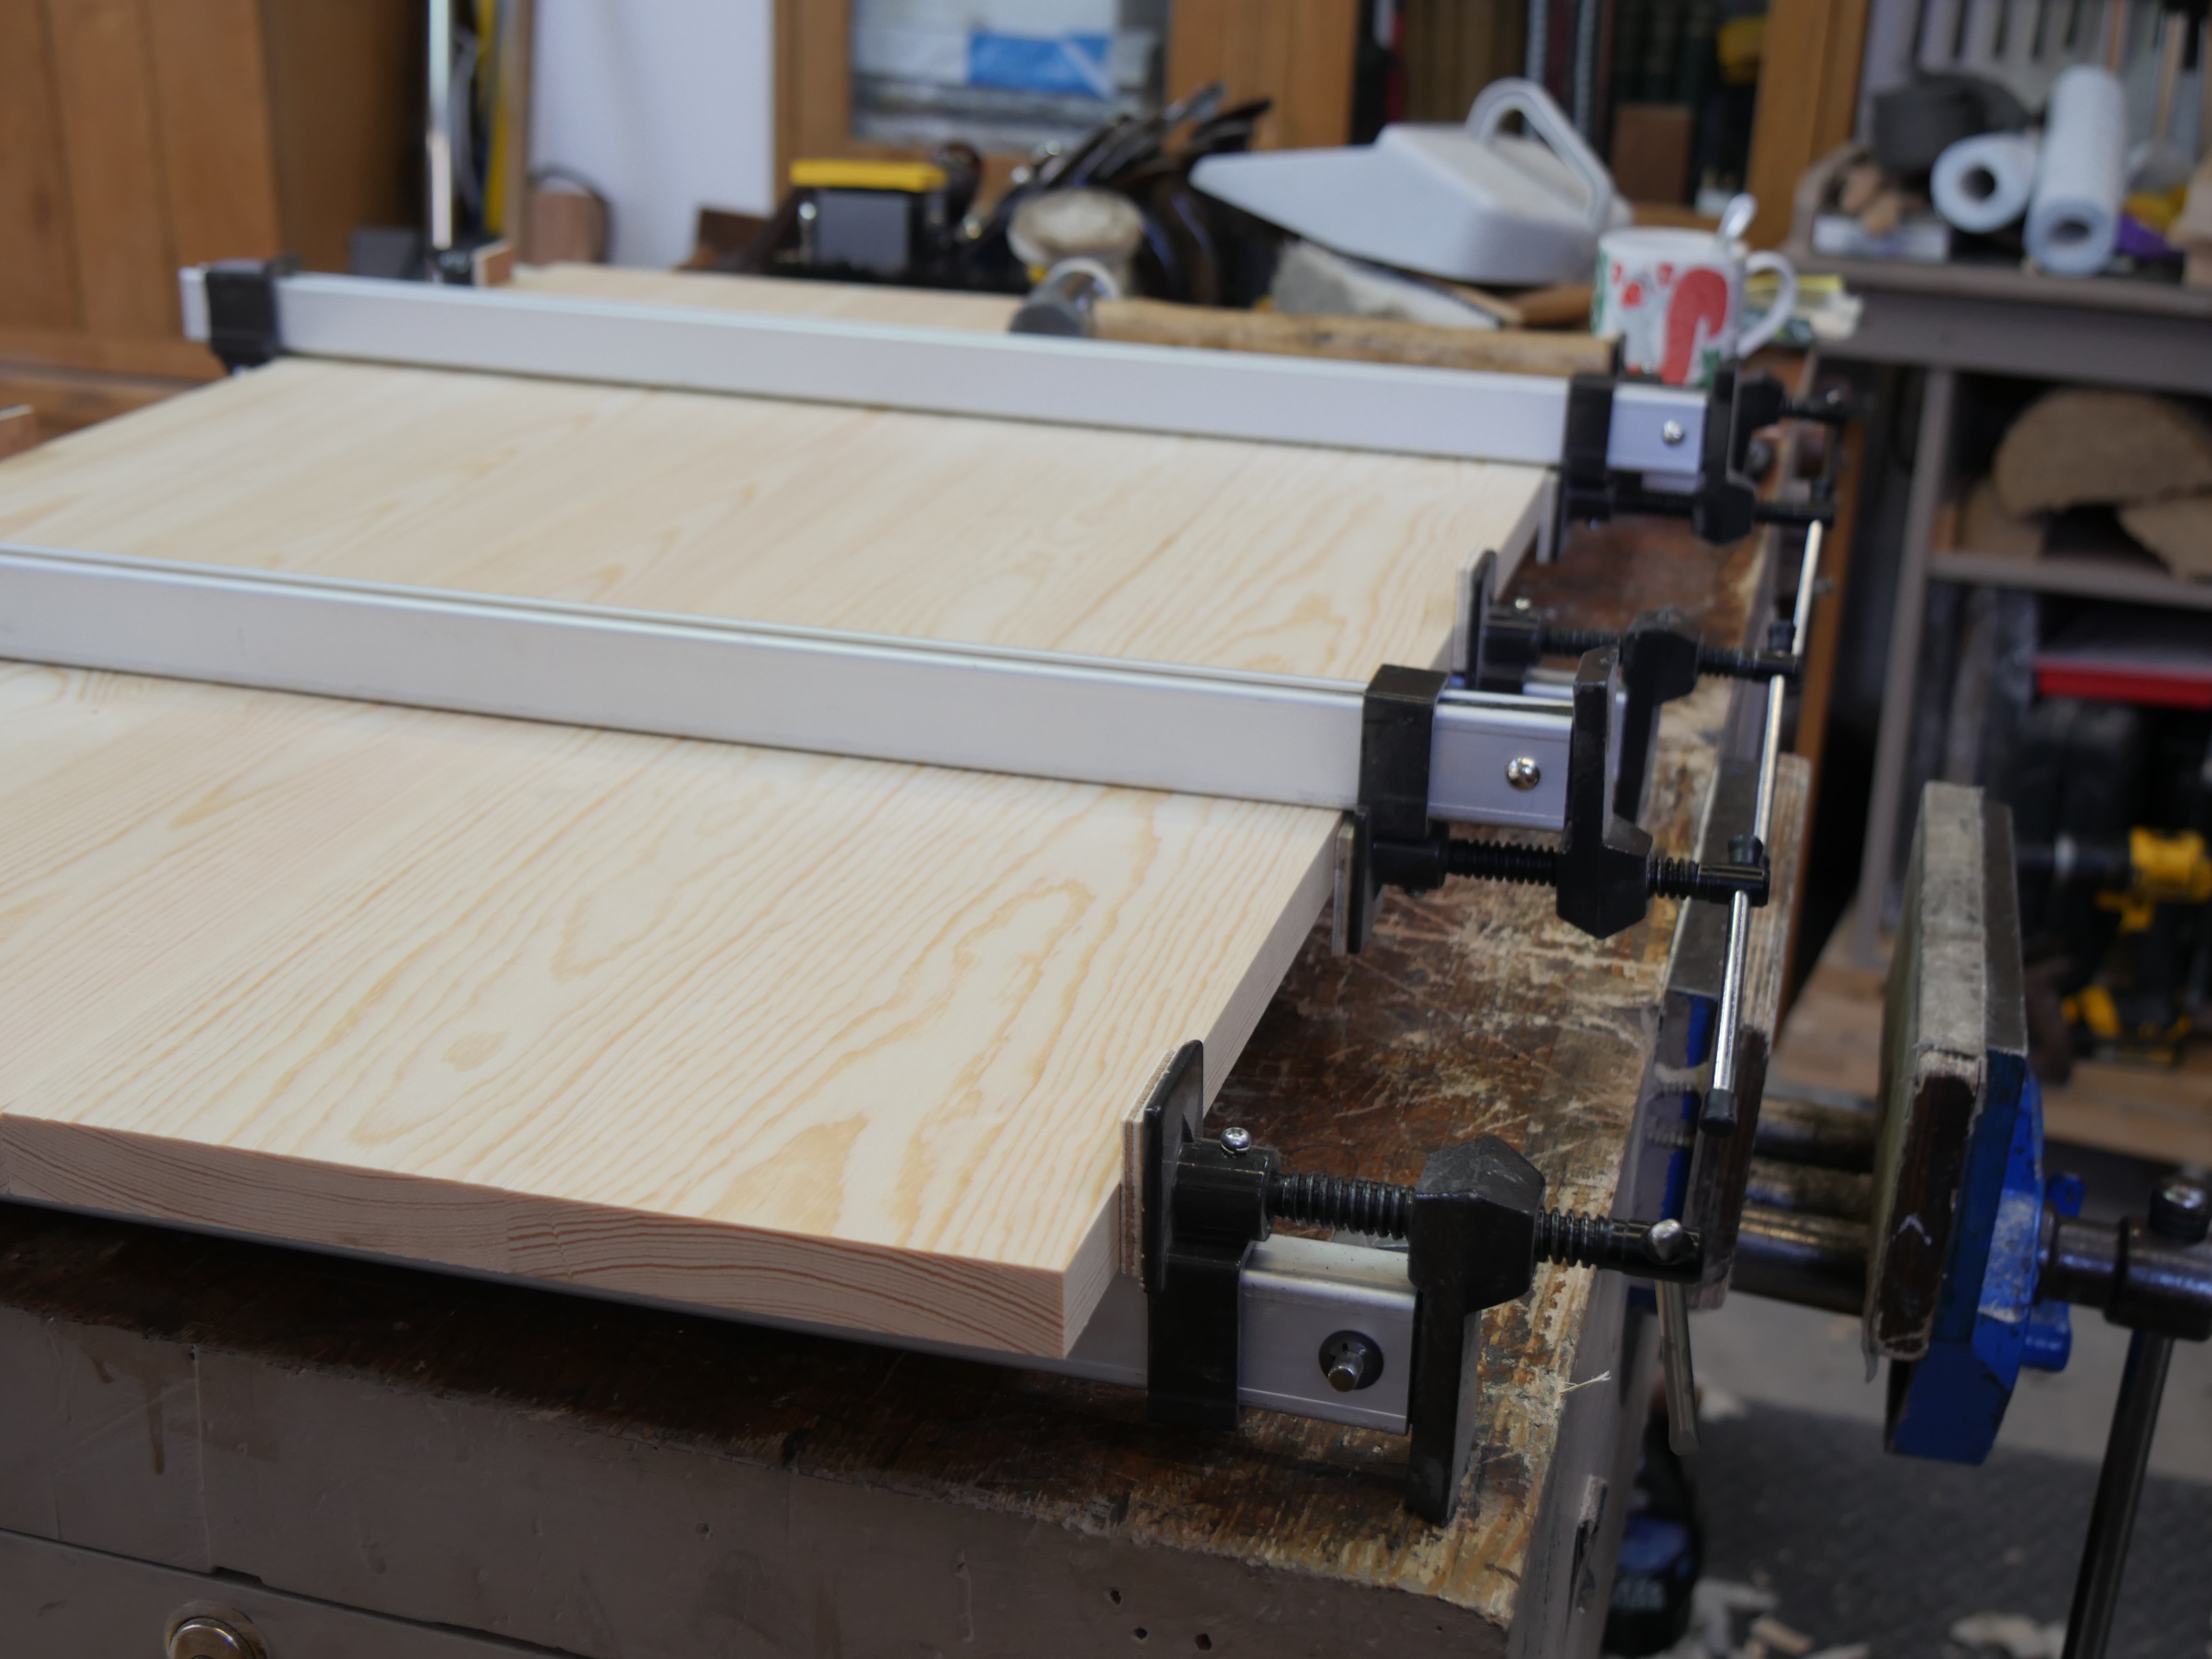
Step 2: With a flat file file the leading edges to each internal corner on the clamp head and shoe to create a round-over for a leading edge. Without this step the clamps bind too often for comfort and they are awkward when you least need it, which is usually during gluing up. Only do the edges in contact with the clamp bar and not the sides.
Step 3: Use a light lubrication like petroleum jelly to reduce friction between the head and shoe. I also use this to lubricate the threads of the head clamp and along the bar itself. This act alone makes everything slide perfectly.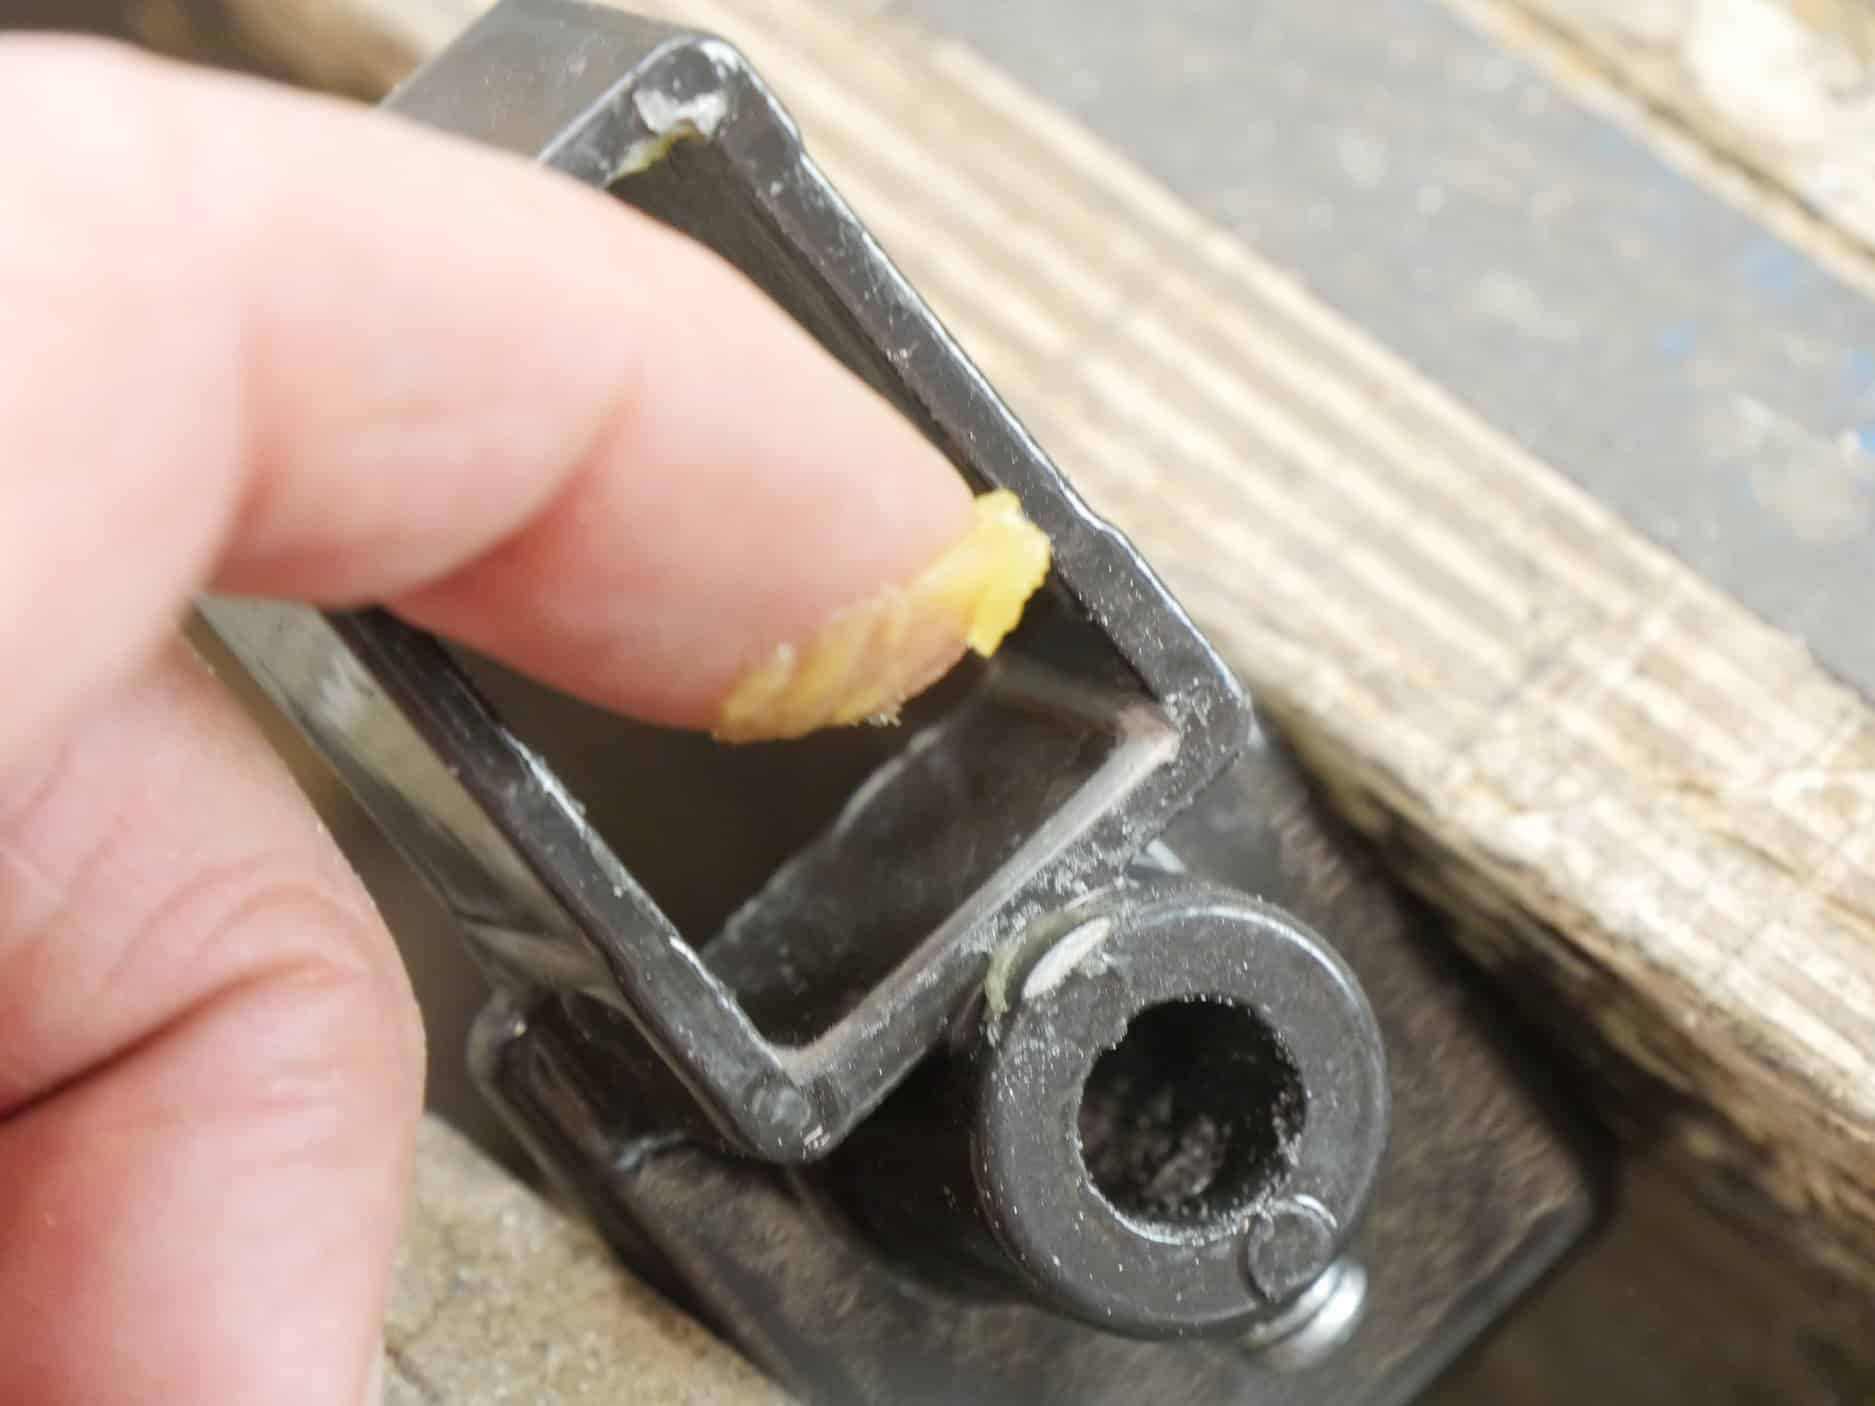
Step 4: Cut a 16mm by 25mm wooden stick to fit inside the aluminium extrusion the full length measured from the inside of the clamp head to the end of the square tube. Any wood type will do but try to choose straight grained stock as knotted or wiry grin can snap. You do not want a super-tight fit as it gets harder and harder to insert the deeper the wooden insert enters into the tube. Just a snug fit is best. It can get to point where it will neither enter further nor be withdrawn. Insert the section of wood and drive it home. 
Step 5: Grease the threads of the clamping mechanism.
Step 6: The clamp heads come with no cushioning and can mar the wood. I use squares of 1/4″ plywood as this holds up well under the pressure of the clamps. Use two-sided tape like picture mounting tape to stick the pads to the clamp heads. Roughen the paint surface with abrasive paper first to improve adhesion.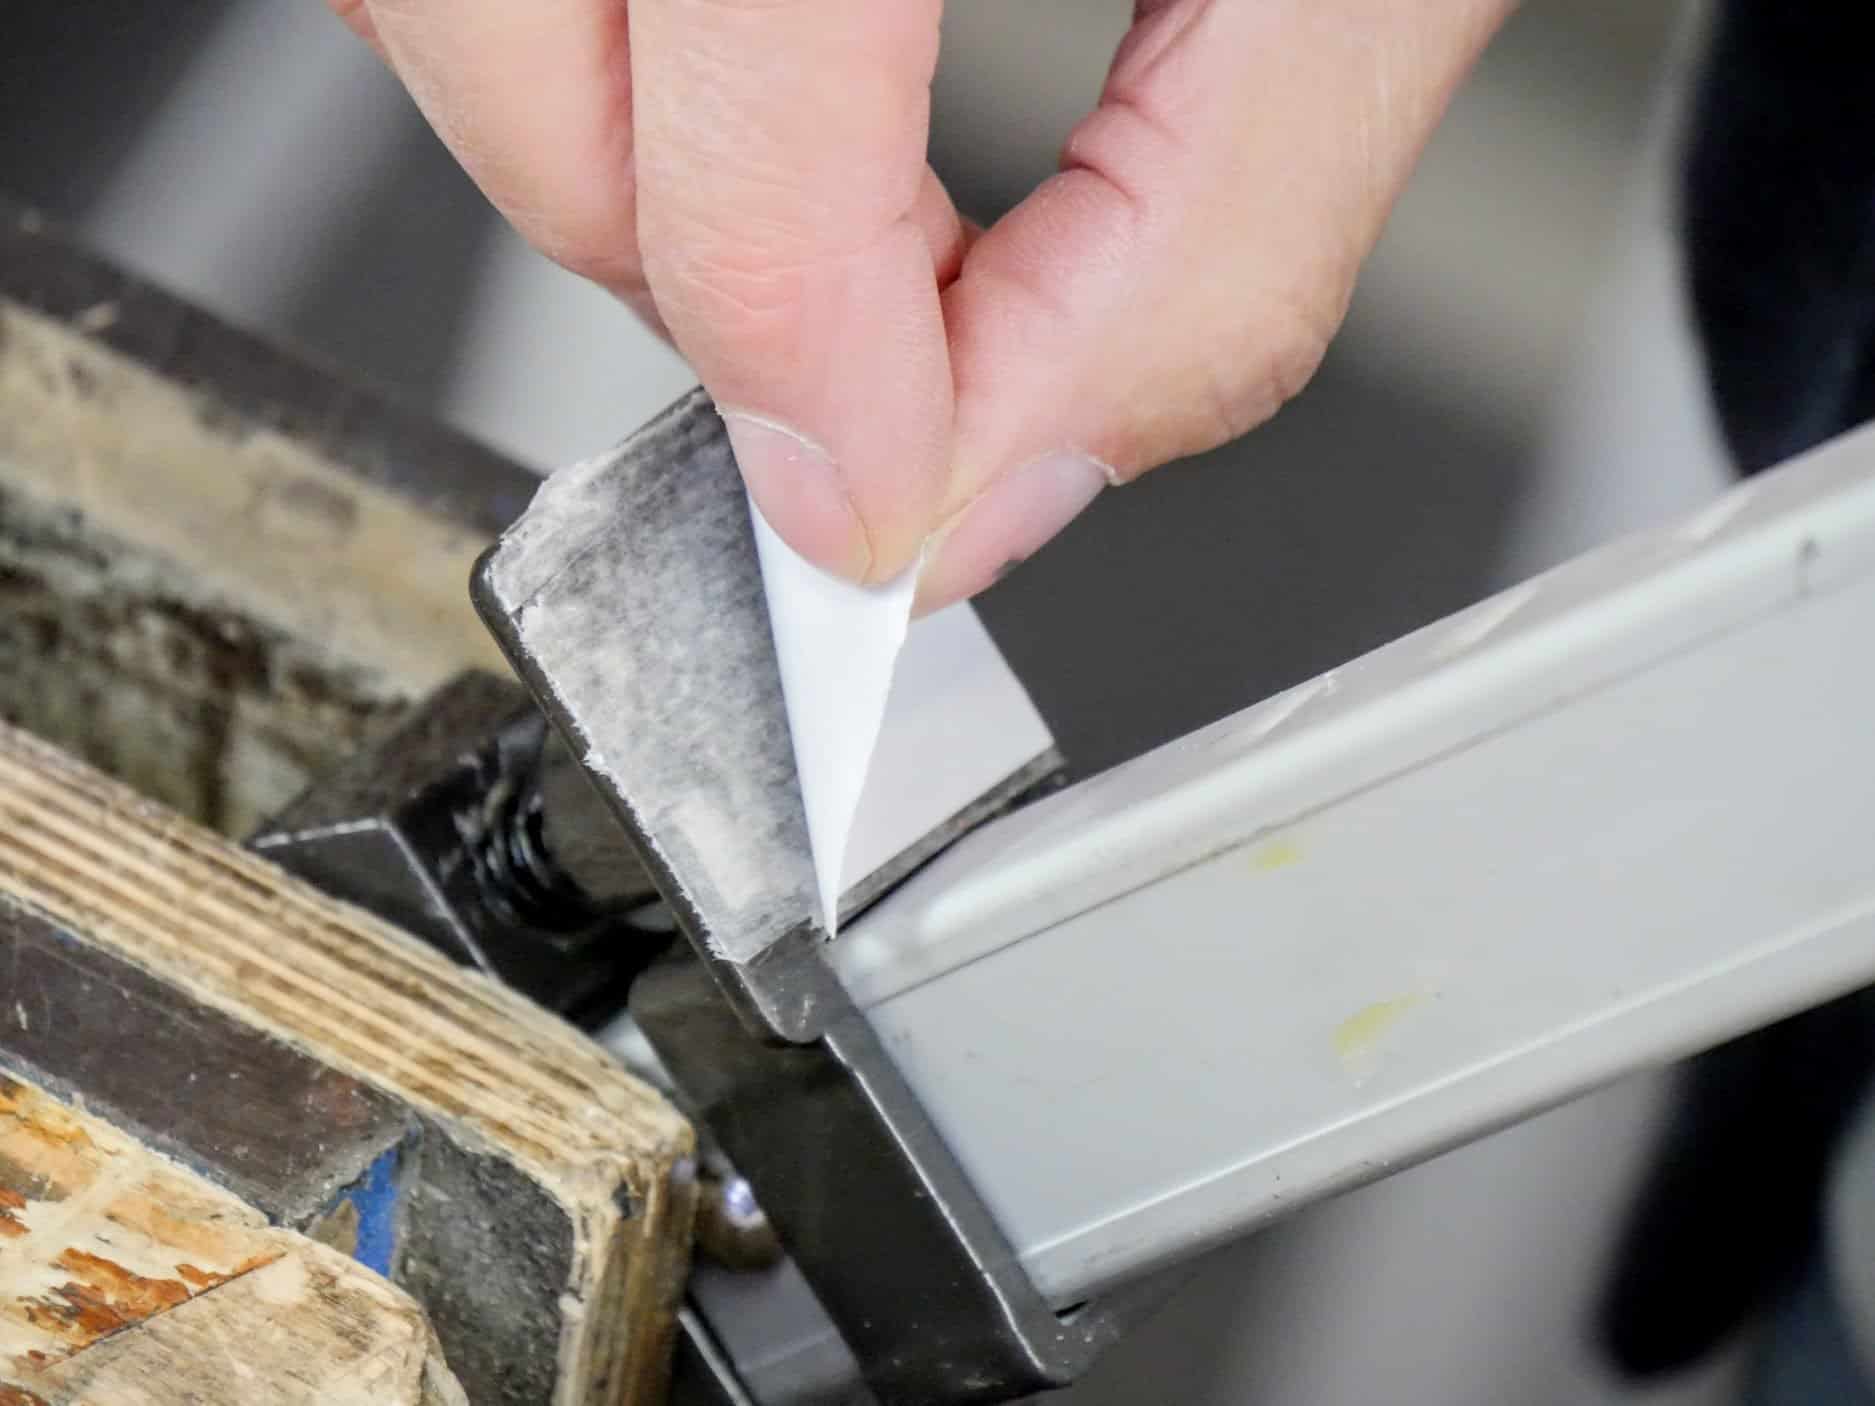
Step 7: Press on 1/4″ plywood squares.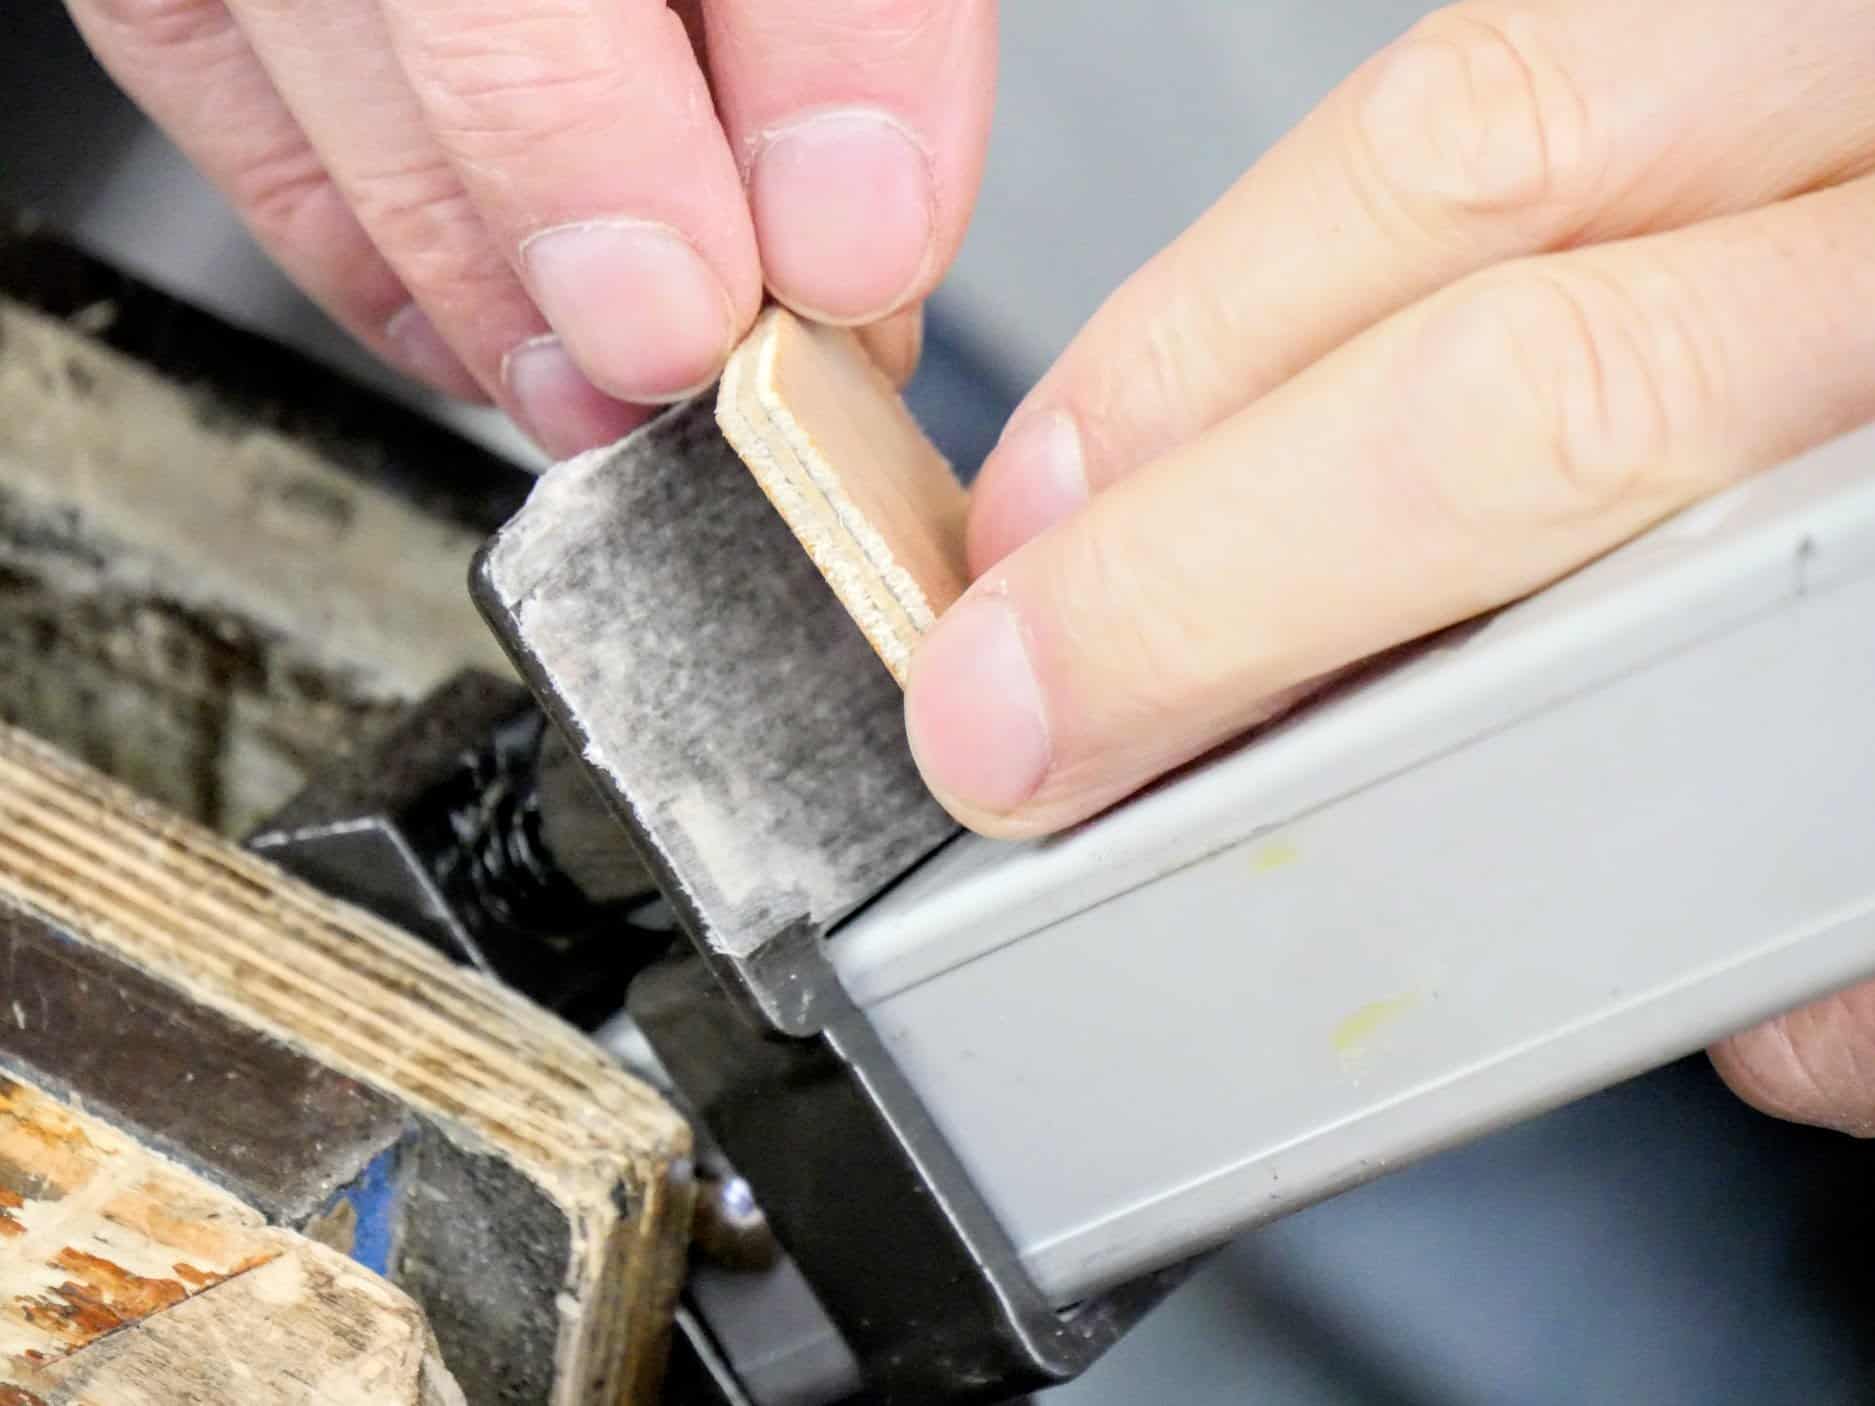
Step 8: Use the clamping pressure to seat the plywood squares.
Now you have some decent working clamps for about a third the price of most others. You will be amazed how these minor upgrades make the clamps feel in use.
As an added note. Deiter Schmidt at Fine Tools Germany offers their Juuma clamps for sale and they are very good clamps made from thicker alluminium and you can still upgrade with the inserts. I blogged on these two years ago.
I found the best price recently at Transtools for this type of clamp;
https://www.transtools.co.uk/hand-tools/woodworking-tools/sash-clamps/silverline-aluminium-sash-clamp-600mm-24in
It’s about £5 for postage, but if you’re buying several it still works out a good price.
Regards,
Matt
Paul,
Another site you may want to look at is transtools.co.uk. I bought 8 of the 600mm clamps and although as usual they all needed fettling they now work perfectly thanks to your tips. The other plus is they’re the cheapest I have found.
I purchased some similar (red) clamps from an Australian supplier and have done all the same steps outlined above, it made a measurable difference to the feel and usability of the clamps.
The only trouble I had was using double sided tape to attach the plywood squares. I tried two different types of tape but no matter what, the tape would always slowly start to slip under clamping pressure, meaning the clamp shifted some times quite a bit under load. The tape always remained stuck to the plywood but started to slip on the clamp face.
I tried two different types of the thin picture mounting tape (similar to that shown above) and both by brand name manufacturers. I suspect in part it was because the clamp faces are not perfectly parallel, but I never thought about roughing up the painted surface on the clamp face!
I eventually gave up and CA glued the plywood squares in place….
Yes, not all double-sided adhesive tapes are created equal. For absolute permanence use contact cement, coat both surfaces, leave to dry ten minutes and press home. Can be more messy though.
I found double-sided carpet tape which has an open weave fabric base is damn near permanent.
I would love to know where to get these as I live in Australia and the only ones I can find are rockler which at $70 a clamp is very pricey, I only own 5 and am saving for more.
I’ve searched everywhere. I keep getting the UK suppliers on the internet but the postage ends up as much as a rockler clamp costs.
There are two places I know of where you can get this type of clamp in Australia:
https://www.toolsforschools.com.au/
https://elraco.com.au/
As per usual, they are more expensive here than everywhere else in the world, but still more affordable than most other options.
I know Paul prefers not to have links to products in the comments, but this style of clamp is difficult to find in Australia (and I have no connection to either company!) so I hope providing this information here is ok…
I picked up a set of 4 of the Elraco style clamps (2x 1.5m & 2x 1.8m) along with an Australian made Stanley #4 plane, for $100 off Gumtree. Having retrofitted them as per Paul’s suggestions, I can say they are worth even the ridiculous sum you have to pay down under. They are simply the best clamps I have found. They provide ample clamping pressure, they are light enough to move one handed, and the ratcheting stop is quick and simple to use, unlike F style clamps, which can snag when you don’t want them to, or slip off when you’re trying to set up.
The only thing I would add is that it’s almost certainly better to have your wooden infill pieces considerably smaller than you might expect. I made mine slightly undersize, and ended up having to ram them in by striking the clamp against a concrete slab. Even now, I’ve had to slightly modify the ratcheting stop piece to allow for the slight bulging that’s occurred in places as a result.
Bret, in Aus’ search for Australian School wood working supplys. Not sure that I’ve correctly named the company. It’s a business that supplies Tafe shcools etc. cheers Peter
Hi Tom, I’m needing long lightweight sash clamps also. What was the name of the Australian supplier?
In most of my Harbor Freight clamps the screw that sits in the groove of the thread mechanism (attaching it to the top head) got loose every so often. Now I resort to fixing it with a drop of thread locker (blue Loctite, in my case) in addition to all the improvements you have suggested.
The part about the clamps binding to often is true. I never thought about filing the inside like that. Thanks for the idea.
Thanks Paul. I’m fairly new to wood working. Out of curiosity, are there some name clamps you’ve used that don’t need this refinement? What lengths and how many do you recommend we get as a good starter set. I’m mostly building the kind of stuff on your master class series.
As anyone here can tell you – you will never have too many clamps!
Personally I’d start off with half a dozen of the 90 cm but it does depend on what you are intending top make. The big clamps will obviously rack down to handle small items but they’re very clumsy
I think there are a few well known current makers offering a large range which is quite unnecessary because it can be confusing. For larger projects and heavy joinery steel clamps work well and they are available as sash clamps and then T bar clamps. If you are in the USA you can access Dubuque alluminium clamps via Lee Valley Veritas. These are the best lightweight clamps on the market in my view and are especially good for furniture making. They are strong, well made and well proven. In the UK or EU you should go for the Juuma clamps from Dieter Schmidt Fine Tools as I mentioned as they are as good as the Dubuque. Axminster has their version of the same clamp but the price is higher and shipping too. Hard to imagine why but the same clamps can be had from Dieter Schmidt for cheaper and less postage costs too I understand.
The common sizes are 600mm and I would say six of these, perhaps 2 900mm and then maybe 2 1200mm for good measure. Add more as you grow.
Thanks Paul. This is very helpful. I’ve felt very comfortable based on your advice on what tools to buy. Clamps have been a gap in what I own.
Cheaper than Transtools is tool-net.co.uk. Search for “aluminium sash clamp” – the Tool-net and Silverline ones are exactly the same, and seem identical to the ones that Paul has shown us how to fettle. You’ll save about £1 per clamp which is significant if you’re buring a few. It’s possible to get free postage on £50+, or was when I bought late last year.
I have a few of the Harbor Freight clamps Paul was writing about and they do bind on unclamping. A tap with a hammer unbinds them. I’m going to make modifications like Paul showed.
They are light weight, adjust quicklyt, economical and do the job well. Of all the clamps I have these ARE my go-to clamps.
Here in the States Harbor Freight has the
24 inch, 20 inch capacity, clamps, $10
36 inch, 32 inch capacity, clamps, $12
48 inch, 44 inch capacity, clamps, $15
60 inch, 56 1/2 inch capacity, clamps, $16
60 inch, 54 inch capacity, clamps, non-marring jaw pads, $17
These I believe the sale price. They almost always have 20% off coupons even on sales papers as you enter the store.
I’ve been using these clamps for at least ten years now but I’ve never really bothered trying to improve them this way. I will give it a go. Over these years only two of them have broken and I cannot think of a way to repair them. In both instances, it is the spring toggle on the tail stop that has broken at the tip where it meets the bar. At these prices though it’s no big deal. The cheapest I’ve found so far are here: https://birco.co.uk/products/silverline-vc62-aluminium-sash-clamp-600mm
Purchased some of these a few years ago. Left them in the box. Recently opened the box and examined them . Not happy, but like you said they were cheap. Mine were from Amazon. Saw an earlier post of yours about improving these. Thanks for the follow up. Now to find straight grained wood. LOL!
These darn Sash Clamps are wonderful. I keep buying em, if I need to spend some money and don’t know what to get, I get Sash Clamps! And I buy some more Harbor F Clamps which are also too good to be true, they’re super cheap but work as well as any F clamp I own, they work better than any of my C clamp collection. I wouldn’t have know about these Sash Clamps if it wasn’t for Mr.Sellers, Thank You!
I also discovered the wonders of Shellac from Mr.Sellers. I replaced my standard Urethanes with Shellac, I’m learning that I can introduce Color and get a nice Vodka Buzz from working with the stuff, breathing it in, as I work, especially in the early morning. It’s a darn nice way to start the day. Thank You again!
Timely post, I have recently been having trouble with my Harbor Freight bar clamps binding. I removed all the heads and filed them like you described, lubed the threads and put them back together. No binding now and lubricated threads make a big difference.
I’d made the wood inserts and glued on some wooden pads a year ago, also put on some thread locker on the handles nuts.
For cheap clamps they work quite well now.
Thanks for all the advice Paul!
I wish to change my email address for your blog, but I get “Security check failure.” when I try to unsubscribe or edit my subscription in your email. There does not seem to be any other way to contact you…
Unfortunately, my shoulder hampers my sawing, and that long rip saw cut will have to wait until either the shoulder heals (a very slow process), or I find some other solution. Even the Japanese pull saw is problematic.
Age and torn tendons are forcing me over to the Dark Side that includes such necessities as dust collectors.
I’ve recently done Paul’s adaptations and heartily agree that they turn a cheap and somewhat poor clamp into one that’s a pleasure to use.
Rutlands are selling them very cheap in packs of 6 at the moment, although I could only afford 2 so I got them from screwfix.
I checked with fine tools Germany, and they do offer the Juuma clamps. However, at incredible prices, which aren’t justified by the added rubber paddings. Last summer, I got mine from Amazon, 1 m long, around 12 Euro each, no name. With the upgrades, they do a fine job.
But it is really important to cut the wooden inserts small enough. I had to get one out, because it had expanded the aluminium profile and the sliding part got stuck. I had to chop out most of the wood in small pieces.
Great tips. I’d like to add another idea.
I tightened the spring clip and cross pin. I used a hammer and socket.
This really tightened up the screw head to the aluminum bar.
Not sure if it will help, but it made me feel better.
Is the wood that goes inside really 16mm x 25 mm – and what is the tolerance how loose/tight does it need to be?
Locally the closest that I can only find is 13×23, 13×27,13×28, 18×27 and 18×28…..
I need to get quite a few clamps, and not sure I want to spend ages planing down to an exact 16*26 … unless it really is worth it
It is and you should. It only takes a few minutes per clamp and if I would and could do it at 68 I see no reason why anyone shouldn’t if the work will last a lifetime. I suppose the choice is yours really. It seems to me such a small thing to do and I certainly don’t write articles if things are not worth doing. Perhaps it’s a cultural difference?
Sorry, I didn’t mean to imply that you wrote the article for nothing … it was a time versus money calculation (as my weekend time is limited … unfortunately the only time I have for woodworking) … so would I spend more money on the clamps ( for say the Juuma clamps) – and then spend my time working on a project rather than fettling the clamps?
Unfortunately neither money or time are unlimited….
As you think this is worth it … then the fettling will be a mini project all of its own, and I will still get to use one of my planes in the process. The other part of my question is to whether there is much tolerance to the 16mm x 25mm baton.
They start out quite easy but get stiffer the more they enter so you have to be careful because as you drive them home they can be hard to withdraw if you need to. Even the heavier gauge juuma clamps feel greatly improved by adding the wood.
Unfortunately, these box section clamps are no longer, it seems, sold by Screwfix.
Go to ebay. There are lots suppliers of the same ones as a screwfix but they heads may be red or blue not black. They are all made in the same factory.
Hello Paul,
I noticed that on the clamps I bought that the hole where the clamp screw locates in the shoe must be drilled too deep. The upshot is that as you apply pressure instead of the screw end applying load to the end of the clamp the groove in the main screw screw contacts the little location screw and all the load is transmitted through this (if you see what I mean). It’s easy to check – if you remove the little screw and tighten the clamp you shouldn’t see the edge of the groove through the small hole.I fixed it by dropping a couple of small washers into the shoe hole which centres the groove. Now the small screw only functions to retract the shoe once the load is off.
Does anyone know of a sensibly priced source for these in New Zealand or shipping to New Zealand? Best I can find is some Aliexpress ones but I cant tell the quality from the small photos.
Difficult, Paul. Most of them are made in Asia by the same company. The walls of the alluminium are thin but that’s not usually where the problem lies and especially so if you add the inserts as per my recommendations. The problems occur in two places, the screw thread for clamping pressure;m sometimes these stick on one out of say thirty. Two, the tommy bar bobbles on the ends often work loose and usually right in the middle of clamping a glued up joint. both can be corrected, one with a Threadlock glue and the other with some steel wool in the threads and some light oil or vaseline. I just looked at the ones up the ones offered by Aliexpress and they are identical to the ones we get here from a distributor of lower end tools and equipment called Silverline. These do work. I cannot say they are a lifetime tool but `i have personally used them in good and adverse conditions for 9 years and they are still going perfectly well. I personally much prefer these lightweights over the lifetime steel versions. Why not buy one and try it out first to see how you feel?