Why a Garage Workshop Beats a Castle Any Day!
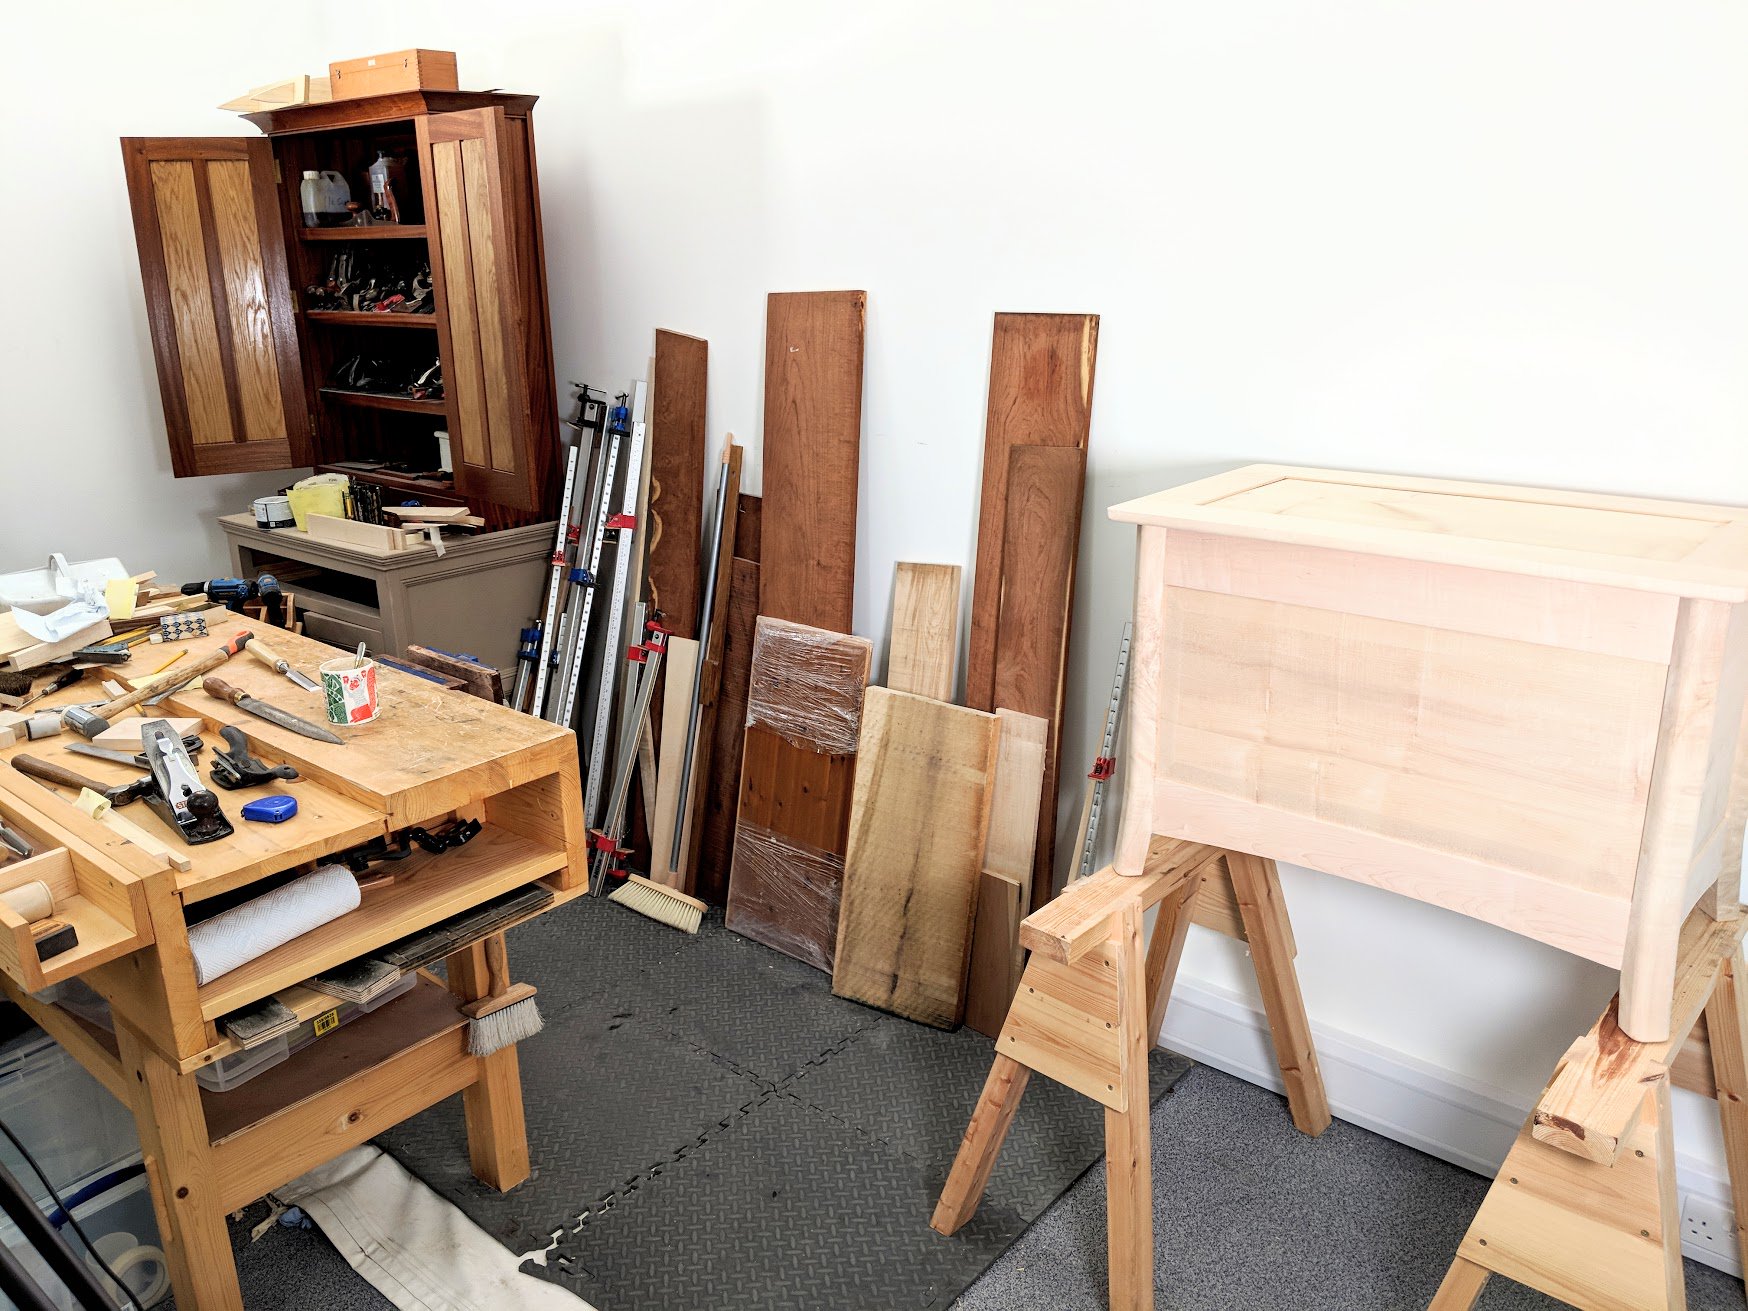
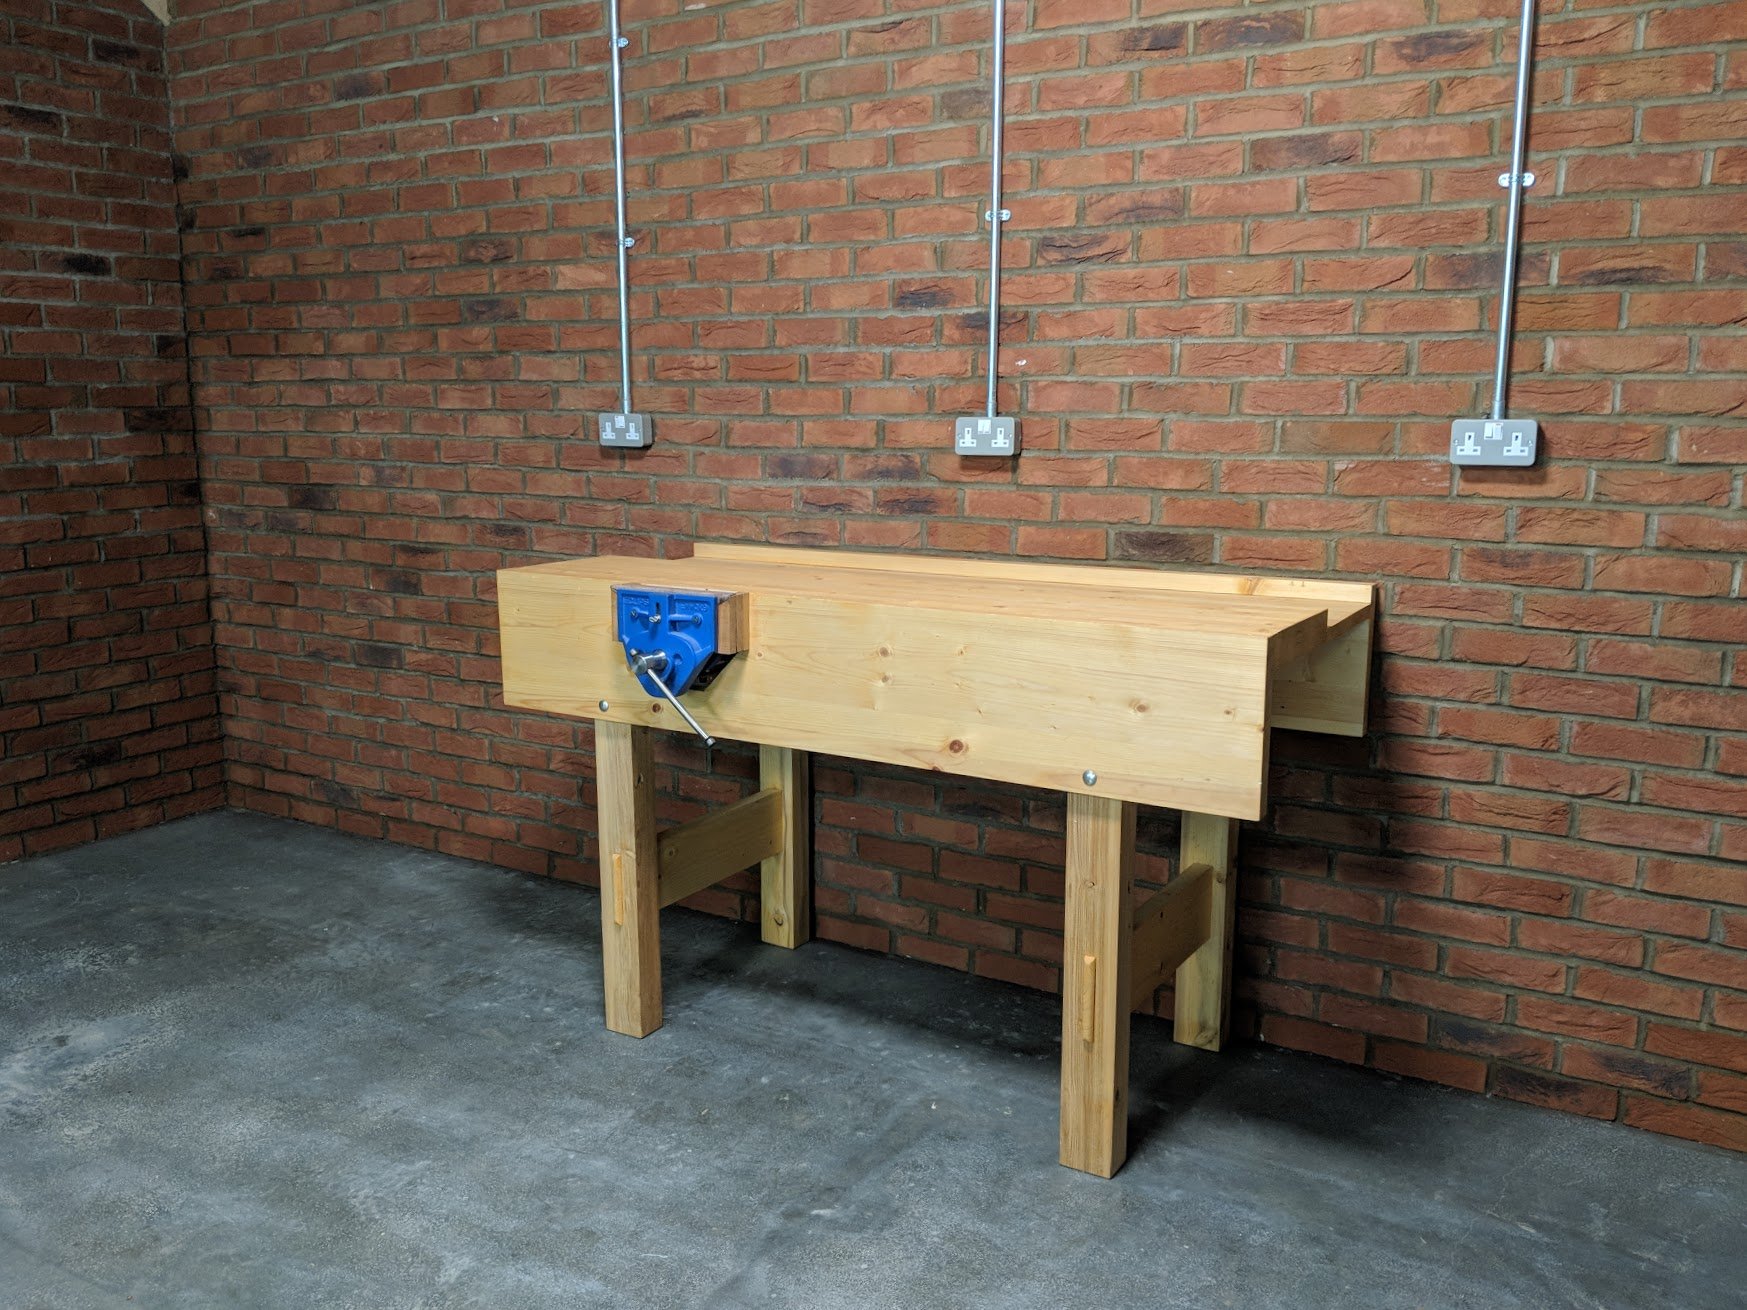
I am currently taking possession of my new garage workshop. The brickwork’s dried out now and snagging is all done. Having moved shop for the umpteenth time, both on larger and small scale levels, this feels as though it may well be my last workshop. Since my last making to sell in the USA ended my commission work I no longer make for work but the garage workshop is a workshop I could readily make and sell from. Were I to return to my former maker days selling spec and commission pieces to support a growing family I could make every piece I ever made from this new space which is roughly 3m x 5m. I need so little by way of machinery. I use hand tools in my work and that won’t change now. To make all the things I’ve made through 50 plus years has been a wonderful. It’s kept my mind alert and my health good. I no longerI have to prove anything to anyone, my work is well proven. The multiple thousands of you who have followed and known me through the years are no longer mere spectators but practitioners of my craft. This is how the craft is being preserved and it’s being well done in garages just like mine quite well enough thank you.
Knowing that this is what the majority of you have told me you have to work from, it is fitting for me to lead you and others along a similar passage. Unless you are commercial maker, something I never considered myself to be, or worse, a professional, also something I would never consider myself to be, you need little more than what I am showing here for a new and raw beginning. You should not expect any more nor despise it. In reality the actual space you need to perform physical work in is about 3m x 3m square and with roughly 2.8m to 3m headroom if possible. I’ve worked in two metres if headroom and found ceiling height the bigger issue. Any additional room is mostly for stowage of equipment and the storage of materials such as wood, finishes and ancillary necessities. So keeping the whole thing real for the majority is what my life is mainly about. I want real skill, real work, real hard work, real effort and all of this throughout my every day. I never needed the Castle workshop nor in particular a teaching facility to make my furniture in and yet in some ways, many ways, this workshop feels like my castle, my classroom and my garage. My happiest days have been making in my garage and that’s what I feel talking to you this evening.
Some of you have expressed concern about the garage looking lonely and so too my workbench and even me. What you usually do not see is the hundreds upon hundreds of emails we receive expressing deep and sincere thankfulness for what we’ve been doing to prosper others in the craft. There’s no quick, slick talk, no sponsors and no sales pitch either. Telling people to subscribe is our way of telling others to find a simpler form of success. People follow us to learn how do it, make it, finish it. They want the skills I have owned for decades; half a century and more. You don’t see what I now see from my garage side of my workbench. I see half a dozen unique young people beaming back at me as we joke back and forth during the workday. They’ve got ideas and skills to make my work easier as I grow older. They have vision and purpose. Sometimes, often, I think I am dreaming.
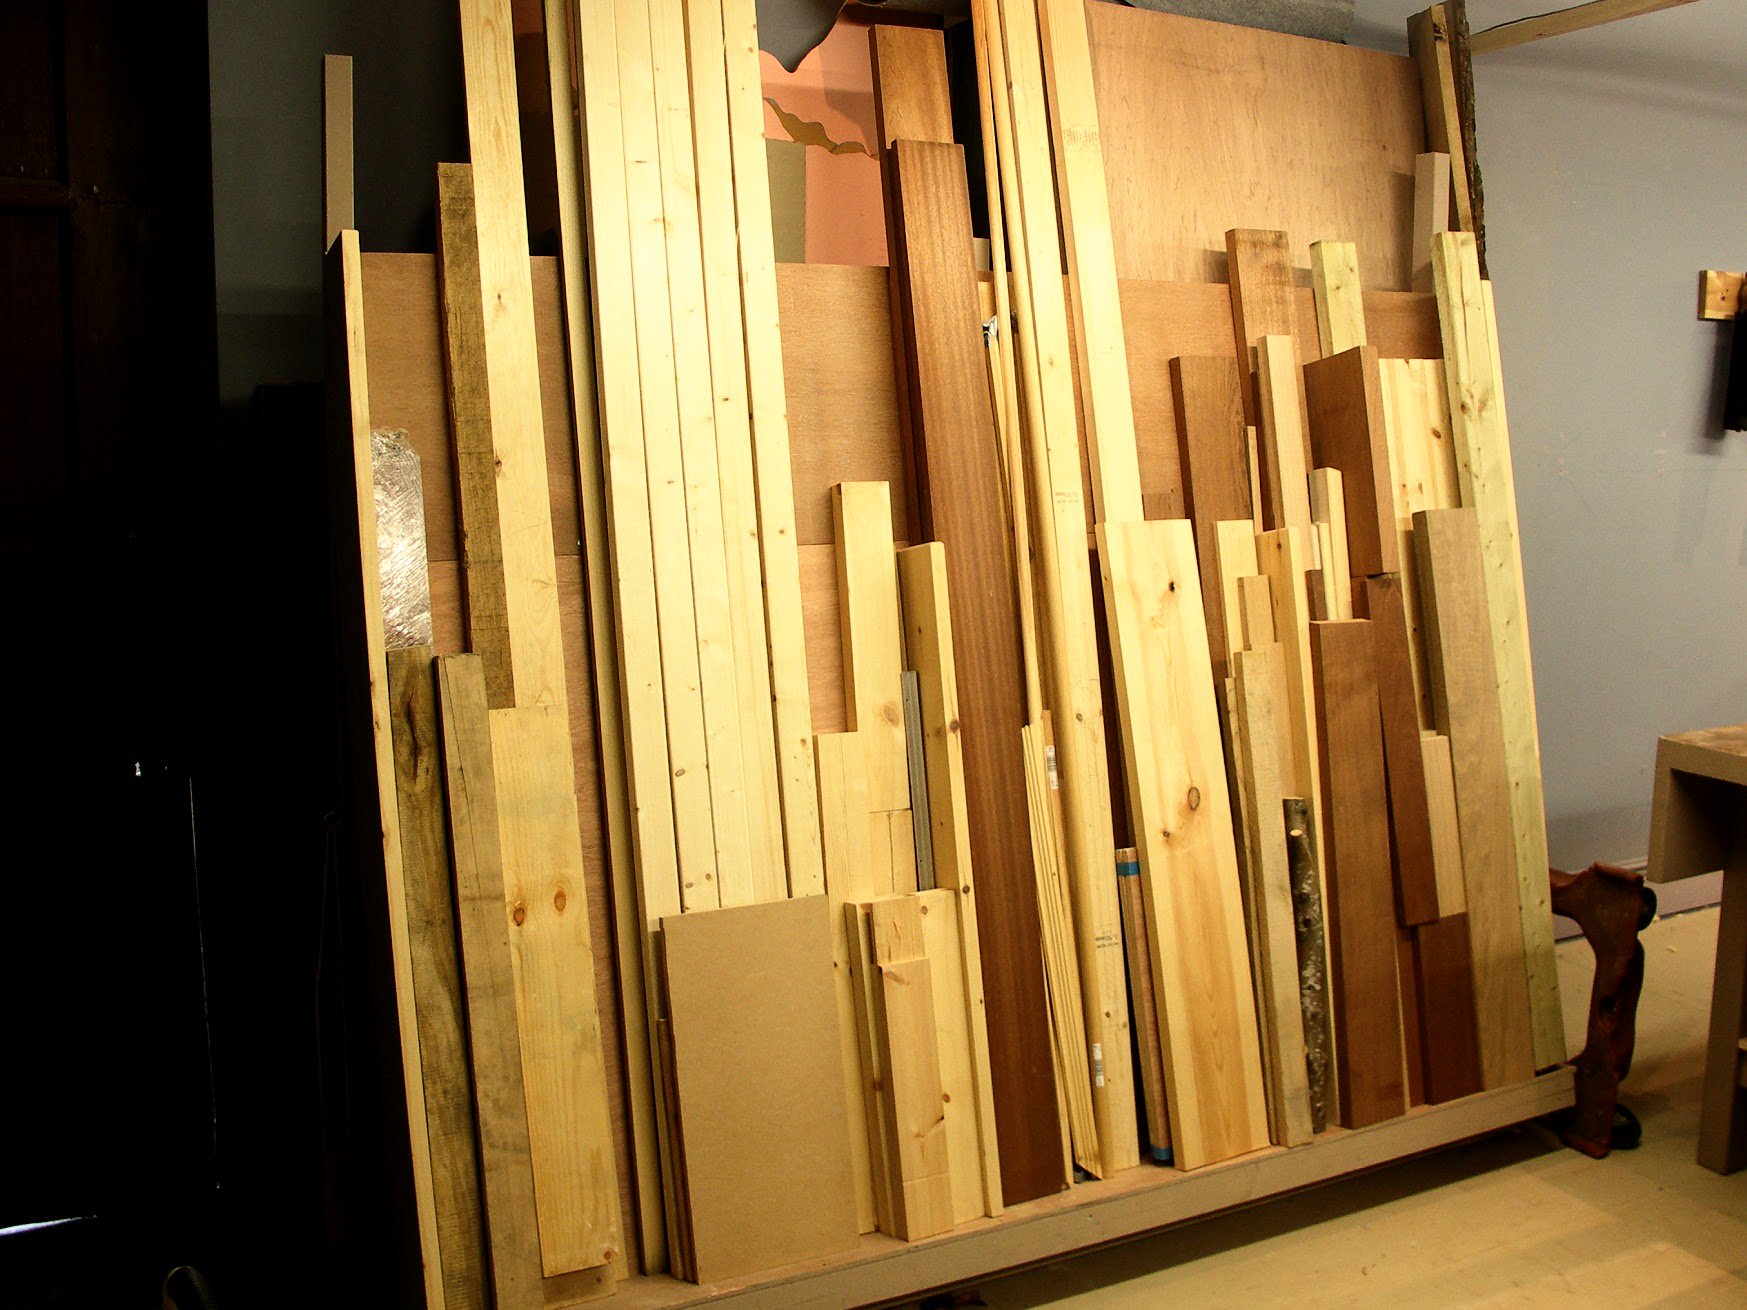
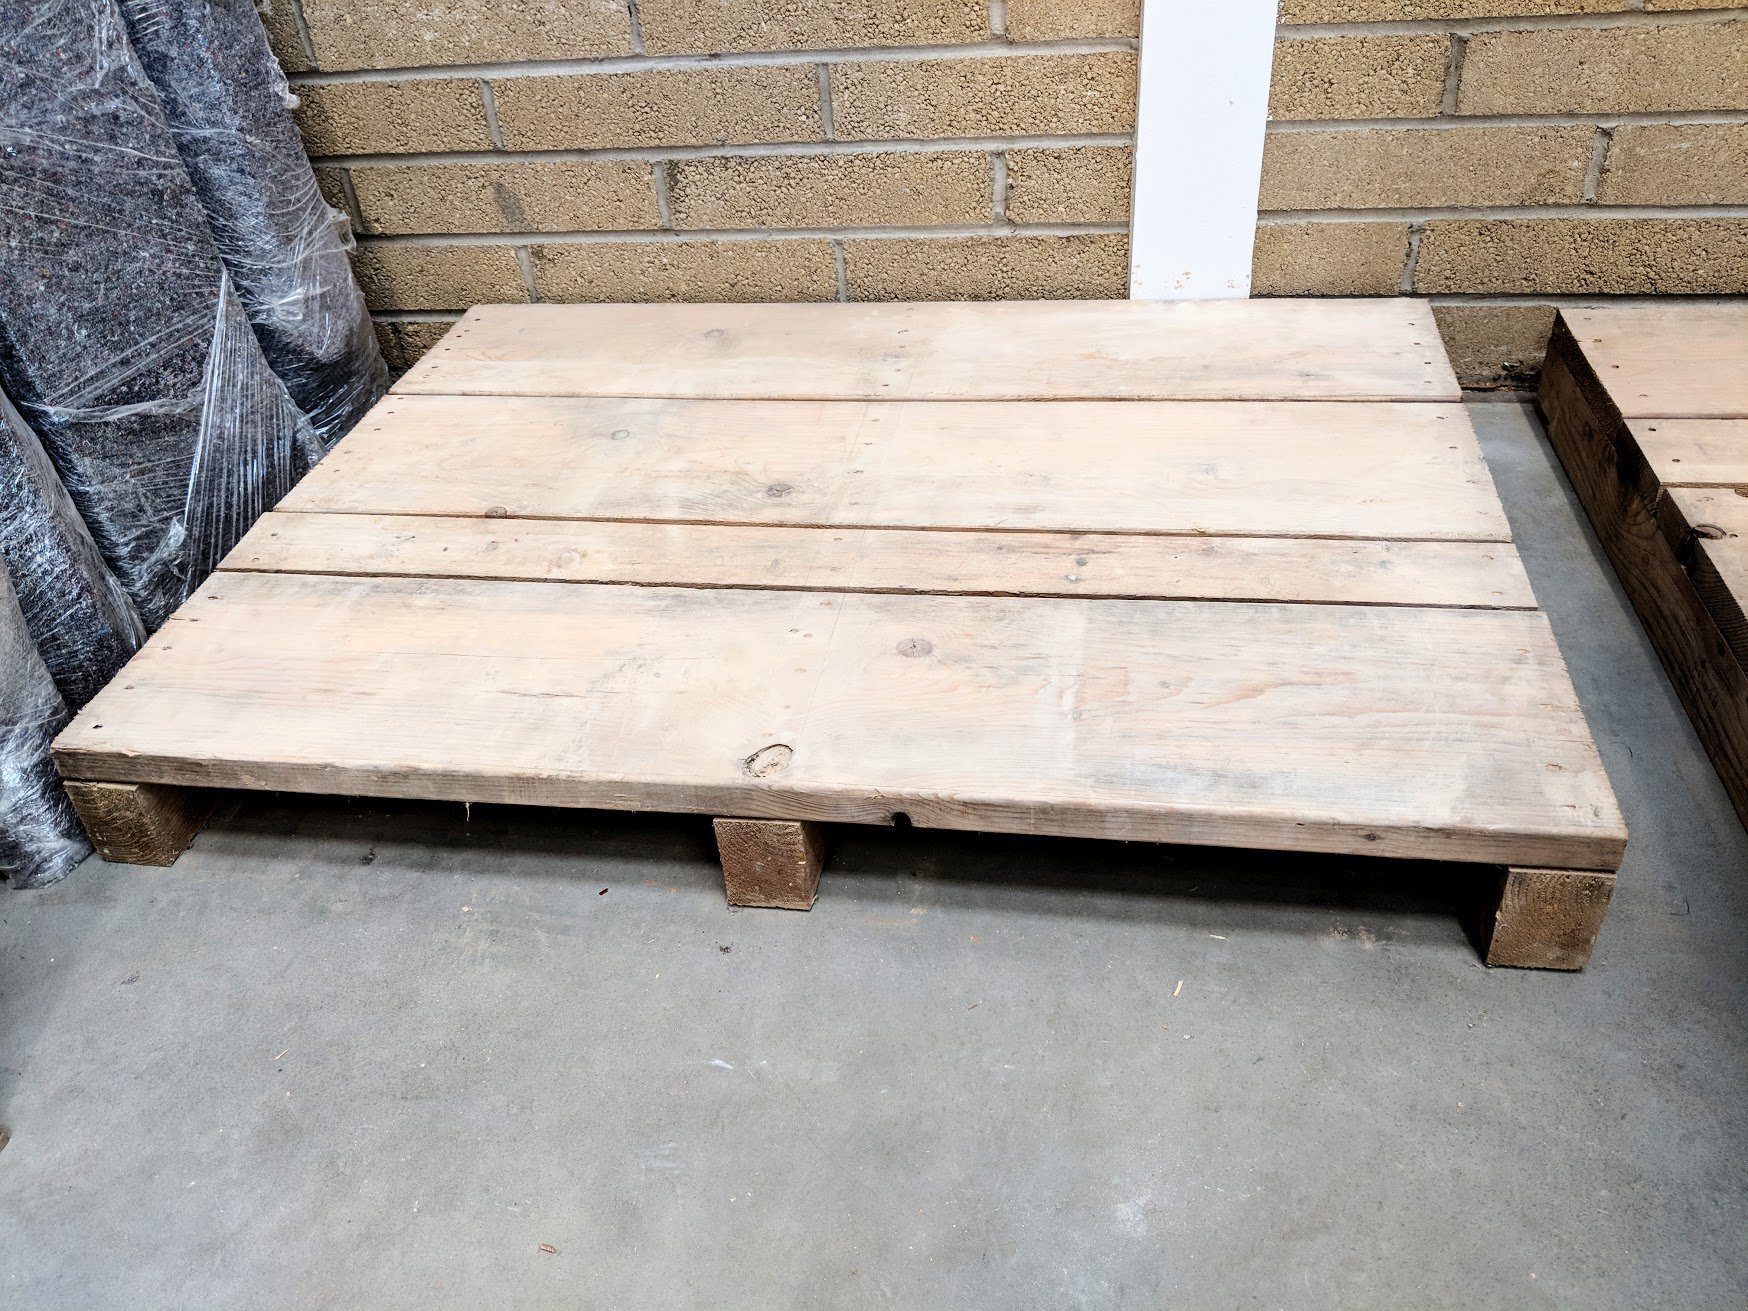
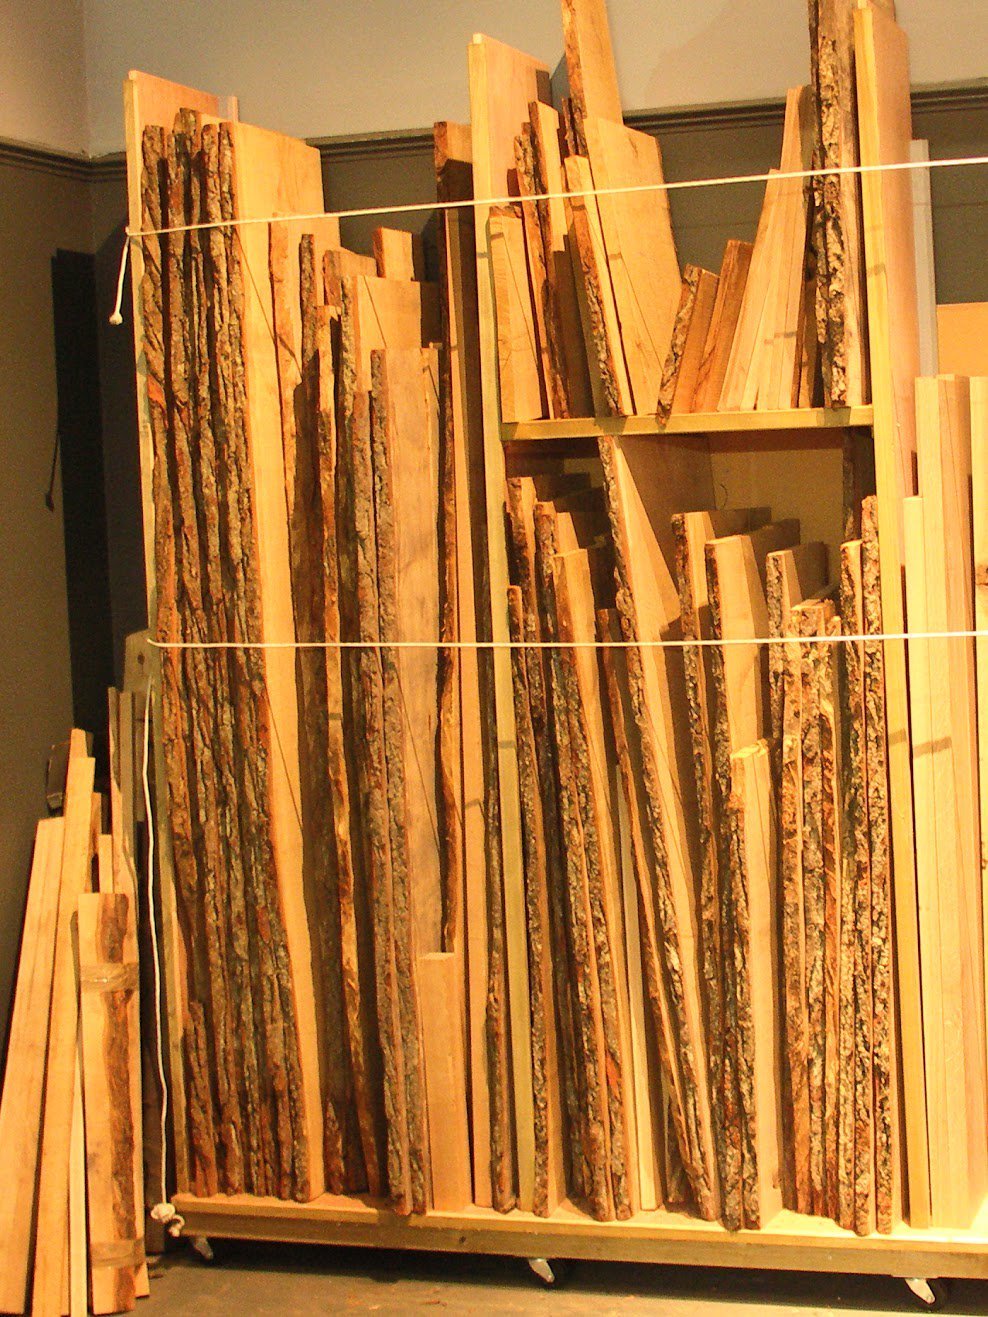
As it is with most woodworkers, I keep wood in stock. Not a lot, not too much, about enough to pick through when I am ready to start a new project. It’s good to have a project in mind and buy ahead accordingly where possible. I have always liked to keep the wood around for a while before I start working it so that it can acclimate to the shop, releasing any excess moisture ready for the drier places it might end up in when the piece is finished. Generally I am talking about good wood I have bought or had milled for my work and not say pallets. Whereas recycling pallet wood has merit, I’ve yet to see something truly lovely made from the wood. Mostly it makes us feel better to become more nonsumerist to use up what might otherwise go to a dump or end up as only fire fuel. Perhaps I should set myself the challenge to prove myself wrong and make something lovely. That’s not a bad idea. Most of what’s seen made from pallets is unskilled workmanship commensurate to the material. But I have seen somethings made from unjointed, screwed together functional pieces that, well, I quite liked too. Anyway, no matter, I have kept some pallets through the years and put them to good use. When I look at a pallet these days I look mostly for clear grain and find it without spikey knots—wood that can indeed be worked with hand tools like handsaws, chisels and planes. I recently found some heavy pallets to stack my stuff on too, for transportation needs in my moving palletised furniture pieces and then for temporary and permanent stowage. These were the rarer good sort of pallet. Not pretty, just stout and not throwaway stuff. Surprisingly a recycling wood outfit flung out these pallets for firewood so I grabbed them and repurposed them. With none of the usual gaps associated with pallets and solid two-by stock and 4 x 4 bearers it was a no brainer for me. Hannah and I have worked in some odd days to try to bring order to such a mass of things. Pallets are ideal if you have a pallet truck to move things around.
Wood storage is often a serious space issue. how do you throw this or that piece away? How do you keep it? What gets burned and what’s a keeper? It’s not just new wood that’s the problem but more the overage via offcuts. Is there a system or a rule? A rule of thumb, maybe? Whereas the wastage by large companies is excessive and really inexcusable, when you work for yourself you acquire too many offcuts you know you may well use sometime down the road. The issue then is exacerbated by the reality that you are indeed constantly accumulating them with every rip or crosscut you make. Mostly it is not extravagance, just that you must buy wood longer than you need by a couple of feet. What to do? I have a found a charity developed to help people get back to work in and around Oxford. I deliver my scraps and offcuts to them and they use them for making projects they sell. It’s good wood, not rubbish at all. I feel so much better doing that.
I have never been wasteful with wood. Offcuts from an ash tabletop make good cutting boards, wooden spoons and spatulas. In times past my offcuts meant good cash flow. A shop with an open door policy meant sales to tourists looking for small mementos of a vacation to the region. I have sold thousands of cutting boards that were beautifully made and finished. Some were freeform, some rectangular. Each one was eyed for shape and uniquely individual. If you don’t want the open-door invasion, pack them up and sell them through the local deli or farm shop. Local people and tourists like to support local artisans even when the product is twice the cost or more than from the chain retailer.
Donating my surplus to a charity training provider, social enterprise or community interest business has been really great as helping people get back into the workplace through a safe and nurturing environment has become ever more important to me. By making saleable products to support the charity they too become self sustaining. In my own background I am looking at more work with other organisations to train their mentoring teachers to teach and train the methods I use. Who knows how that will look down the road. Teaching teachers is something I feel is important enough for me to invest in be that my time to teach or financially. It’s something I want to become increasingly passionate about. It’s about restoring good health to others. I will keep you informed of the developments as we move some of that forward. I will be speaking at more venues on this and my experience working with people has made me aware that there are a lot of caring individuals out there.
Your hand tool workshop is where real living begins. All else is just an alternative unreality. That’s the way I have always seen it. The more you do real woodworking the more real it becomes to you and your family. It’s something also great to talk about with friends at work too. They will be surprised when you tell them what excited you over the weekend working in your garage.
I noticed in the first photograph that the workbench was not sitting on concrete, but, some sort of interlocking padded flooring. What are you thoughts on padded mats/runners vs. padding the whole floor of the workshop. I know there is a cost difference and it looks like you consider it worth the investment to get full floor coverage.
I also noticed that the workbench has an added shelf for your sharpening plates and strop. It also has an added tool/shelf along the back side that would be against the wall. I can see if being handy if you can get to all sides of the bench, but, doubt it would be useful if the bench is pushed against a wall.
Thank you so much for the videos and the detail that you give in your instructions. It has helped me greatly and I am looking forward to building some sawhorses and a workbench.
Yes, I set up the temporary studio in our what is now the staff break room which is carpeted. I put down a plastic liner and then the padded tiles to keep the carpet from damage and spillage. I will have my new bench in the new workshop directly onto the concrete.
I have some rubber matting around my bench. The idea is to reduce the tiredness from standing for so long. It’s a small inconvenience when sweeping up at the end of the day but out weighed by not having aches and pains
One year the floor was so cold in my garage shop, I could not stand on the concrete more than an hour. So I put down a plastic sheet as a moisture barrier, a layer of foam board and then a layer plywood. (Two thin layers of plywood screwed together, but otherwise floating on the foam board. ) Now my feet are toasty and my legs don’t ache from standing on concrete. Also if a tool accidentally falls it will safely land on soft wood and not on hard concrete. It really was not all that expensive to do.
I would agree with your opinion on most pallet wood projects. But Taylor’s pallet wood guitar jumped to mind, I wonder if that would meet your standard for a lovely piece of work.
http://www.guitaradventures.com/taylor-pallet-guitar-story
I really like the idea of recycling your scrap. I am a leatherworker that does a bit of wood work and my scrap leather all gets bagged up and donated to the local school’s art/textiles department. I can’t realistically keep it all and it’s such a shame to throw it away when the kids can have access to a resource the school could never buy. Good luck in the new workshop, I am looking forward to seeing it up and running.
That’s great Brian. I bought a large box of leather off cuts from a saddle maker (a company rather than an individual). It cost £30 inc. shipping but it is a very large box and it contained a lot of lovely saddle leather offcuts. Perfect for my needs, making tough edge guards for razor sharp axes, drawknives and the like. It is nice not to have to compromise on thickness and quality leather, although I am limited in the size of the items I can make – no bags or aprons! I admire the saddler for taking the initiative and making the effort to sell these on, rather than disgarding them. As well as reducing waste significantly, I think they see it as a way of conserving/promoting leatherworking skills. “It’s all good”
Paul amazingly lovely….well done
2 nights ago I watched a fascinating programme showing TUTANKHAMUN
burial chamber ….as first seen by Howard Carter.
I Could hardly believe my eyes????? On the back wall was a chest just like your blanket chest, really spooky…..could have been a Paul Sellers plant!!!!
I had to look up “snagging” and was amused to find out that the “snag list” is equivalent to the US construction industry “punch list”. So as an architect, I say “we are punching out the job” or “punching is complete”. And that made me laugh at the silliness and irony of our word because the contractor often feels we are beating him up.
Paul,
Delighted to see your bench in place in the garage! I’m looking forward to your generous, new examples of old. What I mean by that is your demonstrations of skills that have accomplished fine joinery and the resulting masterpieces for centuries.
On your previous bench of a darker color I have often noticed a toothed stop set in a shallow mortise, that can be raised by turning a recessed screw. Puts me in mind of Roubo’s example of an iron stop captured in a square of oak which is raised and lowered to desired position by the striking of a heavy mallet.
My questions is, Do you ever use that stop as I have never seen you do so in any of your videos or was it one of those articles that looked good at the time of purchase but didn’t perform as advertised?
It’s a planing spike I assume? Great things. Bit quicker than a holdfast and less in the way too. You can make them out of old scrapers.
https://paulsellers.com/2015/03/adding-a-flush-bench-stop/
One advantage of a garage or basement shop if it is connected to the house or within a few feet is that when you have a spare moment you can get in do a little work without wasting time traveling. No excuse not to go to the workshop, because of inclement weather. Maybe all the time you have is afterwork and before bed or weekends. Its nice if the shop is attached to your dwelling.
It is surprising the quantity of waste material that gets generated from small scale endeavours. Last winter my mother in law received between one and a half to two tonnes of seasoned, mostly recycled offcuts for her combustion stove. As long as they are not treated and have no paint/varnish residue into the collection bags in they go, down to the size of a matchbox. She stayed warm for no cost and it was better than the current alternative of the council waste stream where it would be buried to rot. The chips and sawdust go into the compost for the garden and the shavings line the guinea pig hutch which then also end up in the compost. I wonder sometimes how much material is actively repurposed by fellow woodworkers who do it not only for raw material usage but also to give the supposed waste a useful purpose. It seems to be a difficult thing for a lot of bigger scale businesses where I live. Apparently not cost effective.
Of all the YT channels I follow you are the best Woodworker hands down. I watch the others for entertainment but you for knowledge. I have been in the trades for 30 years but doing real Woodworking only 5. By real woodworking I mean not just but jointing two pieces together and hoping they don’t warp. Thanks!
Your last workshop??? No I don’t think so. You’ll be setting up workshops for decades to come. Just as you have set them up for decades past. You set my workshop in motion here in the southern U.S. and it runs most efficiently.
Hi Paul. It’s great to see your enthusiasm for your garage workshop I moved my workshop out of a spare bedroom bandsaw as well long bench cabinets full Monty. Now in the garage it feels like I’m in a different place e that I’m happy to be in. And what is great other guy’s on the road working in there garages come down for a chat and a laugh it don’t get better.
Regards Larry.
I am very much looking forward to seeing that new workbench being put through its paces.
I live in a place where the oldest buildings are around a hundred years old.
I would love to work with my hands in a castle 🙂
Paul, would mind publishing the modifications you plan to make to your workbench. My son and I each just finished one and have been contemplating what shelves and drawers we will add.
Many thanks.
We will be passing on the work through more videos, Harold, yes.
I would work in a castle.
It was nice for a while and I enjoyed it but I plan to enjoy the coming years in my garage a hundred times more. The castle was a toy for a rich slave owner who lived off the backs of sugar plantation slaves in the West Indies and Welsh slaves mining slate in the Welsh mines. Nothing to be proud of really.
Nice that you and others who were there gave it new meaning.
Any chance we might see a sketch of the layout of the shop? I am very interested in your opinion and experience as to what a 3m by 5m work pace should look like. Your work, ethic, values and descriptions are the very best examples of professionalism on YouTube. Thanks for sharing your knowledge.
For those of us not in the UK. When you said “and snagging is all done”. what does that mean, thank you Paul. You have been a great mentor to me.
Snagging is the critique at the end of a building project when the builder goes round looking for anything that needs a little extra attention. Undone work gets fixed. In the US it is a punch list.
thank you
Your work is so well-explained and the beauty that comes from it is remarkable. Thank you!
Hi Paul,
I have my PS workbench in the garage, which is used everyday , however it is clear now I’m struggling when it comes to how to set up the 3x4m space I have.
I have consulted a few books on workspace and flow design but nothing seemed to sink in. Also storage of, tools offcuts and the like I just don’t know.
Could you maybe outline a setup for a garage as an everyday worked in workshop?
Thanks Paul
Nathan
Nathan, one thing I have learned with WWMC, all the books will be wrong. Sure there are some common threads but everyones space will br different and unique. The best a book will get is how ir works for the author. The best starting advice I think there is, is to find your favorite spot at the bench, collect your favorite tools and see were you can store them with in a single step. And then wirk out frim there.
I stow my tool chest to the left if my bench, vise to my right, and my sharpening station behinded me. I am right handed, but my setup is typically left handed.
Thanks Evan,
Very insightful share.
I’m not sure if I’m at the level you sound like you’re at.
I will contemplate at my workbench ,which tools might be best closest by.
The space of my garage is actually 5m X 5m. Plenty of space. And it’s pretty empty.
No tool chest yet, no real storage either, however there’s certainly been a surge in used hand tool acquisitions and my bench is 7’10.
For the space to be creative it feels like it just needs to have space around things. Not to much clutter. Be the obv, be practical.
Looking forward to the revealing of the the new garage.
Thanks Again
Keep following the upcoming videos as I set mine up. I will be adding to my workbench first and then wood storage including offcuts next. Im going to hang a shelf unit for less used tools.
Alright I will be watching with a keen eye.
Thanks, can’t wait.
Everything is starting to take shape.
I think I use more machines than you, so a slightly larger footprint is my preference. That said, I completely agree with your remark about headroom, too low a ceiling is a far greater annoyance…especially with a small footprint!
Thanks again for another thoughtful post
“Your hand tool workshop is where real living begins. All else is just an alternative unreality. That’s the way I have always seen it.” 😀 I had to laugh at that, as I recently told my family, only half jokingly, that I had come to the realisation that I have inadvertantly stopped living in the real world, which I find increasingly displeasing and unpleasant, and instead now live mostly in a more limited but far more pleasant world of my own! 😀 I am sometimes forced back in to reality but do what I can to minimize such unpleasantness. They just nodded, as it they already realised that 😀
BTW They accuse me of referring to people on the internet (“Paul Sellers”) as if they were real people that I know. 😀
Teaching teachers, Yes! and keeping the record. My daughter, who plays viola and violin beautifully, can trace her teachers back several centuries. The past comes alive.
Like it does through your blog, for which I thank you.
Paul I have not the time to read all of your comments. and I know you probably don’t have the time to read all of the comments from everyone so if you don’t have time for what ever the reason to read this little comment. But as I have said already in a earlier post I asked you this question why would you put a “new era” brick wall behind your work area “bench” as to my reasoning you being a Wood Working Man. I would think you would PUT install a Wood wall of some nice design! So why the brick wall? and IF I missed an earlier post answering this question please forgive me.
John, I may be wrong but I would presume the brick wall is to simulate a typical brick built domestic garage that is so typical of many home woodworkers workshops. It lends an air of authenticity and of course if cabinets and shelving need to be fixed to the wall then Paul can demonstrate this on a masonry wall rather than on a less typical wooden (partition) wall.
My last four home workshops were brick-built garages. They were/are solid and water proof and easy to anchor things like shelves and cupboards too. In the USA stick-frame garages and homes are as common as brick ones are to the UK. I am going with the fact that our survey showed us that the majority of people have a workshop in a single car garage. Brick was a nice contrast for me and I love brick anything regardless. Additionally, for all the years I have had my blog I have read every single comment anyone puts the effort into personally. Unfortunately I cannot answer every comment. Thanks for writing.
Paul, are you planning to add the Workbench Castors with the “Simple foot lever (that) elevates the bench onto wheels” which you used on a previous bench? (see Paul’s blog LIFT OFF! ADD SOME SIDEKICKS FOR GREATER MOVABILITY).
I’ve spent that last 2 months clearing my garage, dumping the junk; built shelves for all the other power tools and tool boxes I’ve acquired over the last 20 years; put up shelves for ‘non wood working activities…’ etc; mounted my workmates, trestles and temp work tops on the walls – and can now see that I do actually own a garage floor, and consequently how much usable area I can/will have.
I am about to make a start on the PS workbench (top slab wood has been acclimating for a few days) but an issue that I know I WILL face is being able to move the bench out and around from its designated spot against the wall. The castors that you used before are rated for 220kg and I was wondering if your experience with these (in use from Feb 2015) has been a good one?
rgds
Mark
Yes, no complaints with mine at all. I reordered the same ones.
Regarding pallet wood, I work in a place that gets many pallets each day that that are not usable on the warehouse racks and are headed to the mulcher. I’ve found several pallets of maple wood and after sawing open the large 4×6 runners have found some very nice burl. All of this was used to make a cradle for a co-worker’s new baby boy. I just added a picture to the gallery on Woodworking Masterclass. We’ve also found walnut and quartersawn oak on pallets which we’ve used for table legs.
When I lived in Texas a trucker used to stop by and leave me 2×4 skids that were solid and dry cocobolo. You never know until you look.