A plane difference
I have written my book on Essential Woodworking Hand Tools and left some tools out because owning every tool in the world is mostly unnecessary and especially is this so for new woodworkers who often turn the pages of catalogs and find themselves bewildered. Of course, we should be able to believe that every tool should work and work straight from the package. Truth is, if you buy a new bike or a new car, you don’t expect to have to tune them before you start your journey. Many hand tools, on the other hand, whether they arrive good to go or not, need periodic sharpening and most likely will need taking to task every few hours or so. It is good when a tool is ready to cut straight from the box and that is a recent phenomenon. I think it is likely that Lie Nielsen was maybe the first to offer edge tools ready sharpened and finely honed. The contrast between the old-school makers who ground their bevels to 25-degrees and never put an edge that could be used to them and Lie Nielsen was night and day. This then gave Lie Nielsen the edge over the former competitors who have steadily declined in both manufacturing standards and output. I believe that their demise came because they relied on their ancient and outmoded reliance on a reputation that was not a reputation based on good codes of work practice. They thought that they were the best but they were just slightly ahead of low grade. For about ten minutes more work they could produce a really decent plane, but their arrogance and pride makes them blind to this simple truth. Their planes now come with built-in flaws that should never have been there, but if you treat them like a kit, replace the plastic handles and spend a couple of hours with a file and a wire brush, you will have a decent plane to work with. Buying one on eBay may well be ready to go with a little spit and polish as the previous owner/s will likely be an ex joiner who already fettled it.
I say all of the above to say that you don’t need the list on the ‘Salesman’s guide to buying new tools‘. You will only end up with planes you may never use sitting on shelves gathering dust and the admiration of friends who think you are tool rich. You don’t need either, listen to your Uncle Paul! You will do just fine without them and without calling yourself a minimalist to qualify yourself either. Let’s just get real. Go to commonwoodworking.com to find a mass of free information on tools that we have put together over the years to get you started on buying them in, using them, adjusting them and maintaining them for daily use. We refuse all kickbacks or free tools. Of the hundreds of different project videos we have produced on woodworkingmasterclasses.com, the tools listed on CW are just about all we have ever used. When I wrote Essential Woodworking Hand Tools it wasn’t to produce anything more than core information on the most essential tools I’ve fully relied on throughout my work-life as a woodworker. I decided later to produce an occasional ‘Tools Worthy of Honourable Mention’ page to introduce planes and other tools that, because I already own them, I tend to use them. These are tools I might not buy for that occasional-need use because I can adapt some other methods to get where I need to be. Things like shoulder planes, draw knives, scorps and such. Why are these in a category of non-essentials? Well, perhaps non-essentials would be better put as lesser-essentials. They are often tools that are perfect solutions in certain situations but other tools can be adapted to solve an issue with as good an outcome as with the more special tool. Remember too that I want new woodworkers to get the core essentials first and even buying the way I suggest, it can still run up the costs to more than some can afford.
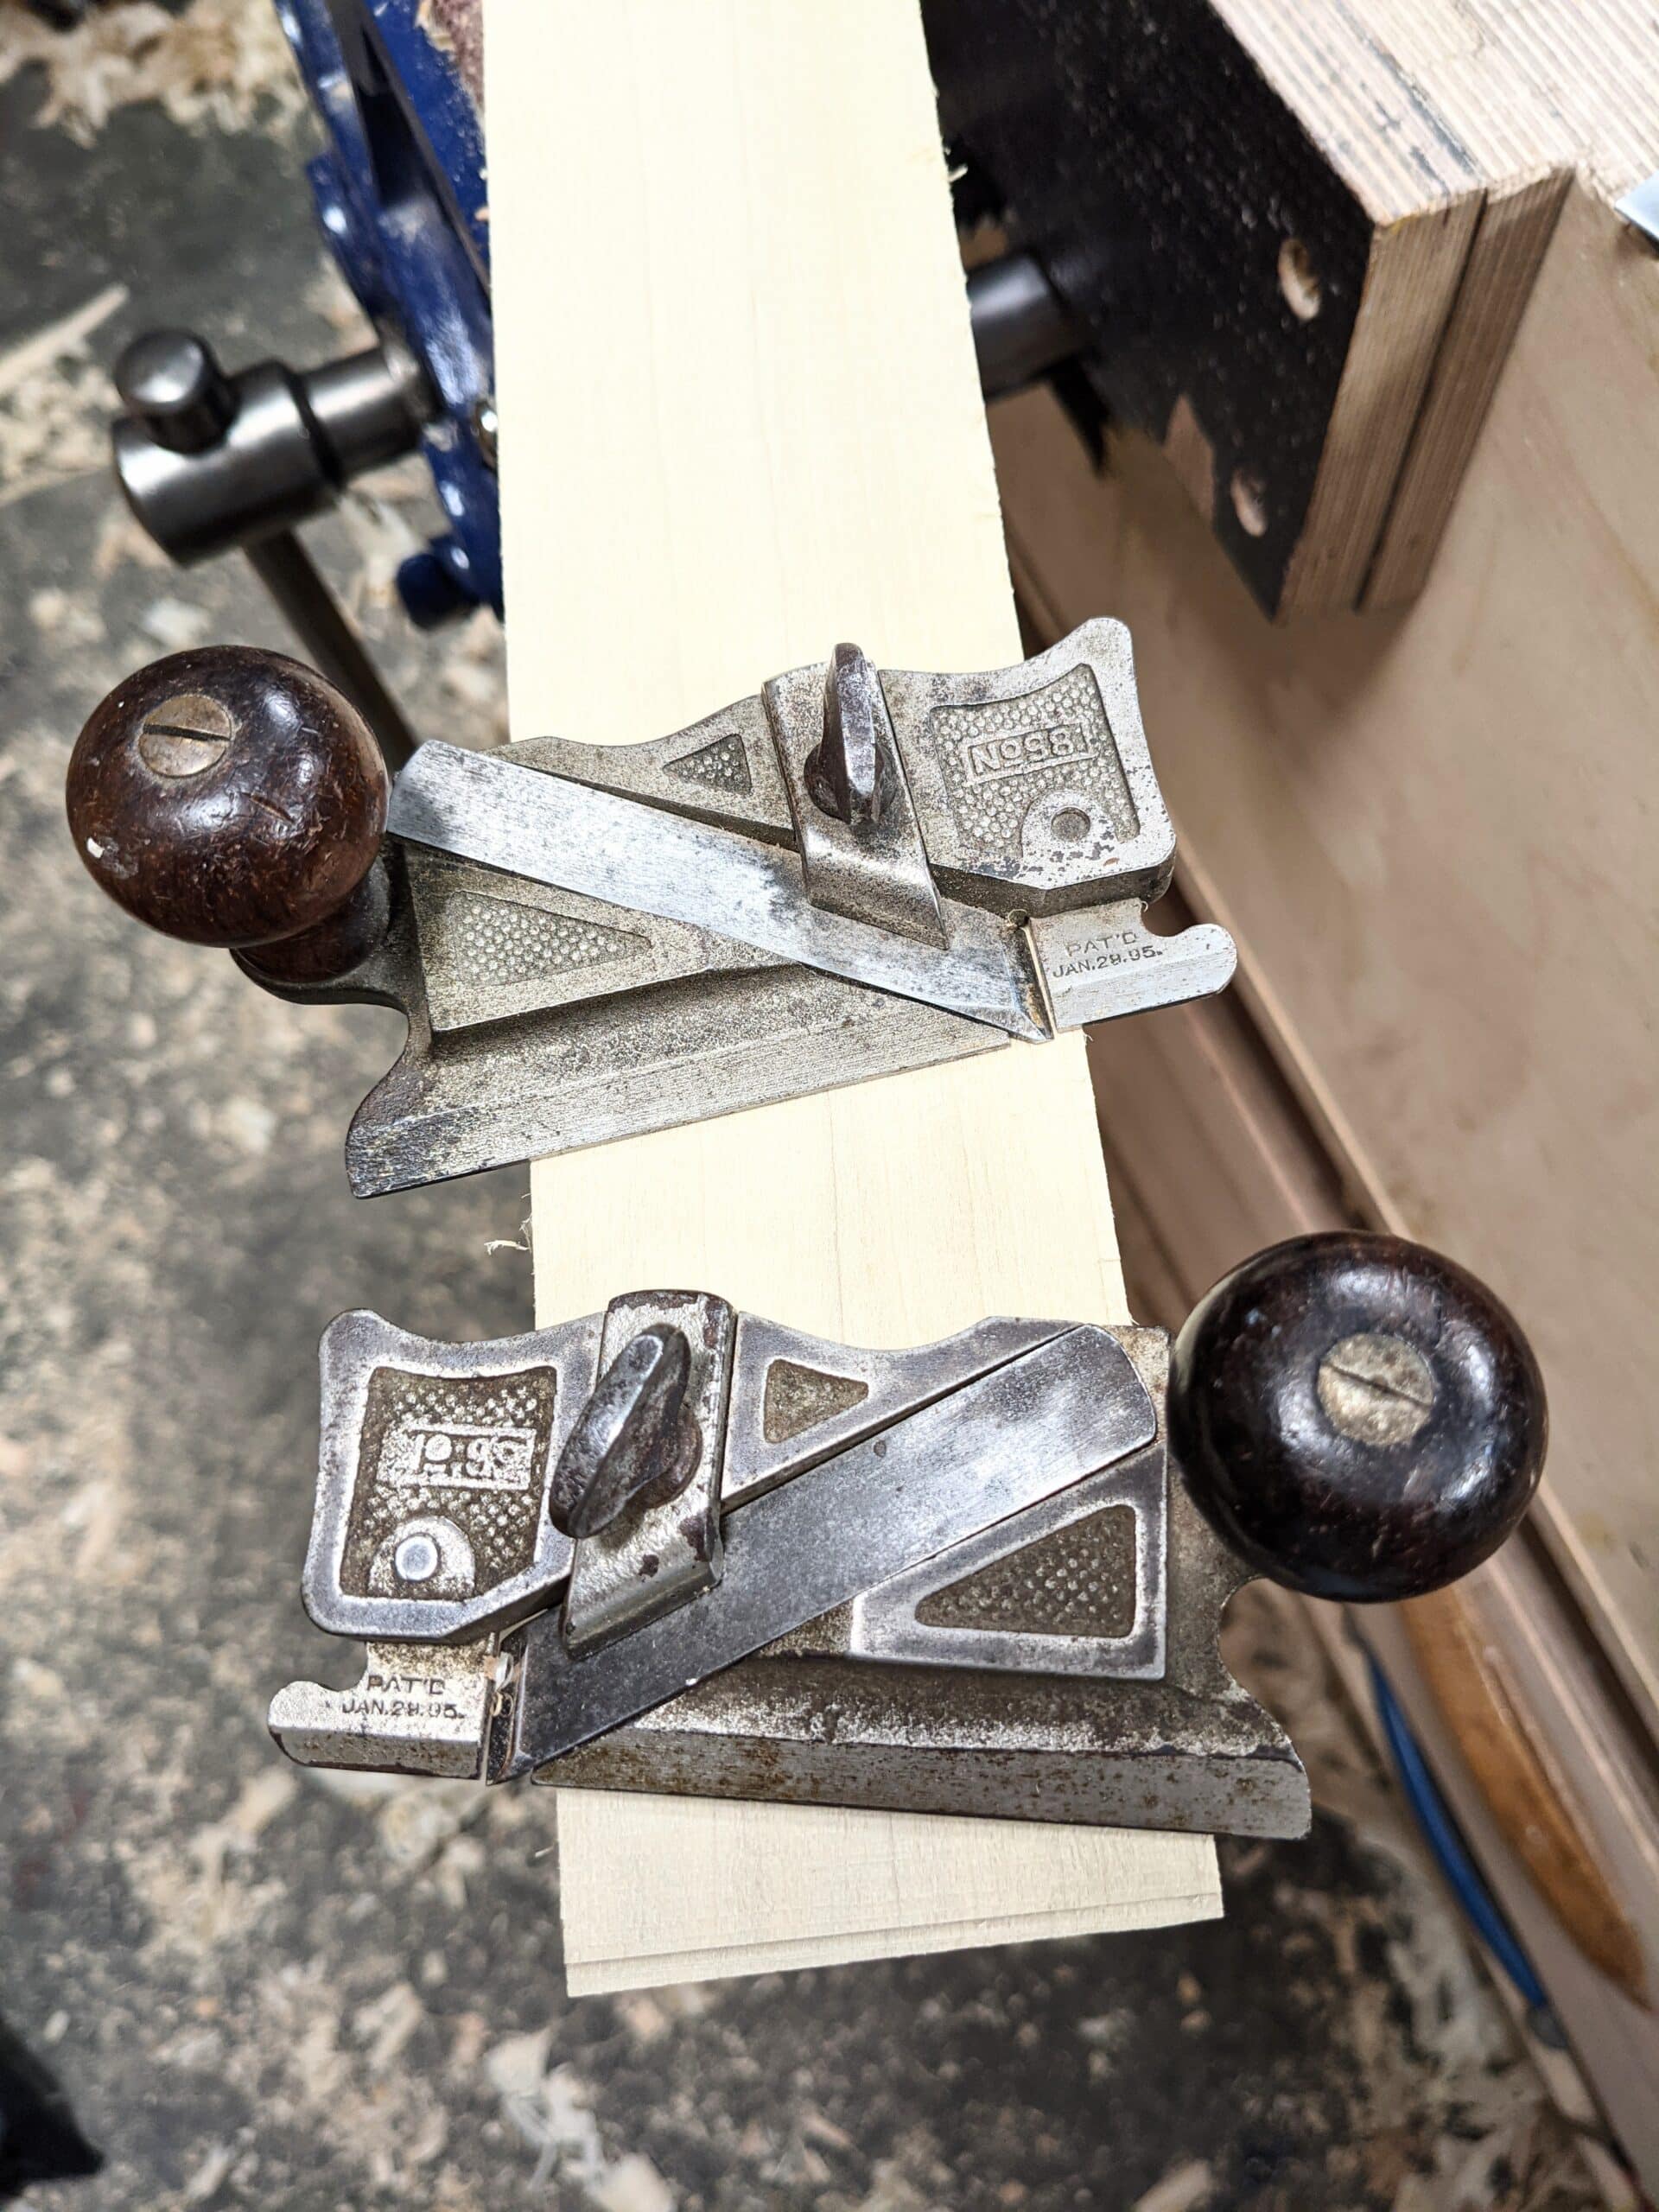
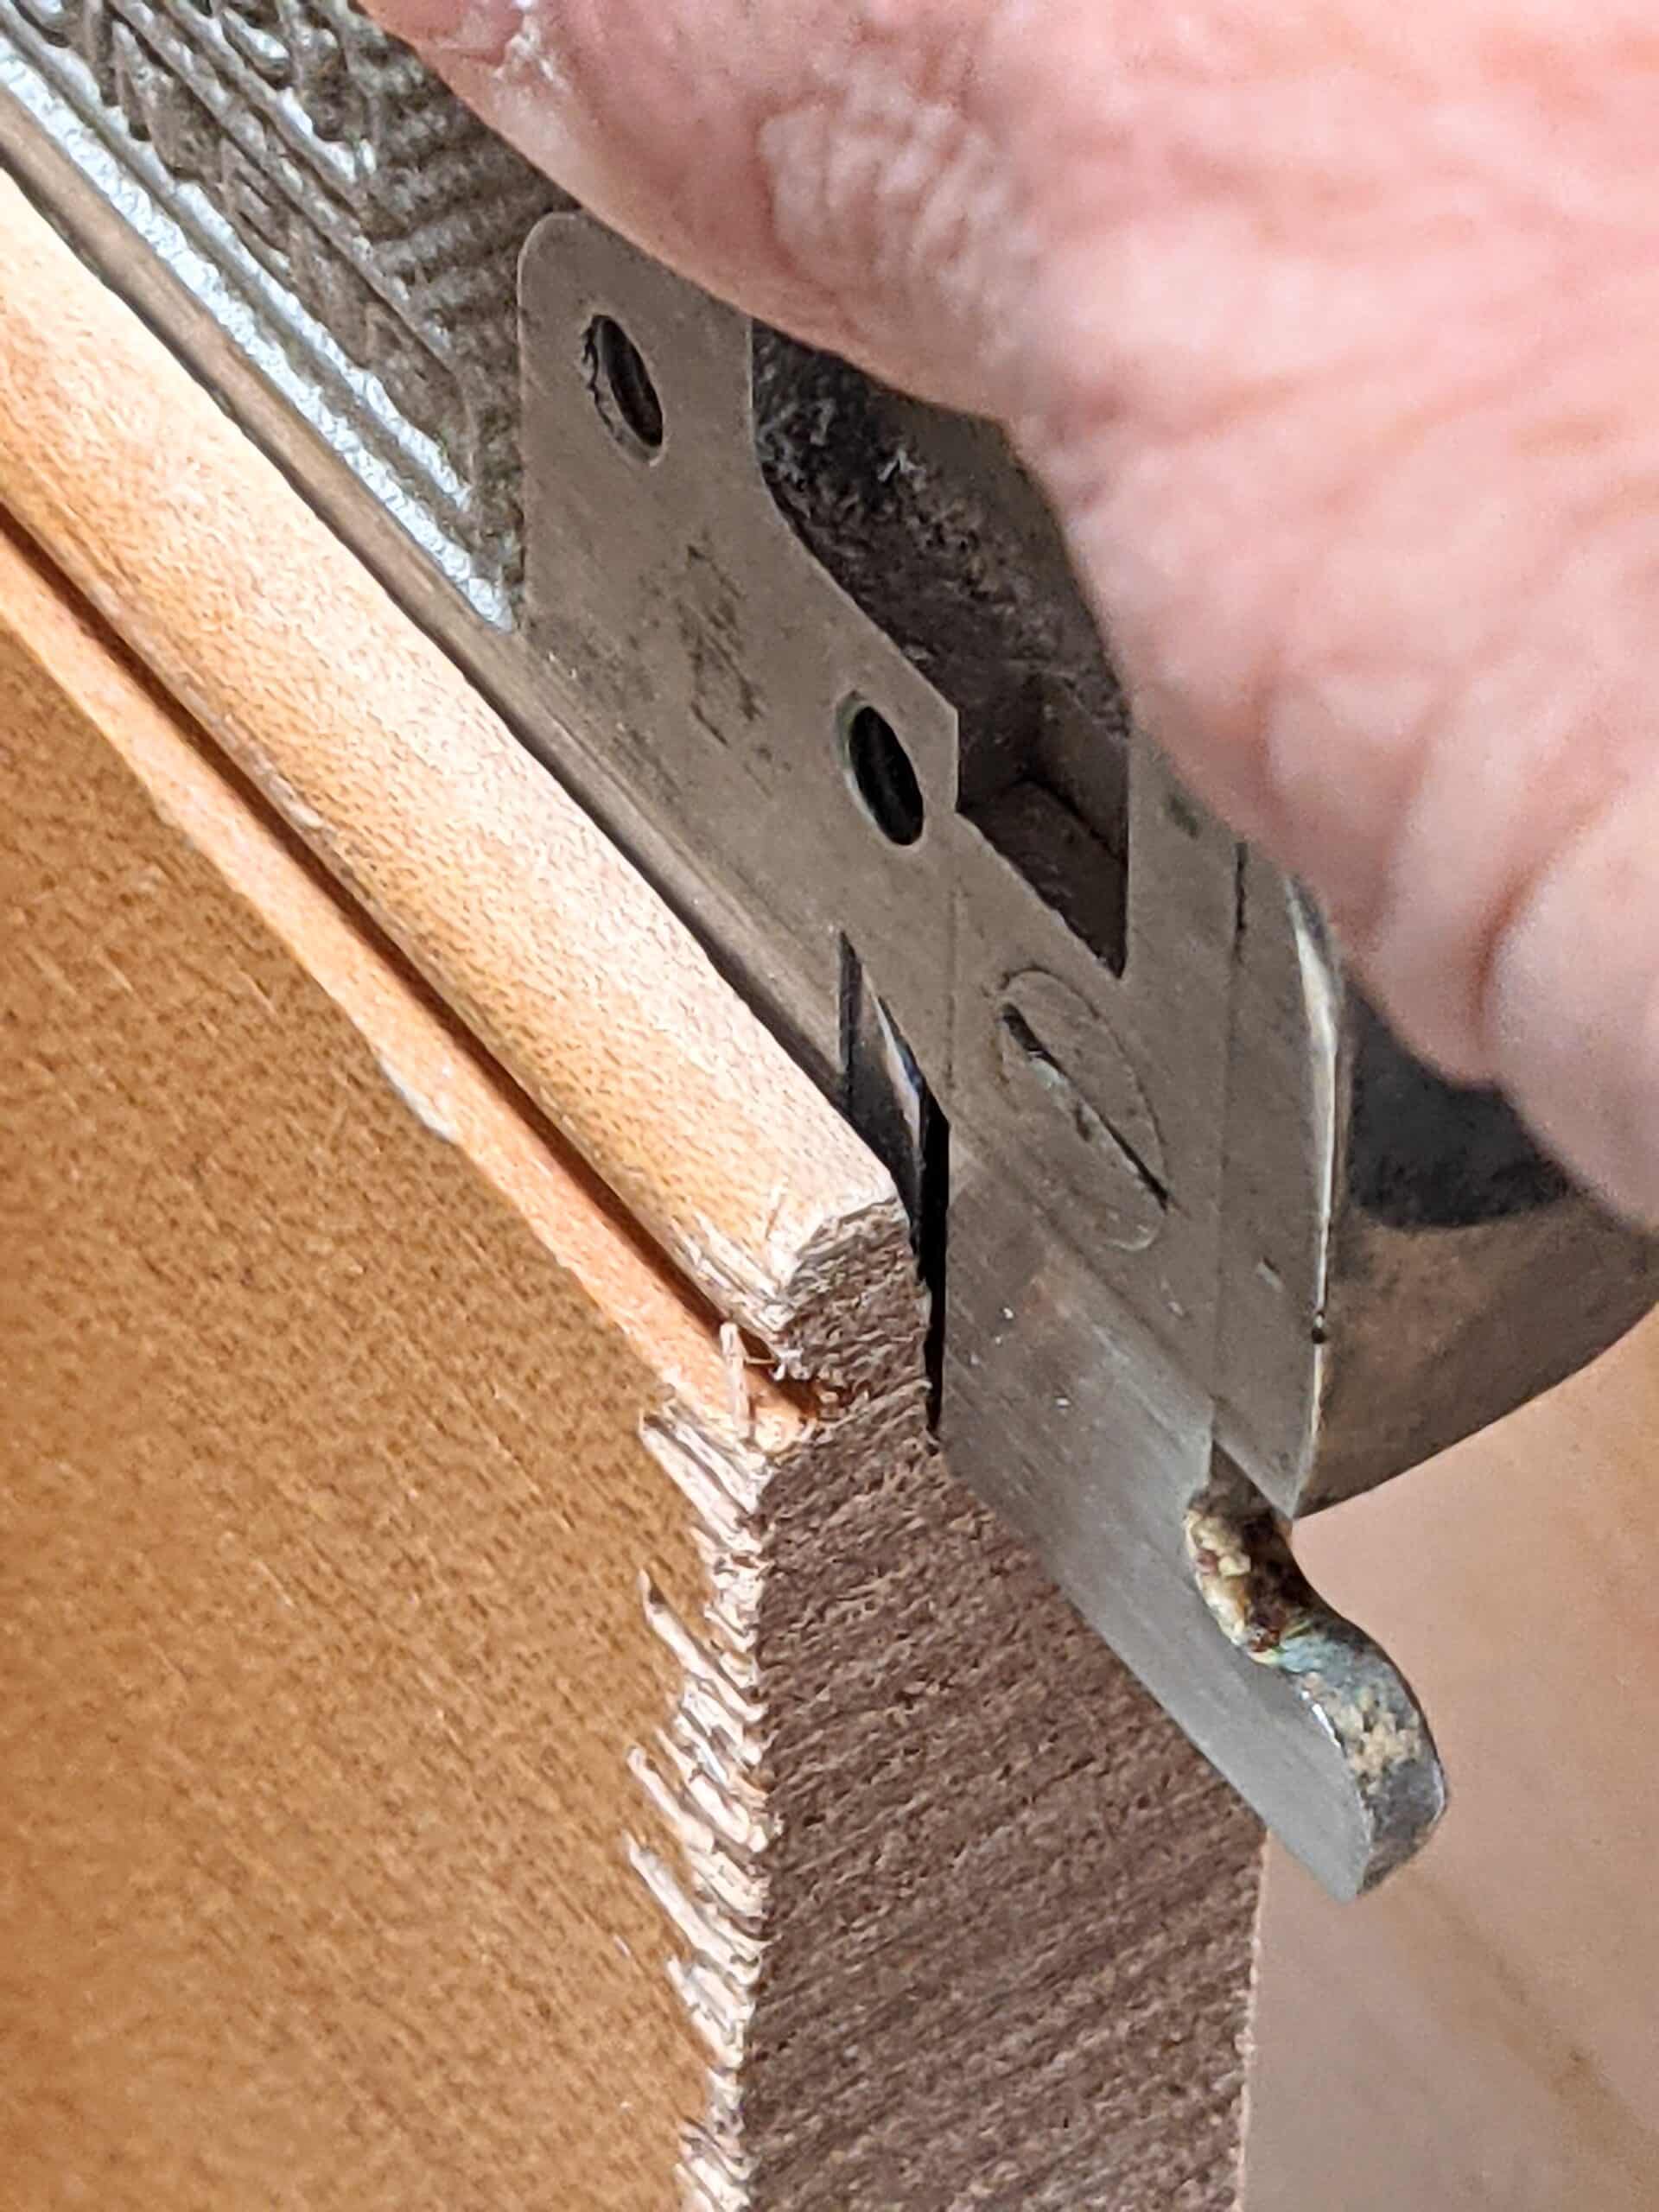
The plane I want to talk about is the side rebate plane produced by Stanley and then Record and then Preston too. Some side rebate planes have one blade in them and thereby require two such planes with the blades offered in two opposing directions to deal with opposing grain and the opposite sides of grooves and such. The two-bladed versions offer left- and right-handed in a single plane body so when you encounter situations where an opposite direction is required you can simply flip the plane over or end for end or use it on a pull stroke to resolve adverse grain issues.

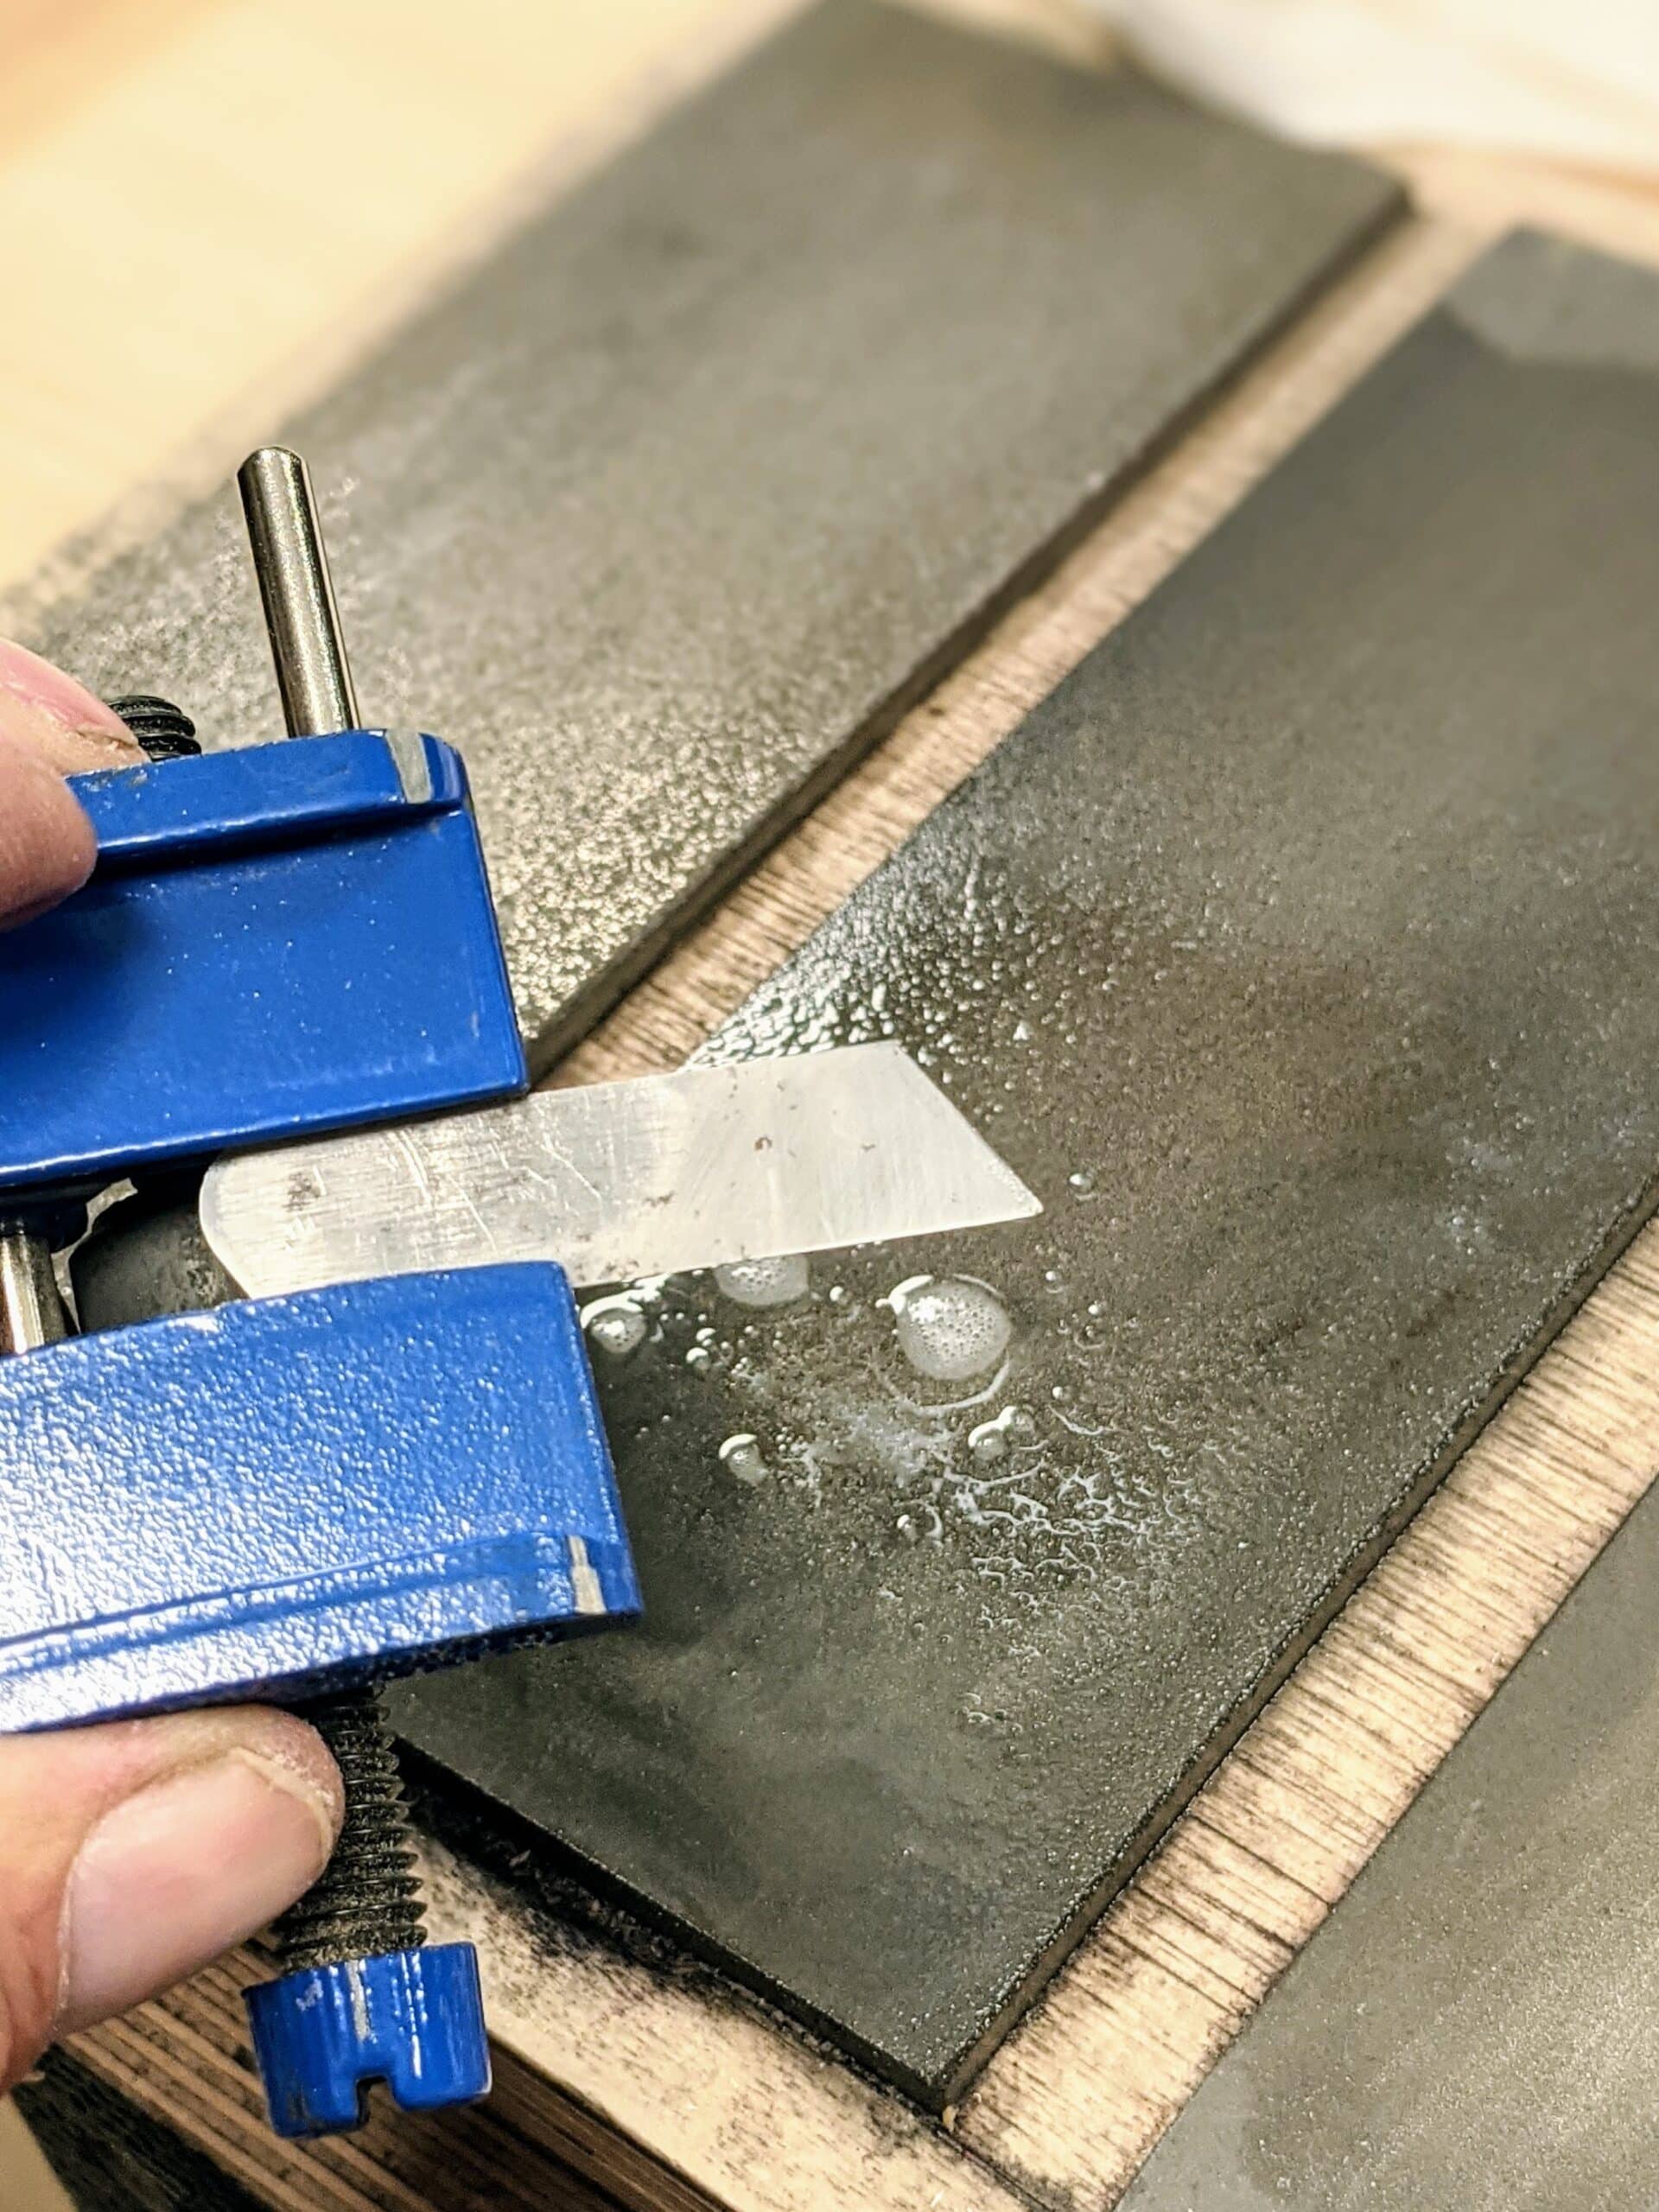
This side rebate plane by Stanley came from a recent eBay purchase to see what condition a previously owned one might be in if someone did the same as I and what they might face if they bought one from there too. It’s in fair to good condition, totally usable and fully functional apart from a missing depth fence and the former owner seemed to me to have used it extensively. He/she did, however, need to get new glasses or a different way to sharpen because the bevels were so unevenly cambered it would be impossible to get the vertical cut you depend on this type of plane for.
Side rebate planes are designed to take off shavings of even thickness from the wall of a groove to increase the width of a groove and retain top-to-bottom parallelity or the side wall of a rebate somewhere. If the bevel on the cutter is uneven in pitch or angle, the cutting edge cannot develop a parallel cut from the wall of a groove or rebate wall. This may not be obvious when you first try the plane.

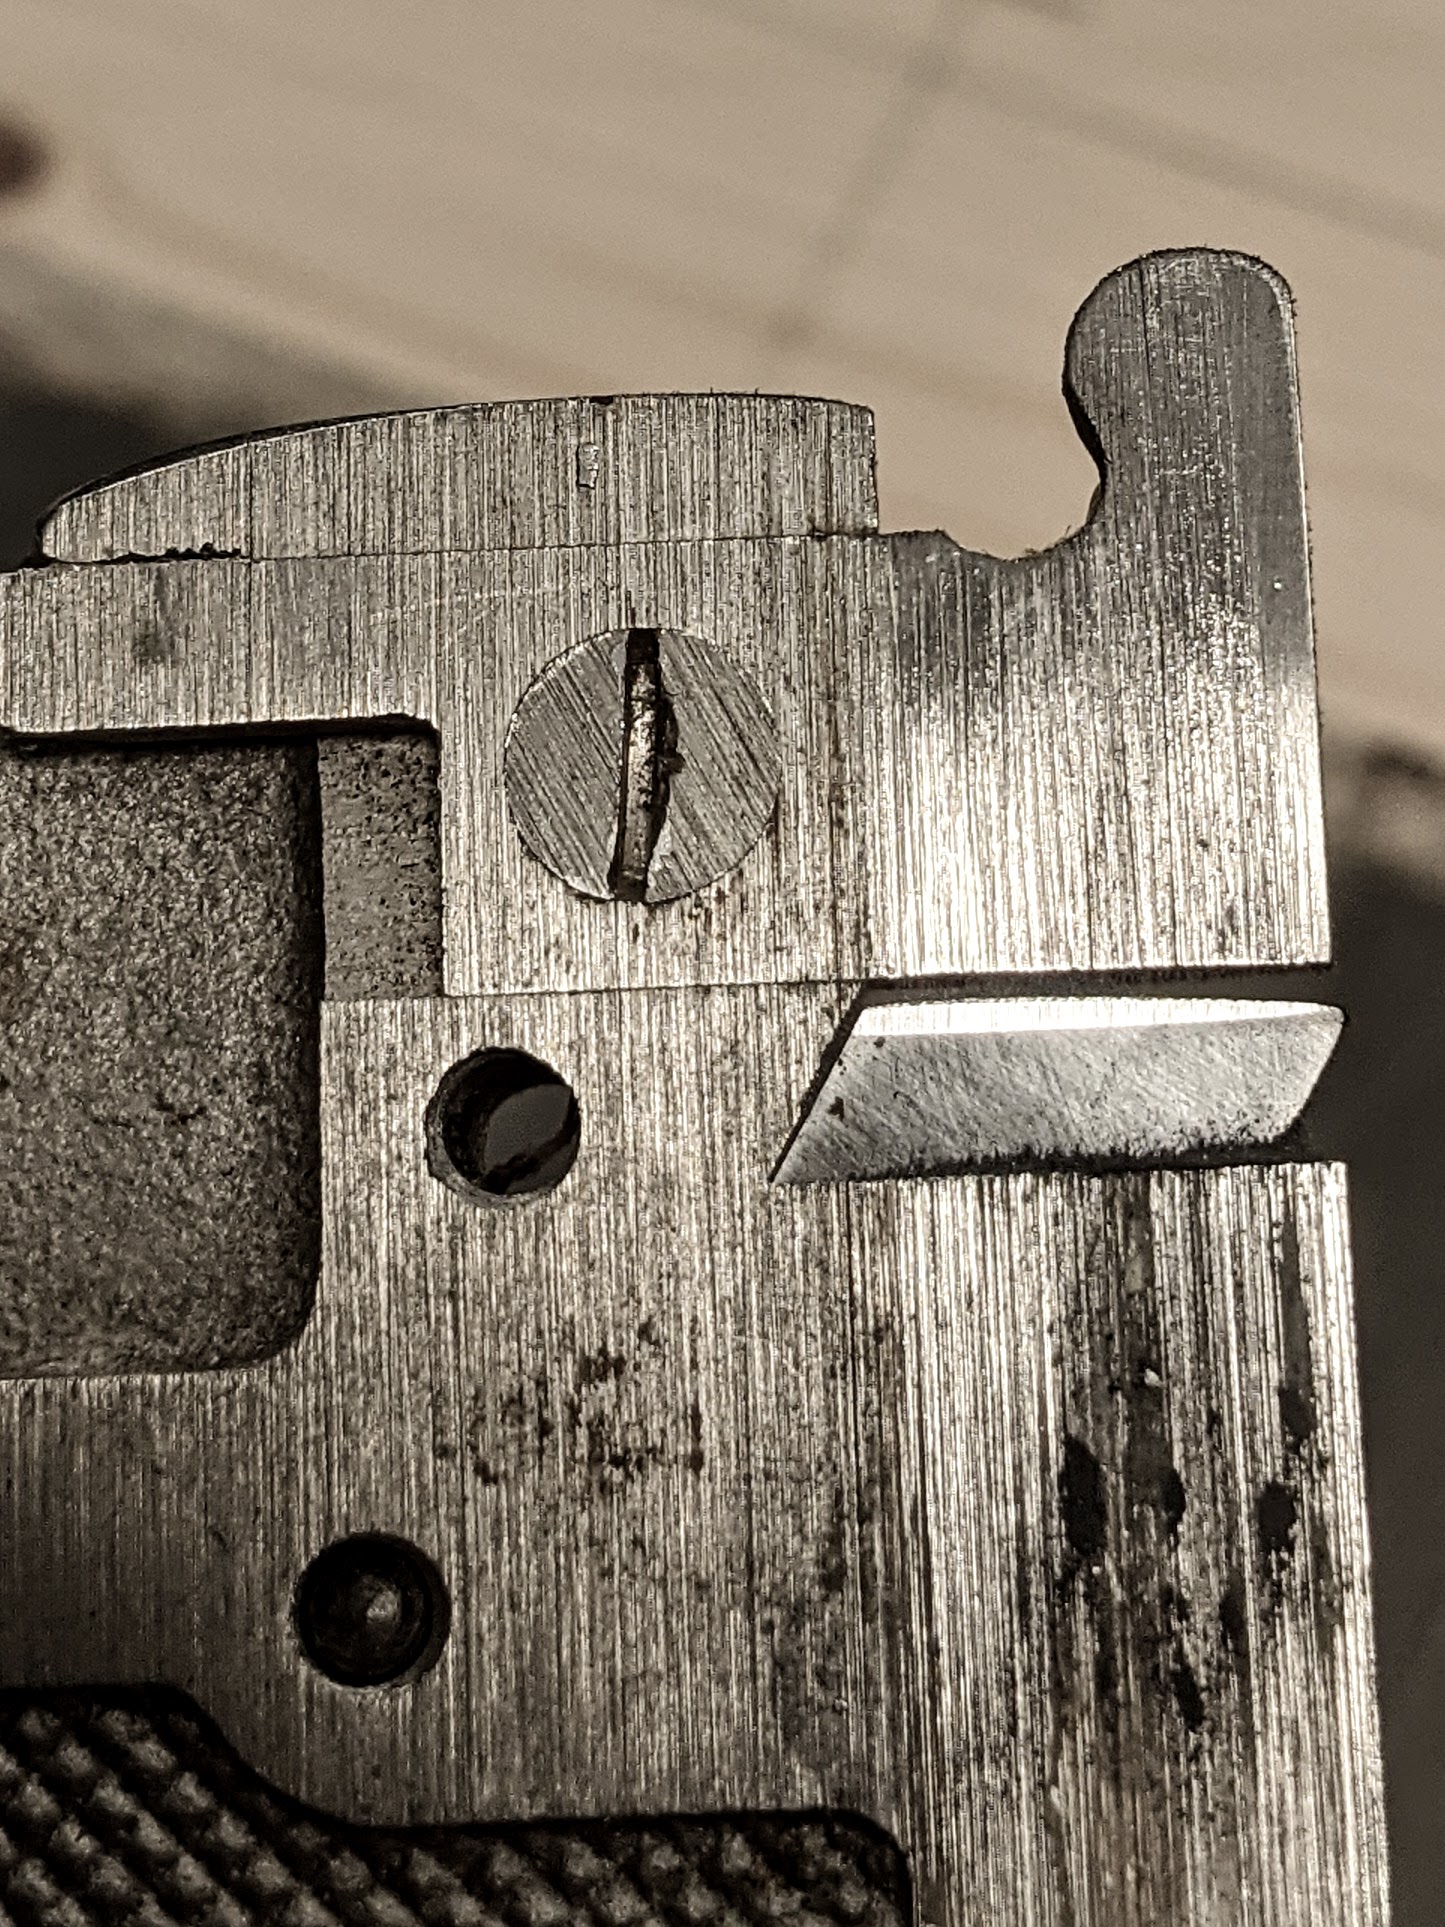
Think about the sole of this plane differently than you would any other plane where the sole is beneath the verticality of the plane. Think of the sole being on the side of the plane where the blade protrudes. Then you will understand better what I am speaking of.
This plane should not be confused with the earlier wooden version of the plane which had a much taller cutting edge and was often used with a combination of other planes known as moulding planes. Whereas the vintage wooden version did skim off shavings in similar fashion, they were used to refine rebates in mouldings and door frames where the Stanley version could not go. They were also used with unique moulding planes like snipe bill planes and various moulding planes where grooves were run along the face of say a skirting board or architrave to allow moulding planes of different profiles to further develop across the width of a board. Remember that the skirting boards we use today (base trim in the USA) were not simply a bullnosed top corner in 1/2″ thick stock, 3″ tall. No, some skirting boards were upwards of 12″ tall and some were made in two or three parts to build one on top of the other. Mouldings were ornamentation of the most ostentatious kind in some houses and offices, museums and such.

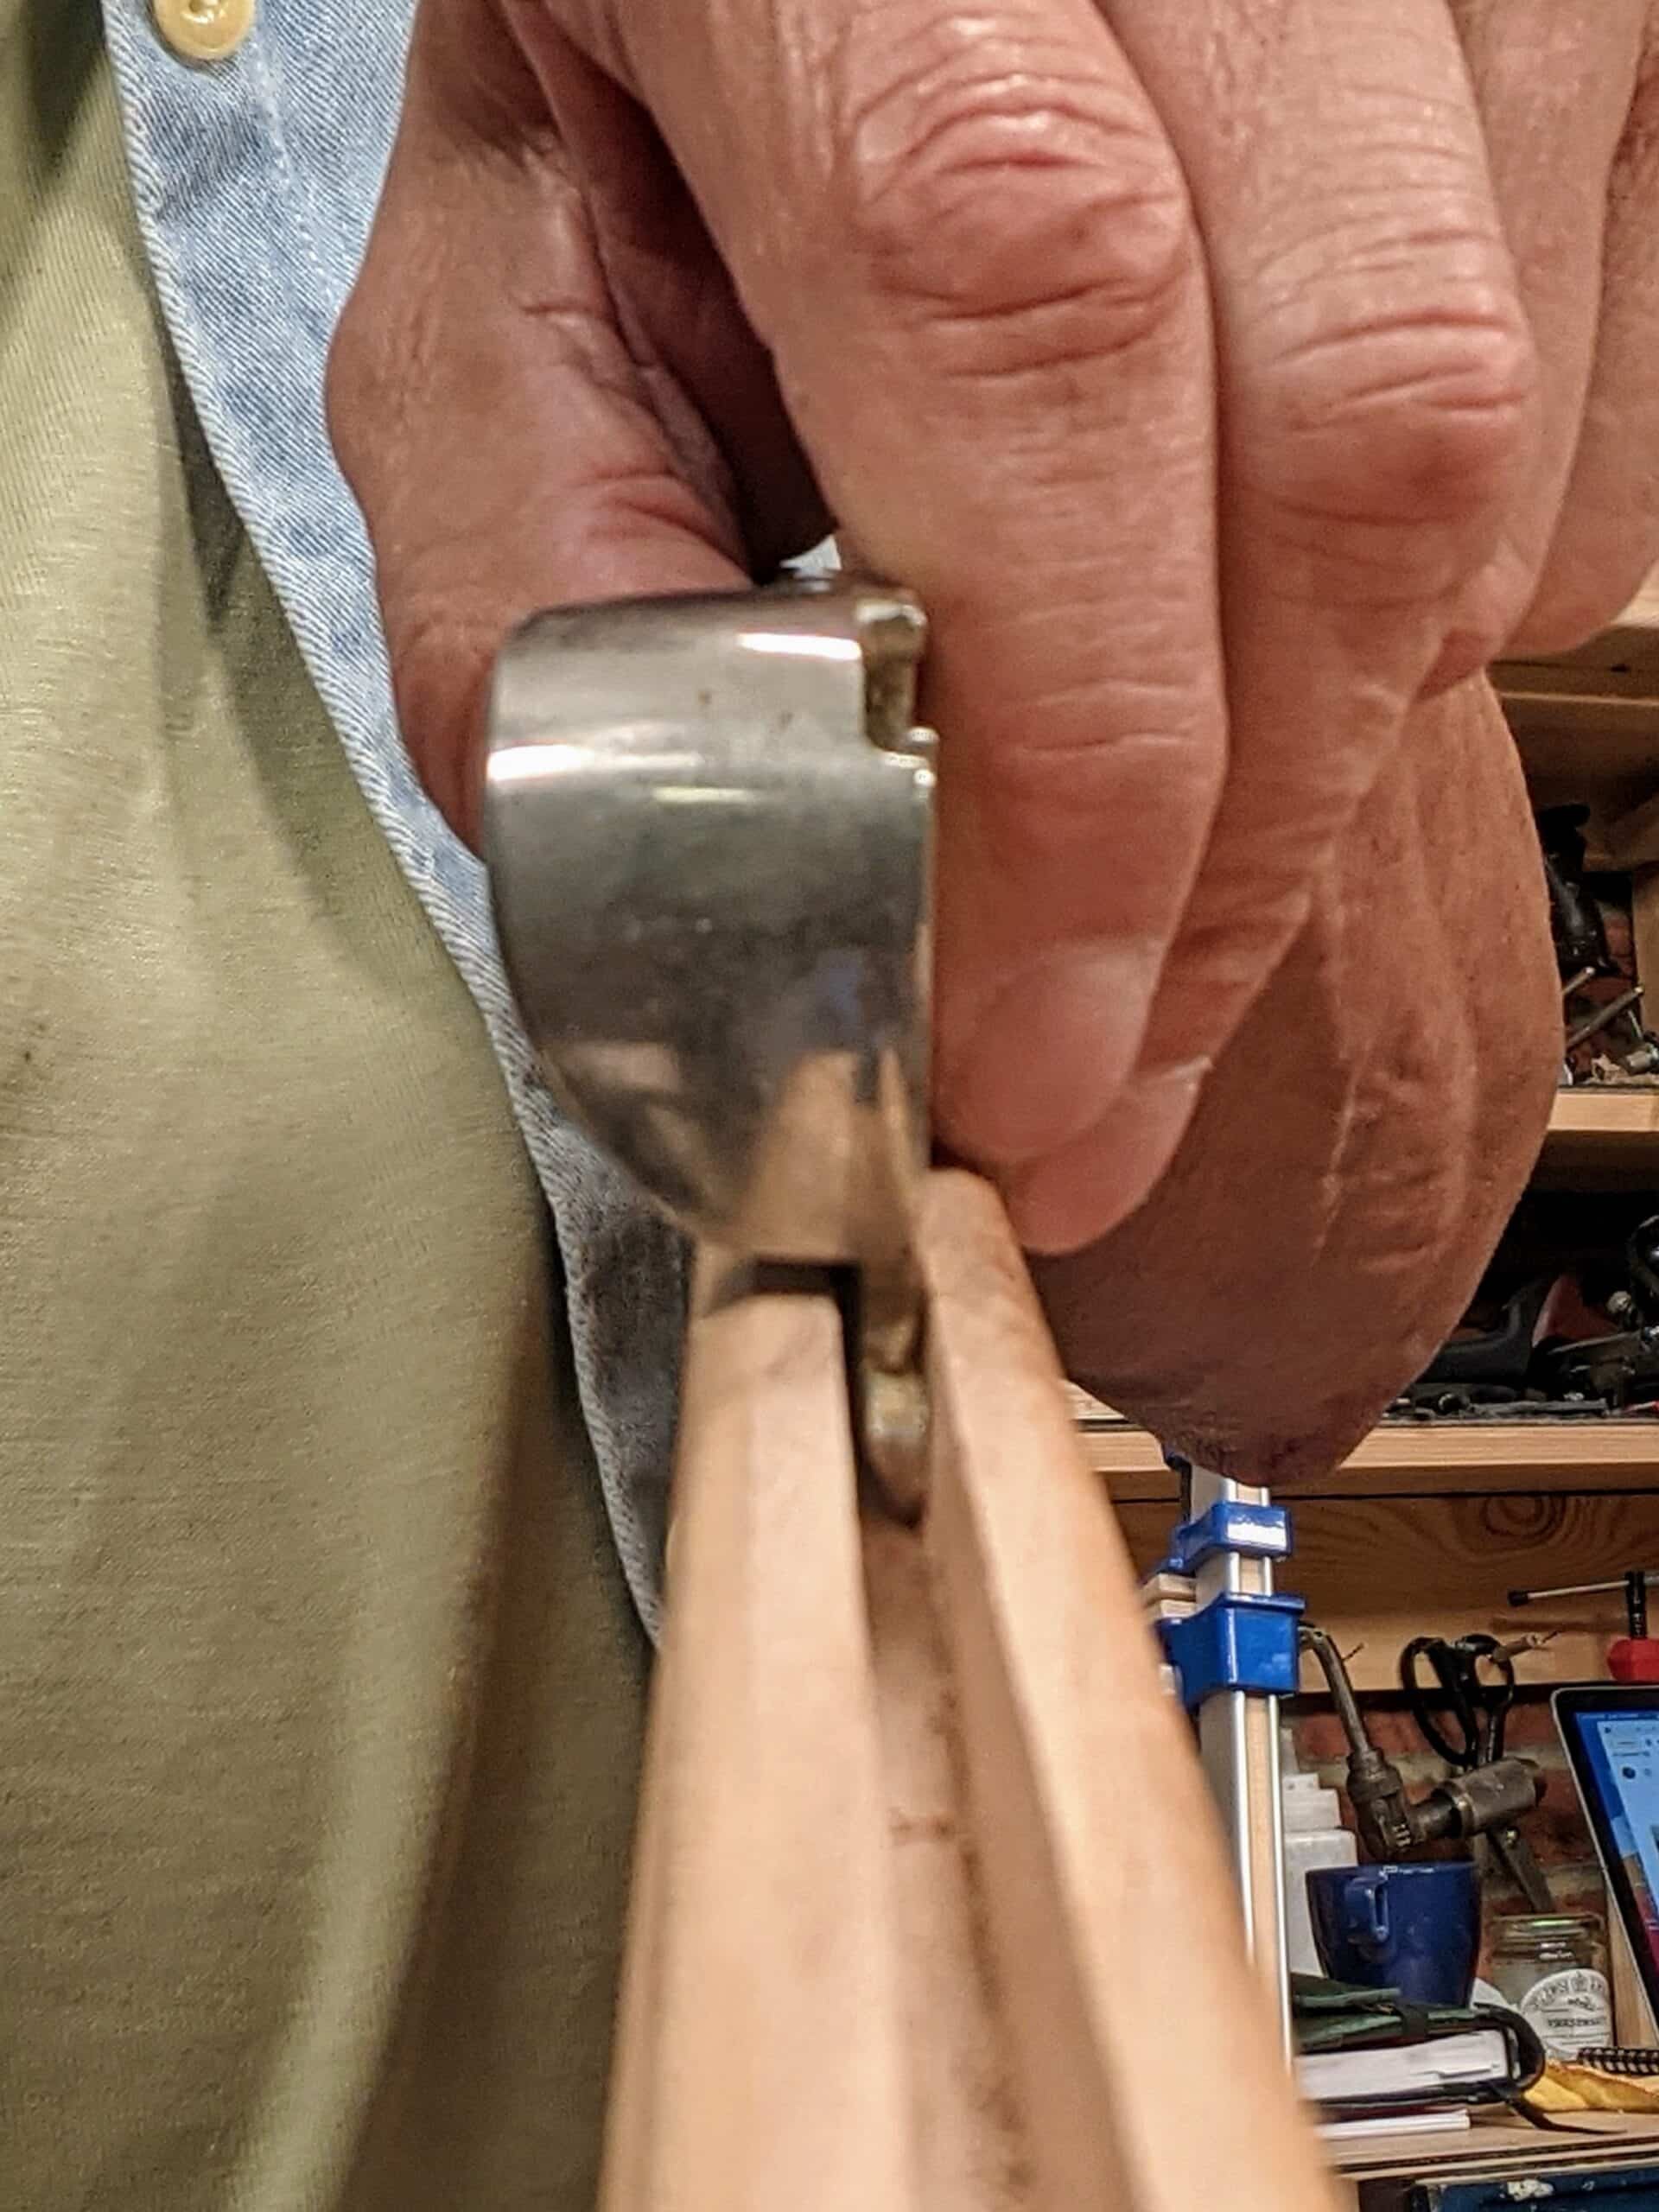
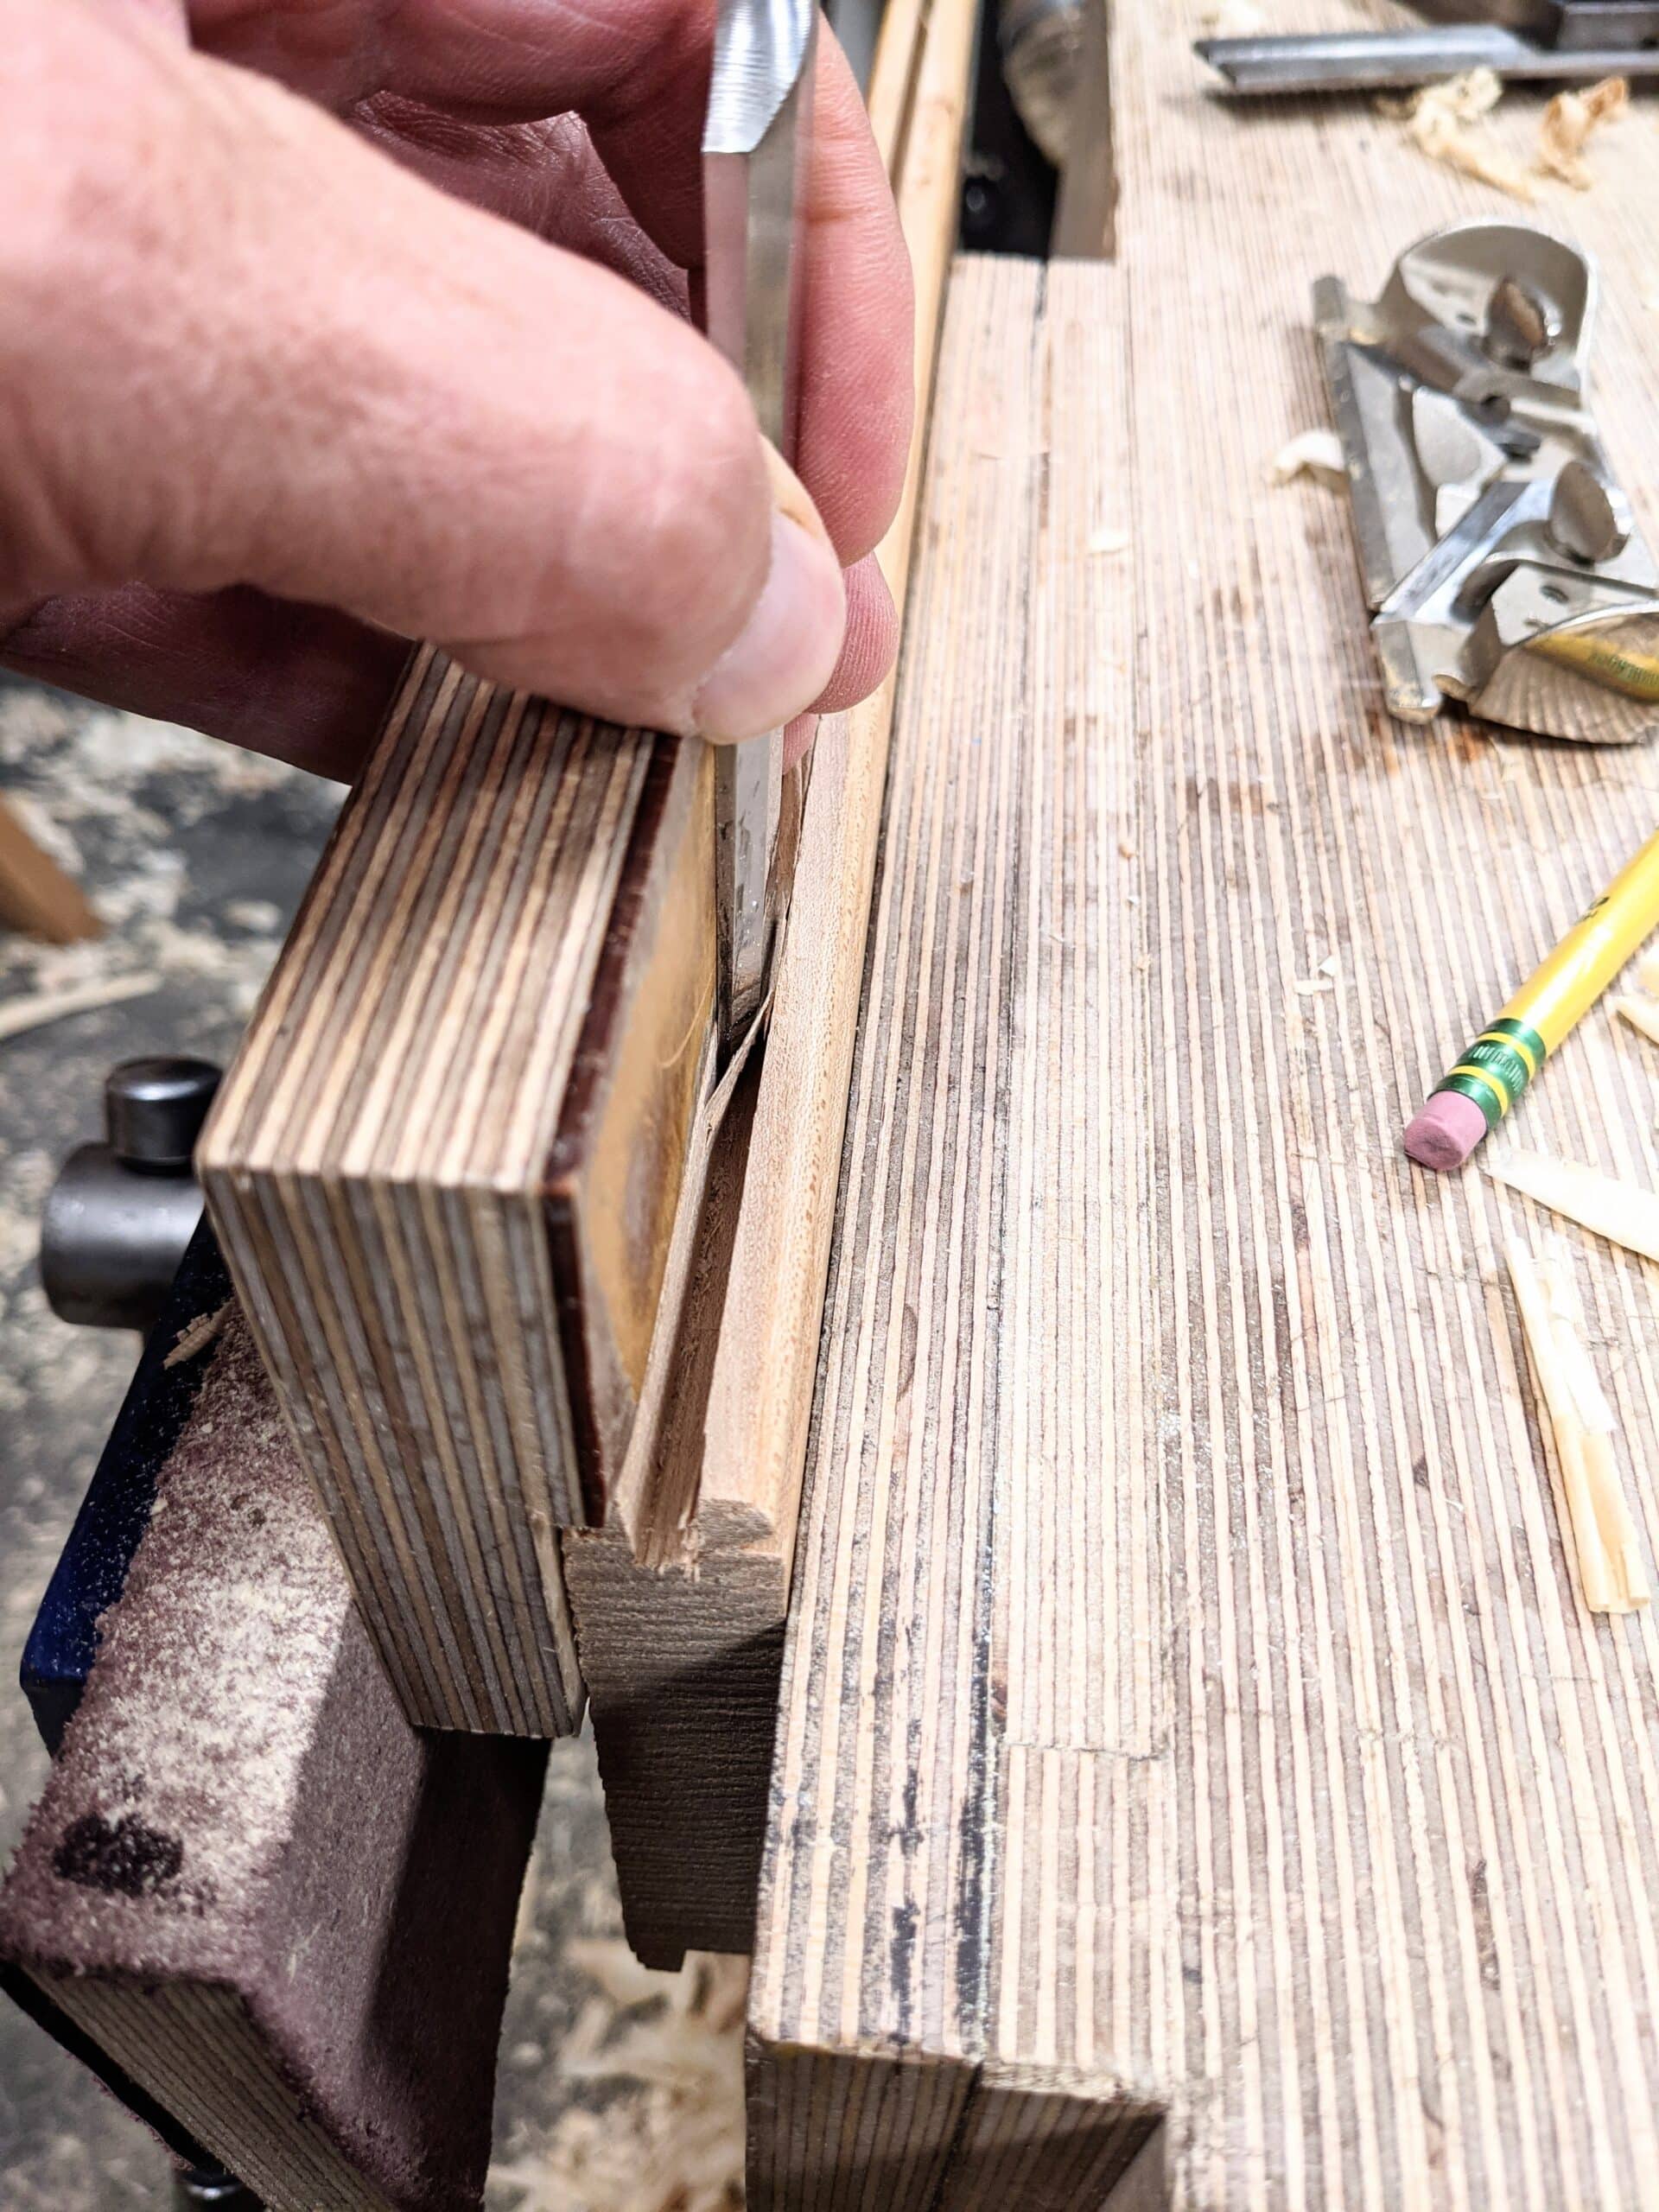
To begin recalibration on my newly bought side rebate plane I checked all of the component parts to make sure there was nothing holding off the cutting irons or anything that might prevent a good lockdown to the cutters etc. Beyond that, there is not much to these planes as they are without mechanical adjusters. Both cutters had badly formed bevels made worse by repeated sharpenings in the wrong hands. By extending the blade just slightly beyond the sole face (that’s the side face, remember) I placed the plane on the fine diamond plate and rubbed just once or twice ever so lightly. This highlights the ‘out-of-squareness’ caused by uneven abrading of the bevel by the previous owner and at the same time serves as a guideline to file or abrade the cutting edge to.
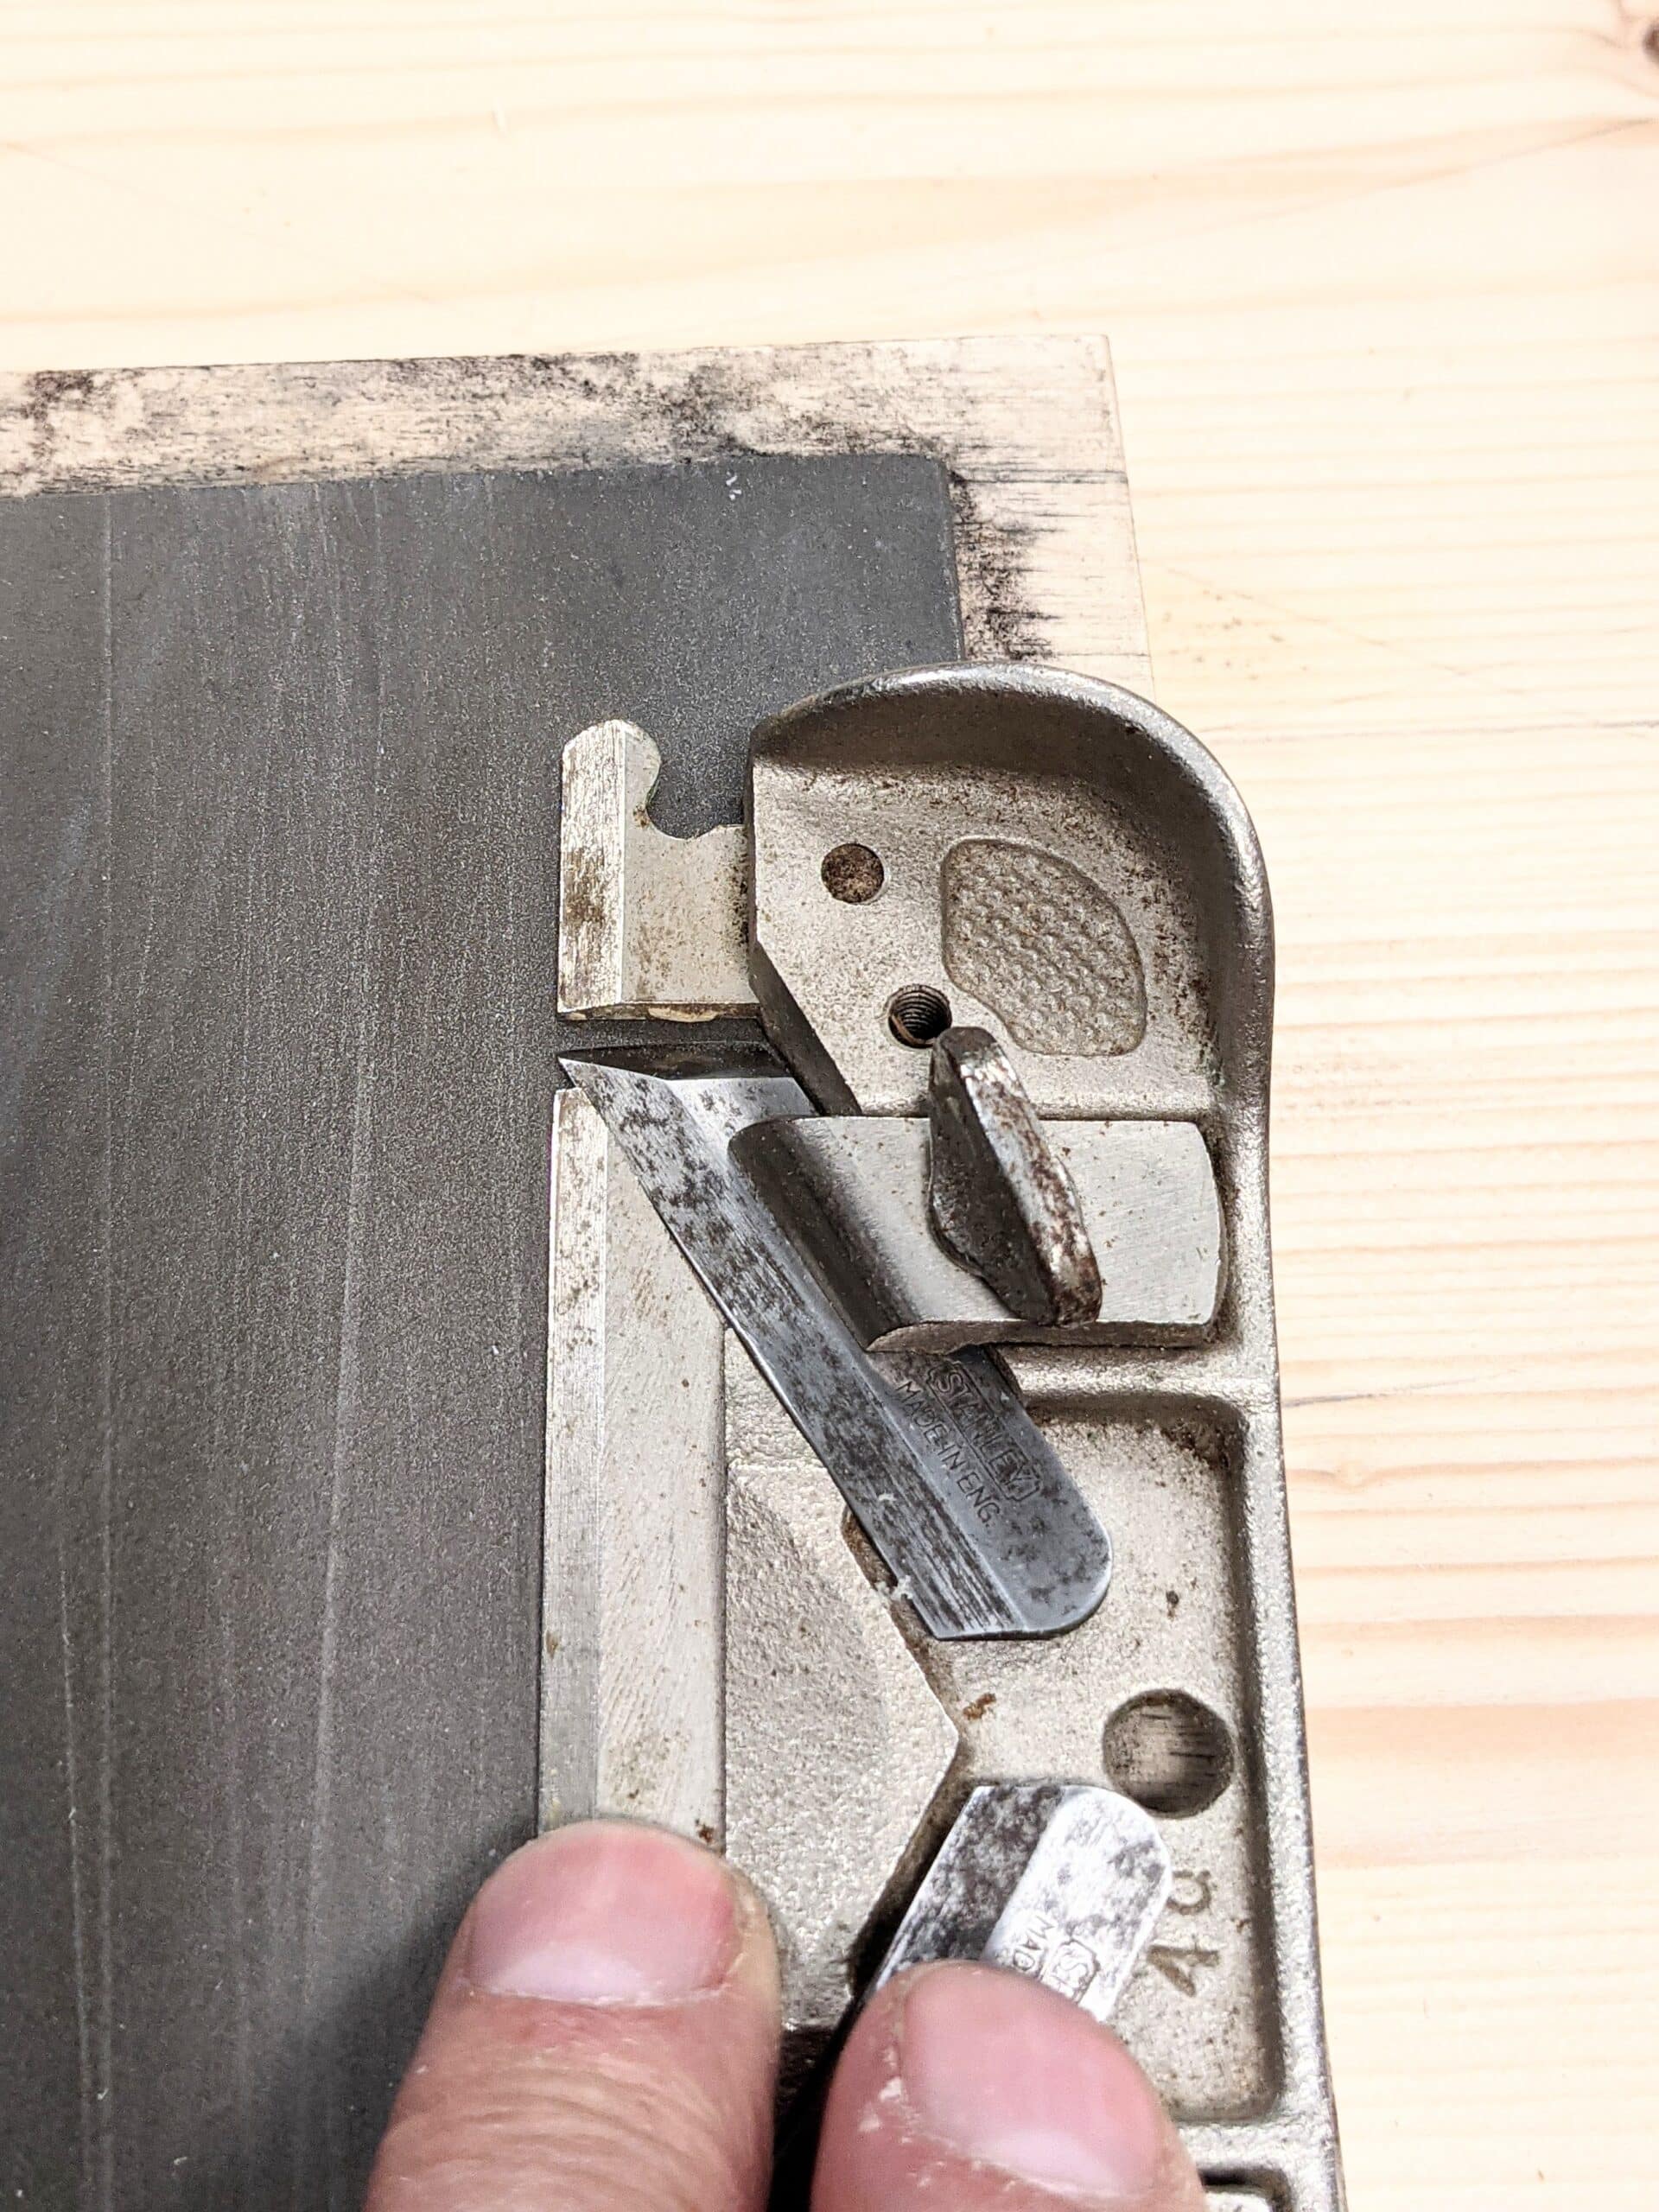
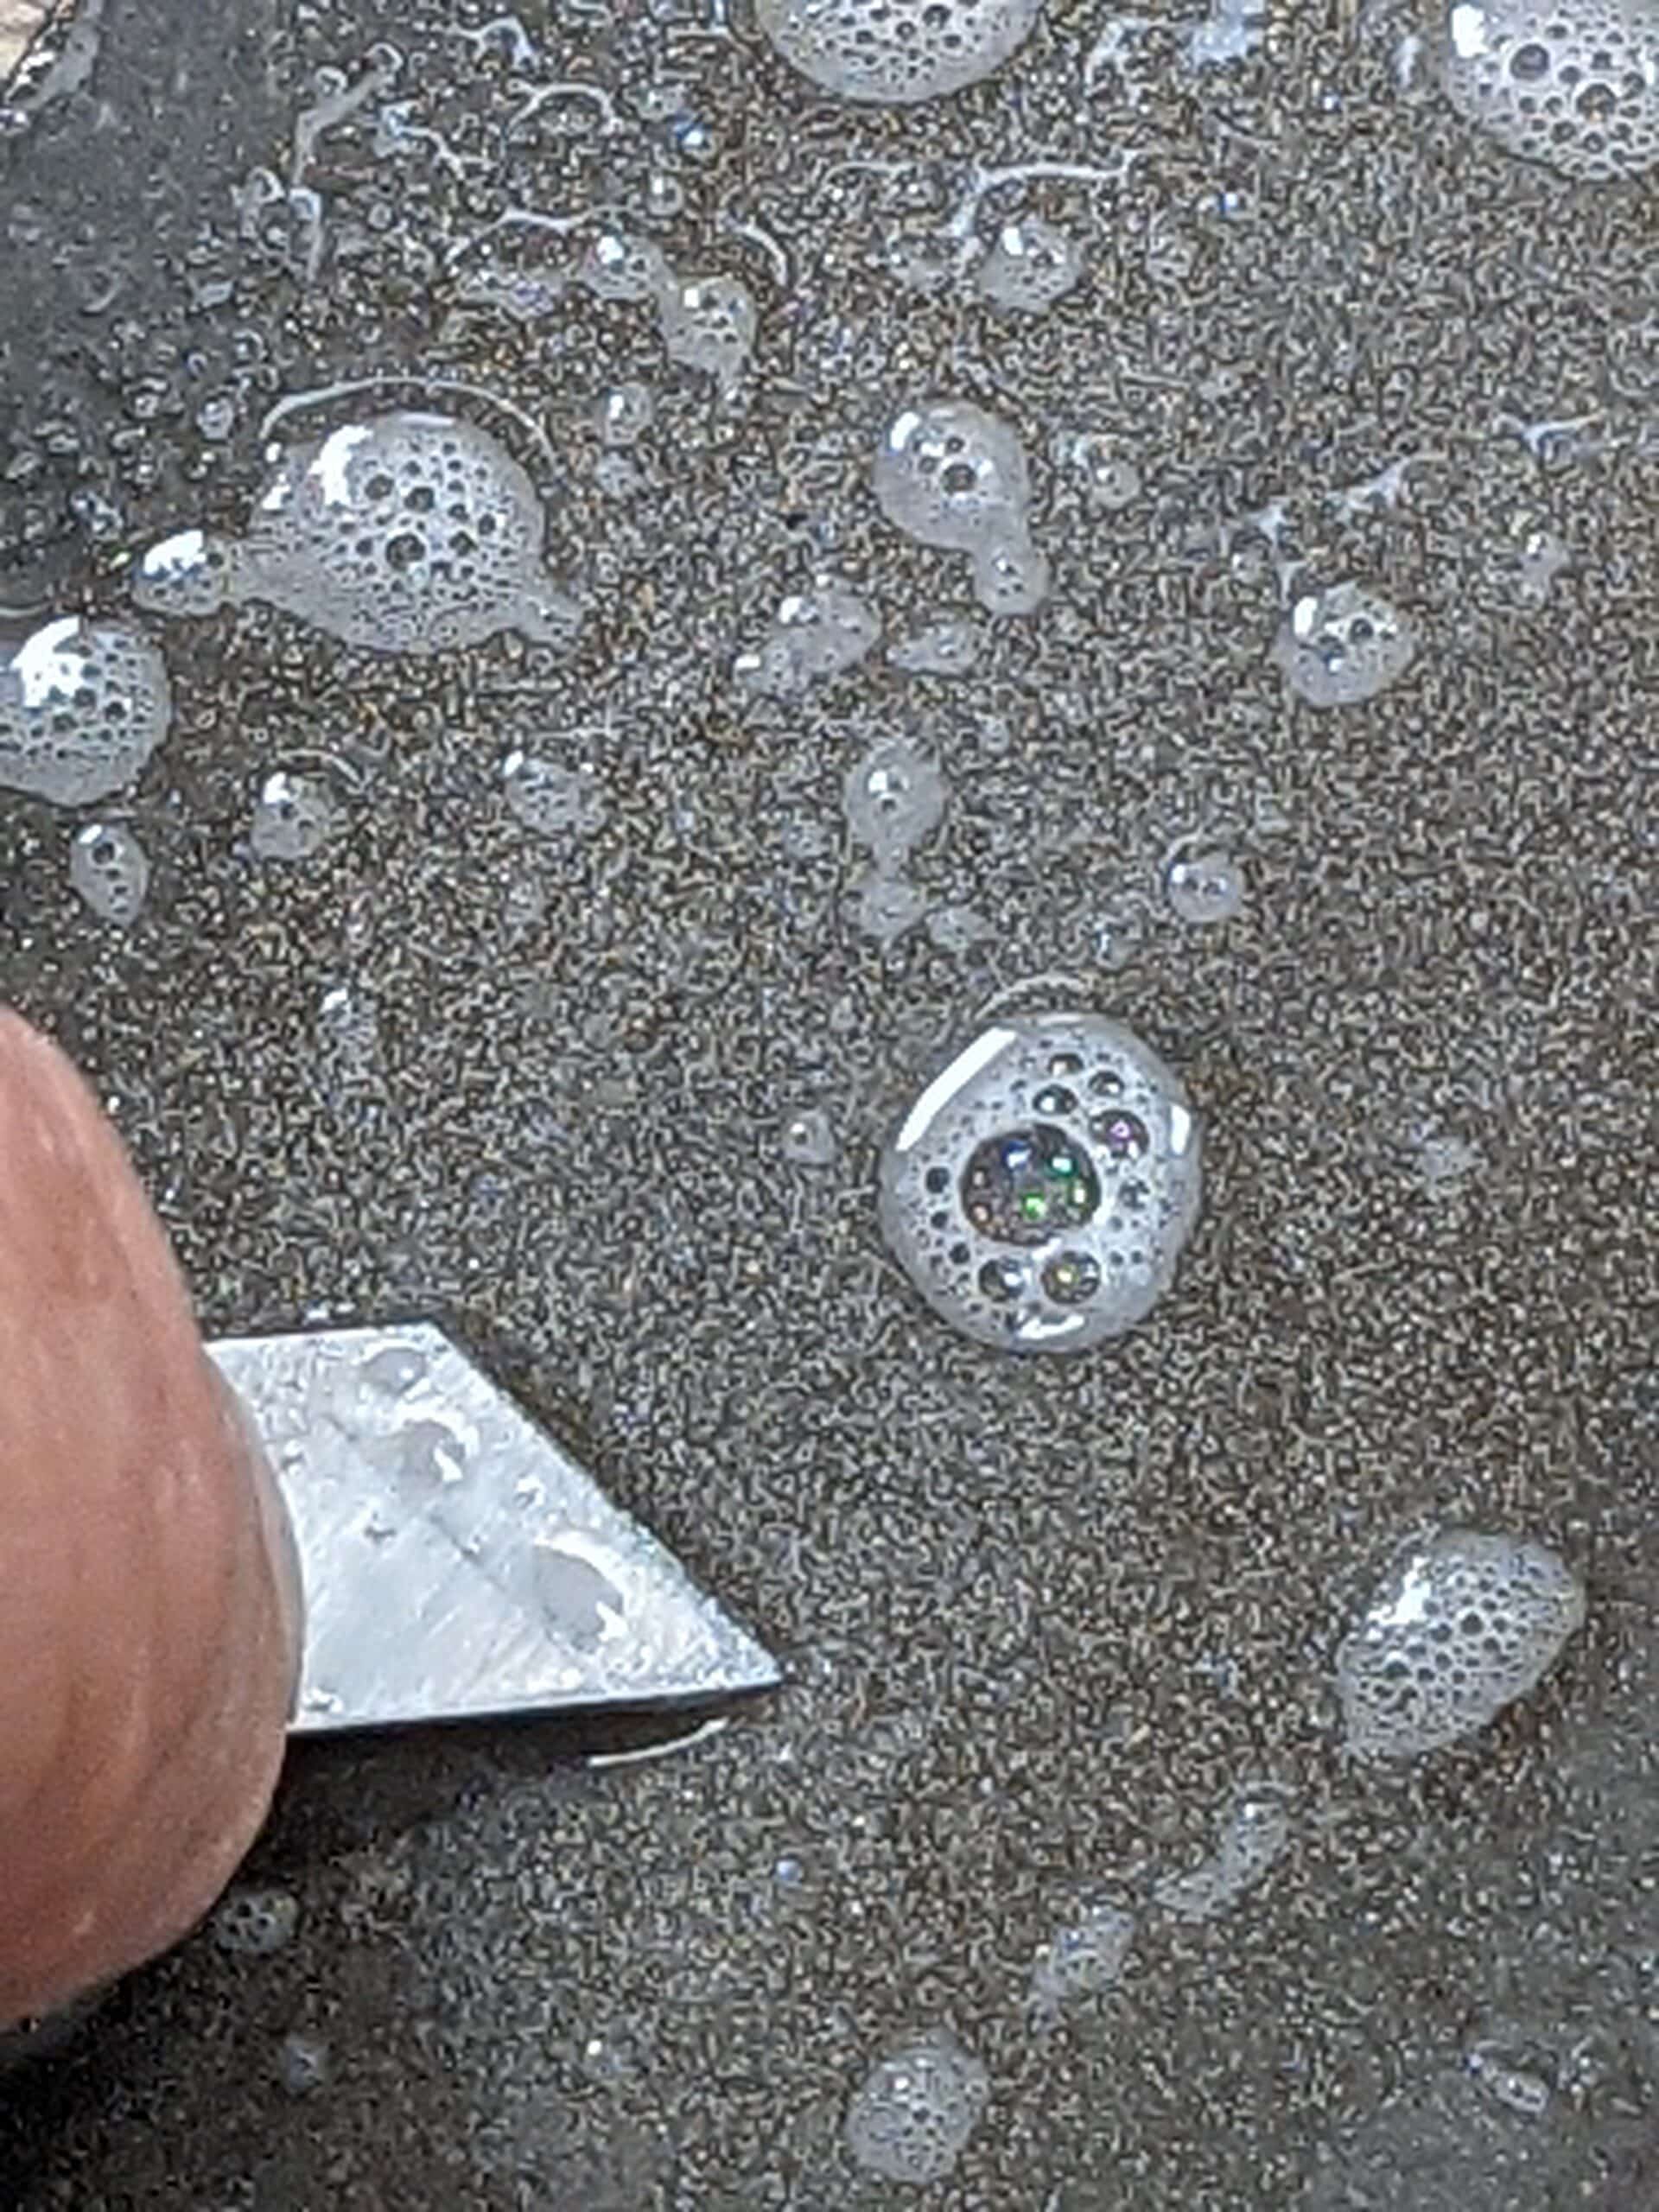
Here you can see how the shine on newly abraded metal shows the line we must now establish according to the recess in which the cutting iron lies and its relationship to the outside face as the sole of the plane. We call this the bed or bedding angle.
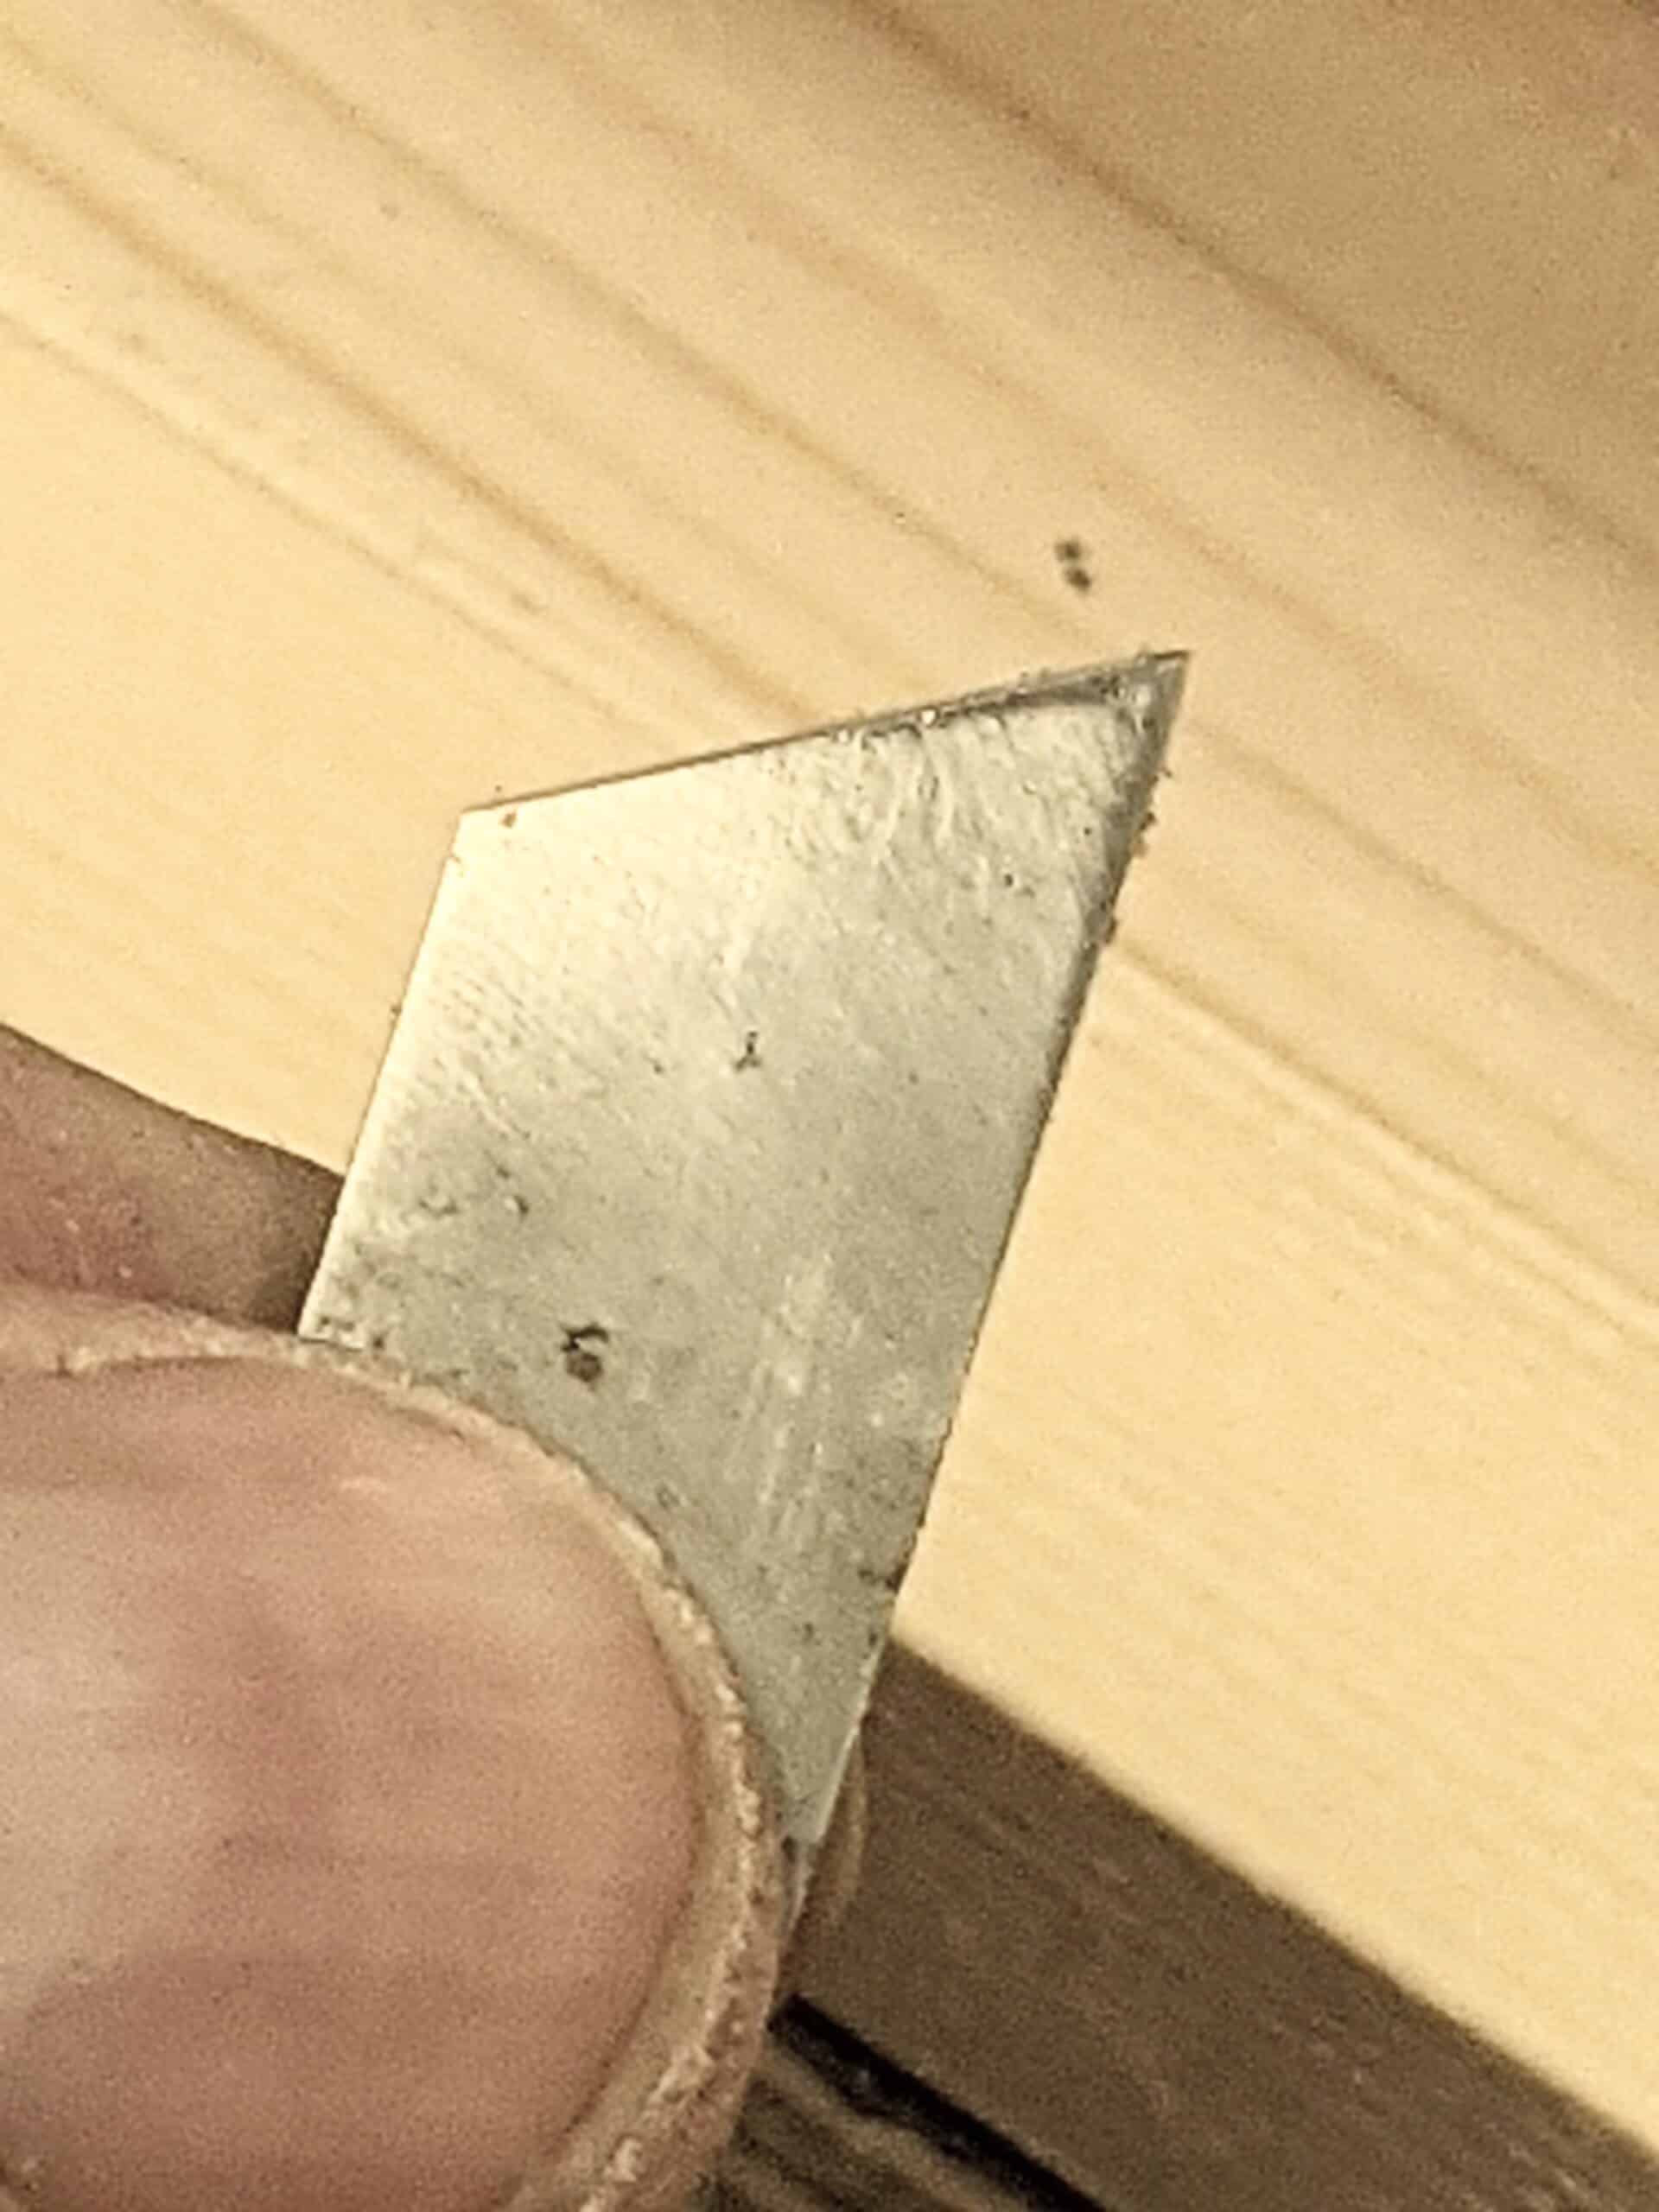
I used a file to reestablish verticality to the cutting edge, which worked perfectly in my case; some cutters may be too hard for a file, in which case, use a diamond hone or plate. I just felt that I had greater control with the file, that’s all.
You can see now that I have filed the edge down to the edge of the bright-line and the meeting edge I have created is what I will now abrade the whole bevel to as I reestablish the cutting bevel.
Once the angle is perfected, it is simply a question of beveling the bevel evenly across its width. These small and thin cutters can be hard on the fingers and this is why the bevels end up unevenly beveled. I suggest using something to grip the cutter with and in my case I just used a regular Eclipse #36 honing guide but NOT so as to guarantee an angle because of course, the bevel is angled and not square-ended as with regular planes and chisels. The honing guide just gives a better balance and control for reestablishing the bevel and then perfecting it, no more.
With new bevel honed and polished, the plane is ready to use. Insert the cutter, tweak it until the cutter barely protrudes past the sole, and you are ready to try taking a shaving off.
Polished out, the bevel looks like this.

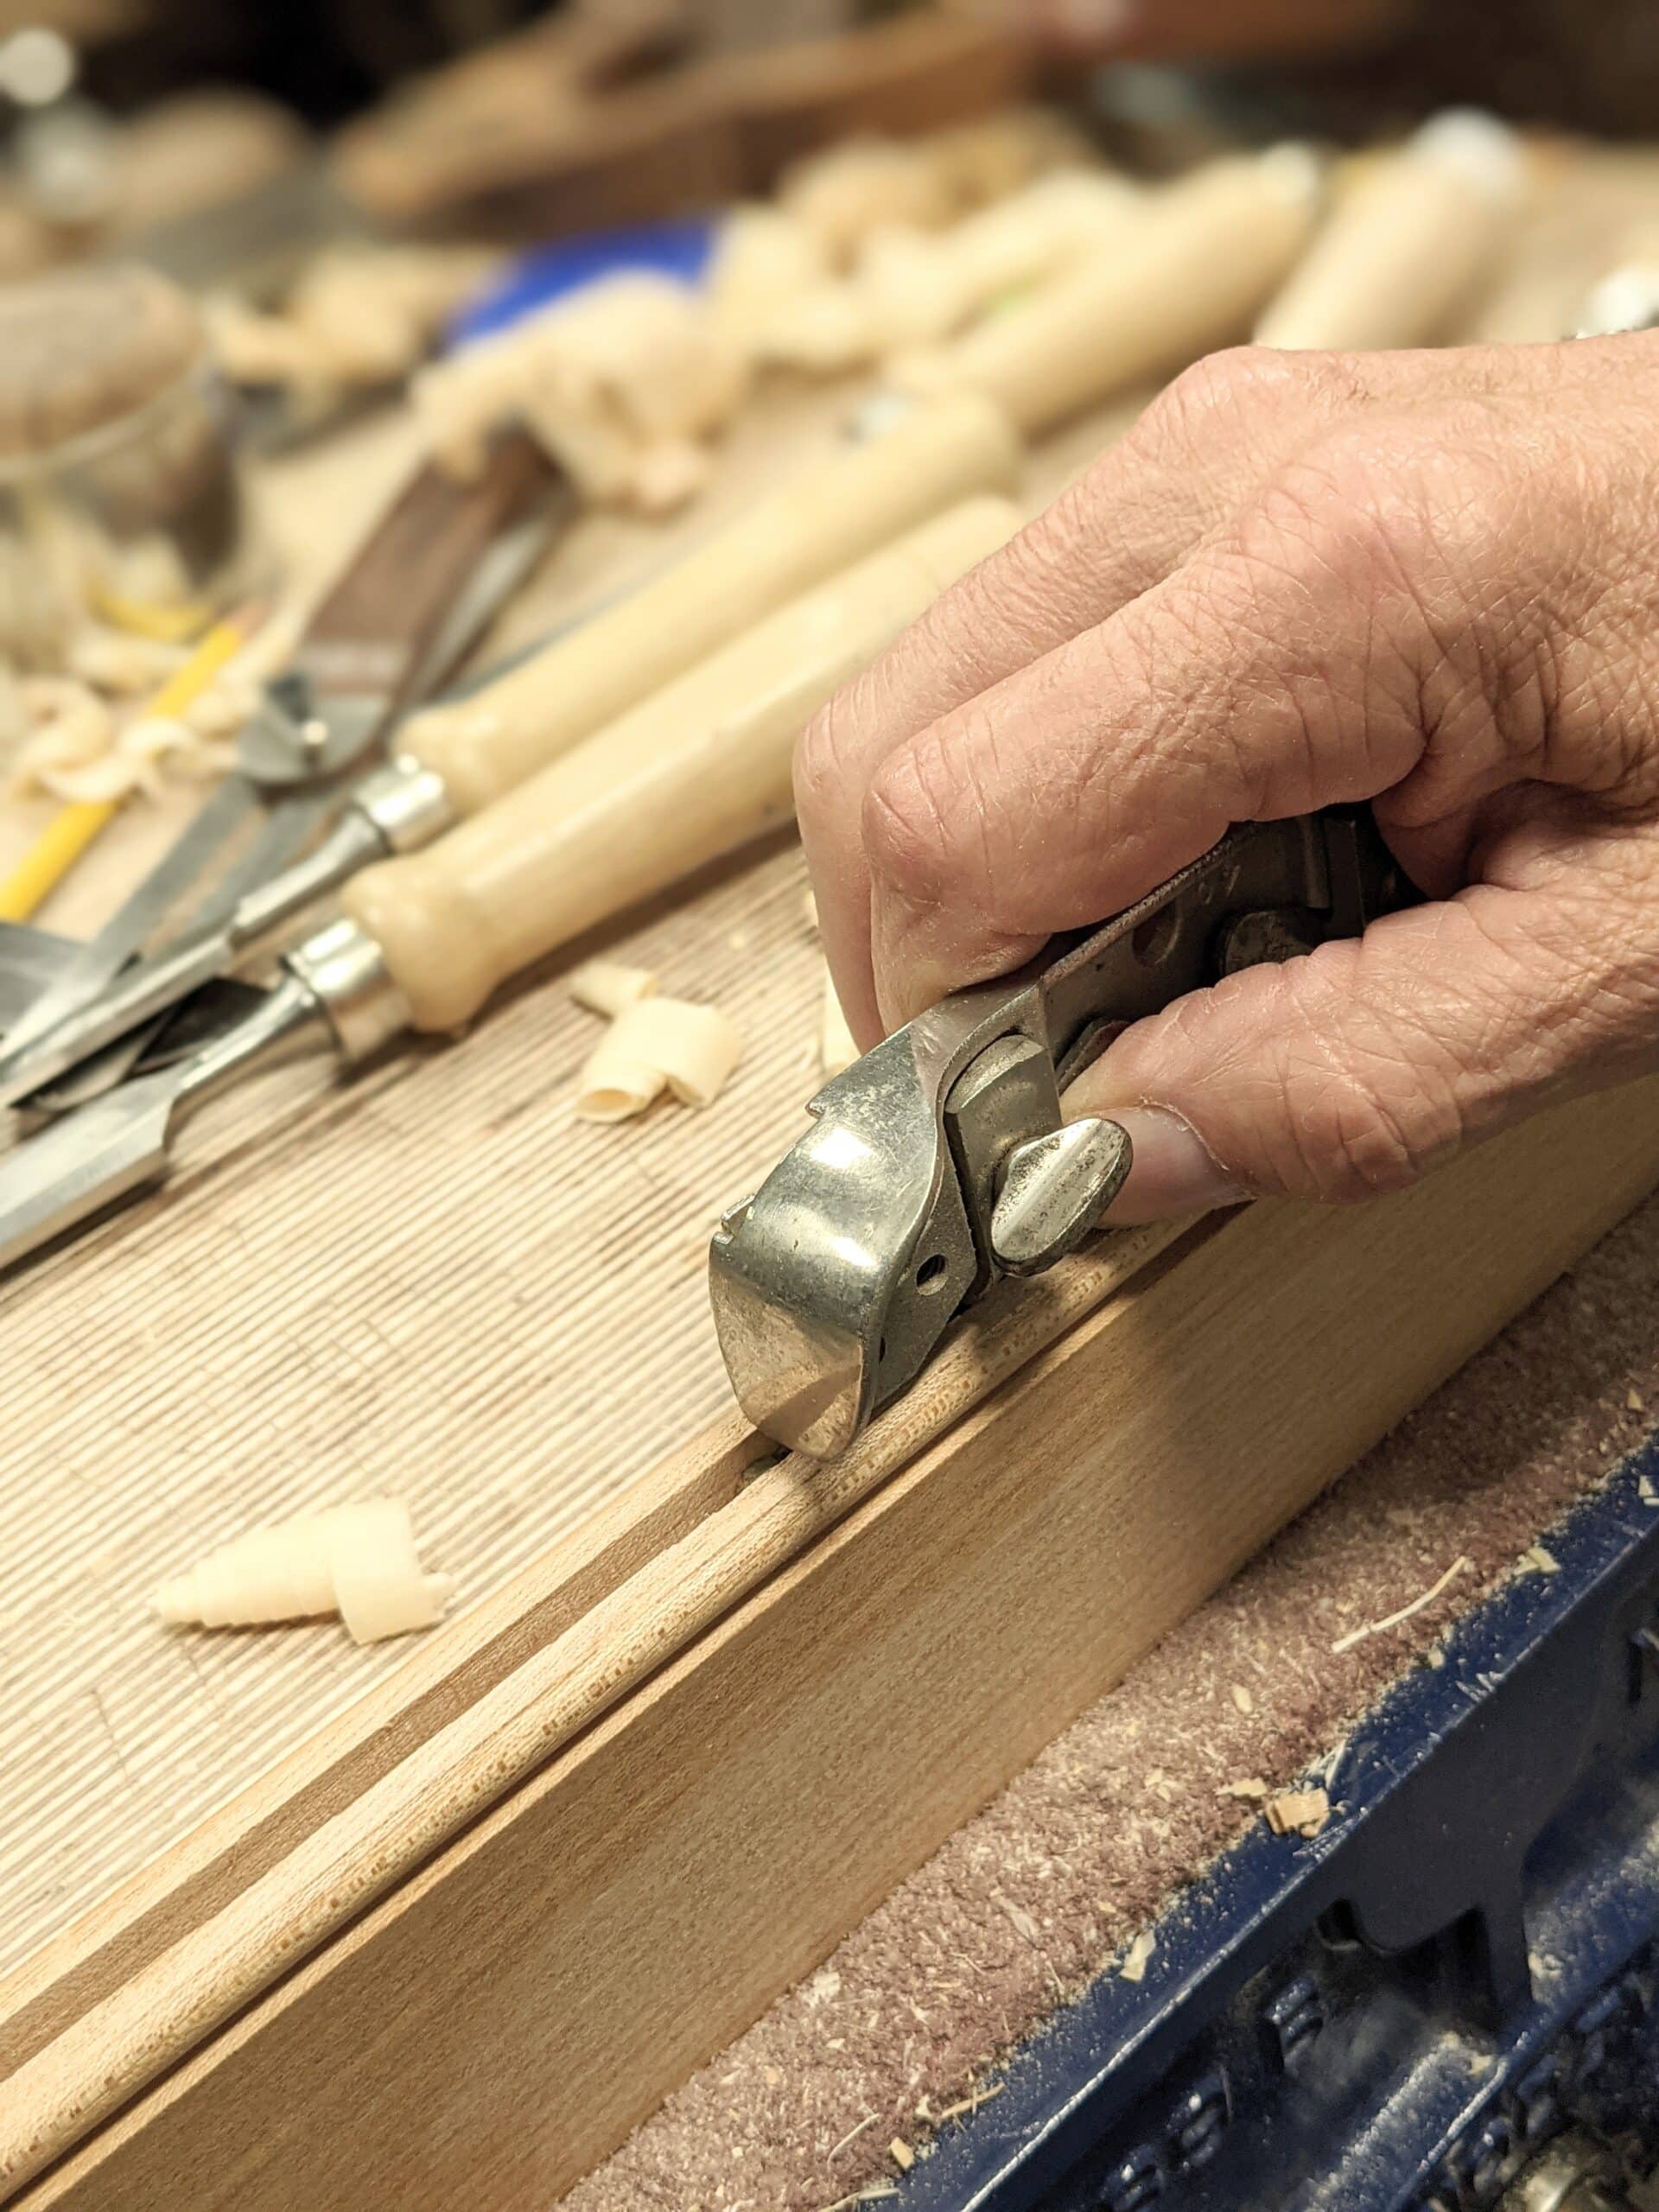
We can use a side rebate plane to create a recess by setting the fence, but using the plane on the face is best done after using either a marking gauge or a cutting gauge to cut the surface fibres first, so that a starter wall is established to begin with, otherwise the grain will tear and the edge corner fracture. I sometimes use a tenon saw along a piece of wood clamped in place and then used the side rebate plane to get to depth. This gives a good clean rebate.

As I said, the side rebate plane is not an essential tool until you encounter many different-sized grooves according to pre-machined sizes in say manufactured sheet goods like MDF and plywood. 10mm is not 3/8″ and 12 mm is not 1/2″. The small differences can be reconciled with a side rebate plane but without one, you create a fence to guide a chisel as shown here. It is quick and effective.
Small “vise grip” pliers might be handy to hold the blade while sharpening.
That is what I use when sharpening the spokeshave blade.
I wander how useful the fence might be?
Wooden clamp would be preferable to metal as vise grips go. Metal clamp causes warping especially on cutting irons. I speak from experience on that one.
Is it possible to make a side rebate plane?
Yes,make a pattren in wood get it casted in brass, old chisel can be your blade. Some file work and threading will make you a reasonable plane. The single blade is easiest.
Dear Mr Sellers,
It is pure joy to read this reasoned summary on the side rebate plane. This sort of information is very difficult to find elsewhere. Thank you.
I do not own a side rebate plane, and as a hobbyist I am unlikely to ever really need one, the relatively few times I have had to extend a groove I use a variant of what you show at the end of the article, but I (mis)use my wooden plow plane to act as a fence.
I bought one back in the seventies (new) but found it difficult to sharpen to the right angle. Recently I did find a way and it handles perfectly.
Your method is a huge help.
(Perhaps I just needed better spectacles!)
Great, I have been waiting for the price of these to come down and now they are going to go through the roof.
I could have used one this week and had to use a chisel. I didn’t get as smooth of a surface as I would have liked and figure the plane would have done better.
Also, how important is the fence on one of these.
Every week you amaze me. I never knew such a plane existed. I’m not sure I would ever have a need for one, but now I know 😊
I don’t understand the mentality of this blog. When you mention a company by name it’s all good but when I mention a blog or tool maker by entire post gets deleted.
I’m guessing the admin is attempting to make sure people aren’t soliciting for a given maker. Not saying that is what you’re doing, but likely they’re concern. A blanket policy removes any subjectivity. You can start your own blog, or post on Relevant FB groups as a solution.
Nice little plane, but I hope I never need one now.
By tomorrow morning, only Bill Gates will be able to afford one!
😂
You said, ‘I believe that their demise came because they relied on their ancient and outmoded reliance on a reputation that was not a reputation based on good codes of work practice. They thought that they were the best but they were just slightly ahead of low grade. For about ten minutes more work they could produce a really decent plane, but their arrogance and pride makes them blind to this simple truth.’
I’m sure you are right, and I think it was the same attitude that killed the British motorcycle industry
Yup!!!!
I’m really tired of having good brand names destroyed by cutting corners for the sake of a few extra $ of profit.
Yes, British motorcycles, and to a degree British cars.
What killed the British motorcycle was the lack of an electric starter. All the Japanese had them but the Triumph, BSA, Norton etc didn’t have them and they were hard to start with the single cylinder when it was still full of a compressed charge.
I shall never own a high end plane, especially an aero (little old pilot’s joke there), but I managed to purchase a CraftRight piece of made in India rubbish that I spent close to 15 hours and 2.5 million sheets of various grit paper sanding down the sole to remove the casting lines, trying to get the sides sort of square and pulling the frog out again to remove the casting lines and get the lateral lever (forget if that’s the correct name) working and finally putting an edge on the iron. However I wanted a Stanley No. 4 and finally found one in my price range masquerading as a lump of rust. It was a shocker but I had watched Paul’s restoring video so off to the bank and re-mortgaged the house to buy yet more sandpaper. It cost almost as much for shipping as I paid for it and I took before and after photos because I am a vain man and needed self praise on my great job. Well it needs a little more work and I was disappointed to find that this Stanley didn’t have to screw adjuster on the frog so I have to wing it with my extremely bad eyes.
I want to sell this plane so I can get a “real” Stanley No. 4 and get one that has a iron depth control that will turn without having to pick it up and use 2 fingers to turn the darn thing and a frog screw adjuster and a cap that will allow me to remove the iron from the chip breaker. I am unable to do this on both the planes I have and as a result I don’t consider either of these plane to be actual real true bench planes because they are missing the features that make them as such. The CraftRight I want to turn into a scrub plane now that I know what one is and I knew it was a bottom of the range tool when I purchased it but the Stanley was a pure disappointment with those 3 items it was lacking. Maybe I am expecting too much but these planes, even secondhand ones are very expensive in Australia so I am green with envy with the prices that people pay in the US and the UK plus you get to pick them up for diddly at flea markets and garage sales. If my Stanley had the “missing” components I was prepared to replace the plastic tote and other thing and pay more for pay for the wooden furniture than what the plane cost me just so I could look at it and delude myself into thinking I had a proper bench plane.
Apologies for the TL:DR novel but it’s not only Lie Nielson that have lost their former stellar reputation but Stanley whose name is still IMO held in his regard especially by people my age who remember them as the tool to have in their youth but they are letting themselves down with their growing range of tools that using more and more plastic to replace the adjustment controls which just don’t last. I seethe with envy at people mentioning they have a Stanley that was made during WWII or earlier or even 20 years after the termination of hostilities. I’m sure Paul would be able to tell us when the rot began. Cheap tools sell but if they are too cheap and break it destroys the reputation built of decades in a very short time and allows an up and coming new player take a bite of that market share.
Again my apologies for the length but I am now going to blame my meds for the extra rambling and thank you Steve for the British motorcycle as the catalyst for stirring up memories that led to my rambling. 👍
I never understood where these planes might be used, Thanks for the explanation!
I’m sure prices will go up!
Hi Paul,
I’d be interested to see a demonstration of one these planes in use.
Have you used one in any of your project videos?
No, Mike. I don’t want anyone feeling they must go out and buy one because I used one in the project.
Thank you for this post Paul. Very interesting.
It may be helpful to know that if you loose one of the screws which holds the fence to this plane, it would seem that the it is the same thread size and length as the screw which secures the cap iron to the Stanley 151 spokeshave! It certainly worked on mine!
My go-to plane is a Stanley SB3, single blade tool with no cap iron. Just because I’ve had it for decades. It says Made in England on it, but I know for a fact it is a copy made in India. But it works beautifully and I still reach for it first, even though my two No.4s also now work great (since you showed me how to sort them out).
Personally I don’t have a problem with plastic handles although I’m sure wooden replacements would be lovely.
The last bit about paring to a makeshift fence was cool as I was doing just that a few days ago. Haha, I thought I had invented it! I do more metalworking than woodwork so I set up the fence with scrap alloy flatstock but with a newly honed chisel it was very effective as you say.
Great article, thank you.
I also sometimes use an SB3. i picked it up for 50p. Cleaned it up and sharpened the blade ( I suspect that I was the first to do so). It cuts far better than I was expecting. Not that quick to set. I saw someone remove the adjusters and set it with a hammer like a wooden plane. As I have other planes I tend not to adjust it until it needs sharpening, but for the price I paid it is a useful plane.
I’m afraid I wouldn’t pick up an SB3 if it was free. Hammer setting works with any plane and if you are experienced it can be as fast as with mechanical adjusters or even faster. The SB3 was such a downgrade and a dumbed-down plane. I am only commenting here because I don’t want anyone to think it is an OK plane for long term use, that’s all.
Hi Paul
I was expecting a negative reply and nearly didn’t add my comment. I have mainly used it, for example, if I am recycling / reworking painted wood. Stops getting paint onto better planes or the consequence of finding an unexpected nail.
Sounds great to me. Also, whatever works works, in my view.
Interesting article Paul, thanks, especially re-trueing the face line info. However I’m surprised at you disdain for an SB3 (or4). I found one cheaply, purely out of curiosity, tuned it, used it and fell in love with it. small and comfortable (even with its placcky handles!) and never bumps itself out of whack on a knot because of the double adjusters; easy to minutely tilt the blade when needed as well. Standard Stanley blade holds an edge too. prefer it to my No 3 for most things because of weight and size.
No matter, Tony, you like it, I don’t. Let’s agree to disagree then. I doubt its ultimate strength and knots don’t knock my cutting irons out of whack anyway, so no problems there. I also doubt that, unlike my Stanley #4, #3, #4 1/2, #5 and #5 1/2 it will still be in use after 56 years of full-time use working 10 hour days, six days a week, but I will not be the one to find out.
Because I did a lot of finish carpentry, I used the #79 to trim the inside faces of wooden window sills when the double hung bottom sash was too close, or for trimming the inside faces of rabbeted door stops.
It was handy for that, but, as a jobsite carpenter, that was all I used it for. It was a neat little tool, but it got replaced by specialty electric tools that were faster, not better.
Paul,
Can you simply bring the stone to the cutter? In other words, clamp the blade in a vise, or on a block, and then move a small stone or diamond paddle over the edge?
Thanks,
Jason
Paul:
I have two questions, one about this plane.
With two blades set for cutting one will always be dragged. Will that act to hone the opposing blade or dull it?
The second question is more about philanthropy.
I have a growing collection of hand tools.
Certainly not as many as you but a I have a lot. I’m not a collector that puts tools on a shelf , I use my tools when I do my woodworking. They are all honed, fettled and good working condition.
Someday I won’t be able to use and enjoy these tools. I’m sure that there are others like me who have a collection that people interested in woodworking would appreciate. Is there any organization that would take these tools as a donation and give them to future artisans?
It would give me great satisfaction to do such a thing.
I know exactly what you mean, Tom, I have thought such things too. Not all of my tools have any sentimental attachment and even if they did, they are in excess of most family needs. I have four sons and a daughter and 14 grandchildren so hopefully, the meaningful ones will find a home without being sold.
There’s a great charity called TWAM, who do this. They collect old tools and put together packages for tradesmen in developing countries. Hand tools are particularly useful for areas that don’t have reliable electricity supplies. It’s certainly a better fate than them being turned into lamps of clichéd pub fittings.
I’m content that the method I showed works perfectly well, Jason, so I’m not looking for another method for myself. I think we should/can all experiment to find what works and that’s what keeps hand craft so alive.
Hi Tom,
Please see my reply to Paul below regarding unwanted tools.
I have the pair of Lie Nielson side rebate planes. I find them very handy. Wouldn’t go hungry or miss the rent payment to buy them though.
Paul, I’m a long time follower of your YouTube channel and your blog. I wanted to let you know how much I appreciate the knowledge you share and want you to know that I personally have greatly benefited not only in that knowledge but also in the enjoyment of the craft as a result. I just purchased your book Essential Woodworking Hand Tools to add to my library. Thank you again for all you do!
Hello Ron, Thank you for reaching out to encourage me and everyone here that makes the work possible. I hope that you enjoy my book as much as I did putting it together. Kind regards, Paul
Hi Paul,
prior to applying a finish, could you please comment on the merits of using a plane to get good chatoyancy vs sandpaper? (does sandpaper tend to ruin chatoyancy in your view? is there a particular plane that works best to get good chatoyancy whilst minimising nearby tear-out?)
there’s lots of conflicting commentary on this on the internet, and no prior comments on this i could find by you, so likely of interest to many? thanks a lot.
The issue surrounds the comparison contrast between a surface created by continuous single shavings side by side using a cutting edge say 2″ wide and then a surface refined by abrading using thousands of glass-type cutting particles to wear the surface. The abrasive particulates used usually abrade in sequential stepped reductions according to the grade of abrasive paper used. Ultimately, you transition from many hundreds of particles per square centimeter to multiple thousands, we go from big grit to tiny grit. The more you abrade down through the grit grades the finer the surface becomes. The issue remains the same. One surface is sliced in swathes of 2″ wide swipes side by side, more or less, whereas the abraded surface results in a million ‘scratches’ long and short and side by side. For the main part, industry and then woodworkers, in general, rely on sanding as a final stage prior to applying finishing coats. In most finisher’s systems, the finish is applied to an abraded surface somewhere between 250 and 350 grit. The finisher might say there is no point in going further as the coats applied build upon one another until the final level has flowed out and left even coverage with no unevenness and flat spots. Perhaps a glass-like finish would describe this stage best. With some finishes, the abraded surface gives a better ‘tooth‘ for the finish to ‘cling‘ to. Planed surfaces give the least grab and I have seen finishes of different types ‘curl‘ away from the surface sometimes. This can be especially seen where one face meets an adjacent face at 90-degrees and the arris has not been removed. As the finish dries and cures, the two faces shrink away from the corner and actually break directly along the corner edge or at best they stretch/shrink to a thinness that is not sustainable for long-term use. It is common, therefore, to abrade the corners of the wood to create a slight radius at these junctures so that they are either beveled or rounded to remove the 90-degree angle to the corners.
With regards to chatoyancy, a planed surface results in better chatoyancy with certain finishes. I think of shellac, in particular, wherewith skilled application the surface that has resulted looks like a still-pond surface and your eyes plumb the depths without hindrance–a sort of unalloyed depth-of-field. This seems to me to be more the rarity in commerce than the norm. I have known hand-planed surfaces to bridge the undulations of planed surfaces that are a series of very slight hollows a thousandth of an inch deep over 2″ wide that looks like a mirror finish. This is usually achieved by using the French polishing technique and by sprayed application if the person spraying is highly skilled. Other finishes, catalysed lacquer, for instance, can be built up in several applied coats or a single heavy coat and left to self-level in the atmosphere.
Conclusion: Perhaps the planed surface has the edge, but there may be practicalities to other methods that make it a more acceptable thing to sand.
Also, we should not forget the use of different cabinet scrapers for areas where grain might tear if planed used a bench plane.
Hi Paul,
Thank you so much for this post . Not only do I have a better understanding of how to use these planes, but more importantly, how to get the edge at the appropriate angle, and how to hold them to sharpen them!
Paul –
I like all your posts but this one was especially interesting. I had never seen or heard of this plane so it really peaked my interest. I love how you introduced it by showing the seperate left and right hand versions before the combination one. As I was reading the post I formed questions about what you were saying and then voila, the photo answered then. Your description of how to fix the cutter was clear, concise, and thorough. As you like to say, “Perfect”.
Aloha Paul,
Always good to hear from you .
In my tool box , there was always a #79 ready and able to help after major cuts were made for draw parts and bottoms. I’ve never needed the other #89,90 since #79 worked into left and right corners. One tool needed where 2 were needed before.
Mahalo,
Mark Baker
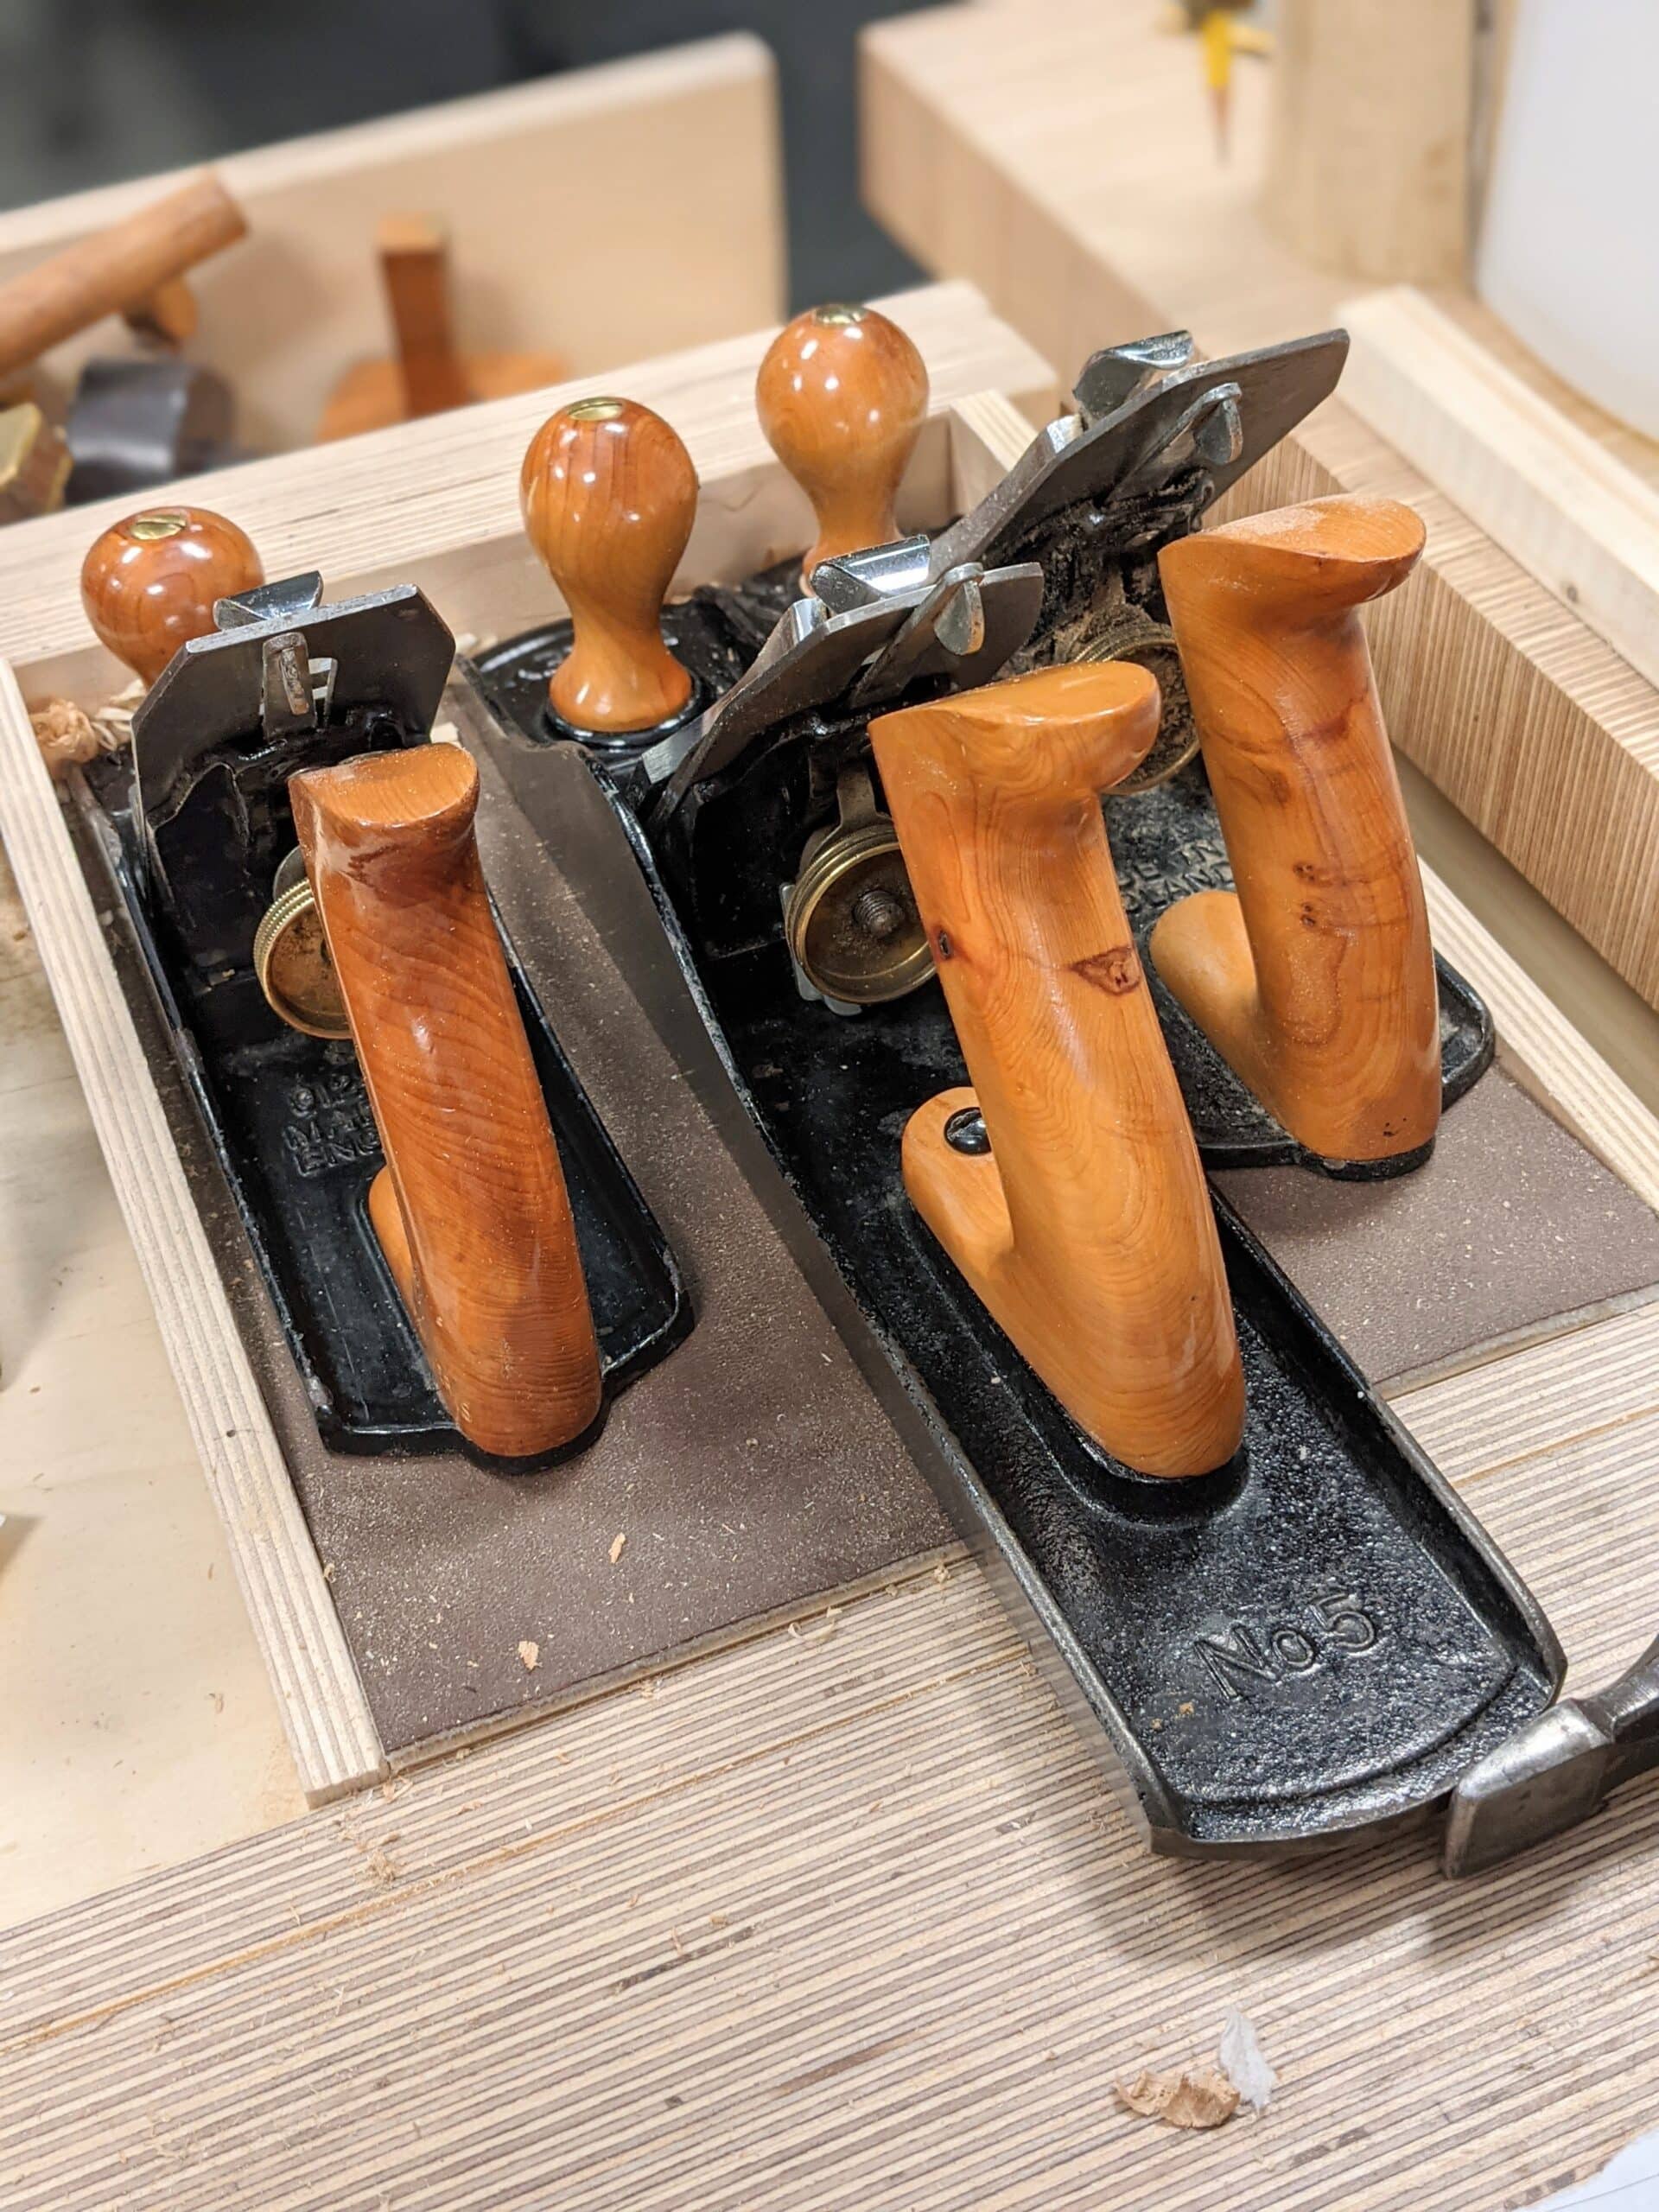
My comment is regarding the picture of the Stanley planes with the new handles.
I watched the videos, and as always, enjoyed them.
I’ve mentioned on a previous blog that I follow probably over 20 woodworking channels (not all hand tools).
One thing I’ve noticed with the hand tool users is the effort that goes into pushing the plane.
Why is it that not only Paul, but everyone using the old supposedly “inferior” Stanley, Record etc’s plane perfect silky smooth shavings with ease.
You hear the plane slice through the timber like a hot knife through butter.
Yet…
Not one single woodworker on YouTube who is using the new you beaut super duper planes with the thick “superior” blades does so with ease; everyone of them are working hard to get a decent shaving. Every plane is struggling to do the very job it is intended to do, easily.
Even the sound of the plane is more like it is bulldozing the timber rather than slicing it.
Using tools is supposed to be a pleasure, not forced labour, you only have to look on the faces of the likes of Paul Sellers, Tom Fidgen, David Barron, Richard Maguire, Joshua Farnsworth, David Charlesworth, Bob Van Dyke etc who all use the old supposedly “inferior” planes it’s the this “inferior” blades, it’s almost like ecstasy as the plane melts through the timber.
Look at the looks on the faces of those who bulldoze these so called “superior” planes through the timber, their smile is more like a grimace; it looks like they all have have a bad case of gas.
Each to their own, but to me, unless woodworking is our livelihood (as was me as an apprentice 43 years ago), it is supposed to be a pleasure not a chore and I just can’t see how having to apply far more effort to achieve the same, or a less satisfactory result is of any benefit to anyone.
In fairness, it may not be the plane, but the thickness of the blade that is the problem, but these plane makers have chosen to align themselves with these irons so becomes a characteristic of the plane.
These clunky lumps of iron may be ok for the 5 minutes of pseudo instructional content on YouTube, but to actually use these heavy clunkers as the craftsmen have done the Stanley etc for over 150 years; all day every day and not end up looking like Arnold Schwarzenegger would be near impossible.
While I have both old wooden planes, vintage Stanleys/Records and a few newer hand planes that I enjoy using I do not find any of them superior to the others. The “clunky lump of iron” that I own – a 5 1/2 Quangsheng bedrock style hand plane – is a pleasure to use as is my vintage Stanley no 4, Record no 5 and the various wooden hand planes I use. As long as the blades are sharpened and the soles get some wax now and then they all perform about the same.
Some of us do prefer some or one hand plane or size over the others. It can be because of so many reasons – we are after all humans first and woodworkers maybe second. Also what we make and how we use the planes plays its part as you say Jamie. I for one love my no 5 and tend to use it a bit more than the no 4. I could of course do all the work that I do with the no 5 with a no 4 and I probably would if I planed boards as much as woodworking artisans like Paul Sellers do.
You say “Not one single woodworker on YouTube…” in your post above. That might not be 100% accurate 😉. One that do not turn to the smaller or vintage hand planes as often during his Youtube videos is Rob Cosman. You mostly see him using his 5 1/2 WoodRiver and he use it with ease. He might be the exception to your statement though.
One thing that a beginner woodworker can take to heart is what Paul has been saying for a long time and you Jamie say above – there is no need to go for the most expensive new tools to enjoy woodworking. A vintage hand plane will do the job as well as any newer model. When budget is tight the vintage wooden planes are great options, and cheap. And even if the sole is uneven and worn down they can be refurbished more easy and to a greater extent than a metal one.
Hi Vidar,
A few years ago I also fell for the Cosman scam.
Very talented woodworker no doubt.
One day it clicked after listening to his many comments on tools that the only tools he didn’t bag out was the ones he has a vested interest in, either designing or selling.
Hence his court case.
The penny dropped that his woodwork channel was a medium for infomercials.
The planes he uses are the best ones, his dovetail saws are the only ones that track true, his wax is better than any other wax, his hockey tape is the best etc; all for sale at a premium price.
(Which bye the way, I stand by my comment; Rob still puffs when using his 5 1/2, look at the video of him flattering boards, he was knackered from flattening the board compared to Paul who is 20 years Rob’s senior doing the same was not when using his Stanley number 4)
I unsubscribed, then found out a whole horde of viewers have done likewise because they too were sucked in.
As Paul often says, he does use a Stanley
5 1/2, but the purpose is to encourage people to get affordable readily available tools without breaking the bank, and learn to set up the tools you are using because that is part of the craft.
I personally love my old 1873 Stanley type 3 number 5 with the backward adjustment screw, the way it feels in the hand is special. I also use 2 number 4’s and a 4 1/2 for shooting.
I also own numerous wooden planes as well and in a couple of years when I retire I’m planning on making wooden planes. I’m slowly setting up for that.
At the end of the day, everyone needs to get what they are comfortable with and can afford.
If someone wants to huff and puff and rub an anvil across a piece of timber that’s fine.
I stopped listening to Cosman for the same reason. He sent me a very sour reply when I pointed out that a beginner could buy a tool kit for the price of all the diamond plates he said were required.
Hi, many thanks for the technique on how to establish the line for the cutting bevel on a side rebate plane. I have a Record 2506 with blades at a similar angle to the Stanley 79. I mis-sharpened one of the blades at the wrong angle and it took a lot of trial & error to get the blade back to the correct angle. Wish I had known your technique then!
If you have one, the Stanley 14-050 honing guide can be used to hold the blade at a skew angle and get a consistent bevel angle. The Stanley is still available last I looked. It has two plates that the iron fits between and two nylon headed screws to clamp down. It can be useful for awkward irons and angled bevels such as found in wooden planes.
Brilliant post and perfectly timed. I’ve just received a secondhand #79 for cutting a batch of sliding tapered dovetails (couldn’t bear the idea of faffing about with a router). Any issues with the blade bevels – well hey presto. Thank you Mr Sellers!
hi paul,
if you have any familiarity with a ‘compass’ plane (with a curved adjustable sole), would you consider doing a video one day on how to use it? or perhaps use one in your home building furniture as a bit of an oddity?
i inherited one from my grandfather who made grandfather clocks – but have never seen one used/ adjusted etc, and suspect not many people know much about them (including me!)
thankyou
paul
Yes, this is an interesting request. Are you talking about wooden compass planes or the Stanley type with the flexing sole that does both inside and outside curves to many radii?
# 20 not so good, #113 much better