Calculating For Fox Wedging
Fox wedging seems to be touched on as a theory of hidden mortise and tenoning with a concealed mechanical dynamic. How many actually use it probably numbers none or one or two worldwide in any given day. Mostly that is with good reason. In most cases, fox wedging is unusually used. Regular mortise and tenons of the obvious types take care of just about everything frame-wise. That’s doors, windows, door frames, window frames, tables and chairs of every type. All in all, it is the single most used joint in the world. Adding a draw-bore pin increases the pullability strength and structure of the joint three-fold and more. The fox wedge is remarkably used in similar positions where it will counter specific types of pull, handles of all types, rails and so on. Of course, there is no true comparison between the two joint types. I am trying to imagine how much pounding pressure it would take to use a fox wedging on a timber-framed building with 12″ (30.48mm) by 18″ (457.2mm) beams, more than a mere wooden beetle or massive persuader, I think. For general furniture making and in the right place, this joint knows no equal. It can increase the integrity of a work incredibly when employed judiciously.
As mentioned, the fox-wedged mortise and tenon is rarely used but it is used as a rarer solution where pulling power is needed over long-term use. In almost all circumstances, it is used where the whole joint is to be hidden from view. Because of this, you are unlikely to ever see or even know such a joint type has ever been used let alone existed. I am using this joint in my upcoming project for an episode in the Sellers’ Home series. It’s not only a rare joint, the need for it is rarer still. I decided on it for a specific reason I will reveal in the video we film in the first week of the new year. I have four to do and I am looking forward to it. Anecdotally, I saw the joint used first when a door stile curved away from the shoulder of a super long rail in a massive gate for which no clamps were long enough. George, my then mentoring craftsman in my apprenticing days, cut the two saw kerfs and said, “Watch this!” When the joint and wedges were in place, he took a heavy sledge and pounded the stile until it seated to the shoulders. An amazing example of its efficacy!
Fox wedging can be used with or without any shoulders to the tenons, but shoulders add strength to the lateral stability of most M&T joinery, so I might suggest keeping them as stops and as added strength to your joints. For this instructional we will have two bare-faced edges to the tenons, so shoulders to two wider sides. This maximises wood where it is needed and the shouldered sides seat the joint and work as long-term lateral stabilizers.
The tenoned rail should be as dry as possible and it is worth drying on a radiator or other source of dry heat. Of course, it is not always necessary to dry down further than the relative humidity in the surrounding atmosphere in which the final piece made will live. I just like to take out all risk factors.
First, chop the mortise to the exact width of the tenon with no allowances to the wide width of the tenon. At the shoulder line, we want exactness. This will stop the wood from splitting as the wedges tighten when the tenon aspect of the joint seats fully against the mortise piece.
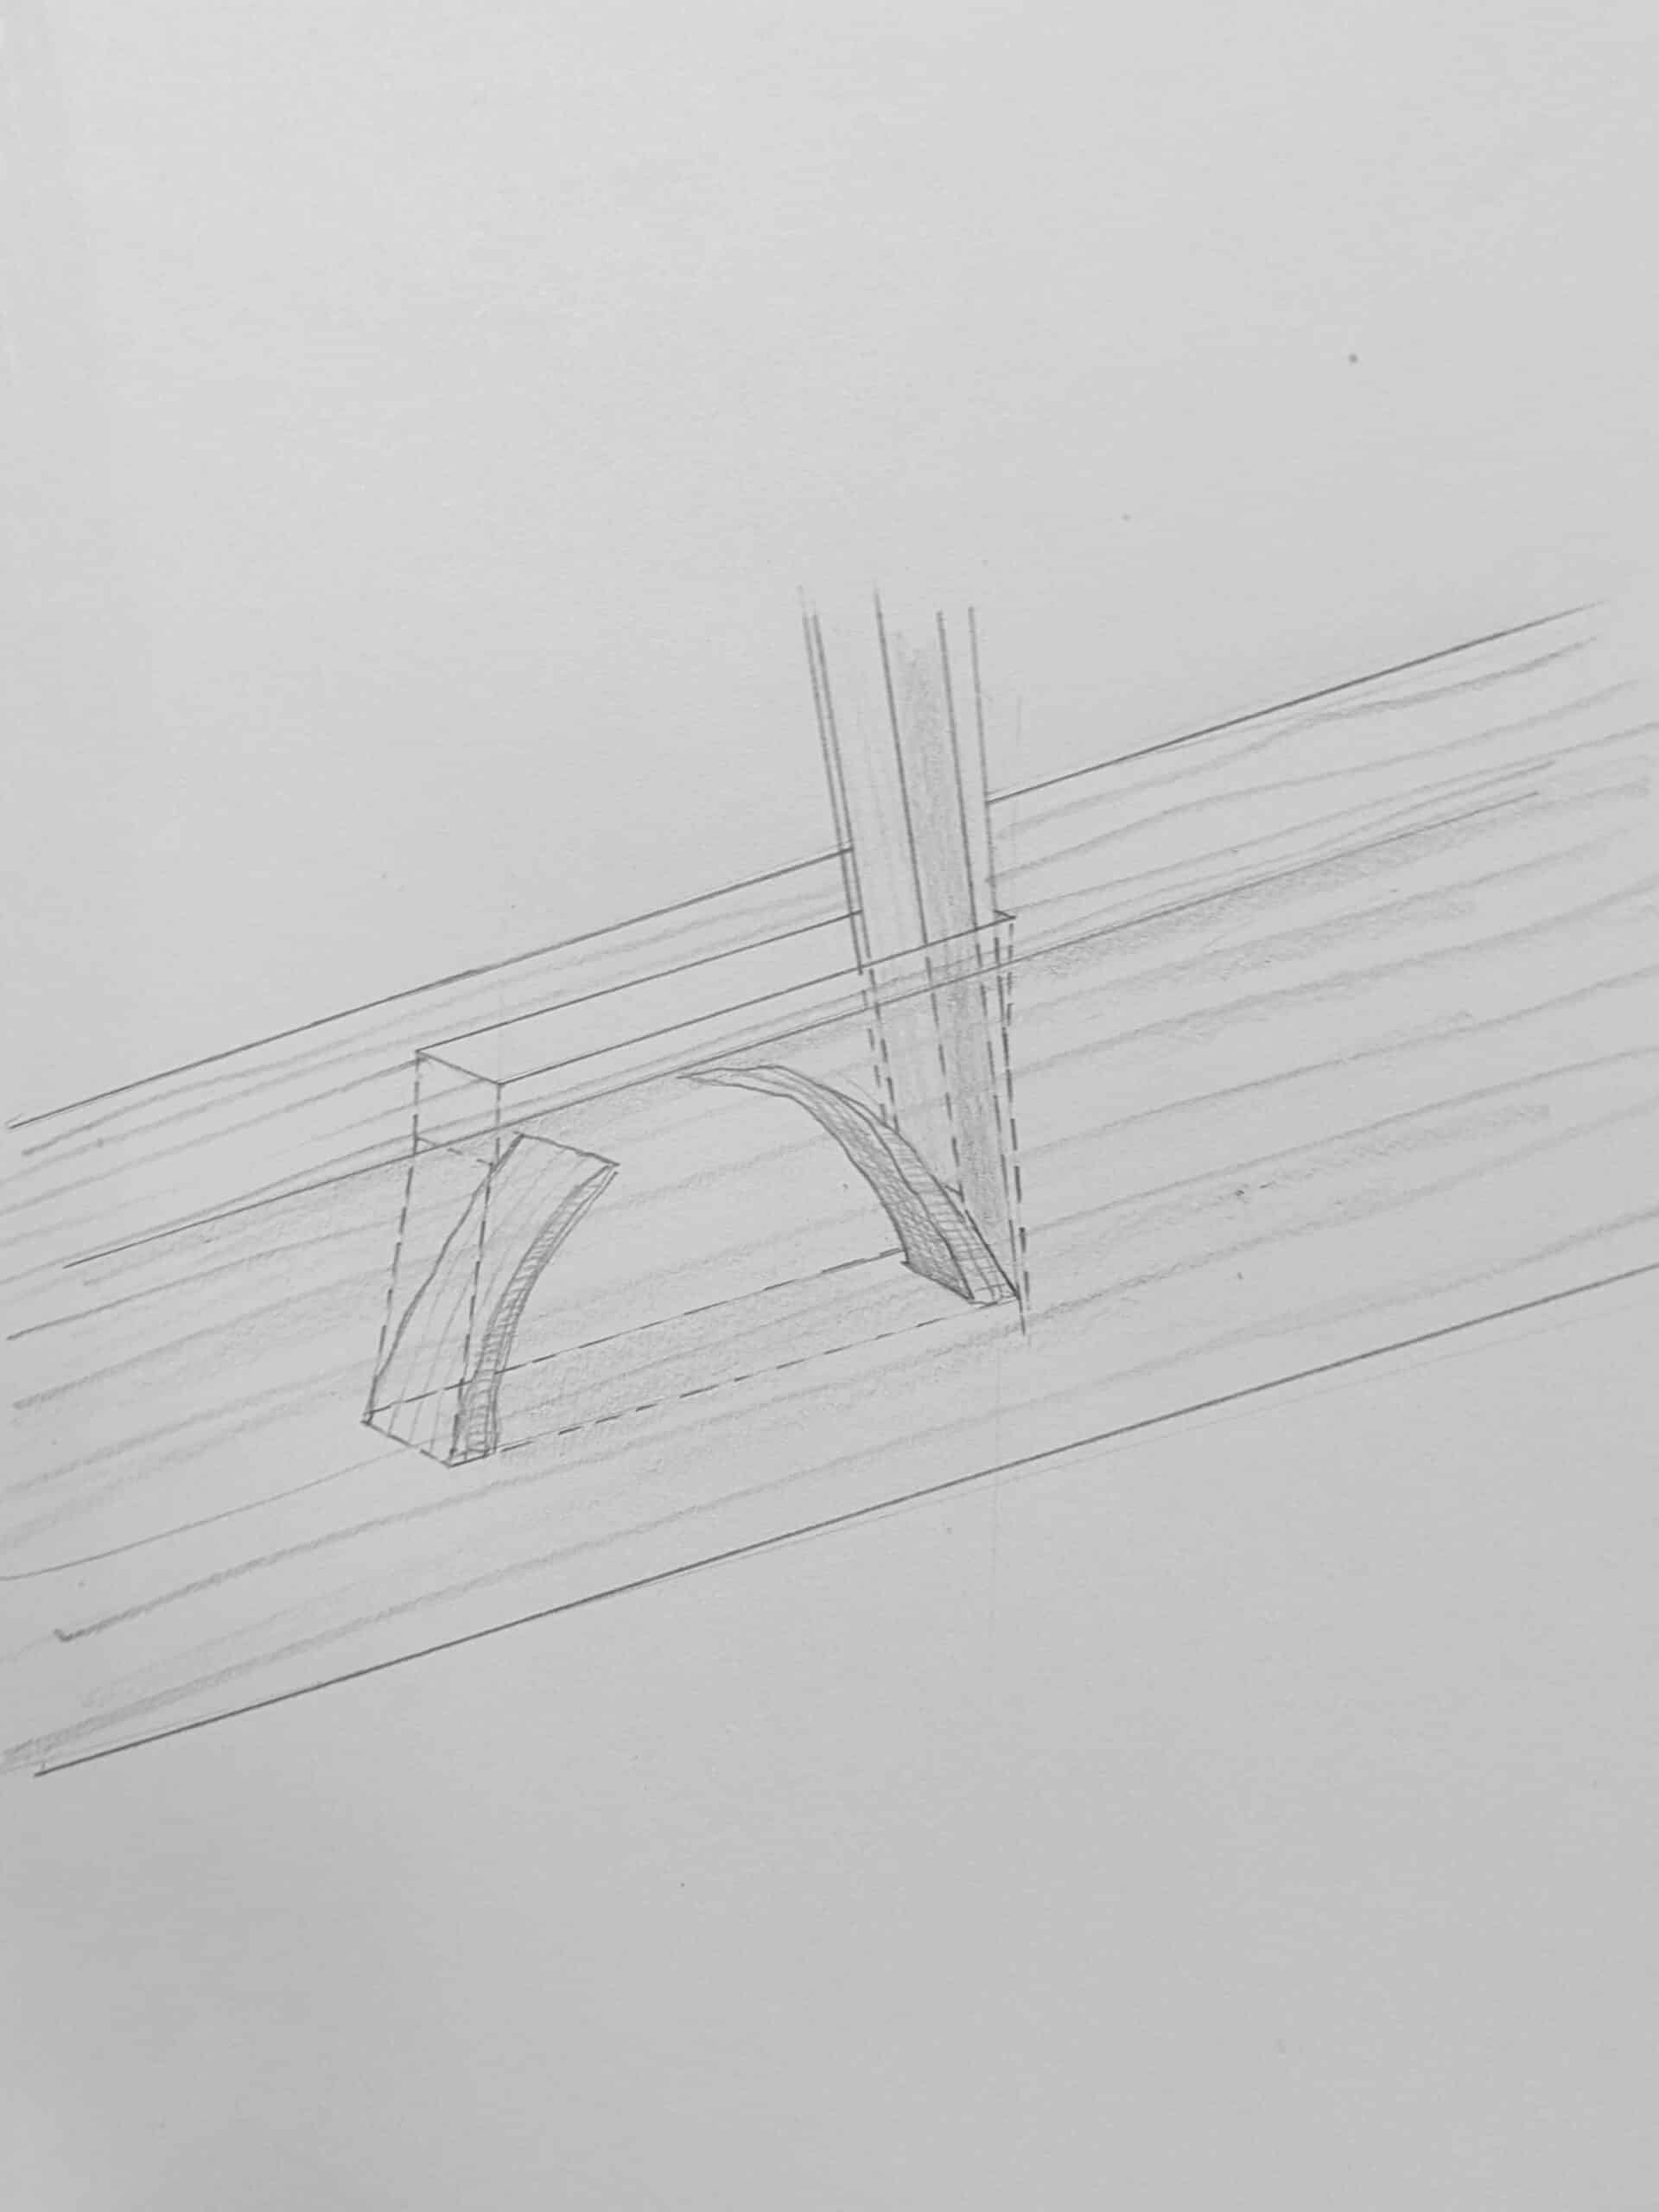
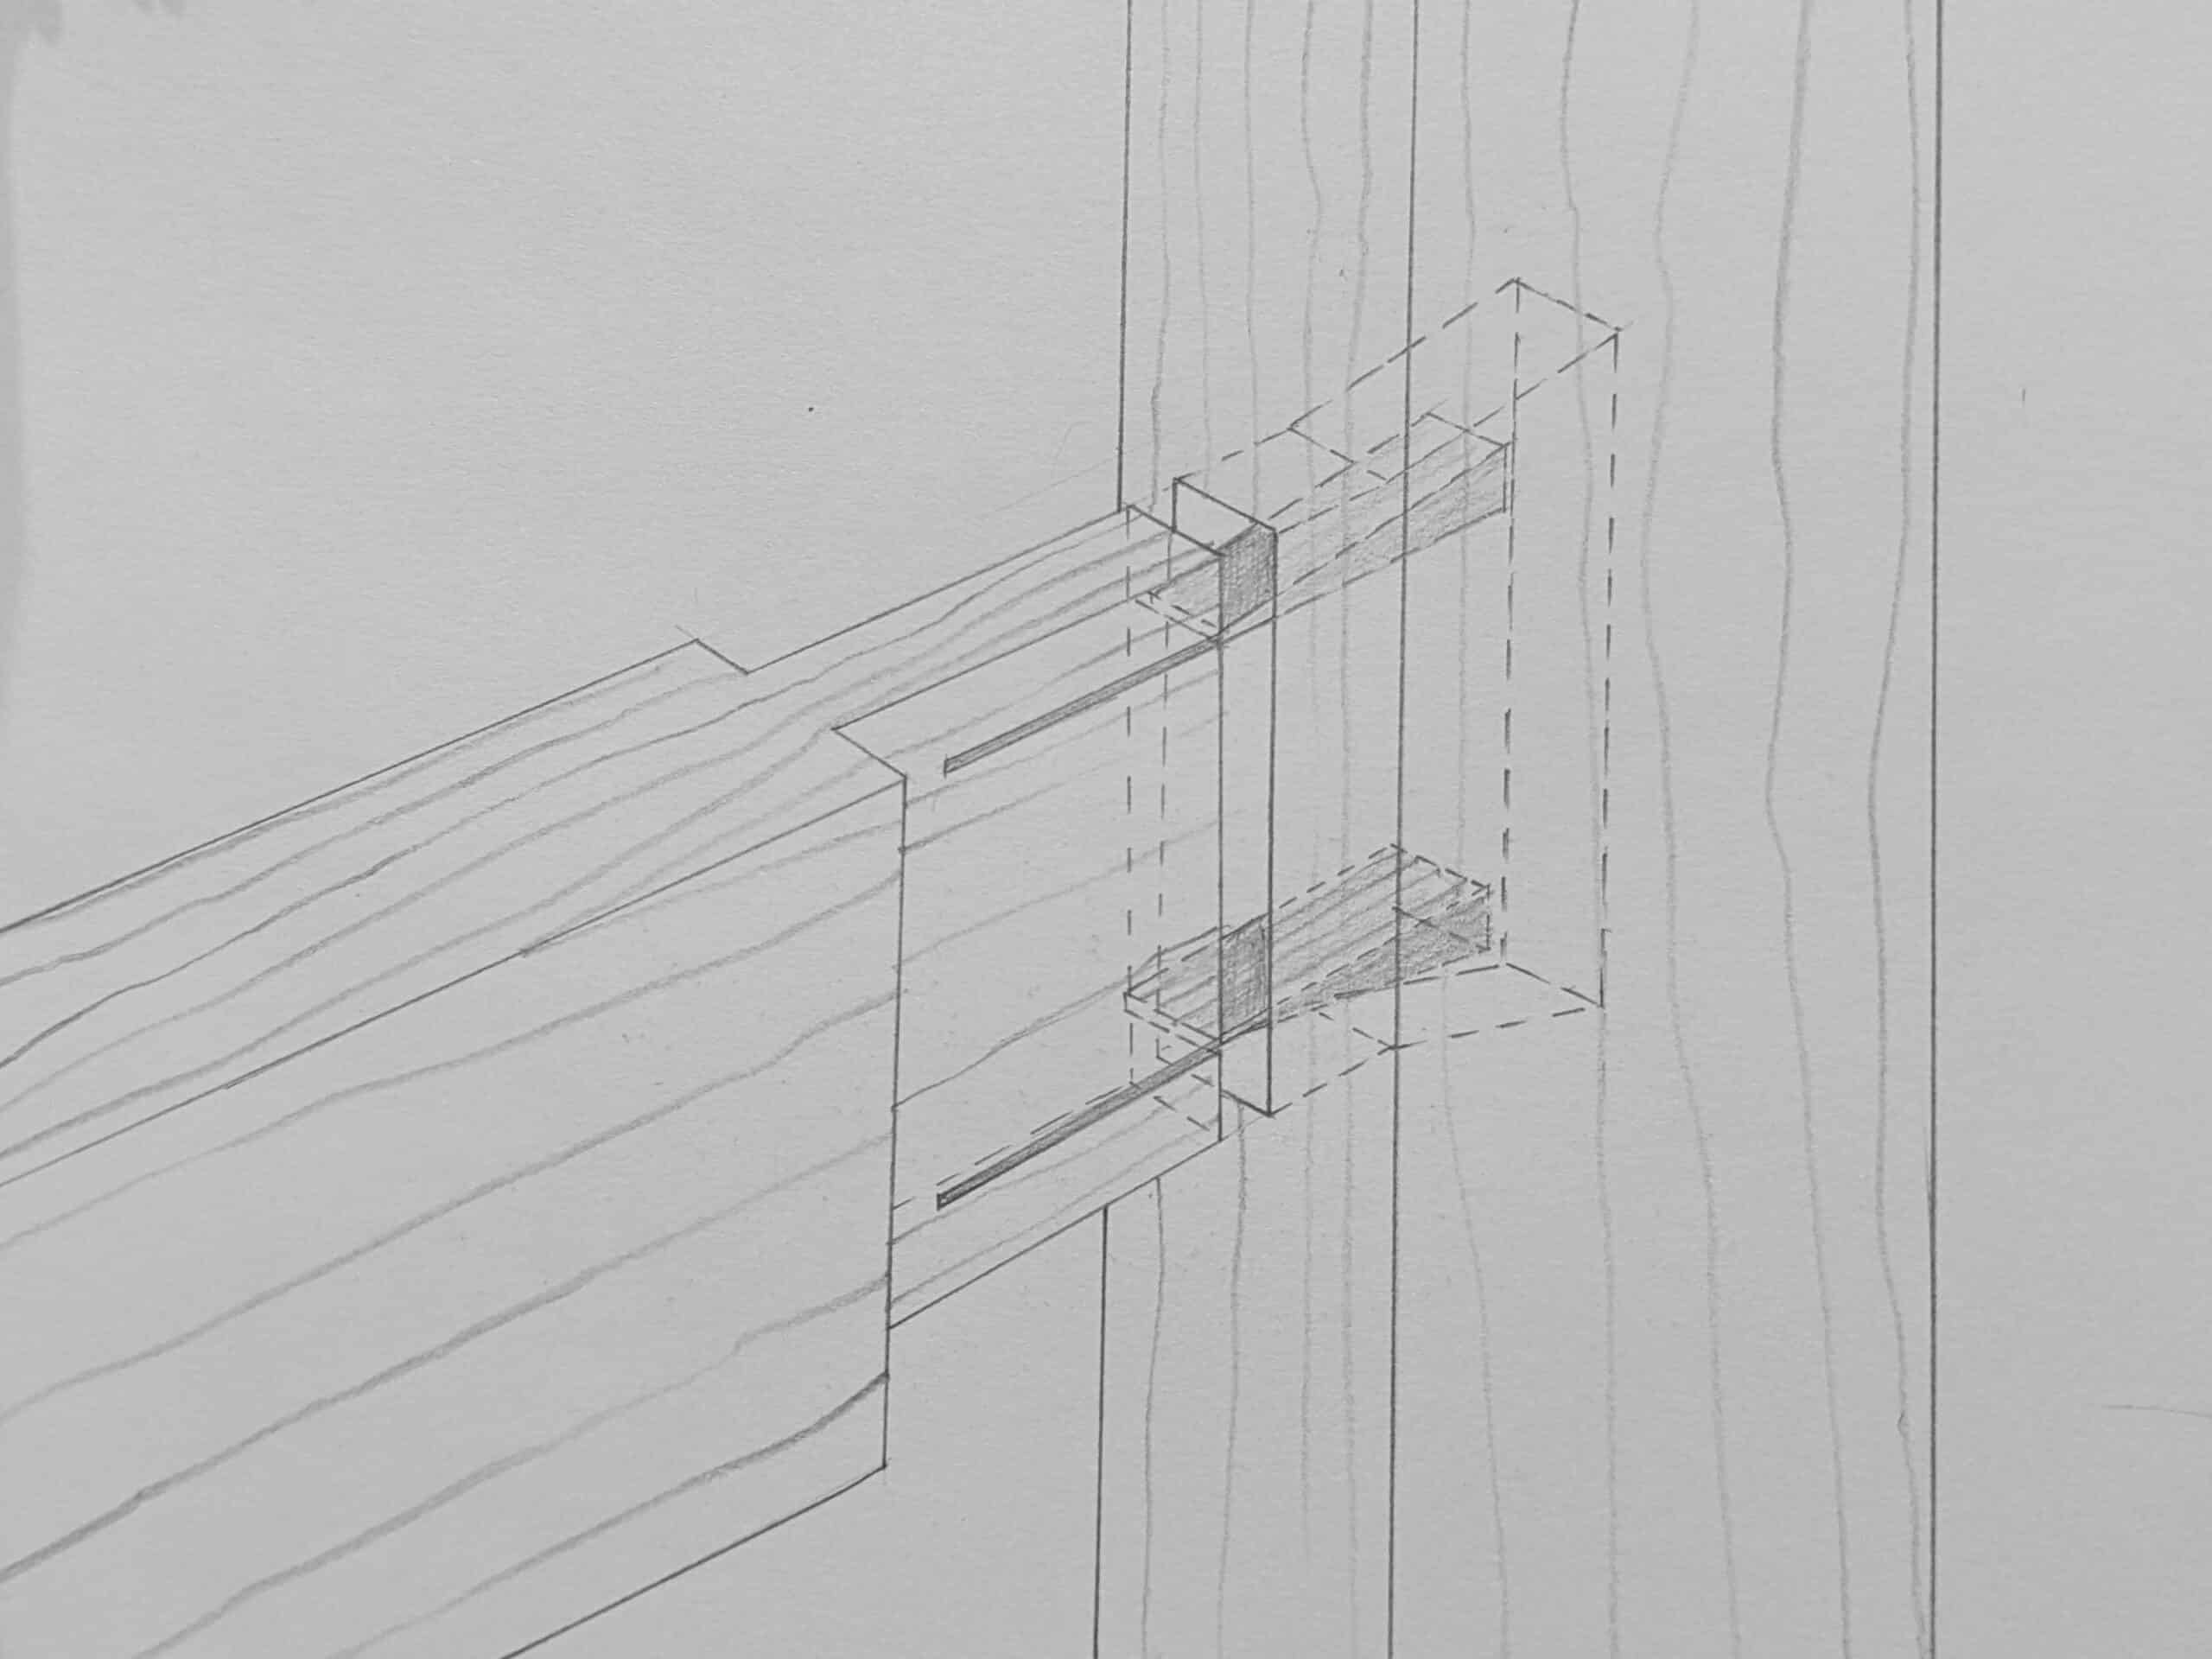
Inside the mortise, after you’ve chopped out the main mortise, pare down the end walls at an angle to gradually widen to the bottom of the mortise, giving room for the wedges to spread into the vacant space and so give it the dovetailed effect that the joint depends on. How much you widen these end areas depends on the length of the tenon. Longer tenons flare out more readily than shorter ones which will offer greater resistance to spreading. In furniture work, we generally keep stopped or non-through mortise and tenons to a reasonable length. An apron to table leg for an average dining table for instance generally needs the M&T to be no longer or deeper than 2″ (50.8mm).

Whether you use one or two wedges depends on the width of the tenon. Narrower tenons can often be widened with a single wedge centered in the tenon. That said, I have noticed a tendency for single, centred wedges to show traces of a split into the visible wood outside the tenon. This is not usually detrimental to the strength by weakening the joint. The reason it happens revolves mainly around the compression surrounding the wood. `even when the joint is cut tightly between the end walls, that wood does yield, especially in less dense woods like oak and the wide range of soft-grained woods. I would suggest that tenons with a width of 1″ (25.4mm)or less a single wedge will work just fine. This can work fine on wider widths depending on the wood type. Many woods are known more individually for their pliability and this will help you determine whether one or two will work in your project. Oak is especially known for both its pliability and its strength and bending properties. Other hardwoods are known to fracture more readily under compression and across the grain and will prove unsuitable. There is, of course, no particular formula. The distance from the edge of the tenon will mostly depend on the bendability of the wood and how you decide how far from the edge will be no more than a good guesstimate. You must look at your wood and make the decision for the best position to make your saw kerf, but, that said, I would say that almost any position will do except going too close to the edge.
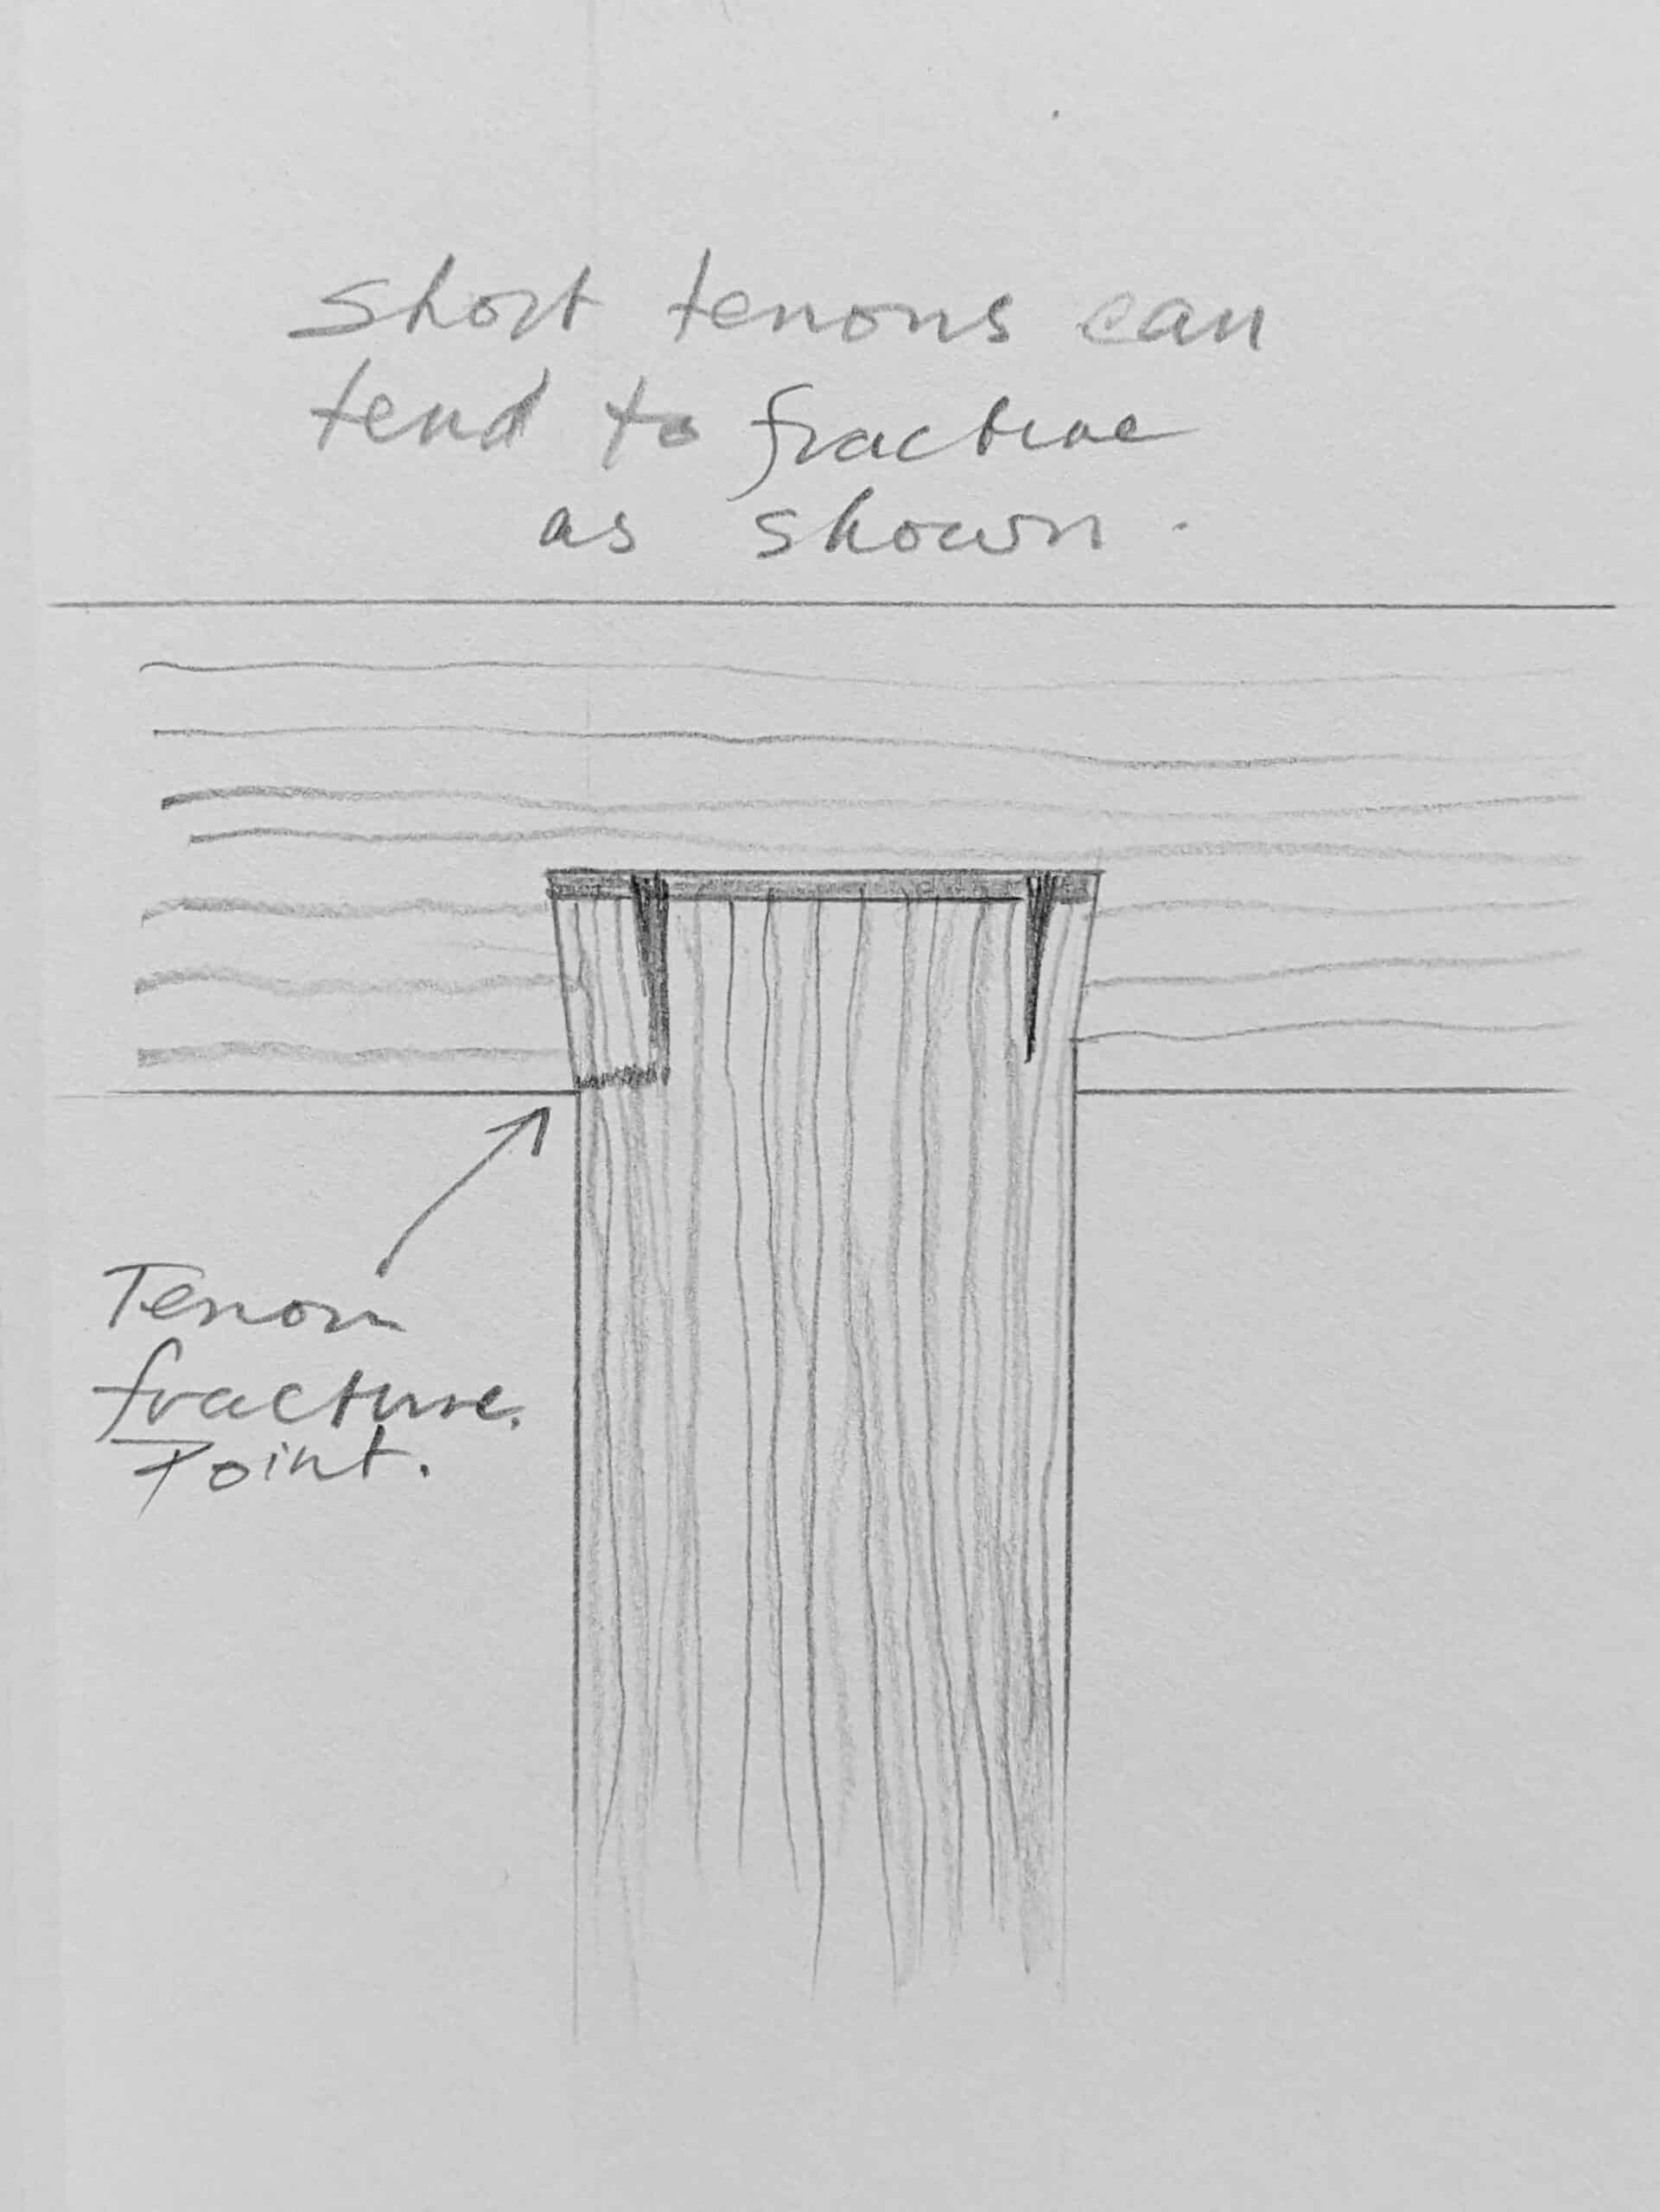
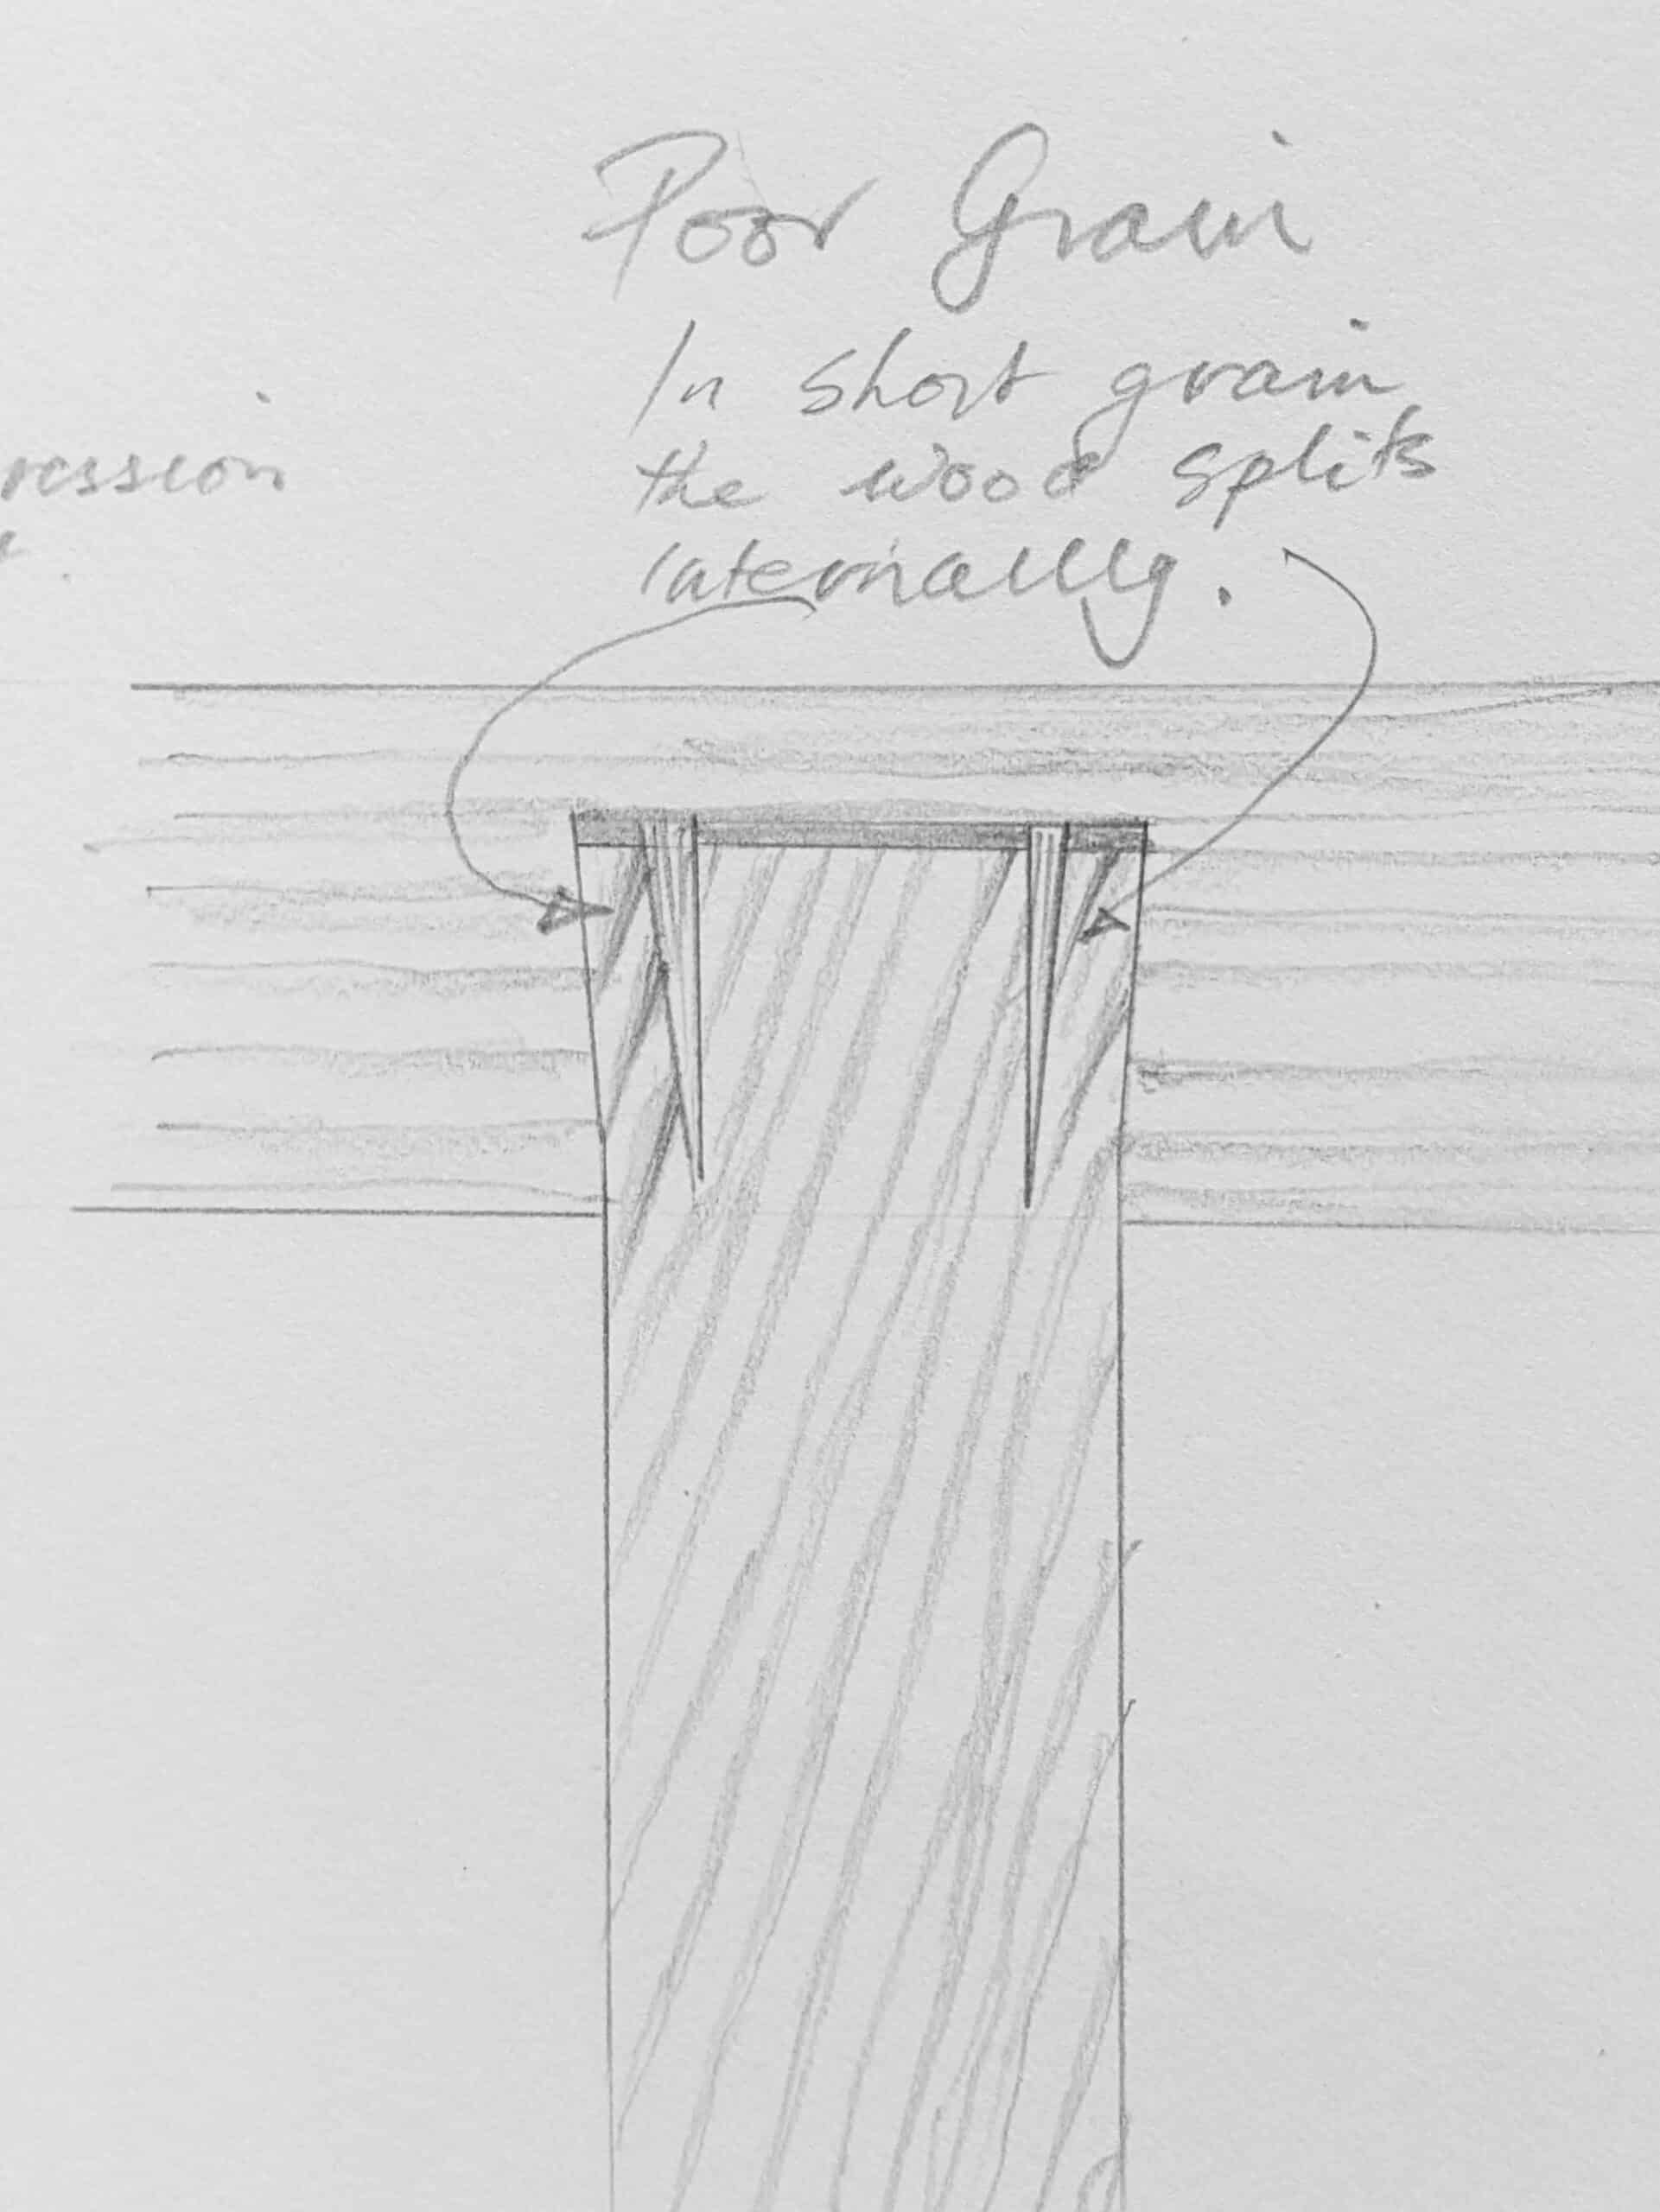
Key to a good fox wedging of the tenon is straight, knot-free, non-fractious grain in the tenon area. You are looking for continuous grain run extending through the tenon into the grain beyond the joint area and the reason for this is that you want the wood to remain intact inside the mortise hole itself. Short grain will usually break and within the joint, you will have lost the integrity if the wood is split off from the tenon. When this happens, you rely on glue alone, which may well hold, but the idea of the joint is to create additional mechanical strength within the wood and the whole joint — integrity — integrated, whole, complete. The real issue here though is that you may well not know this has happened.
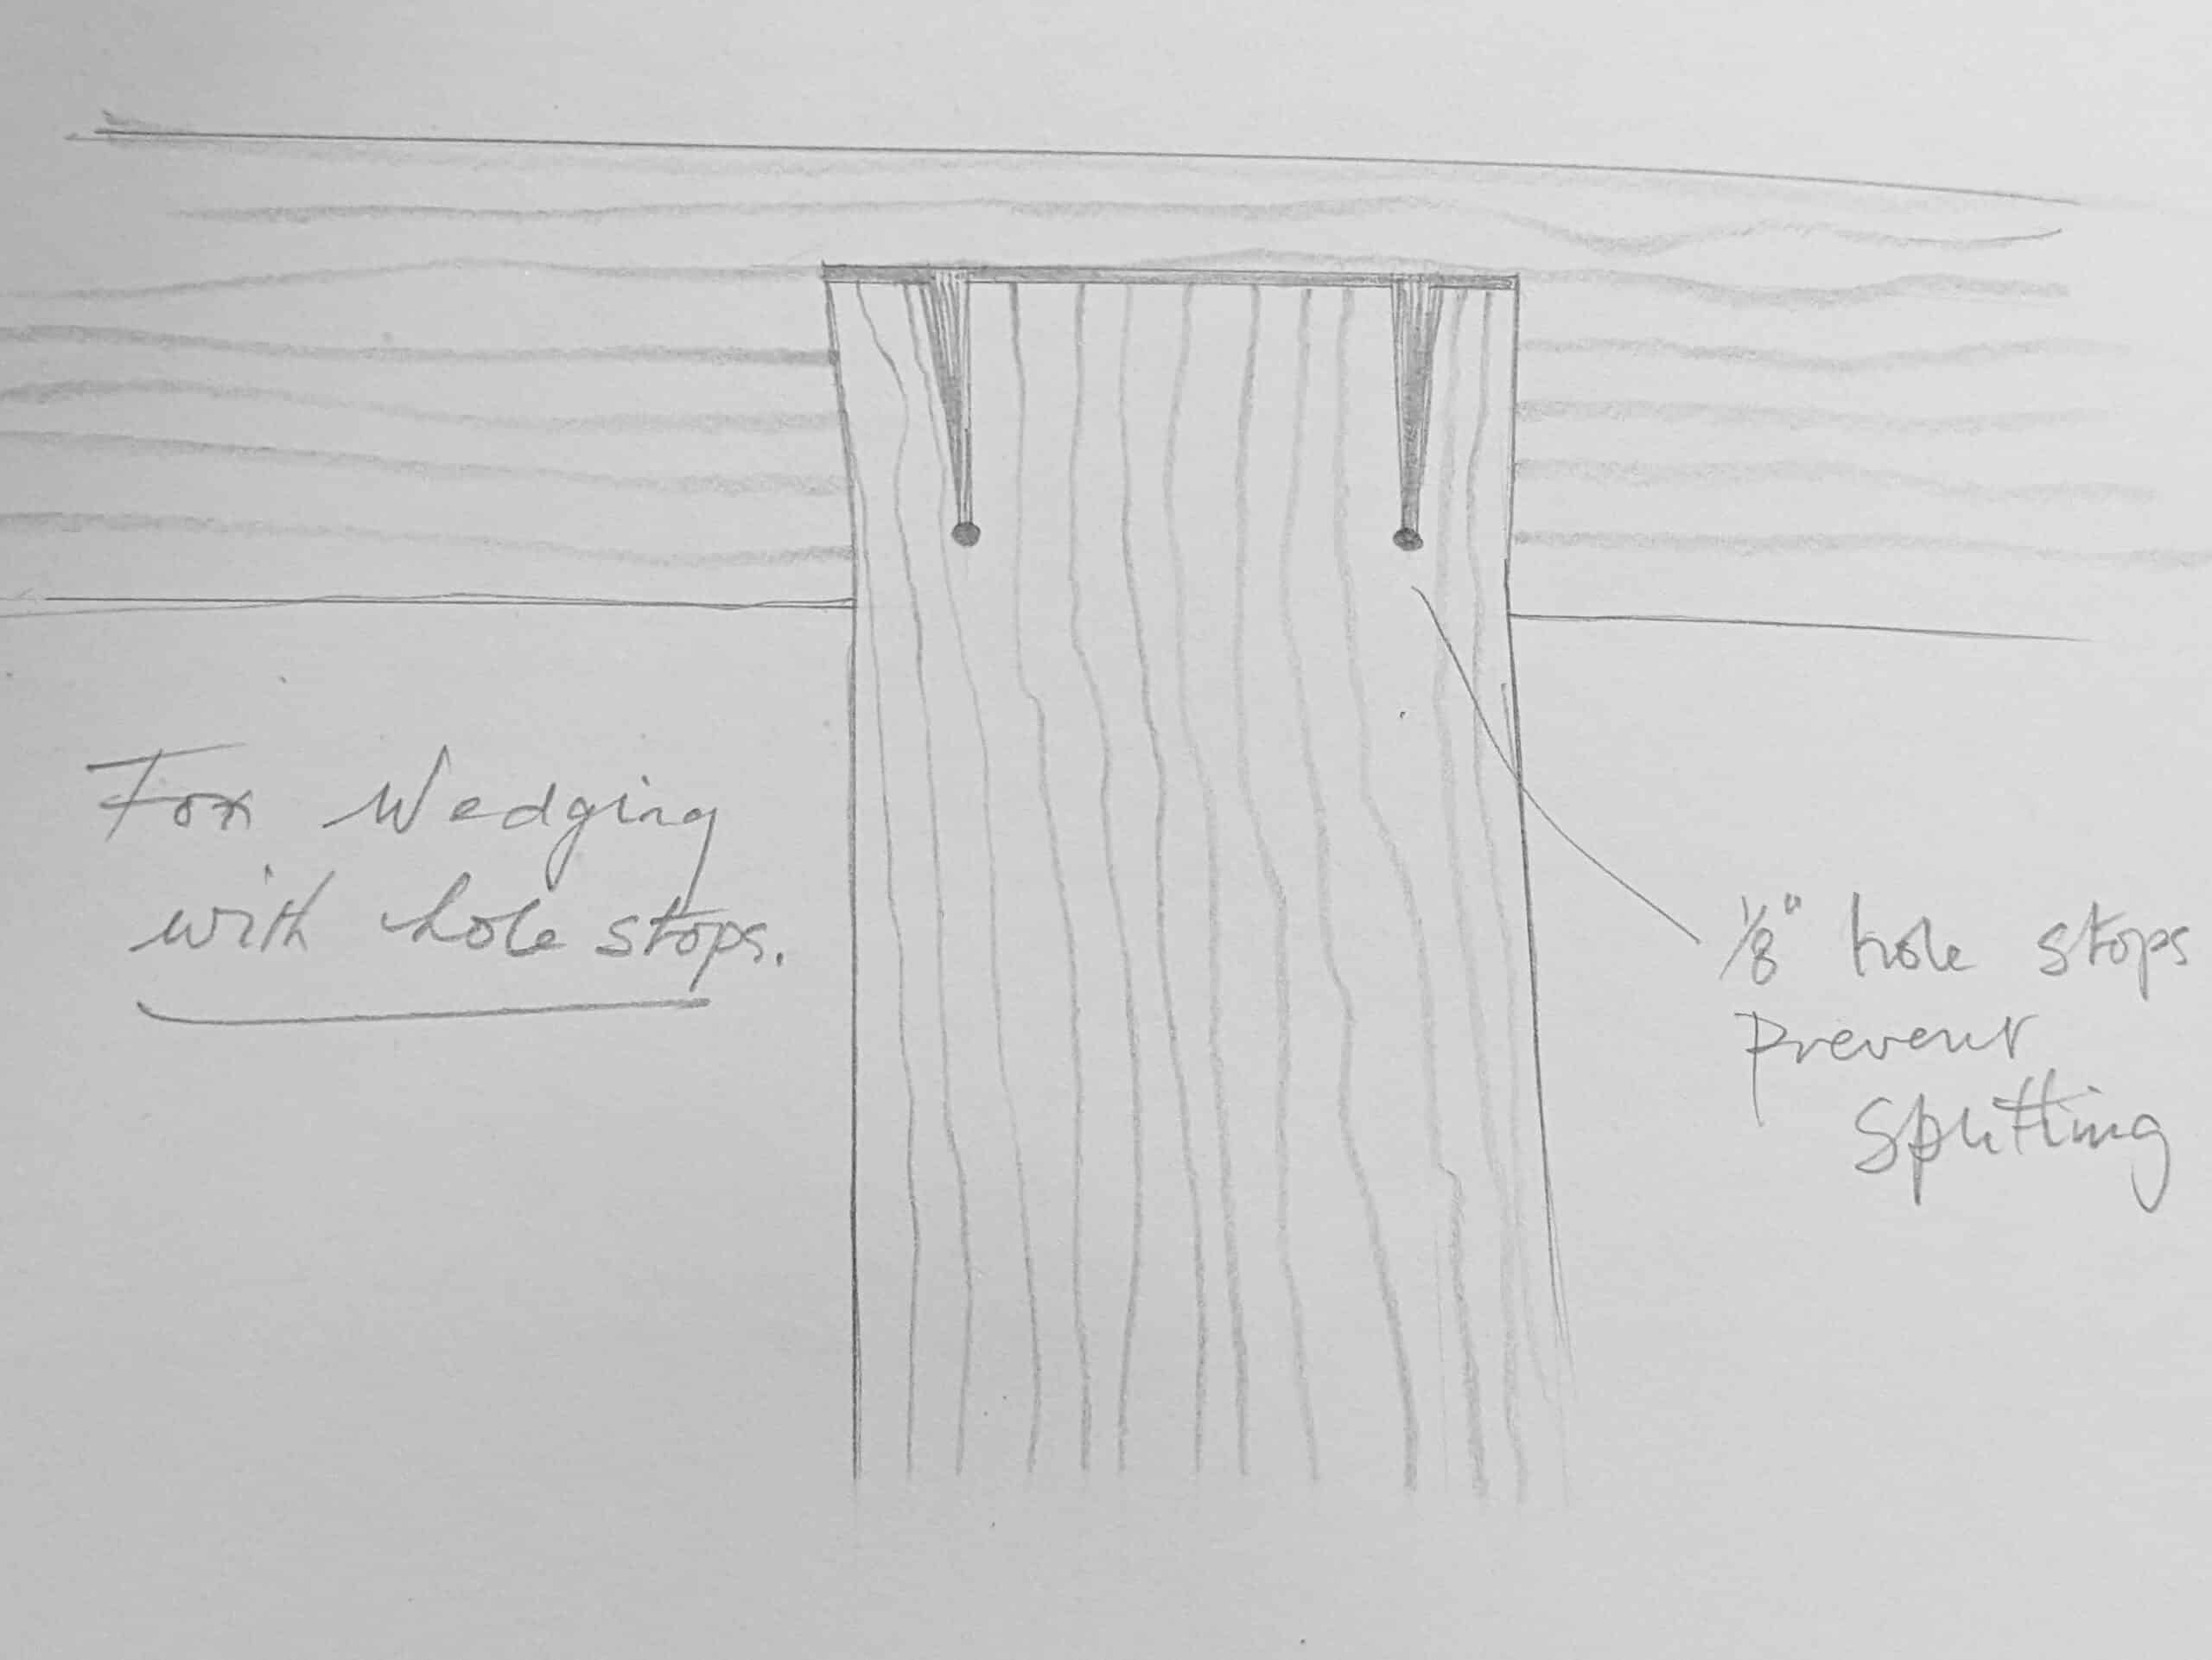
There are advocates for using small holes at the end of the saw kerf to work as stops to stop the wood from splitting. I can’t say I am an advocate of this though I can see how it works. My preference is to keep as much grain as possible. Any amount of reduction increases weakness at the critical area of stress. This is the reason I make sure to increase the wall at the ends of the mortise hole as a ‘retainer wall’ of resistance to prevent any splitting. It works in that I have never had a split occur.
Calculating what will take place inside the joint can depend on the wood type, its compressibility, strength, and more. The necessary first calculation is the space you create in widening the bottom of the mortise. You should not only fill the space by creating a wedge commensurate to the space you created but any additional space for compression in the ‘spring‘ from the wedges themselves, which will compress under driving pressure and then too the same spring in the tenon too.
The saw kerf will likely be somewhere around 1/32″ (.79mm) per kerf. With two kerfs we have 1/16″ (1.57mm). If the bottom of the mortise is widened on each side by 3/32″ (2.3mm) then we have 3/16″ (4.7mm) plus the kerfs, so, technically a wedge of 1/8″ (3.1mm) for each wedge will close off the gap to each side. But that’s the theory. In reality, there are resistance factors in the wood fibre of both tenon and wedge. This is where the guestimation comes into play and this is what creates a little uncertainty. Usually, we use the same wood we created the joint from — oak for oak and pine for pine. We can use hard and dense woods such as we have in scraps. My feeling on this is that glue forms a less certain bond to harder, more dense-grained woods with less compressibility. I have no proof of this and it doesn’t matter that much. The joints will hold just fine with like for like woods so I see no general need to get into this.
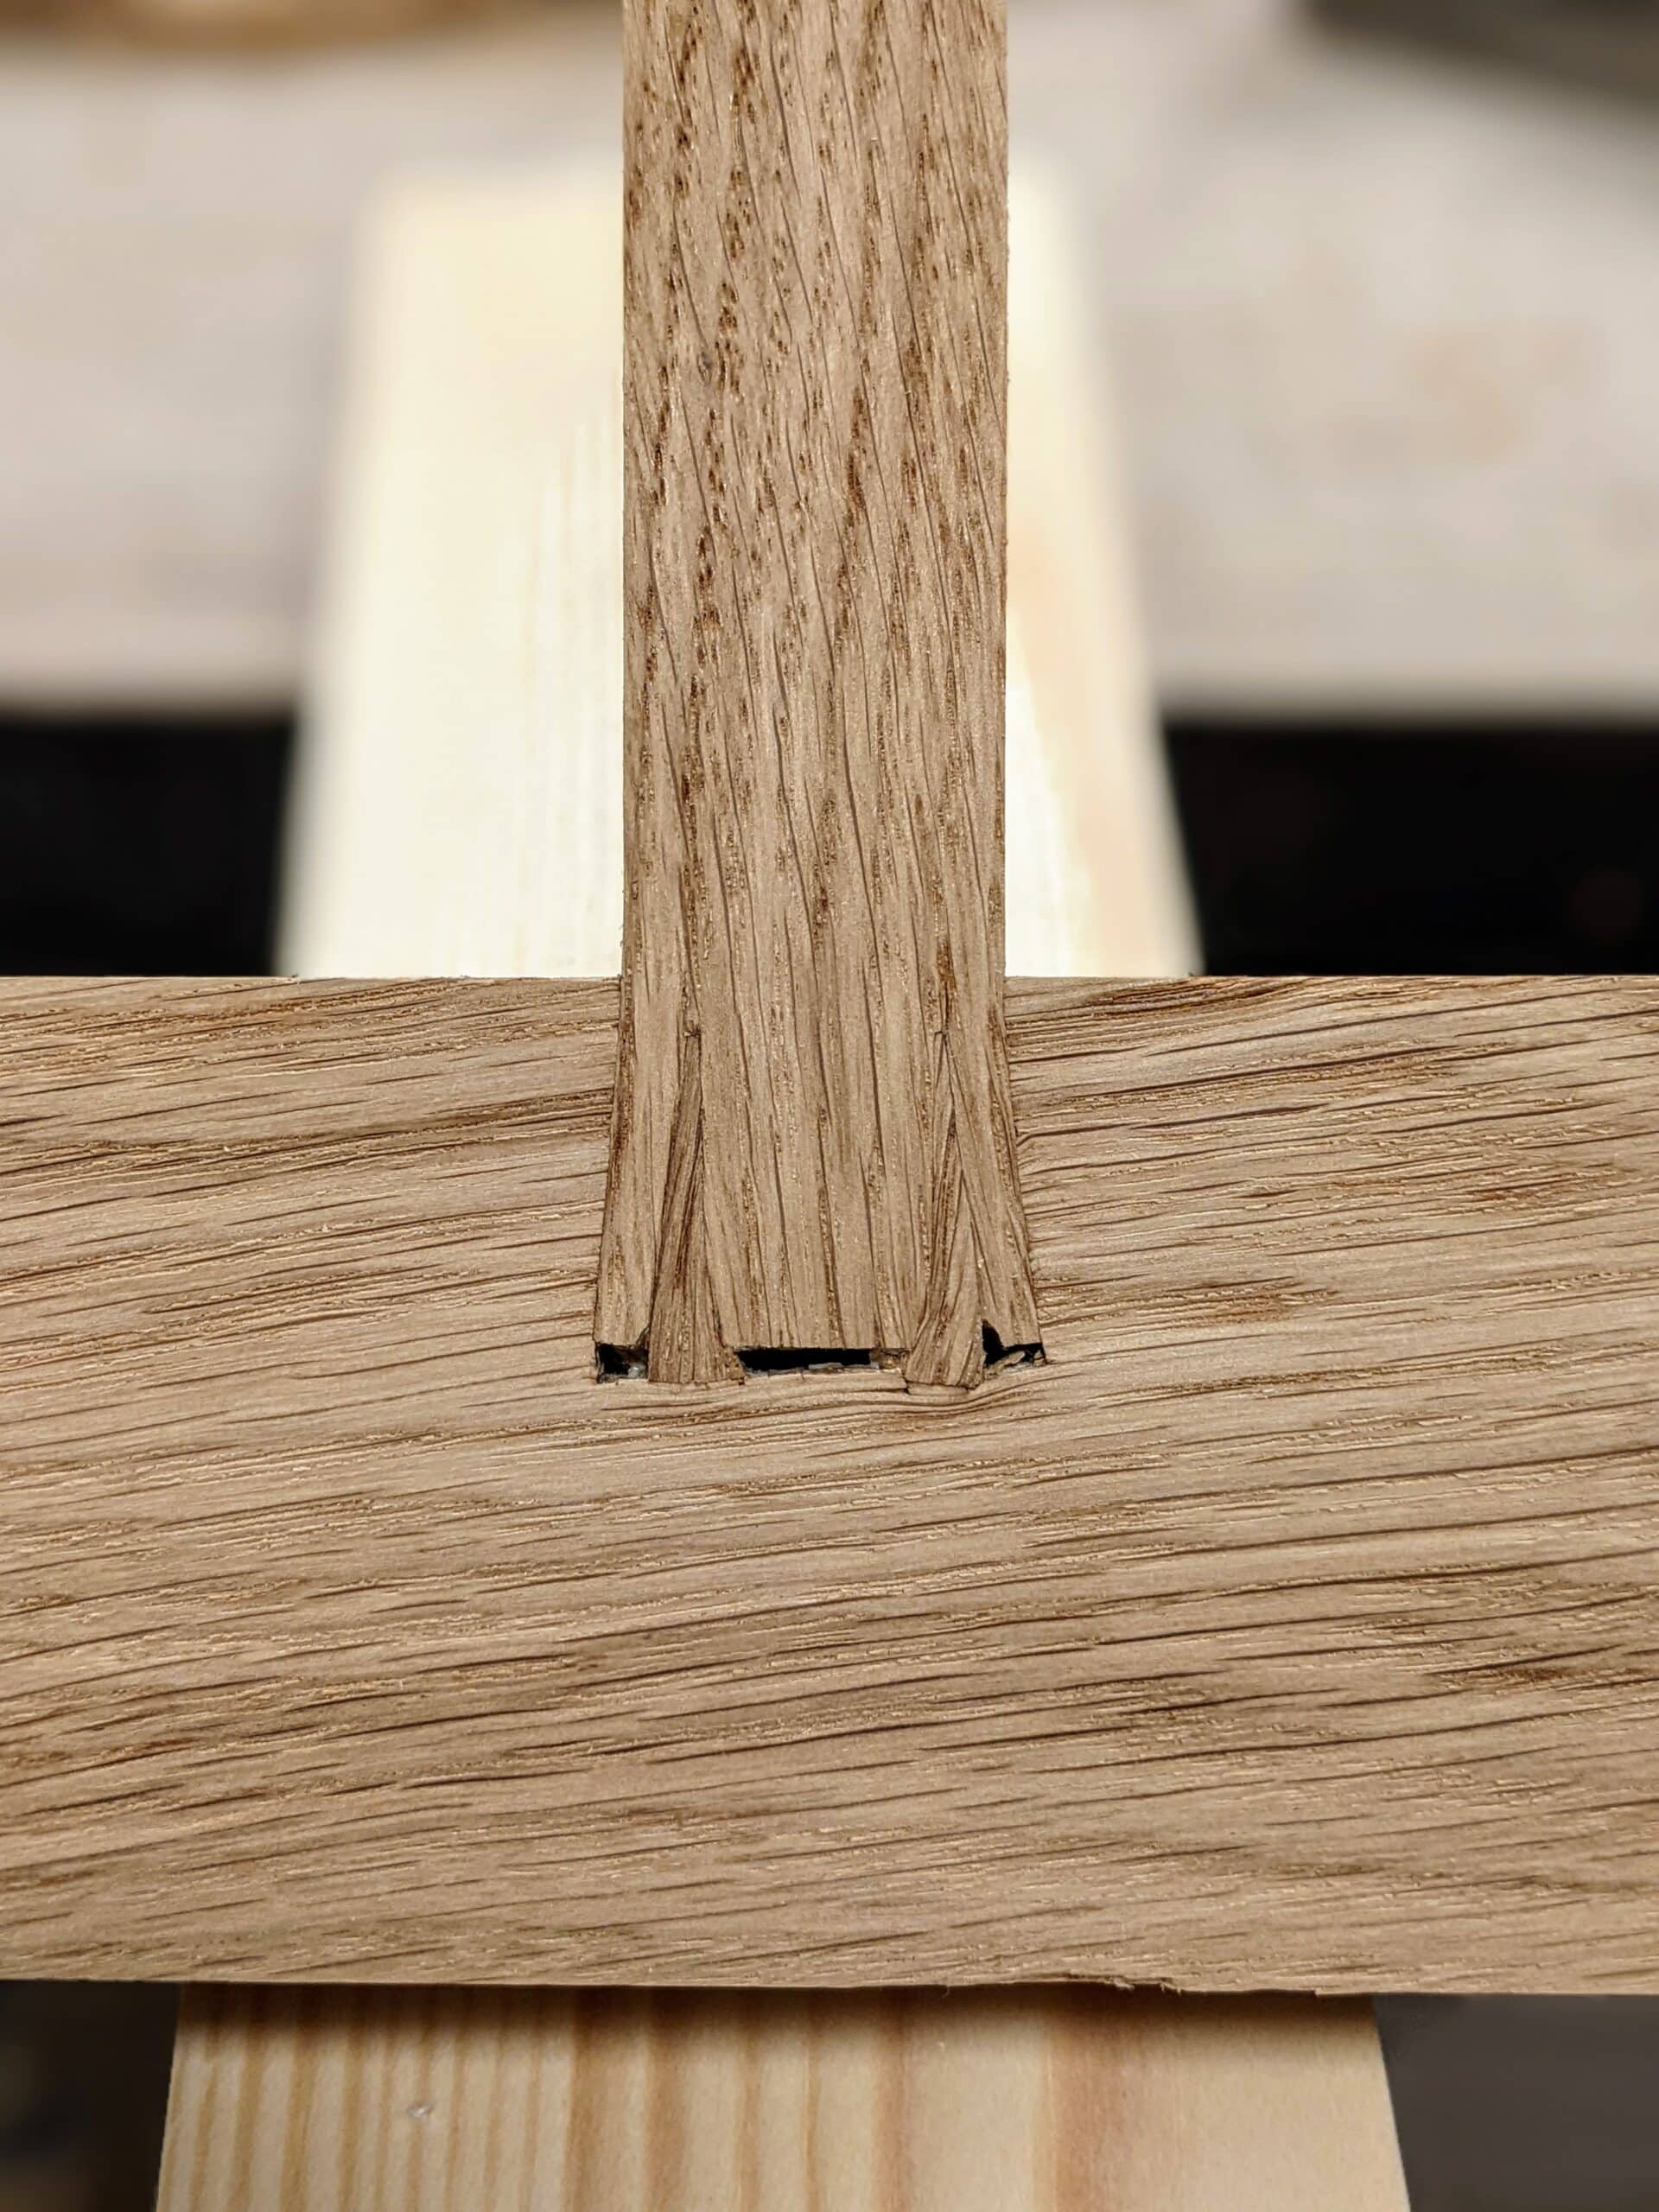
In my YouTube video showing my use of this tenon type, the wedges at their widest point totaled a full 1/2″ (12.7mm) to fill the total available space of just 5/16″ (7.9mm) see pic above. This is in only a 1″ (25.4mm) wide tenon. The substantive compression of components is clear and so too any pressure points. Notice how much the wedges compressed at the wide end of the wedges within the saw kerfs and then not in the short distance near the uncompressed ends. Now notice how much the outer sides of the tenon narrowed to look as though they were cut tapered when they were cut perfectly parallel to the outer edge. It’s good to see additional areas like the ends of the wedges indenting into the bottom of the mortise and the retention properties afforded adjacent to the extended area on either side of the mortise opening. Though we never cut through a section as I did, it is comforting to see just how the wedges work to both compress the wood fibres and also close off any and all relevant air pockets and that there is zero splitting.
Very interesting.
A lot of “details” to be taken into account.
As one says: the devil is in the details.
In the video, you turn one of the wedges, saying something like: that one is in the wrong way (at about 1′). Could you say more about this.
Yes. The square end seats better against the bottom of the mortise and the wedge or inclined side needs to fate the outer edges as these are the sides that will bend out to the voids. The wedges will work most likely but mitigating the possibility is as you say in the details.
I got to believe this will be for a bed frame for the Sellers home. This sort of fox joint wedging should minimize any sort of frame squeaking I would think!
Ahem
Some people drill a small hole at the bottom of the sawn kerf to stop it splitting as the wedges are forced in. Having a shoulder on the tenon helps stop any wiggling when a force is applied to the joint. The secret of fox wedging is in the size of wedges: too thin and the tenon won’t spread enough; too fat and the tenon won’t go all the way home.
that first drawing is great
In a video I once saw the same technique used in wooden boatbuilding when fastening the outer boards of the hull to the frames with wooden (round) plugs. One wedge secured the plug to the frame and another at the outer end of the plug secured the board to the plug.
In boatbuilding, planks can be fixed to the frames using oak trenails, wedged at each end and driven into blind holes in the frames. Of course, the measurements are not so critical as the trenails are of a constant diameter, with no shoulder.
I can see this in many applications of boatbuilding and for several good reasons not the least of which is the permanence of swollen wood once the dried-down peg is inserted and living in wet areas permanently and then the non-erosion of key metal components through exposure to saltwater and water in general.
Thank you Paul. I am grateful for how generously you share this information. Though I subscribe to your Master Class, I have found you are really sharing all your information freely and that really the Master Class is more of a focus on what you teach (and an opportunity of all of us to have our weekly session with you).
I know you have books in the works. If it makes sense, I would greatly appreciate if if you have one include just the kind of thing about the fox tailed tenon included in it. Books feel more permanent to me. I am sure there are other unusual joints as well you could share with us as well so the are documented and we know when it makes sense to use them.
Oh, one of the things I’ve started doing lately, I have been reading more about folks reproducing period furniture. Somewhat often the author will mention and name of someone influential in the field and then mention a book that chronicles their work that also contains measured drawings. Often these books have been out for a long time and I’ve picked up quite a few used for $10-20. Little by little, my woodworking library grows. Will need to build a big bookcase to store it. Now I need to decide the style and there are some many good options. Life is good and happy new year to you and your family.
Would you consider making a test joint as practice run with the timber used for your project first.
Rather than the danger of pounding your joint and the tenon shoulders not closing, which would be a glue up night mare.
I regularly use fox wedged tenons on my wood and brass mallets made using plumbing T-junctions. They are the ideal solution for fixing the wooden handles into the brass fittings.
Hi Richard, would you mind posting a photo of one of your brass mallets? I have a short piece of 1 1/2″ dia. brass rod I’ve been considering making into a mallet. The fox wedge tennon sounds like an ideal joint. Thanks.
Drilling a hole to strengthen a slot or right-angle is a classic trick, distributing the forces that would otherwise tend to be concentrated at the intersection of the two planes. If you look carefully, you’ll see some tool manufacturers take this approach on squares and the like. It may not be needed in this case where the mortise walls will be pressing inward on the tenon, combined with wood’s flexibility … but if you’re concerned, it’s a legitimate approach and it’s cheap insurance.
(For us novices, drilling the end hole before cutting the slot may also help prevent cutting past the intended depth. Which, again, doesn’t matter all that much in most cases but is worth keeping in mind for the occasions when it might prove useful.)
Not sure on your numbers. I don’t make a door without foxed tennons. I can’t be the only one surely?
Thank you!
While I’ve not used one in actual making work, I do use a version of the technique, (sans dovetailing the mortise) when I do repair work on chairs and tables where the extant joints loosened a few years prior and the piece has remained in use. This ‘neglect’ really loosens up the M&T.
I try to gauge the thickness of the wedges by estimating the play that is present in both mortise and tenon, and the amount of existing material I have to work with. The wedges then serve to fill the gaps causing the play, giving a mechanical boost to the strength of the joint and allowing glue to work properly.
Your article has confirmed my actions.
I opted to use this joint when constructing my first mallet. A relatively massive thing, I made it much too heavy for typical use. However, I wanted to make sure the head would never come off no matter how many blows it delivers, or how hard they were. Using a round mortise and tenon presented unique challenges. My first thought was that I would have to relieve the mortise all the way around, but dovetailing the sides of the mortise on either side of the spreading action was really all that was necessary. It feels as solid today as the day I made it, and I have put a lot of power behind it many times. Truly, it is a testament to the strength of this joint. Thanks for sharing, Paul!
Happy New Year Mr. Sellers,
I’ve always been wary of draw bore pinning quarter sawn oak tenons because I’ve always been afraid that the area between the pin and the tip of the tenon would split along the grain. Is this reasonable concern?
hi paul, this is a GREAT article, and putting in the wedge the ‘wrong’ way initally in the video was a useful learning moment for me.
can I please check a few things to make sure I have understood?
1. when double wedging, you are using RIGHT-angle triangle shaped wedges rather than isosceles triangles? (on the basis that – when inserted correctly – it differentially pushes the edges of the tenon further out, without pushing too much on the middle section of the tenon – which is very neat)
1b. where a single central wedge is used – I presume isosceles shape is preferred? (to push both ‘wings’ of the tenon out equally)
2. when cutting the saw kerf, is it generally safe (and perhaps necessary) to cut at least 3/4 the depth of the tenon?
3. very interesting to realise that the wood can be so compressible. I’d never properly thought about this, and that one can USE this, before reading this article
thanks a lot
You are correct on all points, Paul. 1) Even though it will most likely still work if the wedge is the opposite and wrong way, it is better that the wedge is placed so that the end seats squarely to the bottom facing surface of the mortise and, yes, to 1b too. 2) Yes to 2 too. 3) Thank you.