And Ideas Came
My favourite ideas have come from my teaching my craft, working with my apprentices and then too with students on courses where they just weren’t getting it but thought that they were. In front of a class of 16, I saw that they just were not getting what the difference was between a rip-cut saw tooth and a crosscut pattern. I described the crosscut as a three-sided pinnacle pattern and a rip as four-sided. The problem was perspective. A four-sided pattern in my mind was descriptive enough until someone used the word pyramid. ‘No, not pyramid!’ So too, it became clear the three-sided was not wholly descriptive either. That too could give the wrong impression as well. In that split second, I saw how many things can be well intended yet misinterpreted and misunderstood, not one and the same.
The burr cutting edge on a scraper used in woodworking for scraping is also misleading, misinterpreted and misunderstood. How confusing, utterly confusing is the term and yet we still use it day in and day out. What about marking knife, striking knife and layout knife? Does the knife merely mark, strike a line or just lay out? In my world and forever it has created a wall in the wood I am working, hence my coining the term knifewall. So, as 99% of the work I use a knife in woodworking for is to actually create a division in wood that creates an actual vertical wall across the grain between the waste and the wanted. That being so, why not adopt a term that describes that, knifewall says it perfectly hence my coining the term and applying it throughout my writing and instruction. So, new as a result of my energising the word knifewall, woodworkers internationally have adopted the name for the knife as in knifewall knife and then too, well, knife?

Back to the burr on the scrapers be that the flat plate or the #80 cabinet scraper. The very last thing these two tool types do is scrape. Of all the cutting edges creates on woodworking hand tools with cutting edges and teeth, the scraper cutting edge is the most sophisticated of all. Describe a burr to any engineer and in his mind, he will see the fractured outcut side of a plate of steel where the unsupported outer corner fractured unevenly as a result of filing strokes. Speak it to Paul Sellers and he sees a perfectly formed super-thin steel edge turned by consolidation into a supreme cutting edge capable of severing the fibres of any wood grain type known to man. In other words, ‘burr‘ simply doesn’t cut it! ‘Scraper‘ just doesn’t slice it and we simply accepted confusion from the day these two terms were adopted. At least by my mentioning here and in my book Essential Woodworking `Hand Tools, I will go down in the annals of history to record my disagreement with what is truly disagreeable.


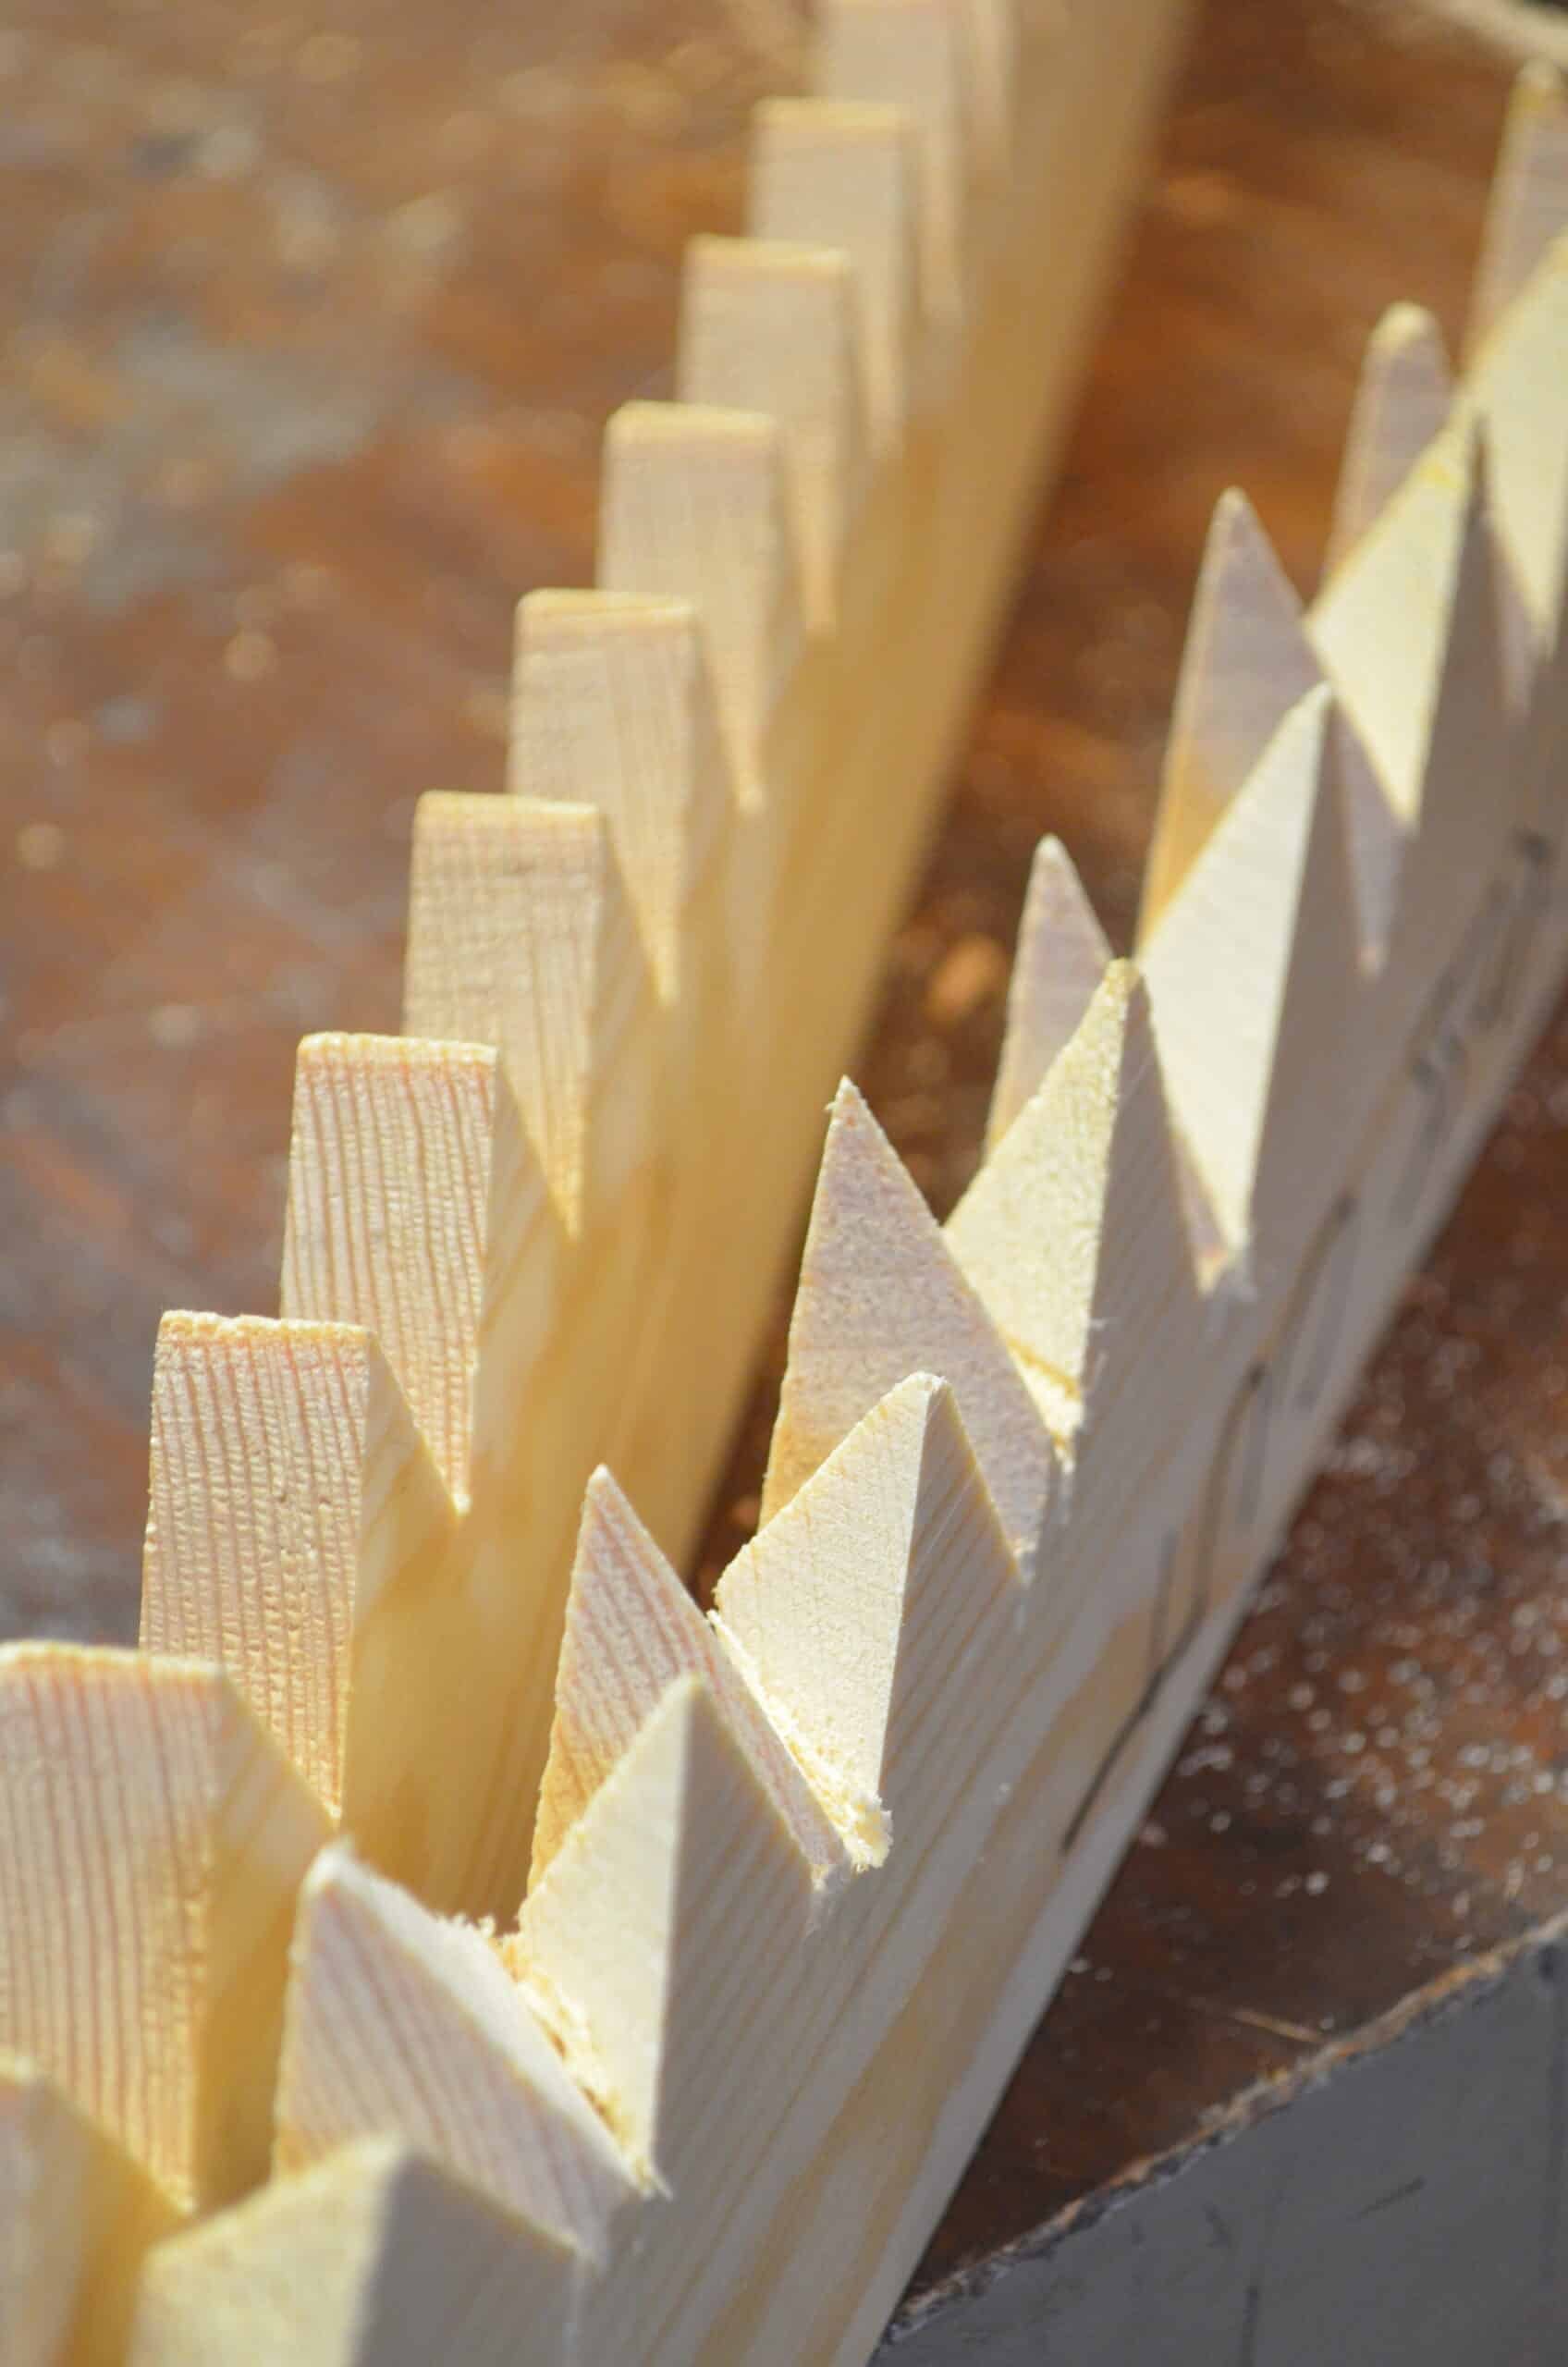
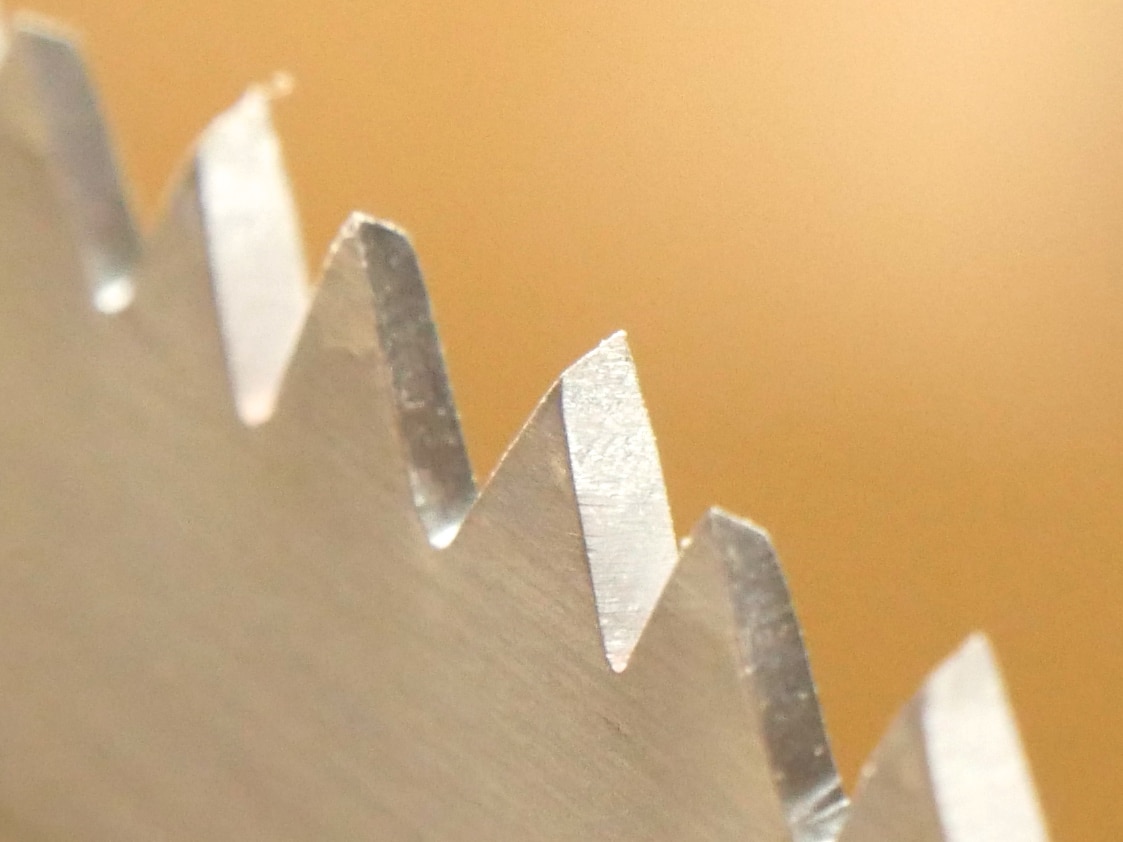
Back to the saw teeth. It was in a class there that I knew we were not getting it. Pyramid shape did not cut it. I grabbed two strips of wood and cut rip-cut teeth into the edge that represented teeth 20 times bigger than a tenon saw tooth in a gents saw. As soon as the students saw it (no pun there) they got it. By using this I could also discuss tooth pitch, show how we can change the pitch by a slight rotation of the saw file, things like that. This then gave me the ability to talk about varying the aggression of the tooth too. Pinnacle was better than pyramid. My three-sided crosscut tooth came from a series of awkward cuts with a fine backsaw and in front of the audience, just to make it harder. The immediacy of understanding was a remarkable revelation because of scale. Twenty times bigger seemed to be 20-times more insightful.

One of my best inventions of all is the mortise guide. Student needs drove me until it was developed and made. What others now take for granted without realising is that it didn’t exist until the early morning when sixteen students were not likely to develop half-decent mortises parallel to the outside faces of their table legs. I would end up running from one to the other correcting their flawed mortises. This particular morning, after a long period of agonising for an answer, walking across a field in Texas on my way to the woodworking school, the idea came for the very simplest of mortise guides. I had never heard of one before, never seen one of any kind ever used. It made me wonder why. At the end of my walk I made sixteen guides and handed them out for the first time and without even trying it out. It worked. At the day, sixteen students created 128 near perfectly aligned mortise holes in sixteen table frames and I had almost nothing to do with any one of them but something to do with every one of them. That was 20 or more years ago and it’s too easy for others copying to take it for granted that somehow it was always there. I assure you — it wasn’t!
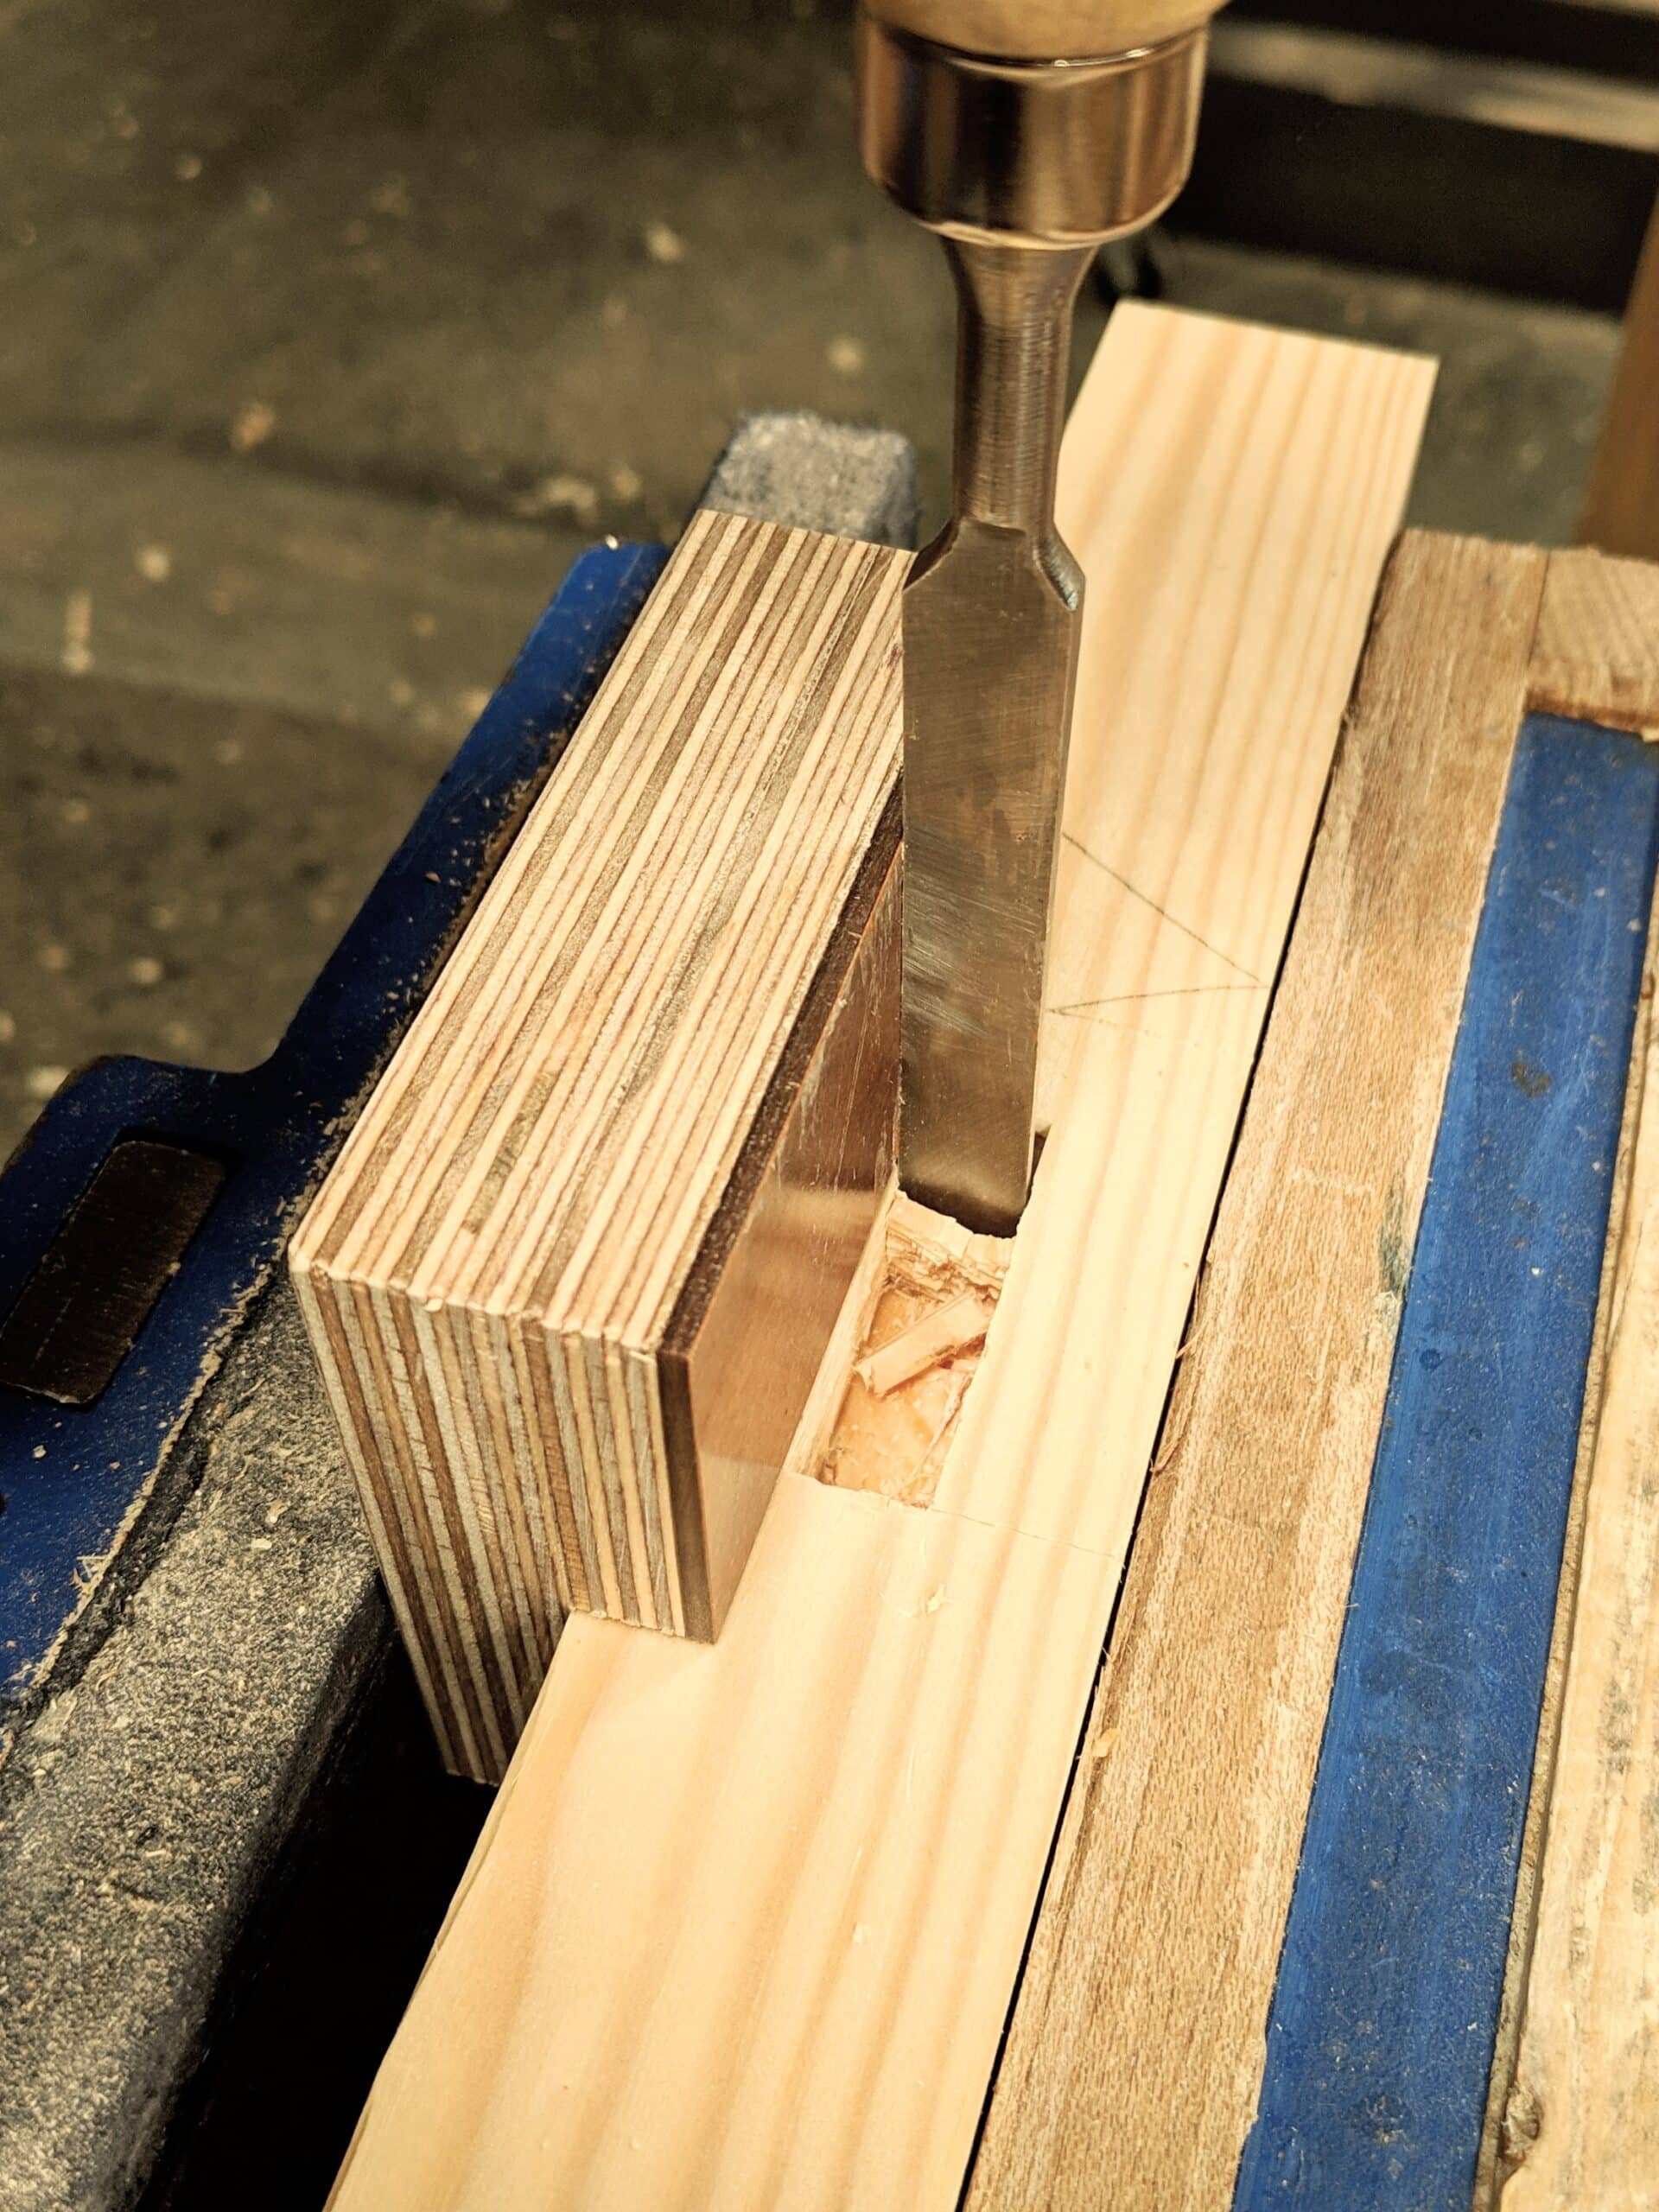
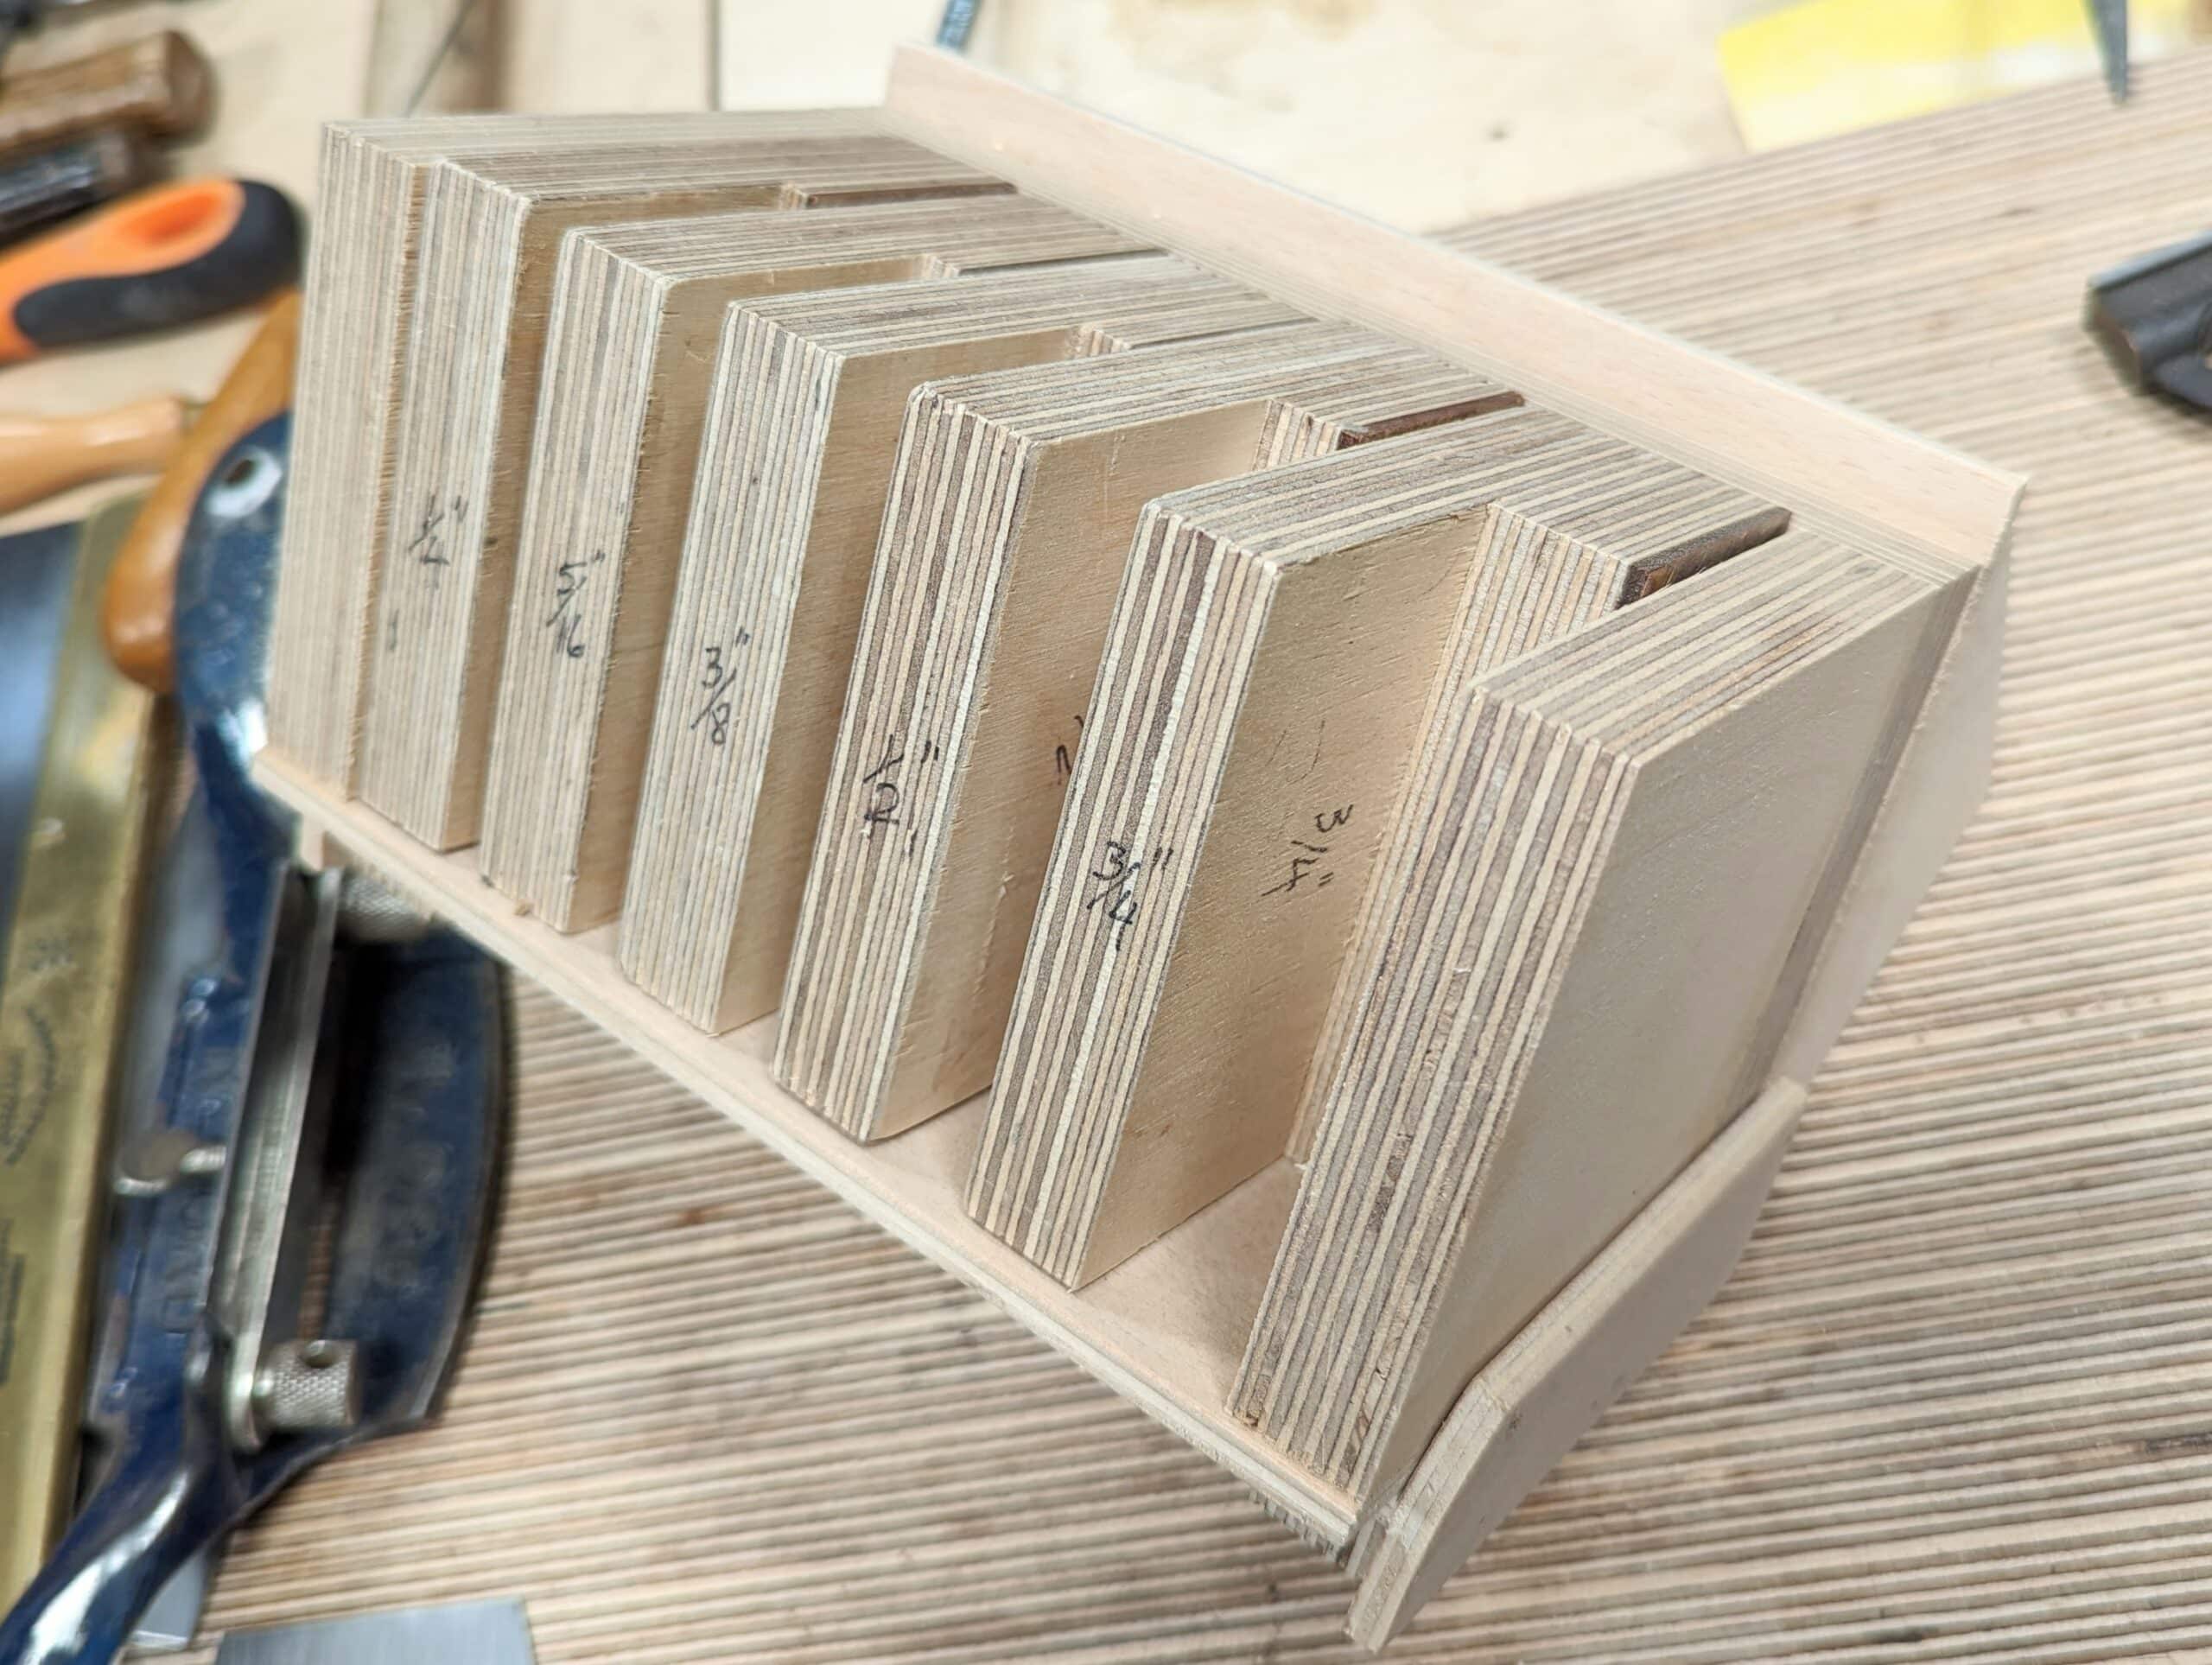
After trialling the mortise guide with students for a couple of decades I knew the guide was of real value and though I do often chop through-mortises regularly without the guide, I find myself relying on it constantly for non-through mortises simply because everything aligns so very well when I do. I made a holder from plywood that sits with the sizes I rely on the most. I make others for specific and non-standard distances. I faced the ones I use with hard-wearing serving tray plastic.
It might seem a simple thing to convert one plane to another. I mean, why would you convert a rebate plane into a plane that hogs of excess rough-sawn material to prepare it for levelling and truing it? Why not just buy a scrub plane designed and made to do that? Well, it’s a plane that needs no changes to the main body and by buying as spare blade secondhand for £5 I have a second plane developed as a scrub plane that works just as well and in my view even better. I may not have invented the plane but I did adapt it and I told everyone else in the world about to make their lives as hand tool woodworkers much easier. You see, again, no one else did it so I did it!
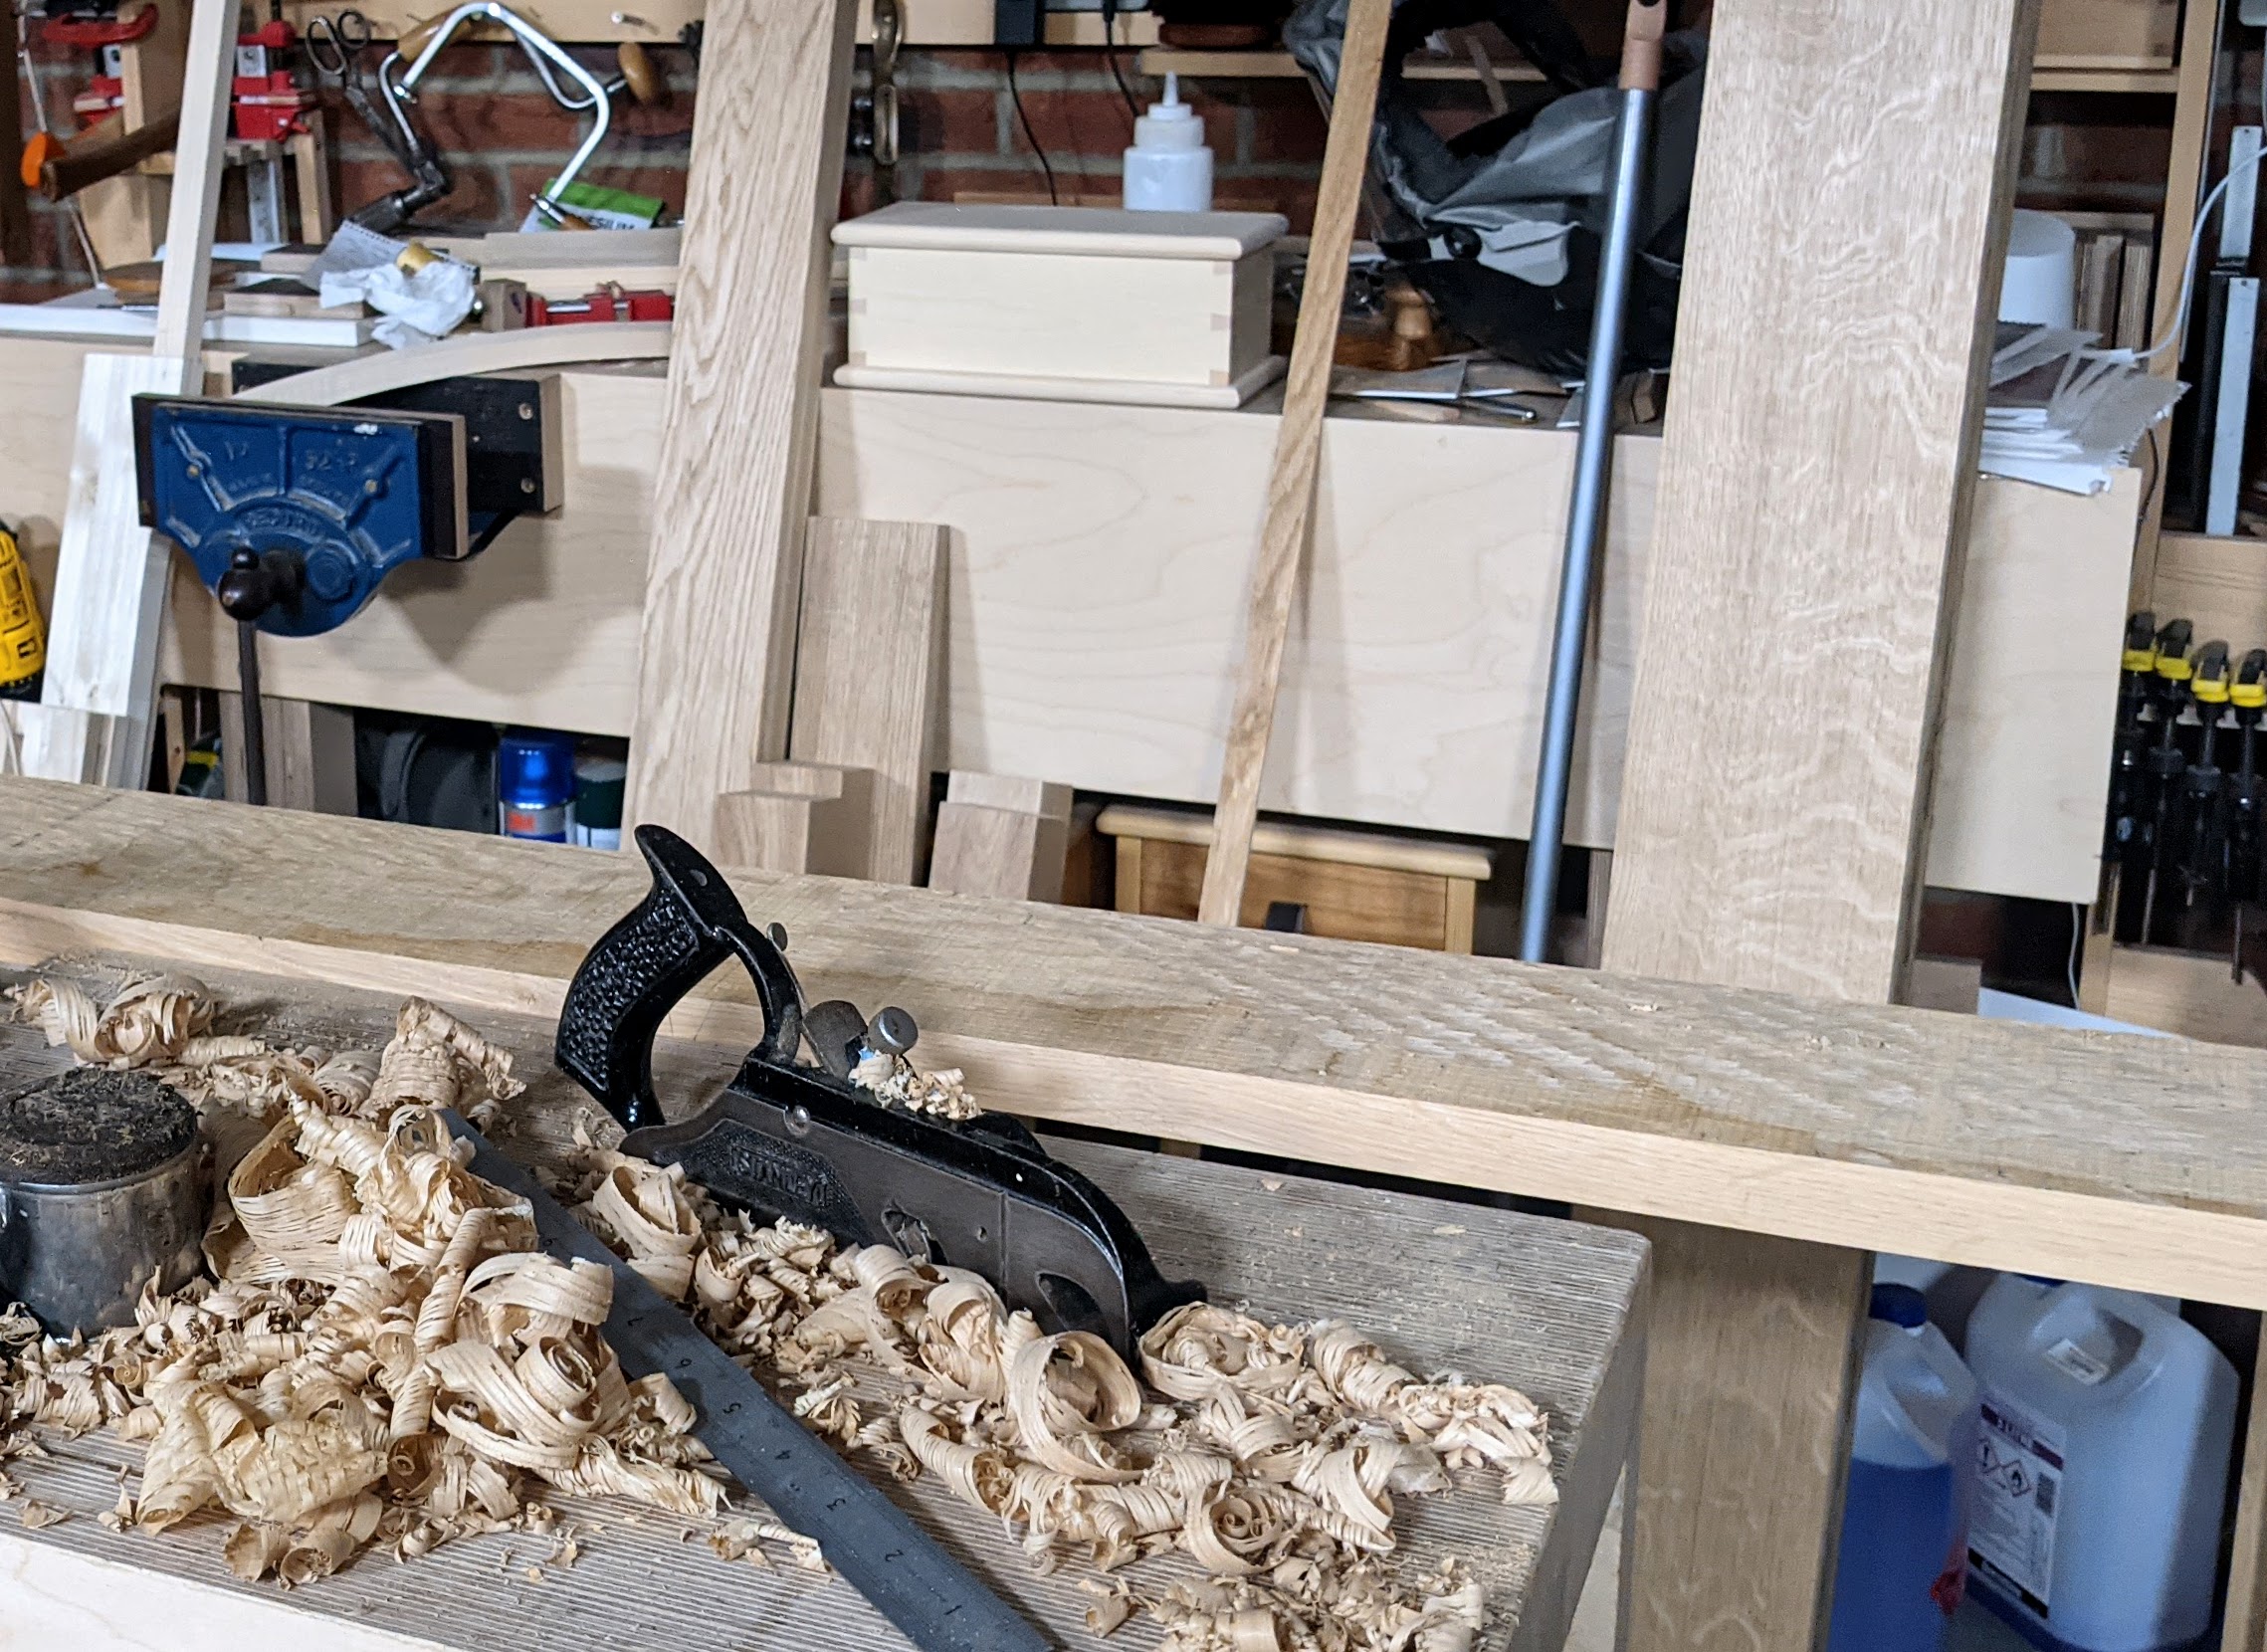
The curve to the cutting iron means that the initial start of the stroke is easy and the more length you take the deeper the take. By lifting off the heel of the plane in a shallow liftoff the stroke eases off again. A side-by-side series of strokes takes the wood down rapidly and easily and the strokes create a wide area in readiness for the level work of the smoother and jack planes. Notice the strokes can also be at a tangent if and when the grain is wiry. I even go square across the grain for really wild grain.


The drawings, the writings, the prototypes and tool ideas along with the enlarged examples of what was just too small to see came as a result of a burden for understanding. Even within the trade of what is called carpentry, now a very minimally-skilled and minor element of woodworking, very few carpenters understand many things about hand tools. That is more evident every day and it is the last place any woodworker should turn to for advice.
Sometimes having a model in a larger or smaller scale can explain the use or shape of an object easier than a thousand words. Even for those of us with the technical understanding of how that object works. I have heard of NASA engineers using Lego to make a simple model to see if a complex design could work before committing to making the design.
Hi Paul, you’ve come up with some great but yet simple ideas that only an accomplished and experienced wood worker like yourself could do and shared them with us.I have made most of these through your fantastic videos on your website. I think if I had to choose the most useful one to me personally it is the mortice guides. They are ingenious and do the job wonderfully. Hope there’s more to come in the future. Your intinuity never fails to surprise me.
Ps. sorry for any wrong spellings of grammar.
We all learn by different means, some people learn by video or demonstration, others learn by reading and others like myself need to do it for myself after a demonstration and reading how to do something.
I get the theory but I can’t do the task until I attempt to do it on my own, sometimes after several attempts. Hence all the wasted wood and sawdust I produce!
Reading and looking videos are great ways to learn the theory.
Then one thinks one can do it; which is not unimportant otherwise one will fear to try.
But one only really has the know-how when one has actually succeeded in practice.
When looking at Paul Sellers, it always looks easy. I always look several times at the video. After practice, I look again to find what I didn’t catch.
And then there is what Paul refers to as muscle memory.
Totally agree with you Tom, I’m just the same.
As someone who is getting ready to need to cut some mortises for the first time, I think I may be stealing your mortise guide idea. And I love to see and learn how others work around problems we all face. It applies in all areas of life, not just woodworking.
Actually, there is no need for theft, I gave this freely to all my students over the last two decades. Others have indeed stolen it from me but to you I freely give it.
The huge saw tooth model was another Paul Sellers stroke of brilliance.
Interesting thing about your YouTube videos Paul. I watch each several times until I feel I understand what you’re doing, and how you’re doing it… how you see it and how you think about it. Then I give it a try, usually with great success on the first try.
But what I find fascinating about your videos, is how much more information I find in them when I watch them after I finally “give it a try”. You pack so much more than your words indicate in each of your videos. I’ve not seen any other presenter pack so much content in a video! You are no doubt, a treasure to us all! Thank you Paul!
P.S.
Ditto on the spelling and grammar!
Love the mortise guides Paul; I have just been watching your dining table video over on WWM and they’re clearly extremely useful. I’ve only attempted freehand mortises before and the results were not great.
Is there a blog post or video where you discuss making these? What’s the hard outer material over the plywood, and how do you cut the plywood to thickness and get it all accurate?
Cheers!
Chris
I feel, with your guidance, I have become quite accomplished with my saws and in particular with my sharpening However, setting the teeth on a crosscut saw can still be a source of frustration. I wanted a larger tooth crosscut saw for quickly getting rear length on my thick rough boards. The frustration is that my saw set just doesn’t reach low enough down the larger teeth to get a reliable purchase. Any tips, modifications or specialist sets that can help.
(Modifying the anvil somewhat helped but it’s not quite there.)
If you are saying you get too much set then upturn a hammer in the vise, place the teeth on sideways and gently hammer-tap along the length, flip over and do the same to the opposite side. There is enough memory in the steel to leave the perfect amount of set. If the problem is not enough set, use a nail set (punch) to tap them deeper. Place the saw on a liece of wood and tap each alternate tooth according to the existing set. If you set too much or unevenly do what I told you for too much set.
Thanks Paul. That’s helpful because I’ll probably need to set the teeth by hammer until I find another saw set. (I assume mine must be a version for smaller teeth). The issue is as follows. The inside and outside faces of the crosscut teeth are triangular with filed facets back and front. The inside triangular face where the hammer falls and pushes to the anvil is smaller than the outer. My current saw set does not allow the hammer to reach far enough down the tooth to get a reliable purchase on the flat surface – can slide to the side without near obsessive care.
So I had wondered if modifying the saw set itself could improve reach.
But I’ve decided 1. I’m an idiot 😉 and 2. I need a new saw set for bigger teeth.
ps. in the meantime I just set the teeth by hammer and it’s adequate.
Mr. Sellers,
There seems to be two schools of thought on setting rip teeth after leveling; before sharpening and after. Which do you recommend and why?
[Addendum: Ignore that unthought out query. Obviously resetting the teeth before they’re all the same depth – top to gullet – will result in an uneven, side to side tooth set. Not what is needed for smooth, even cutting.]