Joinery Complexities
As it is with many things simple they become the more complex as joint numbers increase around the same corner. Corners can present the greatest of considerations and especially on slim wood. As an apprentice piece set by the other men, I had to make a fish-tank corner from three pieces of solid 35mm by 35mm sticks in the single corner and all of the outside faces to the corner were mitred at 45 degrees. That looked easy enough, I thought, on seeing the three sticks emanating from the corner. It was when George tugged at the parts that I saw within the jointed area that all of the parts were further jointed inside with interlocking dovetails one to the other and within each other. I never succeeded to make it. My skills were undeveloped yet.
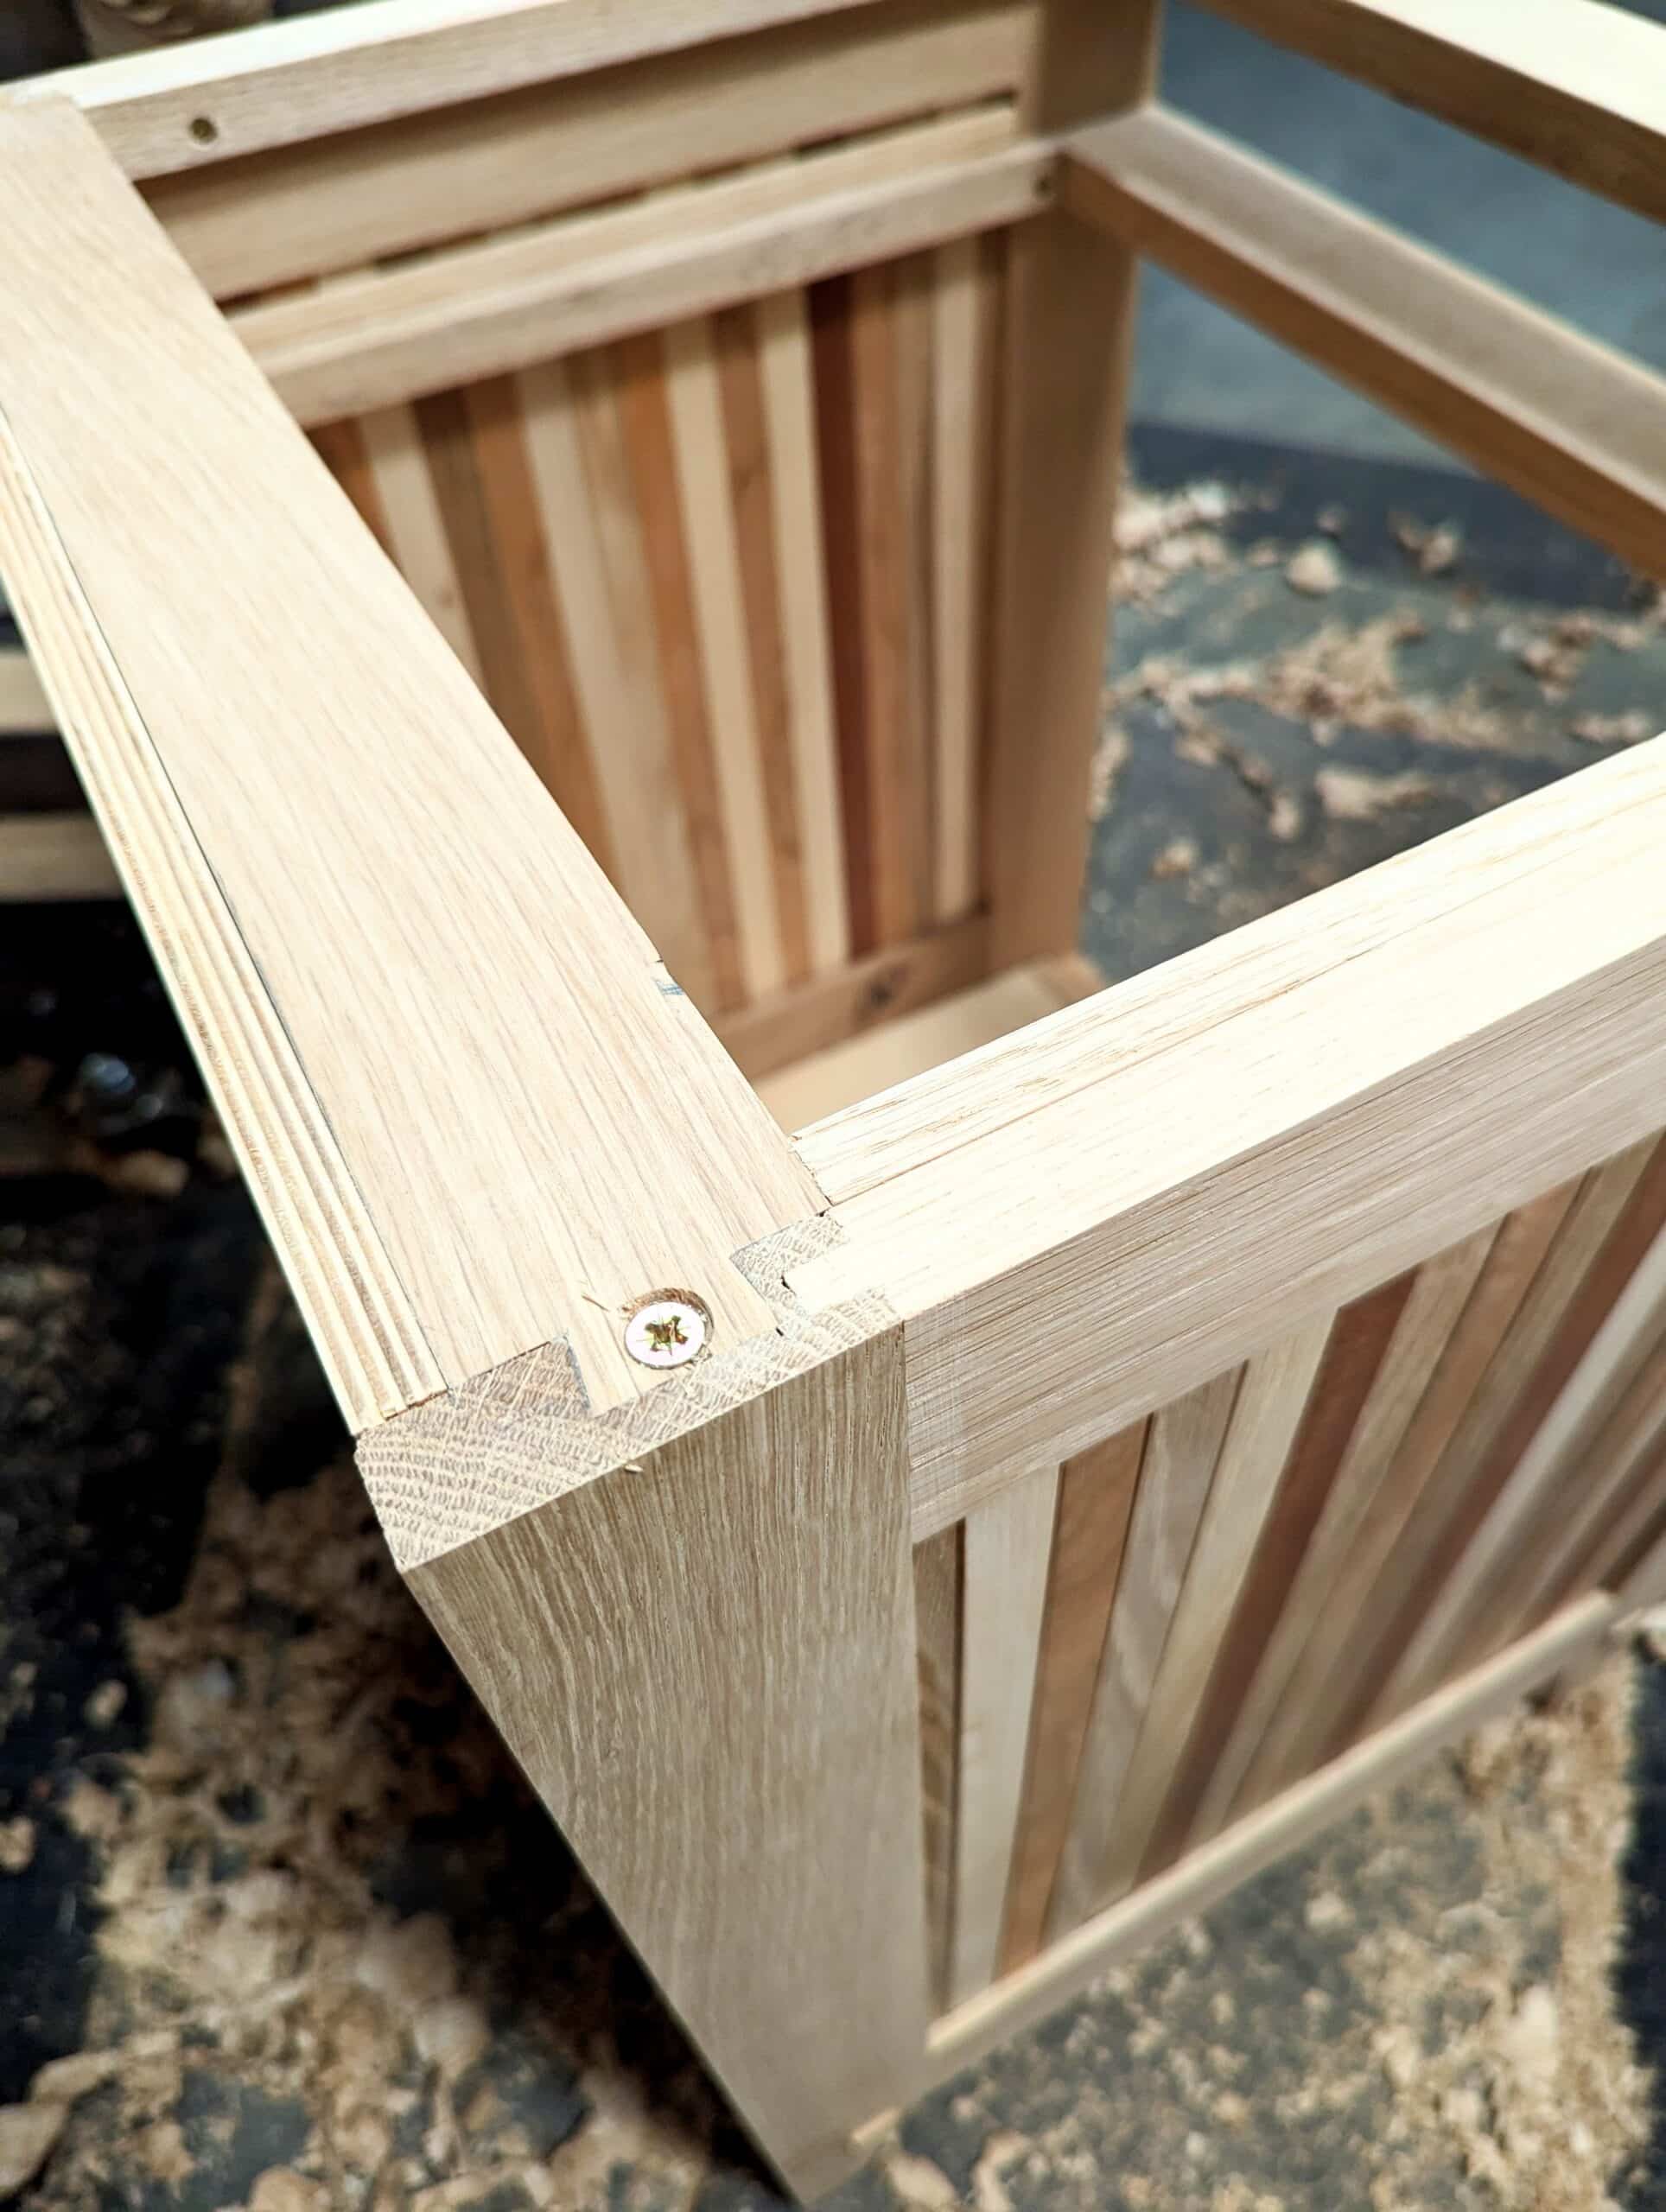
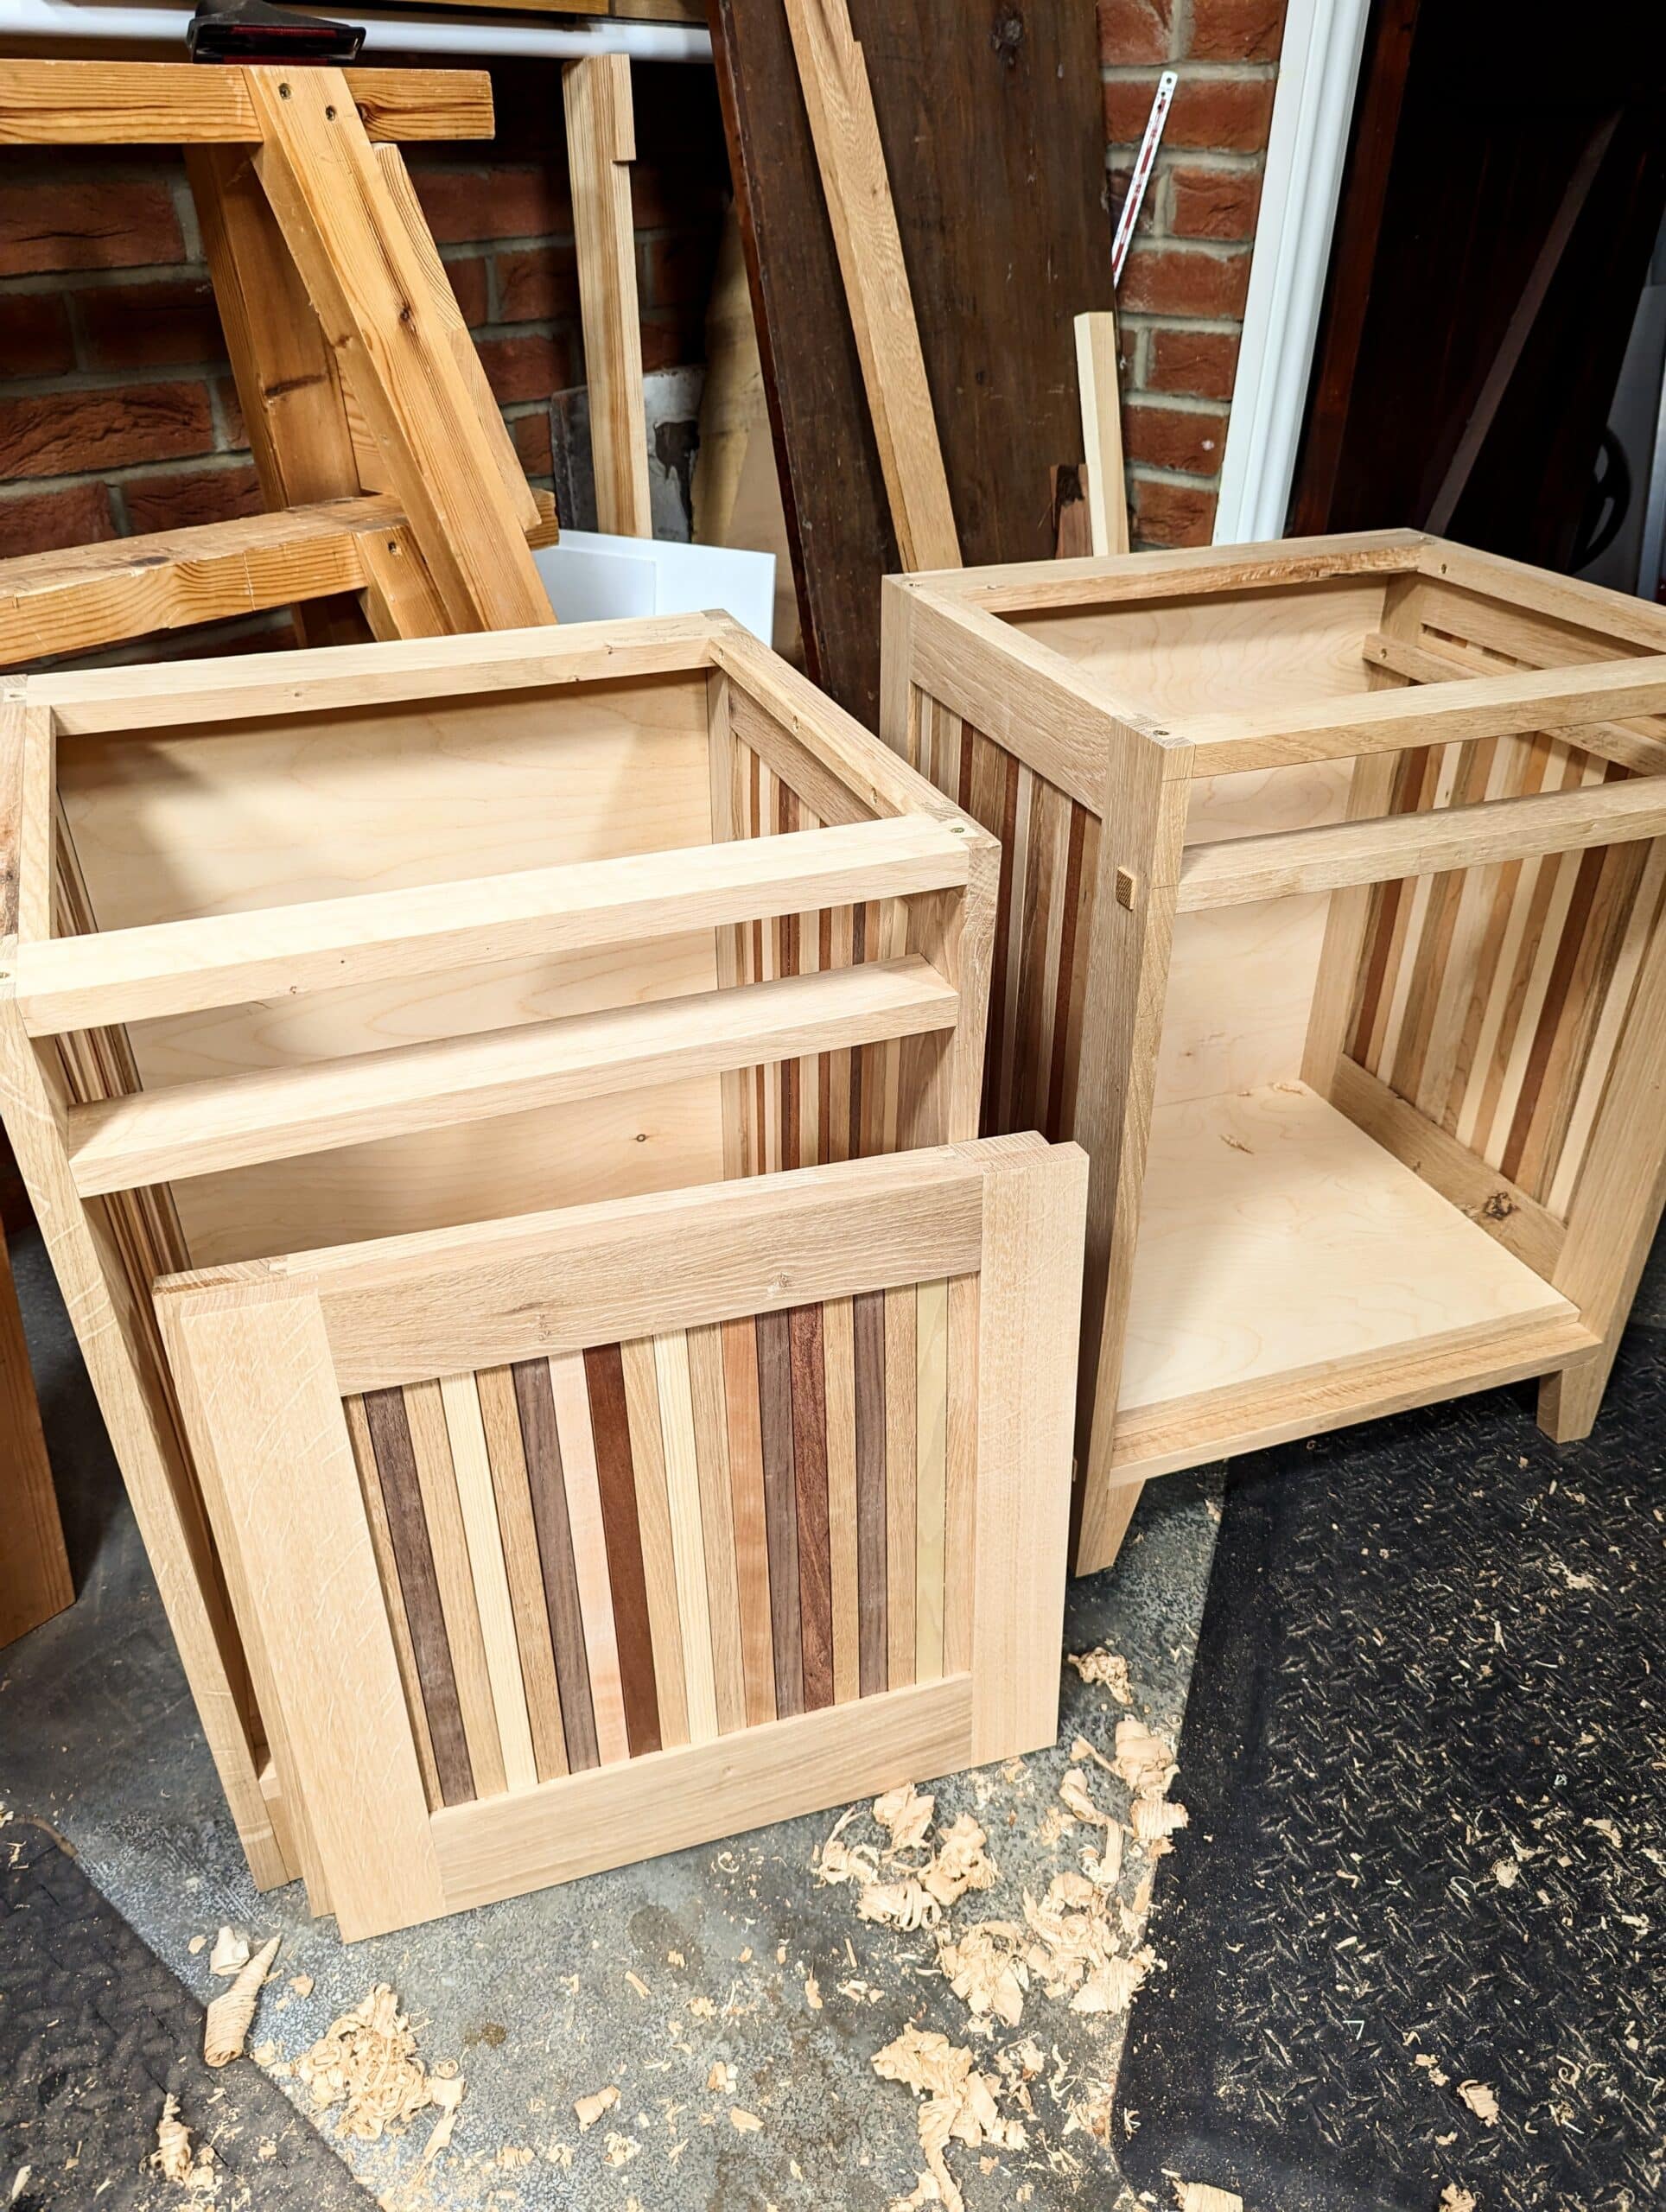
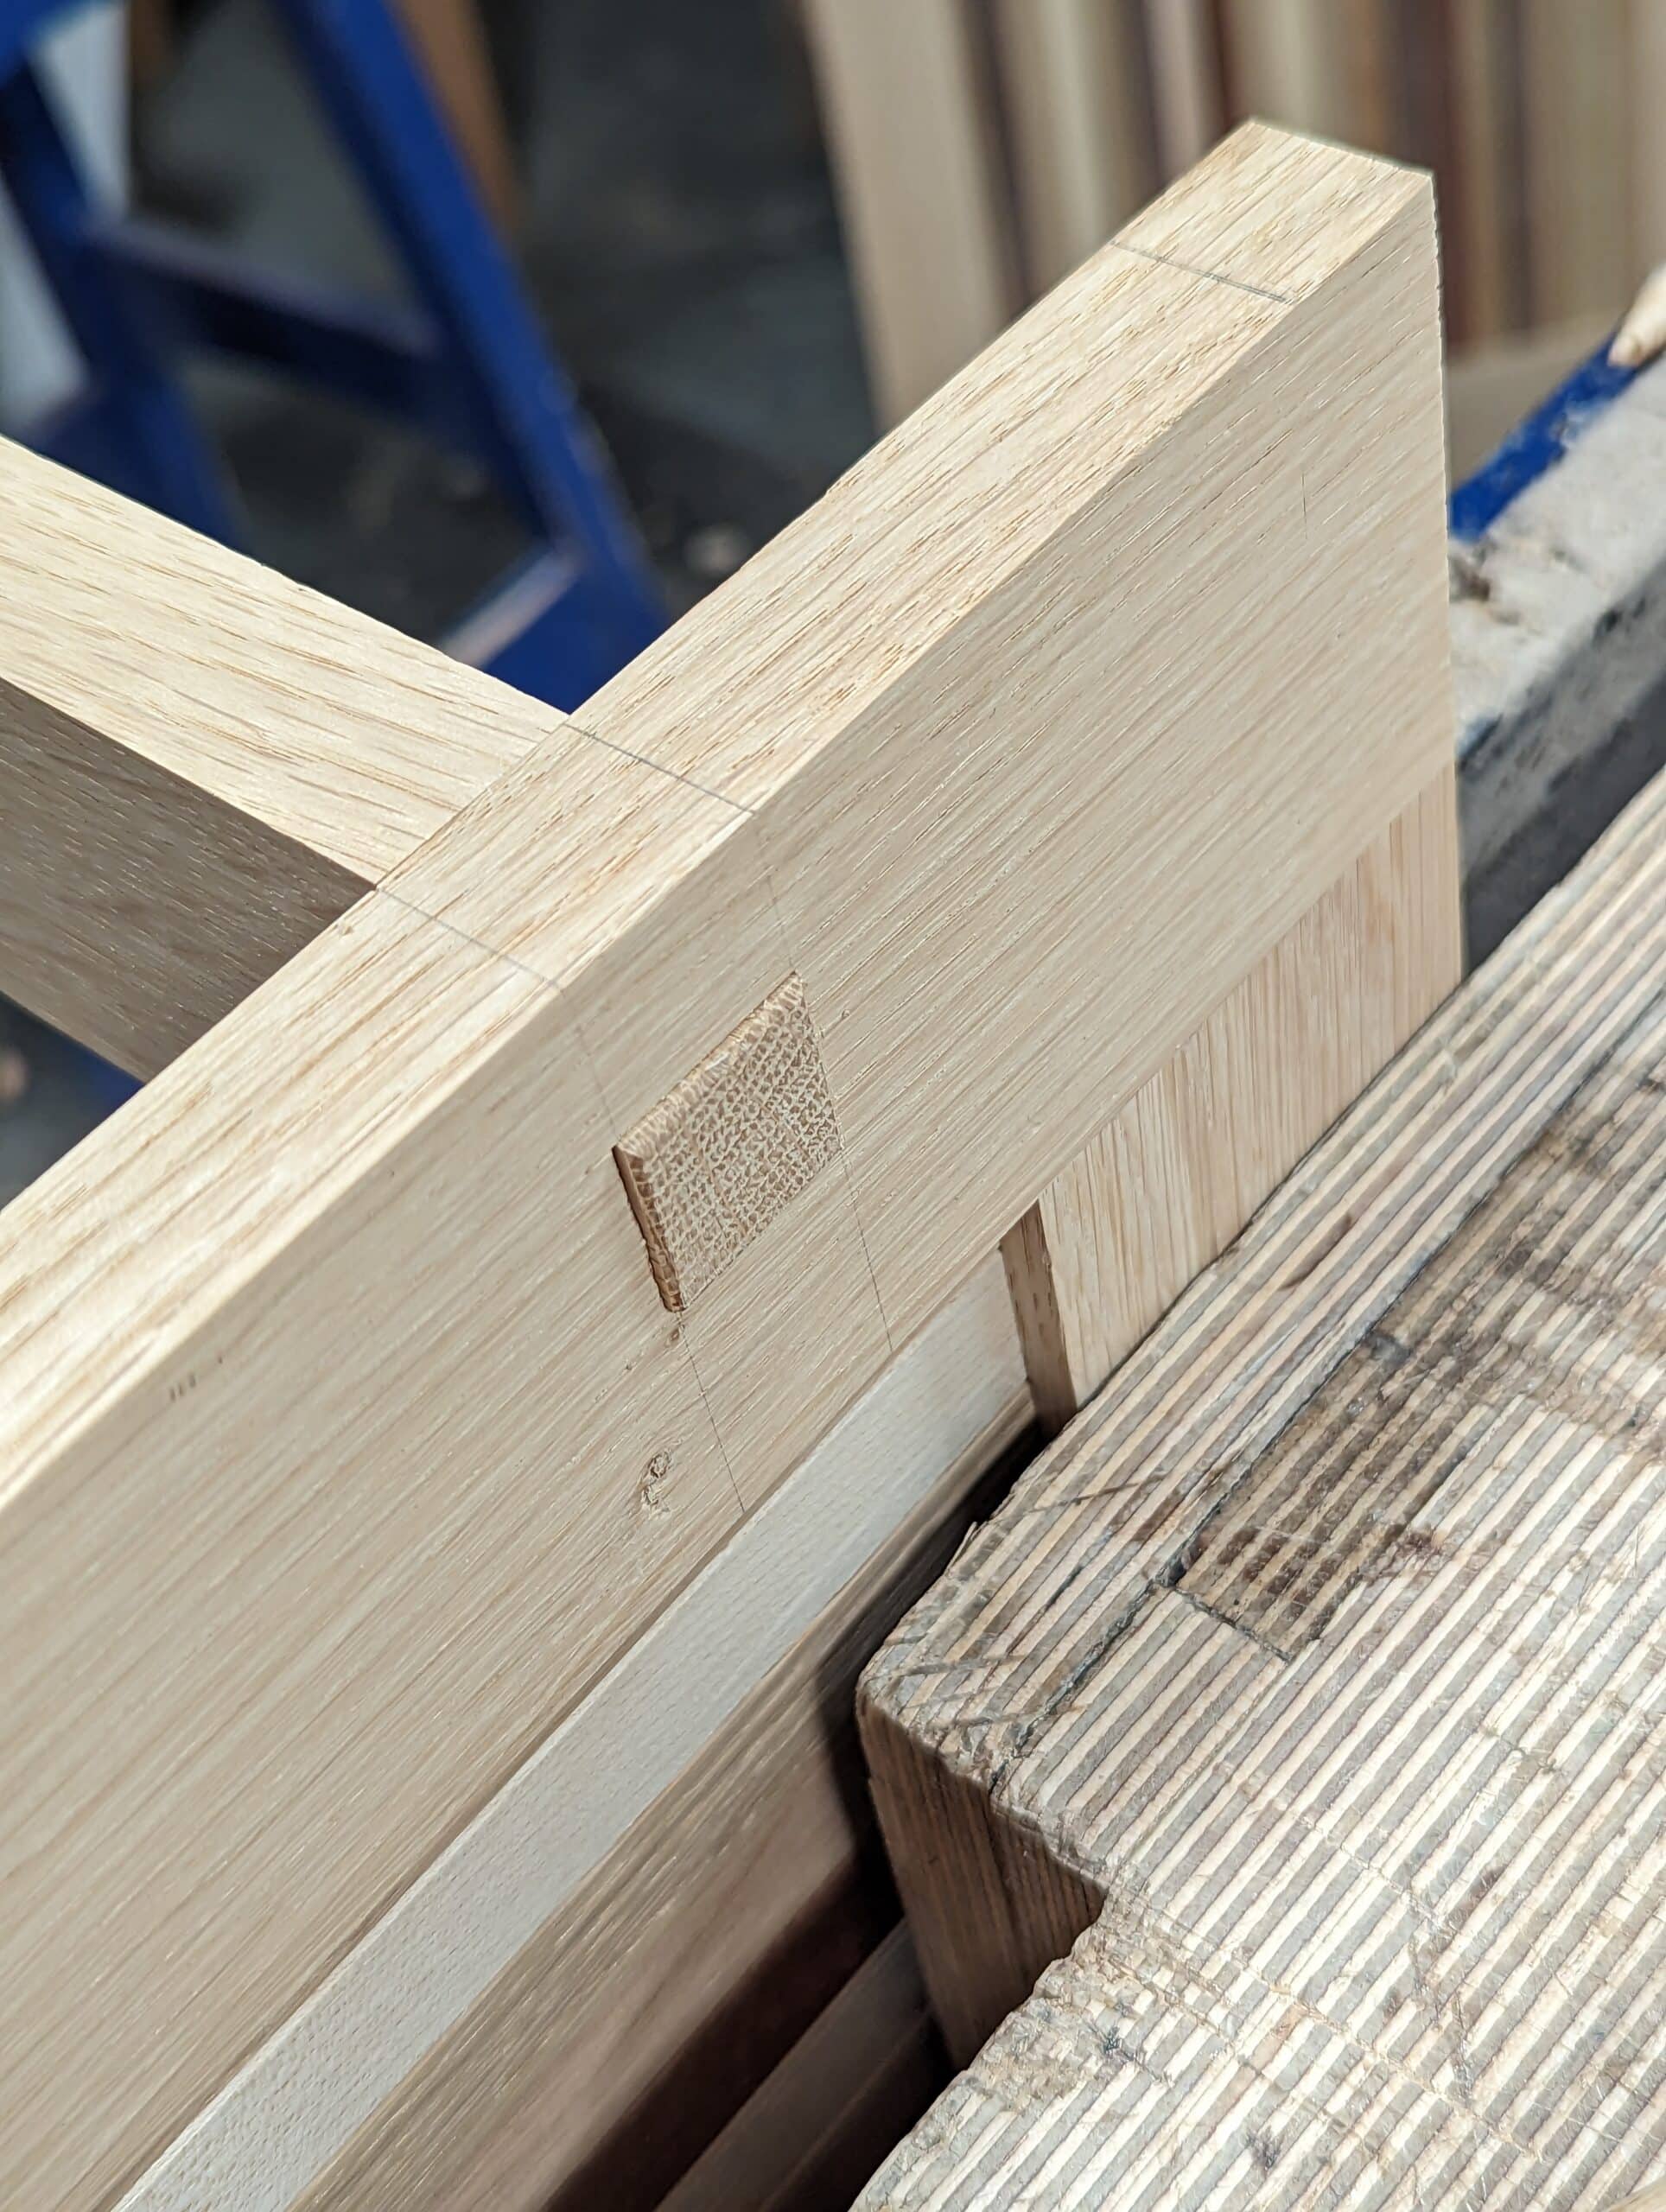
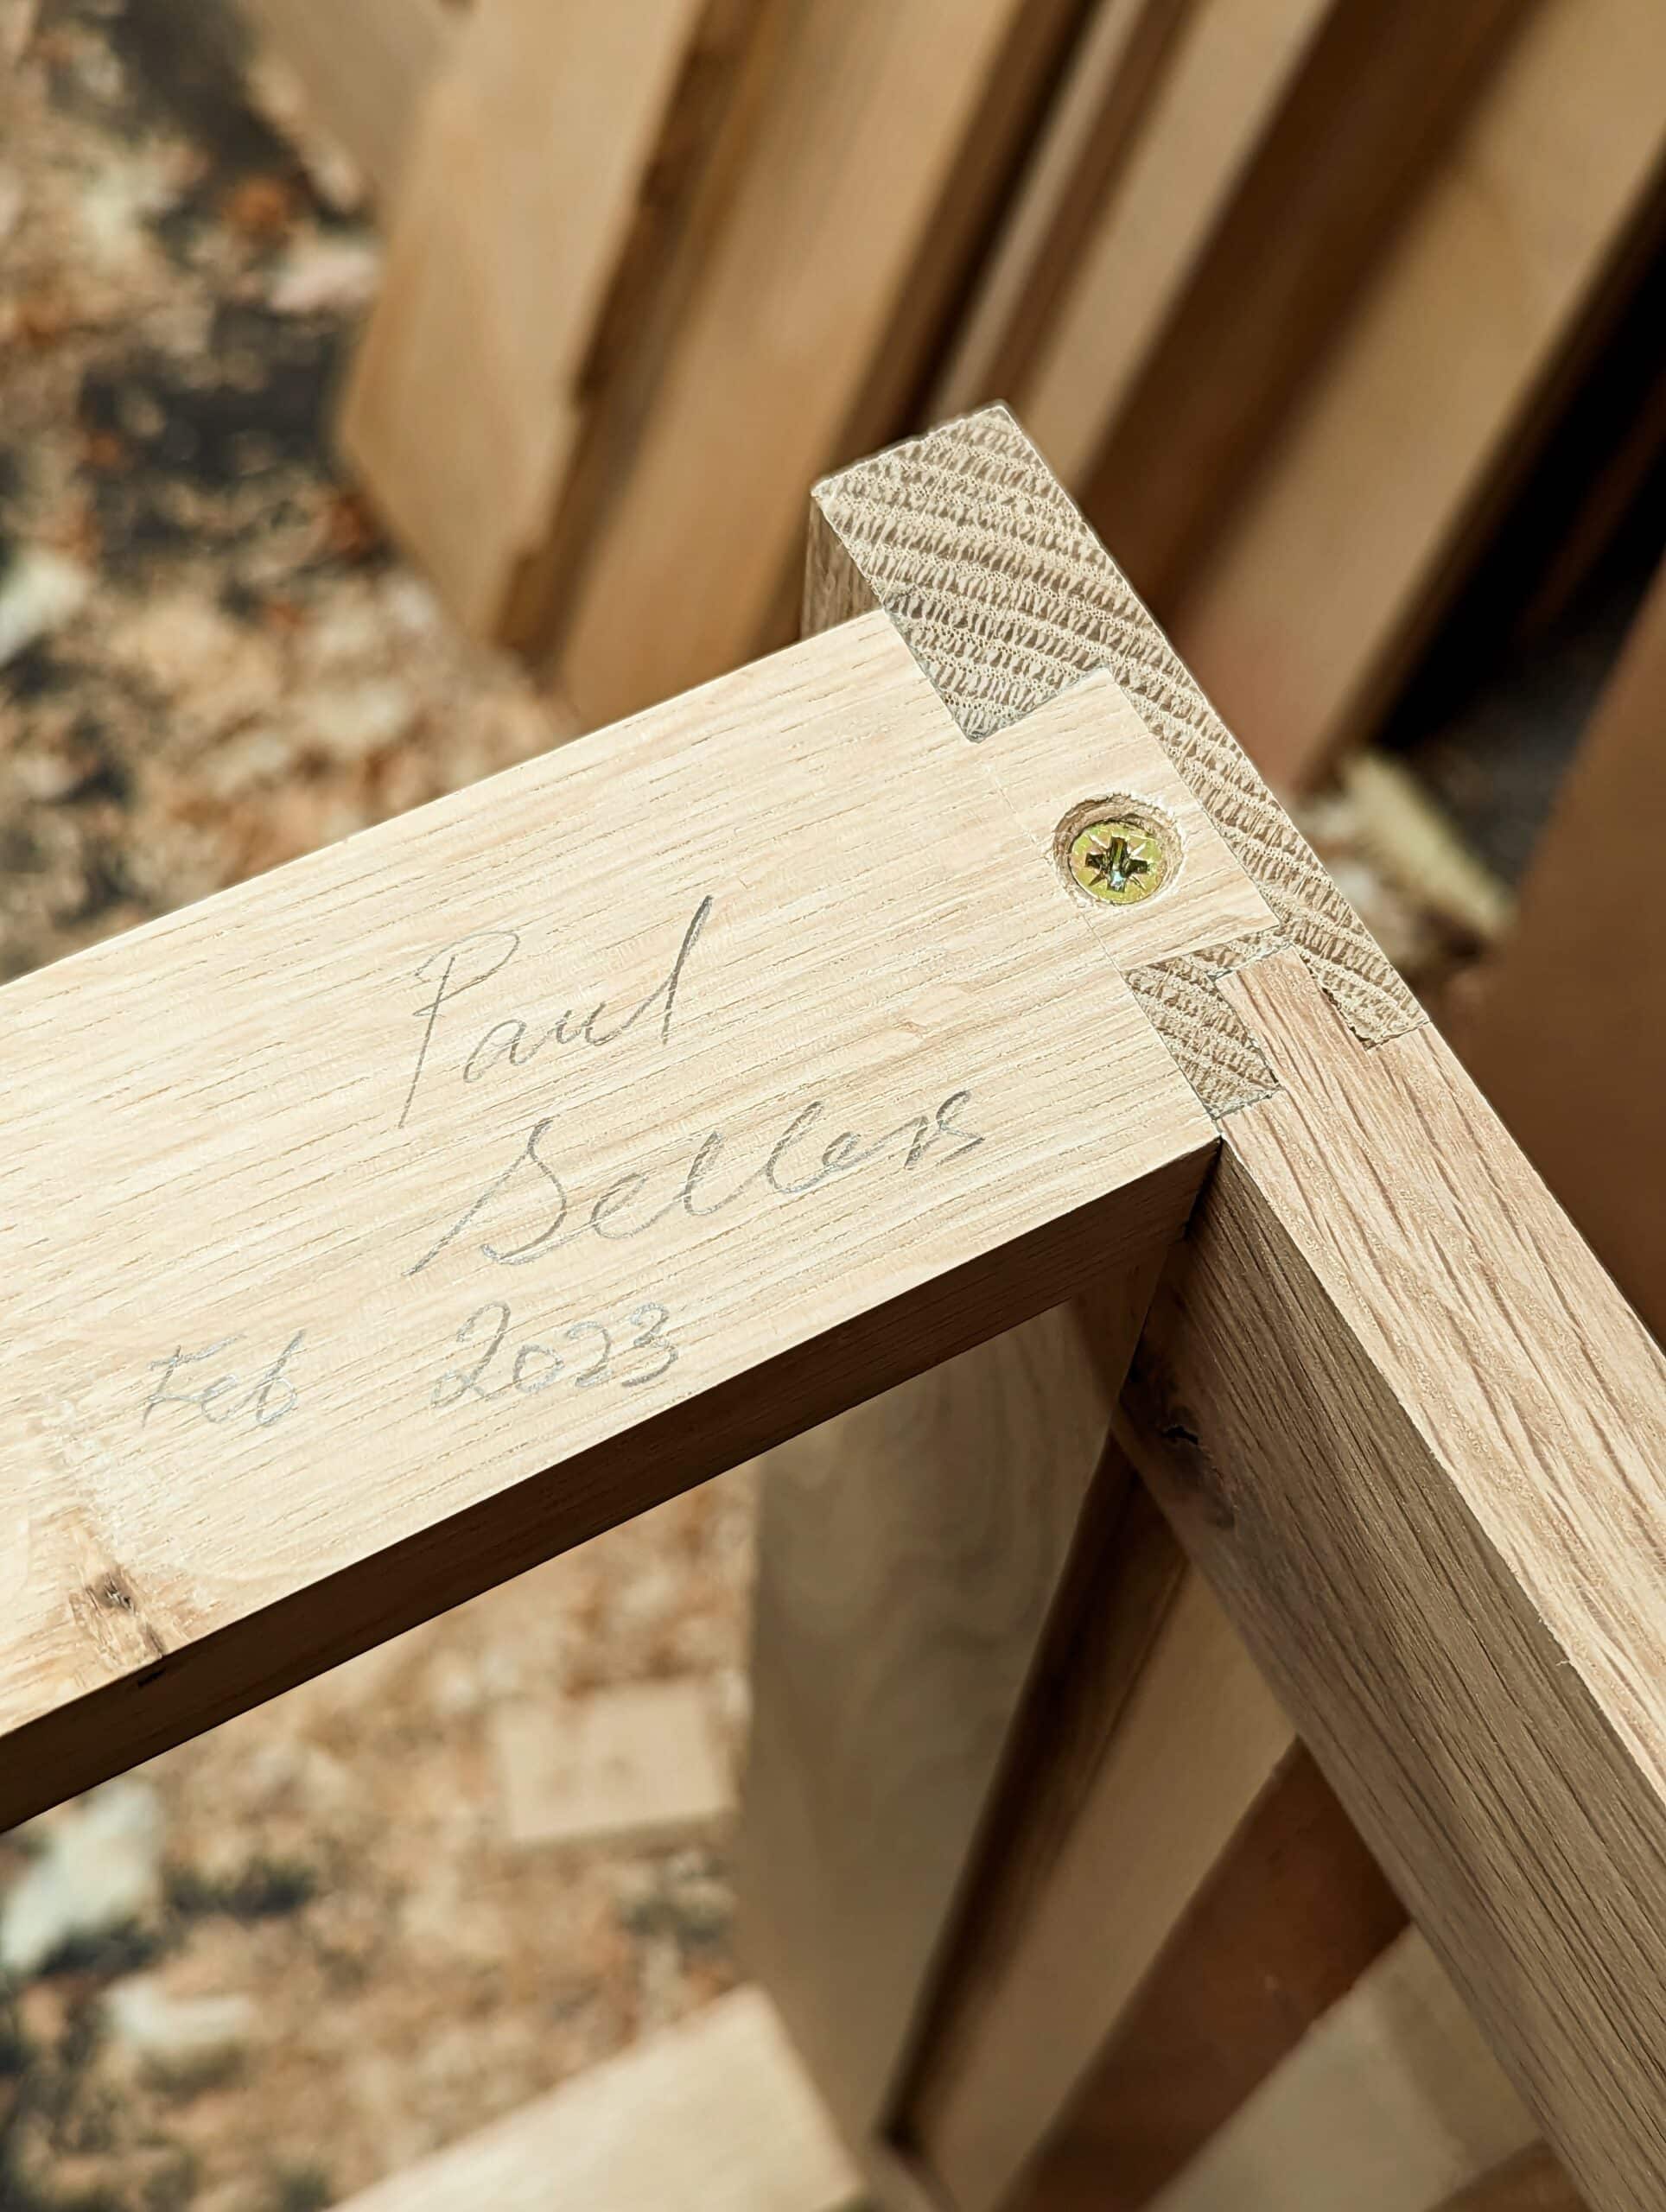
On my newest project, I needed a top side rail, a top front rail, a drawer opening and then a parallel lower rail to separate the drawer from the door area. On paper, it seemed doable and all the more so in my head. On the outside, the joint can appear one way but inside it takes on a different dynamic. To reduce how much I took out of the wood I halved the thickness of the dovetail but retained the ‘pull’ dynamic dovetails give. I decided too to shorten the length of the dovetail too. With precise cutting, it would have all the retentive security I needed and no two joints would meet within. The side rail is haunched 3/4″ down from the top edge so my dovetails seat nicely in the top of 3/8ths of wood. This close proximity could have been rethought by enlarging the legs and using a heavier section of wood but the whole point in the piece is to create the kind of high-demand working makers imposed on themselves in the 1700-1800s. I admit that many early pieces refined for the refined often had many weak points in favour of design and decoration in the refined homes of the rich and influential, but many pieces had qualities to the designs that were compensated for by good and thoughtful joinery. To this end, I feel everything in my design is adequately strong enough for a couple of hundred years of use.
The frames, three of them, came together just fine. Two frames would make the sides to the cabinet and the third one the door. Simple enough to make with grooves to take the panelling and haunched mortise and tenons to the top rail front and back. In my world of hand making it’s never just a question of beating something out to form a hole and then sawing the tenon and hoping. For a long period in my life, all of my mortises were cut freehand with no guide, never routed with a router plane for finessing and the tenon came straight off the tenon saw. Five minutes cut and fitted with shoulders all tight and onto the next one. It didn’t happen straight off at my fifteen-year-old start-out, it came after about five years of perpetual handwork. As a full-time maker then, and later teaching others the art, I saw that for the students to gain the experience and mastery I had it would likely take 12,000 hours. I say that because that was my then 46 hours a week, 50 weeks of a working year and for six years in my apprenticeship and journeymanship before I really felt like I fully got it. My students would never be able to give that much in their busy lives so I developed methods that enabled them to make top-notch work but still required high levels of input, self-discipline and self-development leading to them owning the skills I had. It’s worked for many thousands.
Going to the drawing board meant a whole different period of investigation and erudition. In a single class about to commence, I felt I had to become a solution. Moreso, on that day, with a made-up mind, I had a matter of hours to come up with answers for my incoming class. That was when I came up with the mortise guide. Maybe not quite life-changing but definitely innovative and future-proofing success for the students coming and then on to the hundreds of thousands online via the internet.
I think you develop specific sensitivities in many areas. When I plane the edge of my board with the plane, 95% of the times I check the edge is square to the main face. If I am out, it’s usually only one or two thin shavings away from correcting it. And it’s the same with bevels on plane cutting irons and chisel. If I want 25º I hone at that, 30º I do the same and then too 35º. So that’s 25º for most pare cutting, planing comes in at 30º at the cutting edge and dropping off into a camber away to 25º or 35º and still dropping away to 25º (but nothing too rigid) for chopping depending on the task, the wood and the nature of the work in hand.

Once the frames were created, joints all seated and tambour-type panelling fitted, planed and glued, I glued up the frames, left them to dry and then planed all of the faces and edges level. I began laying out for the top rails to be dovetailed side to side front and back. The other rails were tenoned into square mortise holes in the side stile. It was at this point that the theory became reality and I felt the cohesion come to the whole piece. Each joint that might have seemed to weaken the other suddenly strengthened every adjacent joint and the many triangulations gave me a solidity I could rest on.
All in all there are 36 hand-cut mortise and tenon joints to be made in the end, along with eight hand-cut, half-lap and stepped dovetails. It’s not unpleasant work but accuracy is important.
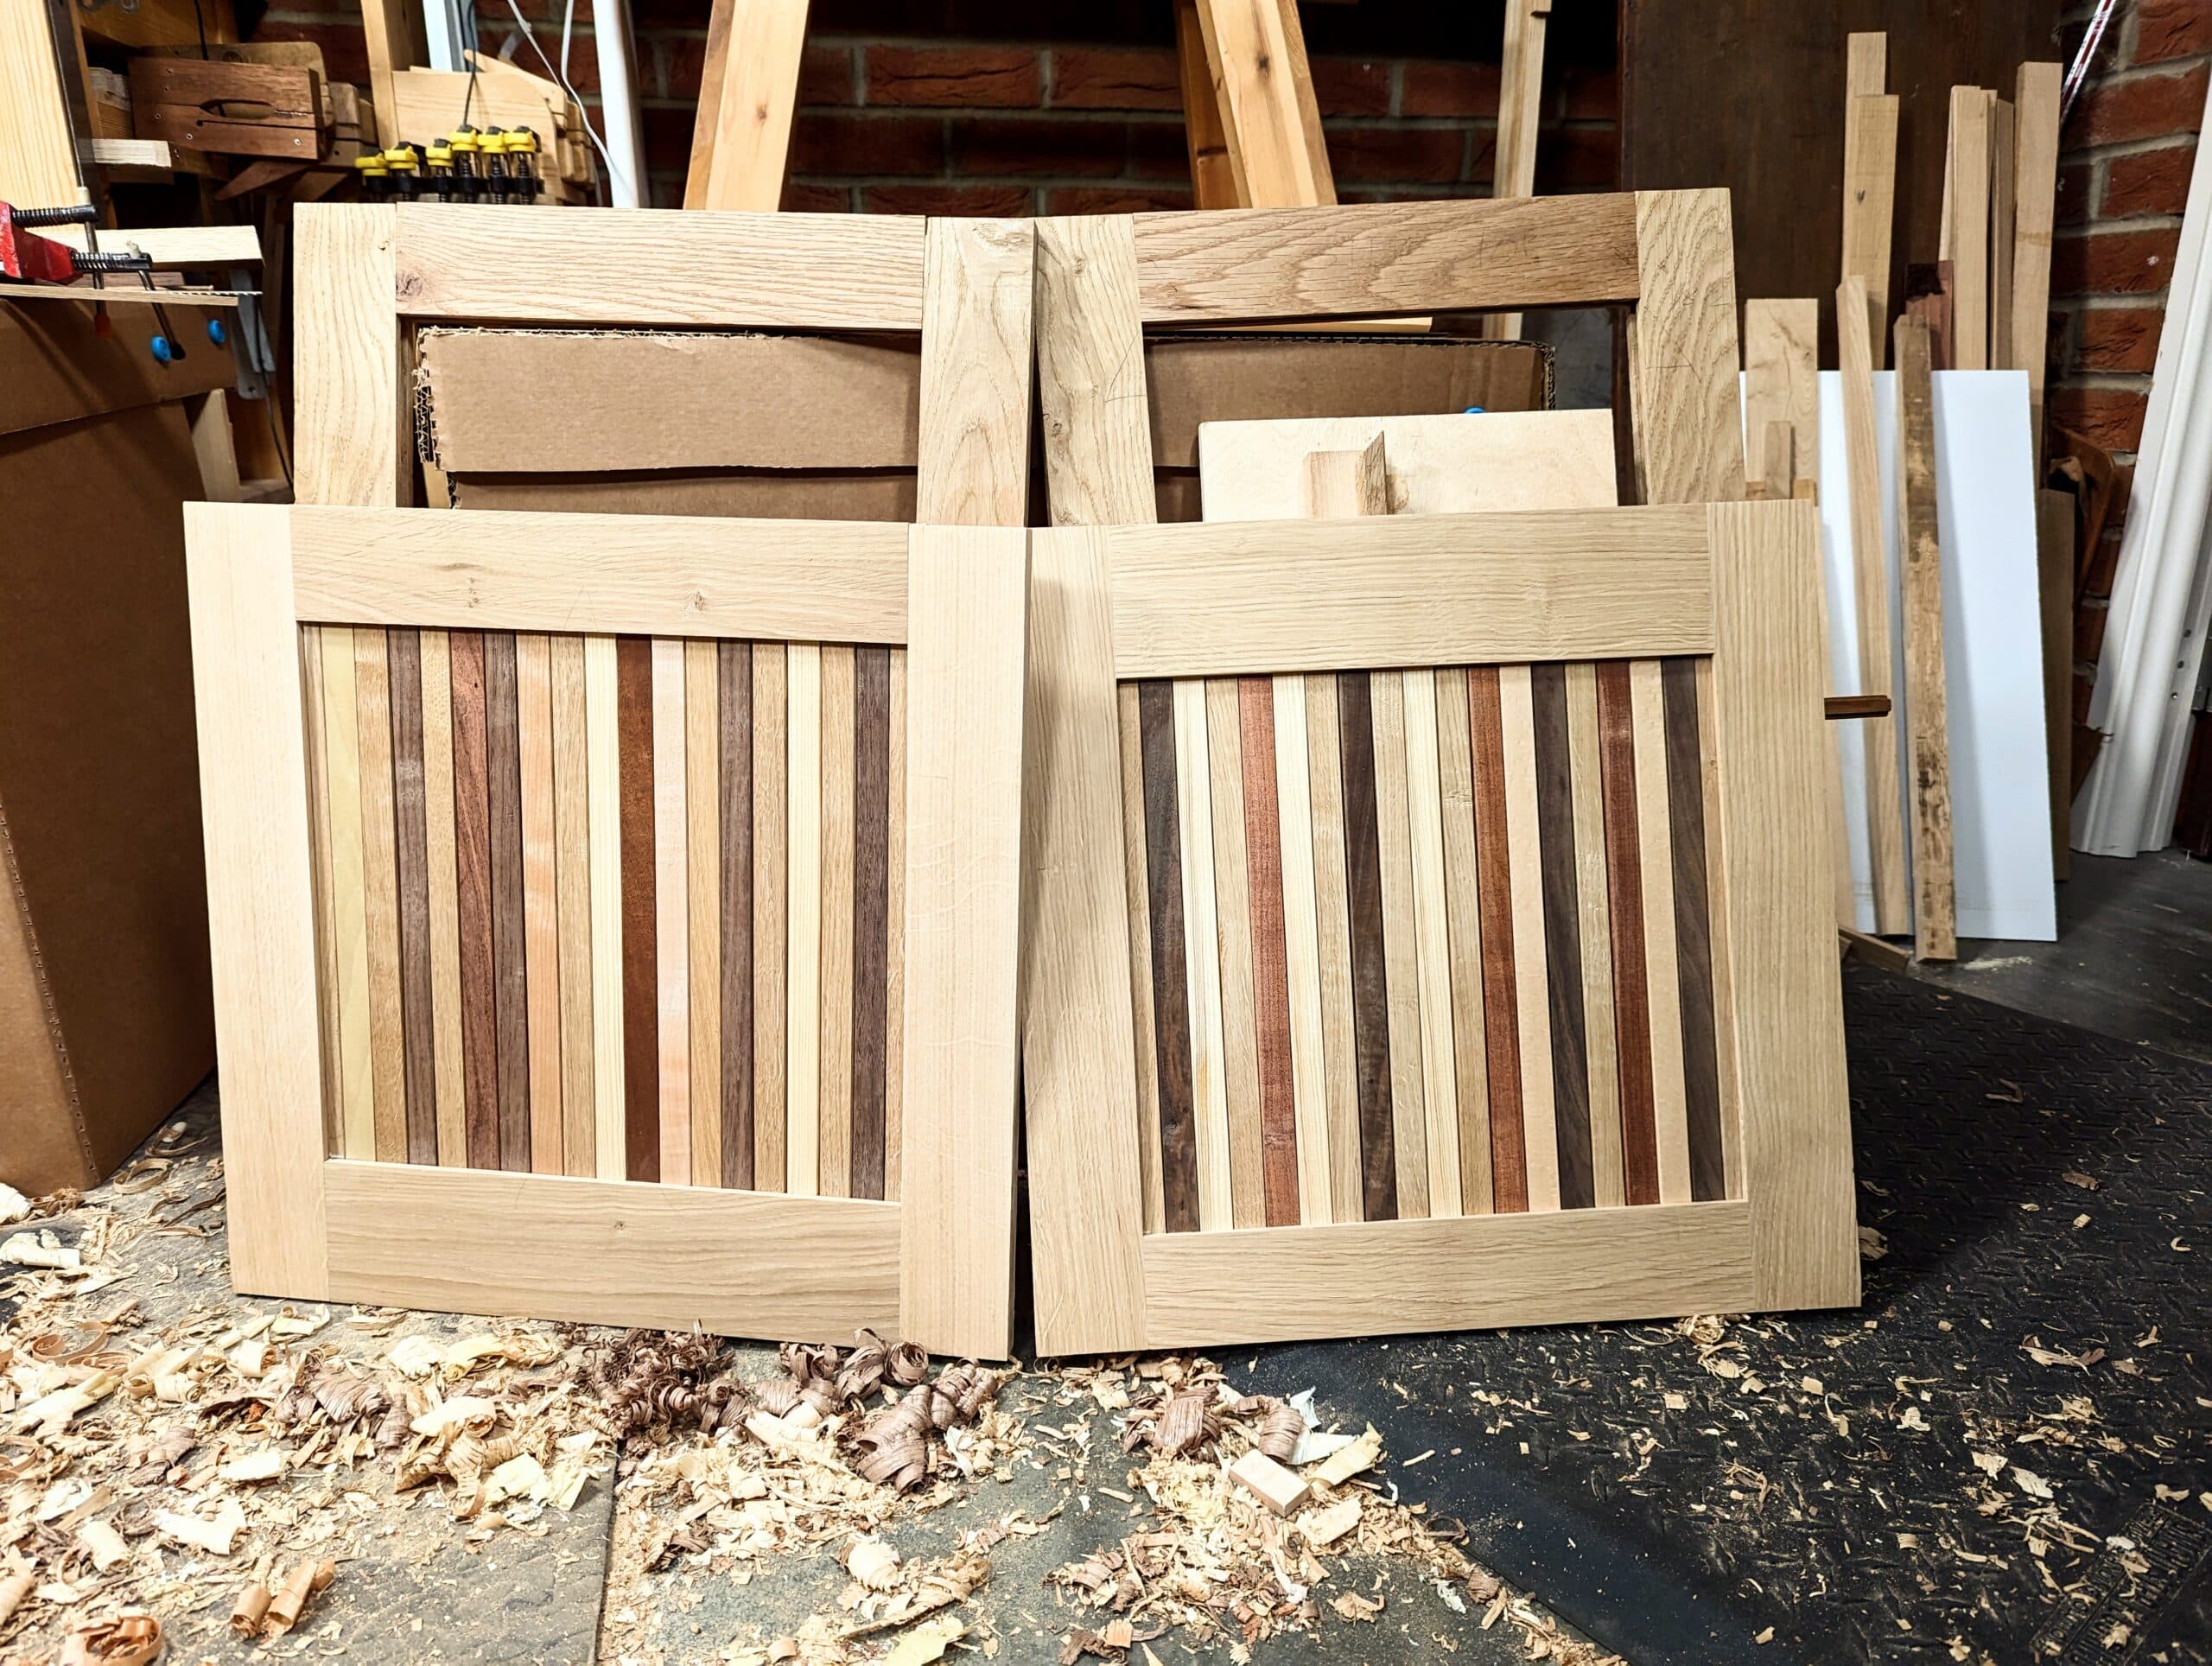
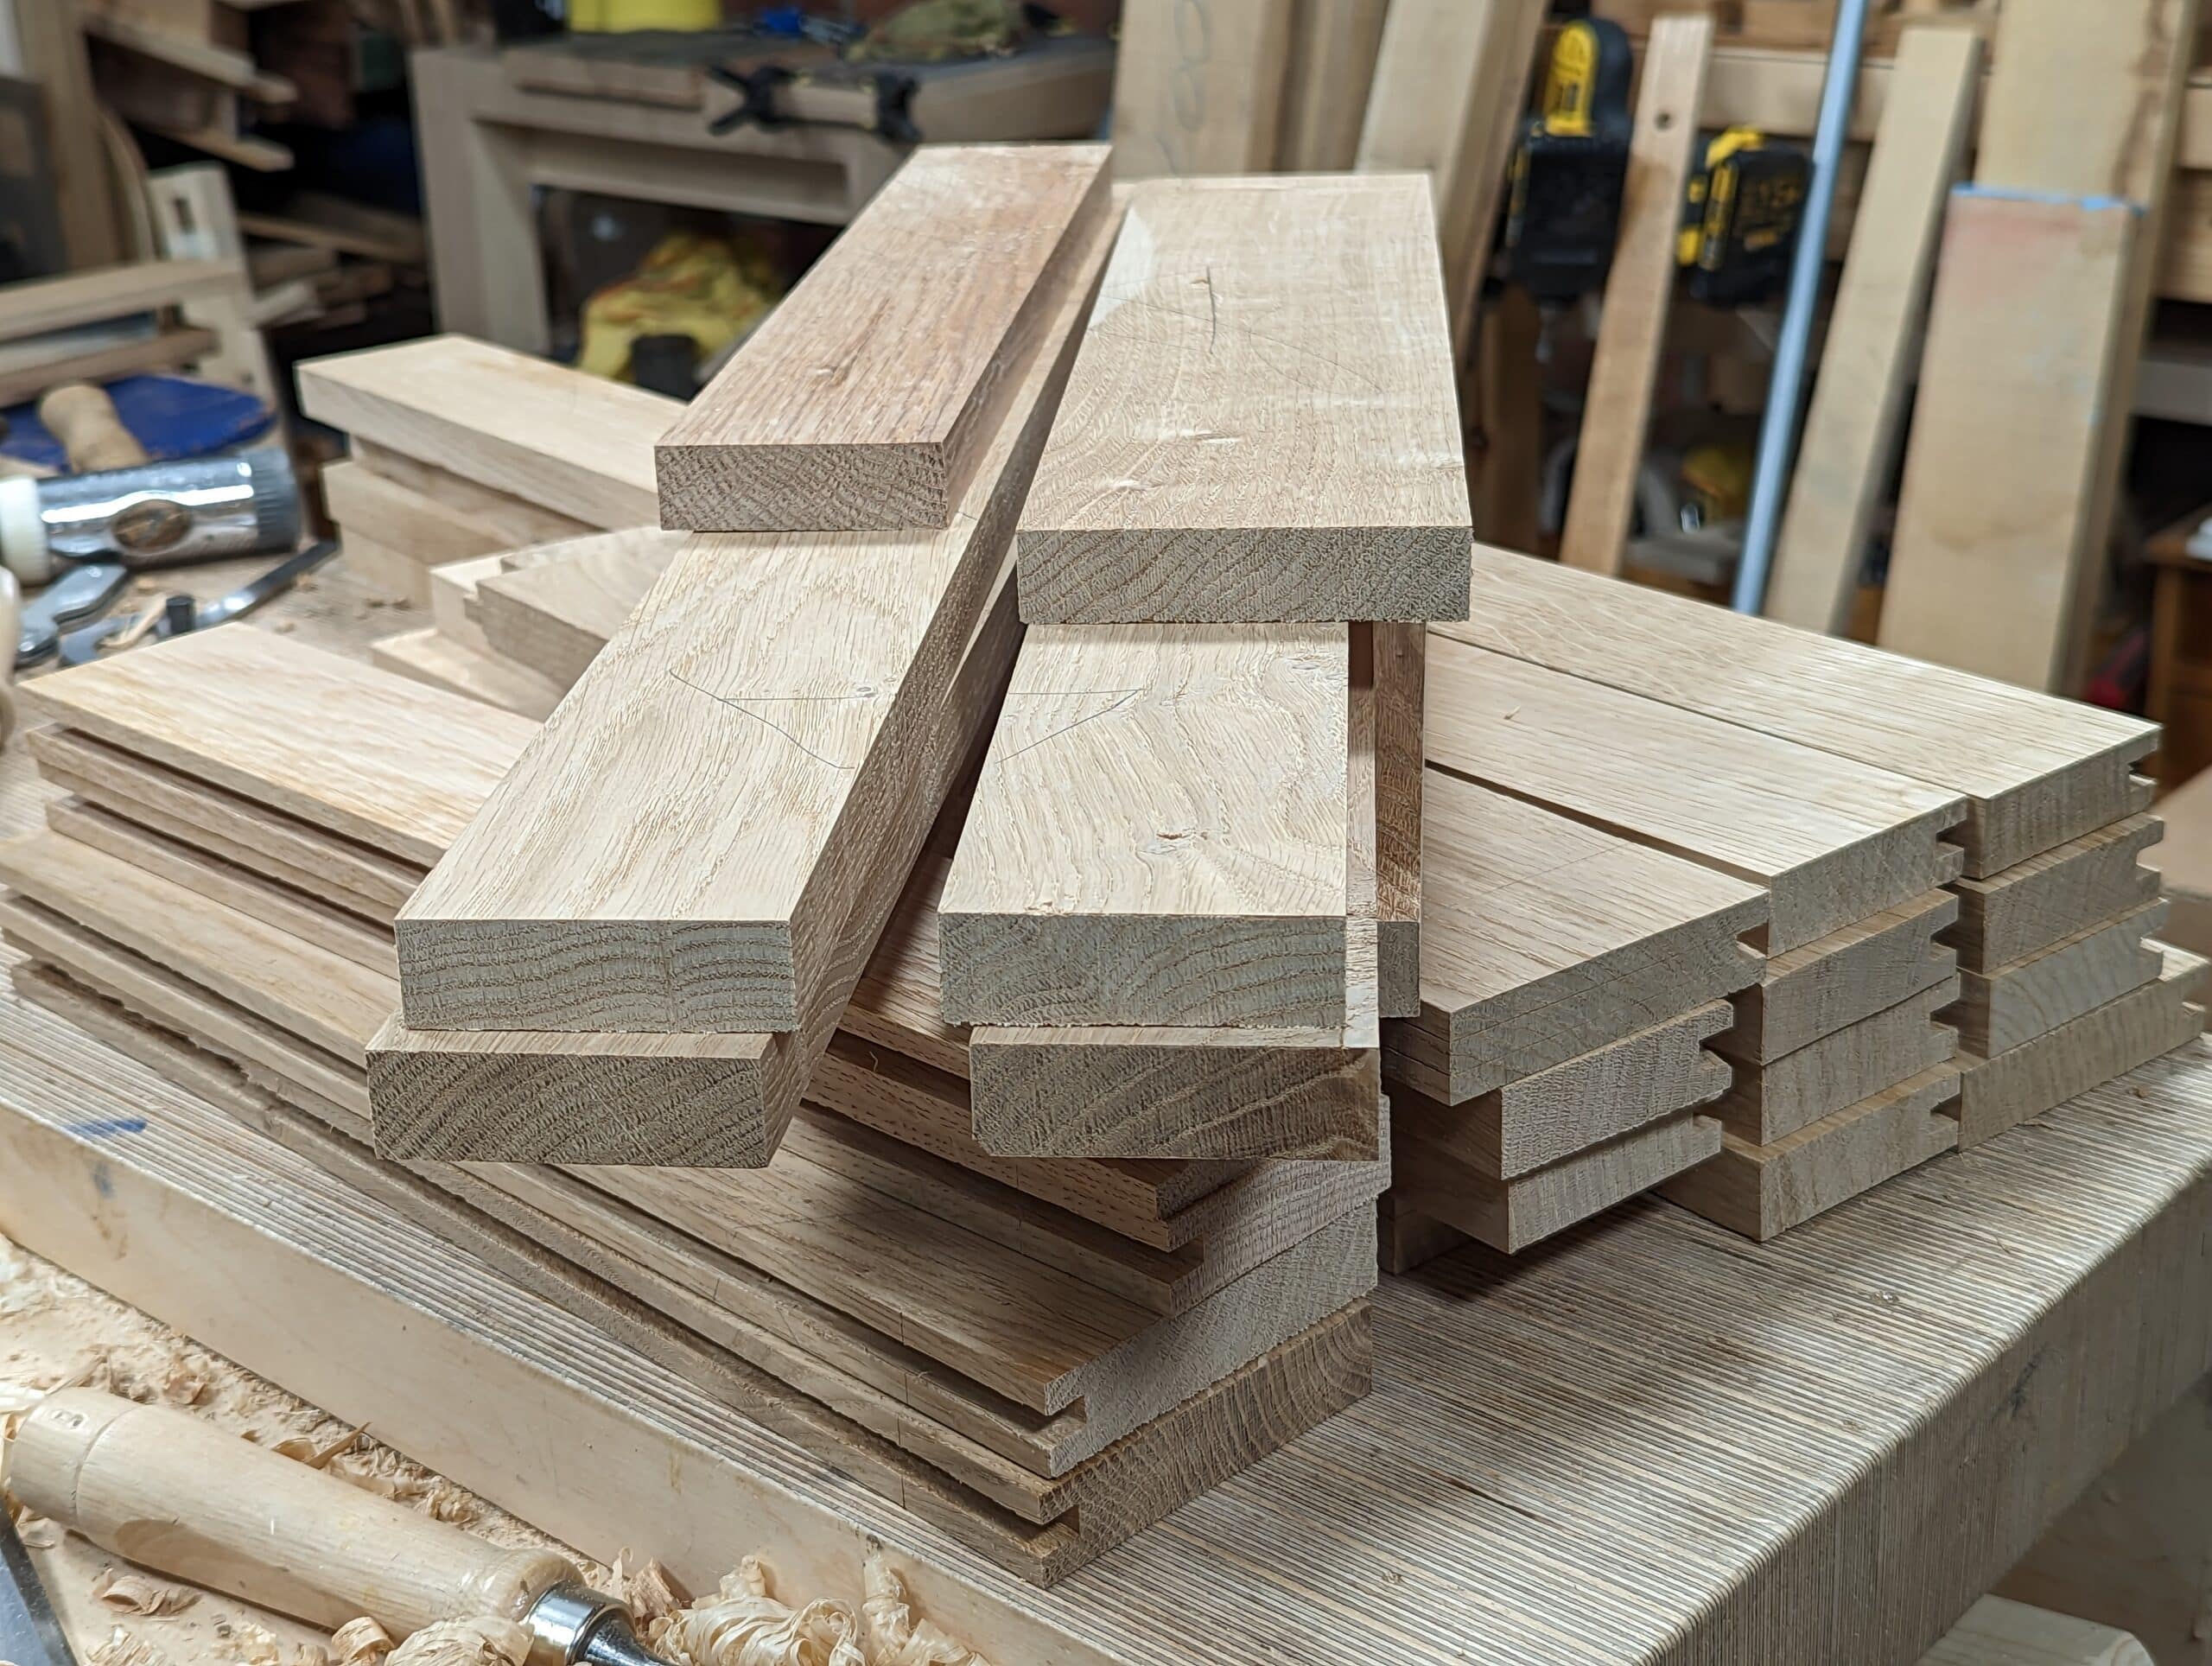
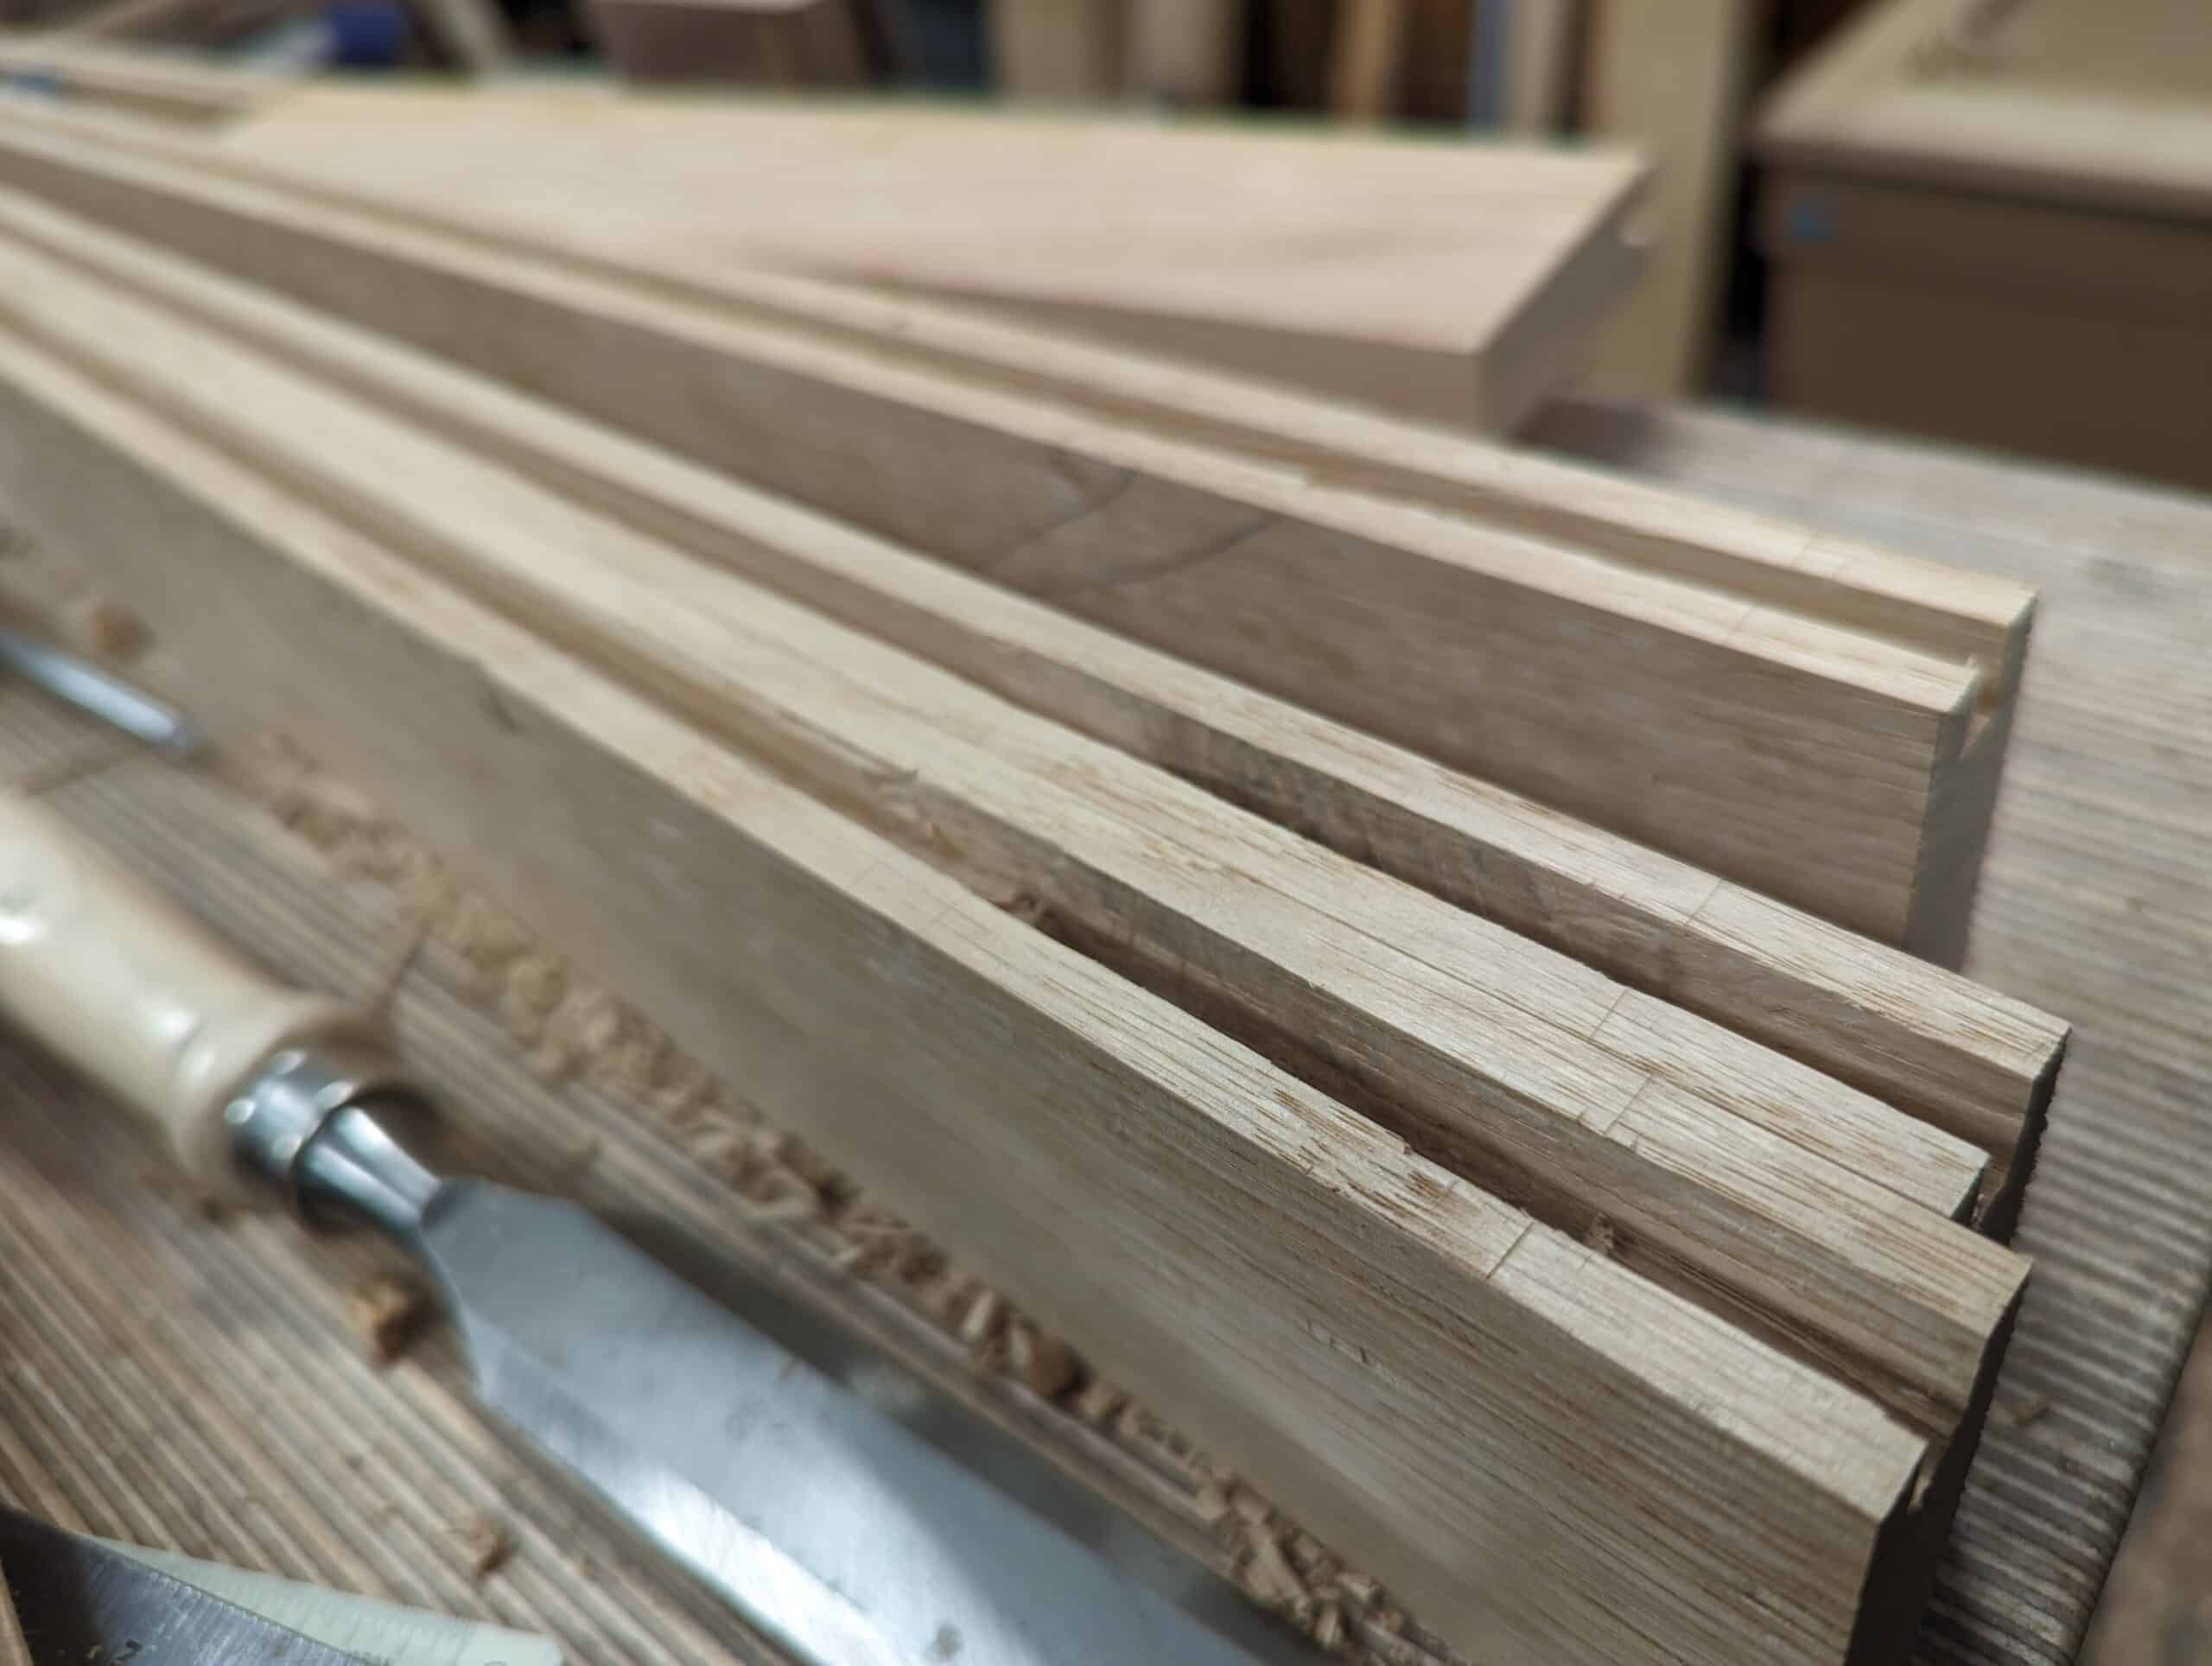
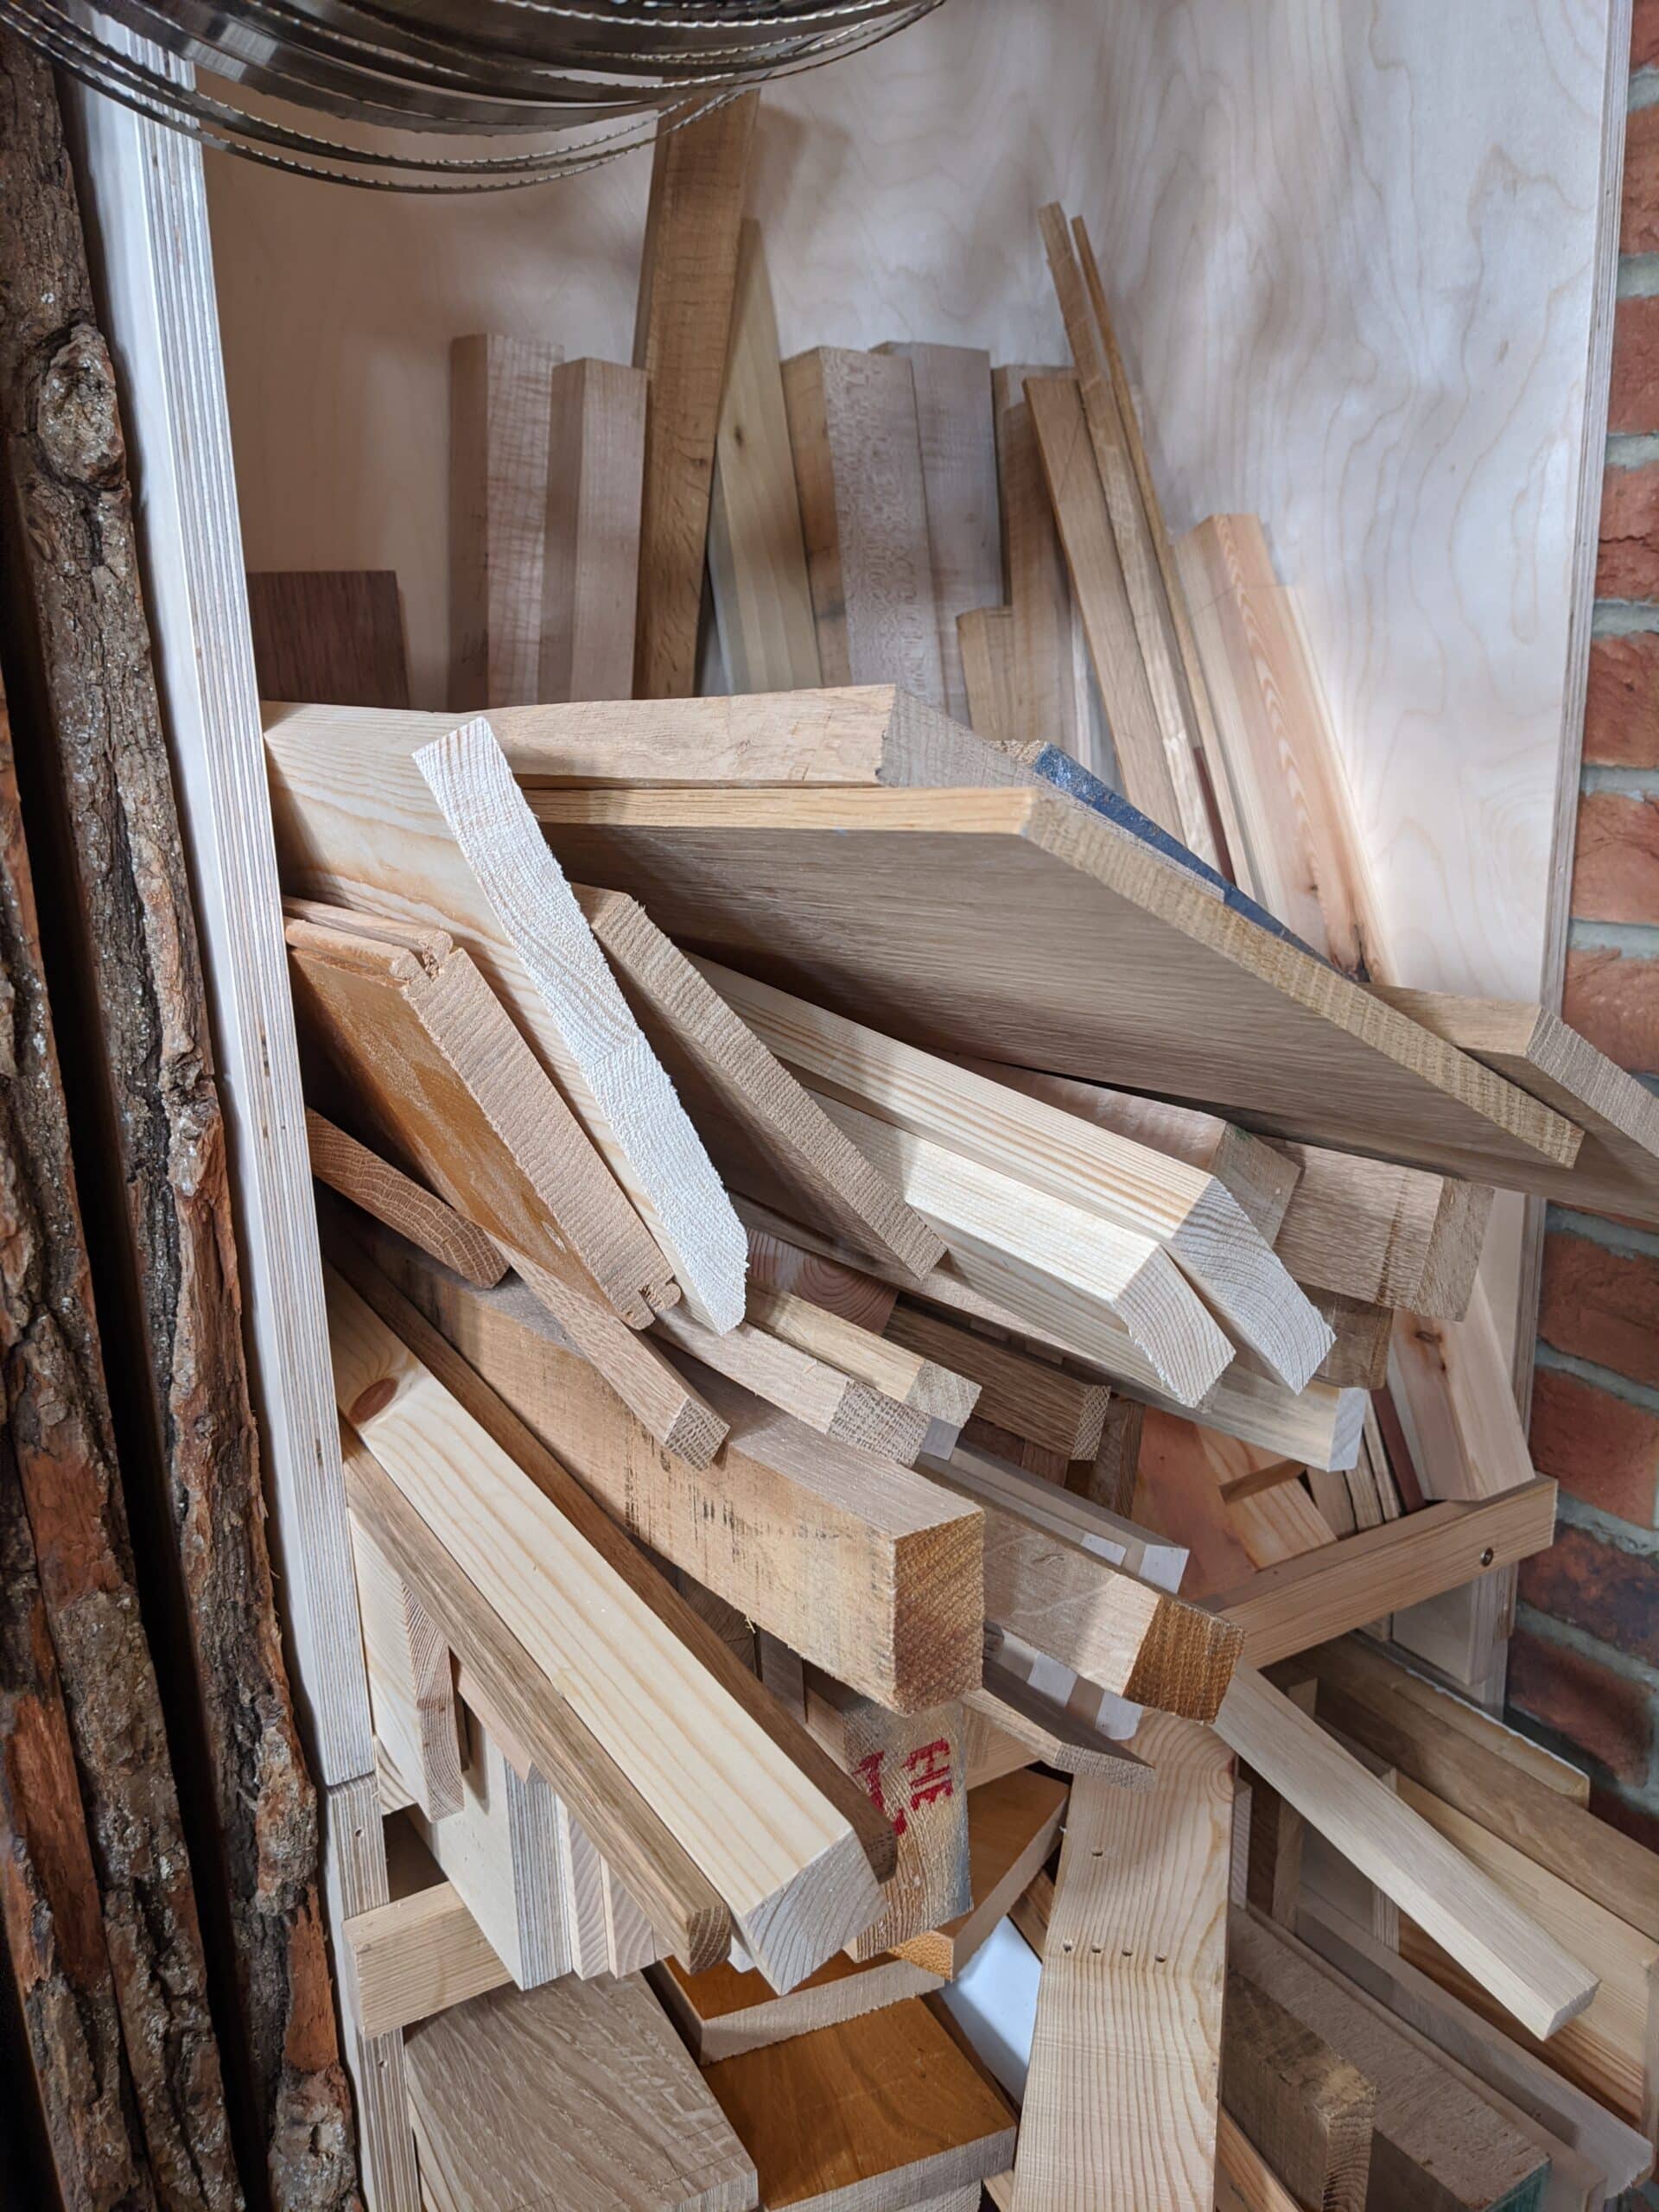
For the slats, I searched out all of my strips and pulled them from every corner of the shop. All in all there are108 at 3/4″ by 1/4″ and I hand-planed all four faces and each edge to edge-join and glue each to the next — 416 surfaces in all but then all the front meeting corners are bevelled at 30º to form a narrow Vee to look like tambour. In the mix of woods there are woods retrieved from the Texas deserts I once lived in and near to, parts of my dismantled roof here in the UK from last year’s remodelling, a piece of spruce from a stud and then a piece of curly maple offcut from a violin now finished and sold. The walnut came from the wall-hung drinks cabinet I made last year and then the meranti was from the builder’s skip in 2019 when I made the spice rack during COVID lockdowns when I isolated at work for six months so I could keep filming and safe.
48 more oak pieces gave me the frames, so another 192 more faces, and every stick and stem hand planed with a Stanley #4 and #5 bench plane to take them from rough-sawn to super smooth so in no need of further sanding. Quite a workout.

I am on the drawers currently. Simple corners with through dovetails in pairs. Twenty minutes per corner, eight corners so two hours and forty minutes for this aspect of the joinery. I’m never sure what it is about drawers but somehow they add something special to a piece I always think.
This was the question that occurred to me in the last post, how the dovetail and the tenon interacted (or did not!).
I think in my own (very limited) planning, I have wrongly thought that short stretches of wood like the 3/8″ short grain “bridge” between the top of your tenon and bottom of your dovetail are only marginally stronger than if there were no wood there at all. But the image you posted the other day of the double double tenons on Oxford doors got me thinking that’s rather silly.
This piece looks fantastic. Now the question is, will the Seller’s Home chest of drawers be a frame and panel construction like this one, a “post and panel” construction (not sure what the right term is; 8/4ish stiles), or dovetailed case construction like the kitchen pieces? We’ll have to wait and see. Exciting stuff all around.
well done 👏
Beautiful oom Paul! Admittedly I am a sucker for sentimental things, but clothing the history of your offcut bin in the permenancy of oak frames truly speaks to me.
I’m never sure what it is about these articles but somehow they add something special to my day I always think.
There’s so much that I’d like to do, but due to extreme space limitations, my shop operates only six months per year. It is outside and offers protection from the sky, but without walls. In my older years, I can’t handle the cold anymore, so I wait and wait for spring, and hope that some day I will be able to put up a shed or garage to work wood and fix clocks and play with trains.
Paul, thank you for all that you do. It is interesting and instructive to read up on all things wood in your blogs, especially during the long winter months.
Kia ora (be well) Paul,
Would it be possible for you to elaborate on “making a fish-tank corner joint from sticks”?
I’ve read your description a few times but couldn’t yet see it in my mind’s eye.
Wood colleagues, please point out if you’ve seen Paul showing it elsewhere, as I couldn’t find it.
Best regards,
P.
Paul,
I never appreciated what you went through to gain your experience with Mesquite till this week. I have a whole new appreciation of you making a rocking chair out of mesquite. All those holes for the spindles and back to rest in. I’m building a new workbench and saw a wagon style tail vice with square dogs and said “I can build that. I have the piece of mesquite just perfect for the moving part of the vice. About 10″ long and I just need to square it up and put a 1″ hole through it for the screw to turn in. ” I know this piece of wood is perfect to complete the tail vice on my new workbench.
That piece of mesquite has been resting in my wood rack for a few years now and it was almost beyond my abilities to put a ONE INCH hole only TEN INCHES LONG in a piece of wood.
At the point of giving up, I would think, “Would Paul give up?” and keep on. I have to say that you never gave the full description of the toughness of Mesquite such that I gained the proper understanding. No matter your mastery of the English language, the full description of Mesquite will require more. I know it is beyond my abilities. I don’t have your skill in drawing or photography to show my problems.
Paul, you need to think on how to share that last little bit of information that didn’t seem to be quite necessary in the past to teach us. Mesquite is tough to work.
I did not intend to blame you for not giving fully of your knowledge.
You have done a great job of sharing about how more common types of wood work and how to handle them and read them.
Mesquite is a unique specimen and you have already warned that you had to sharpen your tools 3 or more times as often when working it. I had not carried that knowledge to what occurs when working in a hole.
I know that that would be useless knowledge unless you happen to be living in Central Texas with access to Mesquite. I am fortunate in living near a wood supplier who carries Mesquite in 4/4 planks.
Thank you for sharing your knowledge to the benefit of the majority of woodworkers.
I have learned enough to have gone from being a machine operator to a woodworker in most cases.
Clarence