My Router Plane Kit
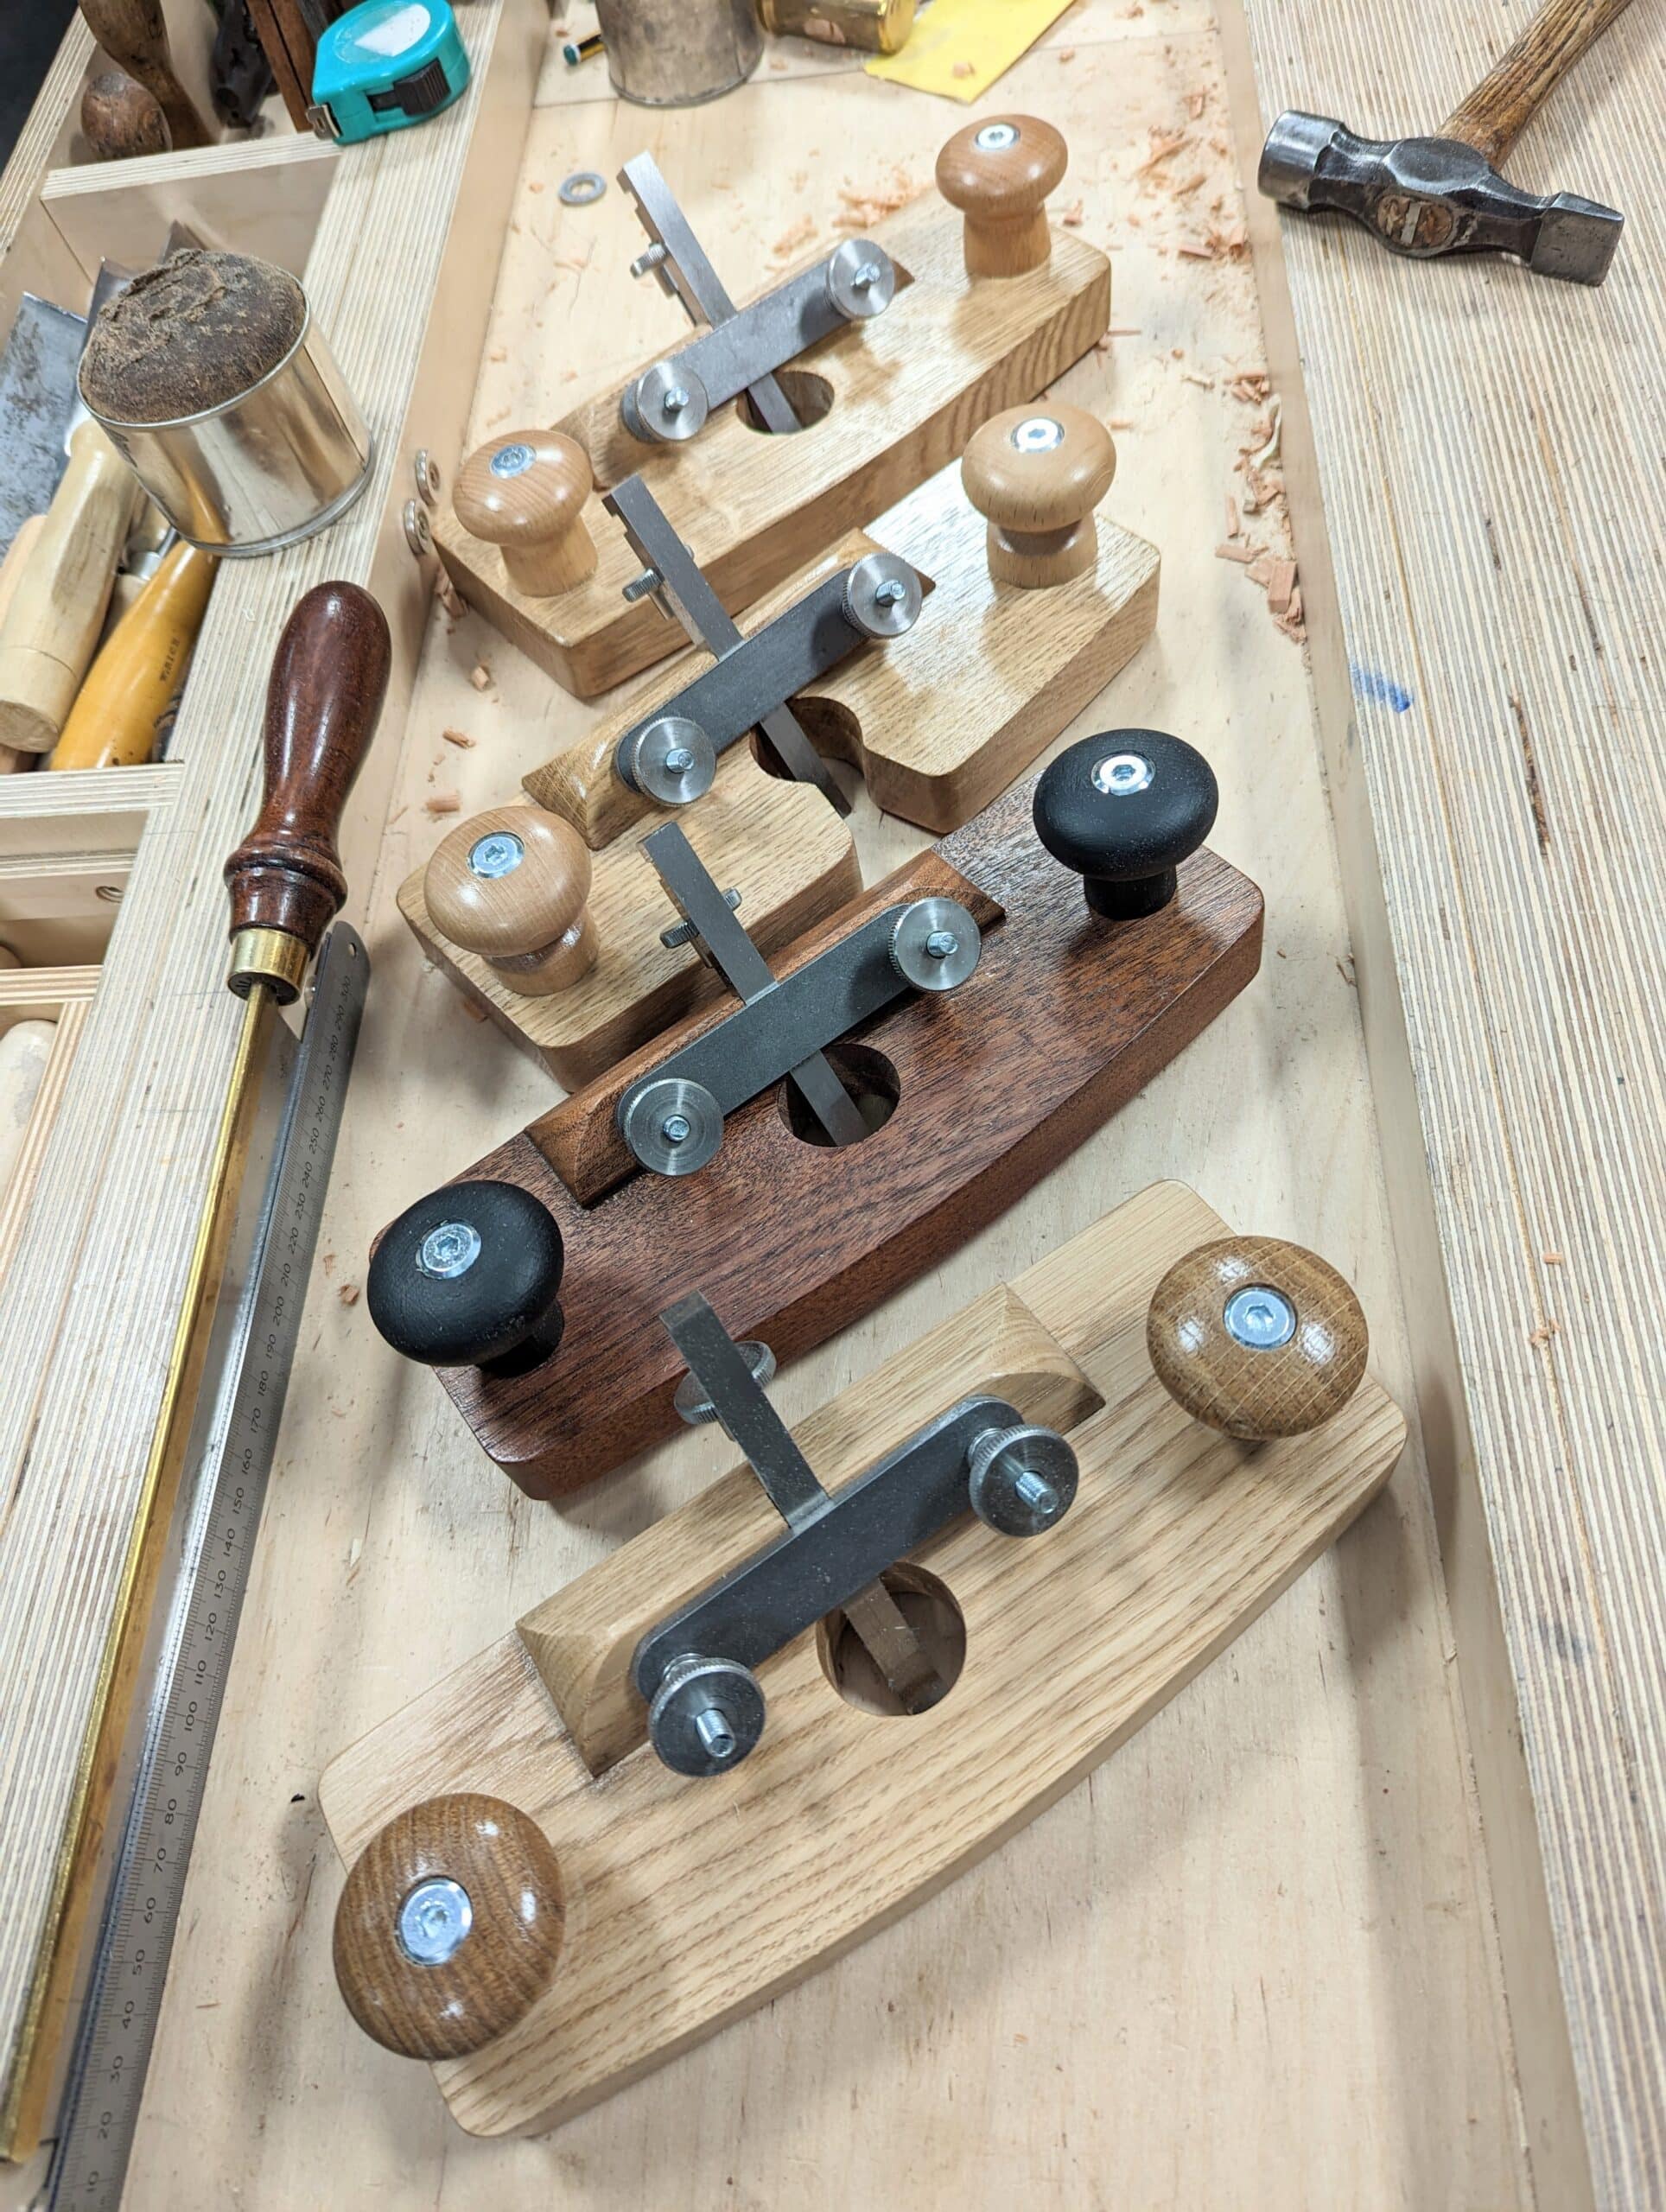
It’s been a year and a half since my year-long burden drove me to make the prototype hand router plane, the one I drafted and crafted over and over in my head. The first iteration came from a two-by-four spruce construction stud. I tried different bed angles for the cutting iron and ended up where I did by trial and error. From that working model, it was simply a question of perfecting the details and methods of making for my finalised version. Today, I can make four in about four hours of worktime without using a single machine. That first time, putting the plane to the wood, I was stunned. Before I even pushed it I could smell success. It responded so differently to any of my personal metal router planes. I wished I had done it five decades before. No rattles and vibrations and better still none of the drag I typically got from the all-metal versions. I’d theorised such things because of the all-wood versions I knew so well but here was the reality: Plane in hand, I’d resolved every concern I’d put up with for decades. I held a plane I’d made and made completely by hand using only my standard woodworking hand tools. To say it surpassed any and all router planes I’d ever used is to understate it. This hand router plane worked smoothly and accurately.
Wood is remarkably resilient; a naturally resistant material that also capably absorbs vibration into its fibres in a way no metal-bodied router plane can. This is the reason why wooden planes give such a sensationally good impression and feel in use. For almost six decades the hand router plane in metal and wood was gradually being abandoned, replaced by the power router but not replacing what it gave to the user in essence. My new router plane was infinitely adjustable with amazingly fine control in the smallest fractions of an inch. The inclined cutting iron never baulked in the cut, could be advanced and withdrawn in its channel without unlocking and resetting and every turn sent the cutter in an immediate positive direction according to the depth adjuster turned with thumb and forefinger. Setting the retainer bar enabled the exact pressure so that any adjustment of the cutter was only a fraction of a turn on the adjuster according to whatever depth you wanted. I never picked up any other hand router that gave me such fineness. Moreover, I never picked up any other router plane to use from that day to this.

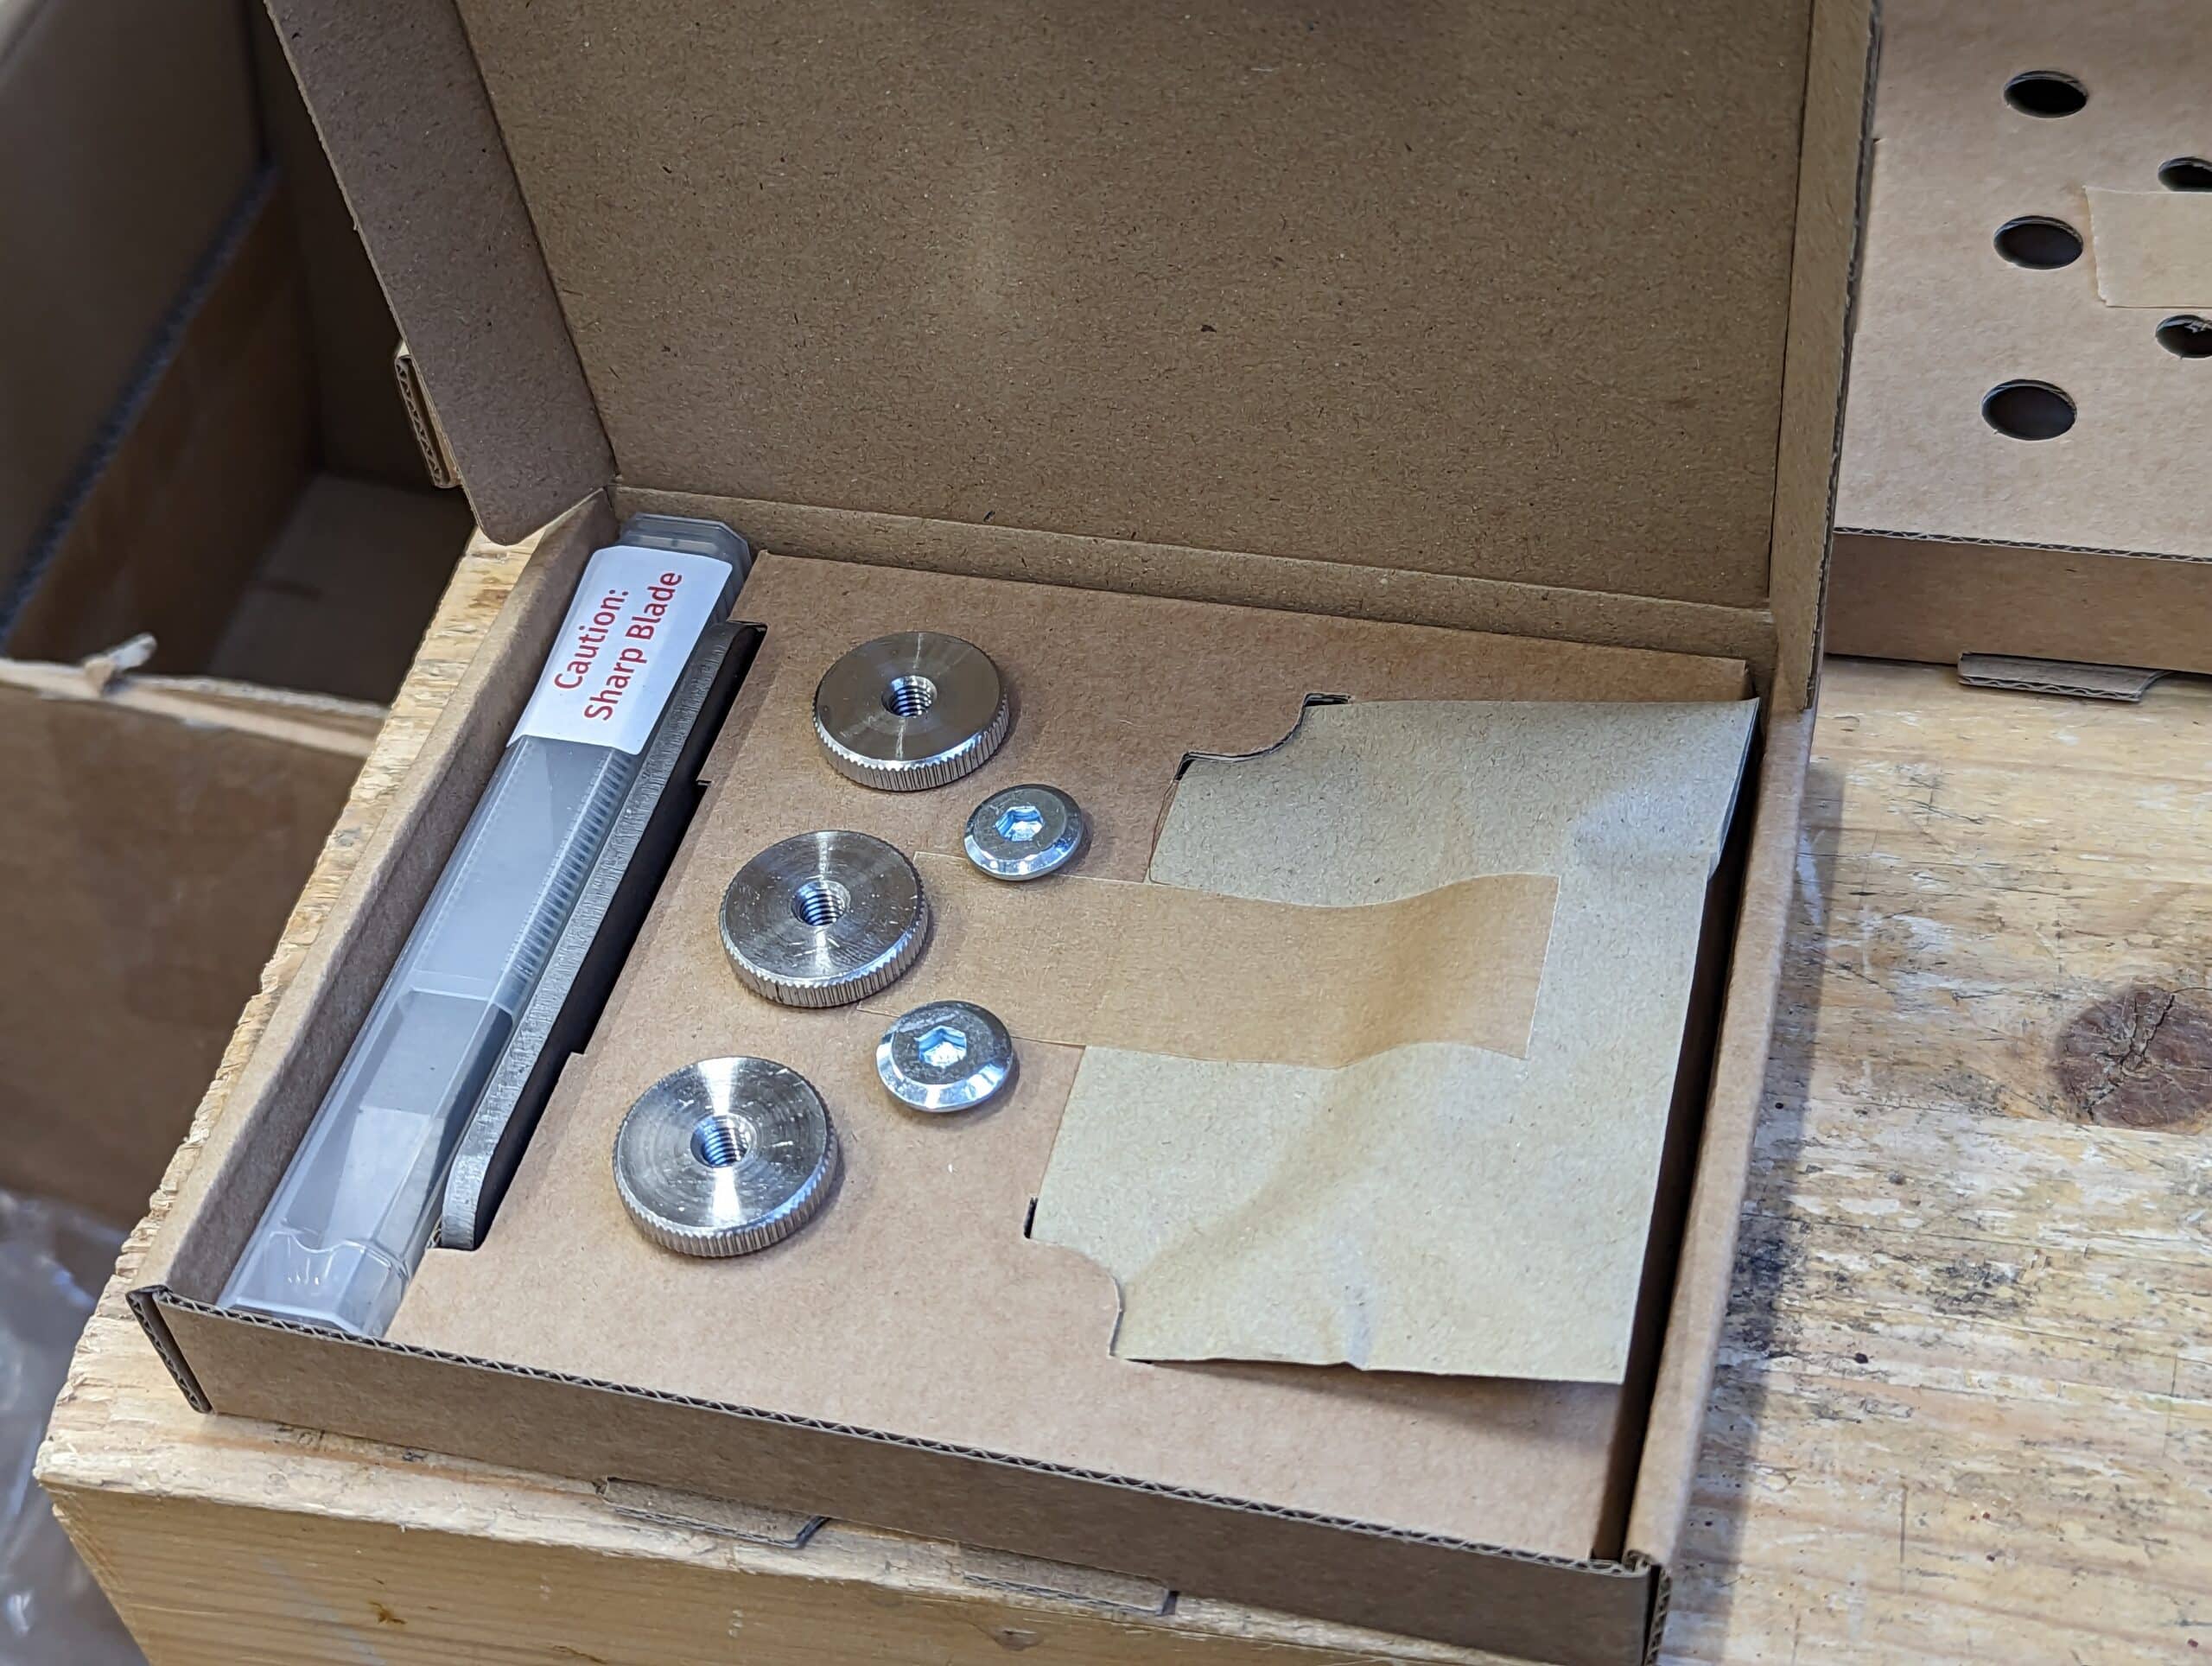
From the comments people made, many woodworkers were not ready for too much metalworking. Cutting steel, retainer bar stock, drilling and recessing steel wasn’t for them. That was understandable, so Joseph and Katrina set to sourcing and pulling together the different parts including the made-in-Sheffield cutting iron as a metal parts kit. Whatever didn’t exist they had made; their intent was first quality and fitness of purpose and then bringing them in-house at an affordable price for worldwide distribution.
So, in quick succession, I made five of my hand router planes from the kits we package and send out. One was for photography, to produce a quality PDF how-to to follow or print out. The second one was to make the YouTube video on how to make your own router plane from the kit of metal parts and you can get more information here. The third will most likely be a giveaway plane and the fourth has an open throat for routing into stopped housings and housing dadoes to stop the shavings jamming against the fore-edge of the recess and the plane edge. I will add the mesquite version with the black handles to my own gathering of the best router plane in the world. Probably the very first Paul Sellers mesquite router plane ever.
Dear Paul. I must thank you for developing and sharing the process of producing a hand made router. Thanks also to Katrina and Joseph for pulling together the ‘hardware’ and making it available. ( I probably would not have had the confidence to source / make the metal components myself ). I didn’t hesitate to put my name down for a ‘hardware kit’ and, once it was received, I was able to make my very own router ( maybe not quite as quickly as you can Paul!)
I had a beautiful piece of hardwood, which I was saving for something special ( I don’t know what it is, but it’s a deep, rich maroon in colour) so it was the obvious choice for my router.
I really enjoyed making the router and am delighted with the result . It works perfectly and I thoroughly recommend anyone to make one with your ‘hardware kit’.
Best wishes
Alan Bailey
Thanks Alan!
I built my router plane with your kit a years ago. I usual use it before my 71. still un the process of getting cleaning and setting up tooksso I can build. getting close now. Thank you paul
I made mine from bits pulled out of my scrap box, including the iron and thumbwheel, because I’m a better and more confident metalworker than a woodworker (50-plus years an engineer, lol!). The mistake I made was using a chunk of aluminium for the body instead of wood. I found the aluminium “draggy” no matter how well I polished it. That’s now been junked in favour of an offcut from a wooden fence post. No idea what timber it is (spruce maybe?) but it planes up beautifully.
I used a leftover piece of half inch square keystock for the iron, which in theory ought to be too soft but in practice it turns out to be okay. It’s super easy to resharpen and it was free!
Thanks for the pointer to the open throat, I’m nicking that idea too.
Does it slide better with the wood base plate vs the aluminum? Just curious on your thoughts on the difference as someone who has built both?Interesting!
Dunno yet Paul – I haven’t finished making it. But the “quick cheat” temporary one I made with the same timber and an old firmer chisel does. It slides lovely, on CLS anyway, which is the only stuff I used it on.
HTH.
RS.Didn’t leave black marks on the wood? Anytime I’ve tried aluminum it does so. even a weird Stanley plane did so until I painted the sole.
Did you try epoxying a thin wood sole to the plane? That would be a really simple addition to fix the issue. Or better still make an oversize sole like Paul has for spanning large tenon cuts. Instead of epoxy you could add tapped holes in the metal base and use recessed machine screws.
I’m looking forward to building one of these and trying it out.
I am disappointed with my Veritas as it keeps loosening up and rattling! Yes I know the fix but then you need another tool to make adjustments and that is disruptive. Sure is a pretty tool to look at though.
It seems to me that if a tool is loose in places you are losing energy that should be going into a cut. Either way it’s distracting.
Then you will not be disappointed in mine. Say goodbye to metal rattles, take up on threads and welcome to an adjuster that keeps its direction and an eighth of a turn takes off the finest shaving you ever wanted from the depth of whatever recess you want.
I was one of the early buyers of the kit. I bought the kit because I couldn’t think of where, local to me, I would be able to buy small quantities of tool steel.
The kit was great, it resolved that issue and I had a plane in short order.
I THEN found out that there was a specialty metals outlet no more than 10 km from my front door which would have allowed me to buy the tool steel. I have since made another with a 3mm blade.
Completed my first last week. love it!
https://www.instagram.com/p/CplmZ26Ne-n/?igshid=YmMyMTA2M2Y=
tip -> make a depth stop for pennies with a simple m6 nylon lock nut on the adjustment screw!
Hi Peter,
I have just read a post about your router plane kits, first time I have come across them,
I’d like to order one, if you are still making them,
what do you charge for them.
Regards
Dave.
Here is the link to the order page at Rokesmith Ltd. Enjoy!
Doesn’t seem to be working for USA.
Should be. Please try again. We ship all the time to the US.
Don, it does work in the US. I live in Texas and ordered mine last year. Made the body from a slab of pecan. I love it! It works fantastic. What Paul says about it cannot be overstated. Best investment I ever made in my woodworking.
Gene Evans
I actually made 2 router planes and managed to source all the metal components as I had a project to work on over a year ago. I sourced the steel from Sheffield which gave me enough to make four blades one narrow tip to work on a 6 mm wide housing.
I also modified the width of one with two 8mm contrasting lamination on the front which gave extra bed width and looks great.
Shame I can’t send the pictures. Thanks Paul for this project.
I was one of the first to put my name down for the kit, it’s taken me a year to get the plane finished as I could only find the time to work on it now and again, now it’s finished and it not only works beautifully but looks so good as well, using it give such a wonderful feeling knowing that I made it and it’s so much better than a shop bought one.
Thanks for the plans and hardware kit! Now how about a Paul Sellers designed number 4 wooden plane? 😉
With a thin scrub radiused blade!
It wants the precioussss!! ~Gollum/Jeff D.
I bought the kit. I have a a bunch of Poplar. Will that work or. Is it too soft?
i live in the US. can I buy one?
Thabks Paul and team! Just starting out with handtools and I put together mine from the kit and it works flawlessly. Really appreciate the reasonable cost and shipping to Canada.
Quick question on this. I have a Lie Nielsen open mouth one and it works pretty well unless I adjust it VERY shallowly. As it gets closer to the blade at level with the base the adjuster nut falls off the screw. Does this version have a similar issue? Or is it able to adjust higher than the base if needed?
Absolutely. There are two notches in the cutting iron for super-deep recessing and the blade fully retracts within the base with no problem.
I just checked Rokesmith’s and they are out of stock for the router kits. Do you know when the kits will be available?
They are available now Gregg. please try again.
Wally Woehlert
I live in South Australia, am I able to order a kit please, I have made one router and had to rely on a friend to manufacture the parts and I am keen to make another.
Yes, we ship worldwide.
I received my kit last week (only $7 to ship to New Jersey, USA). I spent a few hours on Saturday and built the main body of the plane from sycamore. It went pretty well, but I spaced the clamp bolts just a hair too close. I had to file the inside of the holes on the clamp, just a very small amount and it fit perfect. I put in the blade and it worked perfectly straight away. It left a smooth finish without even honing the blade yet. The bed angle is perfect and was obviously well thought out.
I will turn the knobs next weekend (from an old piece of cherry) and the whole project will take maybe 4-5 hours tops. I think this design will put my old Stanley 71 out to pasture.
Tom
Thank you Paul (and Katrina and Joseph!) for developing this design and putting this kit together! I’ve followed your instructions and videos and made your workbench, your jointer’s mallet and now this wonderful router plane. I’m relatively new to hand tool woodworking, but now, if I don’t have a specific tool, I’m starting to ask the question, “I wonder if I can make one of those myself?” That is evidence of having a great teacher!
Many thanks from a fellow Texan!
Rob
Hi Paul
What is you opinion on different width blades ( which are standard with the Stanley, Record, Veritas and Lie Nielsen router planes). Are these important, relevant?
Regards from Perth
Derek
Derek
Only you can decide if you will ever need a narrower blade. Some time ago I made a brass bodied version of Paul’s Allen key blade design – its narrower blade does prove useful sometimes.
The issue you would have is the width of the blade groove in the wooden body.
You would either need to:
Make a new body for each width.
Narrow the end of a standard blade
Use pieces of metal or wood to reduce the groove width for a narrower blade or blades.
I built my router plane before Paul’s kit was available. I bought two irons from Lee Valley— a quarter inch and a half inch. I find I use the quarter inch more often.
the blade widths are two standard widths of favourite planes. I use both.
Maybe others already know this method, but i discovered an easy and accurate way to microadjust the router plane. Much like adjusting the iron on a wooden plane. Tap the iron to extend to deepen the cut, then snug the adjusting nut to take up slack to hold the iron. To make a shallower cut, rap the plane body with a mallet then adjust the nut snug to the iron.
Paul,
Hope you come out with a second edition of “Essential Woodworking Hand Tools”
and include this Router and the Transitional Plane.
Be Well
Joe
Paul, have you ever experimented with a cutting iron with the overall same dimensions but which is narrow (say, 6 mm wide) for an inch or so near the cutting edge?
Hi Paul:
Maybe I am missing it, but where can you buy this kit of parts?
Here is the link to Rokesmith which is the only distributor and ships worldwide.https://rokesmith.com/product/router-plane-kit/
I bought the kit. I have a a bunch of Poplar. Will that work or is it too soft?
It is a bit soft but would still last a few years though.
Thanks.