Sharpness?
It is hard to explain sharpness. Pick up a neighbour’s kitchen knives to cut with and nine times out of ten you will struggle to slice into butter even if you heat the blade. For the longest time it was the same with woodworker’s hand tools and especially in the so-called professional realms. Just when that happened can be easily pinpointed with the advent of so-called power tools. Within a decade or so hand tools all but disappeared and today we are left picking up the pieces of the saddest skill levels in the history of woodworking.
A simple post on my Facebook often stirs up a gathering of the malcontents. My intention is to find out what the biases are but also to come back with just answers for them and others to understand and learn from. From their comments, I quickly discover many of the problems affecting the woodworking world alongside the erroneous teaching they have absorbed from woodworking machinists. That’s why I wrote my second book Essential Woodworking Hand Tools.

The book itself became the most essential tool because it was written with the intent to bridge the gap caused by a loss of a couple of woodworking generations in the woodworking world. here I was teaching classes for amateurs and understanding the more where the shortfall was. That generation lost was now being taught that the only progressive way forward was not to master and establish skilled woodworking but to use miniaturised mass production methods used in industry to make even a single dovetail, mortise and tenon or whatever. The assumption that this was progress was based on the misconception that no one today could cut that dovetail accurately and quickly by hand. That’s when I stepped in. I’d always taught from a lived life working with hand tools; fifty years in the saddle gives you a balanced perspective and a knowledge base to work from that never seems to dry up. In a dispute with a publisher of one of my books, I parted ways early on and at great cost to myself. My woodworking friend, a marketing consultant to large international companies advising me said, “Never mind, Paul, they have the drop in the bucket. You have the well!”
So what is sharp? Let’s just focus on a chisel edge and see all plane edges as chisels. We sharpen almost all of them in the same identical way. A bench plane iron is just a wider version of a chisel.
The first assumption to deal with is the one that says everyone sharpens an edge tool with two bevels. I don’t but I could. I never would, not really. No good reason to although in experiments I have and do.
The second assumption is that you always grind the first, main or primary bevel on an electric grinding wheel. I don’t but I could.
Using an electric grinding wheel can speed up the process of removing a lot of metal to reestablish a bevel to an edge tool but most often, perhaps once in many hundreds, it’s far from necessary. You can use a coarse abrasive of any kind to grind down to a fresh edge and that should take no more than 10-15 seconds provide you approach it freehand.
Another fallacy is that the second bevel is called a micro bevel. You can call it what you want but a secondary bevel works just as well as a name because the increased angle literally necessitates a second bevel be that small or large. The one above might be referred to as a secondary bevel but in terms of sharpness, it is no less sharp than a micro-bevel. Many things offered as new and innovative are little more than trendy terms and clickbait than helpful — even before clicks were invented!
What would you say if I said you never need to grind your chisels on a grinding wheel again? Moreover, that grinding on a machine only ever slows down the process. What if I say that you never need two bevels ever again? Or that a cambered bevel will prove stronger and last longer than a micro bevel? The only way to prove and understand this is to actually do it.
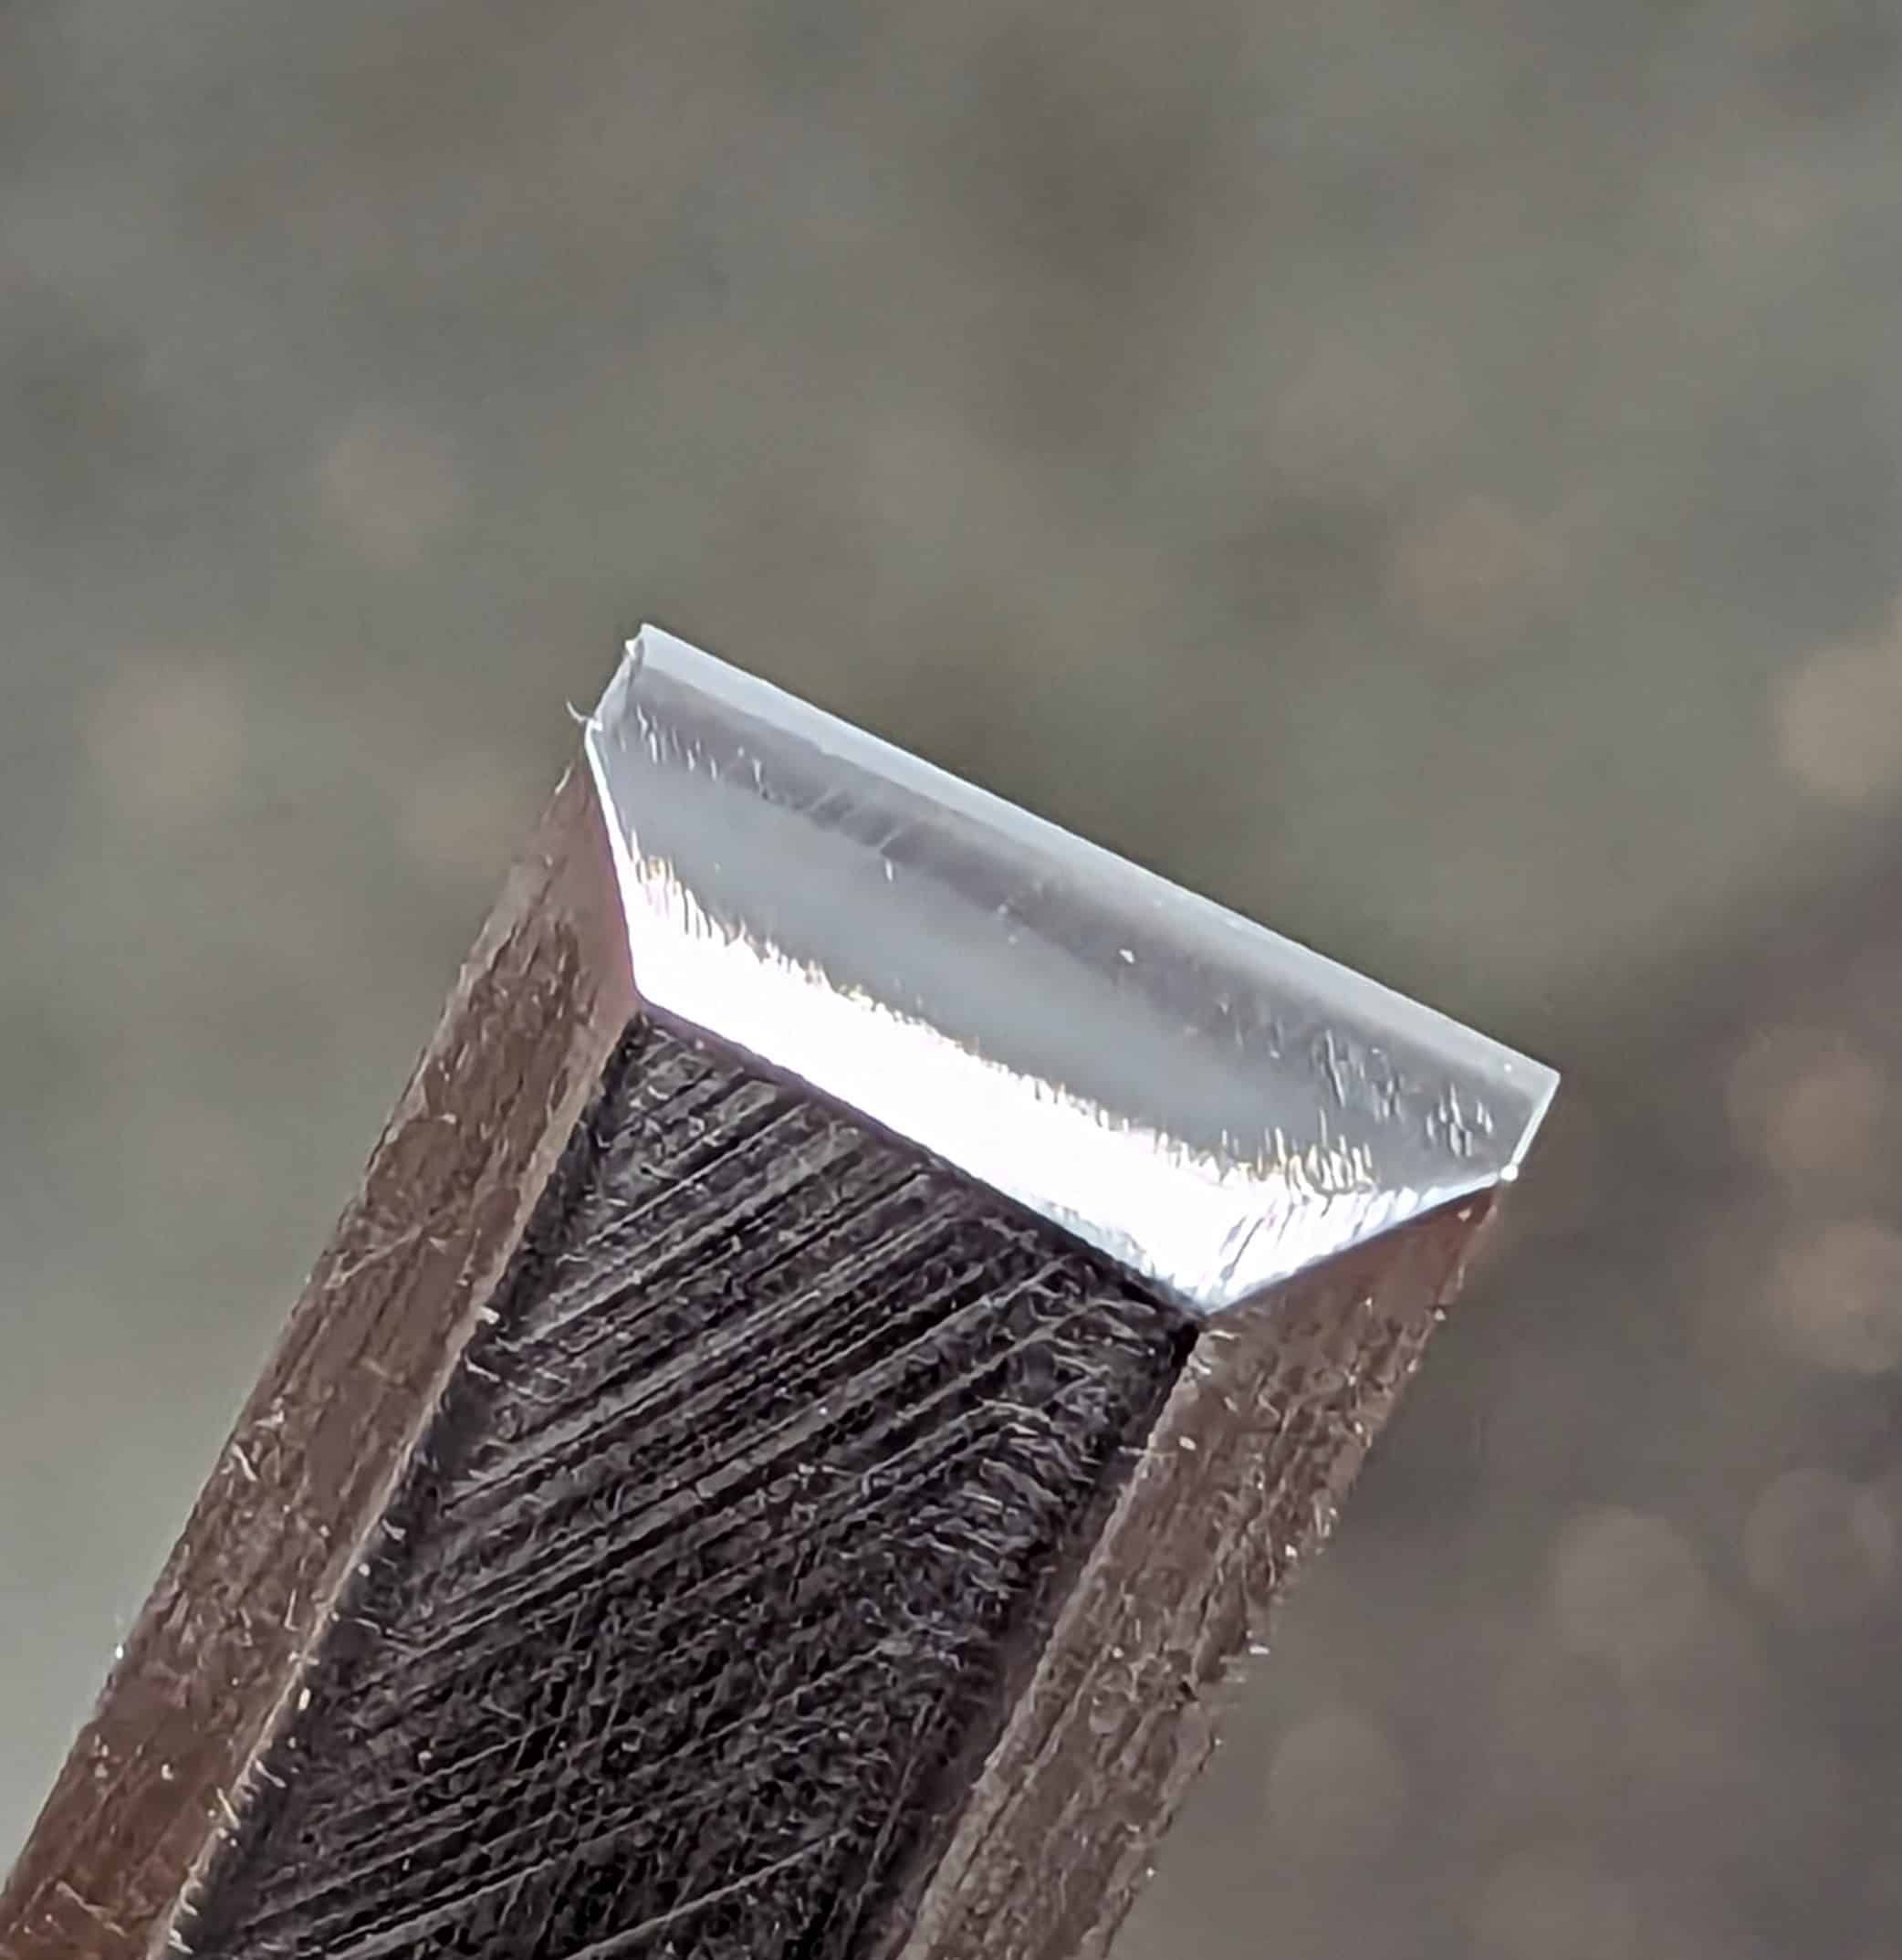
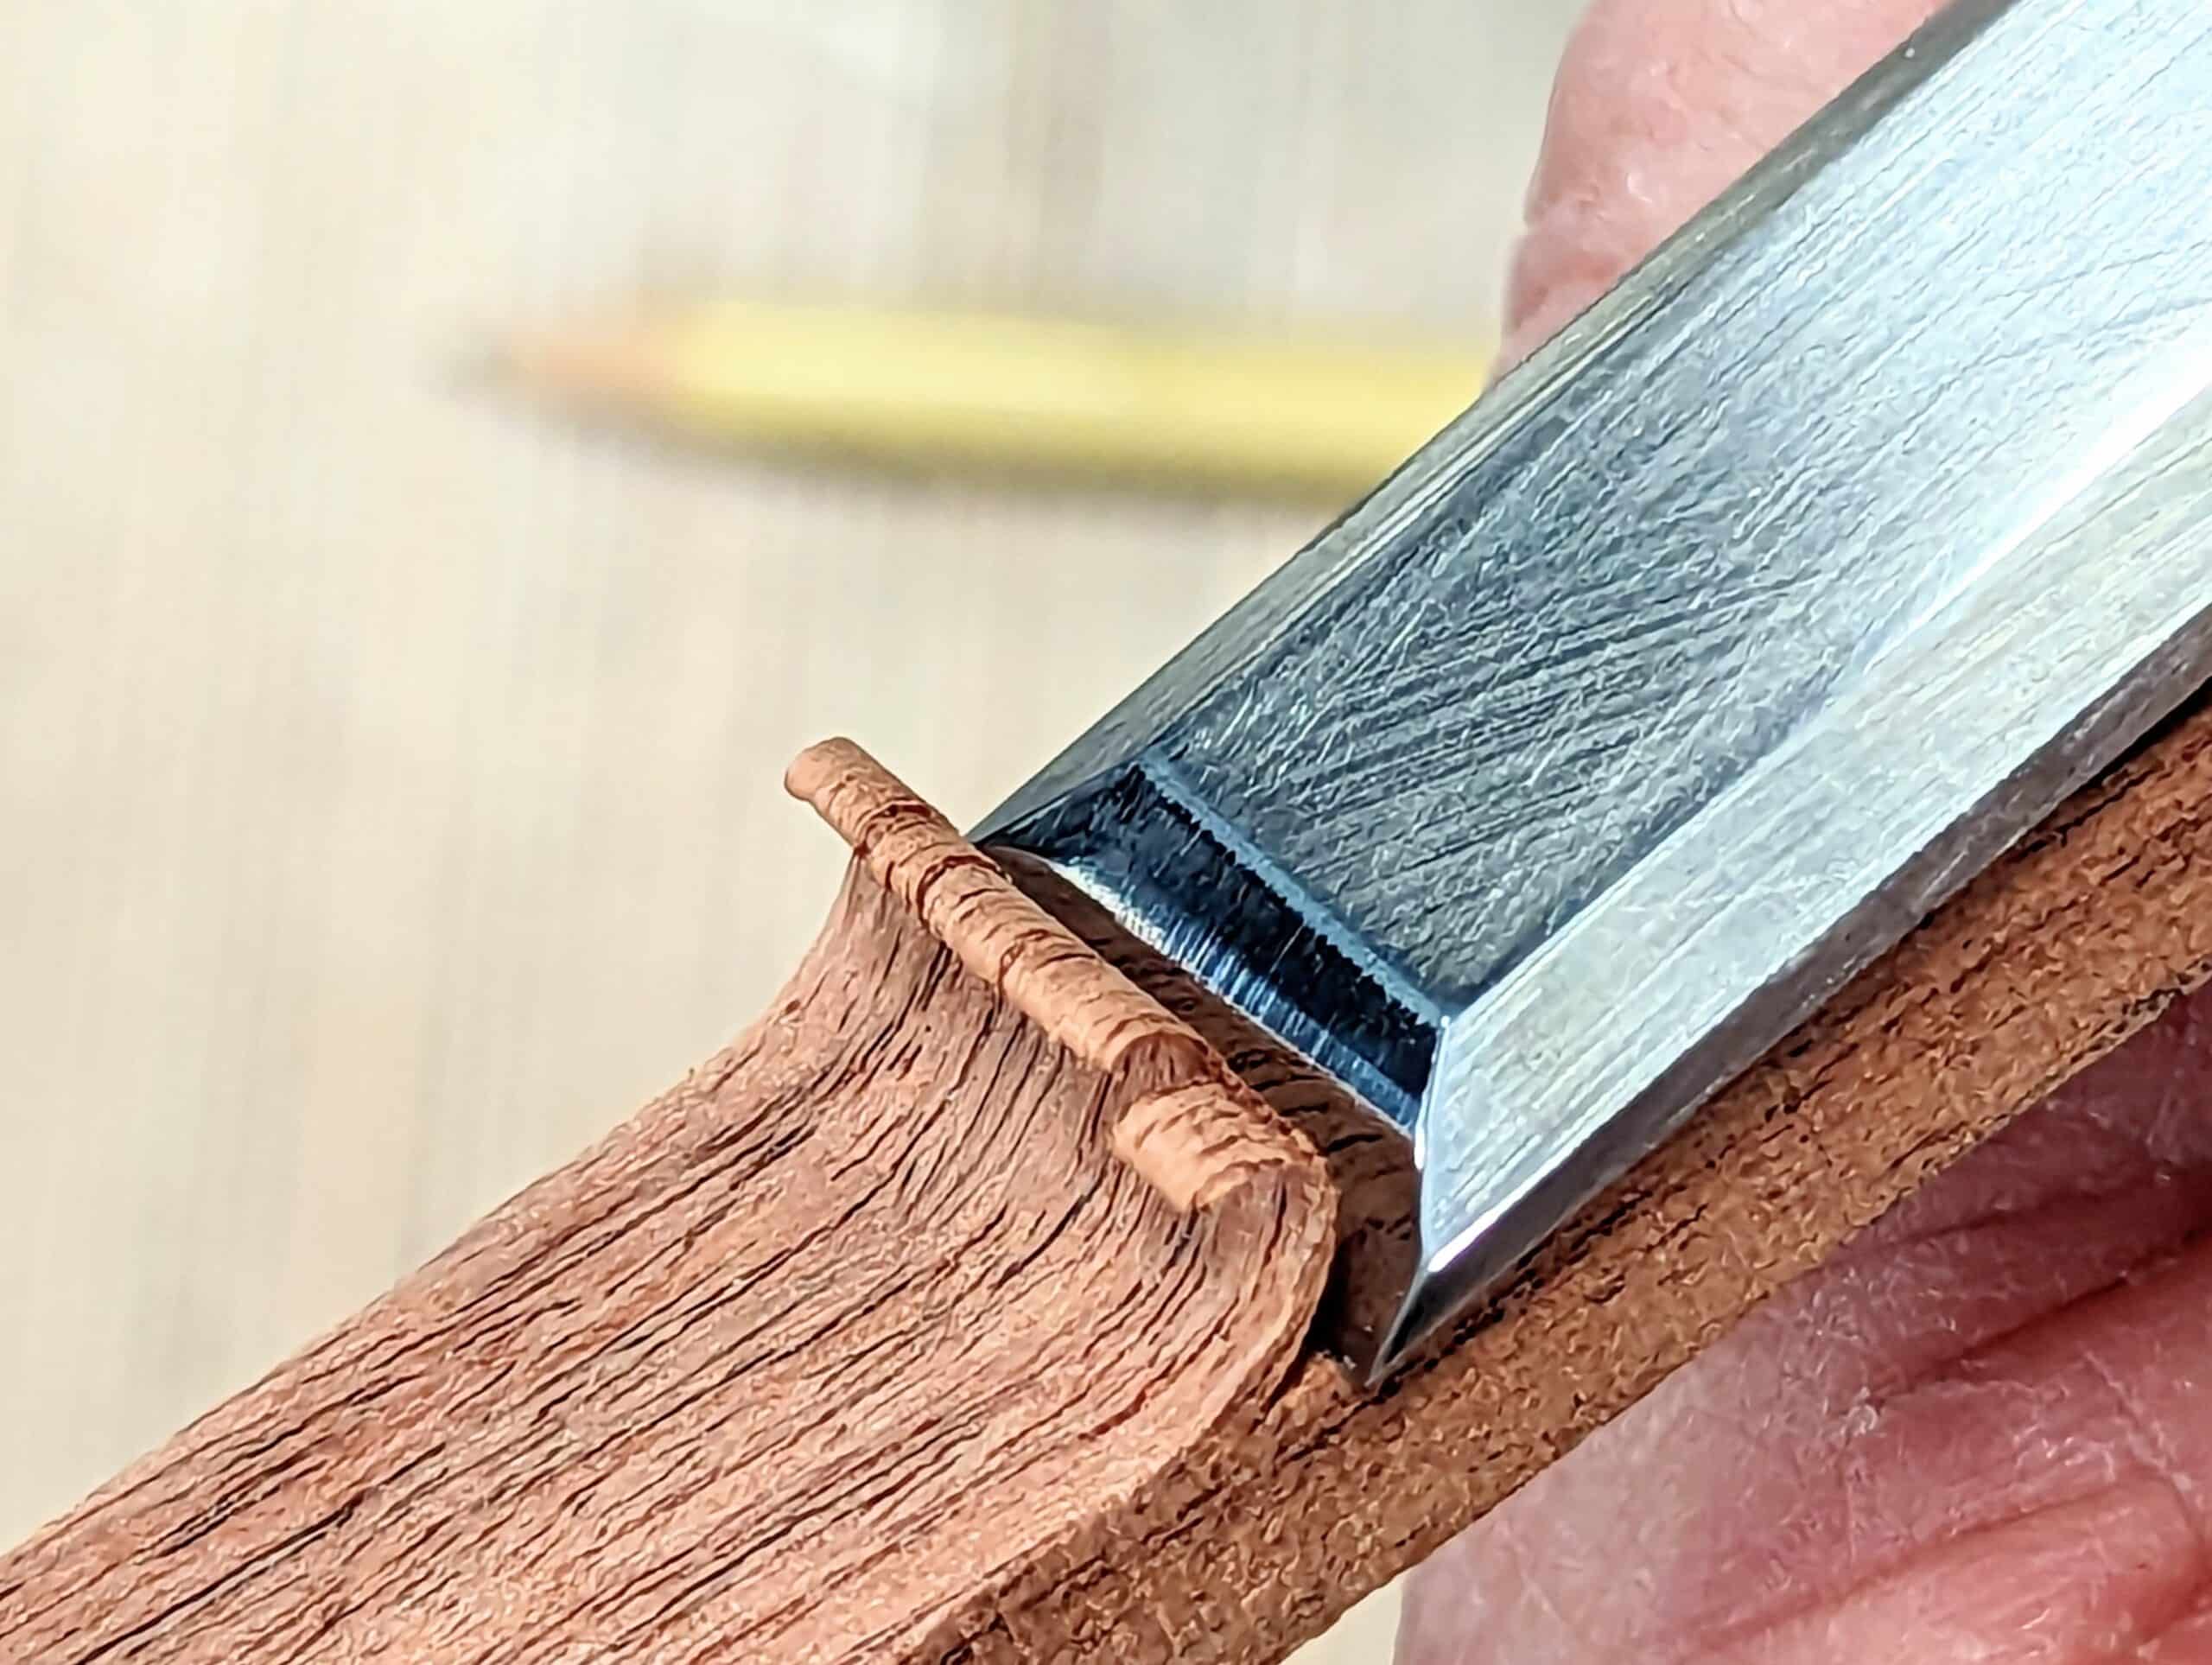
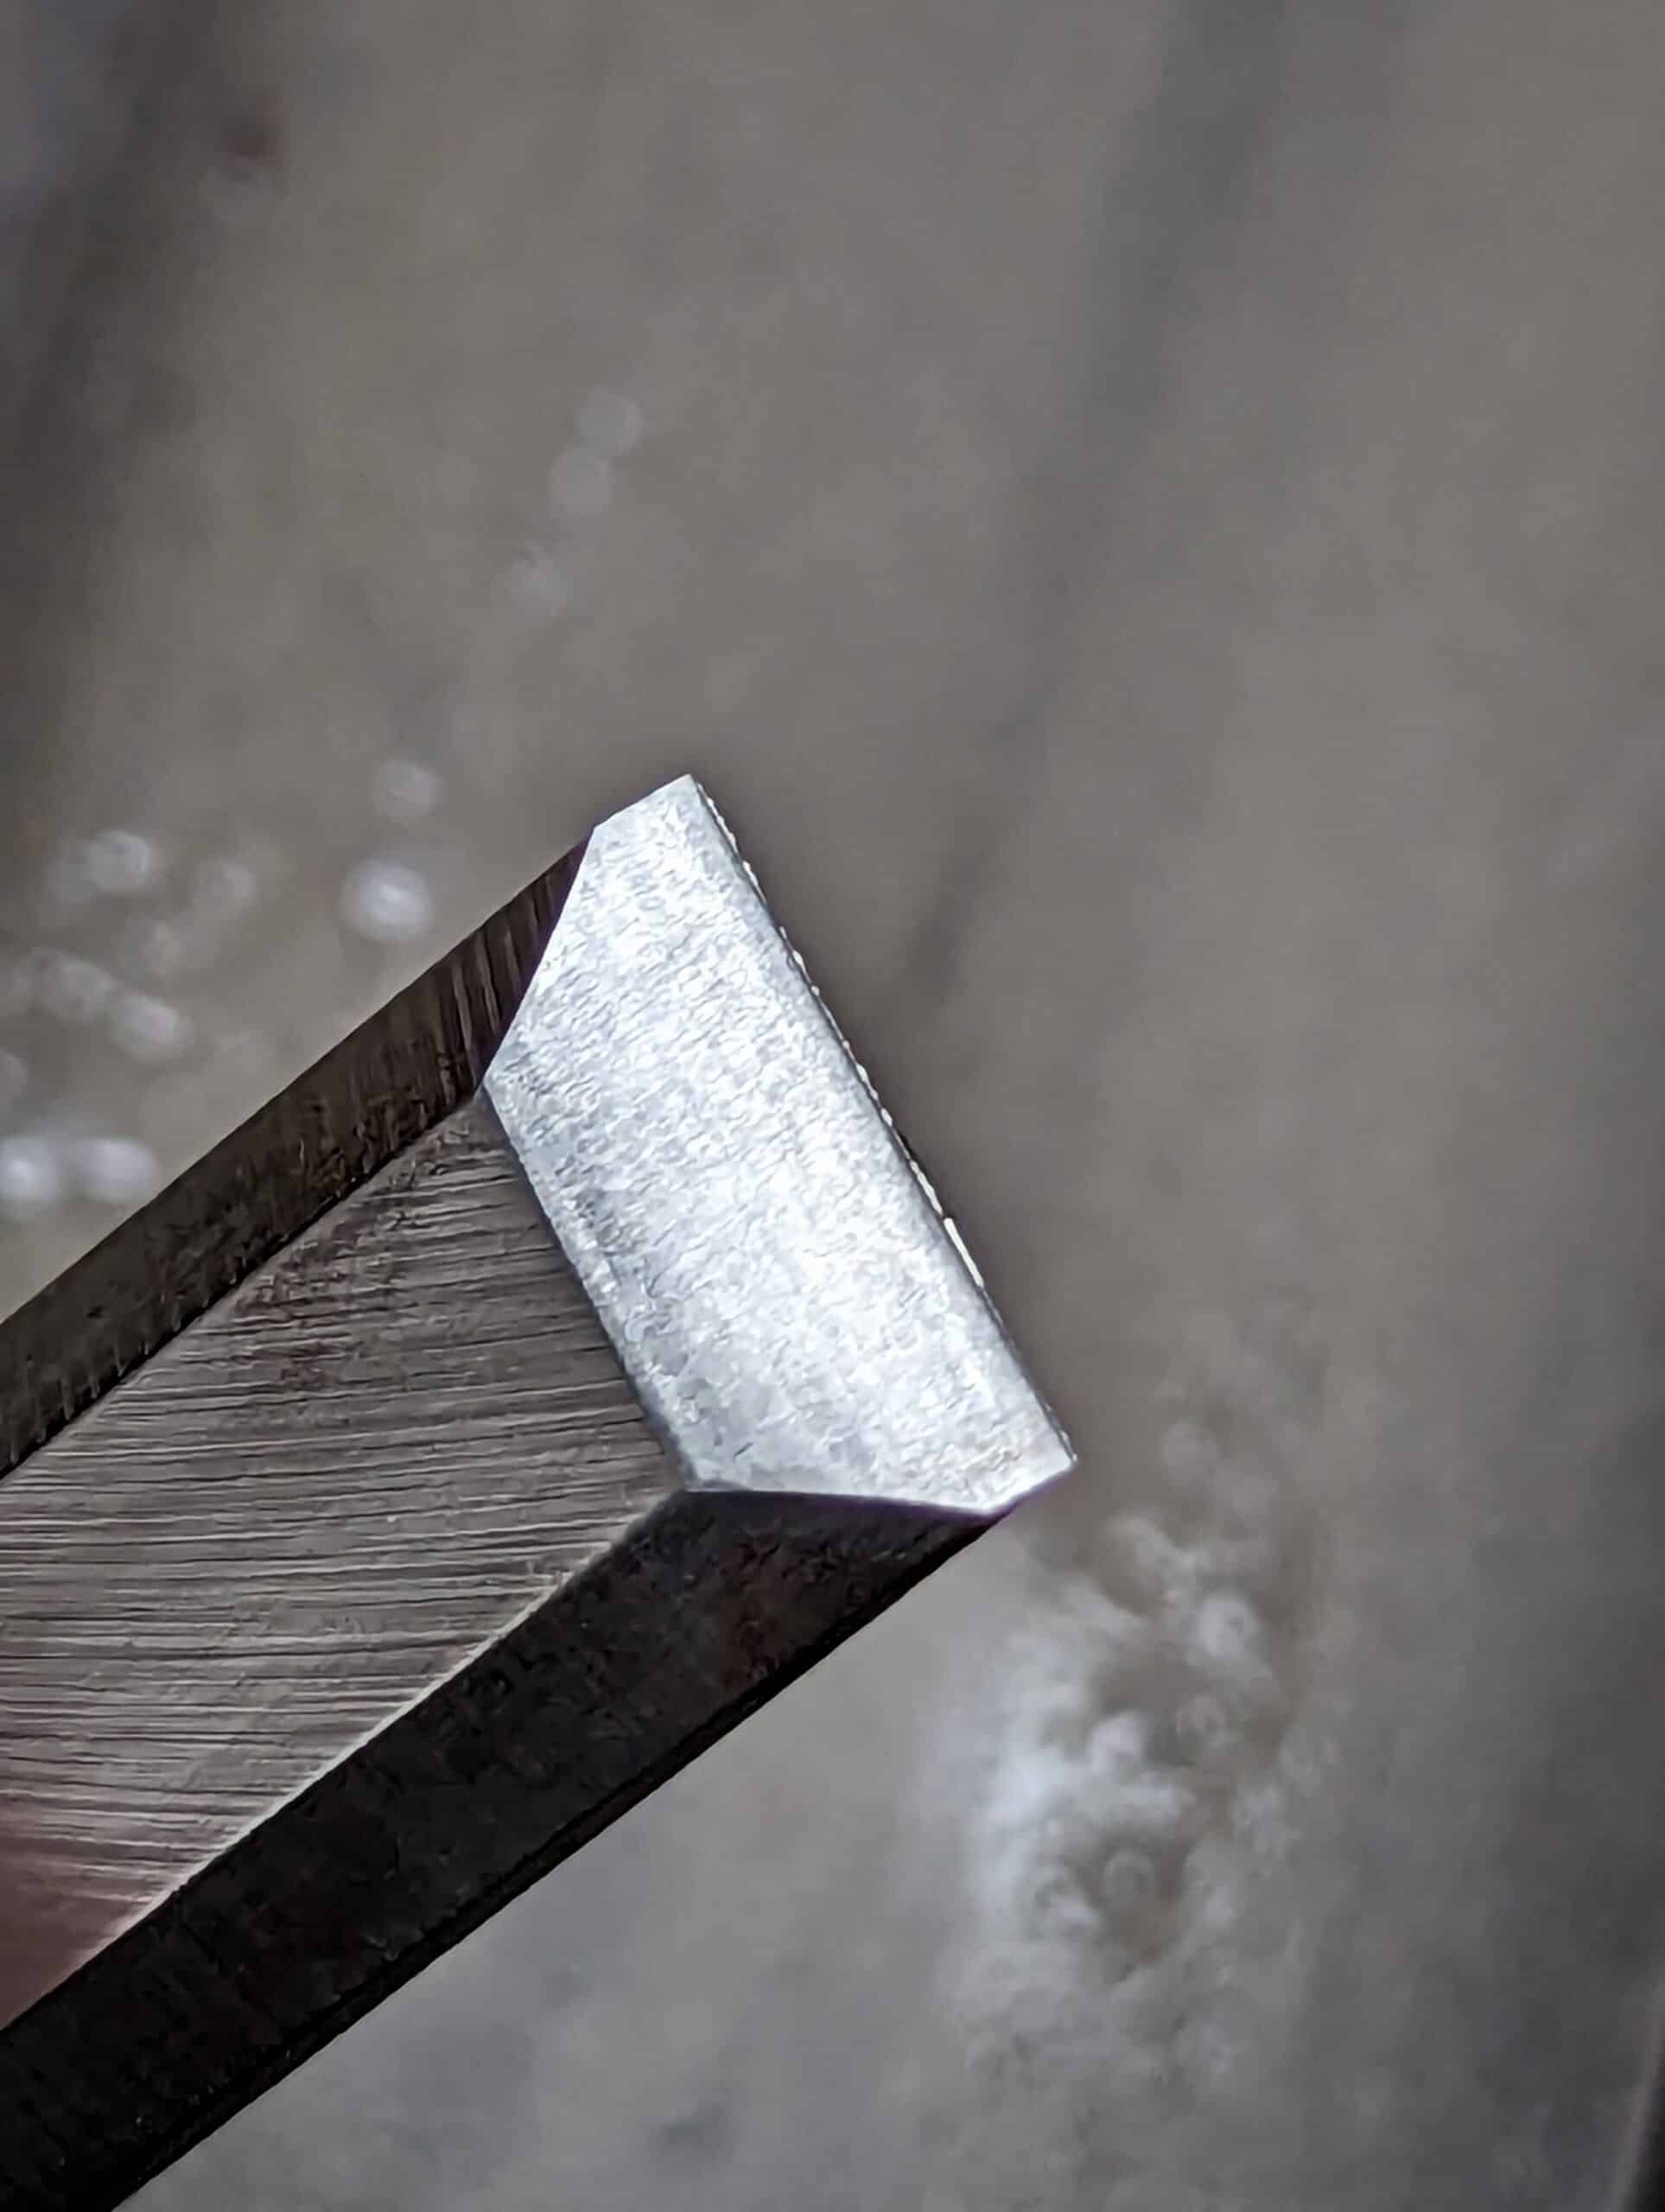
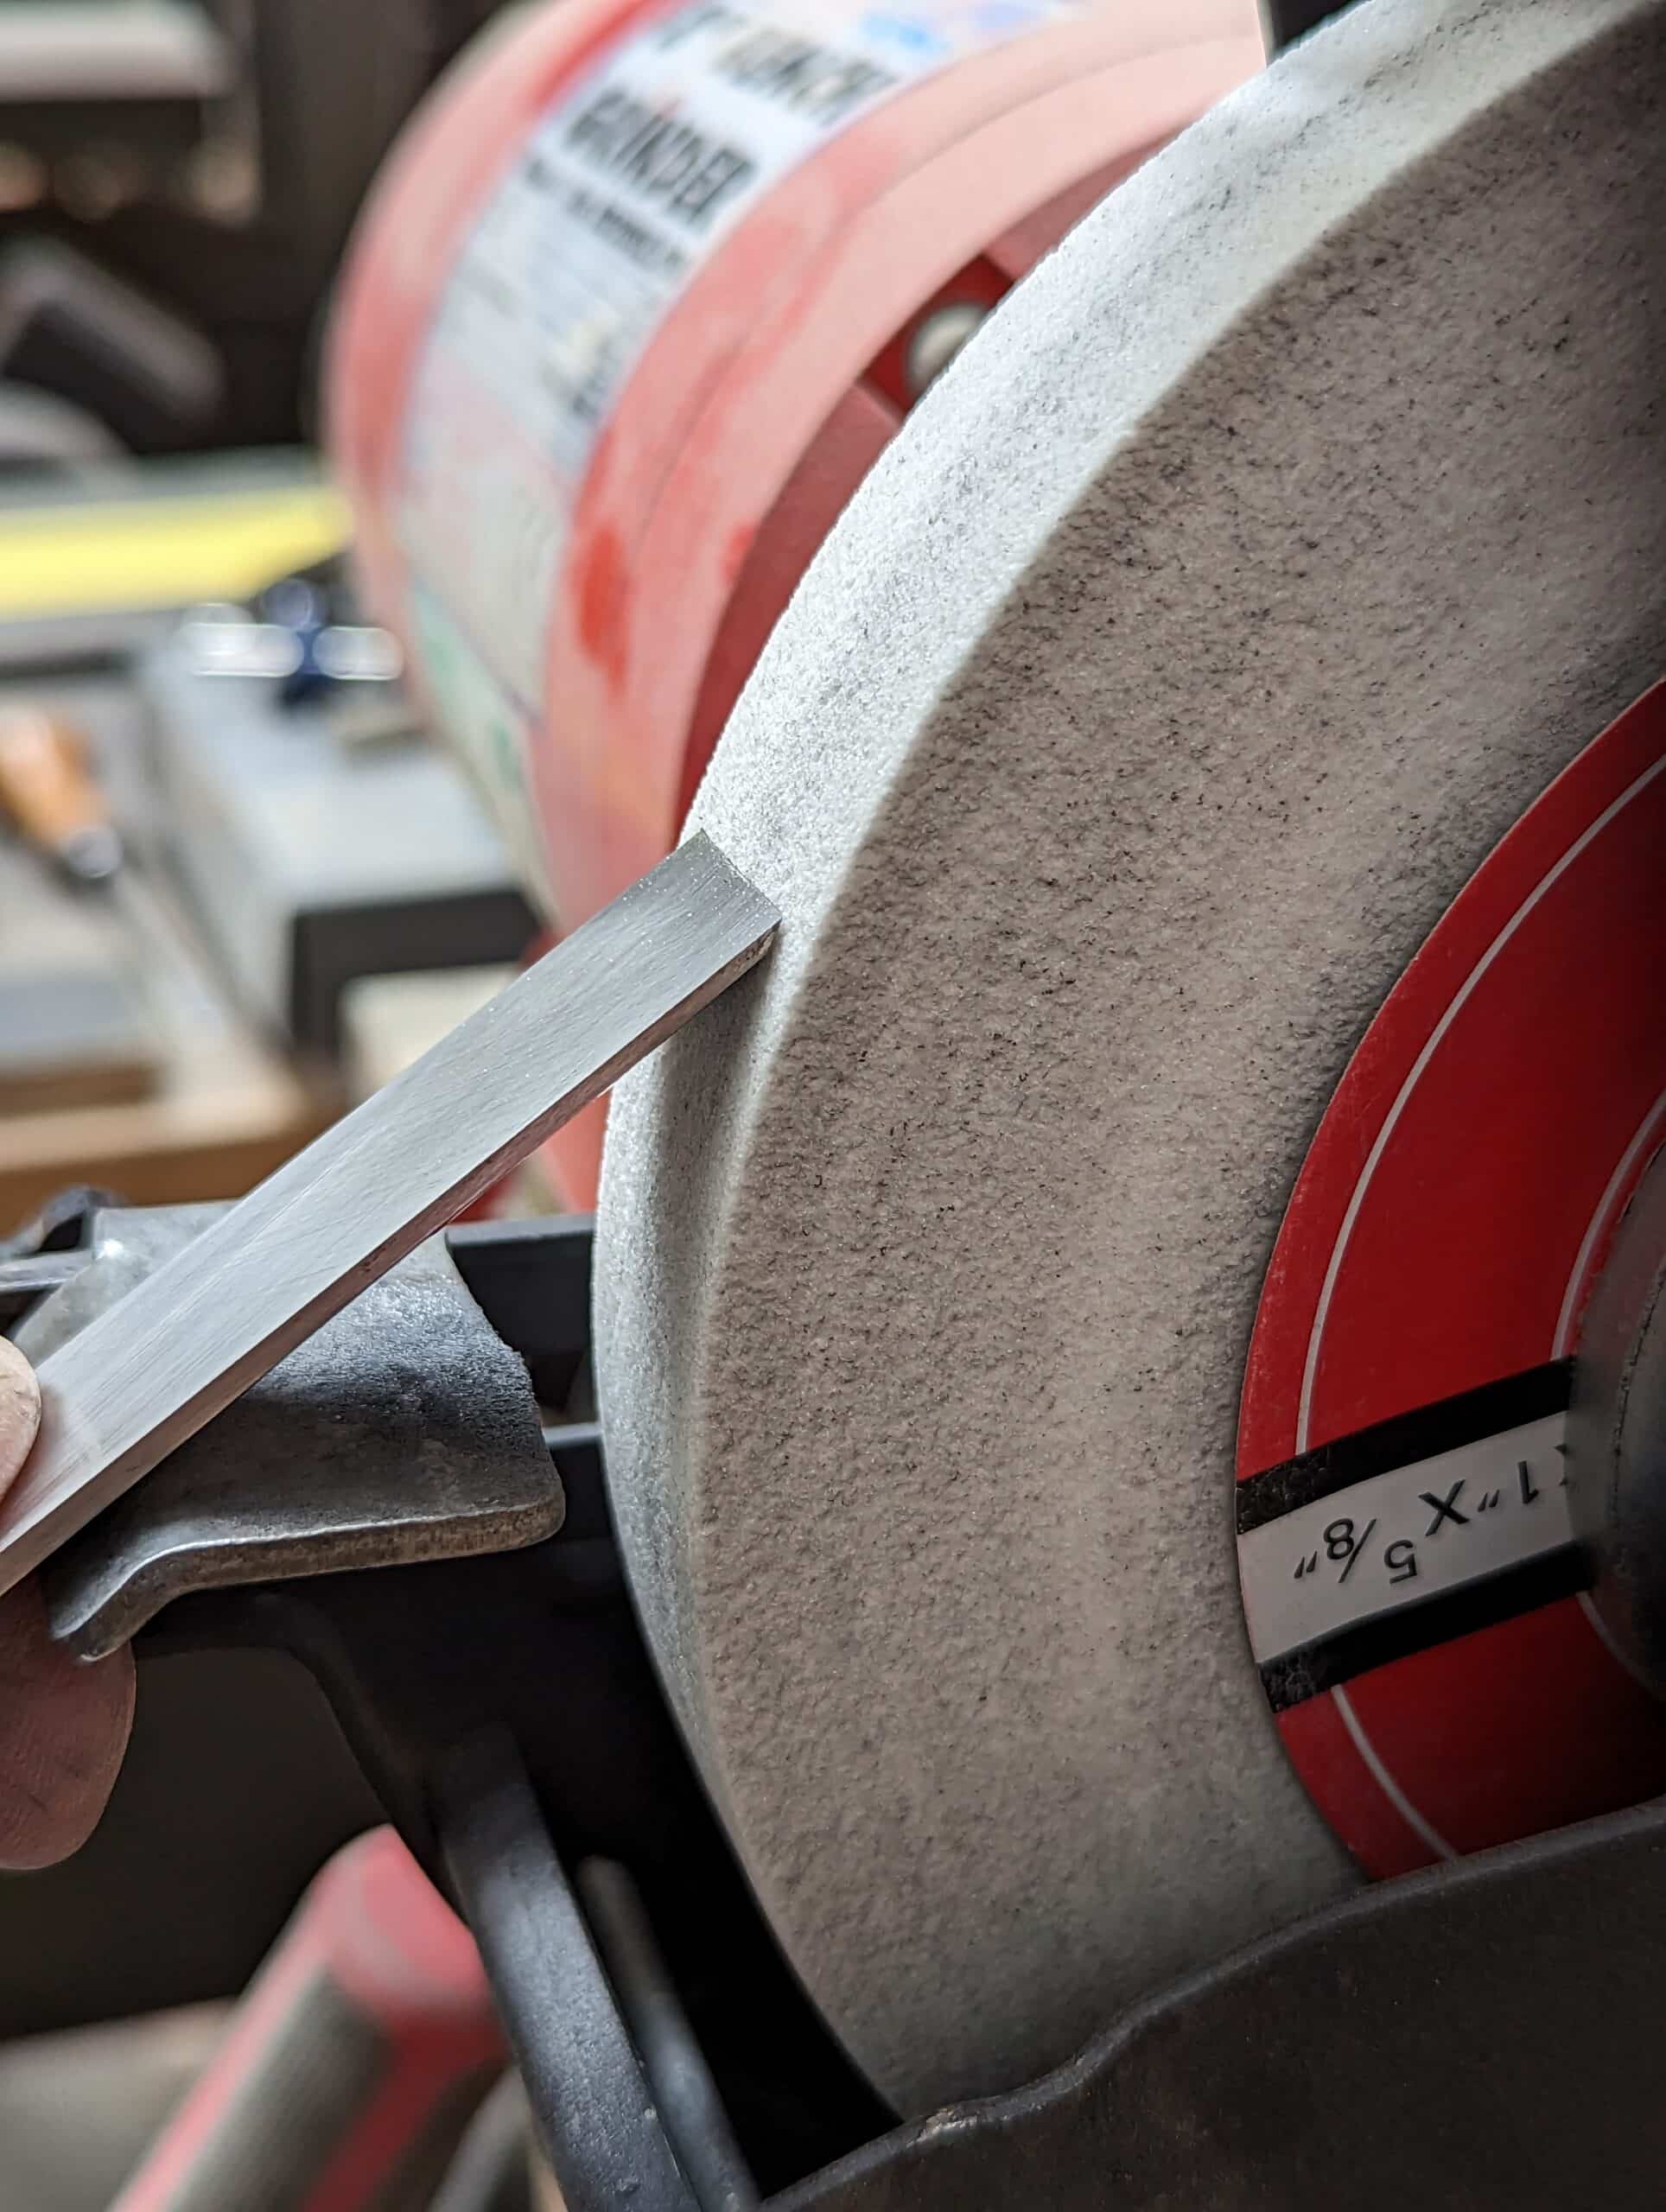
Now, though it is completely unnecessary, let’s say I allow you the one-time use of a grinding wheel to create a cambered bevel. To do this you set the chisel at around 30º and slide the chisel upwards as the wheel rotates. This will negate a hollow grind and cause an elliptical quadrant to the bevel. You may need to do this two or three times until you get the shape you want. Effectively, that starts at 30º then tails off and can be as far along the camber or the length of the chisel as you want. This picture shows what you are aiming for. This initialsing of the chisel is a one-off deal. You never need to do it again. But you actually don’t have to do it. The camber will establish itself;f over three or four sharpenings. Soon you will be freehanding your sharpening with the periodic use of a honing guide to ensure you don’t steepen the curve at the beginning of the chisel edge.
The secondary bevel came in with the increased use of small-wheeled electric grinders that became more ubiquitous during the late 1950 and 1960s. Today, almost all woodworkers will own a bench grinder. Take a chisel or plane iron off the grinding wheel as shown above and the cutting edge will not be viable until it is strengthened by adding a second bevel.
So, even though grinding metal on a grinding machine cuts steel very fast, the faster it cuts the more the steel burns This burning blue at the cutting edge detempers the steel where we need consistent hardness the most. The cutting edge then dulls far more readily and usually crumples under any and all pressure too. This is highly negative in our world of edge tool use. To repair this issue we must grind off the damaged area or resharpen ten times more frequently until we get through to good steel again.
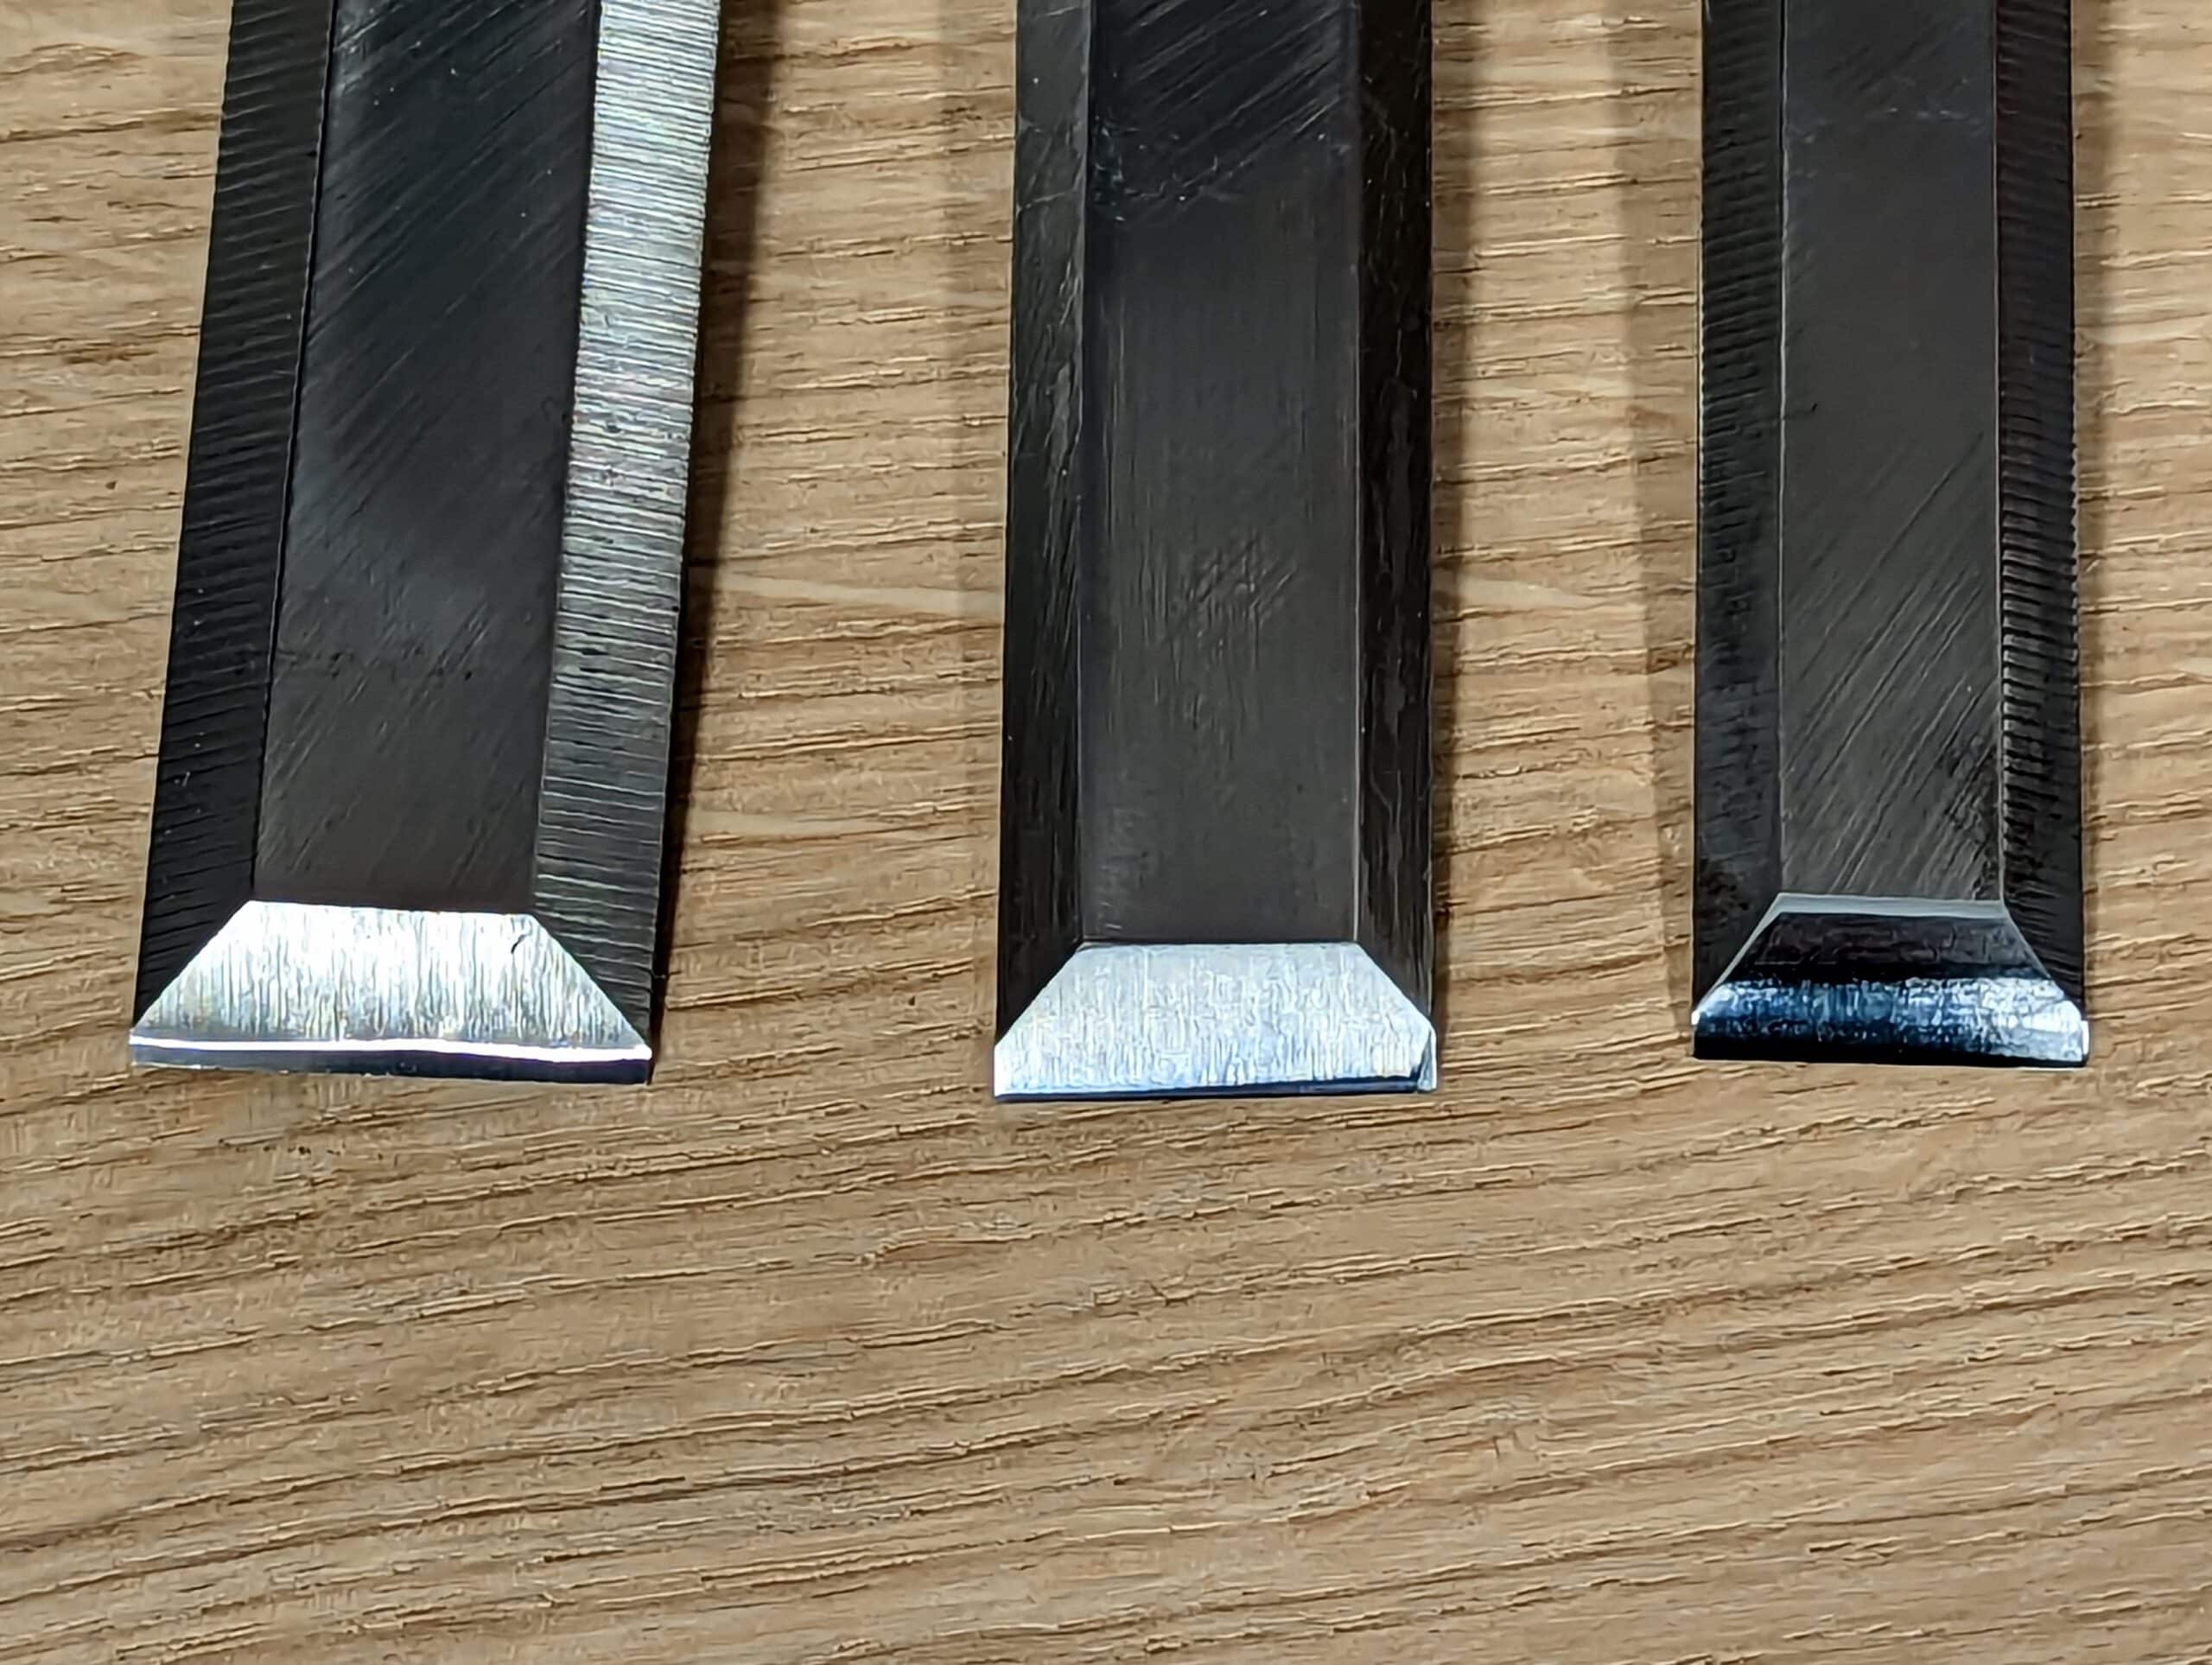
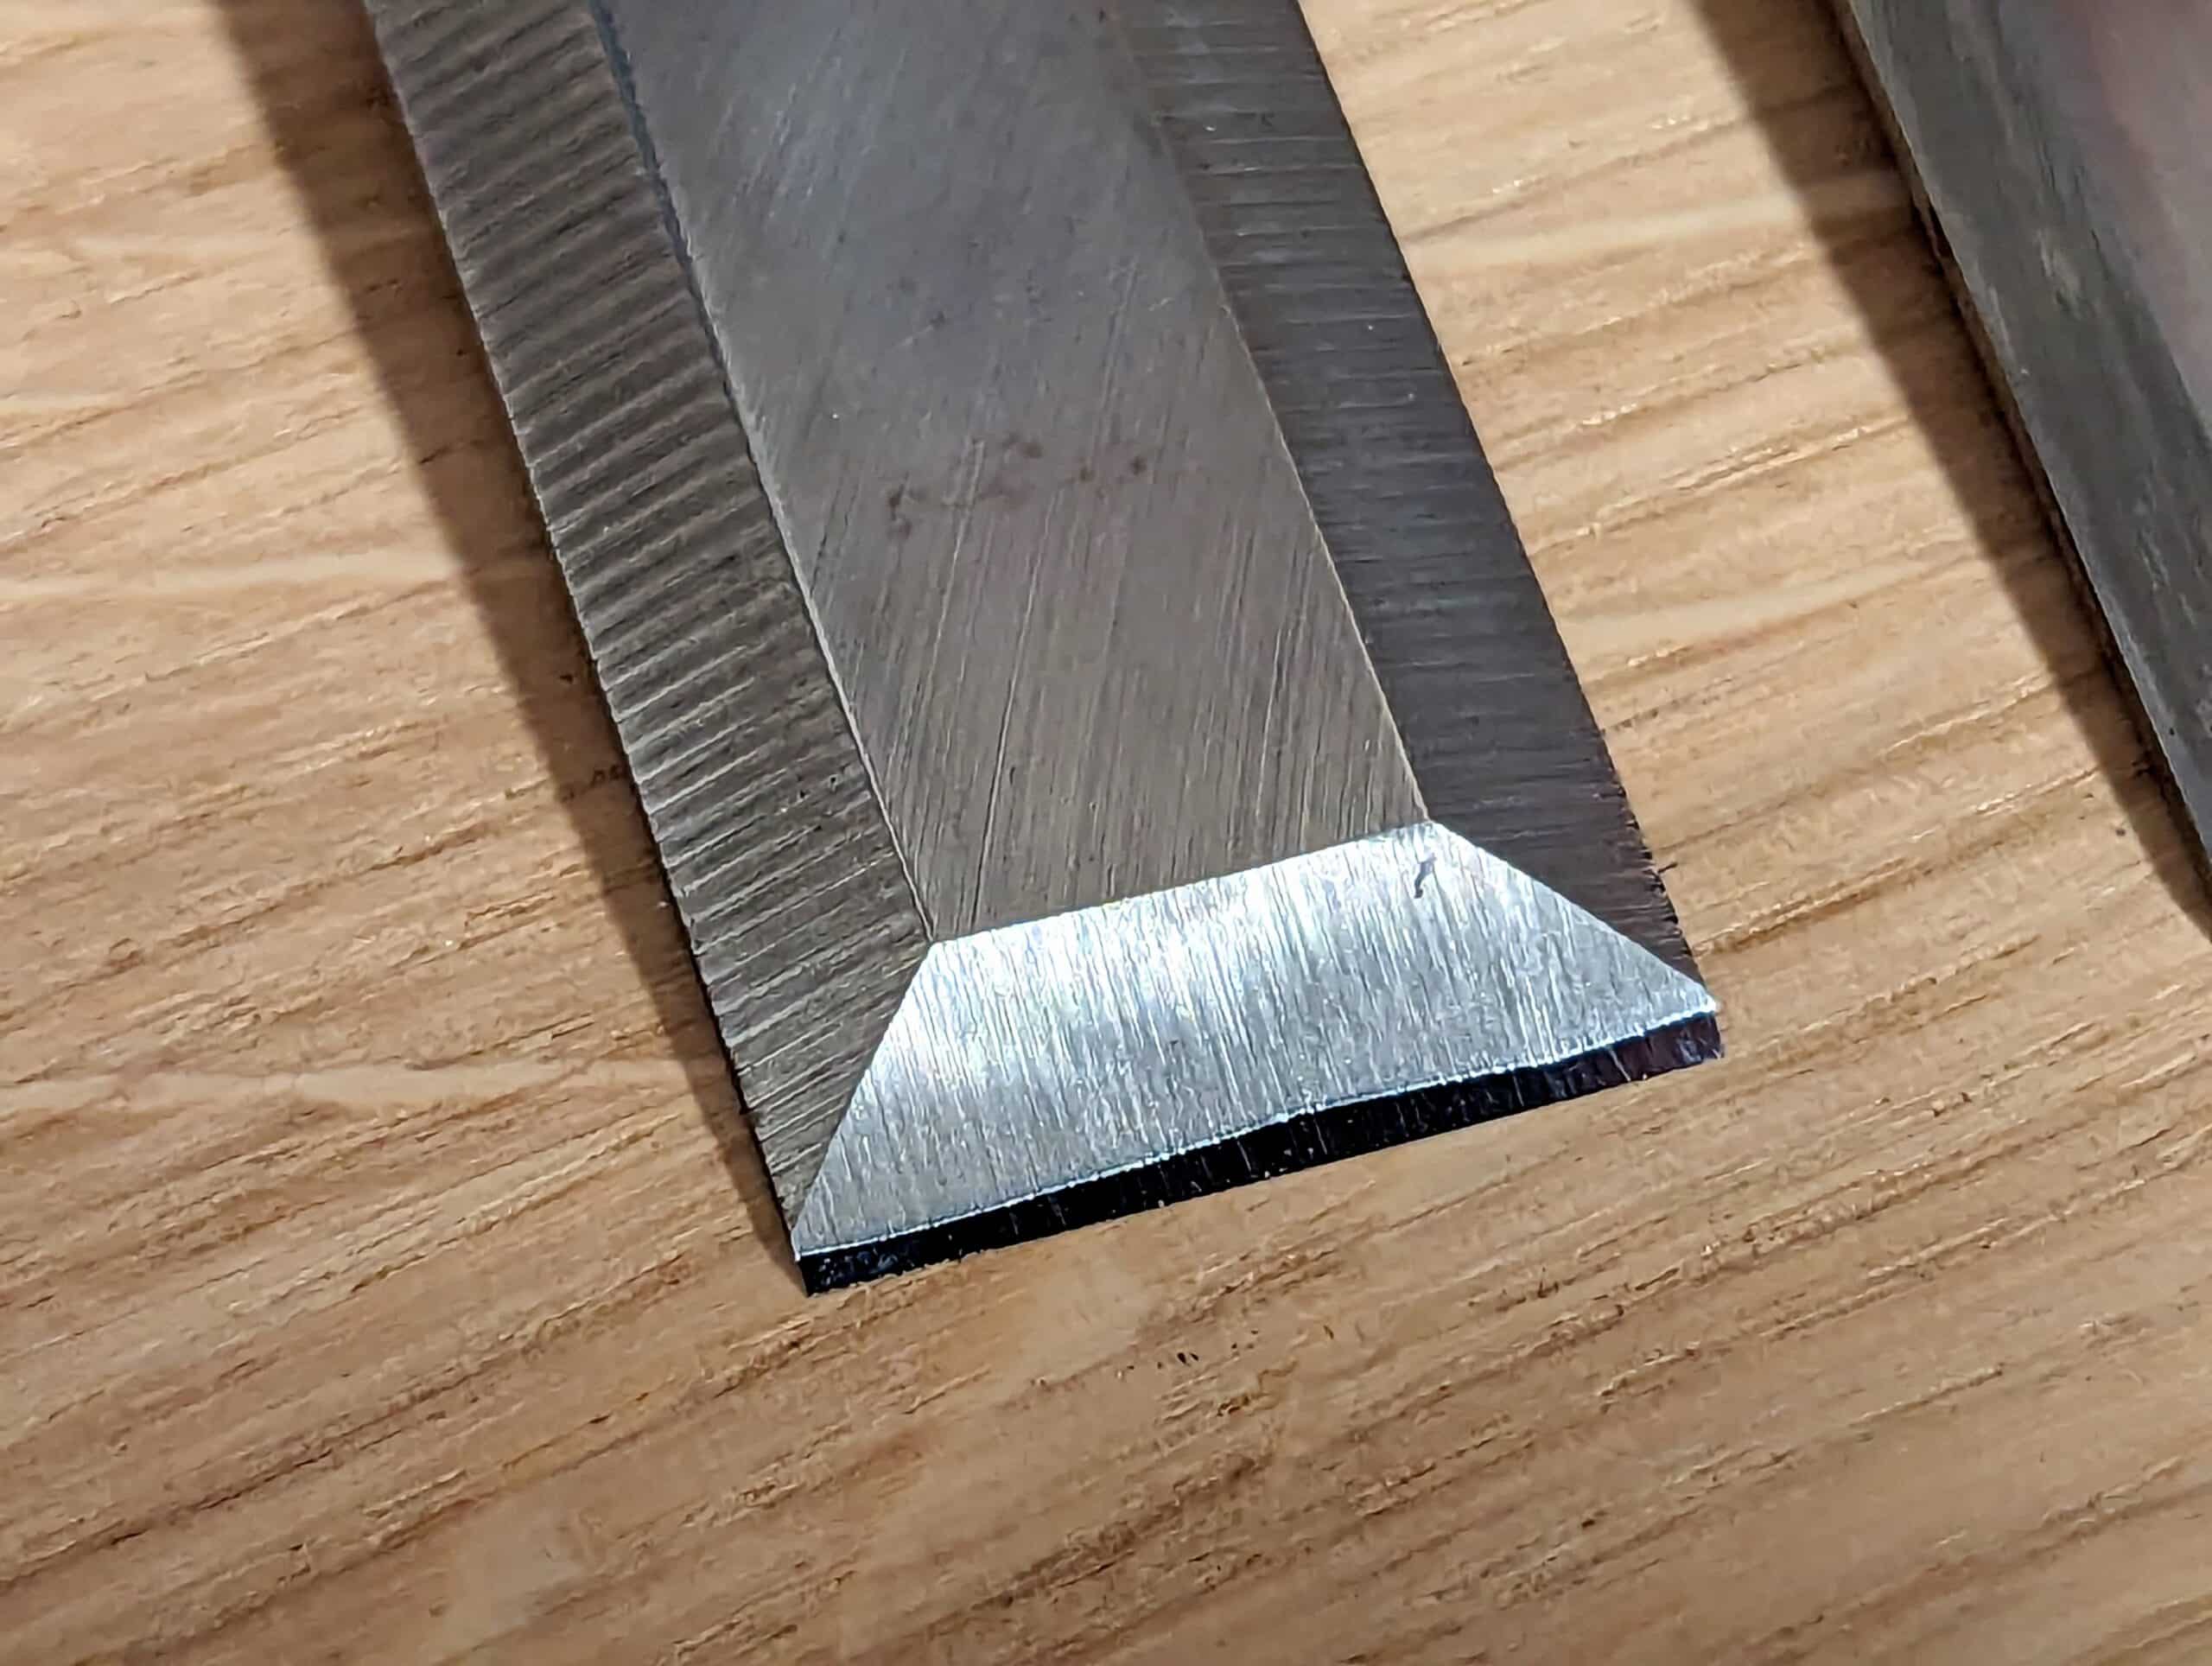
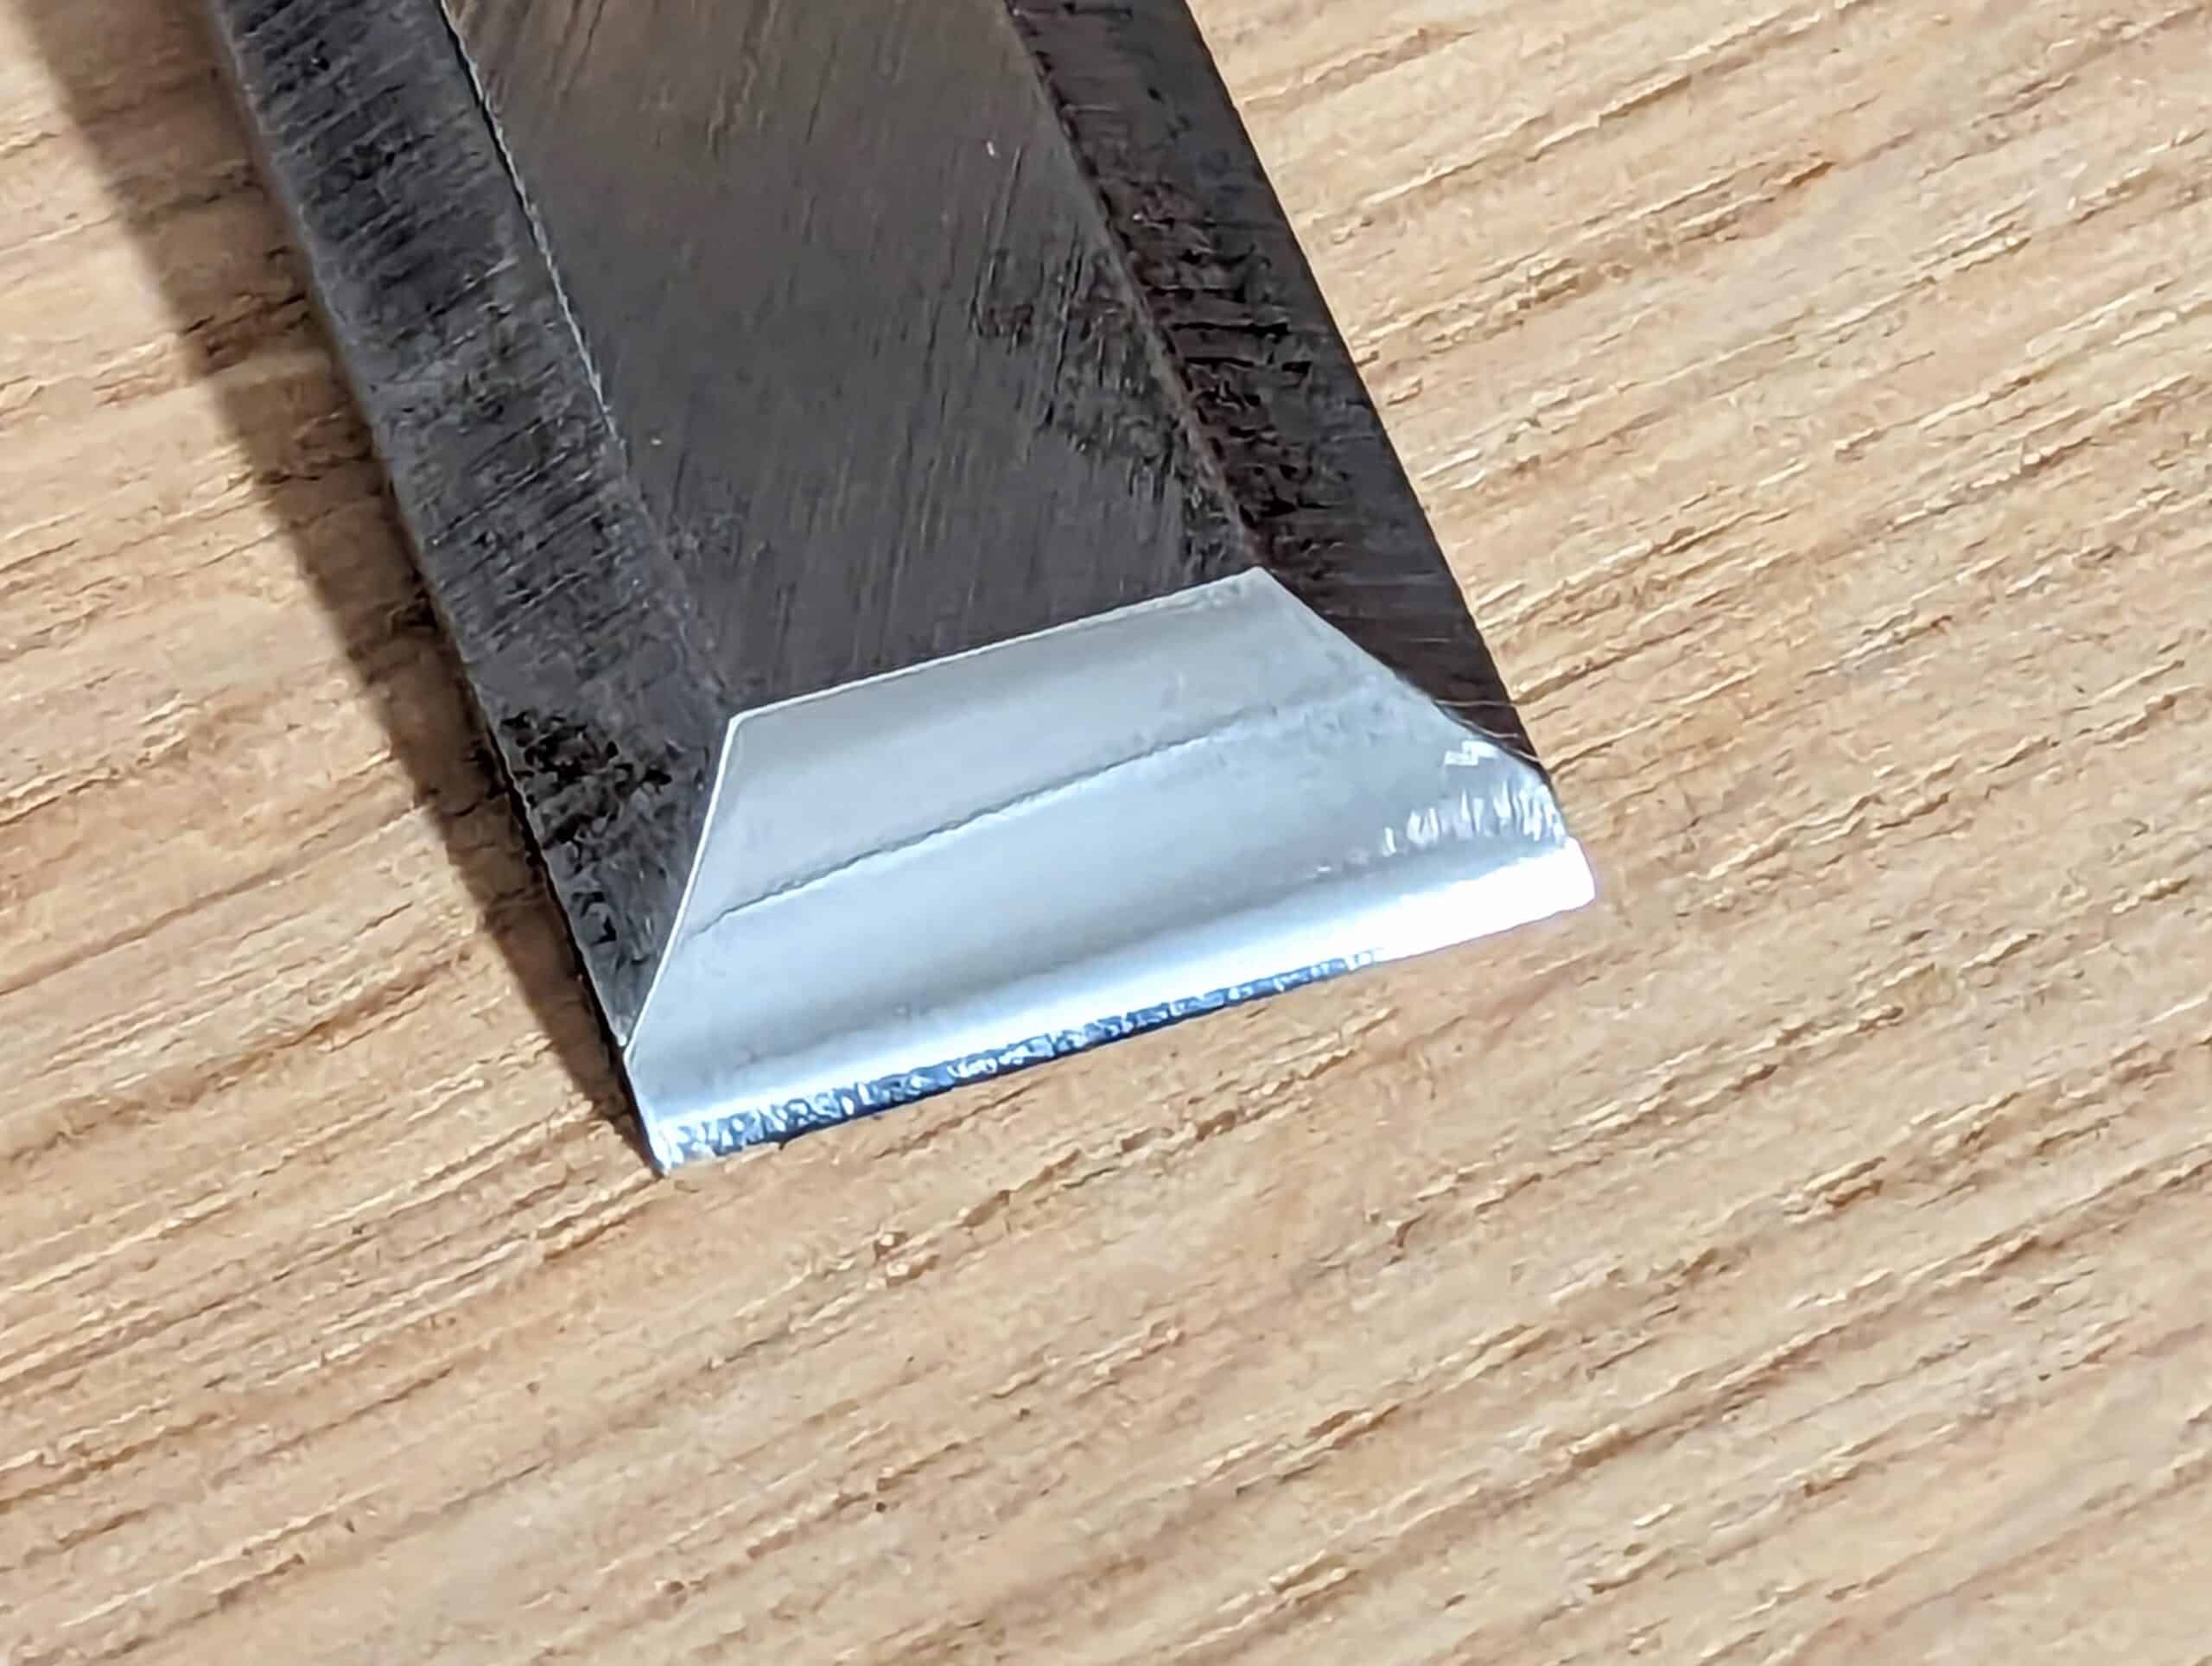
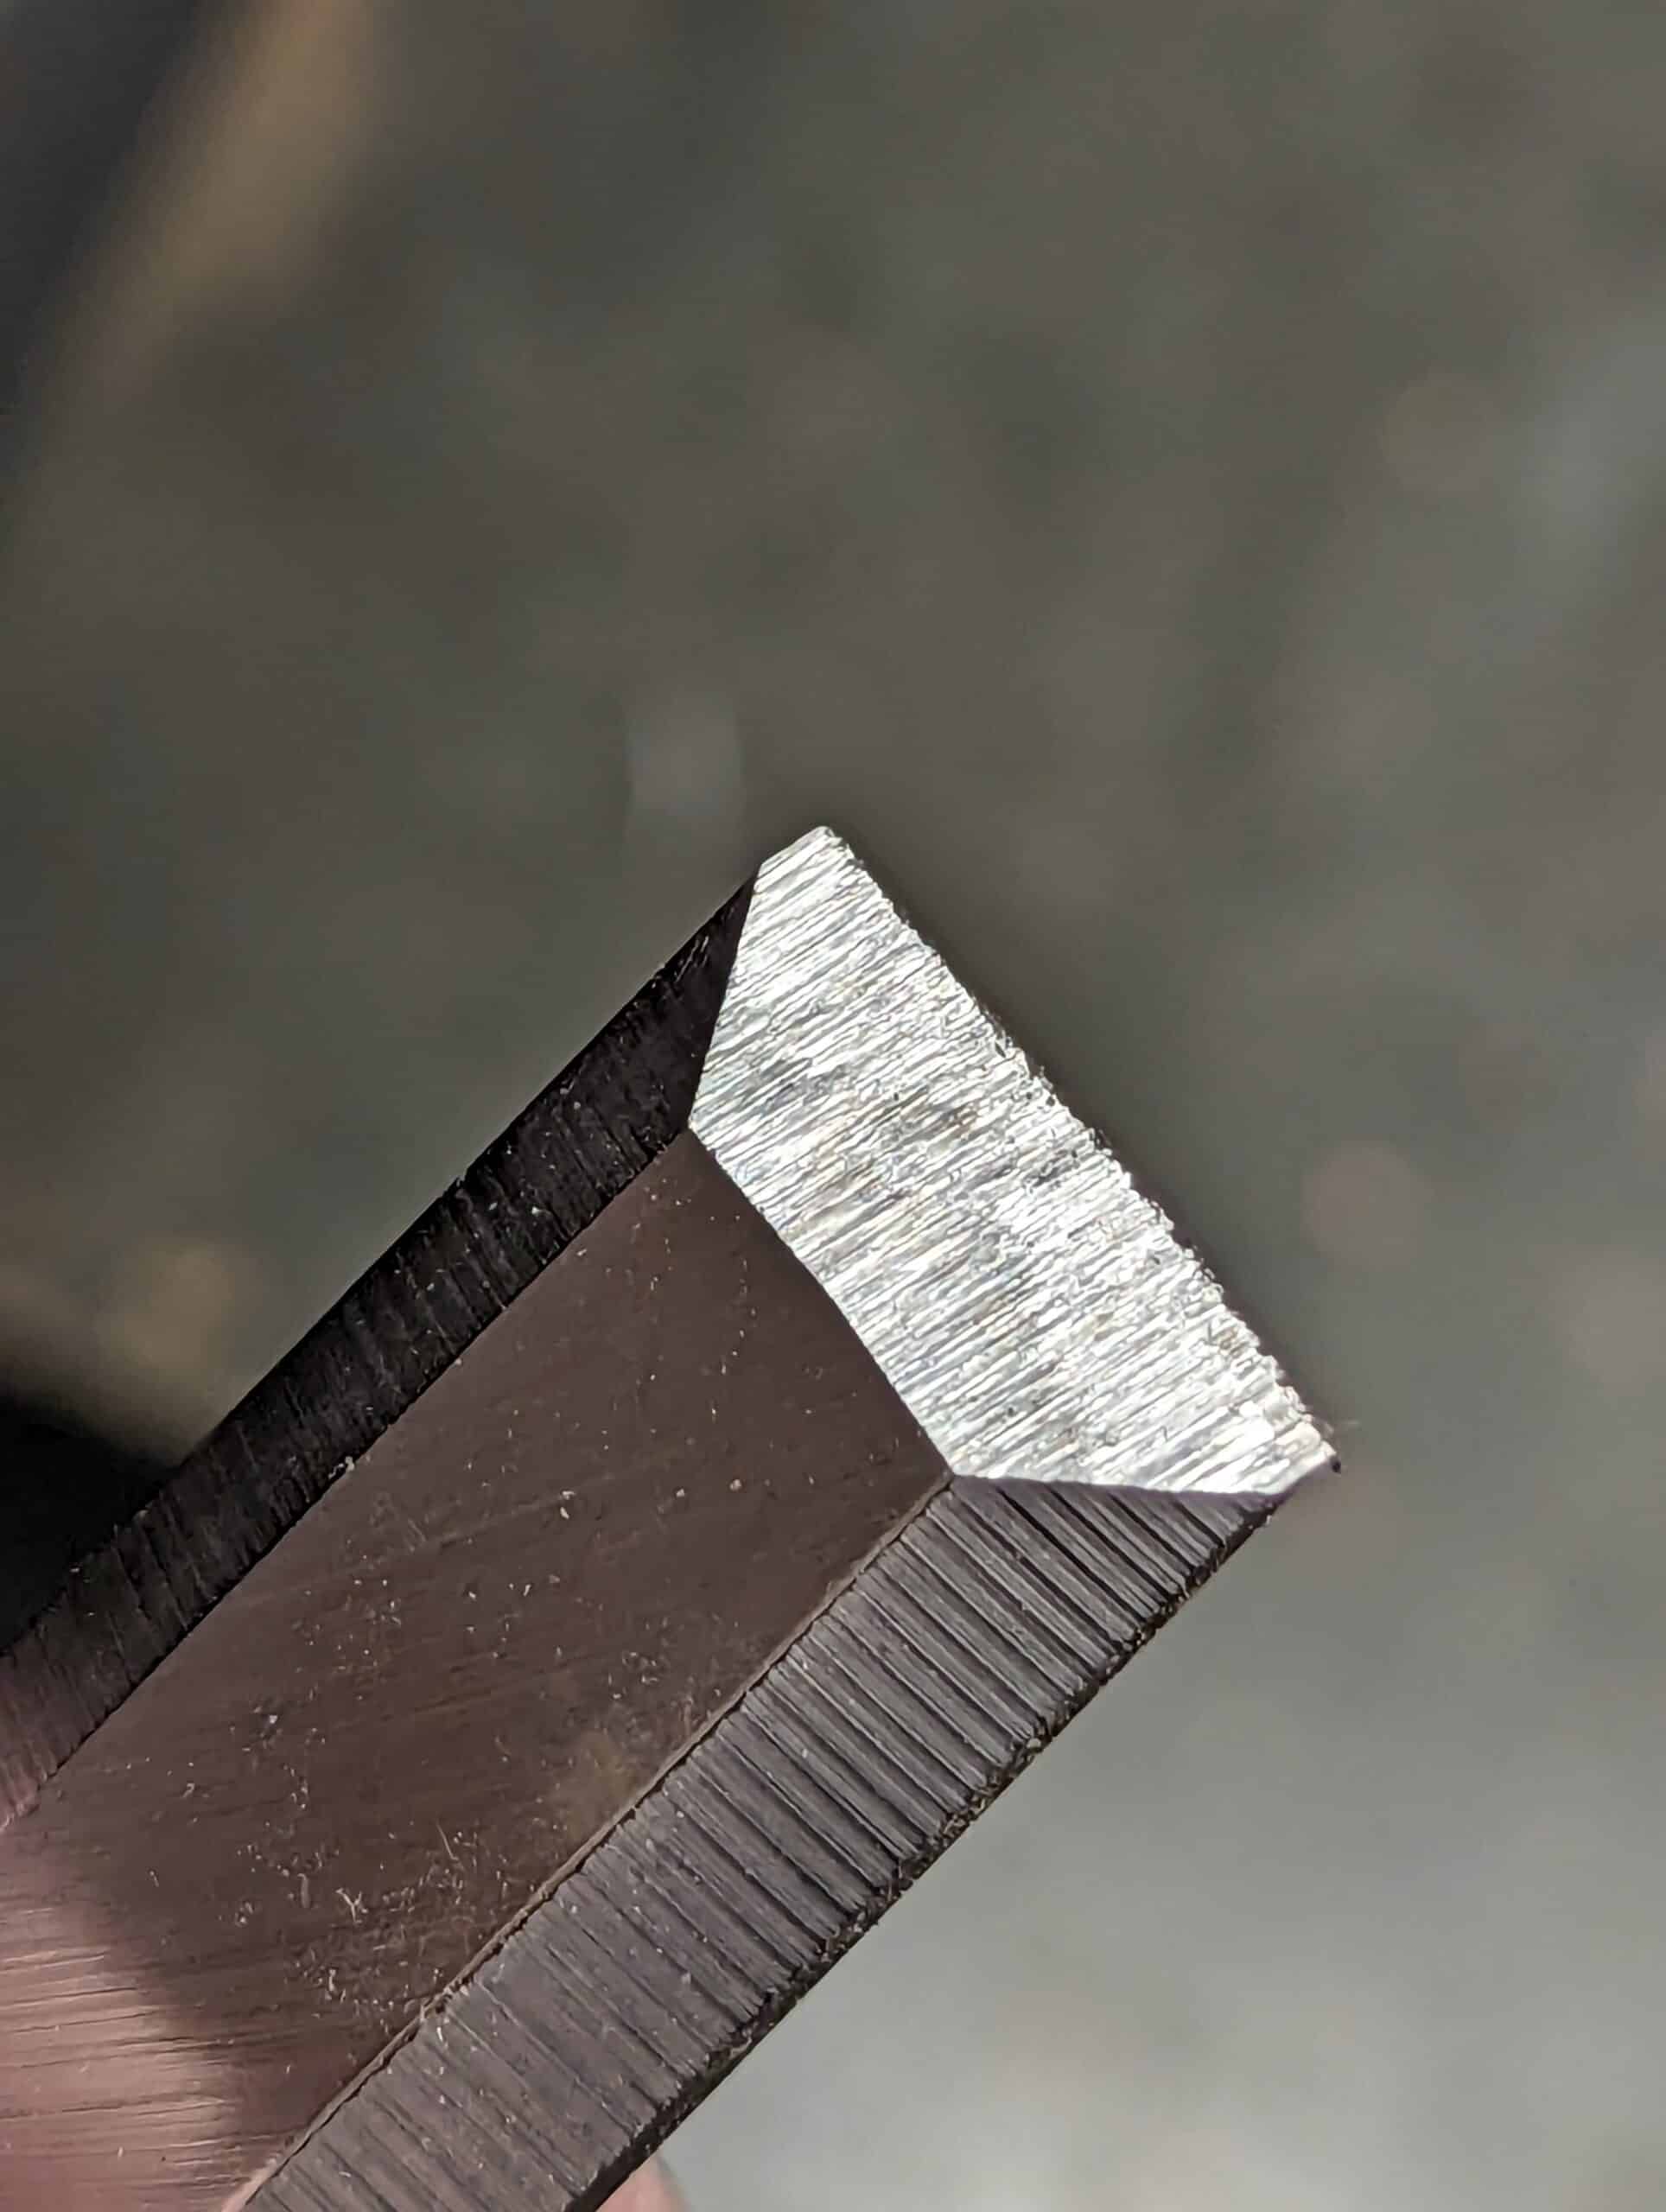
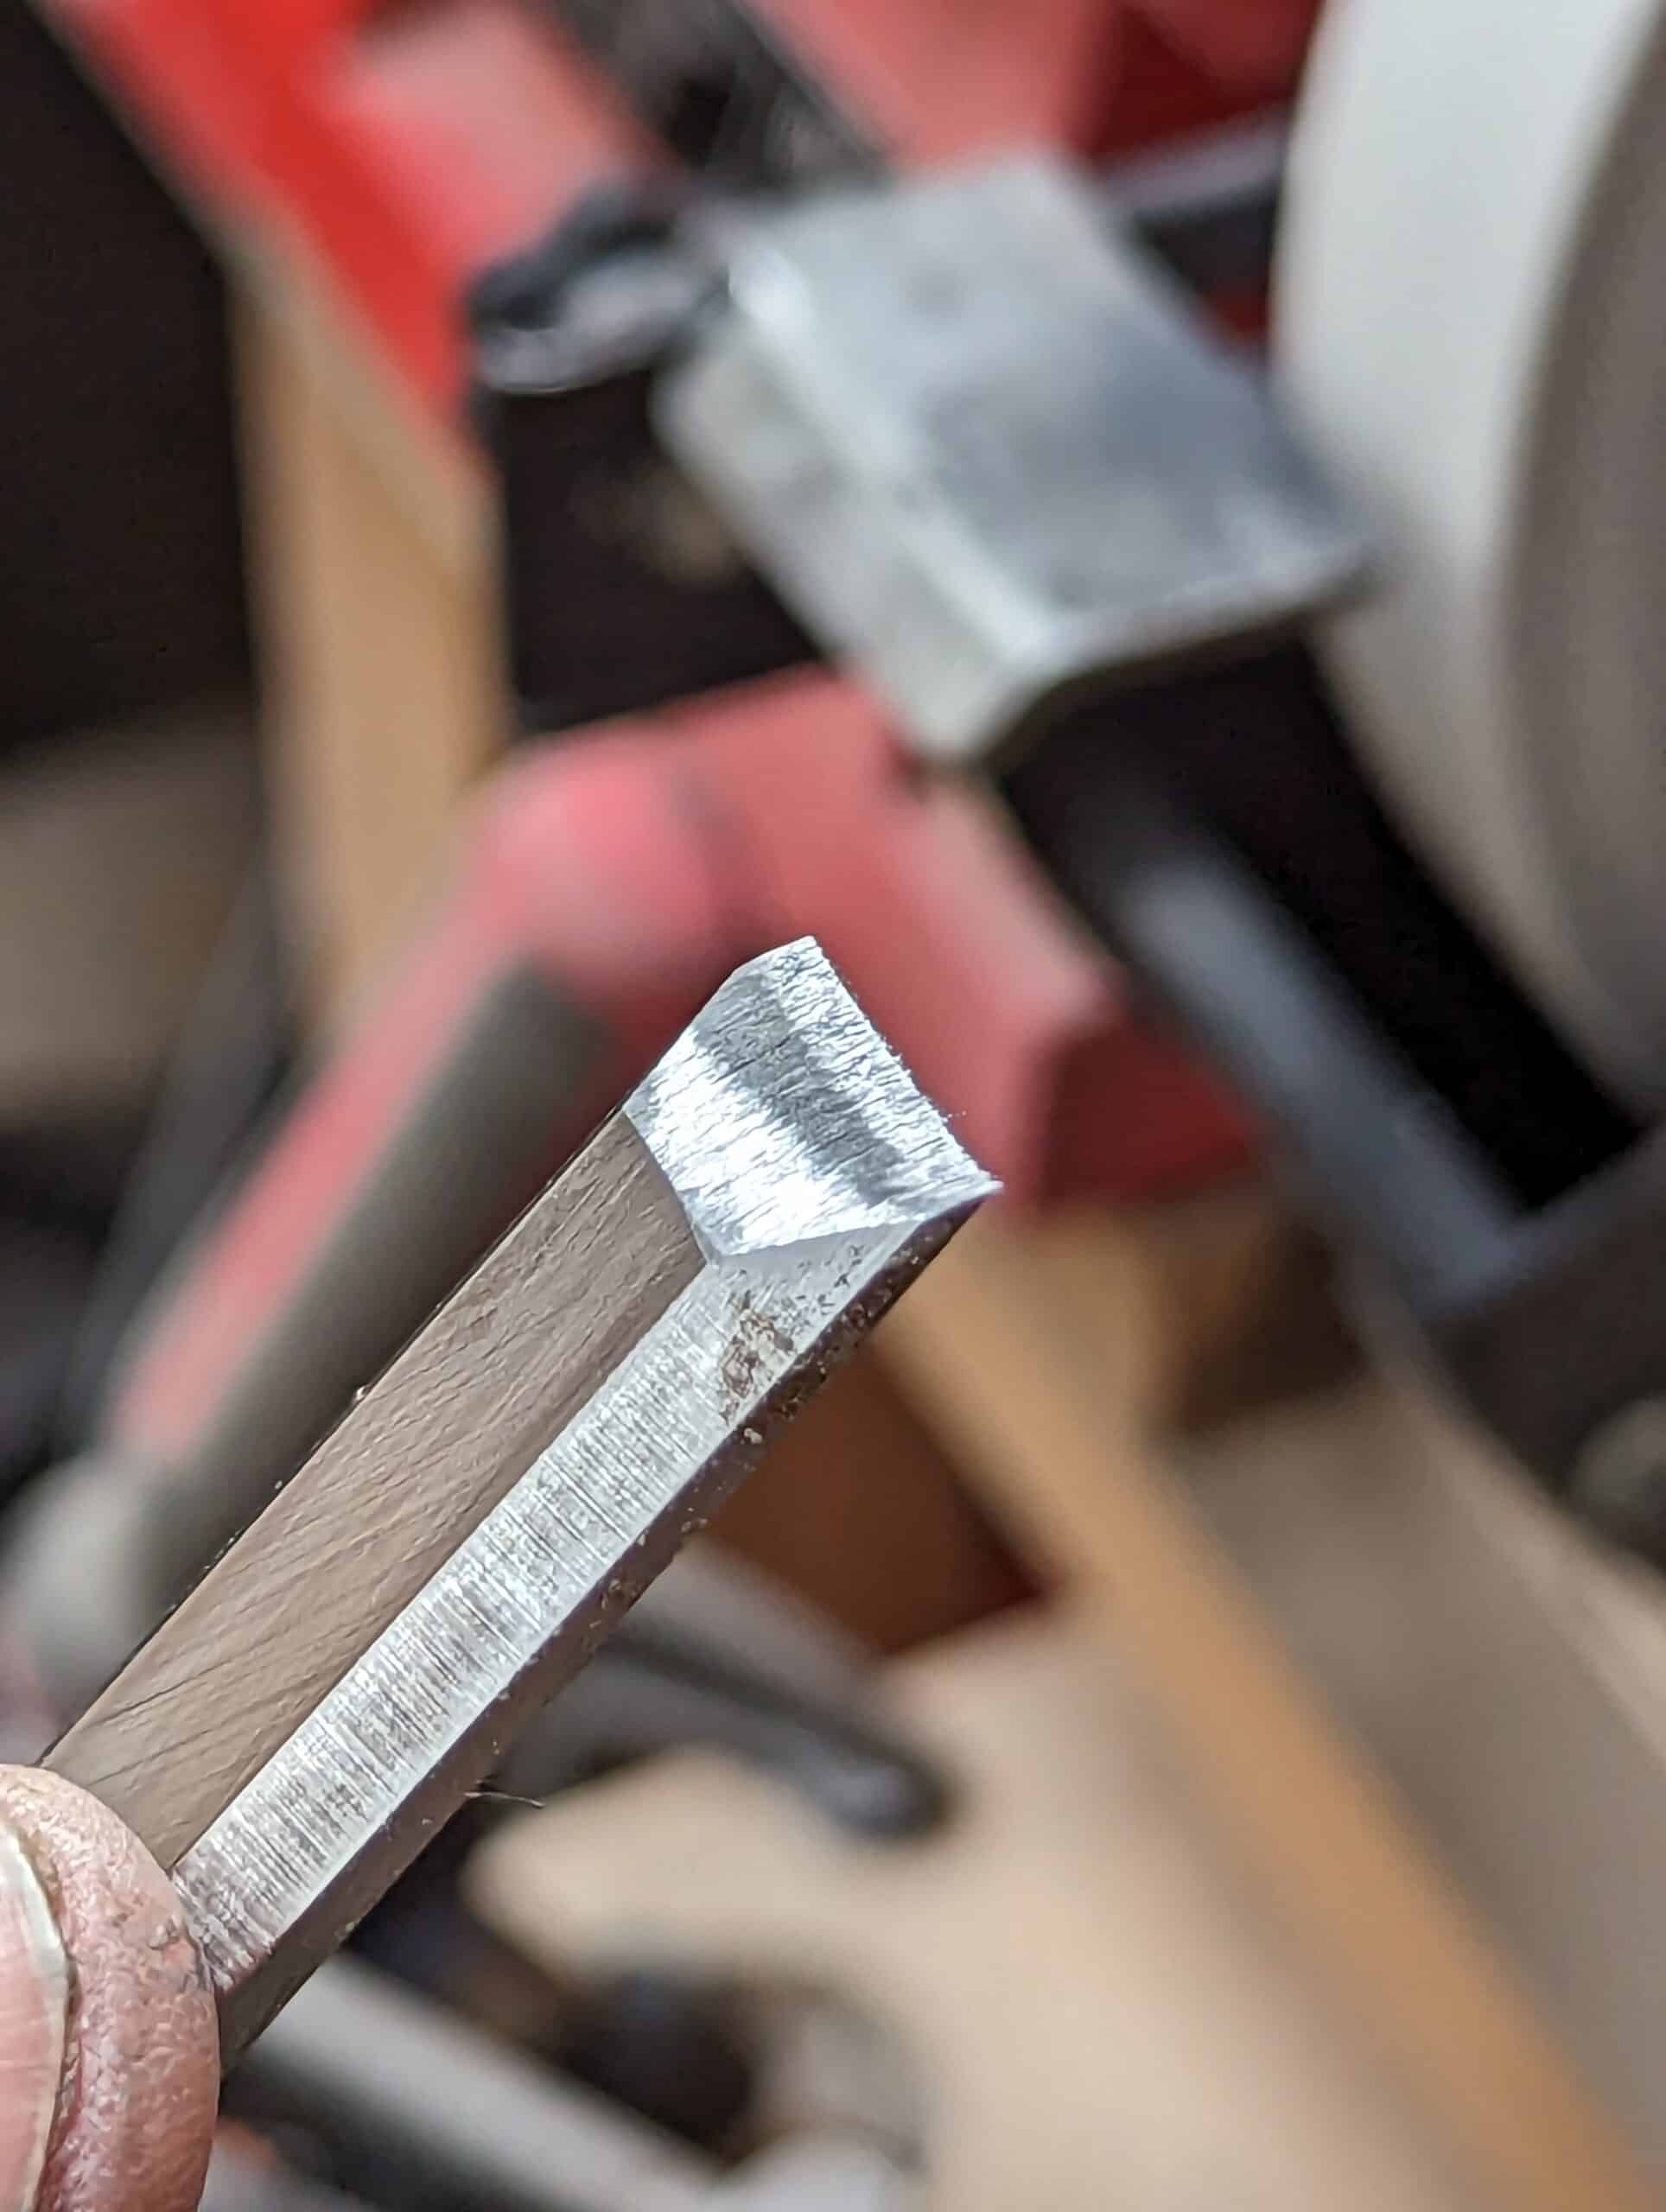
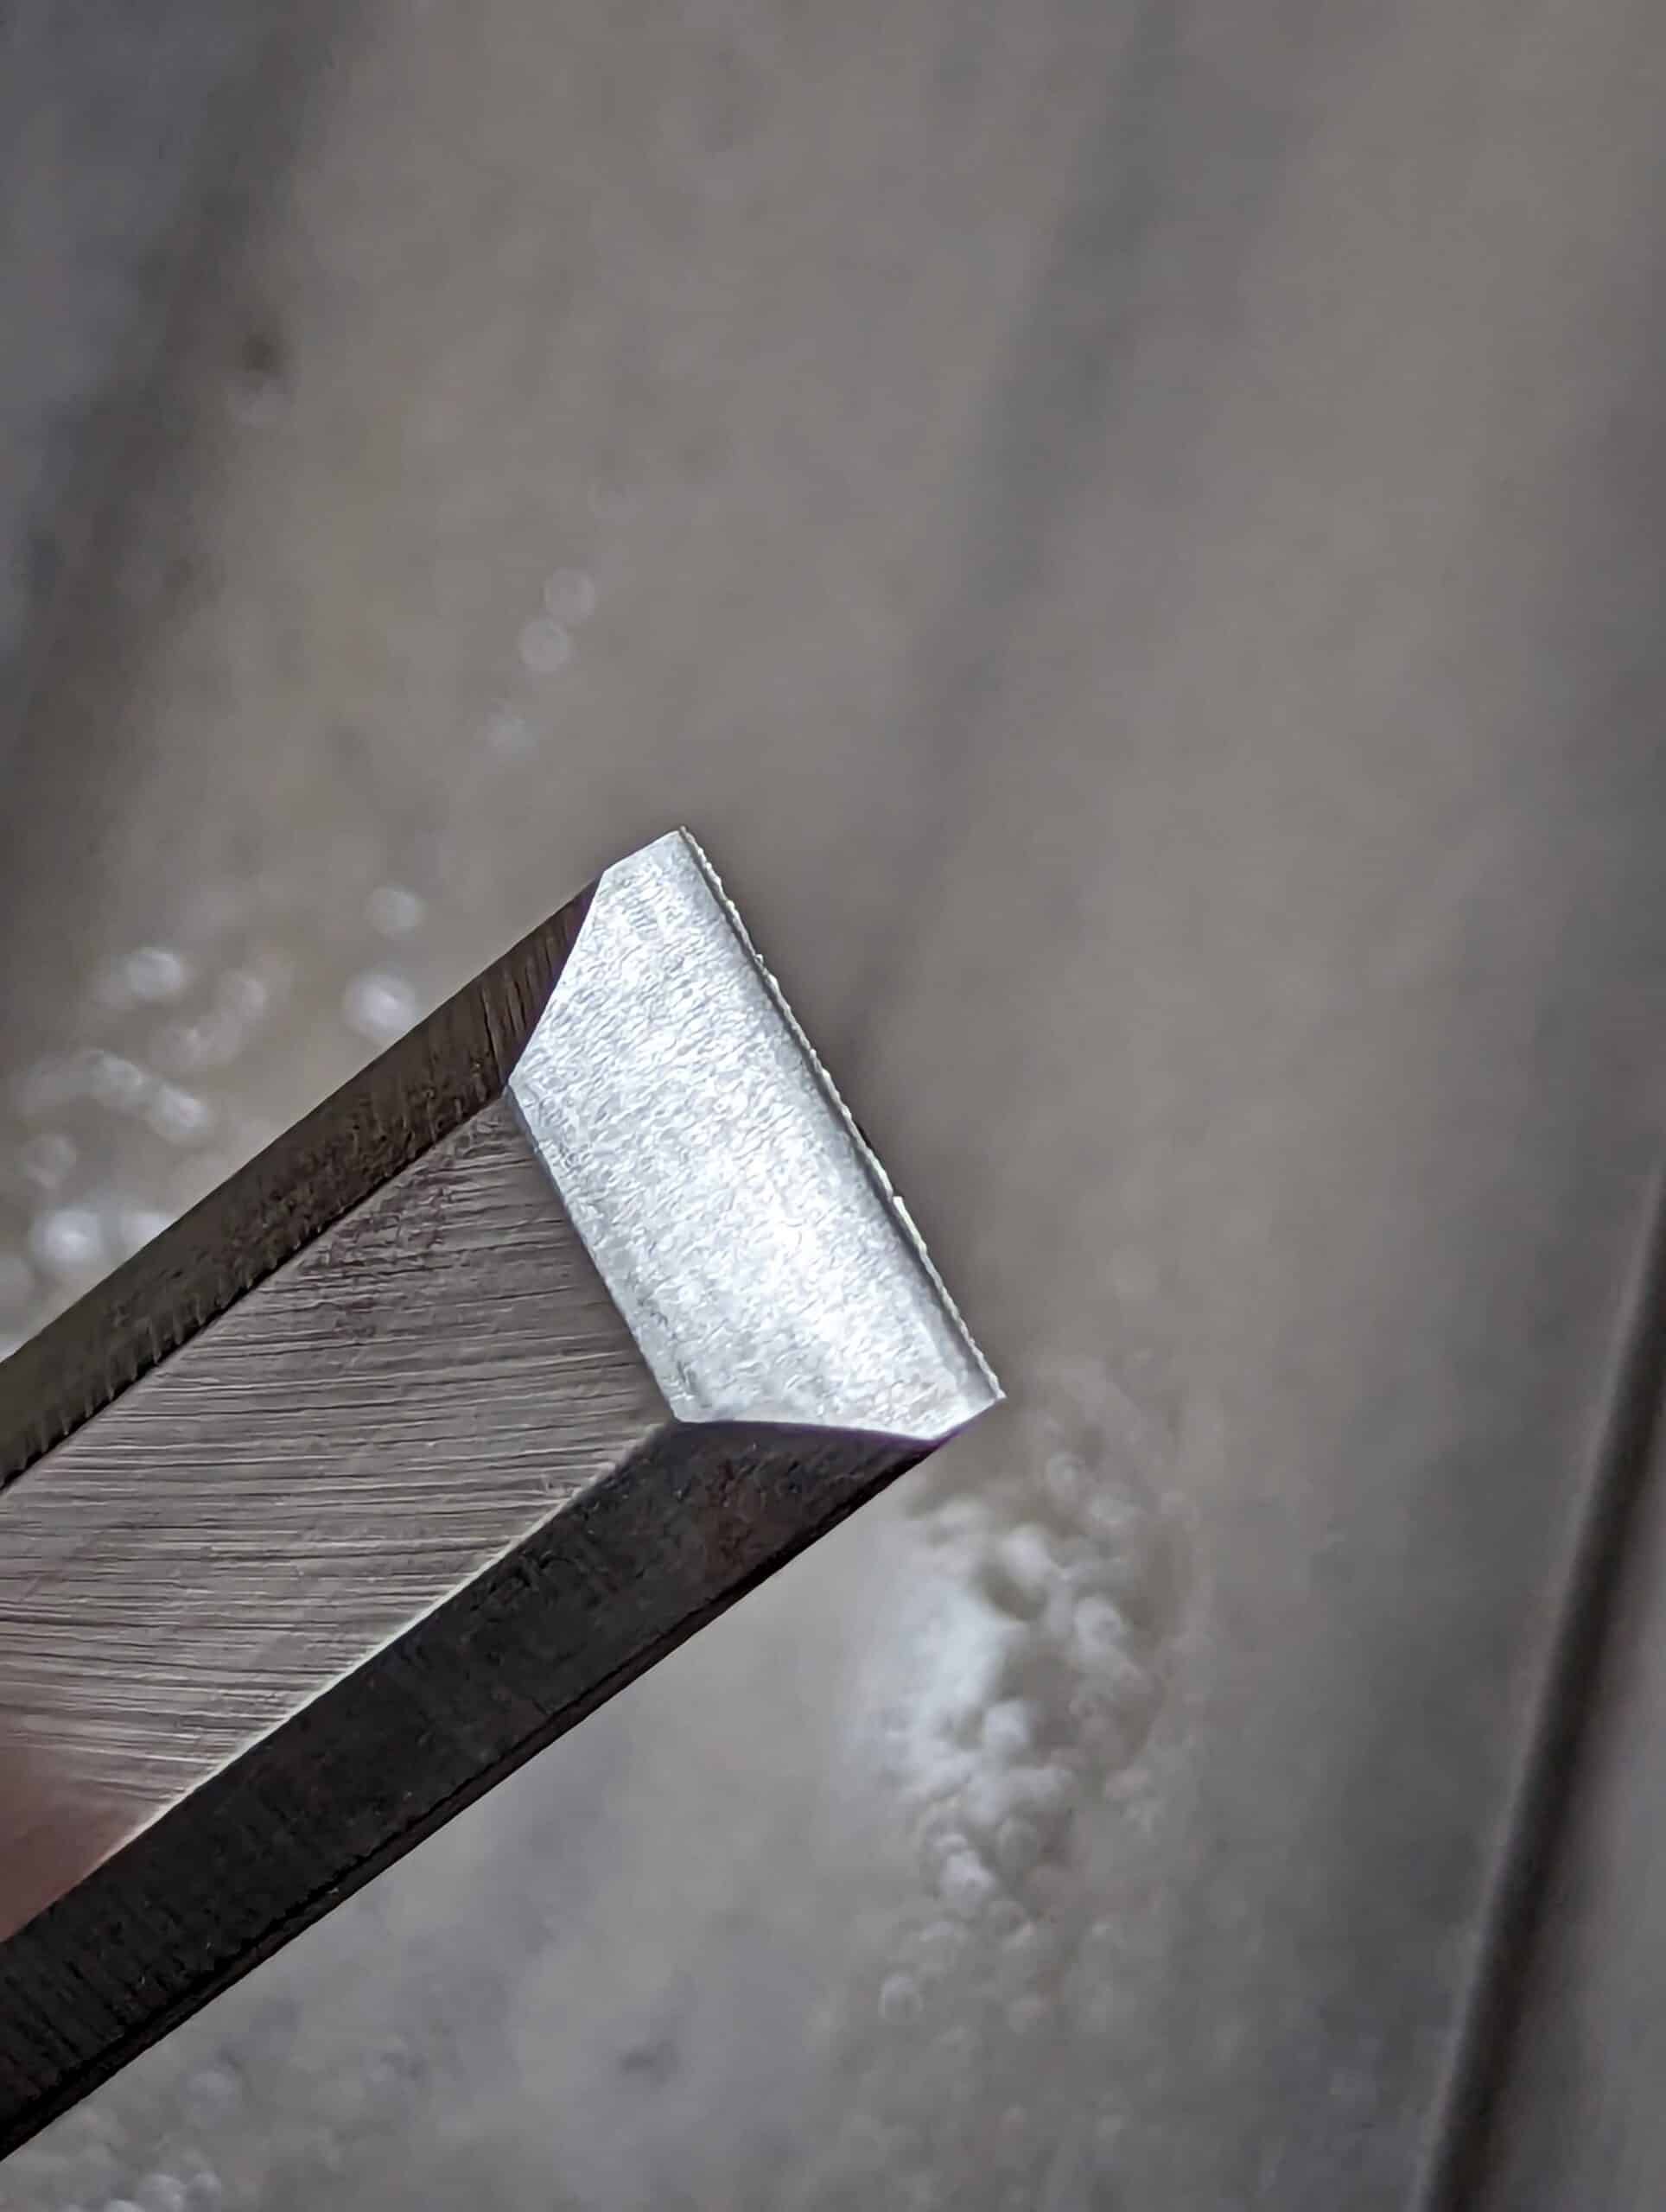
Above you will see three chisel edges. The one on the left is sharpened with a hollow grind
I think drawings show more than photographs.
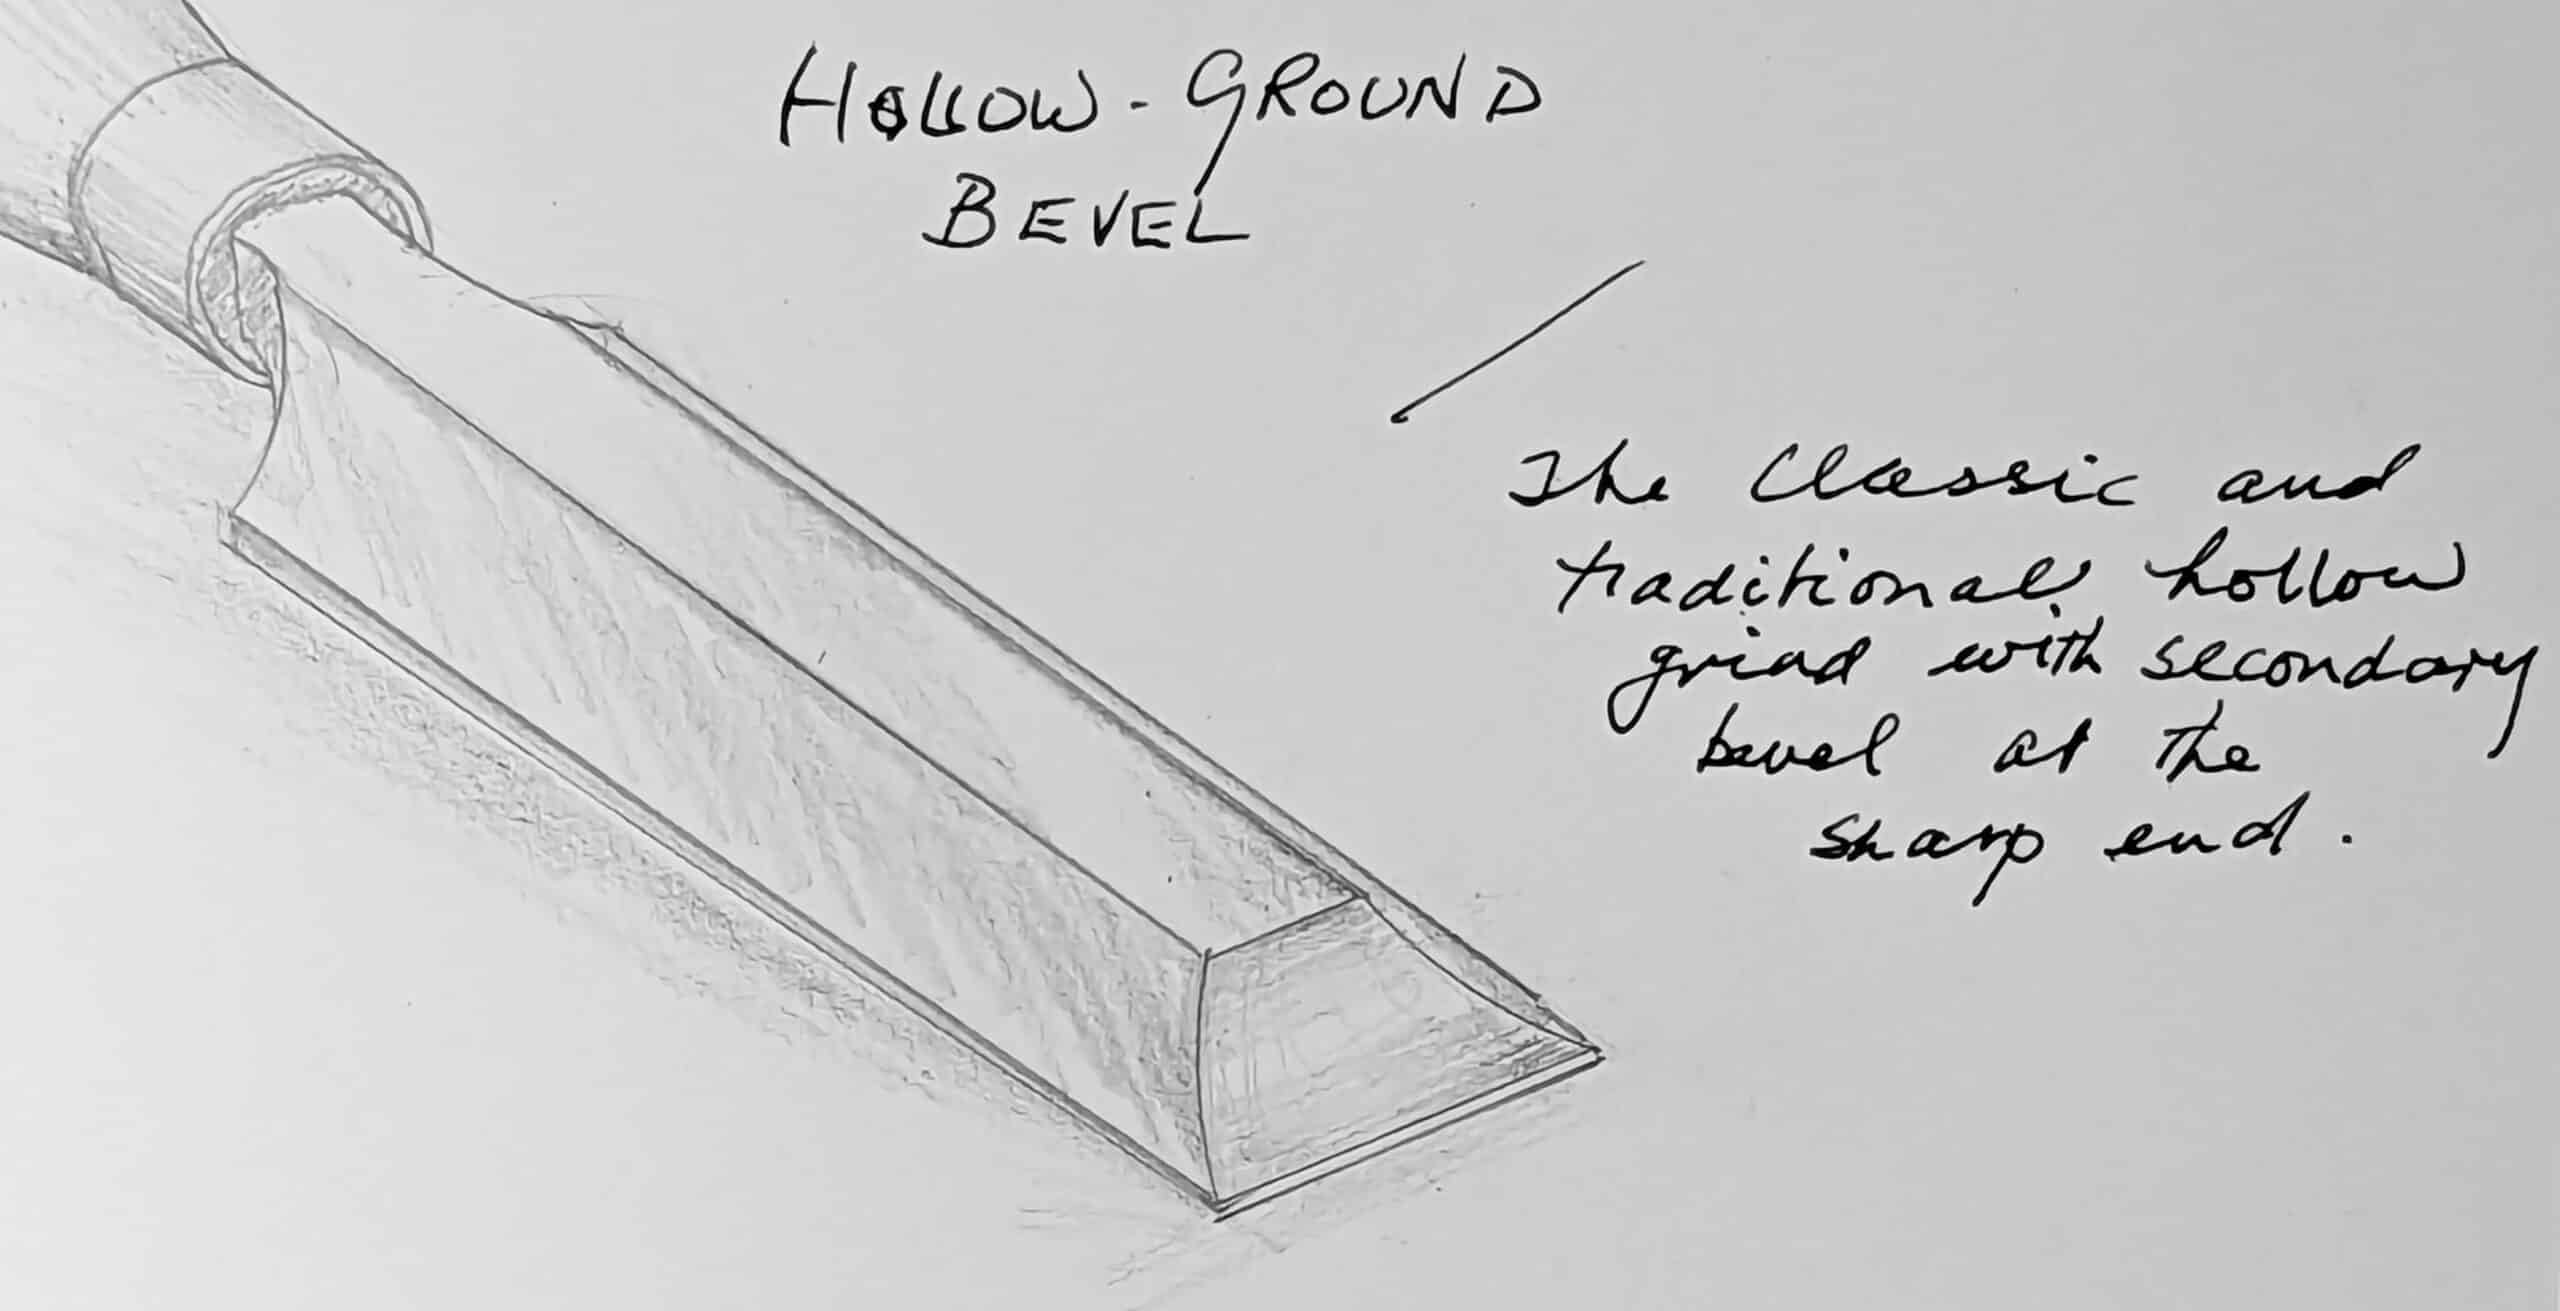
Hollow grinding goes back centuries but not all crafting artisans owned a sandstone wheel to hollow grind. Today of course almost everyone owns a grinding wheel of some kind but it is not true at all to say that grinding is the fastest option. I doubt that most people sharpening using a mechanical grinder can achieve the edge I do using a camber and hand sharpening. A chisel or plane iron takes me under a minute every time.

Some woodworkers prefer to use something renamed a micro-bevel system. Whether they grind a flat bevel as the primary bevel or a hollow bevel, the edge is strengthened using a second bevel. Some say it is faster but I very much doubt that that is true. Just installing the chisel into or onto a guide takes time and then actually grinding it accurately is time-consuming unless you are experienced but even then it takes more than a minute to do. From there you still have to hone that bevel. Whereas it is not too long, the interruption of using a grinder seems always to get in the way.

I adopted this method as an apprentice because all of the men I worked with went from dull to sharpening stone to strop and back to work. There was a grinder but it was used only if someone hit metal in the wood or perhaps a stone at the bottom of a door in for repair.
I call this the macro-camber to counter the term micro-bevel. The time it takes me to sharpen is yet to be beaten by any other method that includes a mechanical grinder but that is not really the reason I use it. Some things are just intrusive, have questionable unnecessary safety elements and are just plain slower. Of the thousands I have taught to use this method, few have ever returned to the grinding wheel even though they already own some very fancy rigs. Why? They just found that once they established the method and repeated it enough to become reasonably skilled and proficient, it was just the best method they had ever used and they felt in confident control.
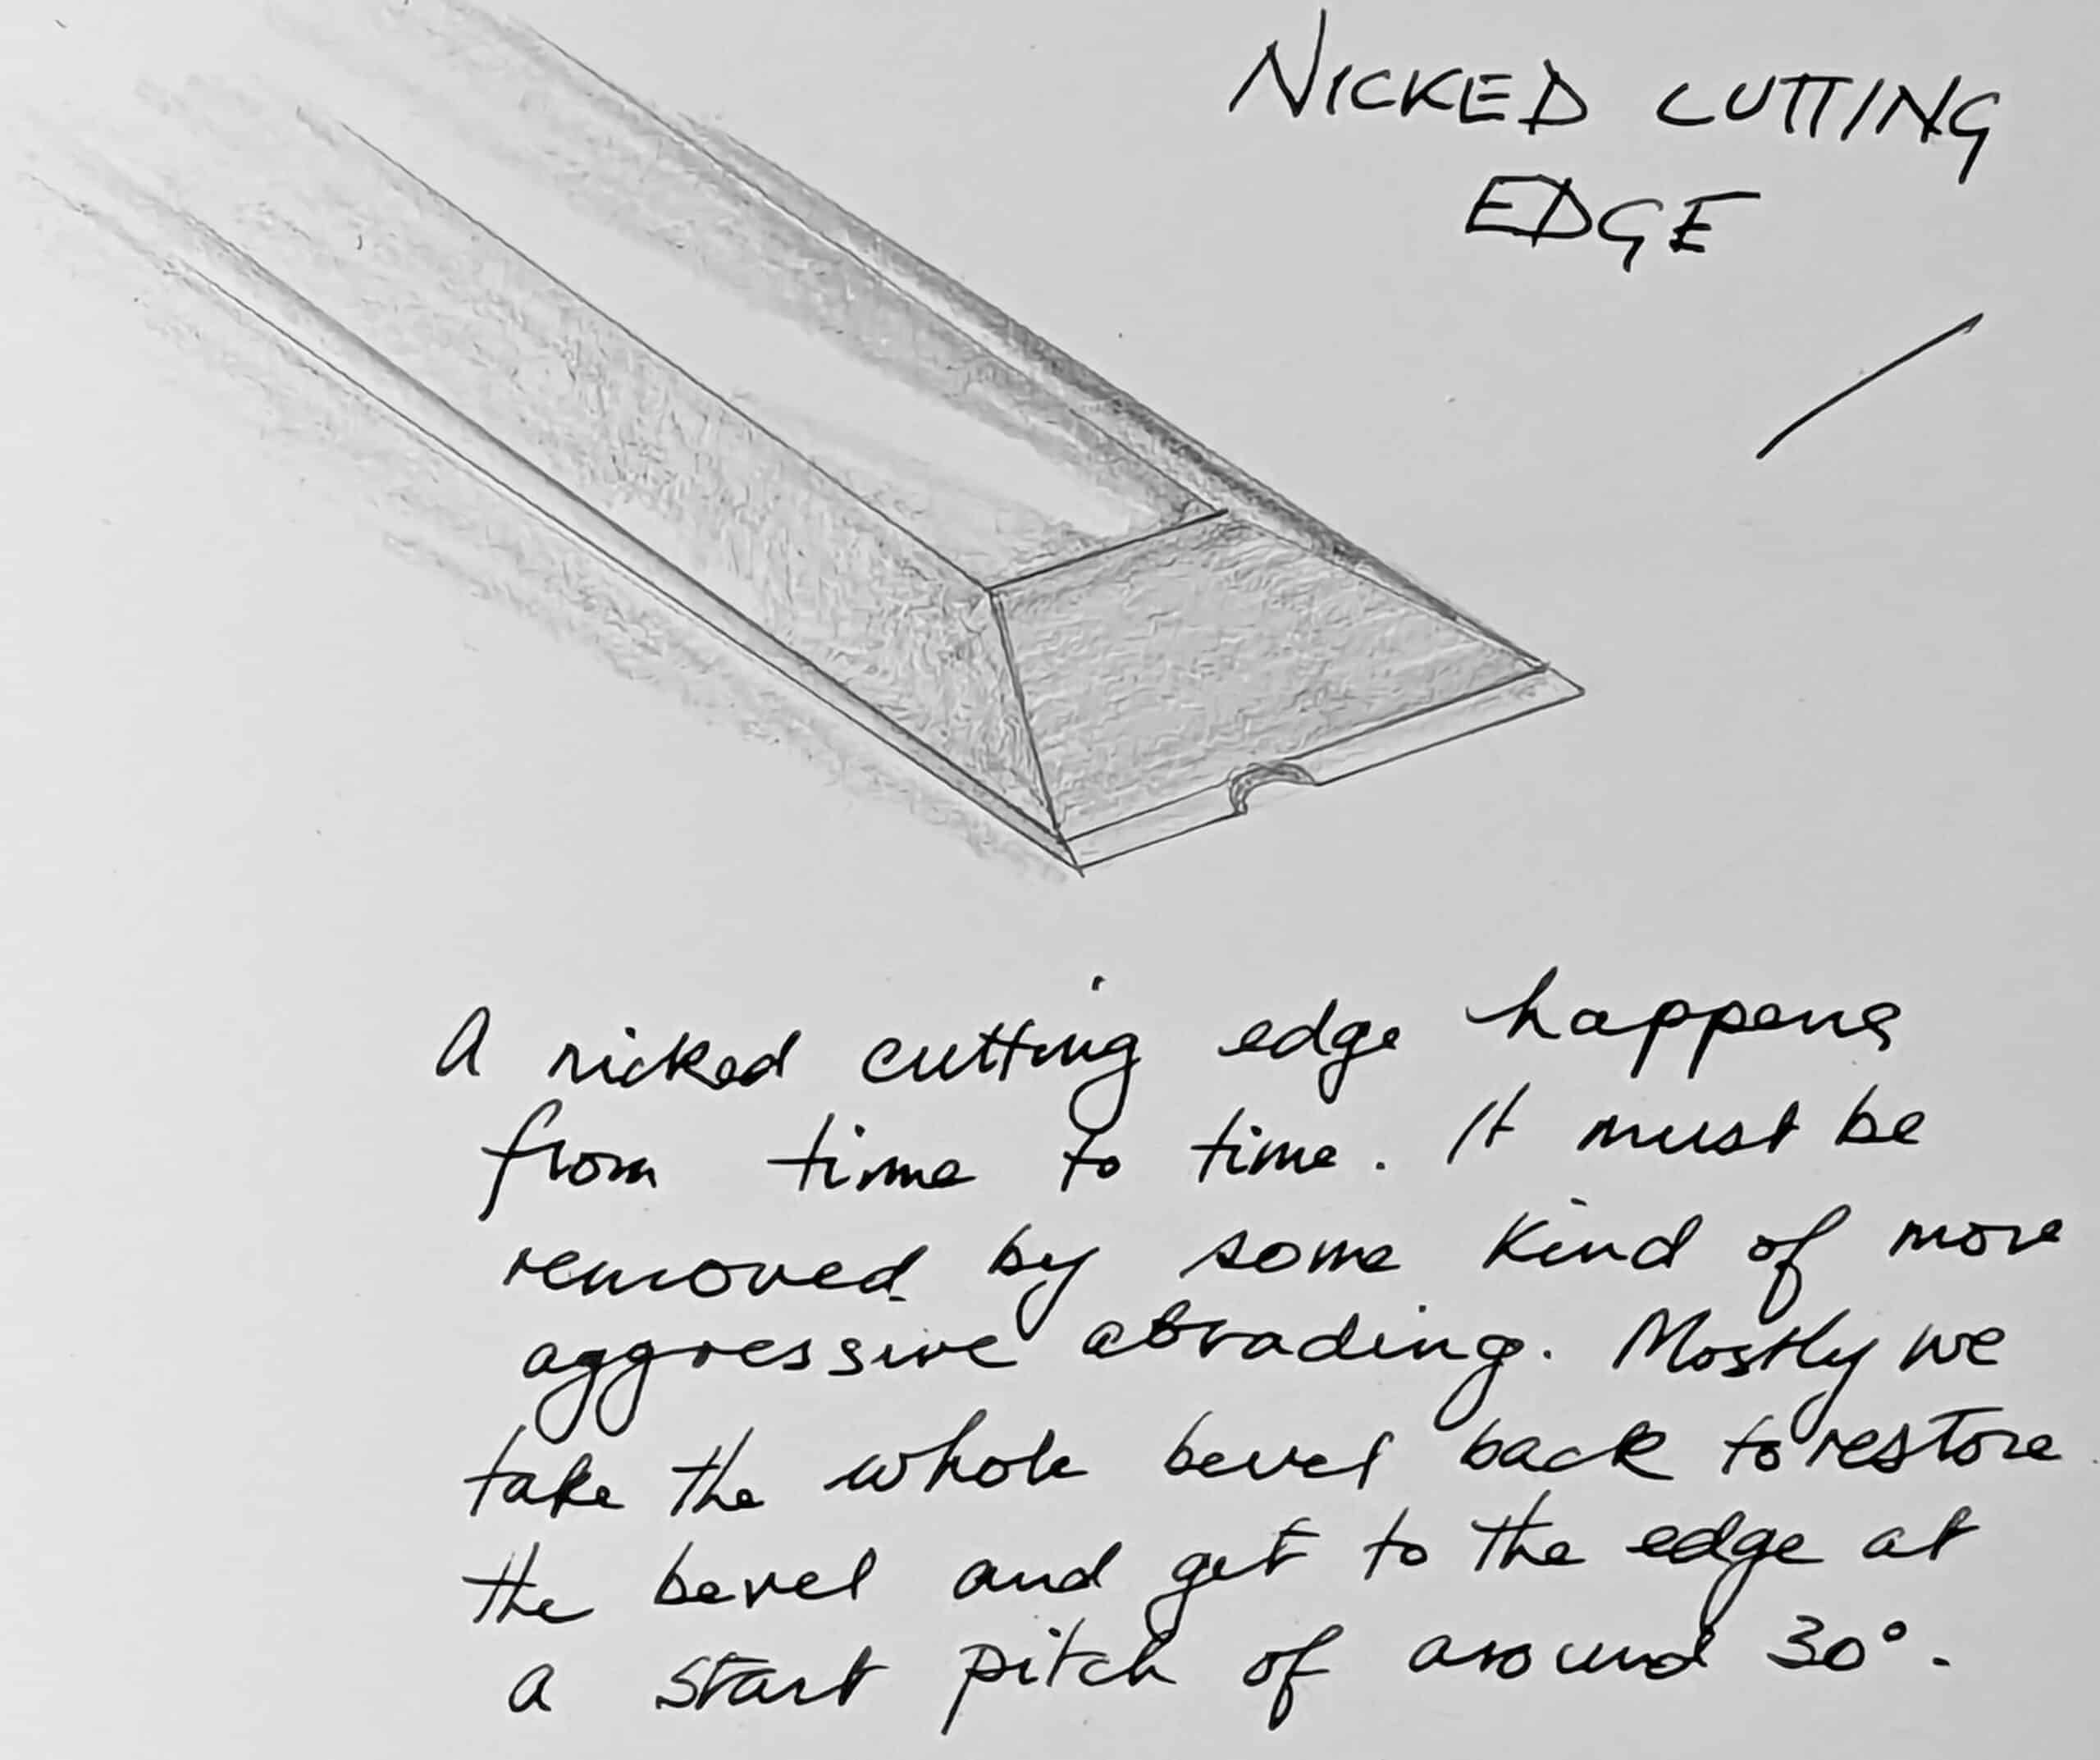
Of course, major nicks in cutting irons cause major impacts on the wood we chisel or plane. Ten strokes with a plane with a nicked iron will leave a surface like a shunting yard for trains. Would I use a grinding wheel in such cases? Well, here is the thing. If the iron is set for a deeper cut, hitting a nail, screw head or embedded pebble will take a bigger chunk out of the cutting edge. In that case, and with impunity, I would definitely use a grinding wheel. If the plane was set shallowly, the nick might, luckily, be very minor. In that case, I would at least try the 150-grit plate or abrasive first. if after ten or so rubs it was gone then I would go further in my refining without using the grinder.
Grinding wheels have their place. Remedial work for deep damage cuts away the excess quickly to regain the edge you need for honing. But though the grinder creates an even hollow if held steady and square, you can create a camber by offering the bevel to the wheel at near 30º and instead of staying there, slide the chisel in an upward movement and you will have q decent 30º start to the bevel and, through that upward movement, create a very nice camber.


From now on you never need to grind on a grinding wheel again and the whole sharpening process should take about one minute per chisel
When you are either creating or touching up the bevel on sharpening stones (and I’m presuming you meant sharpening stones and not planes in the caption of one of the pictures – if not, could you please educate on sharpening planes?), do you use a similar motion as you described on the grinding wheel – start at about 30 degrees and lift as you pull the tool towards you on the stone?
It auto-corrected plates to planes. So frustrating . . . bit like democracies that give the impression of fairness when it’s the majority that rule. Okay. No you simply start at about 30º and by pushing forward the extension of the arms will automatically lift the edge in the extending [process and take steel all the way to the end of the bevel at the end of the stroke.
Yes, “He’s” everywhere. I call the little rascal, “Mr. SpelCzech”, which I describe as, “He who knows better than we do what we were going to say and how it is spelt”.
The approach might vary depending on whether the plane is bevel up or down. As long as the surface of the bevel is trailing the edge, you just need a sharp edge and angle to the bevel closest to the edge that lifts the trailing bevel surface above the cut surface. Too thin can lead to chipping the edge. I sharpen bevel up planes the way Paul shows. If you wander flea markets with old tools in them, you will notice that the vast majority of chisels you see have Paul’s macrocamber. The critical angle is the tangent between the belly and the bevel surface AT the edge. Nothing behind the edge matters as long as it is not resting on the cut.
Bevel up or bevel down, the macro camber works the same.
I don’t own a grinder (strictly speaking I have a hand cranked one needing refurbishment) and hate the idea of getting one. I always go for a camber, I just find it the easiest sharpening method. Periodically, I re-flatten in the guide, because my sharpening can wander over time and I end up with either a blade that is skewed slightly (usually on a wider plane blade rather than chisel), or I feel I’ve just made the angle too steep. It’s always by feel too, I have absolutely no idea what my angle is when sharpening freehand, but I’d assume it was very close to 30 degrees. It just works. I know it works, because I know the difference when I put it to the wood and see an instant improvement. I use a 16,000 grit shapton water stone in place of the strop, but that’s cause I was given it as a gift! One of my diamond stones has begun to rust, so I’m in the market for a new one. One of my next projects will be to create a dedicated “station” for sharpening, as I don’t like the mess near the bench. I’ve been procrastinating for some time in case I decide to get any other metal working kit to house with it.
I am glad someone else has mentioned a tendency toward a skewed chisel through hand sharpening. I used to use a guide all the time but with some practice, and thankfully, I moved to hand sharpening and macro bevels to use Paul’s term. However, I have that same tendency to put a skew on my chisels. It must be a subtlety in my sharpening movement but one I still haven’t managed to correct. So every 30-40 or so sharpening out comes the guide to straighten things up again. But there is hope. I have only been hand woodworking for about 3 years so with some more practice maybe that guide will stay in the draw.
I sometimes end up with a bit of skew over time. If it isn’t too dramatic I can usually correct by hand. I also find that honing guides don’t always automatically correct skew. I do find that a honing guide can help me correct even pretty dramatic skew by constraining the degree of freedom overall so that I can really focus on getting just a bit more pressure on the high side of the skew to bring it back in. I also use a guide from time to time to true a chisel or iron back to a known angle. I’m not sure this is always necessary, but if nothing else it gives me a chance to see what angles I tend to drift to by hand over time. Day in and out though I mostly just rely on plates and strop and hands, eyes, and ears. I also find that a little (or even a lot) of skew isn’t really impactful to most tasks. If I’m doing fiddly stuff or chopping mortises I find that close to dead square can be a good thing.
Ricoh, in Paul’s videos, when he is sharpening, he tells us that he uses glass cleaner (car windscreen glass cleaner) as the diamond stones don’t rust when using that. Ever since i saw that, I (naturally) did the same, and it works. Maybe your diamond plate can yet be saved.
I use a few drops of liquid dish detergent in my spray water bottle. My plates do not rust.
Rico, you might want to try cleaning your diamond plate with some Bar Keepers Friend. Works wonders on mine.
I have good results using Comet and a nylon bristle brush on my diamond plates.
Rico, Do you use Paul’s freehand convex bevel sharpening on the Shapton? I use Paul’s method, but find that it is a bit risky on a water stone because I can gouge the stone. I’m wondering if this has been a problem for you on the Shapton?
Ed,
Yes, I use the freehand method with convex bevel. I just go a bit slower on the Shapton and haven’t had any issues. You could always just use solely a pull stroke when sharpening though it you’re concerned. The principle is still the same.
Rico
PS. Thanks to everyone suggesting the rust solutions, I’ve tried most, but I’ll look up bar keepers friend, as I’ve not tried that. I’m in a particularly rusty area of the UK!
as I commented below:
I use cheap window cleaner that contains vinegar. because it contains vinegar, it also contains a ‘buffer’ to prevent the vinegar from corroding anodised aluminium window frames. the buffer also prevents rust forming on the diamond plate. likewise with car windscreen cleaner, but it stinks and evaporates quickly so I don’t use it. special honing fluid is far too expensive
not all window cleaners work in this way but I find the cheapest ones do.my diamond plates are still clean after years of use
you can also use white vinegar to lift the rust off your diamond plate but don’t soak it, just rub it with a scouring pad
I like the camber method a lot. I find it makes sharpening easier, and it makes chisels a little more controllable when used bevel down. As with others above, I too often wind up with skews on my chisels and planes. I’ve realized I can get along perfectly well with slightly skewed edges, but it is necessary to eventually have to square them up. The only real problem I have with camber sharpening is that I find myself unconsciously raising the chisel or plane to ensure I actually reach the edge, and that of course just makes the angle larger and larger until the tool no longer cuts. And then I need to grind. It takes deliberate self-restraint not to keep tipping the blade up.
A few years ago, Paul did a couple posts on sharpening stones, especially well-worn stones that had been hollowed out over time. This was in reaction to the obsession in the sharpening literature that insisted all sharpening stones had to be perfectly flat. Hollowed stones will naturally create cambered edges. He was going to test them to see how well they did. Did that happen, and if so what were the results?
To be honest always when I try sharpening my chisels free hand I get to a cumber edge.
So what I am trying to say is that I do not need grinder at all.
There was a knife maker, James Batson I think, here in the US that used to say that the knife edge should look like an apple seed. I did the same think when I was forging axes. that bit of roundness works great.
Paul where can I get a hold of your book essential woodworking handtools, as Amazon and E-Bay have prices upto a £1000.00. Way out of my price range.
Nik – this is the genuine seller, £35
https://rokesmith.com/shop/
Enjoy. I’ve got a copy and it’s wonderful.
Nik Cheeseman
Buy from here as recommended on Paul’s Website
https://rokesmith.com/product/essential-woodworking-hand-tools-book/
£35 +vat or £50+ vat if you want the dvds that go with it. I bought my book and dvds from there and received very good service.
Hi Nik, I bought mine directly from Paul’s business which was at the normal price not the Amazon seller price. Probably best to email them directly from the ‘other’ section of the website which shows an illustration of the book. I can’t remember now how I got mine (a little while ago), but it was a simple and easy process.
You should buy the book directly from Paul.
We only sell my book directly from Rokesmith.com
I think you are saying is Grinding leaves a concave edge. You are suggesting a convex edge.
Yes. I think people unquestioningly follow more bijou woodworking these days. And many influencers copy a video put out the day before by another influencer who copied another video presenter who…….
” … and unto the seventh generation they will be cursed … “?
…and your Publisher’s site is where I bought the book after I read this post 🙂
I’m enjoying stumbling about cleaning and setting up a No5 Bailey I found on eBay to prep some yellow pine for a workbench. My goal is to do my best in following along with your first workbench video series and make my first workbench.
It’s going to go quite wrong, but I’m looking forward to working through the mistakes.
Thank you for your generosity.
I tried your macro-camber method, and it works wonderfully. I feel liberated! Thank you for keeping the knowledge of the masters of old alive for the next generation. From what I could see after a dozen sharpenings of various irons, it has all the so-called benefits of a secondary or micro-bevel method with none of the liabilities. No need for a grinder to re-establish a primary bevel after the secondary grows too long, as the major part of the sharpening stroke is to maintain the single macro-cambered relief bevel, while only the beginning of the stroke sharpens the cutting edge. And the cutting edge itself is even narrower than a micro bevel, so it is just as fast, or faster, to sharpen. Moreover, because the cutting edge is so small and sweeps into a camber immediately, I found that I don’t have to worry about needing the muscle memory to be able to hold the iron freehand at the same 30-ish degree angle consistently to avoid blunting the edge. Varying the angle a couple of degrees each time doesn’t matter because a completely new cutting edge is created with each sharpening, so it appears. I just have one question: When I eventually, after many, many sharpenings, have to use a honing guide to knock down the steepening camber, as you advise, do I set it at 30 degrees, 25 degrees, or something in between? And do I grind an entirely new flat bevel at 25, 30 or whatever degrees and start the macro-camber process all over again?
My experience has been the same as yours. I hand sharpen, but from time to time I use a guide to reset things. I’m not particular about the precise angle in most cases and just look to land somewhere in the 25-30% range. There are a couple of exceptions to this. I have a couple of chisels I mostly use for fine paring and I tend more toward 25% for these and a few that tend to mostly chop mortises and tend a bit more toward 30% on these. I’m not particularly scientific. If I’m chopping mortise after mortise on a big project I tend to err toward a bigger angle with an exaggerated camber as I re-sharpen through the job. Having a healthy camber here seems to help the chips pop and release better. I very rarely use a grinder or belt sander- generally this is when there is damage or some sort. Both of these can lead to grief with a slip but after a bit of practice I’m pretty good at using a light touch and one of these machines can save a lot of effort if you have a big chip or such.
Absent more information about the tool or how it will be used, regrind to 25 degrees as a default. As you hone it, the camber will range from 25 at the back to 30 at the tip. Honestly I find it very hard to accurately regrind a tool by hand. At a minimum, a honing jig is needed to get the blade back to flat and square. Then you can sharpen it by hand for many many uses.
I found that dragging my smaller chisels towards me eliminates the skew or out of square I used to get. I concentrate on pulling lightly and evenly keeping in mind that it’s only a small bit of metal that is easy to put too much pressure on. If I see that one side is being abraded more than the other I concentrate on the high end for a stroke or two. It’s usually from using too much pressure from my dominant hand.
Paul, That was a great article. I have followed your method for some time now and it really works. I had a 1″ Stanley chisel that just would not sharpen and cut, I thought it was a duff chisel until I read your explanations. It turned out that I didn’t need the guides and didn’t need a grinder. The main problem was that the back of the chisel was not flat. Once I followed your advice and flattened the back, I got an edge and now there is no going back.
Like others, I occasionally end up with a slight skew but its easily remedied during sharpening by slightly more pressure on the long side.
Thanks, I owe a lot to your teachings.
I had trouble in sharpening chisels and plane blades for years. I bought all the usual jigs and sharpening stones (including the water stones) and none of these was any improvement.
Then I saw the method described in your videos, tried it, and now use no other, because your method is the quickest and most convenient, and gives a good result.
I still cannot manage the ‘one minute’ sharpening, but that is probably because it takes time to get out the diamond stone and strop, carry out the sharpening, wash off the stone, and put everything away.
So … I find the Sellers method to be a great help: many thanks!
(Question: I never see you cleaning (i.e. rinsing off) your diamond stones. Is this necessary, or can they be left as is, between sharpenings?)
Thanks again for your on-going advice to us amateurs.
Thank you, Paul.
I have been using a 300 grit Diamond stone to get my primary/Macro bevel. It seems to go fast for the first half and then forever to get it to the tip and form a burr. Any thoughts?
Also I’ve been putting a 25 degree edge on, should I go to 30 instead?
Yes, start at 30º push away at that and the front edge of the bevel will automatically to give the camber you need.
I’m privileged to own some of my great-grandfather’s planes that I believe he brought with him to the US when he emigrated from Scotland. I was refurbishing one that had long been in disuse (he died in 1950; I sadly never met him), saw the cambered profile, and assumed it had been sloppily sharpened. Now I see the error of my way, offer apologies to his memory, and will gladly return the iron to its proper profile (and no doubt improve the plane’s performance). Thank you.
Thank you for the excellent teaching and sharing your skills with us.
The technique Paul describes has worked well for me. I find you do not grind away a lot of steel so your tools last longer.
I wish I had seen this a week ago before I ordered a Tormek grinder ($$$) All my old (40 yr old) chisels look like your cambered sharps from being sharpened by hand. They cut great but I became convinced of the micro bevel idea and ordered the grinder to get my chisels back to a 25 degree primary bevel so I could “start over” Oh well. At least I will have a nice grinder for the inevitable nicks that come up from time to time.
I’m not at all sure about the reasoning there. You have perfectly sharp chisels that “cut great” but go out and spend “($$$)” on a grinder instead of $10 on a honing guide.
Good evening all,
Hope you are all well. I remember very clearly my late father method of chisel sharpening. He was a very proficient woodworker who sharpened in the camber method, sadly his tools etc were stolen many years ago but I can still remember the “roundness” and the sharpness.
My very good friend who is a professional joiner, who I owe a lot too in ways of tuition over the years will “tell me off” if I have even the slightest camber. I must say he can sharpen with a perfectly flat bevel by hand in minutes, I have tried and tried and tried, so to read this is to me a “breath of fresh air”. Thank you once again Paul.
I might not have the perfect shape on my chisels, but after watching Paul’s YouTube videos on sharpening, I do have the sharpest chisels I have ever owned. I would have said dangerously sharp, but in reality a sharp chisel is easier and safer to work with.
Also – his video about the oil-rag-can has kept them rust free – and we live near the beach.
I understand and will experiment with your “macro camber” technique. Makes sense.
But I wonder about chopping out the bottoms of dovetail pins and tails: does the added bulk and strength just behind the cutting edge make it a little more tricky to get that last little chop squarely on the “gauge line” and not get driven past it?
P.S.: love your “Essentials” book. Truly a masterpiece.
Spot on!
Except I call your “Macro Camber” a “convex bevel” – a result of working the tool hard on an oil stone and dipping slightly as you go which makes it faster, as you can put more force into it.
Hi. Is what you recommemd true for Japanese chisels. They are laminated… soft steel backing to a hard steel for sharp cutting edge. I was taught a single 30 degree bevel. Sharpening takes forever.
Yes, any chisel…all the same.
It ought not to “take forever” sharpening Japanese chisels. If anything, it ought to be quicker than their Western counterparts.
Is this because you are focussing on achieving the perfectly flat single 30 degree bevel?
You taught me this method almost 10 years ago and I’ve not needed a grinder in all those years. Over the years, I’ve adjusted your method slightly. Over time, I work the heel down so that the coarsely ground camber is more like 15 to 20 degrees. I don’t have a secondary bevel, but only the tip will be at my working angle, 25-35 degrees depending upon the task. I find keeping that heel down near 15 degrees lets me adjust the working angle more quickly if I need to adjust for any given task. If you look at my bevel, it has coarse scratches from the heel to maybe 1/2 to 1/3 of the way down and then transitions to the polished edge. It’s all one continuous camber, but I suppose I view it as a constantly emerging or evolving edge that, over the years, creeps down the shaft. Probably 99% of this is exactly as you taught us, but my sense is that my heel is at a lower angle. I will often do a couple of quick touchups biased towards the tip and, for these, I can go right to my finest stone and in 10 seconds be ready for a couple swipes on the strop. Too much of this makes a thick edge, so one must be sensible about it. I’m not suggesting anyone else do this, but it was has emerged for me over the years.
Paul, is there much new in this book compared to working wood 1&2?
I think I commented on this some years back but I found it astonishing how really sharp tools make everything so much easier and controllable. I remember at school how we struggled hopelessly with blunt equipment and became convinced it was a skill level beyond us that we could never master. As a result we dropped woodworking as soon as possible and concentrated on other subjects and went into academic careers. No regrets there, but I think a world of other achievement potential passed us by.
did you never hear of a water stone,
I did. But diamonds are a man’s best friend. Last for years yet stay dead flat and hardly wear at all, cut steel super-fast and have sharpened hand tools every day for 58 years to date and I KNOW WHAT I WANT!
Hi Paul. I want to thank you for all of your videos and blogs on sharpening. i began purchasing expensive sharpening machines and guides when I started woodworking in order to counter a lack of skill. i didnt believe i could ever develop the control necessary to sharpen freehand. I havent used any epuipmwnt other than stones and strops in years now. every edge tool has a macro camber. thx for imparting your wisdom and hard won experience!
I love it when you reference your years and years of experience to silence those who say that you can only get quality results by doing things a particular way. At this point in my life I am limited to using only hand tools. That being the case, I really take what you say to heart. For me, you keep hand tool woodworking within my grasp. I’ve learned from you that I can achieve high levels of quality with a few modest, well used, hand tools. Thank you Paul.
Well, 35 years ago when I first started in on the American show circuit they just plain laughed at me when I pulled out a gent’s saw to cut a dovetail or a Stanley #4 instead of a fancy $250 dollar new one to plane my wood. Ten years on, with due diligence on my part, the aisles were packed and instead of laughing they were cheering. Another ten years and we are training hundreds of thousands every single month and they believe that they can do it too. How about that! No one’s laughing now.
It’s the same in the music business. They say it usually takes about fifteen years to become an “Overnight Success”.
Thank you Paul for sharing your freehand sharpening method. The camber is so easy to achieve and maintain. For anyone in doubt, give it a try.
I agree with your insights 100%. a camber not only makes for a stronger edge, it also helps when paring as you can ‘ride the bevel’ when you need to make a very thin cut
however, if I need to establish a new edge on a chisel or plane I’ve picked up at a flea market, I’ll use the grinder *very* carefully, get out the honing guide and establish a 30/25 degree bevel, and then create the camber… after that it’s hand sharpening – so much faster than using a guide. of course it all takes practice – nobody except the people selling expensive machines will claim that it’s easy and/or simple
I have a question: I have a pal who’s in his late 70s who was a chippy all his life. he sharpens on an oilstone and doesn’t strop at all, and his edges aren’t as sharp as mine. the question is: are our edges sharper in general because of the stones we have available? arkansas stones and japanese water stones are expensive but modern diamond plates are much cheaper in the long run… do we use better sharpening kit because of the lower prices?
You are saying your friend was a chippy and I assume that is your word for a carpenter as this seems top be a common US term for carpenter but not for a furniture maker. I think as a joiner and involved in some carpentry too I have different levels of sharpness mostly because sharpening on the job in a house, office or on site there is no ‘proper’ workbench with the solidity of a vise in it. The pulls and pushes involved in sharpening and stropping are quite high so there would be a tendency to sharpen to a much lesser degree. Stropping to may well be different. Some levels of woodworking, carpentry and joinery included, require stropping to break the wire edge of the burr we create in sharpening. It needs nothing more. Again, the level of sharpness by degrees is much less. So the strop remains unchargewd with buffing compound.
Years ago I was told by an old-timer that stropping a razor creates a cambered edge that holds up better than a flat bevel.
Thank you Paul,
I am just beginning to set up a small work shop area in my garage. I am very much the novice woodworker. I have been watching a number of your videos from building projects to taking care of tools. I just pulled out the old chisels that were tossed into a tool box and examined them. Some show some very bad damage on them and others just no sharp edge. I followed your instructions with my wet stones, and am very pleased with the results. I believe I have produced a good camber edge and look forward to using them on future projects.
I don’t believe that a curved bevel is very satisfactory. As one sharpens the edge the bevel becomes steeper. Moreover one would never actually know the angle of the cutting edge. The hollow ground chisel on a 6” wheel is seriously hollowed and I think leaves a weak edge. I hollow grind and then immediately hone to 25deg. Because the edge is fairly narrow continuing to use the stone at 25 deg is without undue effort. When the hollow has disappeared because the edge and the top have been honed away on the stone I then start a secondary bevel.
Have you ever used a powered belt grinder sharpener on your chisels or planes? I use diamond stones, with and without a guide with lapping fluids along with a leather strop. However, I have a Work Sharp Ken Onion edition knife sharpener with the grinder attachment and a Chinese made belt sander I got on Amazon that was 1/3 the cost of the WS system that uses the same belts that I use more than the stones. Both will put a mirror polished edge with a cambered bevel on a chisel in seconds or restore a damaged edge with a chip in a couple of minutes. The WS is more refined, but I like the Chinese one better because it’s reversible, has stepless on-the-fly speed control with a voltage readout, is much easier to start and stop, and has a tool rest on the vertical portion and another on the horizontal that’s at the belt. It’s easier to use than the WS that has a reference plate you place your blade on then try to move it to the belt without changing the angle. I primarily use the diamond stones to get my cutting edge perfectly straight again. Due to the belts on the power sanders, it’s easy to round the face if not careful. One thing I have to be really careful with is the speed because I don’t want to overheat the chisel, plane blade, or a knife and cause them to lose their hardness.
I also have a Trend and a Schaaf diamond stones and a leather strop that I use. I saw where someone said their diamond stone was rusting. Bora makes a lapping fluid called HoneRight Gold that has no water in it and is supposed to prohibit rust. I have a bottle of it and a bottle of Trend lapping fluid. I didn’t know about the HoneRight until after getting the Trend.
I think you just made everything that encourages my audience with, the whole process of simple sharpening in seconds to a mirror finish and a perfect cutting edge, a truly complicated, expensively prohibitive task that replaced actual woodworking
*Mic drop*
Hey y’all,
GenXer here. I’ve been stupid crazy about keeping my free planes razor sharp, ever since I started using them decades ago. My dad gave me a Veritas mark iv. Much of what I know, I learned from the trees and wood as I wielded the tools. And the tools taught me what I know about the fixtures and jigs. So I basically taught myself how to hone with the guide. Things is, I learned the micro bevel is weak, especially when the steel is cheap. So I would polish the entire bevel. Awe Jeezy jouis that was stupid. Over 25 years of spending days at a time honing my irons. I ought to be embarrassed if not ashamed. Paul, I’ve been watching your sharpening method for some time now, sticking to my guns on honing. Recently I realized I was hanging on to the sentiment of my father, by sticking to those guns. And I threw in the towel and in 4 hours, I had all the irons, free planes and knives in my shop, shaving the hair on my arms. And I feel comfortable doing it free hand. The best human innovations are our skills and awareness. Thank you Paul for sharing your methods. It’s been about a month now of free handing with mccamber and my shop has changed drastically as a result. 🙏🏽
I think a video of this method would help, I don’t quite get the steps you mentioned. Currently refreshing my neglected chisels and using a grinder for primary bevel, would have like to try this method for a change