Making a Few Tools
Some tools are just plain simple. The very simplest looking of all and the most misunderstood in its complexities is the plate steel card scraper. This single-piece tool is misunderstood just as much by professional woodworkers who rarely ever use them even as long-term woodworkers as it is by those just being introduced to the craft. The term scraper itself is just a bad and stupid misnomer simply because it doesn’t scrape but slices the surface of wood in the same way edge tools slice and do not scrape when used correctly. If you think you are about to scrape a surface with a steel plate why would you not think paint scraper used in a forward-thrust, single-handed chiselling action? Not an accurate depiction in any way at all. Then too, another feature of the description describes the sophisticated cutting-edge as a burr. But thinking ‘burr‘ again gives the impression that, because we initiate the sharpening process with a flat file, the edge itself is the fractious and rough edge typically associated with filing thin, plate steel –– not the case at all. Scraper and burr are the misnomers everyone uses. These two terms alone mislead owners and users to believe they ‘scrape ‘the surfaces of the wood using a common burr resulting from a basic filed edge. That’s why I say the terms are inappropriate and misleading. Why we still use them is a mystery to me but it just goes to show how tradition sometimes perpetuates inadequate terms for want of something better. The cutting edge on a card scraper is the most sophisticated of all cutting edges I can think of. It is uniquely developed and knows no equal in dealing with every and any type of grain you care to name. It’s a lifesaver in times of despair when the plane ripped out grain or an unseen glue smear jumped out when the first application of finish was applied. This tool deals with it all.
Some tools are the exact opposite in that they are just plain simple all the way through. They are also simple to use in that they are for the main part only used on the push stroke making them less complex to at least understand and simple to make. These tools are simply pushed into and along the wood’s surface to the most minimal of depth and it’s this that separates it from 99% of all other woodworking. Graving is not to decorate wood as in carving of different types but to create a surface by which printmaking is possible as an art form. And it’s this that has gripped my attention for many, many years. In the hands of a skilled artist, a handful of gravers can create some of the most amazing art. I urge anyone and everyone to consider this form of artistry in wood by simply researching the images created through the centuries. All manner of print once relied on what was at one time a huge trade with factories full of creative artisans preparing wood to become worthy of printing on the page. My initial interest came from the tool trade catalogues and books where planes, chisels, mallets and carving tools were depicted for sale: Stanley and Record of recent years but going back in time, companies like Mathieson and I Sorby, etc. This initial interest always slowed me down to examine more fully the work of engravers and not just in wood but in metal too. I was totally absorbed by how it was done and wanted to see what it would take to create such work. It was this prelude that then opened a door to a wonderful world and the work of today’s modern artists expressing their art using simple tools anyone can actually make.
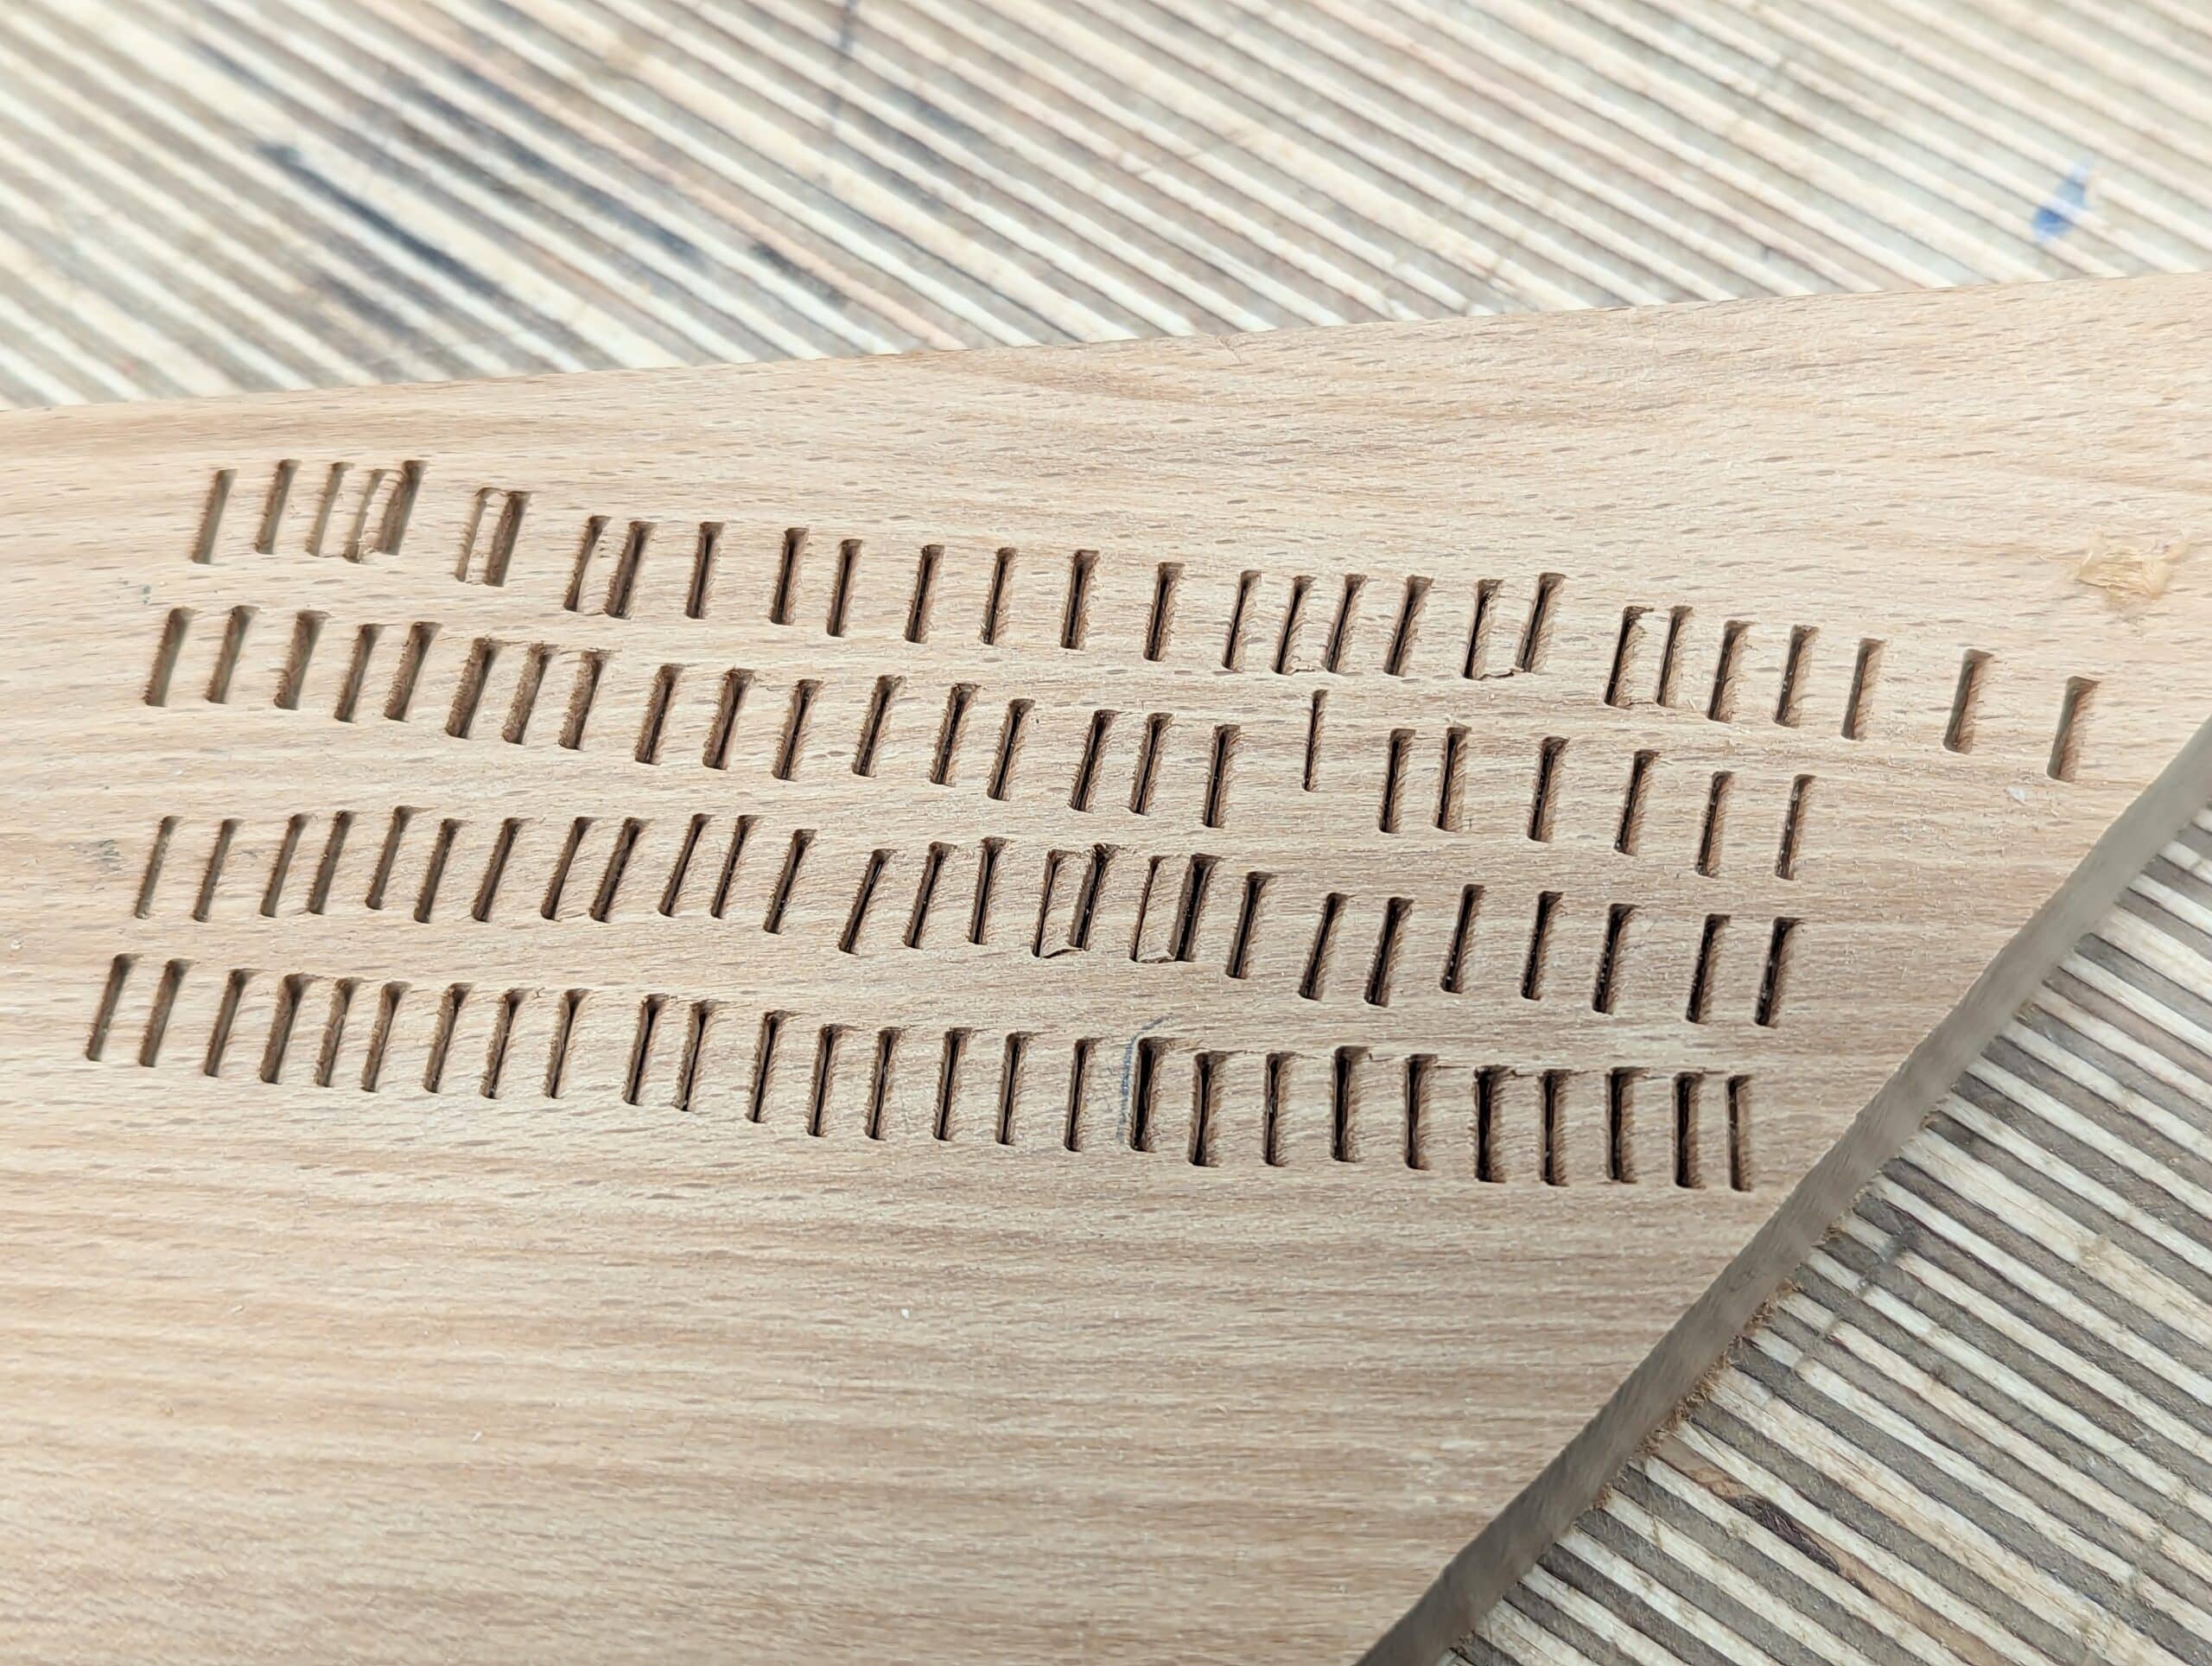
Graving tools used for creating art on blocks of wood are some of the very simplest woodworking tools but the art in using them depends on the creative ways in which the artist persuades the various tools along and into the wood. By this, they ‘draw‘ their intent out fractions of an inch deep to create art we might too often take for granted. Contrast is everything. Contrast, the word, comes from two words contra, against, and started, stand: to stand against. Creating a wide range of surface textures creates the impressions that set one part against another. How this is achieved is purely by the eye, hand and mind of the artist creating. It seems that most of this work is done with no more than ten hand tools all of which are the very simplest to work and sharpen but, as it is with all art, it’s the user of the tool that makes the difference to the outcome on the page. Each and every artist develops their art with the same tools but in different ways. Working all things in reverse on a flat plane, the art reverses the highs and lows to become contrasting strokes and blocks of contrast to stand out as print on a page. Depending on a vast variety of techniques producing shade, tonal depth and contrasting textures, the artist creates all the different values to develop images of every kind imaginable.
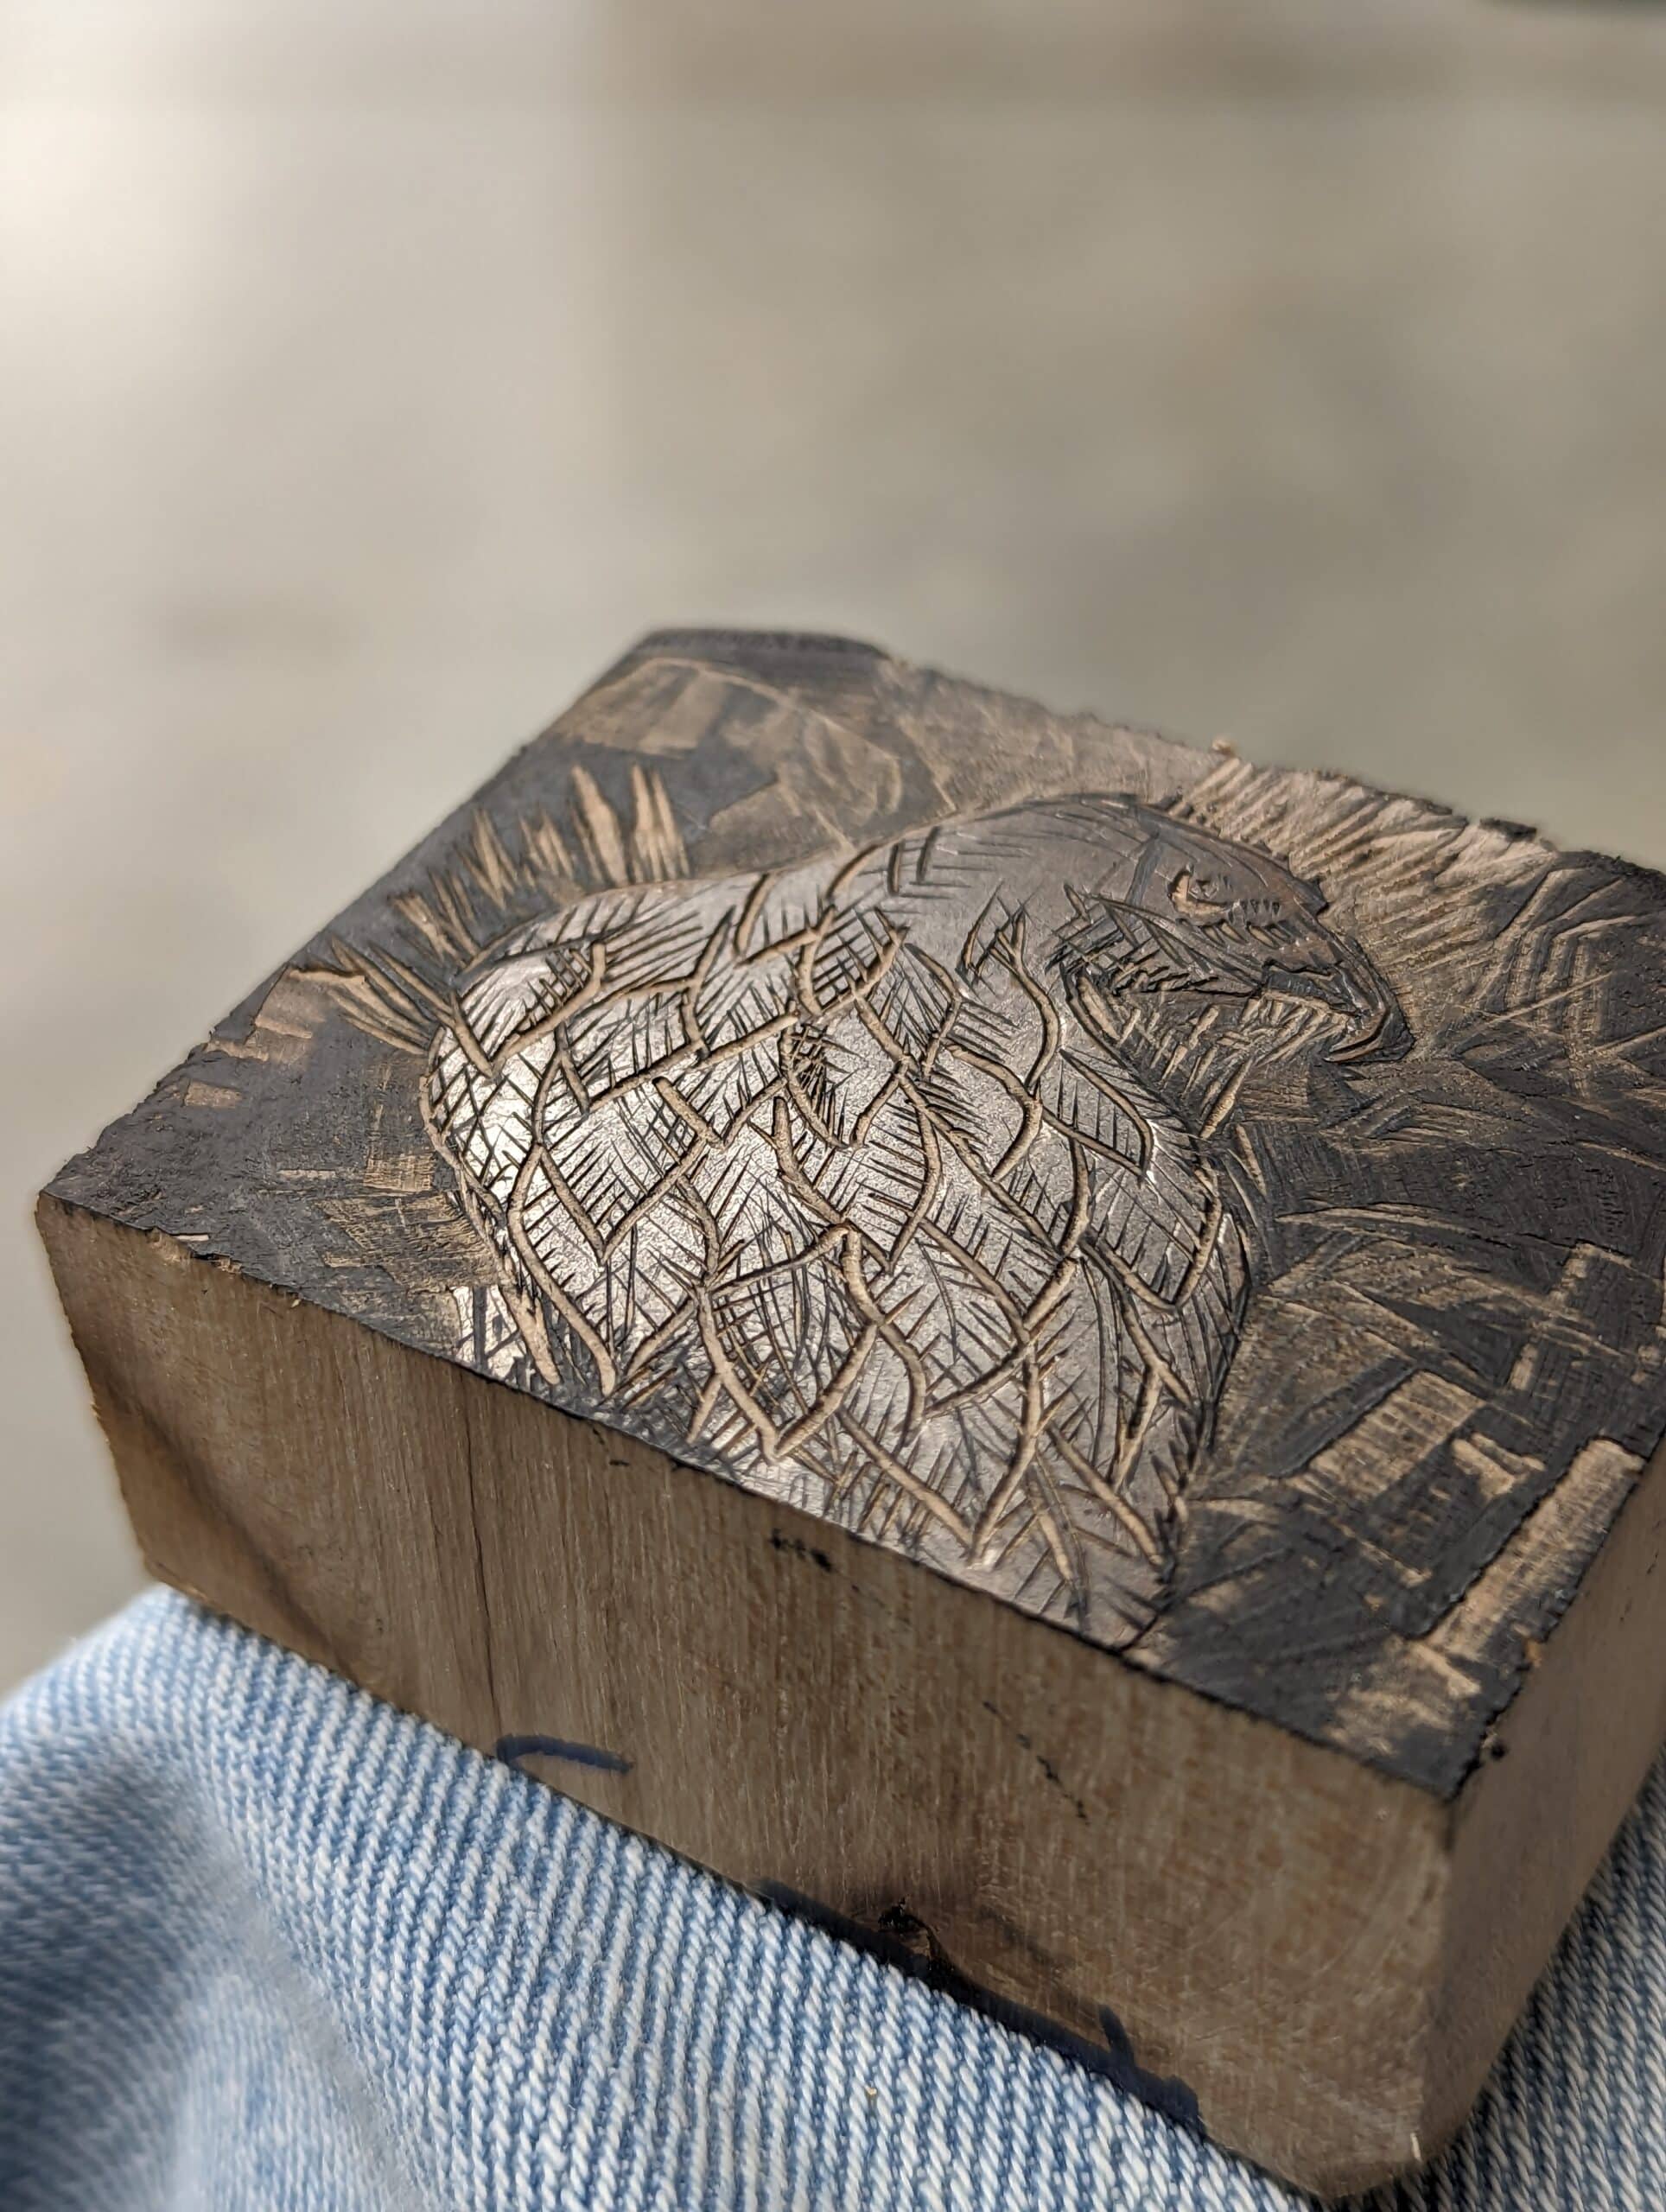
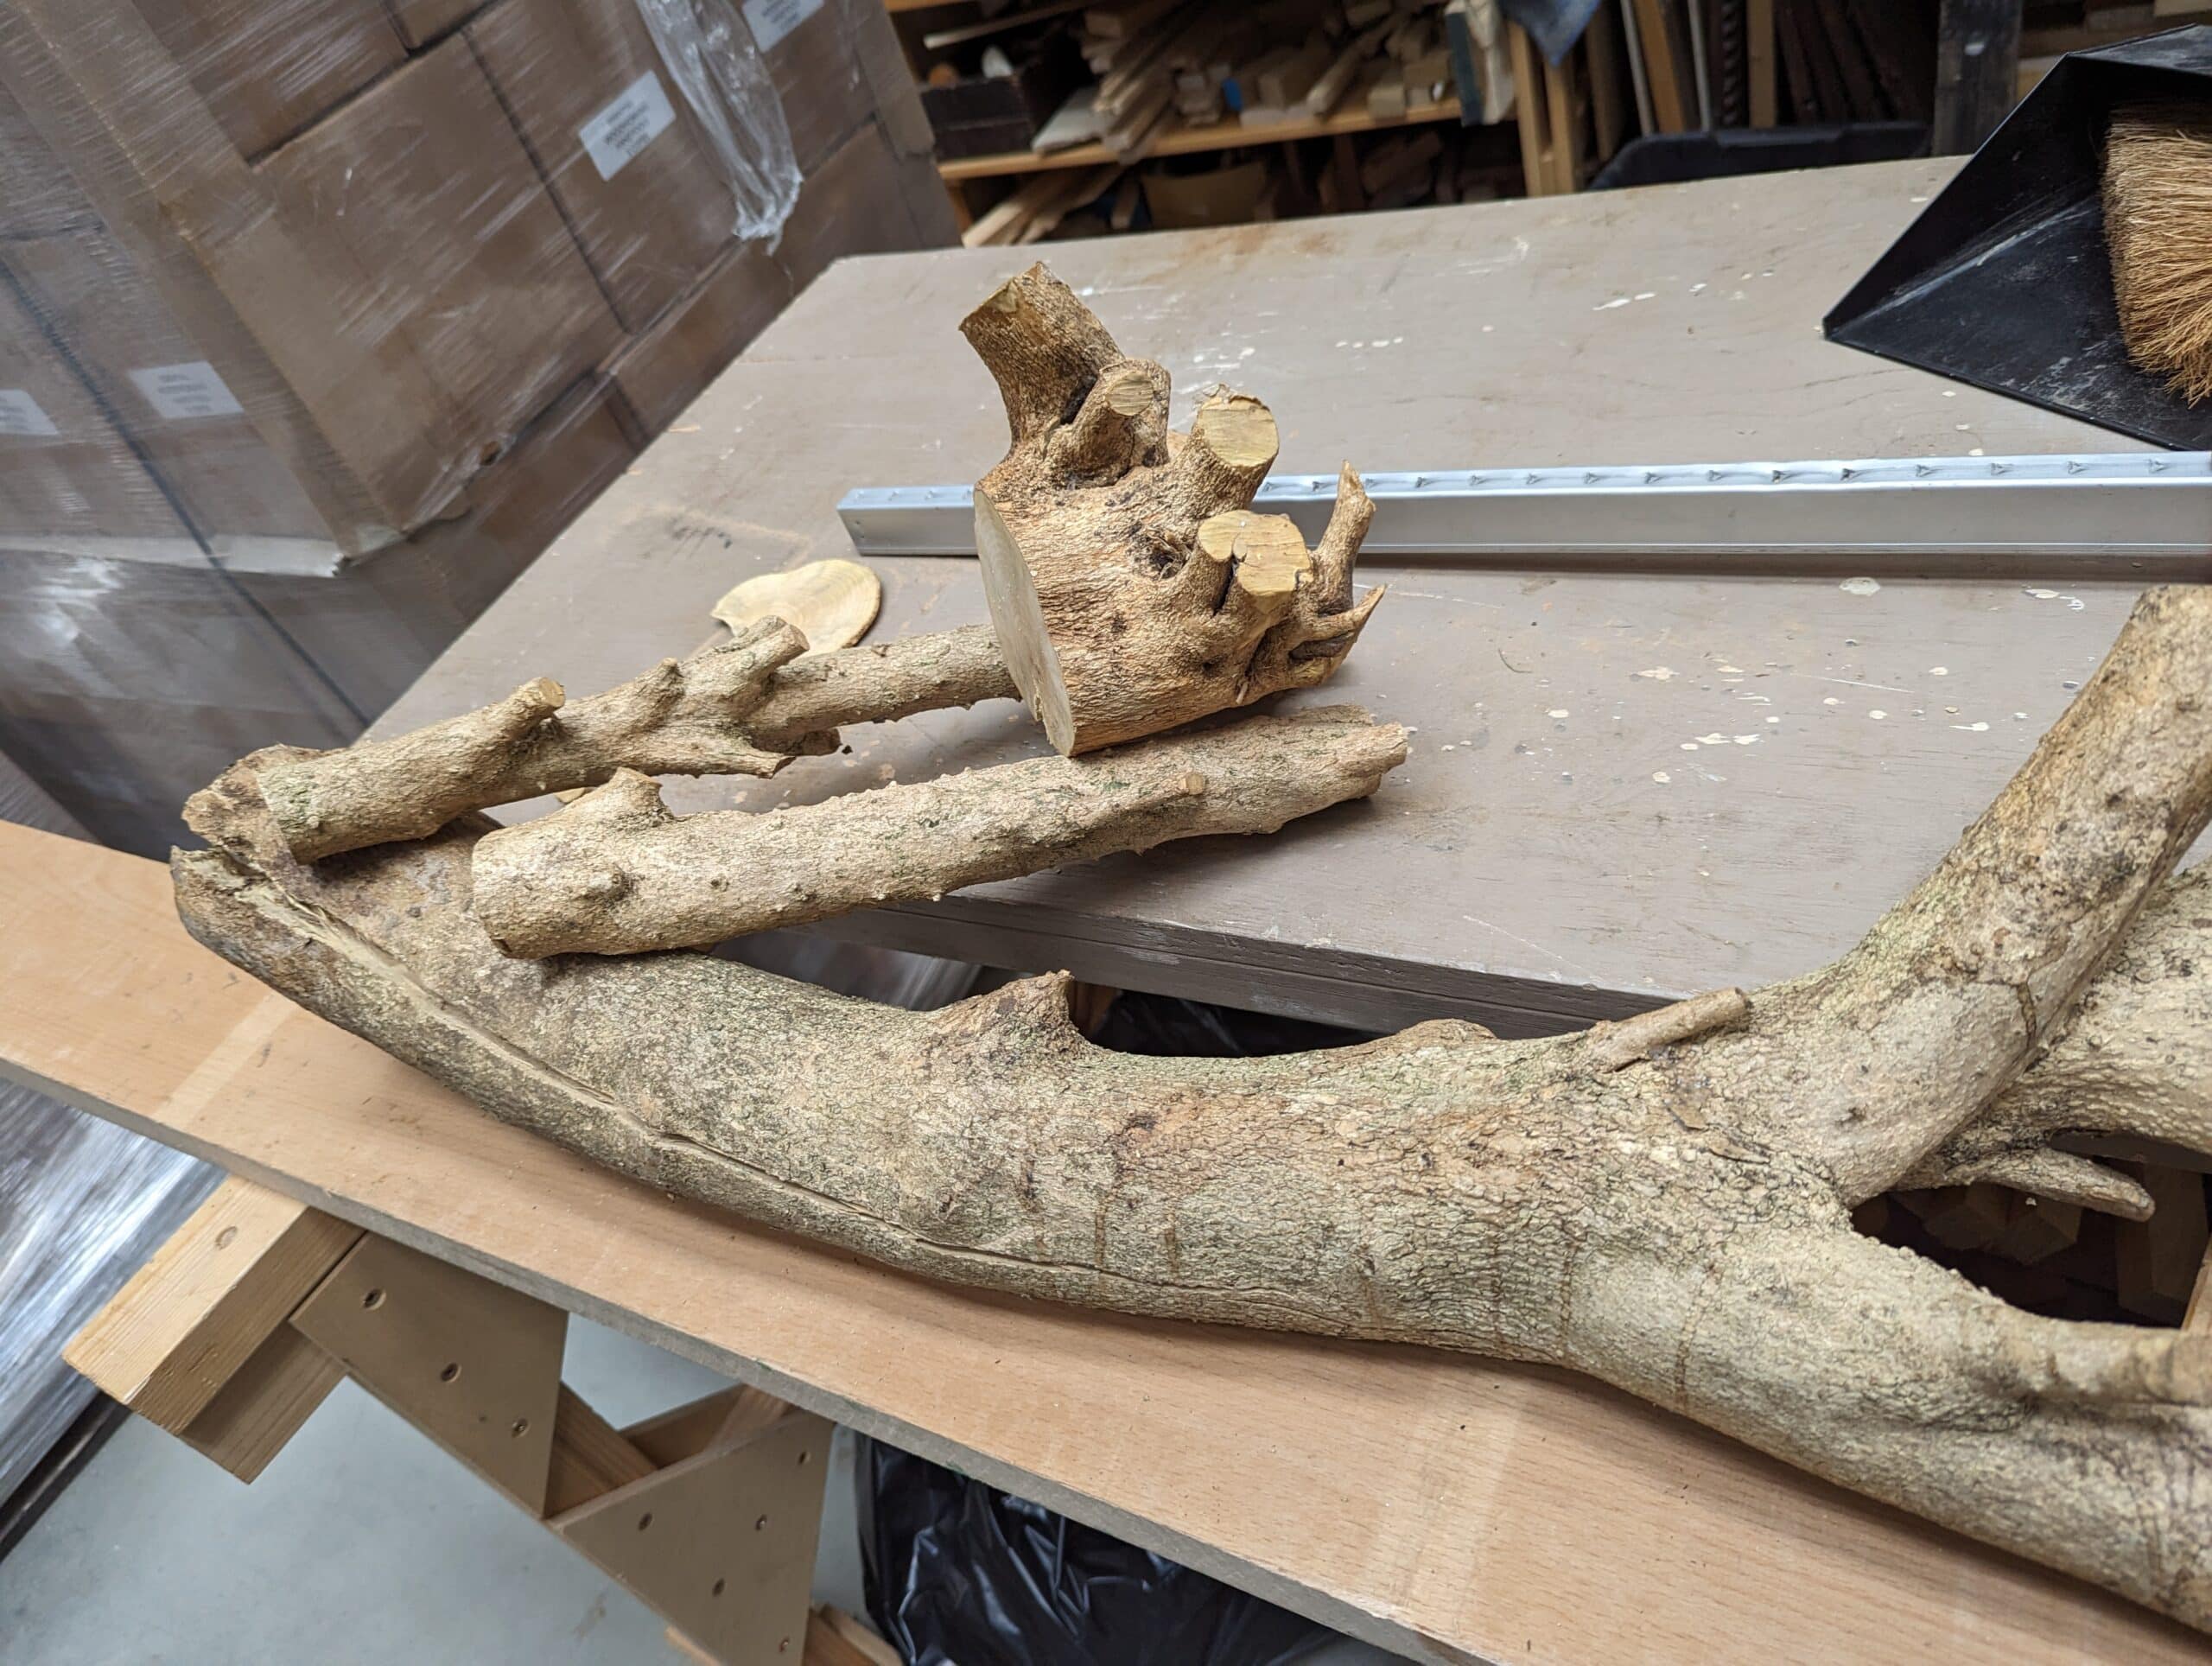
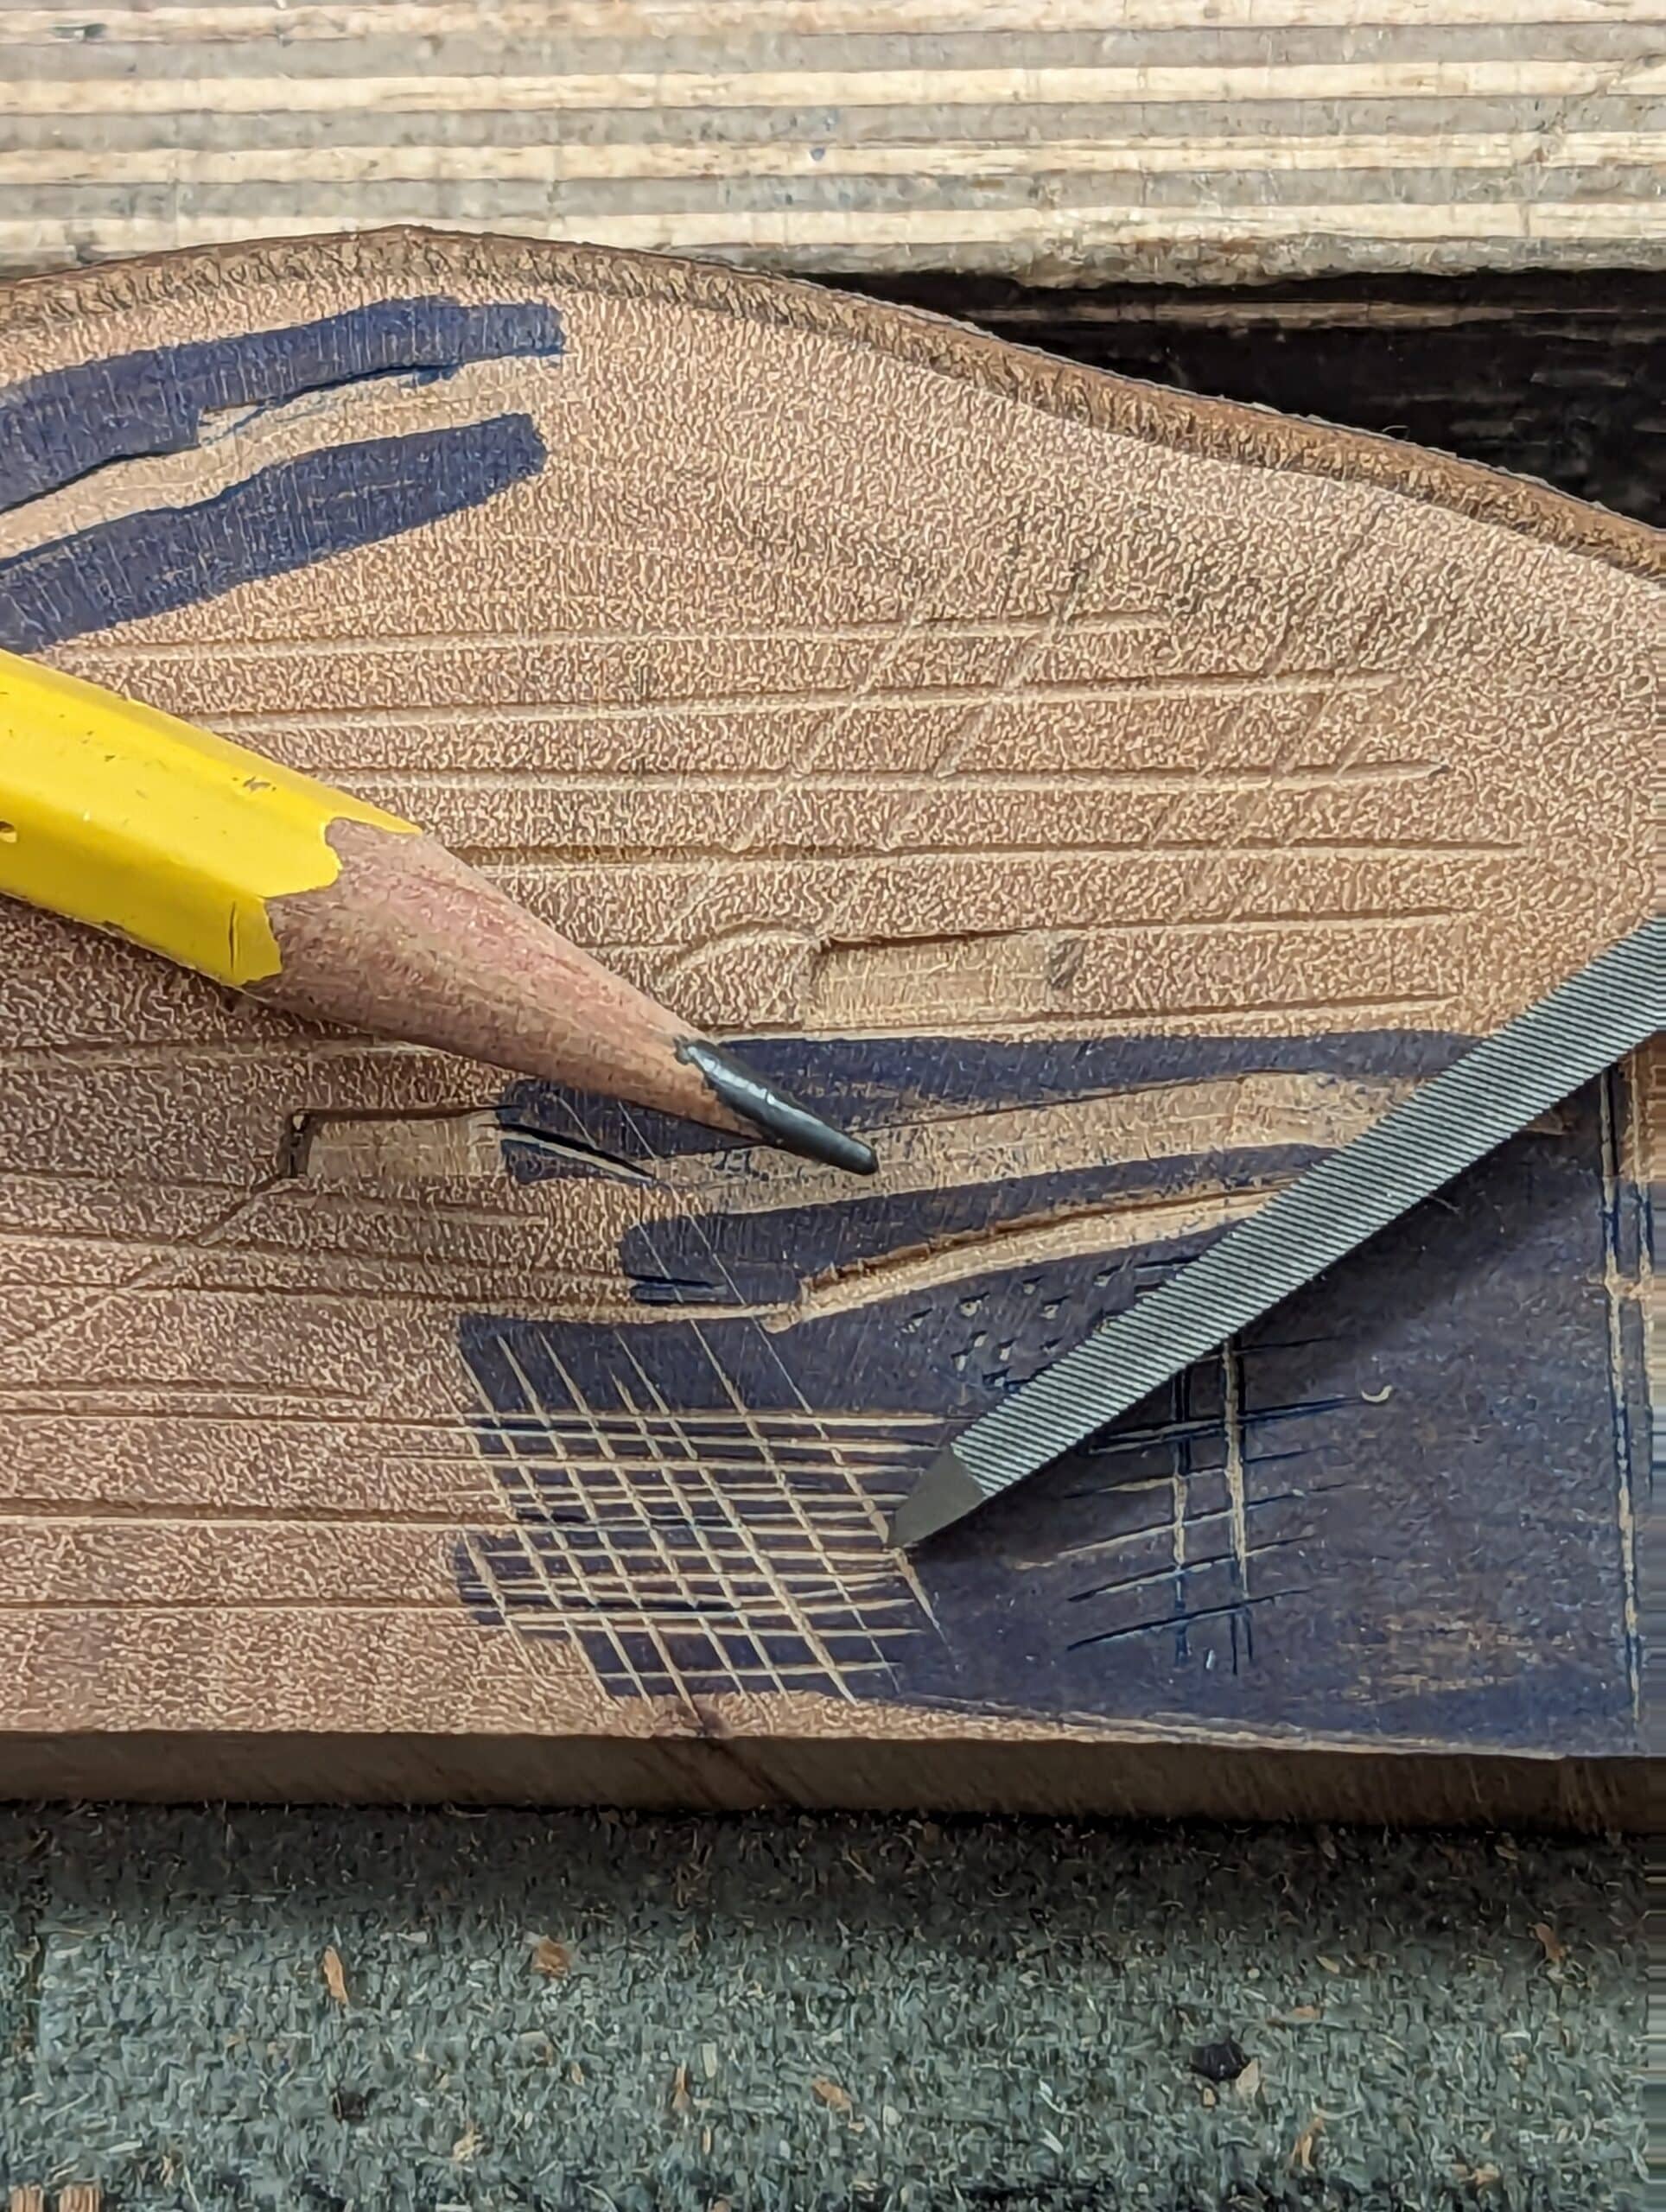
The craft of engraving demands intense attention to the minutest detail and most of this is according to the width of and types of cuts made into the end grain of a block of dense-grained and hard wood capable of being cut to a retentive, unfractured peak or ridge. Few woods are capable of giving you this imperative. Boxwood is the ultimate best and really knows no equal. The pictures below will give you an idea of what we are working with and relying on. To create print blocks, the blocks must be built up from rectangles and squares taken from slender stems. A four-inch diameter trunk is often used in the round or partial round. Inevitably, the stem cracks and splits along its length because of shrinkage. Many blocks are used in printmaking and as they are very limited in size for block printing. Usually, we can use only half or partial widths of a stem unless the stem has been cut to short lengths, end-sealed and very slowly cured (seasoned or acclimated) to an acceptably dry level. Other woods of similar density can be used.

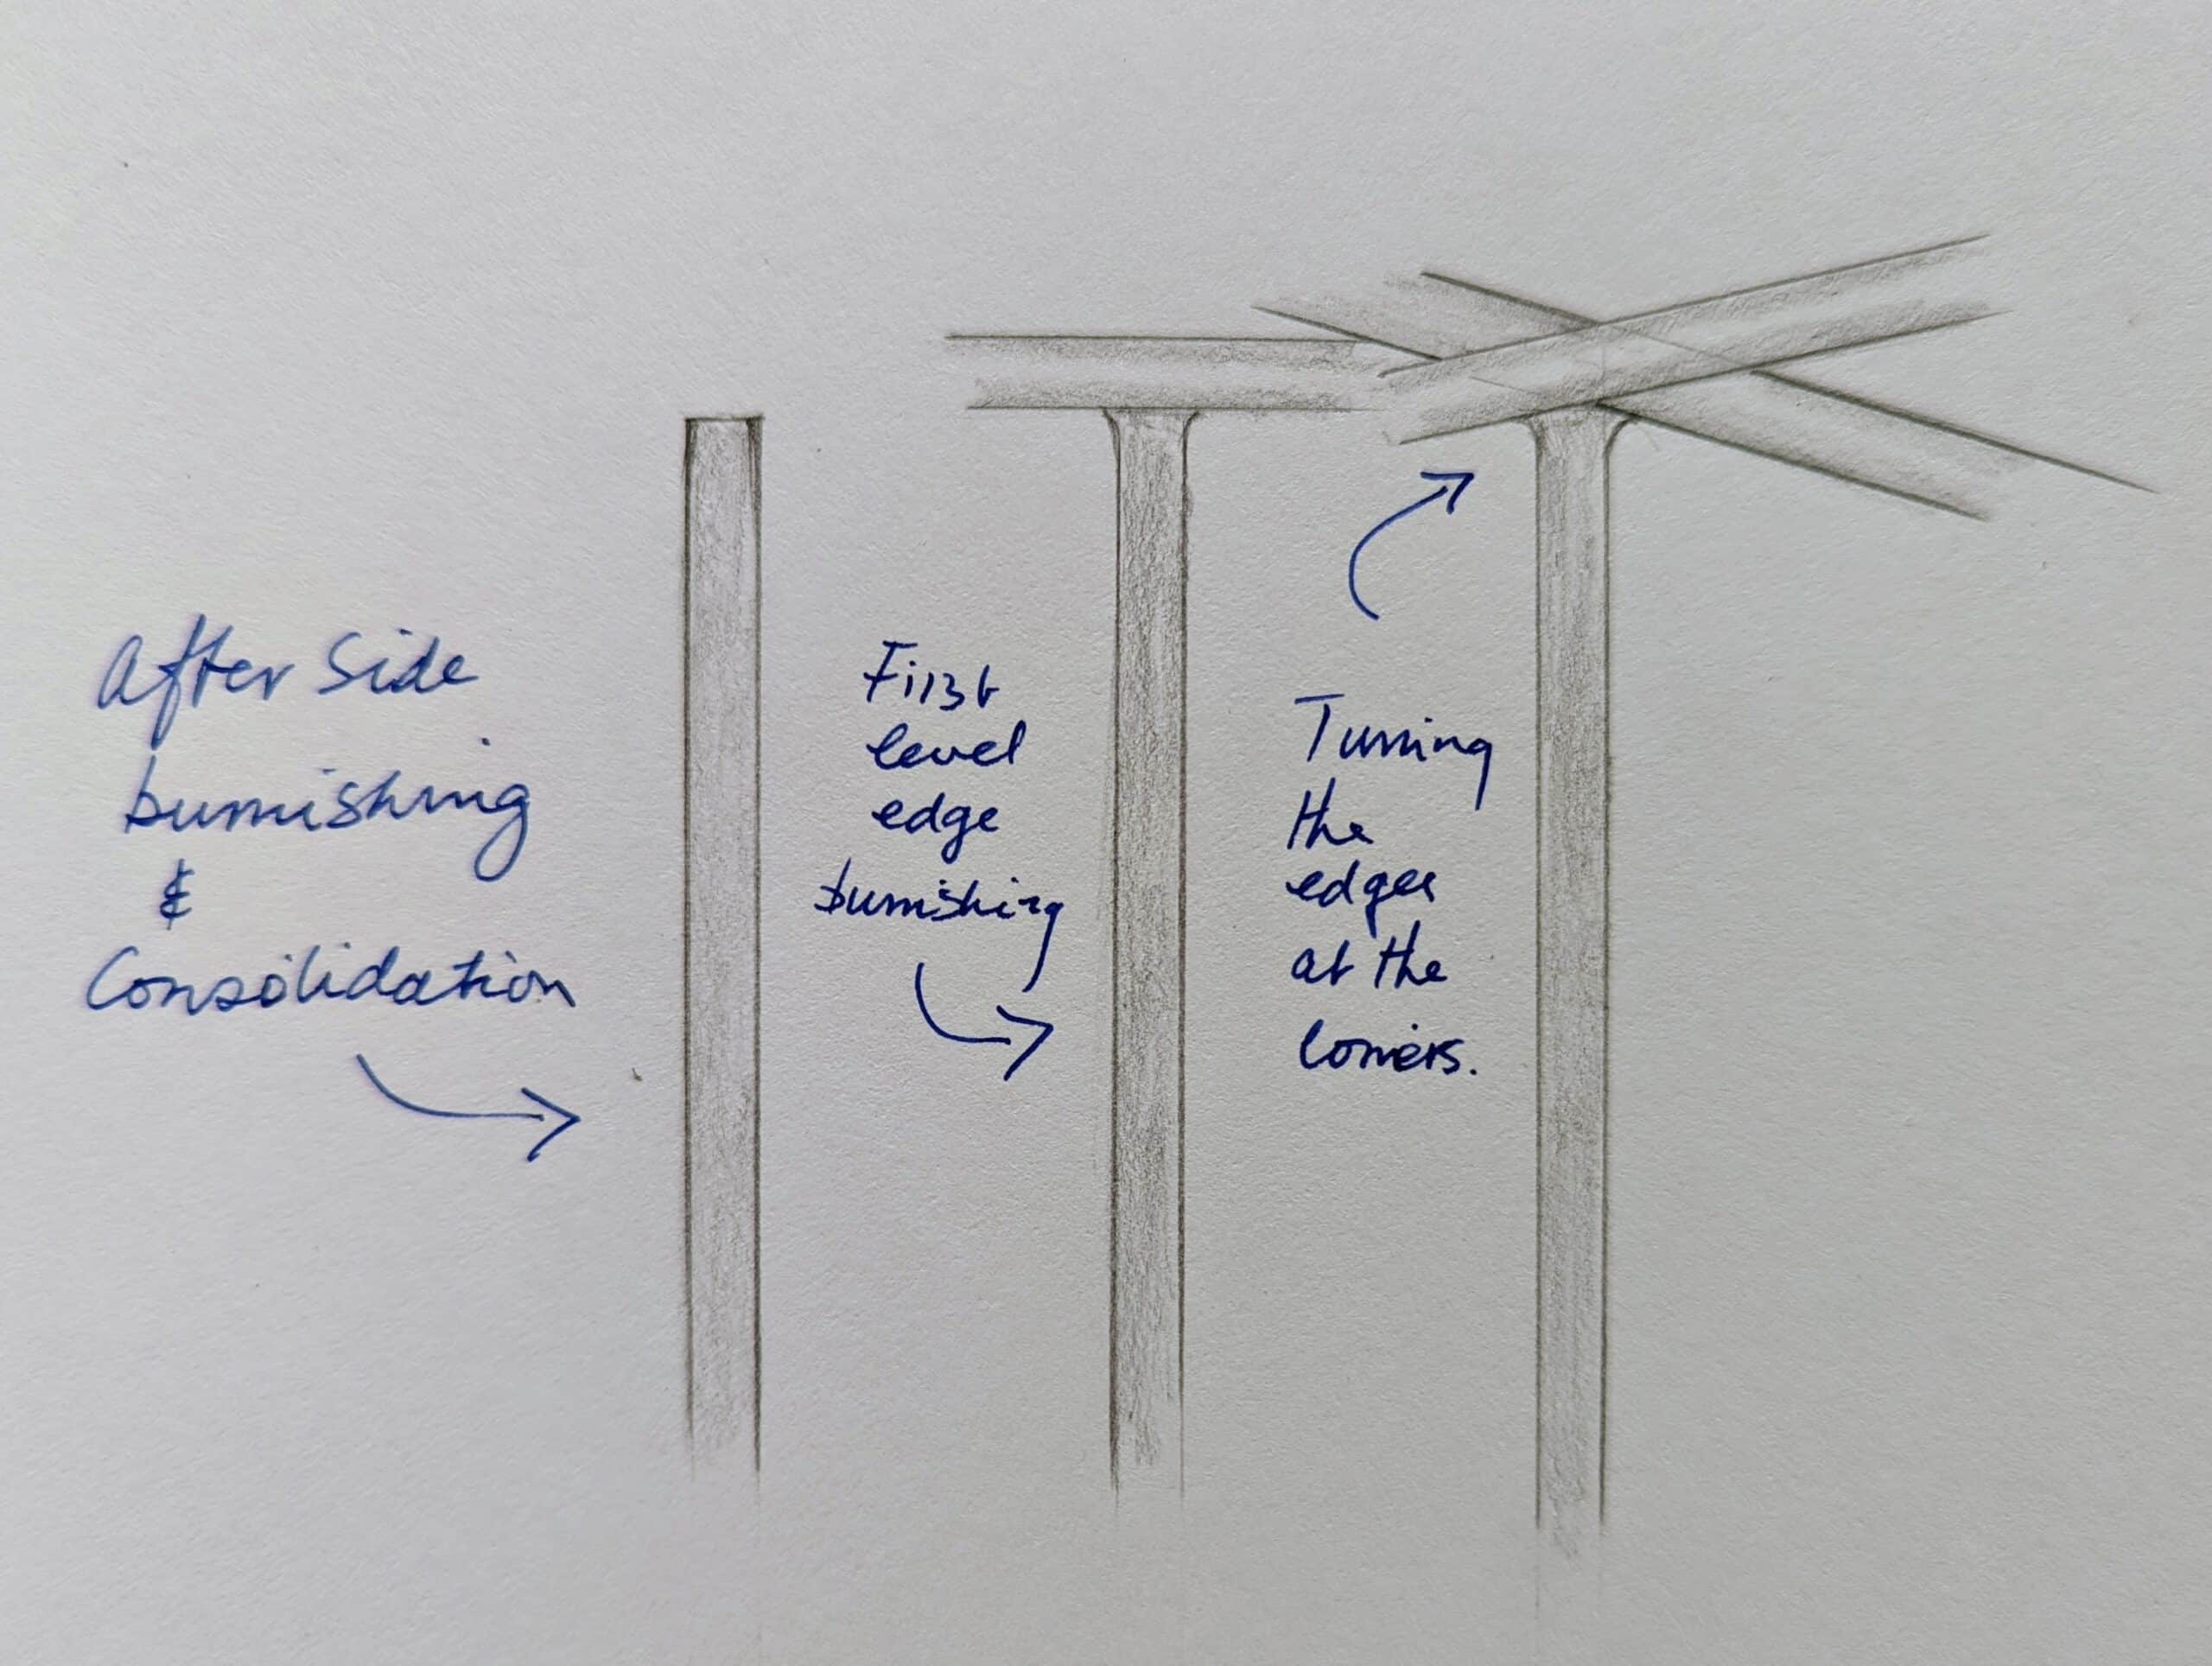
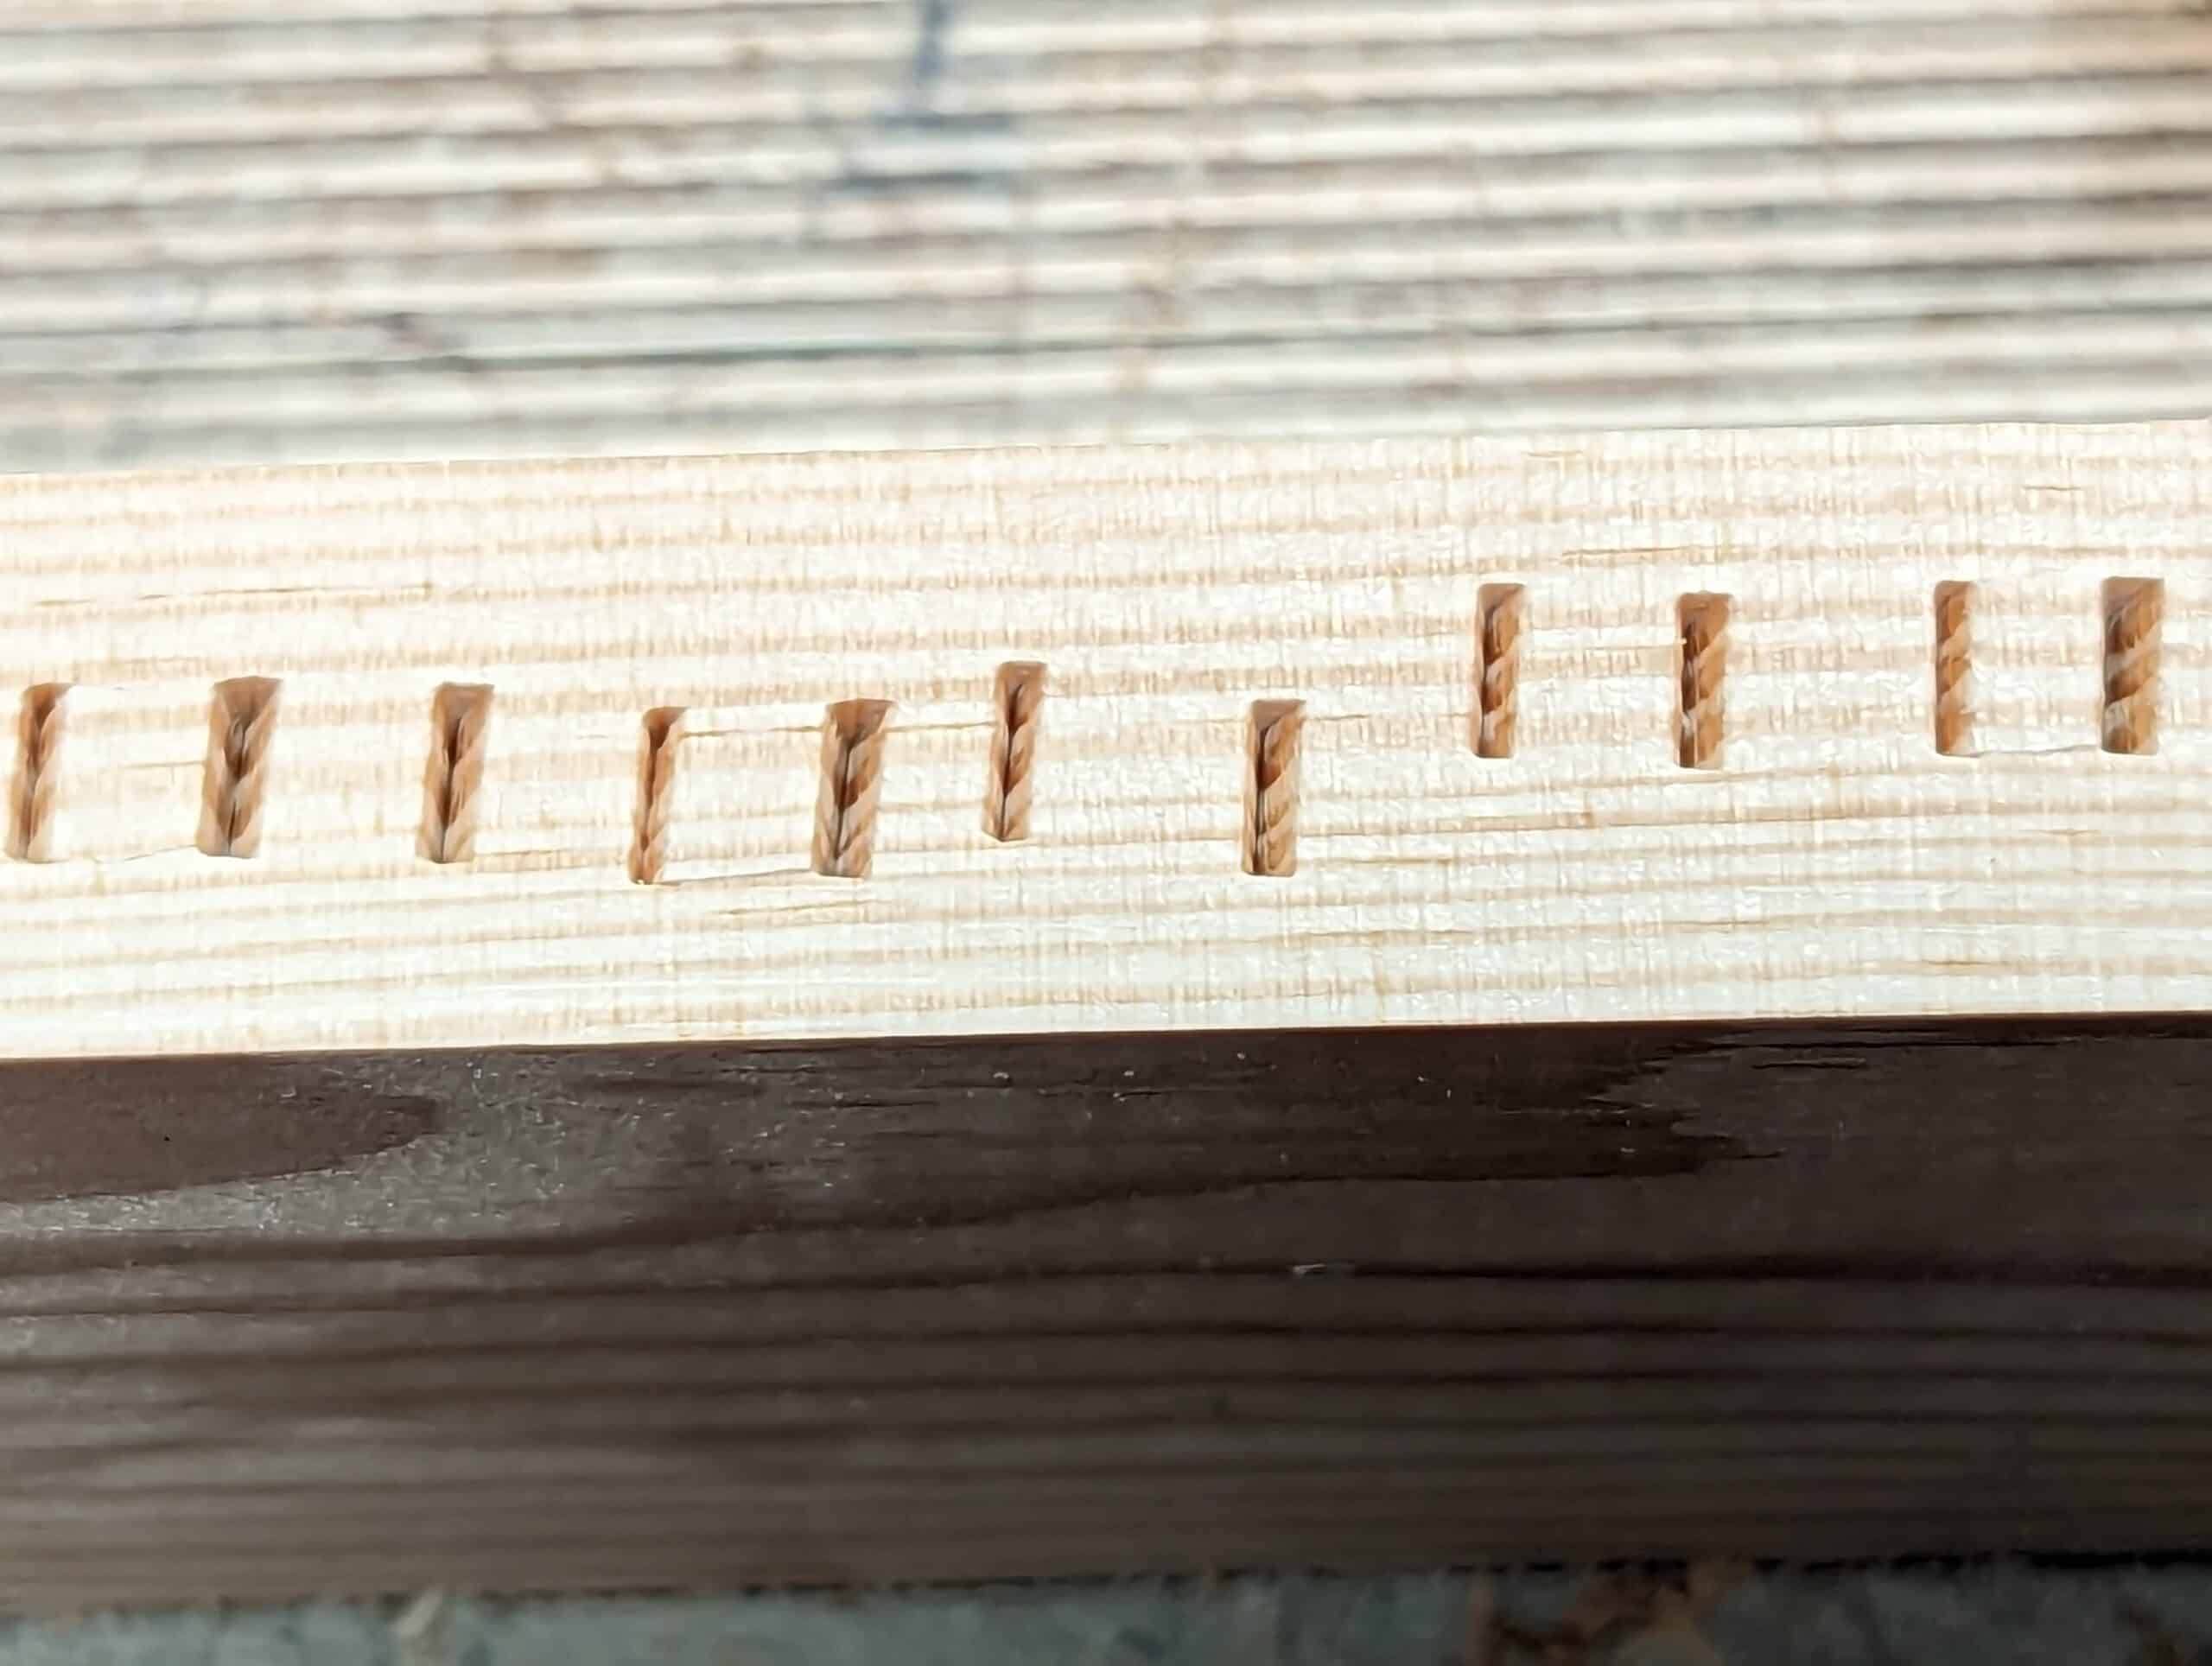
The peaks and troughs, ridges long and short, repetitive and isolated are almost always immaculately cut and yet the bevel creating the cutting edges is the very simplest to develop. Relying on a single bevel of somewhere around 30º, these tools generally cut into the end-grain surface fibres only. And though we always push gravers into the wood fibres, the cut comes as an under- or upper-cut. Though it’s the critical point of the tools, be they square, rounded or chisel-flat, that pierce the surface first we should understand that the side’s angular corners each side of the point that must cut effectively too. With the same shearing dynamic, these side corners must be kept as equally sharp as the point because a deepening cut takes the width of cut to different or varying stroke widths. Not the same as our work in general woodworking. These strokes are always pushed into the wood along the surface of the wood being used. Because the cut lines used in block engraving comprise varying degrees of depth of cut, mostly they are shallow, small fractions of a millimetre, they need only minimal pressure to develop any depth of cut to the surface of the wood; a cut can seem almost effortless as the graver passes through the wood, a totally different experience than general woodworking of any other type. Keeping the bevel supremely sharp and pristine is critical to the crispness needed in the work. By that, I don’t just mean the edge or tip of the tool but the whole bevel so that both outer edges or corners either side are capable of clear, clean shearing cuts too. It’s these edges ,rising on either side in the cut, that create an upward shearing action from just under the end-grain surface fibres of the wood as the gravers are pushed into and through each cut. Effectively, angles of presentation and depths of cuts are micro-adjusted by the artist pushing the tool into the wood and it’s this that determines the widths of the cuts as they progress into, along and out of each and every stroke made. It’s this varying that reflects the artist’s individuality where the artist bends and shapes even the very shortest of strokes to create shade, shape and movement in the art. Varying pressure and depth of cut changes the width of the cut from rigidity needed in one place to flex and bend in another. Always using these tools on the push stroke may differ to other tools, knives, for instance, which are usually but not always pull-stroke tools pulled to cut surface fibres prefacing cuts with chisels and saws, shoulder planes and such. Though our Western methods of woodworking are threatened for no good reason by Asian woodworking methods, hand planes are used equally on pull and push strokes and so too saws if you follow any measure of Asian tool culture.
Making my own tools, I intended to keep the essential simplicity of what is already simple. It is always possible to destroy simplicity by processes. A file and a hacksaw make a complete graver. Once filed to shape, the tool’s metal needs minor levels of abrading to take out the roughness of any filing and file marks. No more than five minutes. In half an hour you will have a heat treated working blad. Keeping it simple means no blacksmithing even though a blacksmithed graver will be superior by the hammers-driven forging. For our work, this is an overkill though. Gravers are light-use tools requiring only modest levels of hand pressure and as such our metalworking isn’t so compulsive. Fact is, it’s not too much different than our woodworking but with different tools. My recent foray into engraving wood block left me without immediate access to graving tools on a Friday evening. It was this that sent me to my metalworking station where I pulled out my hacksaw and a flat 10″ file by my metalworking vise. With these few two ultra-basic everyday simple tools I made my first engraver.
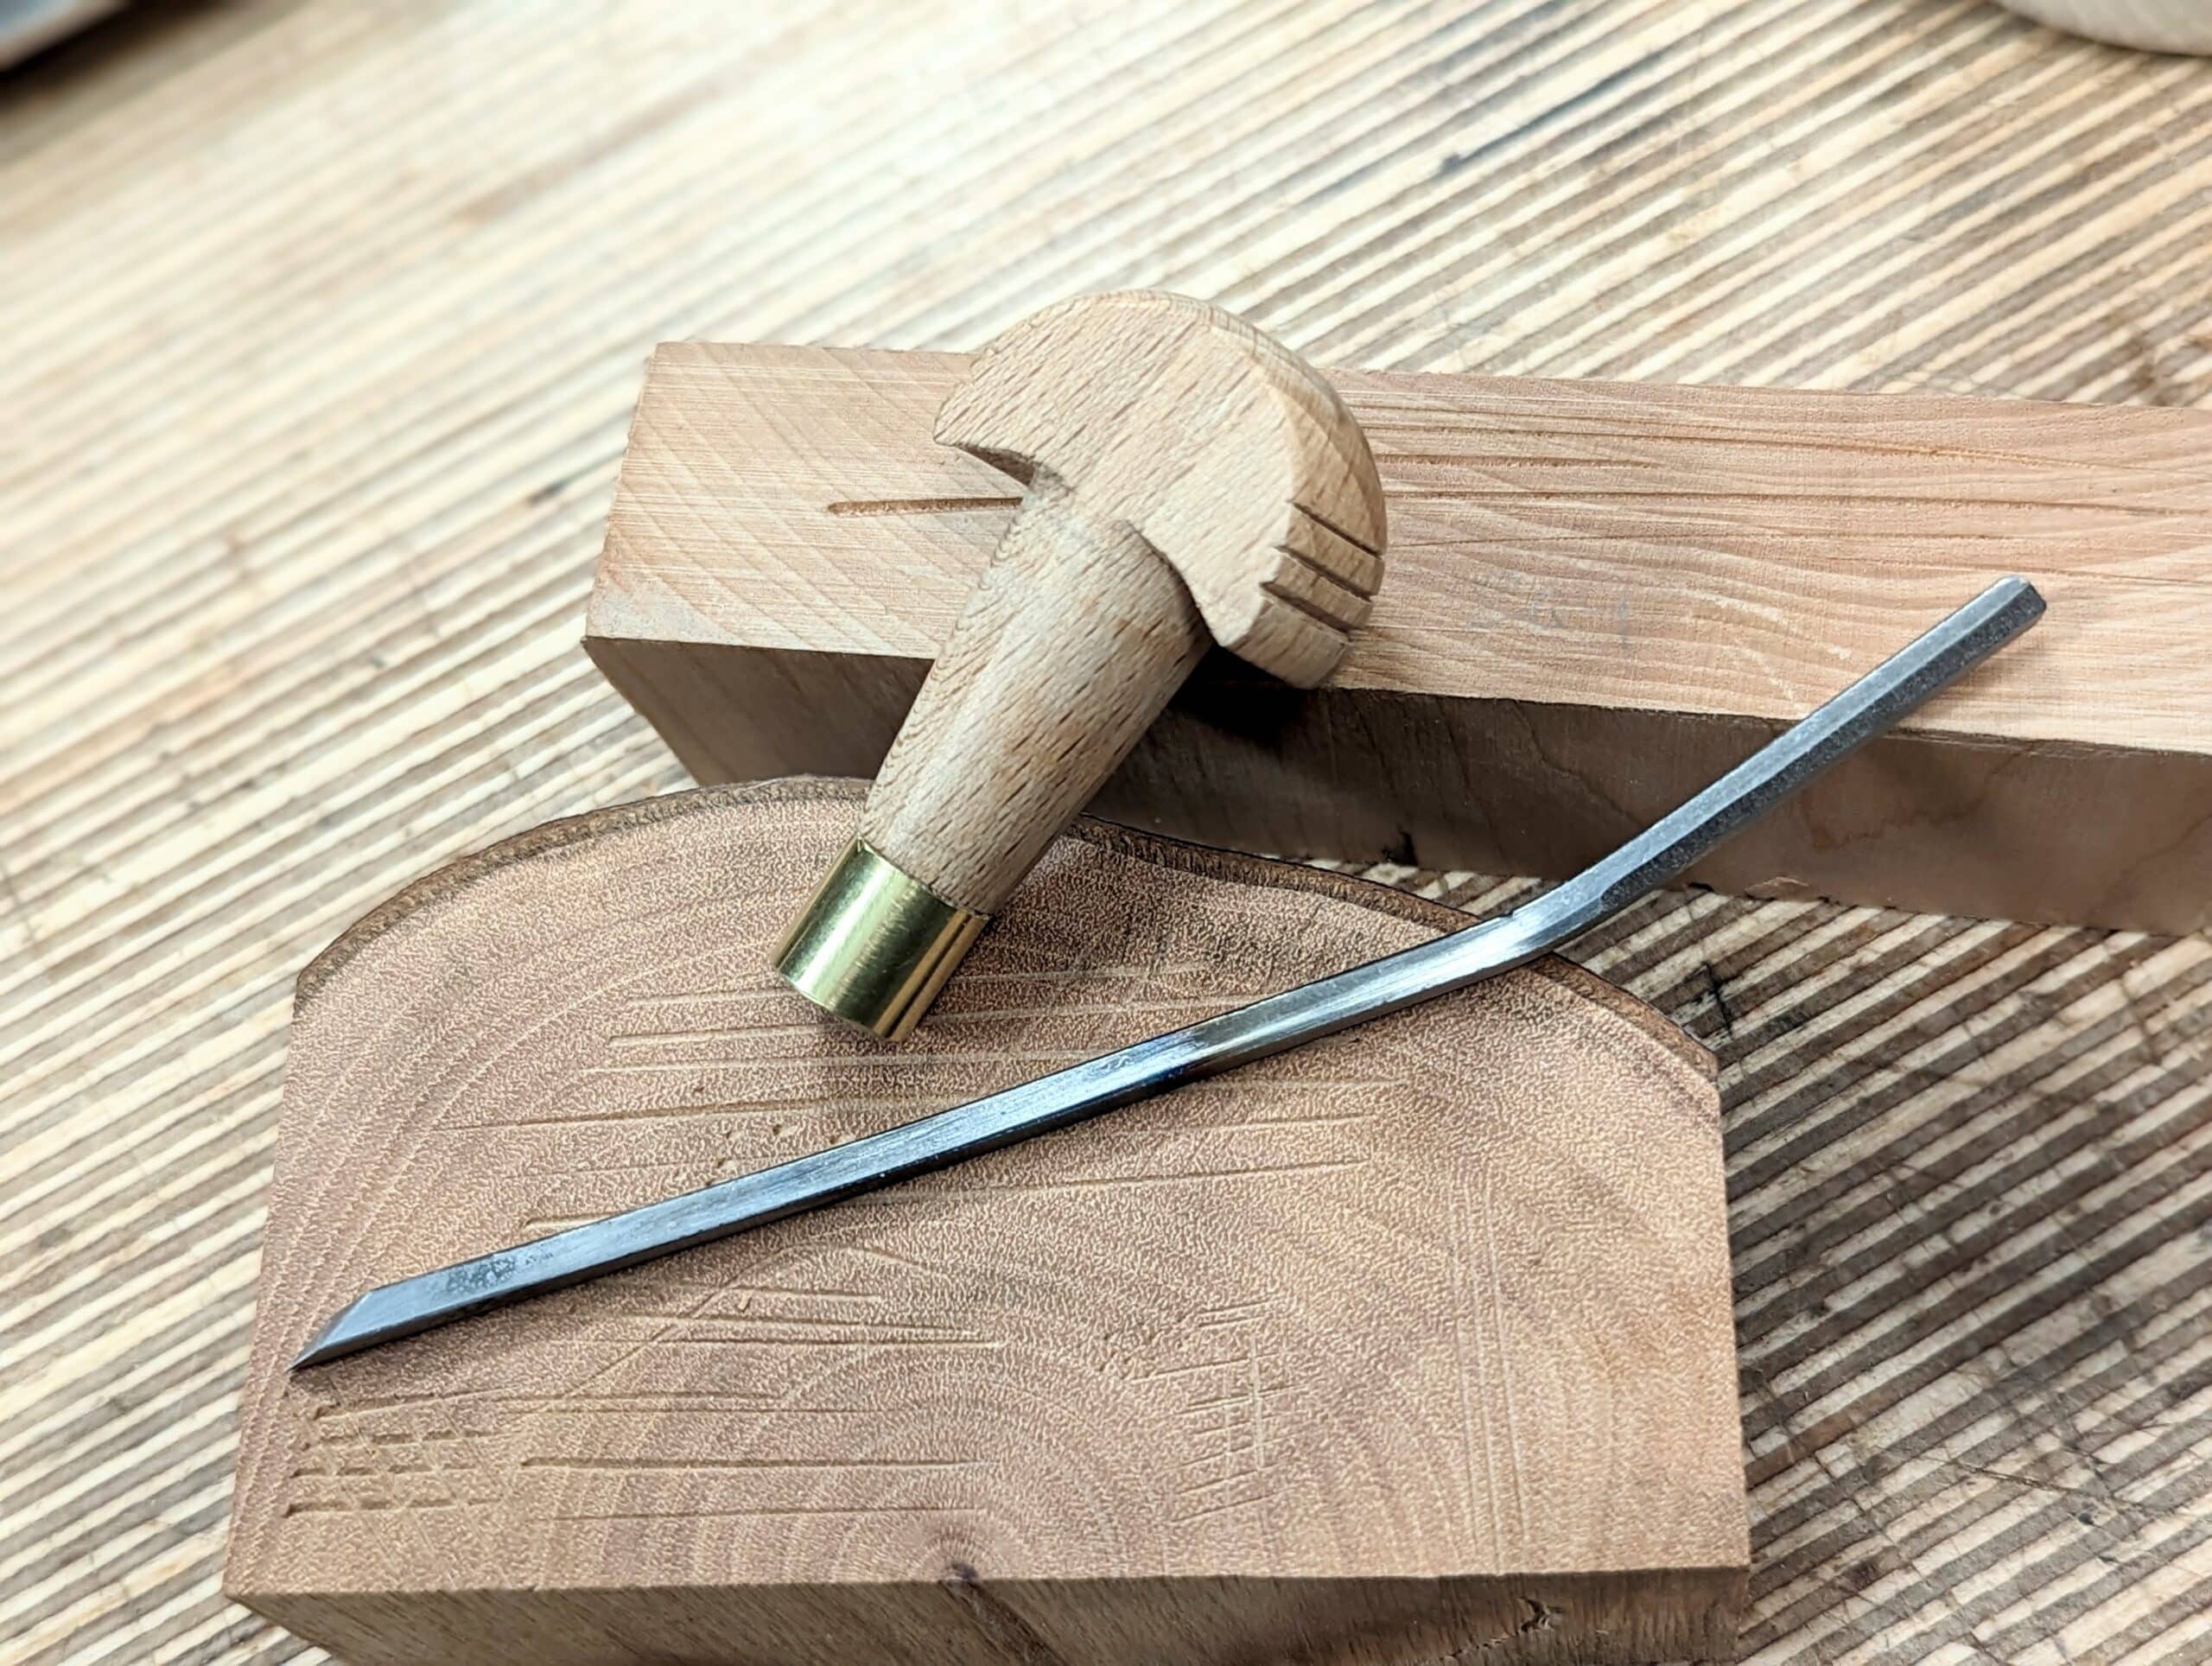
Within 45 minutes including the handle which instead of turning on the lathe I shaped mainly with a rasp first and then finessed with a file and abrasive paper. The ones I used on my course at Cambridge were slightly too short for my hands and I wanted something slightly a centimetre or so longer. Making mine was more labour-intensive because of hacksawing and filing but I found these energies the more rewarding and not at all tedious. In some ways, this is my ongoing rite of passage: I think we need these self-proofs of tackling tasks without access to premium equipment like milling machines, lathes and grinders. Using this tool equalled any of the tools I used on my course so to make a tool for use is pure icing on the cake. It’s surprising just what you can upcycle from an old and otherwise useless file using a hacksaw and a file followed by an abrasive of some kind. My favourite tool was taking a small three-square file no longer suitable for filling my fine saws and making a fine graver. Heating it in the blowtorch to soften the steel’s hardened state meant it filed to shape in a few strokes. Rehardening took less than a minute’s heat including plunging in peanut oil. the round tang fit into a 1/8″ diameter hole perfectly but heating the tange and a hammer blow took it from round to a slight oval. This trick effectively gave verticality to my tang and driving the handle onto it gave verticality to the triangular file shape. That way the flat top registered with my lead finger. little minor filing steepened the sides of the two bottom file faces to create steeply-sided sides for a really fine underside arete to the edge.

Hannah had saved some various boxwood stems she’d retrieved from a dislodged and uprooted hedge and kept for future unknown use. She let me take some for either handles or for the actual wood block I would use for making my block print from. I actually made my first handles from some of the spalted beech scraps in my waste bin as box is such a premium wood for engraving. The beech worked great and is as traditional a wood for handles as any.

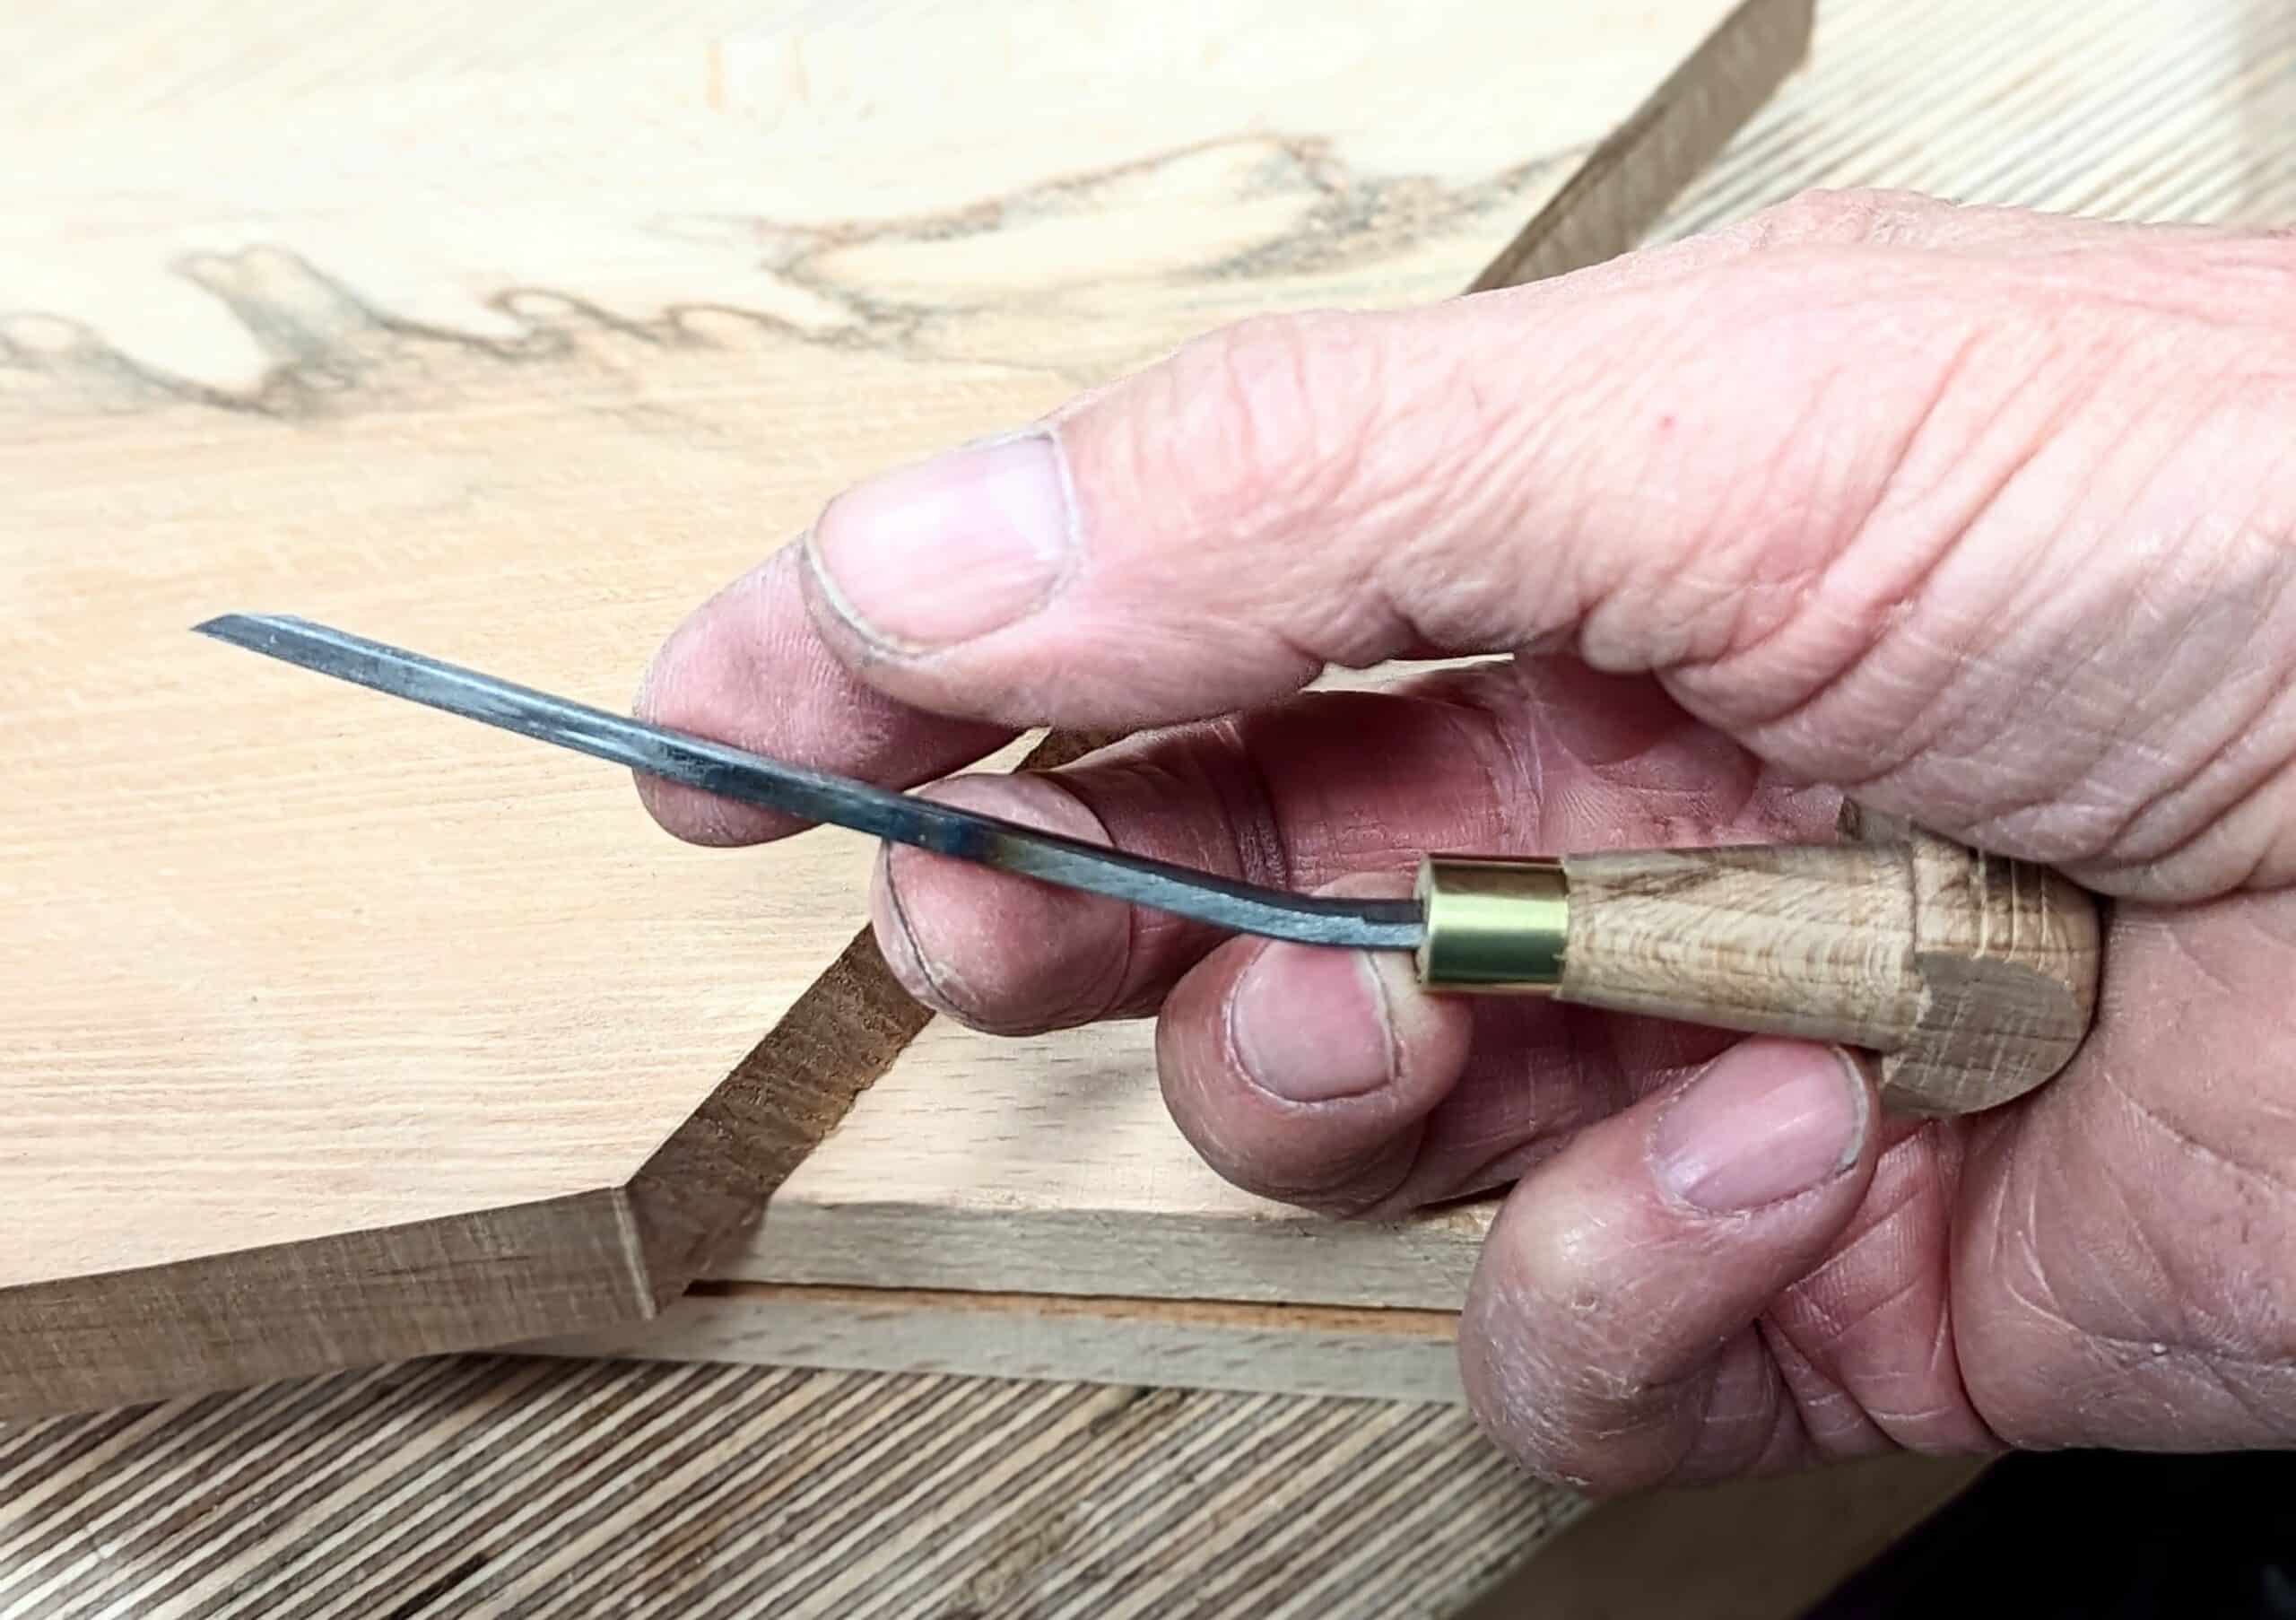
Whereas making the steel graver is quite basic metalworking, the woodworking took a little fathoming to work by rasp and not the lathe which is much easier and faster but not worth getting out for so small a task. I like a challenge, not the easy route, and at the end of the day, the handwork gives me something distinctively mine. The consistent underside cove to the handle is done so to simplify making via the lathe. In reality, we just need somewhere to place the end of our little finger to press the handle into the palm of the hand. The next two fingers run alongside the graver blade and then the index finger is placed in line and on the top or back face or edge while the thumb mostly hovers and floats on the opposite side – I am simplifying here. With the graver gripped somewhat loosely but carefully by the fingers thus, the palm delivers the pressures in different and varying measure and at the same time control and direction.
Good habits in general woodworking might well be adopted to engraving wood but in many tasks, you must disabuse yourself and trust in the learning of something that might feel extremely strange. Gradually you will find yourself adopting methods and techniques for which there may well be no substitute. I did and I am glad I persevered.

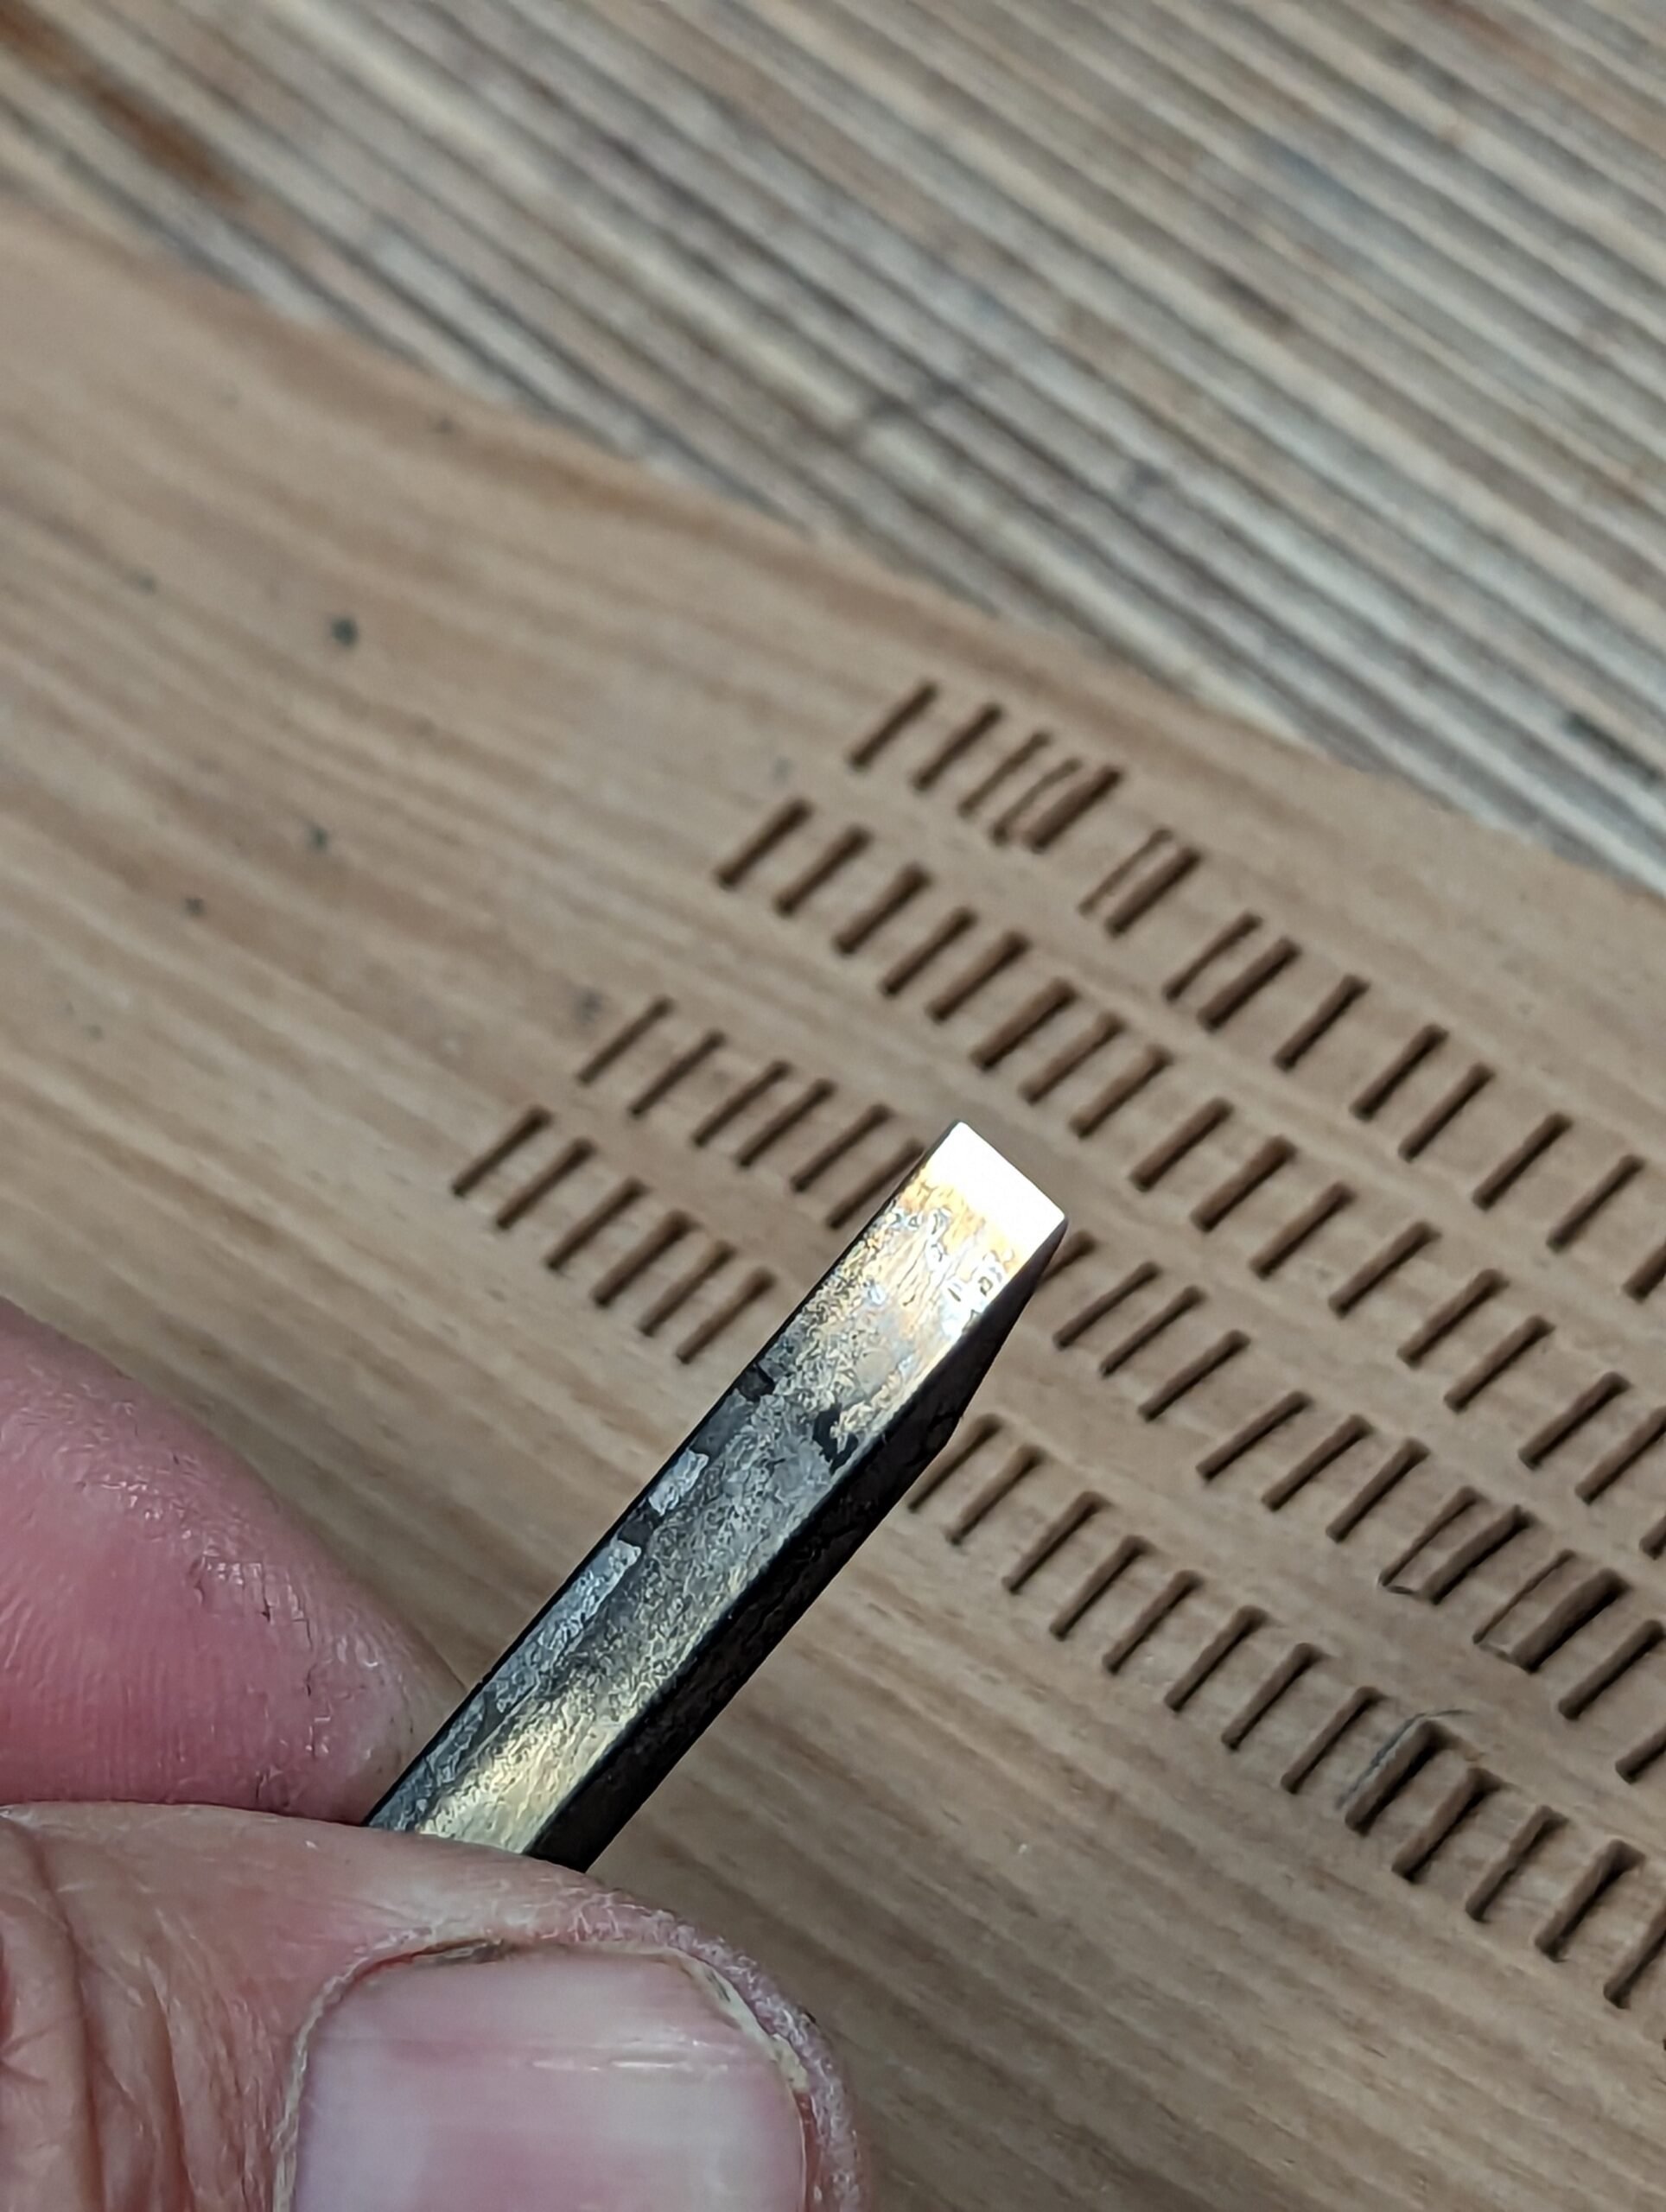
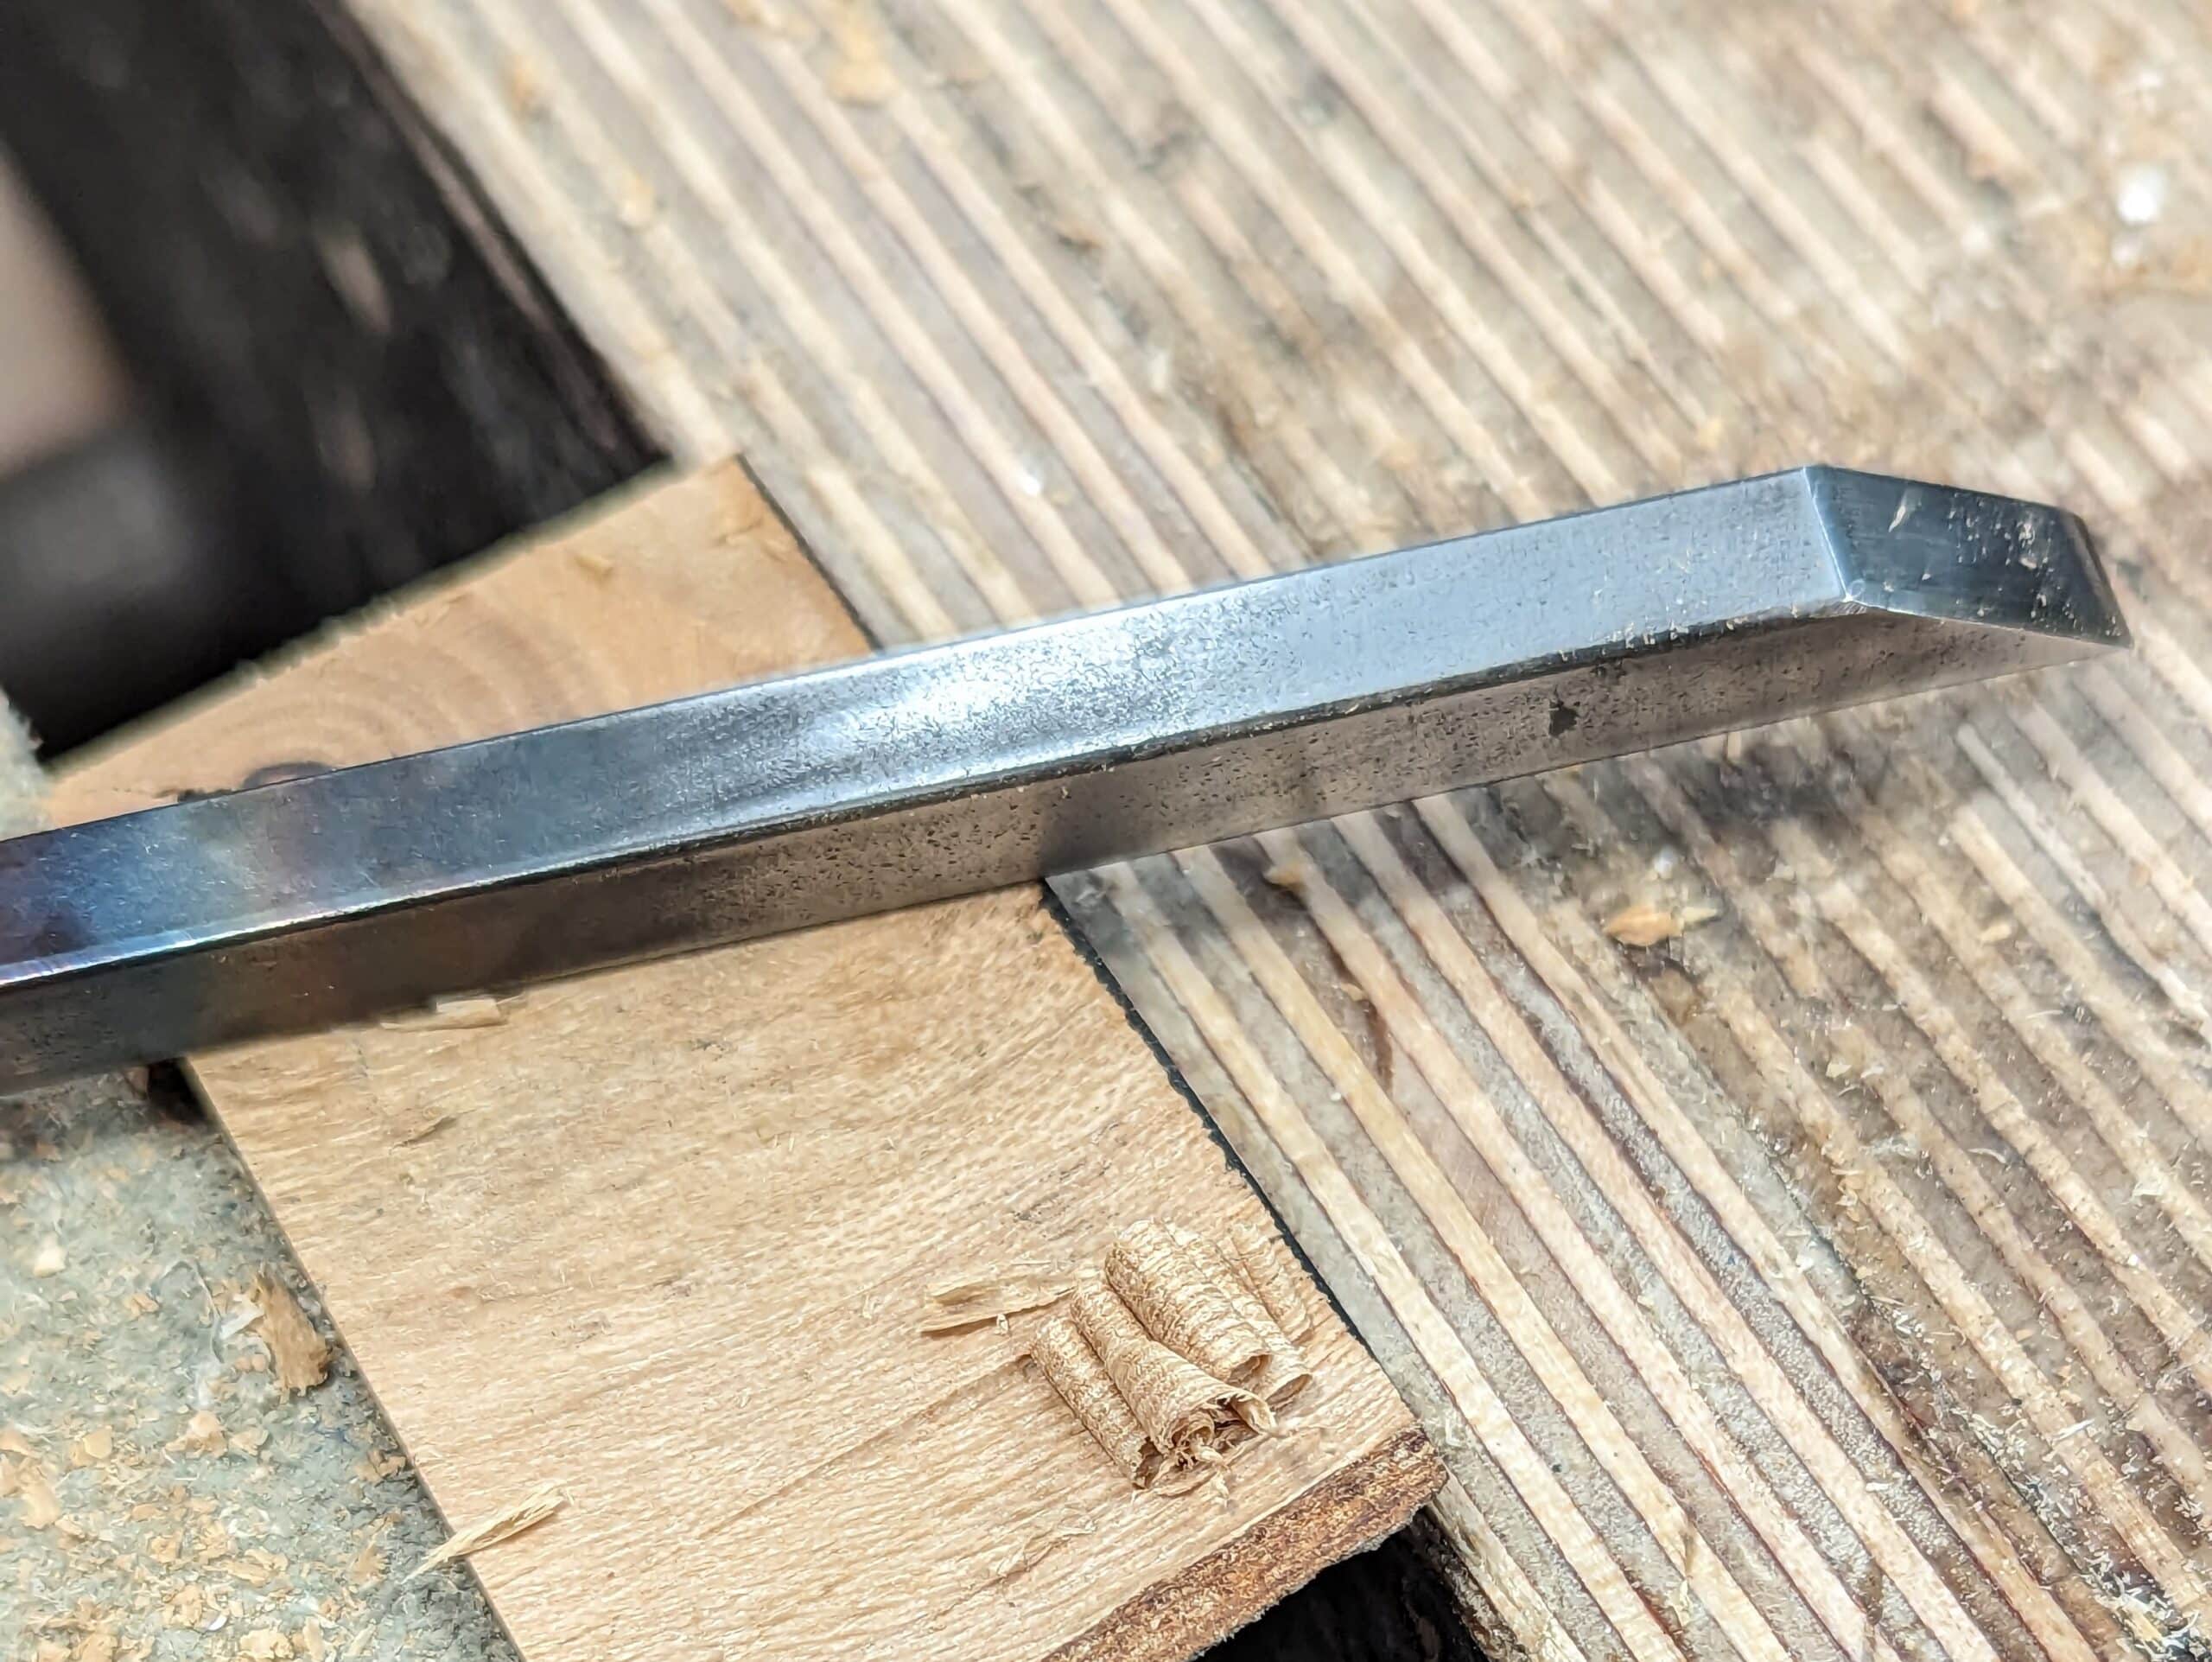
My file now softened with the blowtorch and left to cool readily cut down with a hacksaw even though I do own an angle grinder with a thin abrasive cutter that would have cut it in a heartbeat. My hacksaw blade is 18tpi and that gives me a fine enough cut with some bite to it. It was a mere five minutes of cutting. Filing was the same. I made a diamond graver first. This is really the simplest of the graving tools in that it is simply square stock 4mm by 4mm, with a swan neck bend and a 30º bevel to form the cutting tip. Looking on end of course you will see only a square section but looking from the side slightly and slightly from above you catch sight of the diamond shape formed by the 30º bevel.
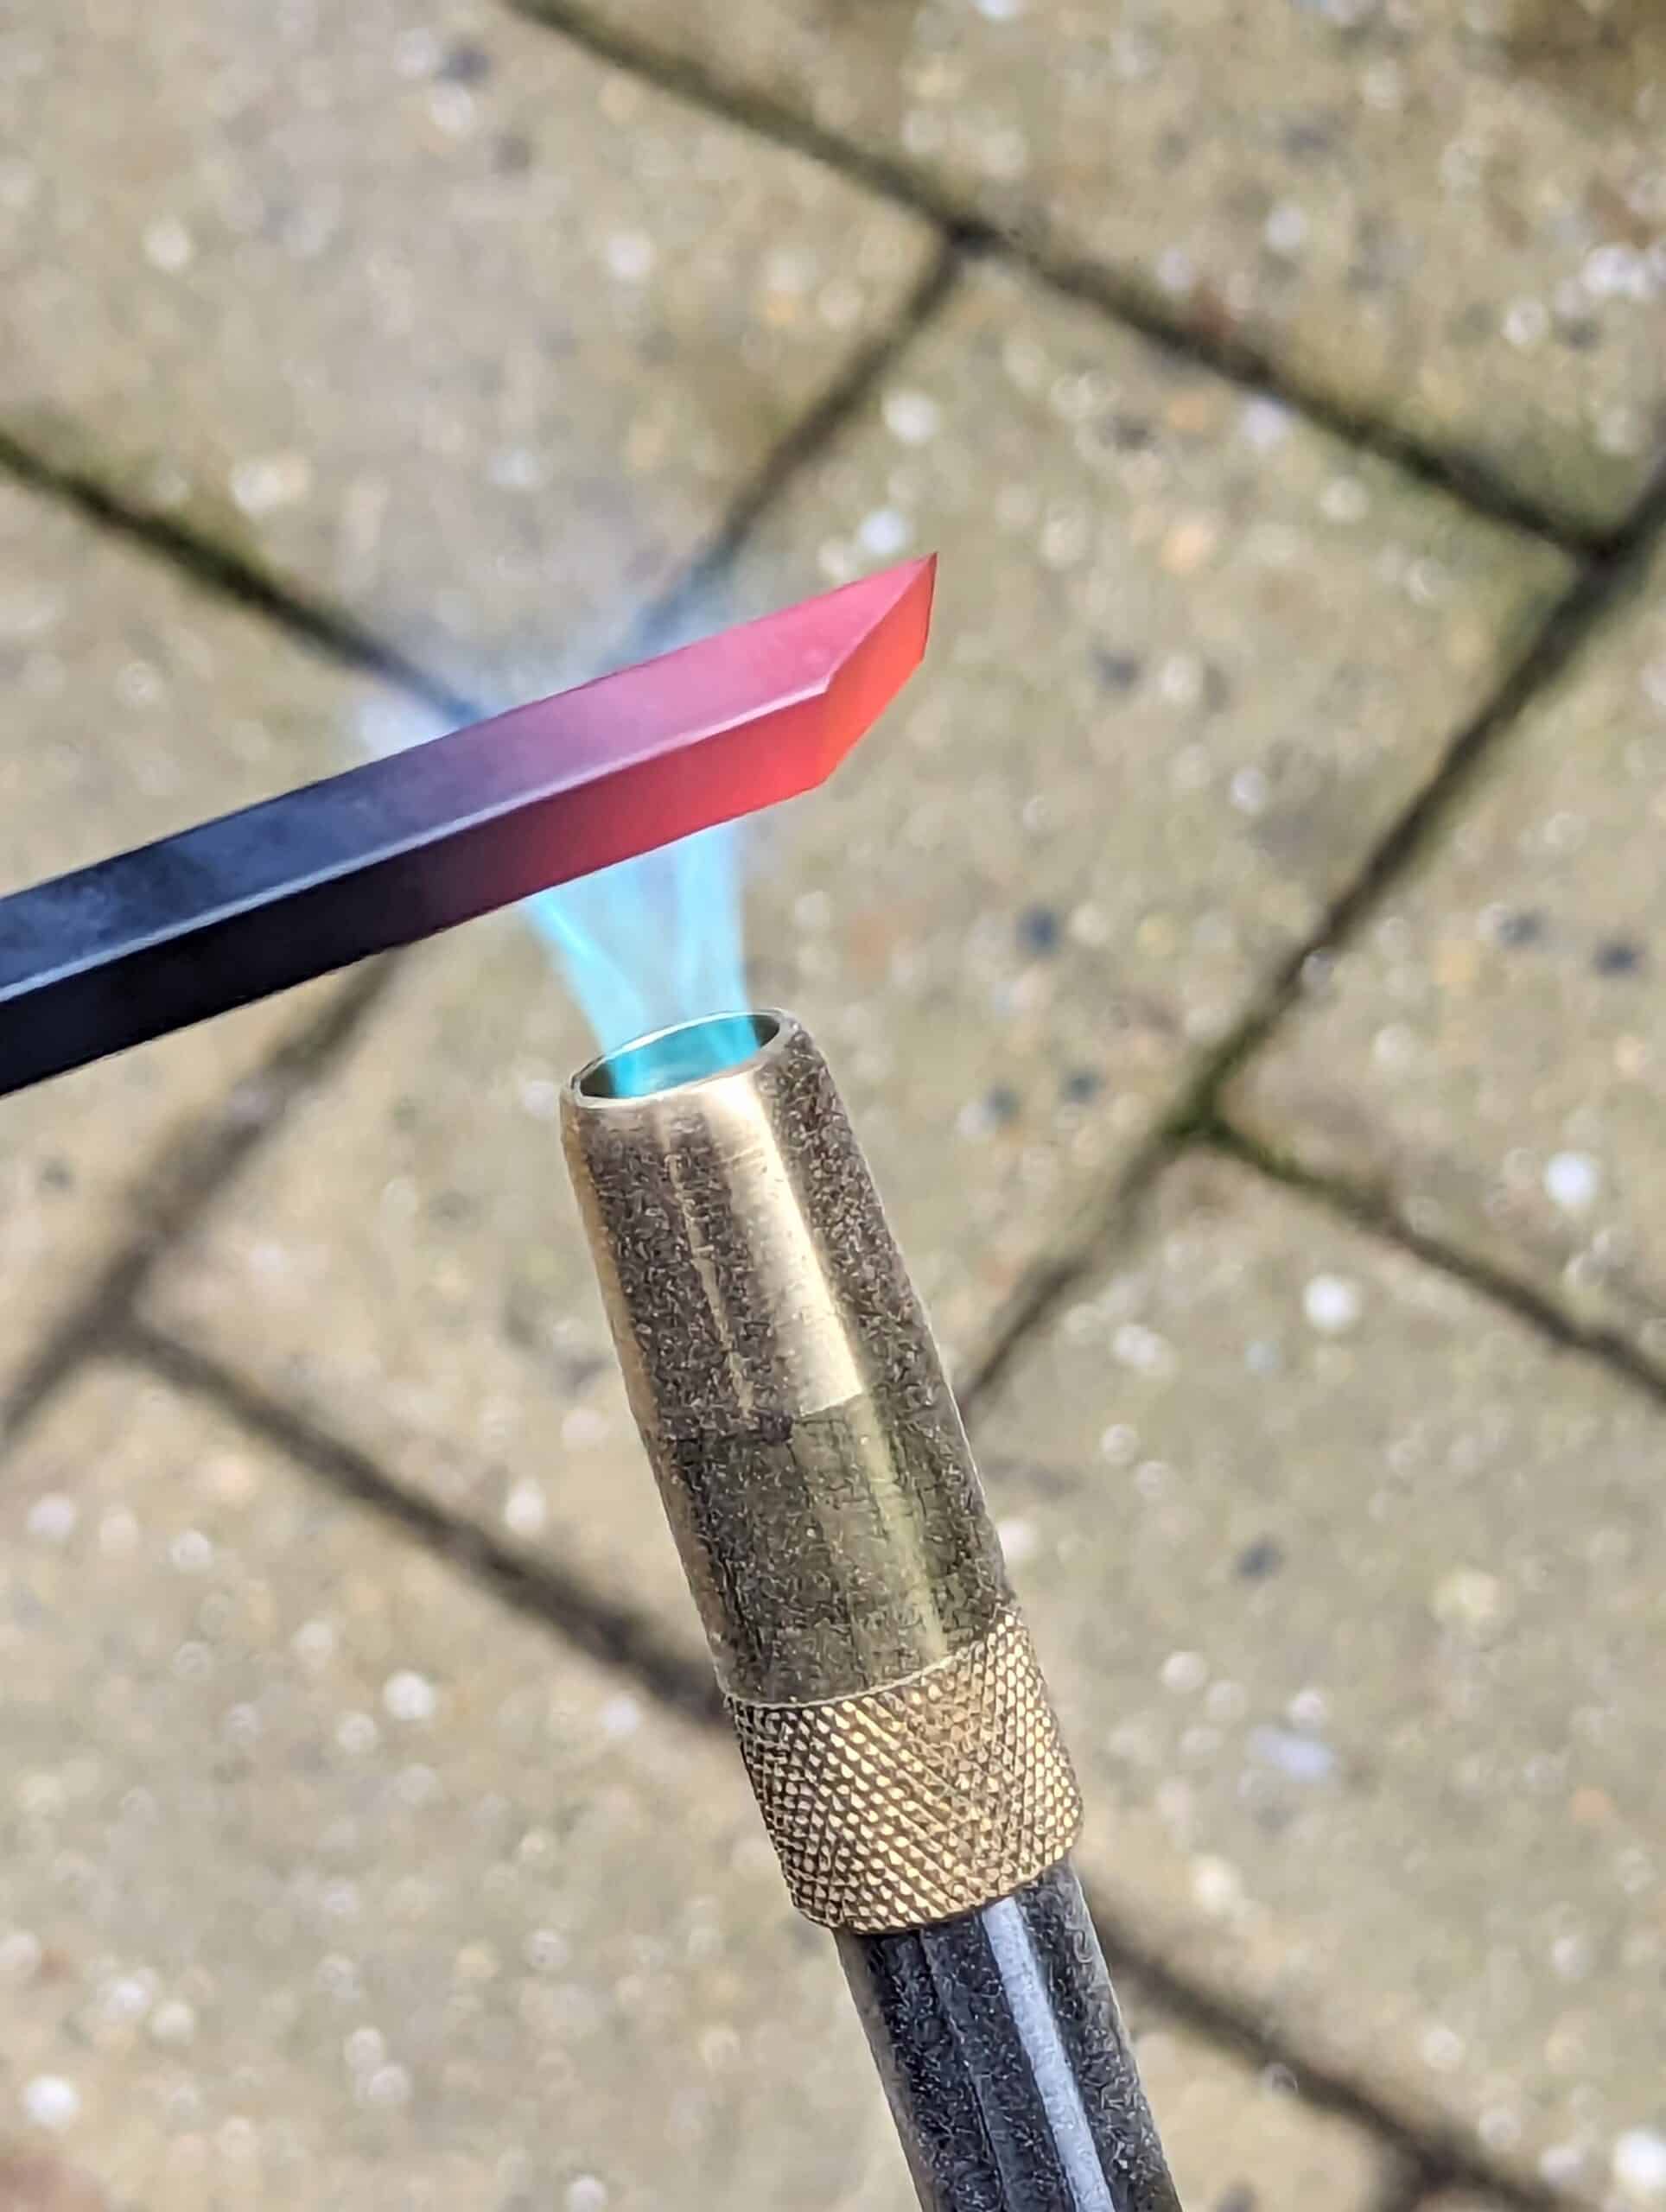
Once the actual working of the metal is done, heating with the blowtorch softens the metal and allows you to more easily make the bend for the neck that feeds into the handle. A tap or two with the steel hammer has just the right amount of drive you need. Once this is done you are ready to then heat the length of the blade from the cutting end and on up the length for an inch or so. Heat it to a cherry red colour and when even and consistent in colour plunge the whole into peanut oil (peanut oil doesn’t flare like other oils) to quench. This process hardens the steel. Following the hardening, place the blade into a regular oven at 350ºF for an hour, allow to cool and then do the same again. This will temper the steel and take out the brittleness and stresses which also prevents the steel from fracturing under pressure in use. I used two drilled holes to drill out waste wood and then connected the two holes with a chisel. In my case, I tried the tang of each tool in their relative holes to get a near but quite well-fitting friction fit almost but not quite to depth. I then installed the blade in the handle and tapped it home to seat. As these tools are primarily pushed into the wood they are perpetually self-seated as you work and should not come loose as you withdraw the tool from the cuts which is really what your little finger does second by second. You are now ready to finesse the tool as needed by coating the handle with s protective finish such as boiled linseed oil or shellac.
I made a small handleless chisel to test the steel’s sharpenability and then, equally important, the quality of its edge retention. After tempering in the oven for two one-hour stints at 390ºF, I used a chisel hammer to drive the edge 3mm deep about 150 times into ash, beech and pine. I have been using it for other things and the edge is still good.
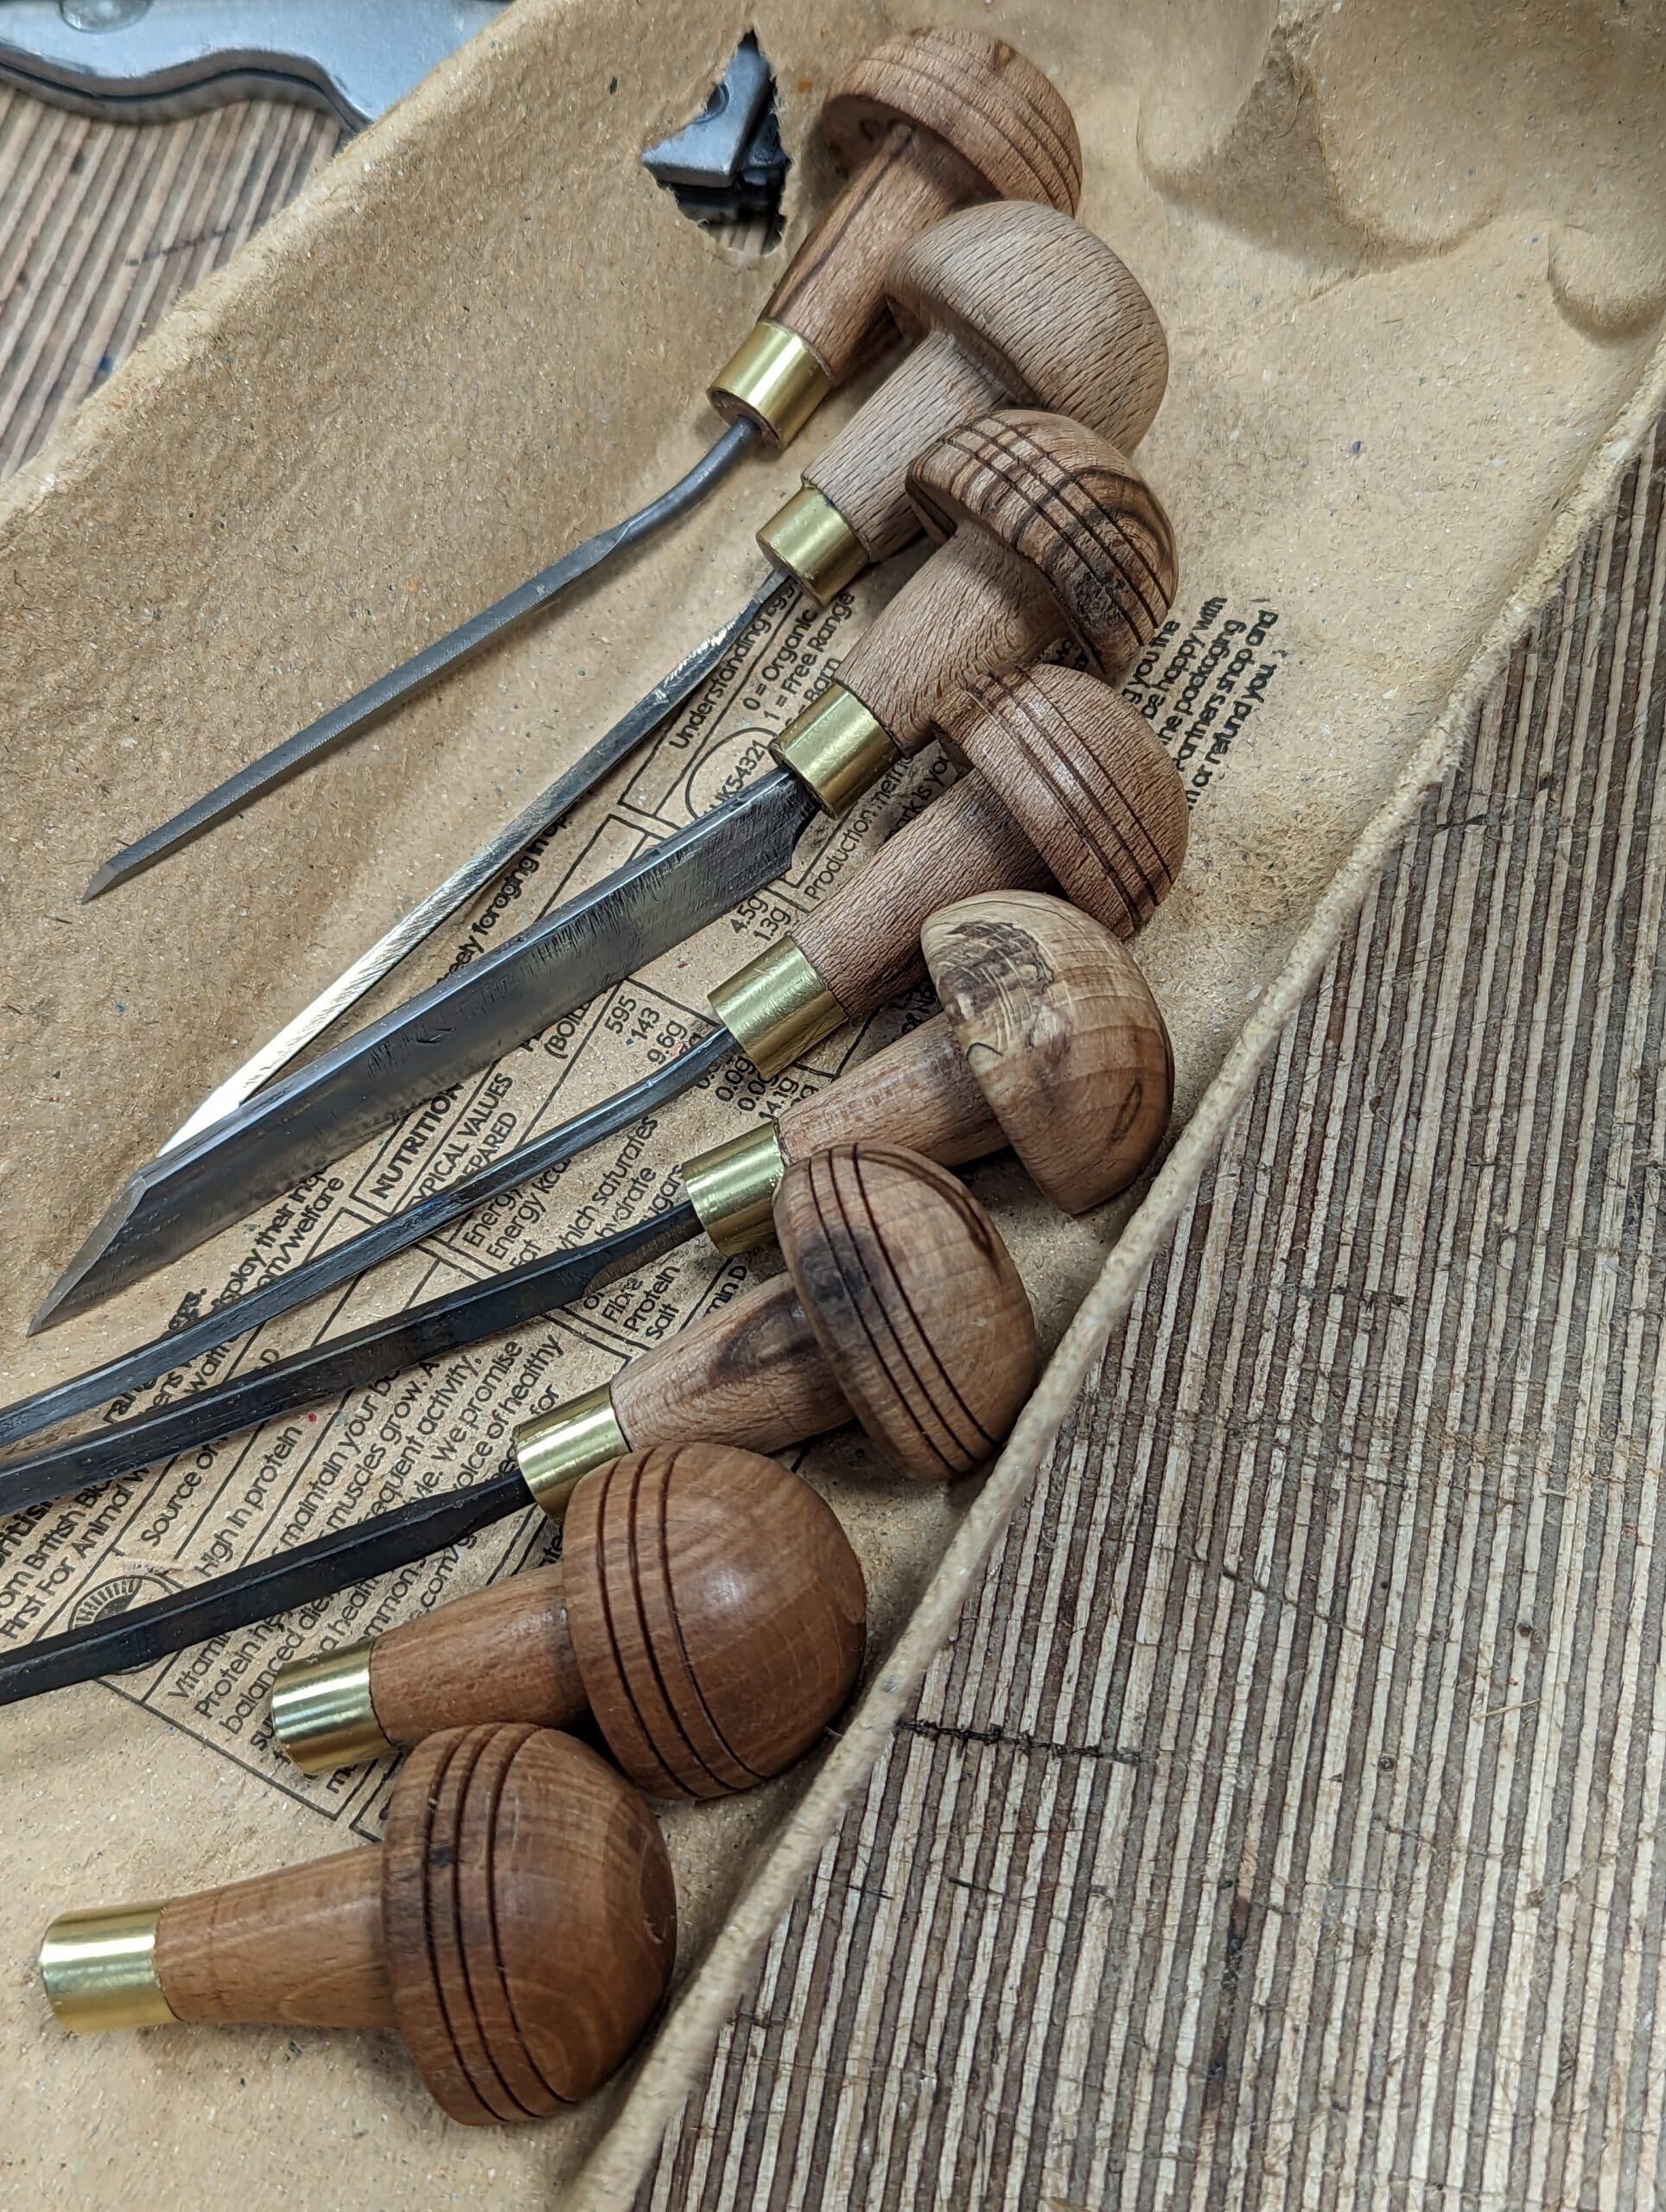
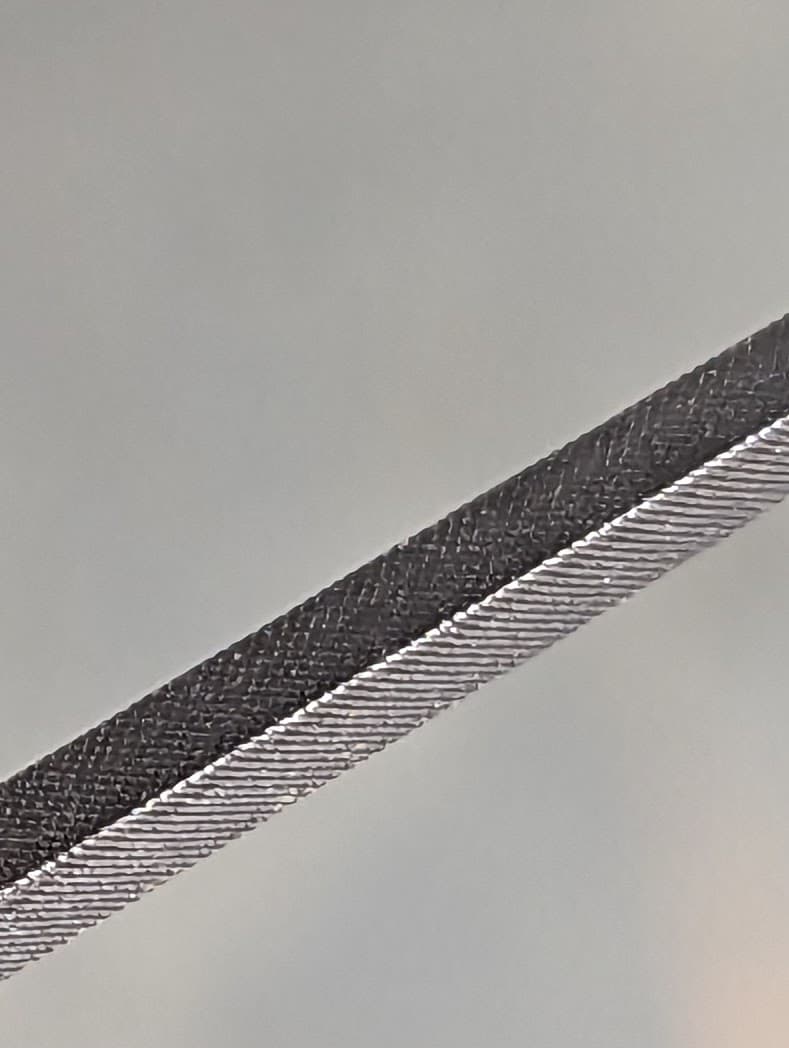
After the first handle, I made a second but then made 9 more but used the lathe and turned them. They take five minutes apiece as a repeatable project one after the other. My favourite to make and use is the one made from the worn-down worn-out three-square triangular file. These are the small files I use for sharpening my dovetail saws. Though the flat faces may look good it’s not these faces that stop them working but the unseen extreme corners where the super thin edges break down superfast. Triangular files are indeed six-sided, three wide faces and three very narrow ones as flats where each of the wide faces come together.
The file-ability of files once reheated and left to cool without forcing makes the files soft enough to file and hacksaw. You have excellent tool steel to work with and when the files are indeed worn down and unusable they cost you almost nothing to make into a top-quality tool.
Wow that was a ton of research, and I thought you were all day making furniture! You’re a busy man, Paul.
Not really, Craig. We accumulate knowledge in many realms and the knowledge and skills are transferable. What we have to guard against is the snobbery in professionals and professional realms. When we are learning about tolerance and such it often comes from those who are the least tolerant but I won’t name names or job titles. The questions we might ask ourselves is are we woodworkers or instrument makers, gravers or woodworkers or artists or all of the above? When I made a cello with my son a professional violin maker specialising in cello making asked me why we chose the cello as a first instrument, commenting on how beautiful the instrument was. I asked him why and he answered, “Because it is the most difficult instrument of all to make? My answer to him though was, “We didn’t know we couldn’t make one so we made it.” Yu see to me violin making is total woodworking with the presumption of the job description. Tell someone you are a carpenter and the hearer just goes, “Oh.” Say you are a violin maker and they go, “Oh, wow!” Making the gravers were the simplest tools I ever made and even with the trialing and testing the tools enabled me to be using one in and even more a matter of minutes. I am not an engraver or am I now I have done some. When I pick up a pencil and sketch I become an artist and having written to well-received and strong selling books I am an author. The fact that I was raised in social housing and left school being told by the then head teacher that I could “Never be educated.” never stopped me from discovering that I was well educated and capable of many things but in freedom from the baggage other people had to carry around with them.
For a nice comparison with someone working in metal, there’s Chris of “Clickspring” on YouTube. I found him first in a wonderful series about making a clock from scratch. He’s done a ton to teach himself how to engrave, and made plenty of videos on it. His longest standing project was making a working version of the Antikythera Mechanism, including making, and only using, all the tools that could be assumed to be in the toolkit of the ancient craftsmen who made the original. I believe he’s the co-author as well of an academic paper on the Antikythera Mechanism, too. Marvelous stuff!
Possible typo – 350ºC. Should be ºF?
Yes. Done and thank you.
I also use old files as lathe chisels. I have a dozen worn out files that were my father’s.
I use them to make thin parting tools, and both skew chisels and shaped chisels for different turning profiles. I never thought to reheat and temper them, so thank you. I’ll give that a try.
I also found that the poorer grade Nicholson half round mill bastard files make good wood rasps. They are cheaper than a truly good rasp, and they do a good job of finish shaping after the Shinto rasp does the heavy lifting.
Fantastic, I must give this a try. A couple of questions Paul: first, have you ever given us a “tour” of your metalwork area/station? I currently do my very basic metalworking at my woodworking bench, and it – obviously – creates a lot of mess. I wondered if you had a setup akin to your workbench setup, but for metal? If I’m going to build something, it’d be nice to consider the various requirements and pitfalls before doing so. Things like bench height, vise requirements etc, that I have no real idea about. Secondly, when you temper steel in your oven, is it safe to just throw them in when you’re cooking other food? Rather than have the oven on twice I mean. Or do these things give off any toxic fumes that I’m unaware of, and I’d be better buying a cheap toaster oven for instead (I saw one in Aldi last week!).
Thanks,
Rico
A few months ago, I needed a very small chisel to clean up tha bottom of a groove (1.5 – 2mm) not having one or willing to go try a buy one I decided to make my own. I had a piece of 3/16 x 1/8” spring steel, so by cutting and filing, a few minutes on the lathe for handles I had them ready. Some 60 years ago an old blacksmith taught me how to harden and temper steel (without an oven). So in the space of 1 1/2hrs I had 3 micro chisels 1- 1.5 and 2 mm wide, they worked great and I intend to make a few more slightly larger.
Cheers Paul
Seeing comments of Rico and Paul Gysemans, using an oven two times an hour at 180°C for a single tool seems a bit pricey.
While this two times an hour at 180°C might be the best method, there is an old way to do it.
1. harden the steel as described by applying the heat at the cutting edge and cooling after reaching cherry red;
2. clean the edge end with a steel brush and/or sanding paper;
3. use the propane torch to heat the metal two or three inches away from the cutting edge. The heat will propagate along the steel toward the cutting edge. The oxyde on the cutting edge color will change with the reached temperature.
One can find on internet the relation color/temperature.
pale yellow: 220°C;
Straw yellow: 230° C;
orange: 255°C;
…
dark blue 288°c
…
and so on.
Cool in peanut oil immediately when the desired color is obtained.
Straw yellow is hard enough for a scrib pin to mark metal.
I think 350 F for an hour with an apple pie and graver sharing the oven would work – though the pie should probably come out around 40 – 45 minutes. The cost of running the oven would be split with the pie.
I tend to cook in the oven when I temper my steel blades and cutters, etc for use but, of course, I usually save up half a dozen to do at once and worry less about the cost when I work frugally anyway.
Thanks Paul, RR and Sylvain! That has answered my question.
Reminds me of a technique I used many years ago. Heat the tool to cherry red, just quench the tip that needs hardening, not the whole heated length.
Abrade the quenched tip with abrasive and wait for the heat to conduct back to the tip, when it’s the right colour, re-quench the whole tool.
You can use Tempilsticks to indicate the metal temperature. These are waxes that melt at a range of temperatures and give quite an accurate reading.
I am a carver making walking sticks and various small sculptures. I have found old black Allen keys (as apposed to chrome platted) very handy for fine chisels. A favourite scraper used for bark removal and other more detailed work is made from a large mechanical reciprocating hacksaw blade, ends and edge ground to requirement.
Do you think mineral oil would work as well as peanut oil to quench steel?
Too many liquids to try so I go with what is known to work. I don’t own mineral oil for any good reason and wouldn’t go out to buy it but over the years I have used peanut oil on good advice instead of motor oil which smokes profusely, stinks and often flares up. Peanut oil does none of this so I use and recommend it. You can quench in water and it will harden the steel and in a bind this is what I would use. That said, water can stress the steel.
Kudos to Hannah for sticking the foraged boxwood somewhere for whatever project might appear. Many pieces of more regular wood may ultimately end up in the fireplace but the ‘specials’ are just that, special.