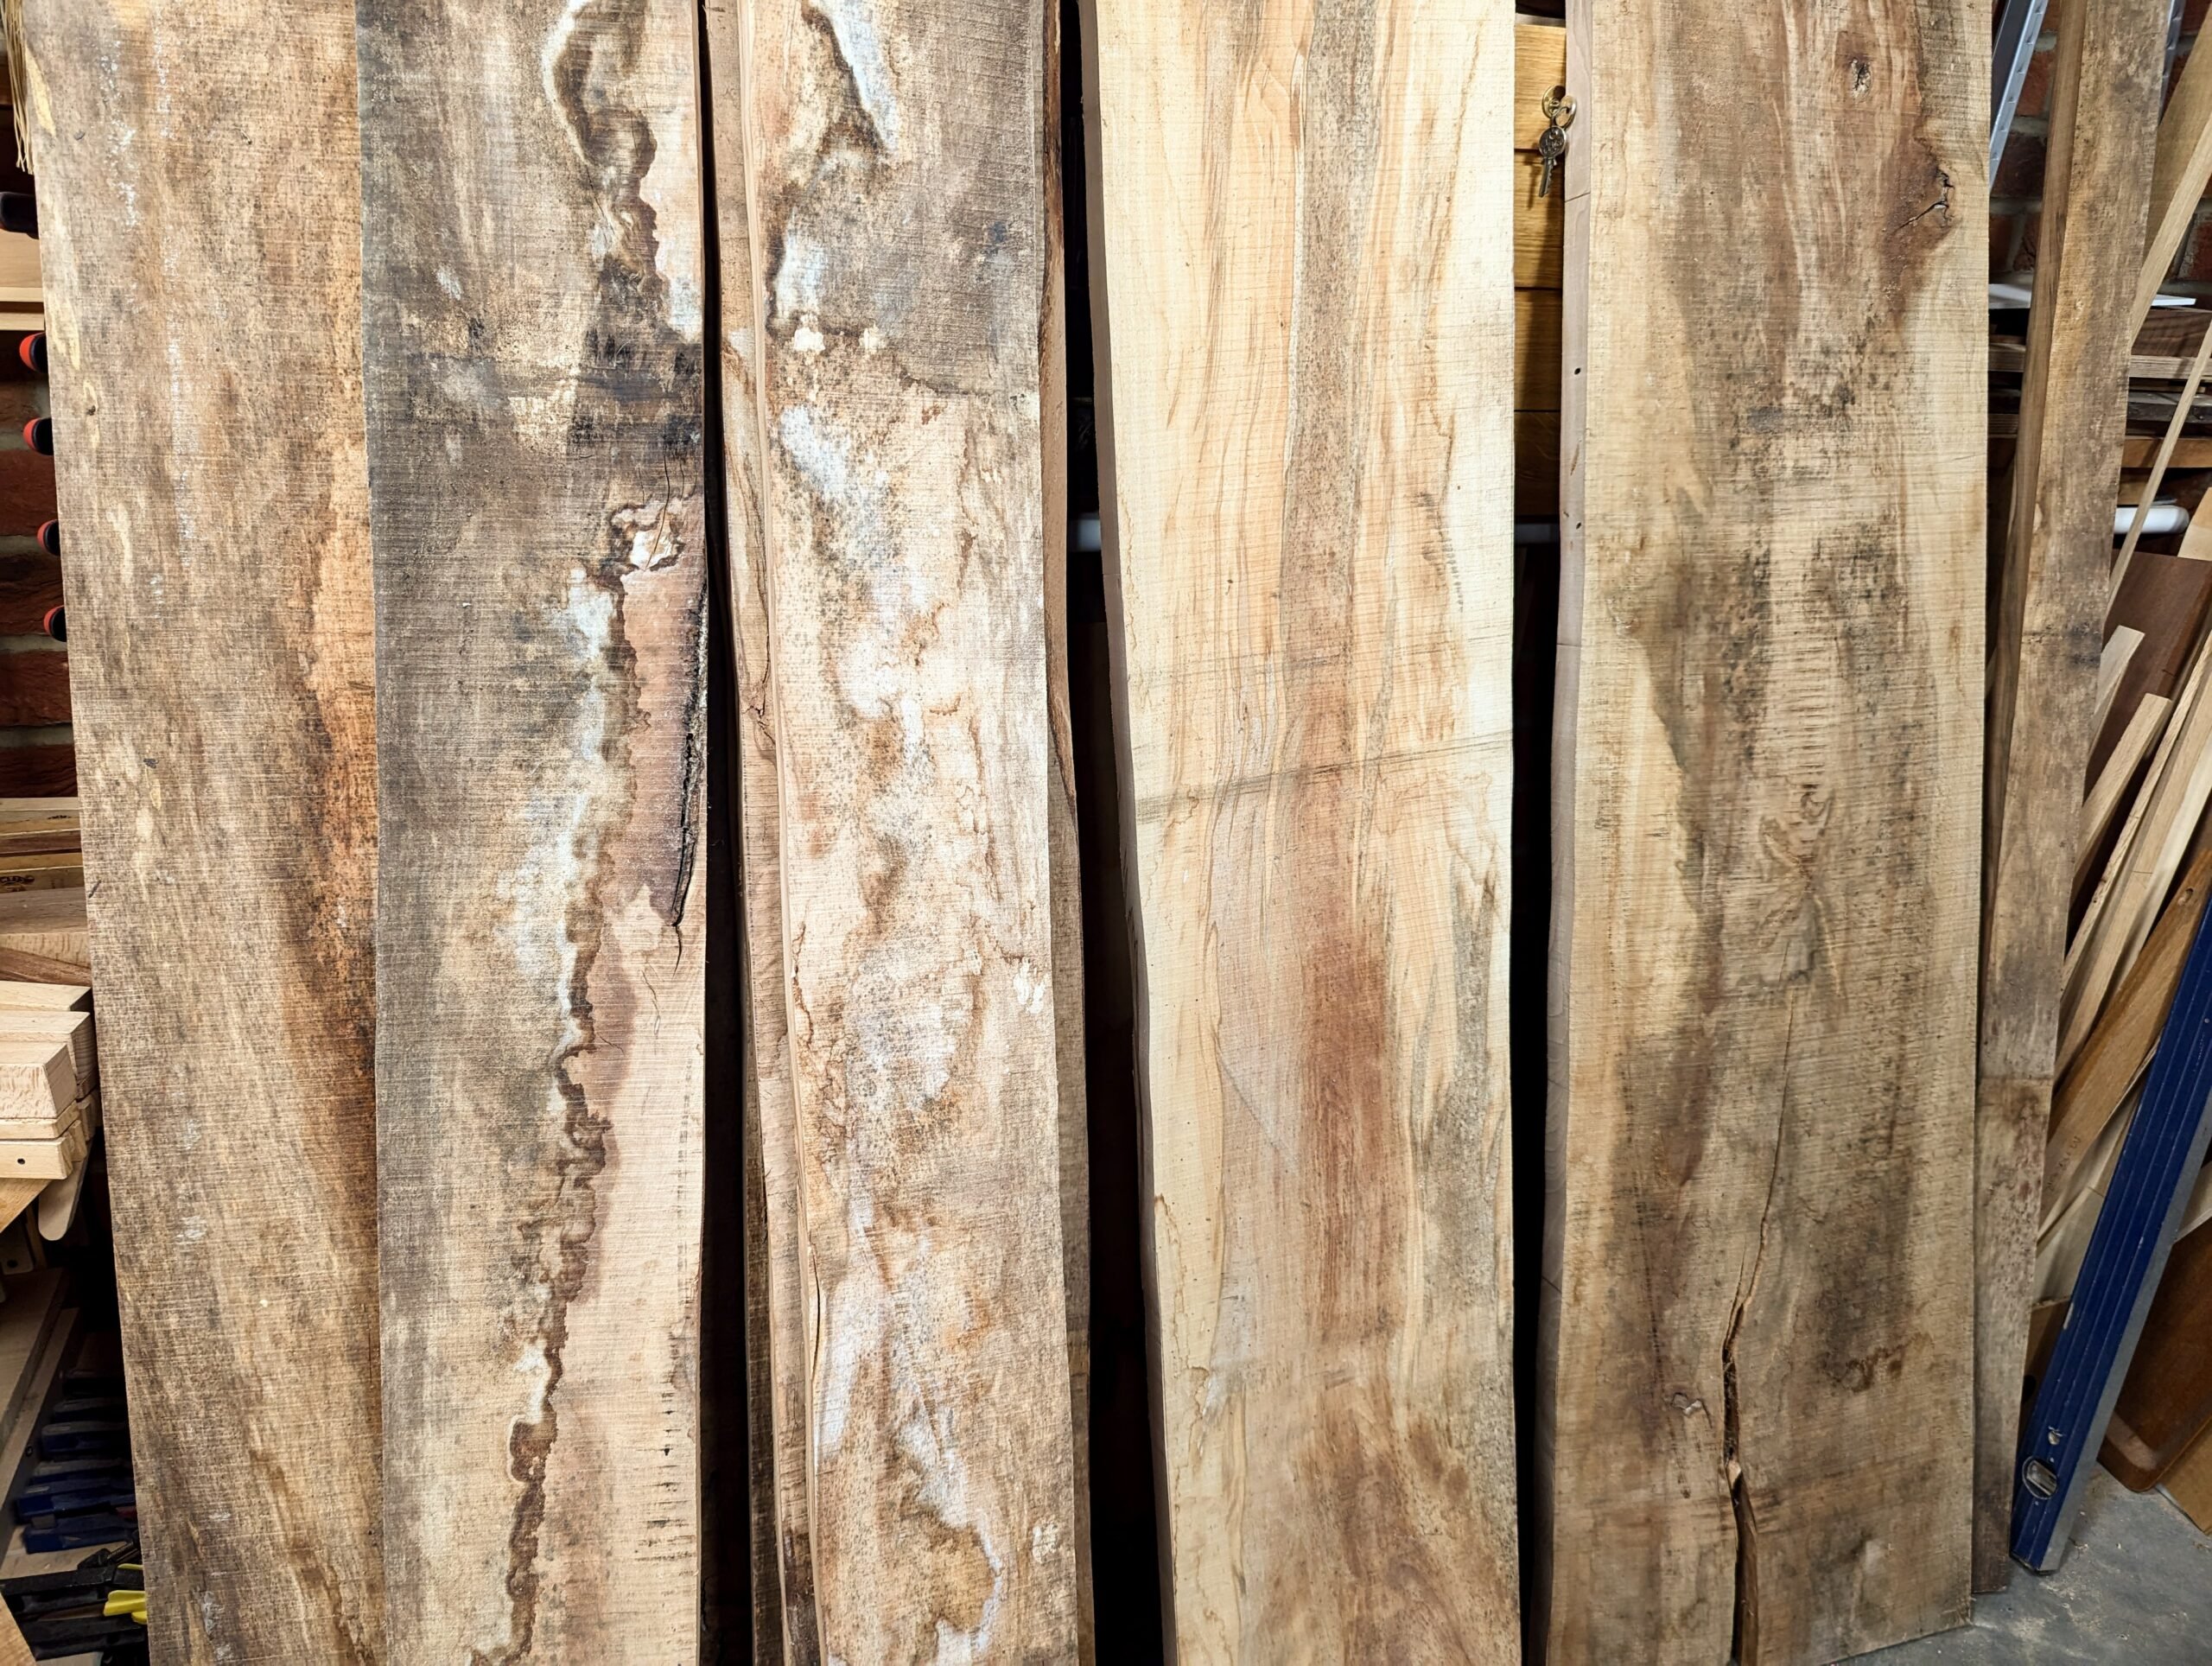
You Can’t Judge Some Woods . . .
. . . by their cover.
My wood stacks come from long planks that needed straightening for joints before joints could be made. The joints rely on straight edges to two adjacent faces trued first by hand planes and opposite faces sawn parallel by saw and planed smooth too. This has been my way for decades though oftimes a machine might have kicked in for commercial elements to make it work.
I have many tricks that make my work go. Without these tricks, my work would be too laboursome and strenuous and the tricks are not for using hand tools so much as a bandsaw. Machines in my world take care of donkey work but I don’t want machines hogging up my small floor space any more than is necessary. As a result, I have one four-square-foot footprint to that end. In this area stands a bandsaw on wheels. For long lengths, quite rare, I can spin the bandsaw to an open door and exit my long cuts through that door. 98% of handmade furniture will be in lengths shorter than three feet. Therefore the bandsaw remains fixed in its place at the end of my workbench. I raised the bandsaw to what I consider a working height. Bandsaw designers are not users. 34″ to the tabletop is four inches too low for most woodworkers. It’s a stupid height. Neat for me though is that I jacked mine up to align the top with my workbench. This really helps for a variety of reasons I care not to explain beyond longish pieces needing cross-grain length-shortening-cuts can rest safely on my bench top as I feed an end into the sawteeth.
A major obstacle to truing wider and longer pieces is the amount of donkeywork it needs to flatten a surface ready for parallel truing to the opposite face and then the edge truing too. Having a jointer and a thickness planer in two machines or even a combination machine is too space-consuming. Also, I am not one for stacking up machines and pulling them to task for every cut needed. Boring and inefficient use of time and space and I WANT hand work most but not all of the time.
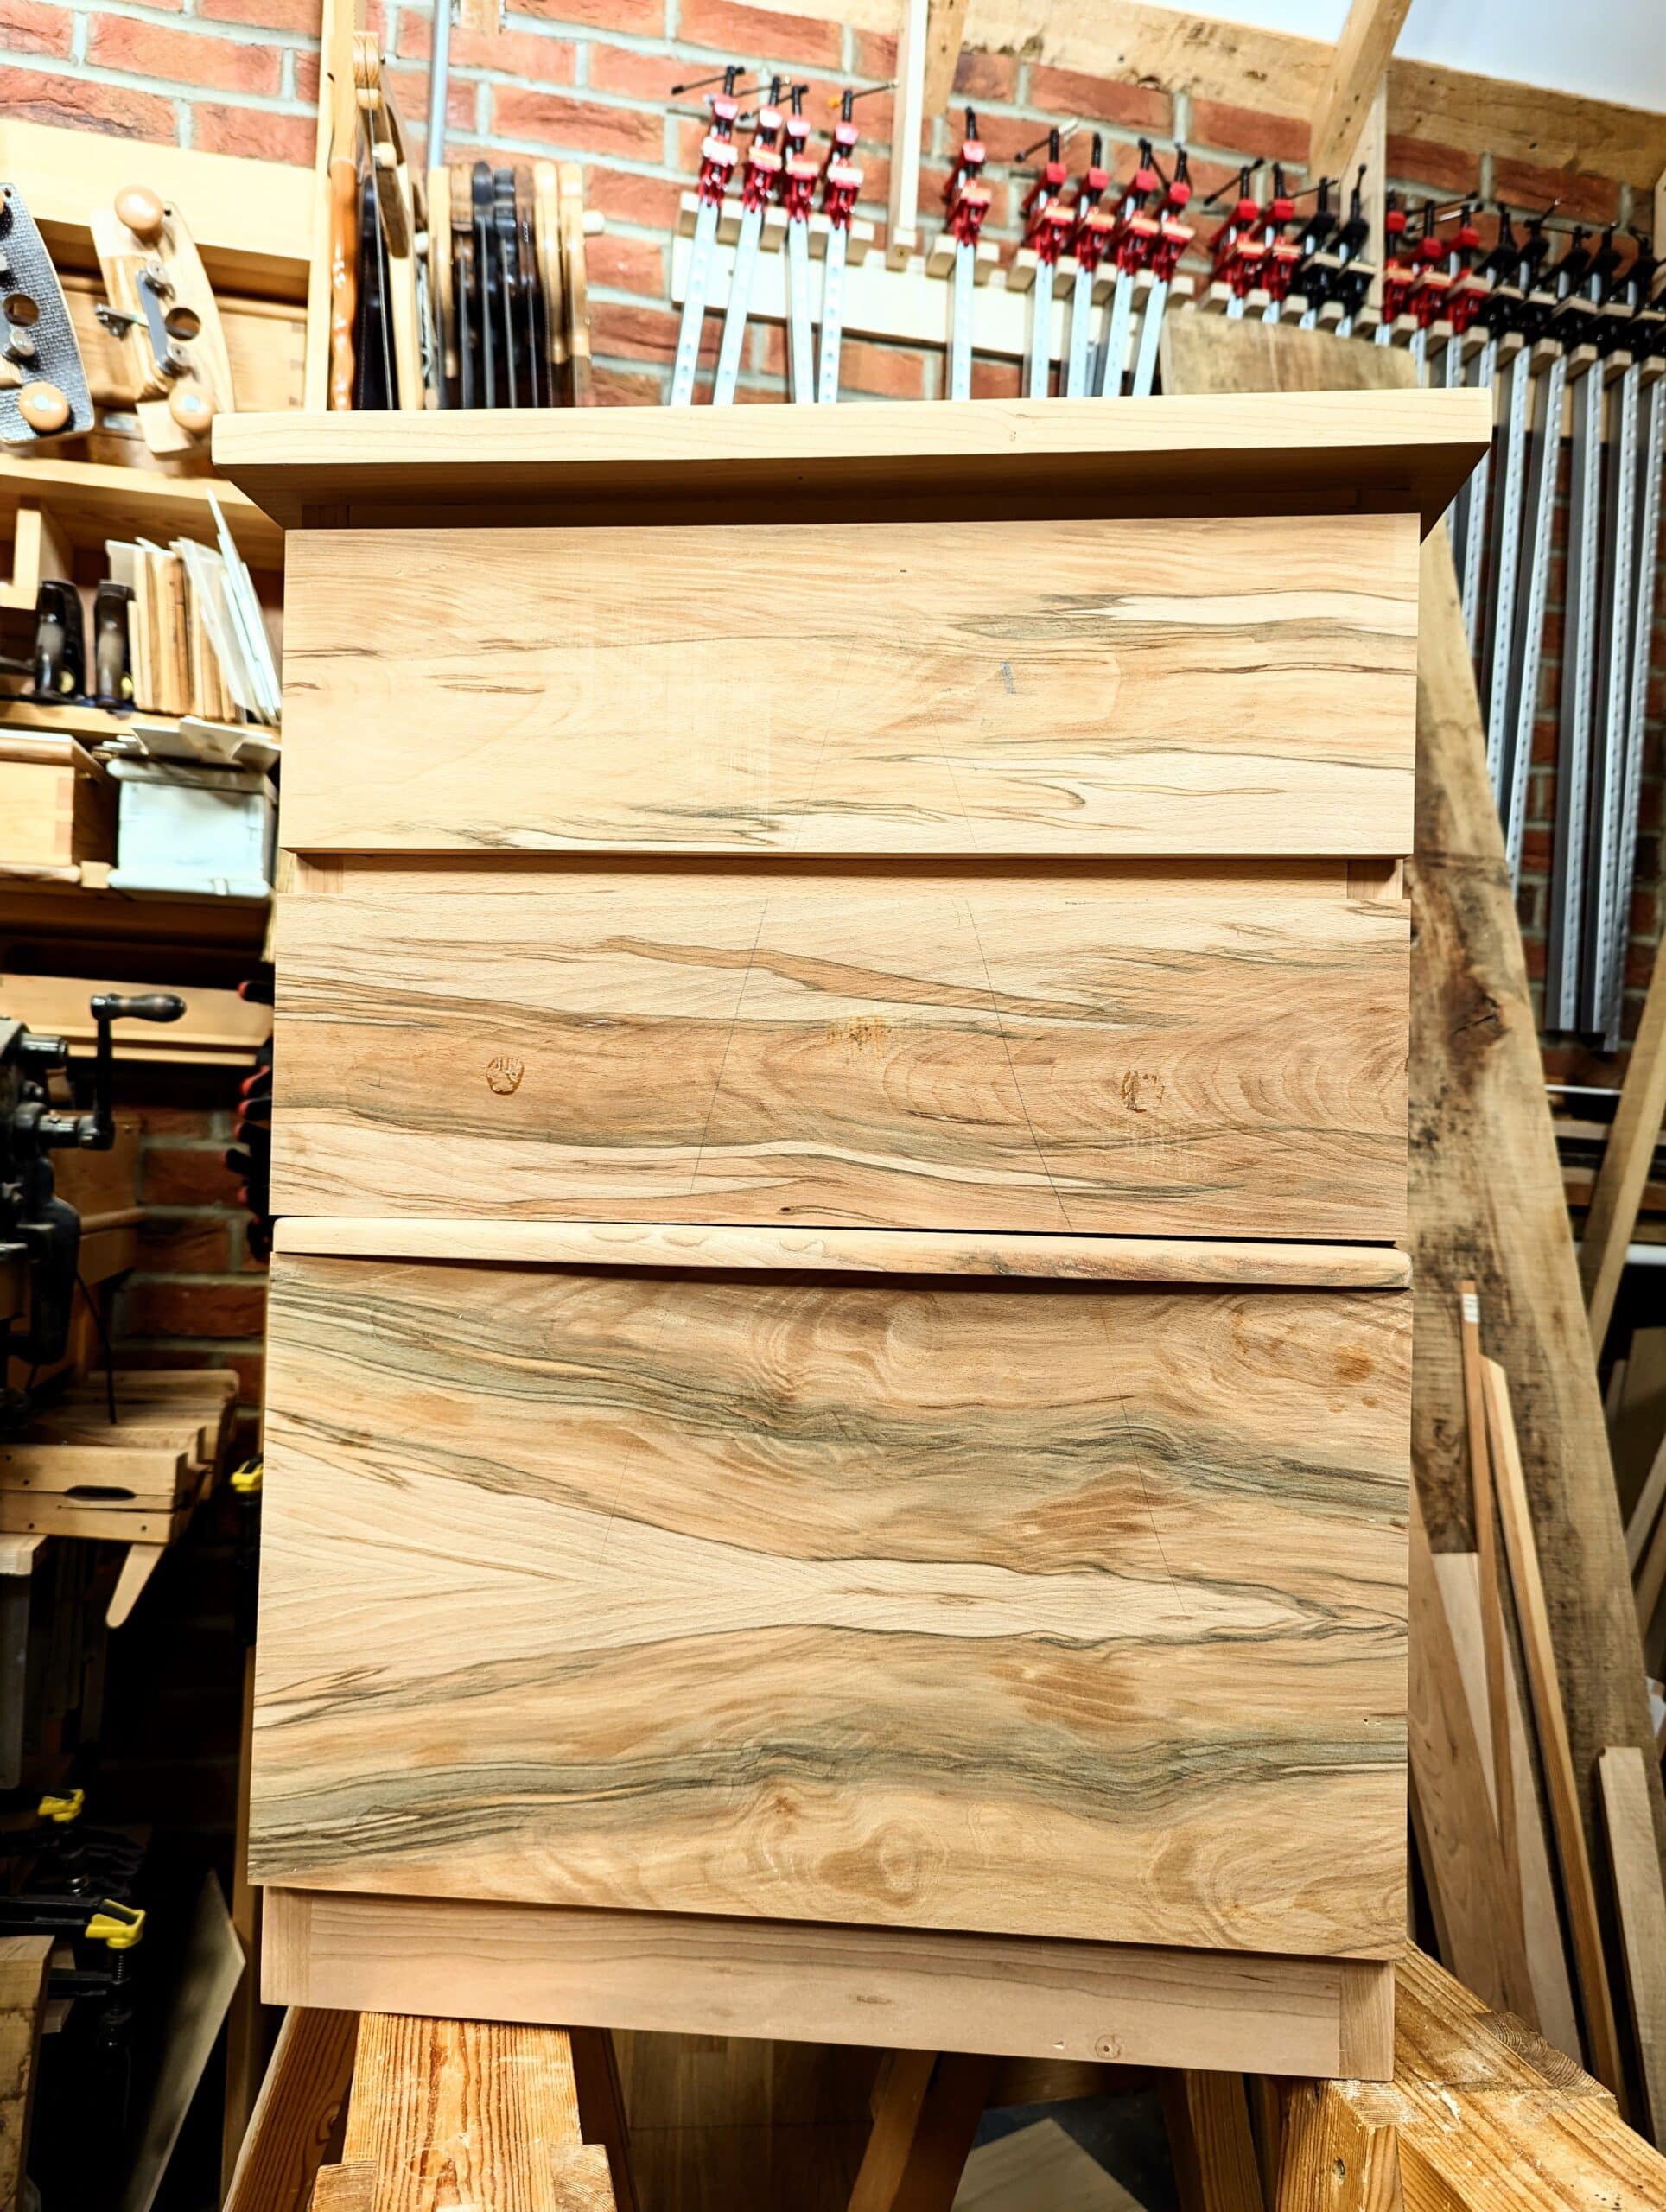
So here is one of my jointing tricks for wide boards. I just made a filing cabinet minimally using my bandsaw for stock reduction at the most minor level. Ripping five- to six- and some seven- and eight-inch wide boards is not really much fun using a handsaw and it can be less fun using hand planes even when you have a strategy if you have an eight of an inch to take off that defies handsawing. That said, I do still do it.
The bandsaw enables me to cut two panels from a single piece and also helps to create bookmatched panels. In fact, no other power machine gives a more economical outcome be that in material or in time. Bookmatching in solid wood or by slicing thinner facings is definitely a bandsawing task. You’ll lose a mere sixteenth of an inch max if your bandsaw is set up correctly and you have a sharp blade installed. Though I did indeed plane the faces of all my materials for the drawers and facing. And I didn’t use any of my arsenal of bandsaw tricks, I’ll tell you of one here and now. This could save you half an hour to an hour on a single piece. It’s good on my machine up to around 10-11 inch wide boards depending on the grain fibre resilience in the wood type.

Firstly, sight in two winding sticks to see what you are dealing with. I hasten to add here that narrower sections of wood might well be best dealt with with bench planes alone. This method is mostly beneficial on boards say 3″ and up. Narrow stock is readily and easily dealt with bench planes unless the distortion is particularly bad. This sighting with winding sticks in will magnify any discrepancy by dividing the width of the board into the length of the winding sticks for sighting purposes only.

By shimming one of the winding sticks until the twist is eliminated sightwise, and then dividing by two, you will determine how much wood you will need to remove from corner to corner to deliver a flat board. That’s how winding sticks work. I slide a wedge under one of the winding sticks and slide it in until the winding sticks show coplanar levels.

Use the vernier to give you a dead-on reading.

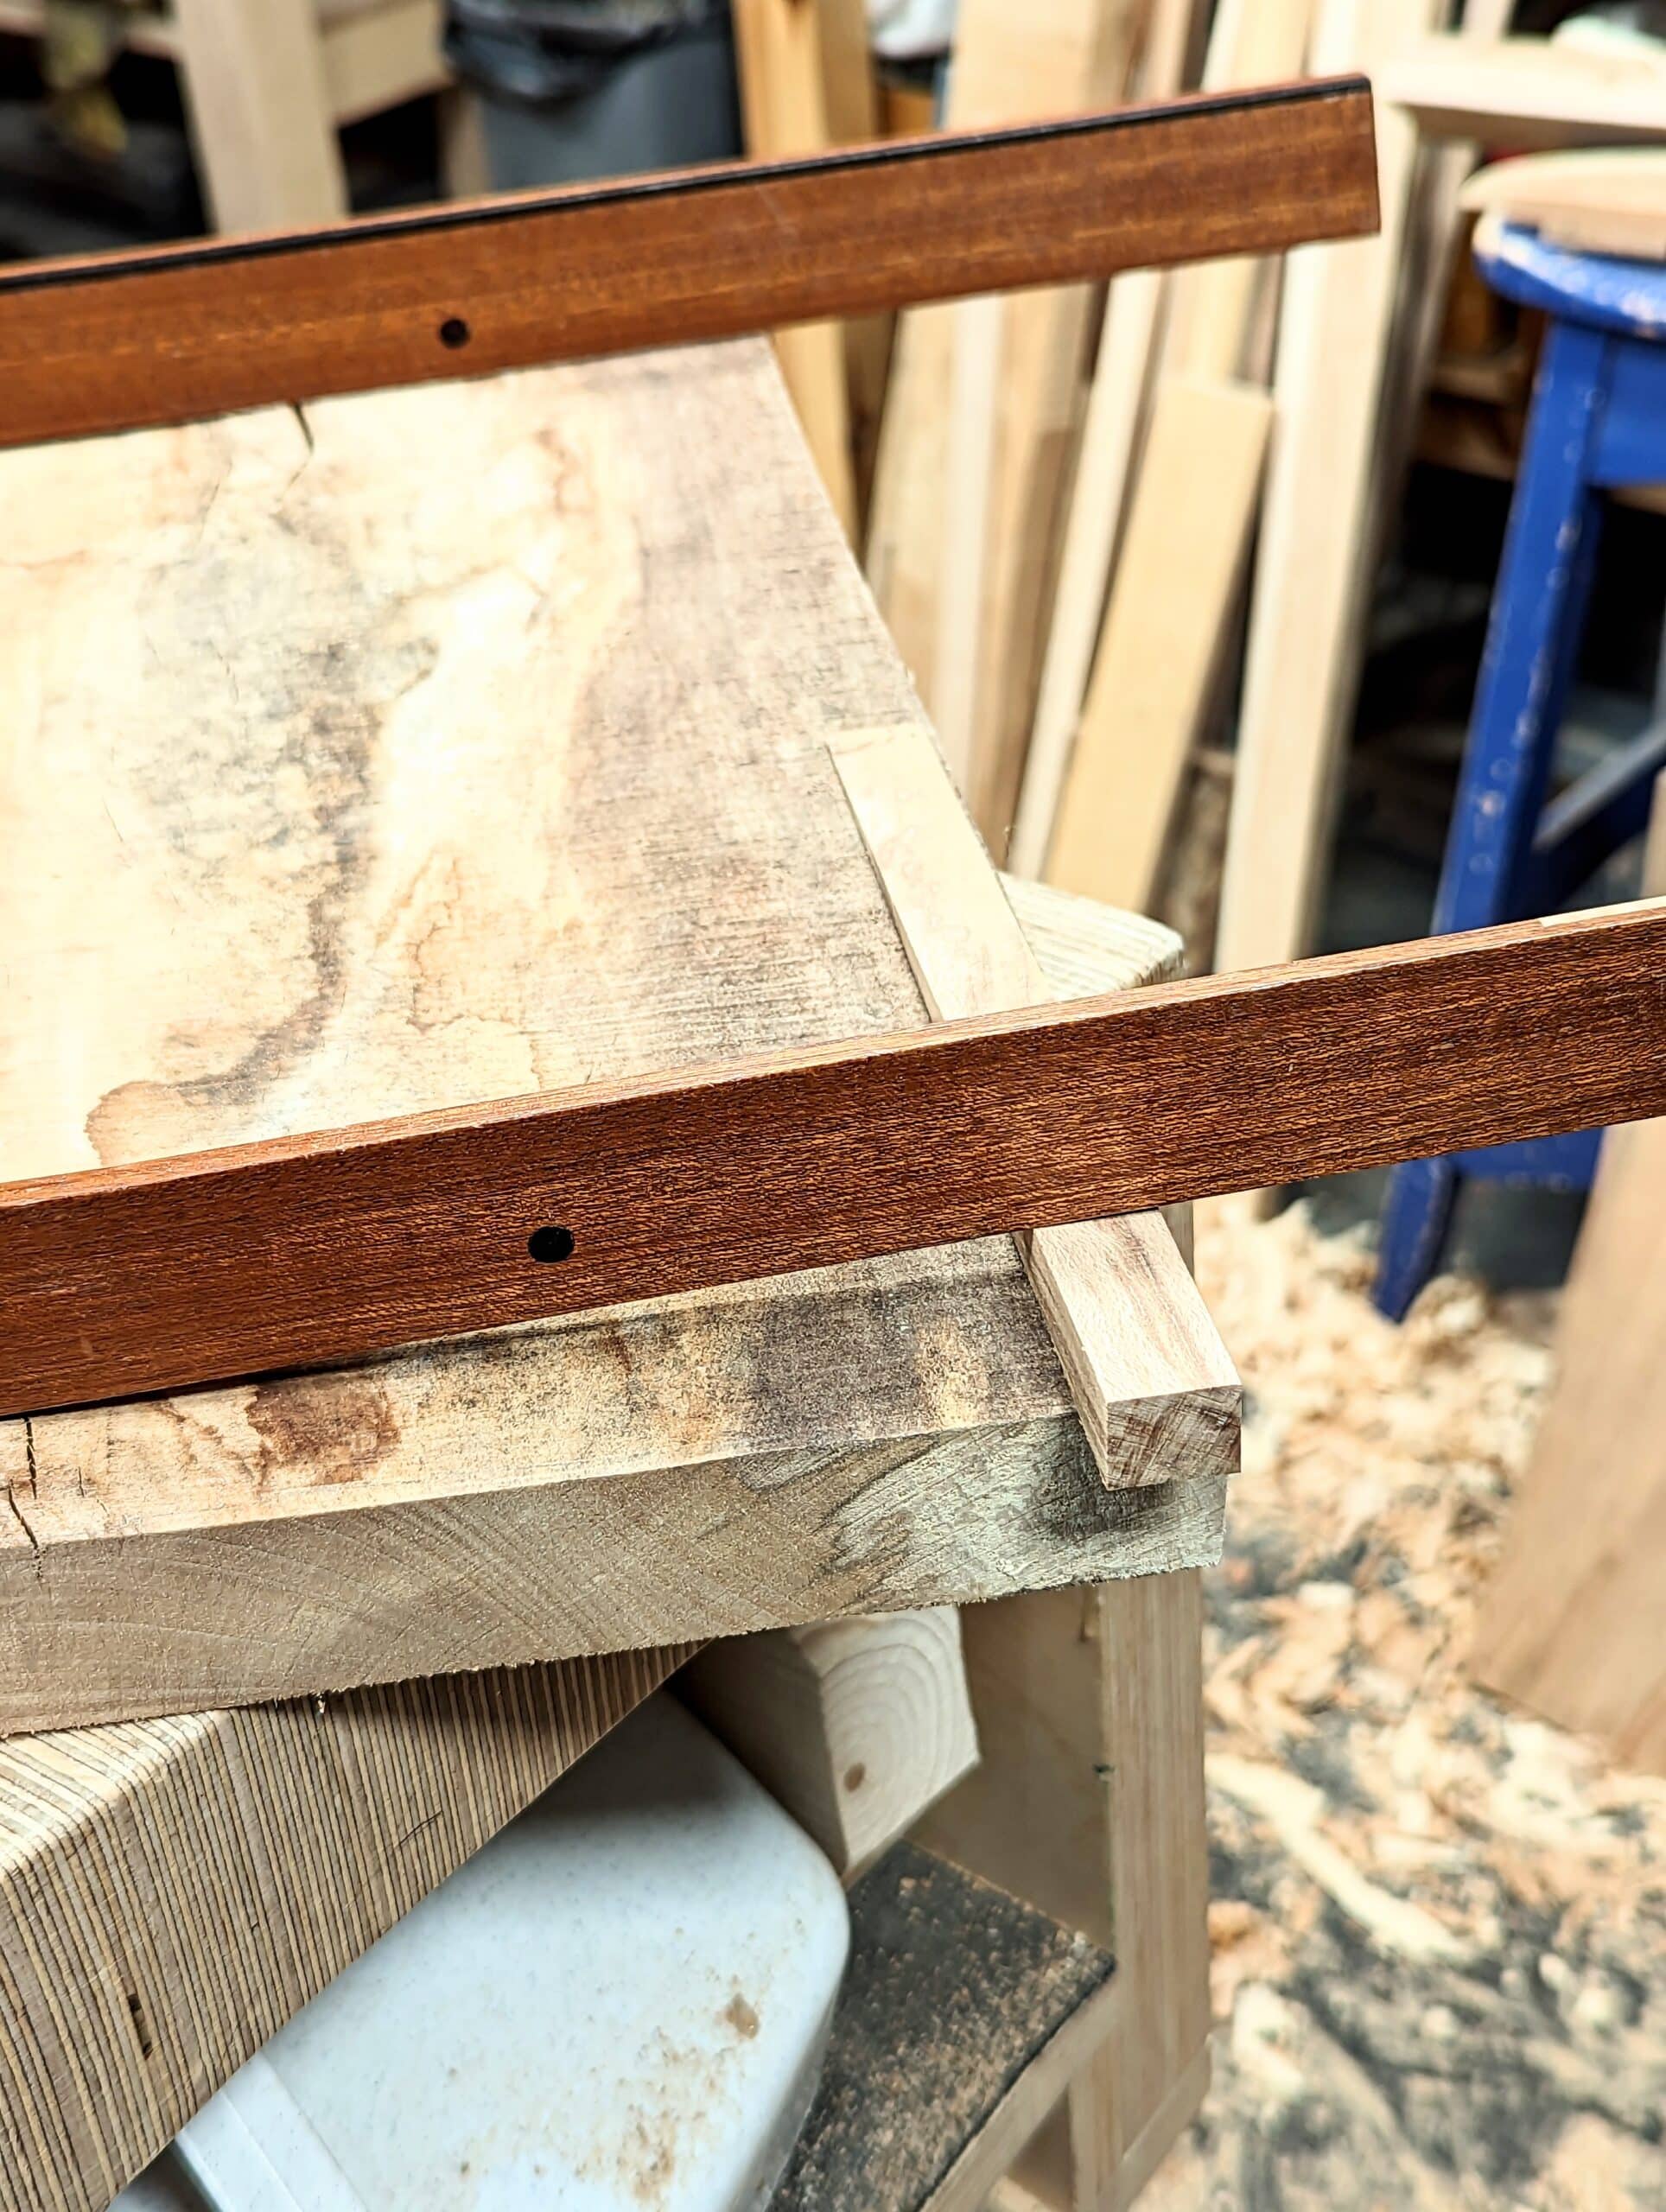
If you take that divided thickness and cut two sticks the width of your board in length to half that thickness, 5.2mm in my case here, you have two representative pieces of what you must remove.
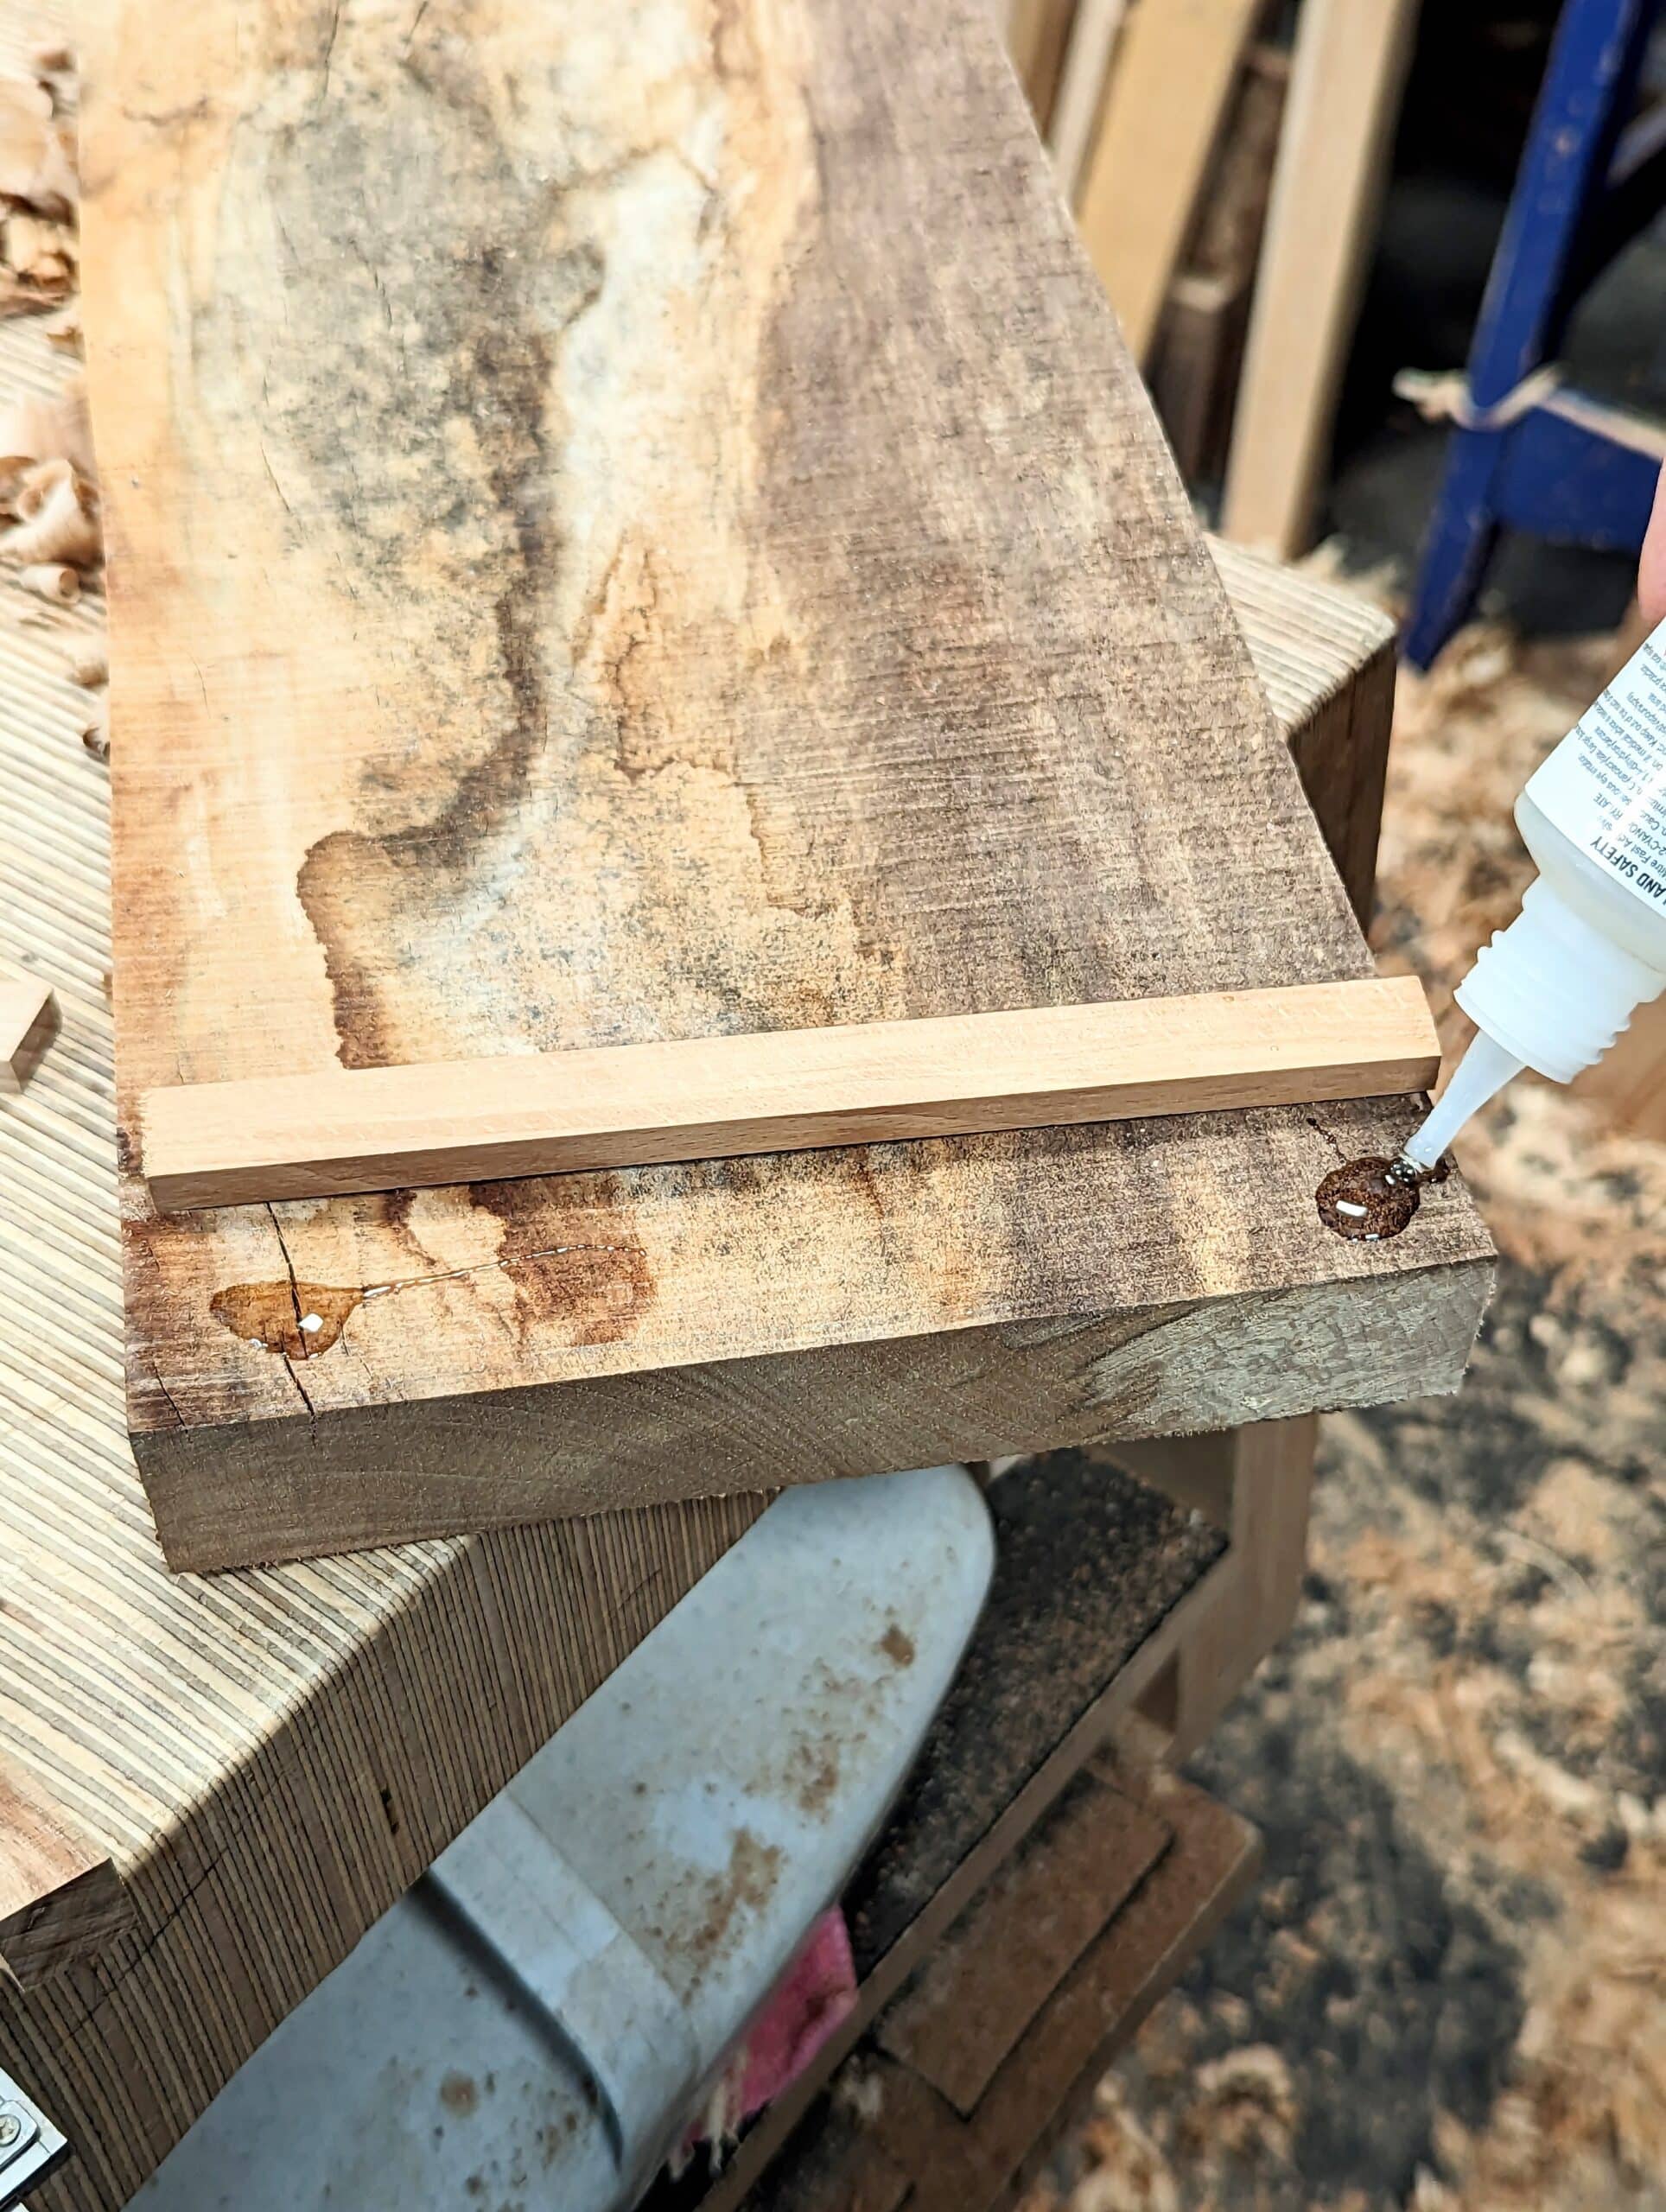
With the cupped side uppermost, drop two drops of superglue onto the two extremes of the board at the corners or near to.


Squirt some accelerator onto the stick and press it onto the face over the glue. Do the same at the opposite end.

Now set your winding sticks in place and check that the twist is still the same just in case. Whatever difference you have, use a wedge wonder one of the winding sticks to establish a difference and measure the wedge with calipres for accuracy.
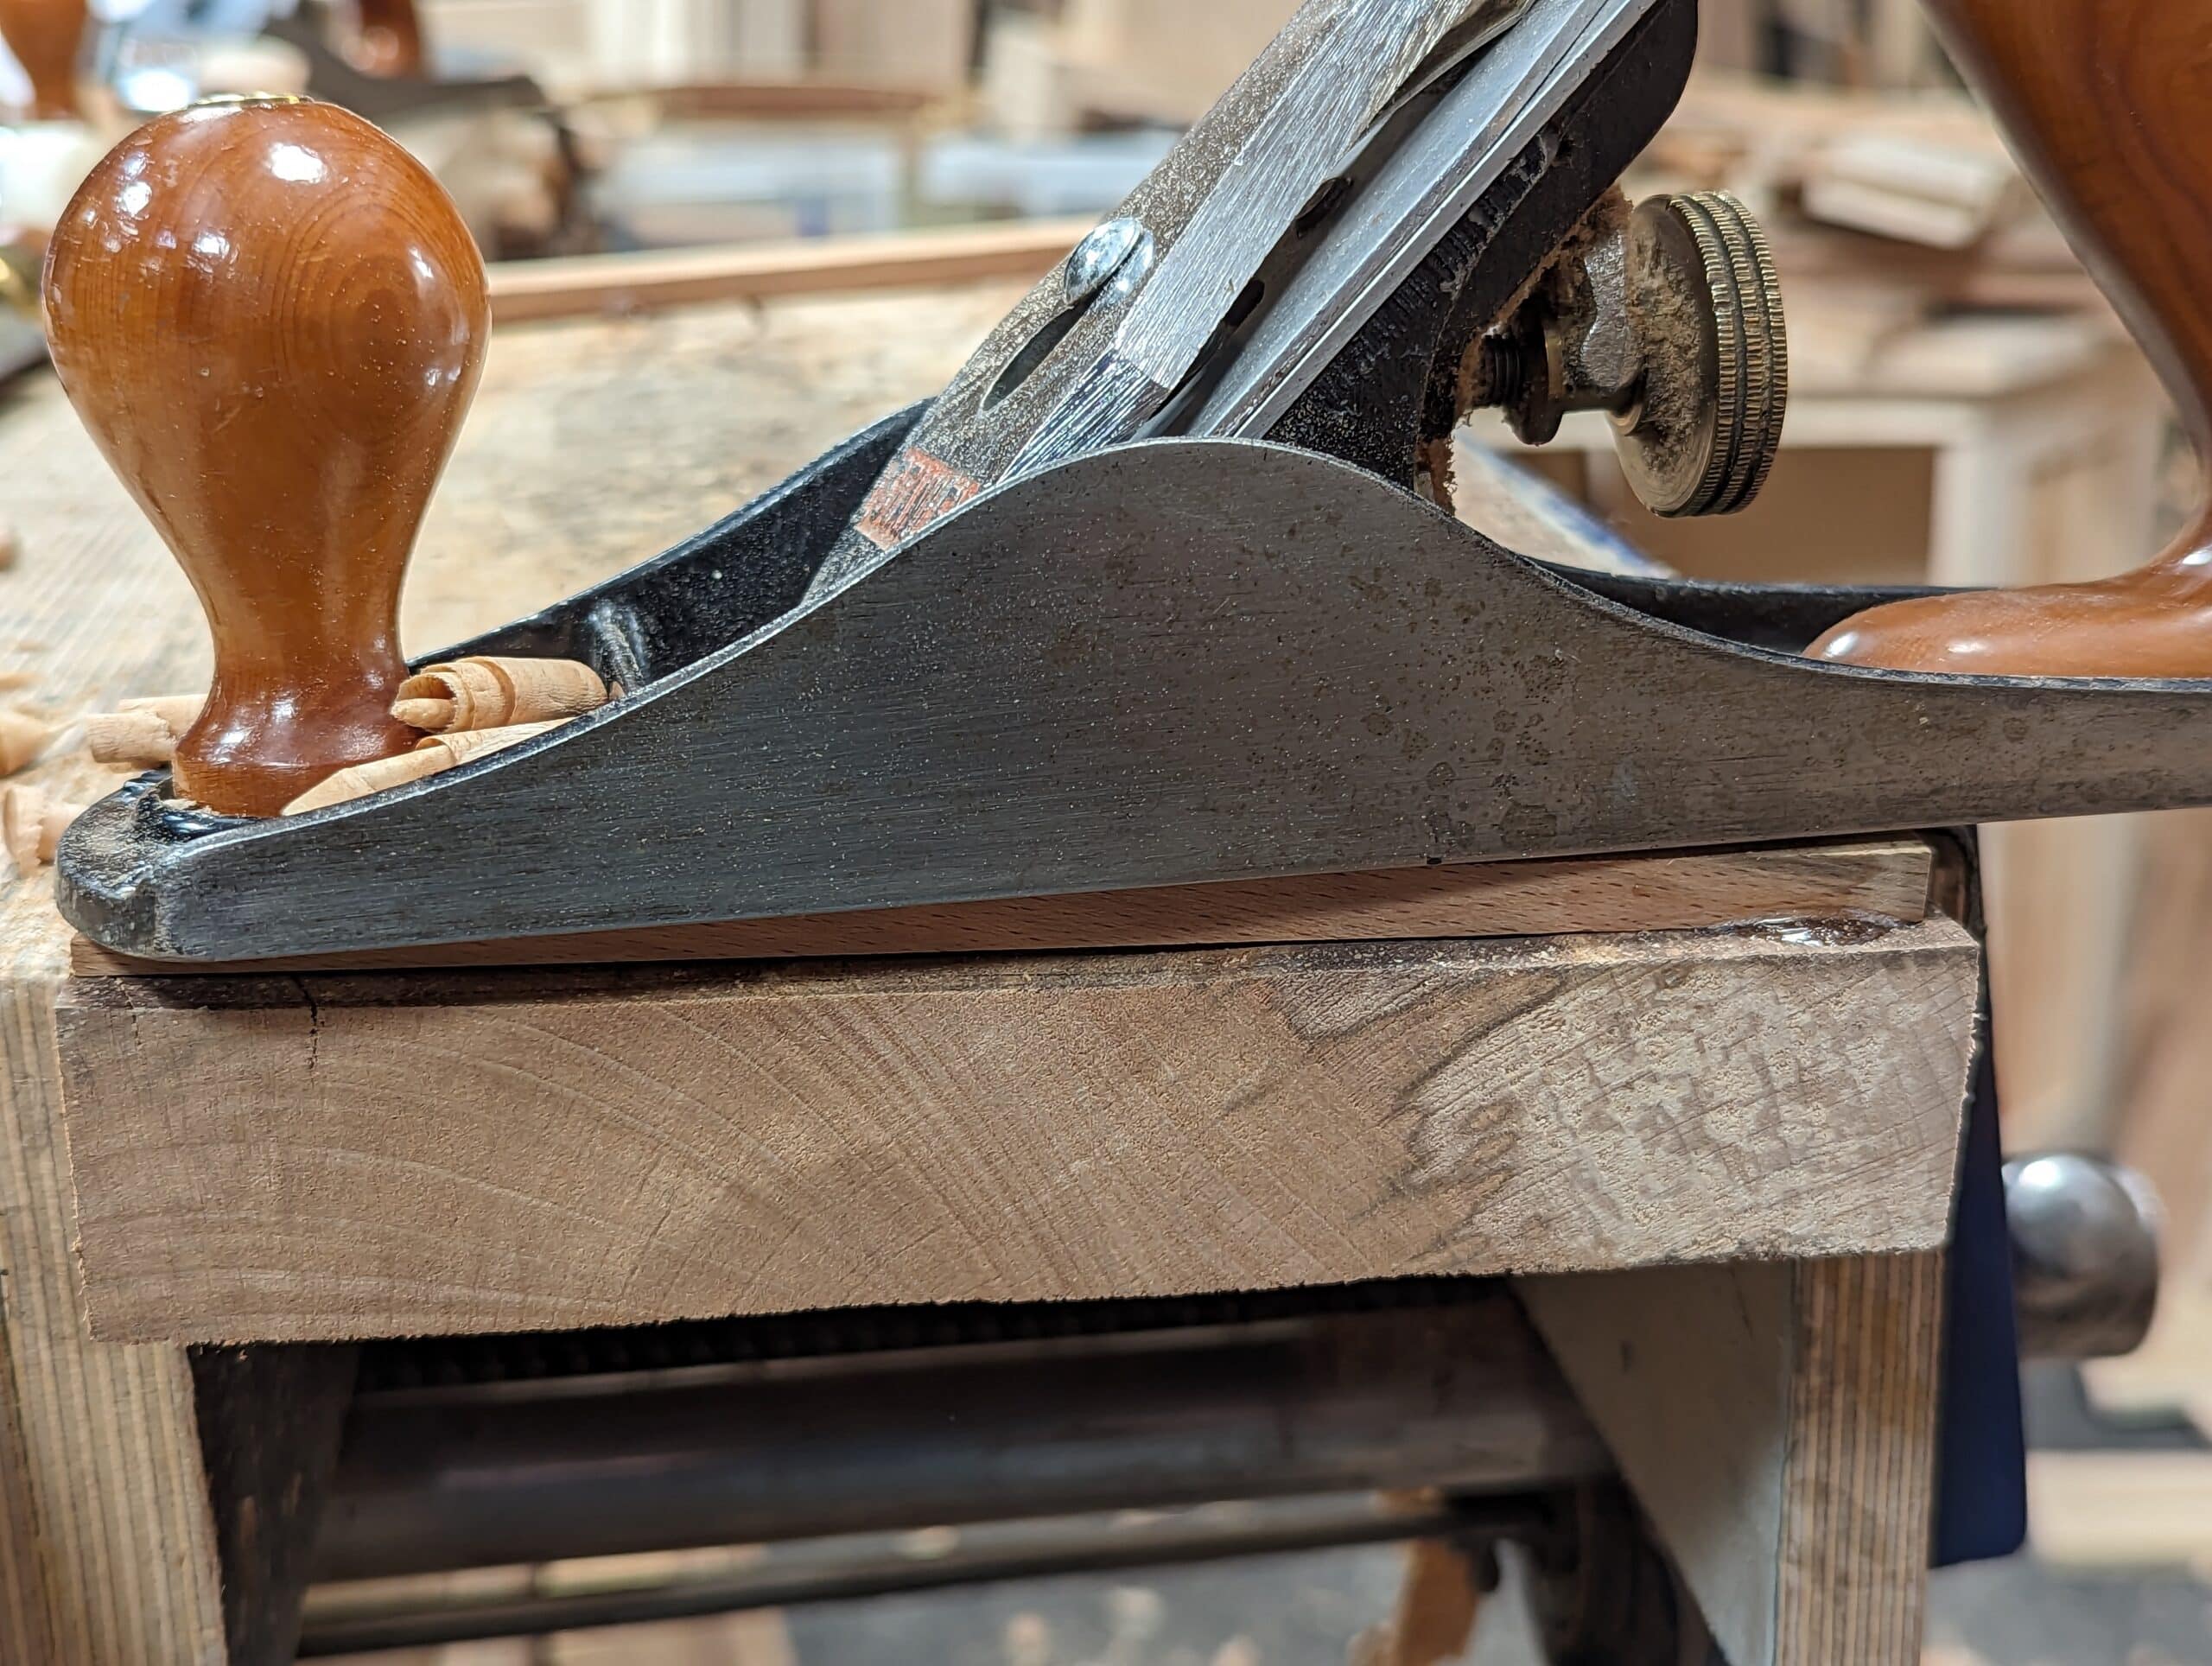


You can now plane the sticks down at each end to establish a flat and true plane between the two sticks.
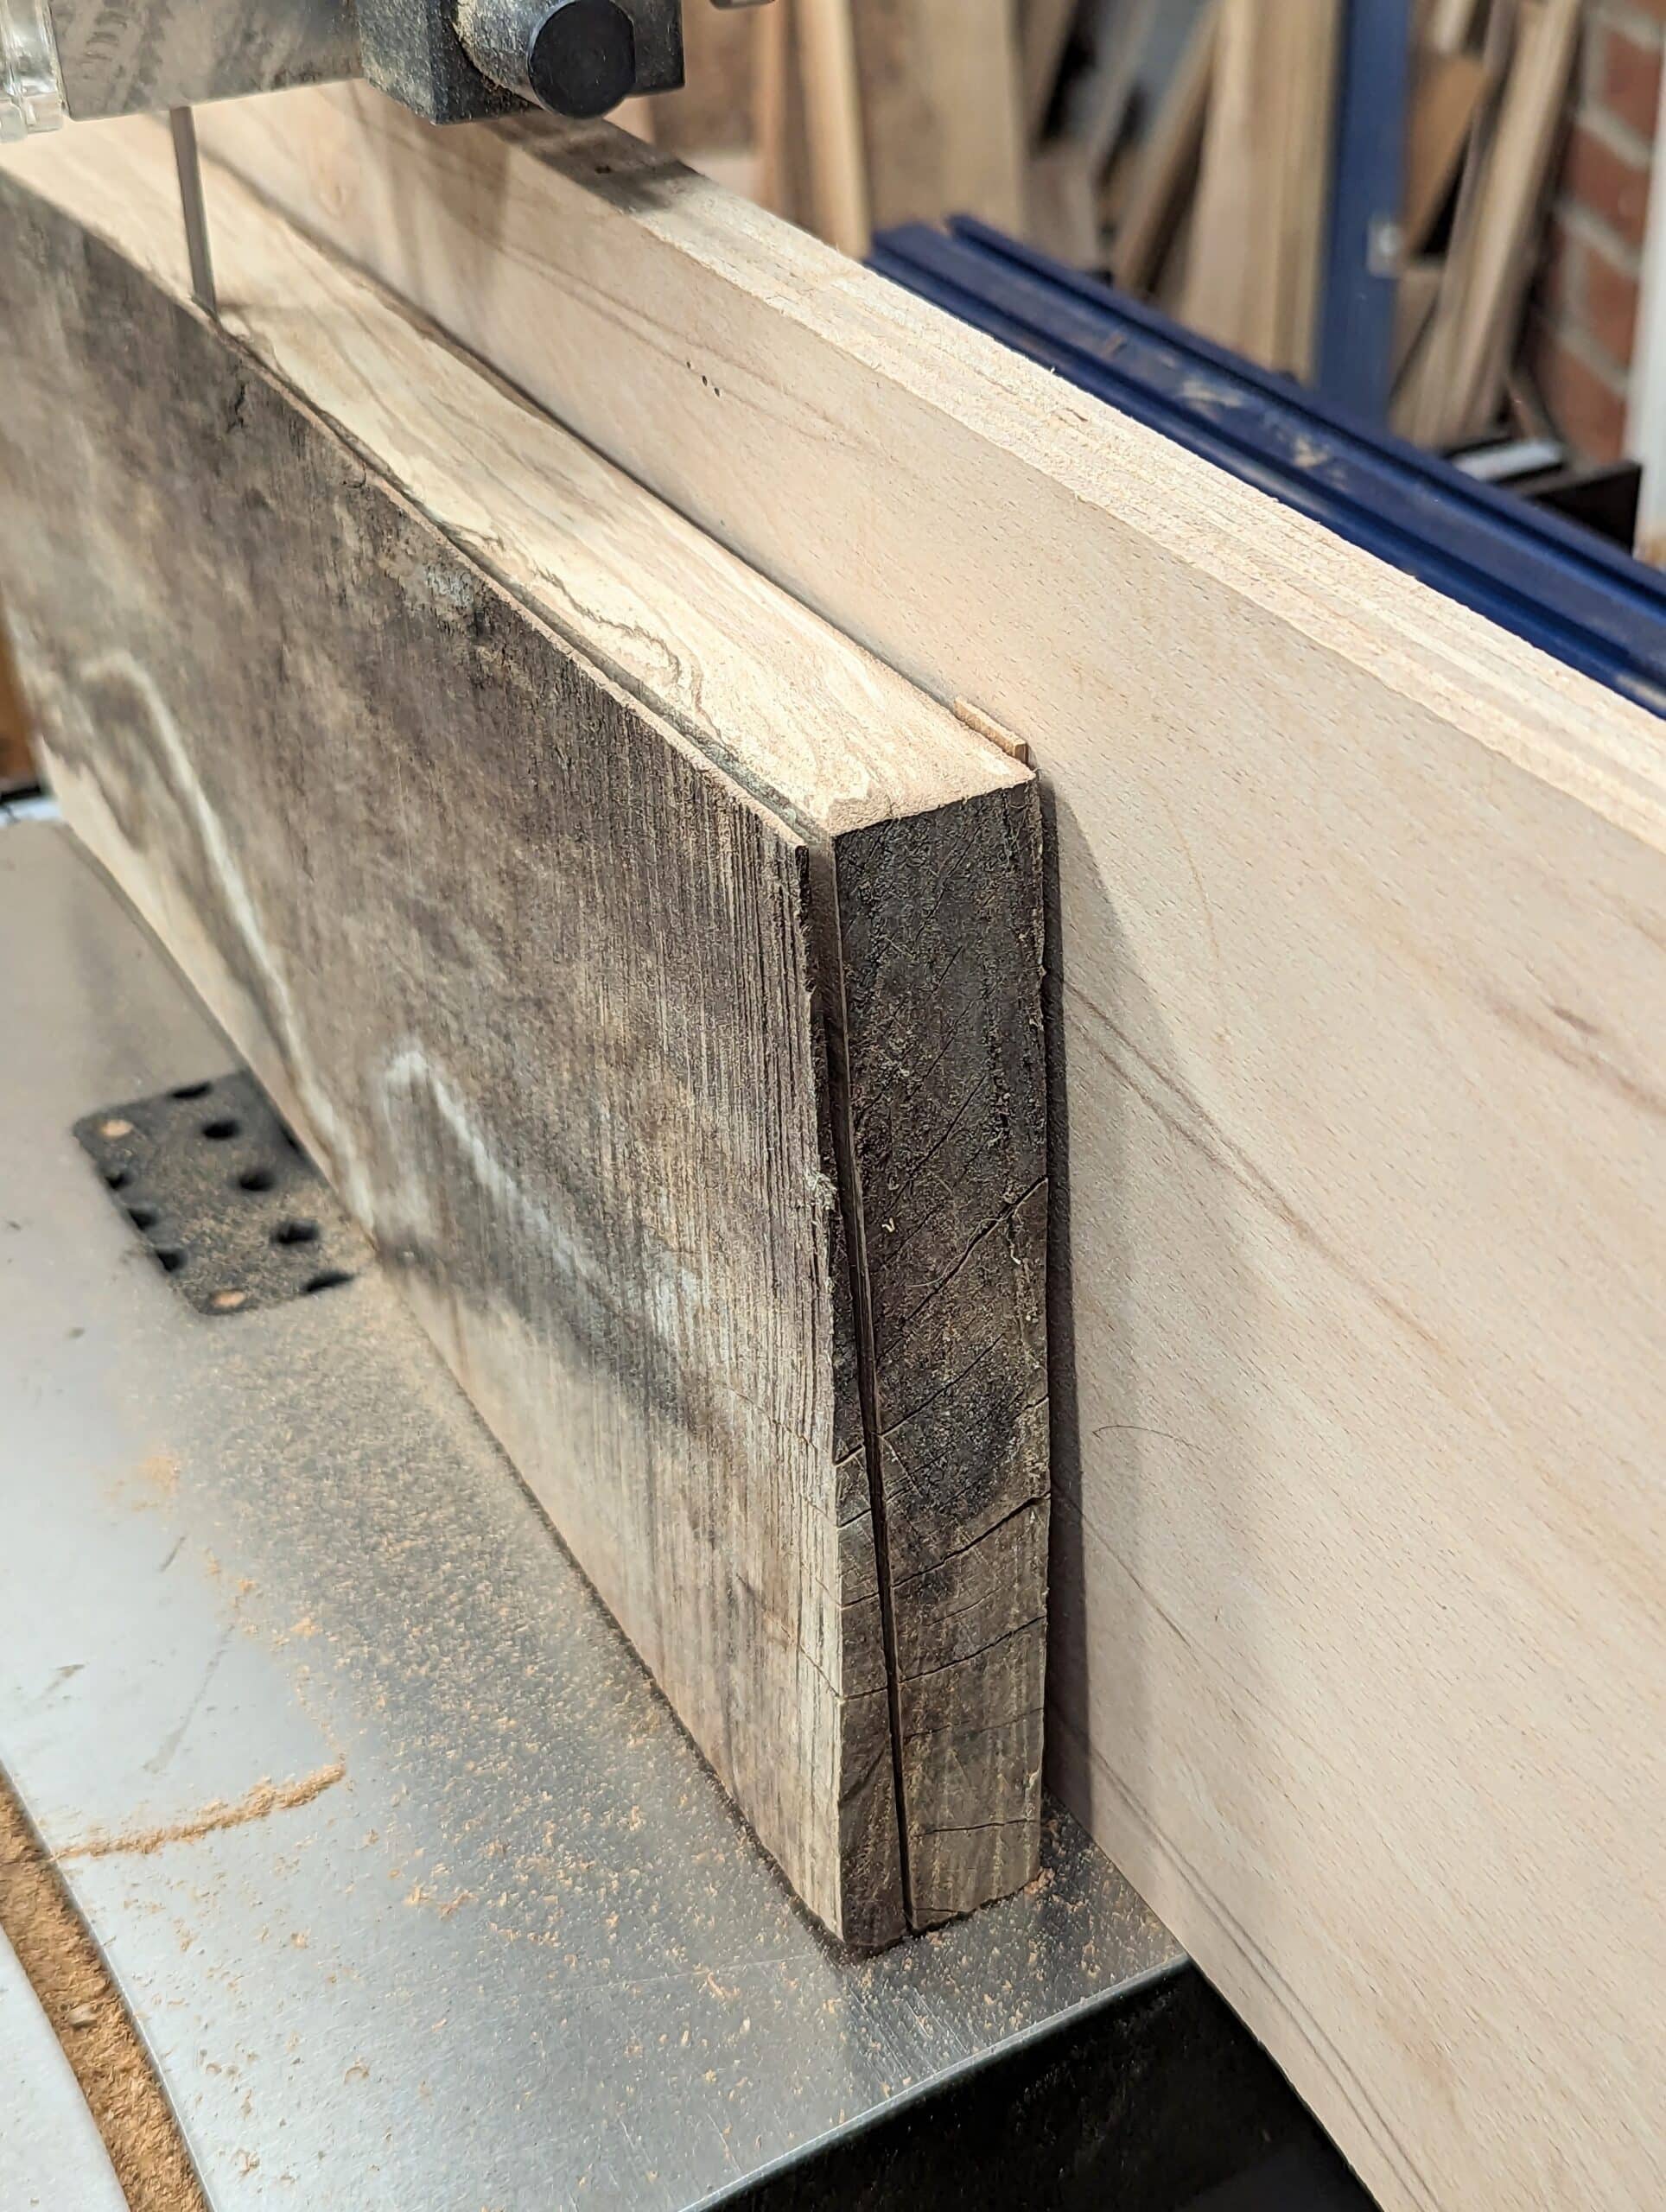
Once established, you pass the board into and through the bandsaw blade either with a shallow pass to establish flatness on the nearest face to the bandsaw blade or a maximum thickness taking into consideration the final thickness of what you need. Either way works
You can now either turn the board around and take a second bandsaw pass according to the desired thickness or plane up that face for smoothness and then take a parallel cut using the new face as the registration face.

I planed up my first bandsawn face and used that against my plywood fence cutting off the wedged or inclined shims all in one.

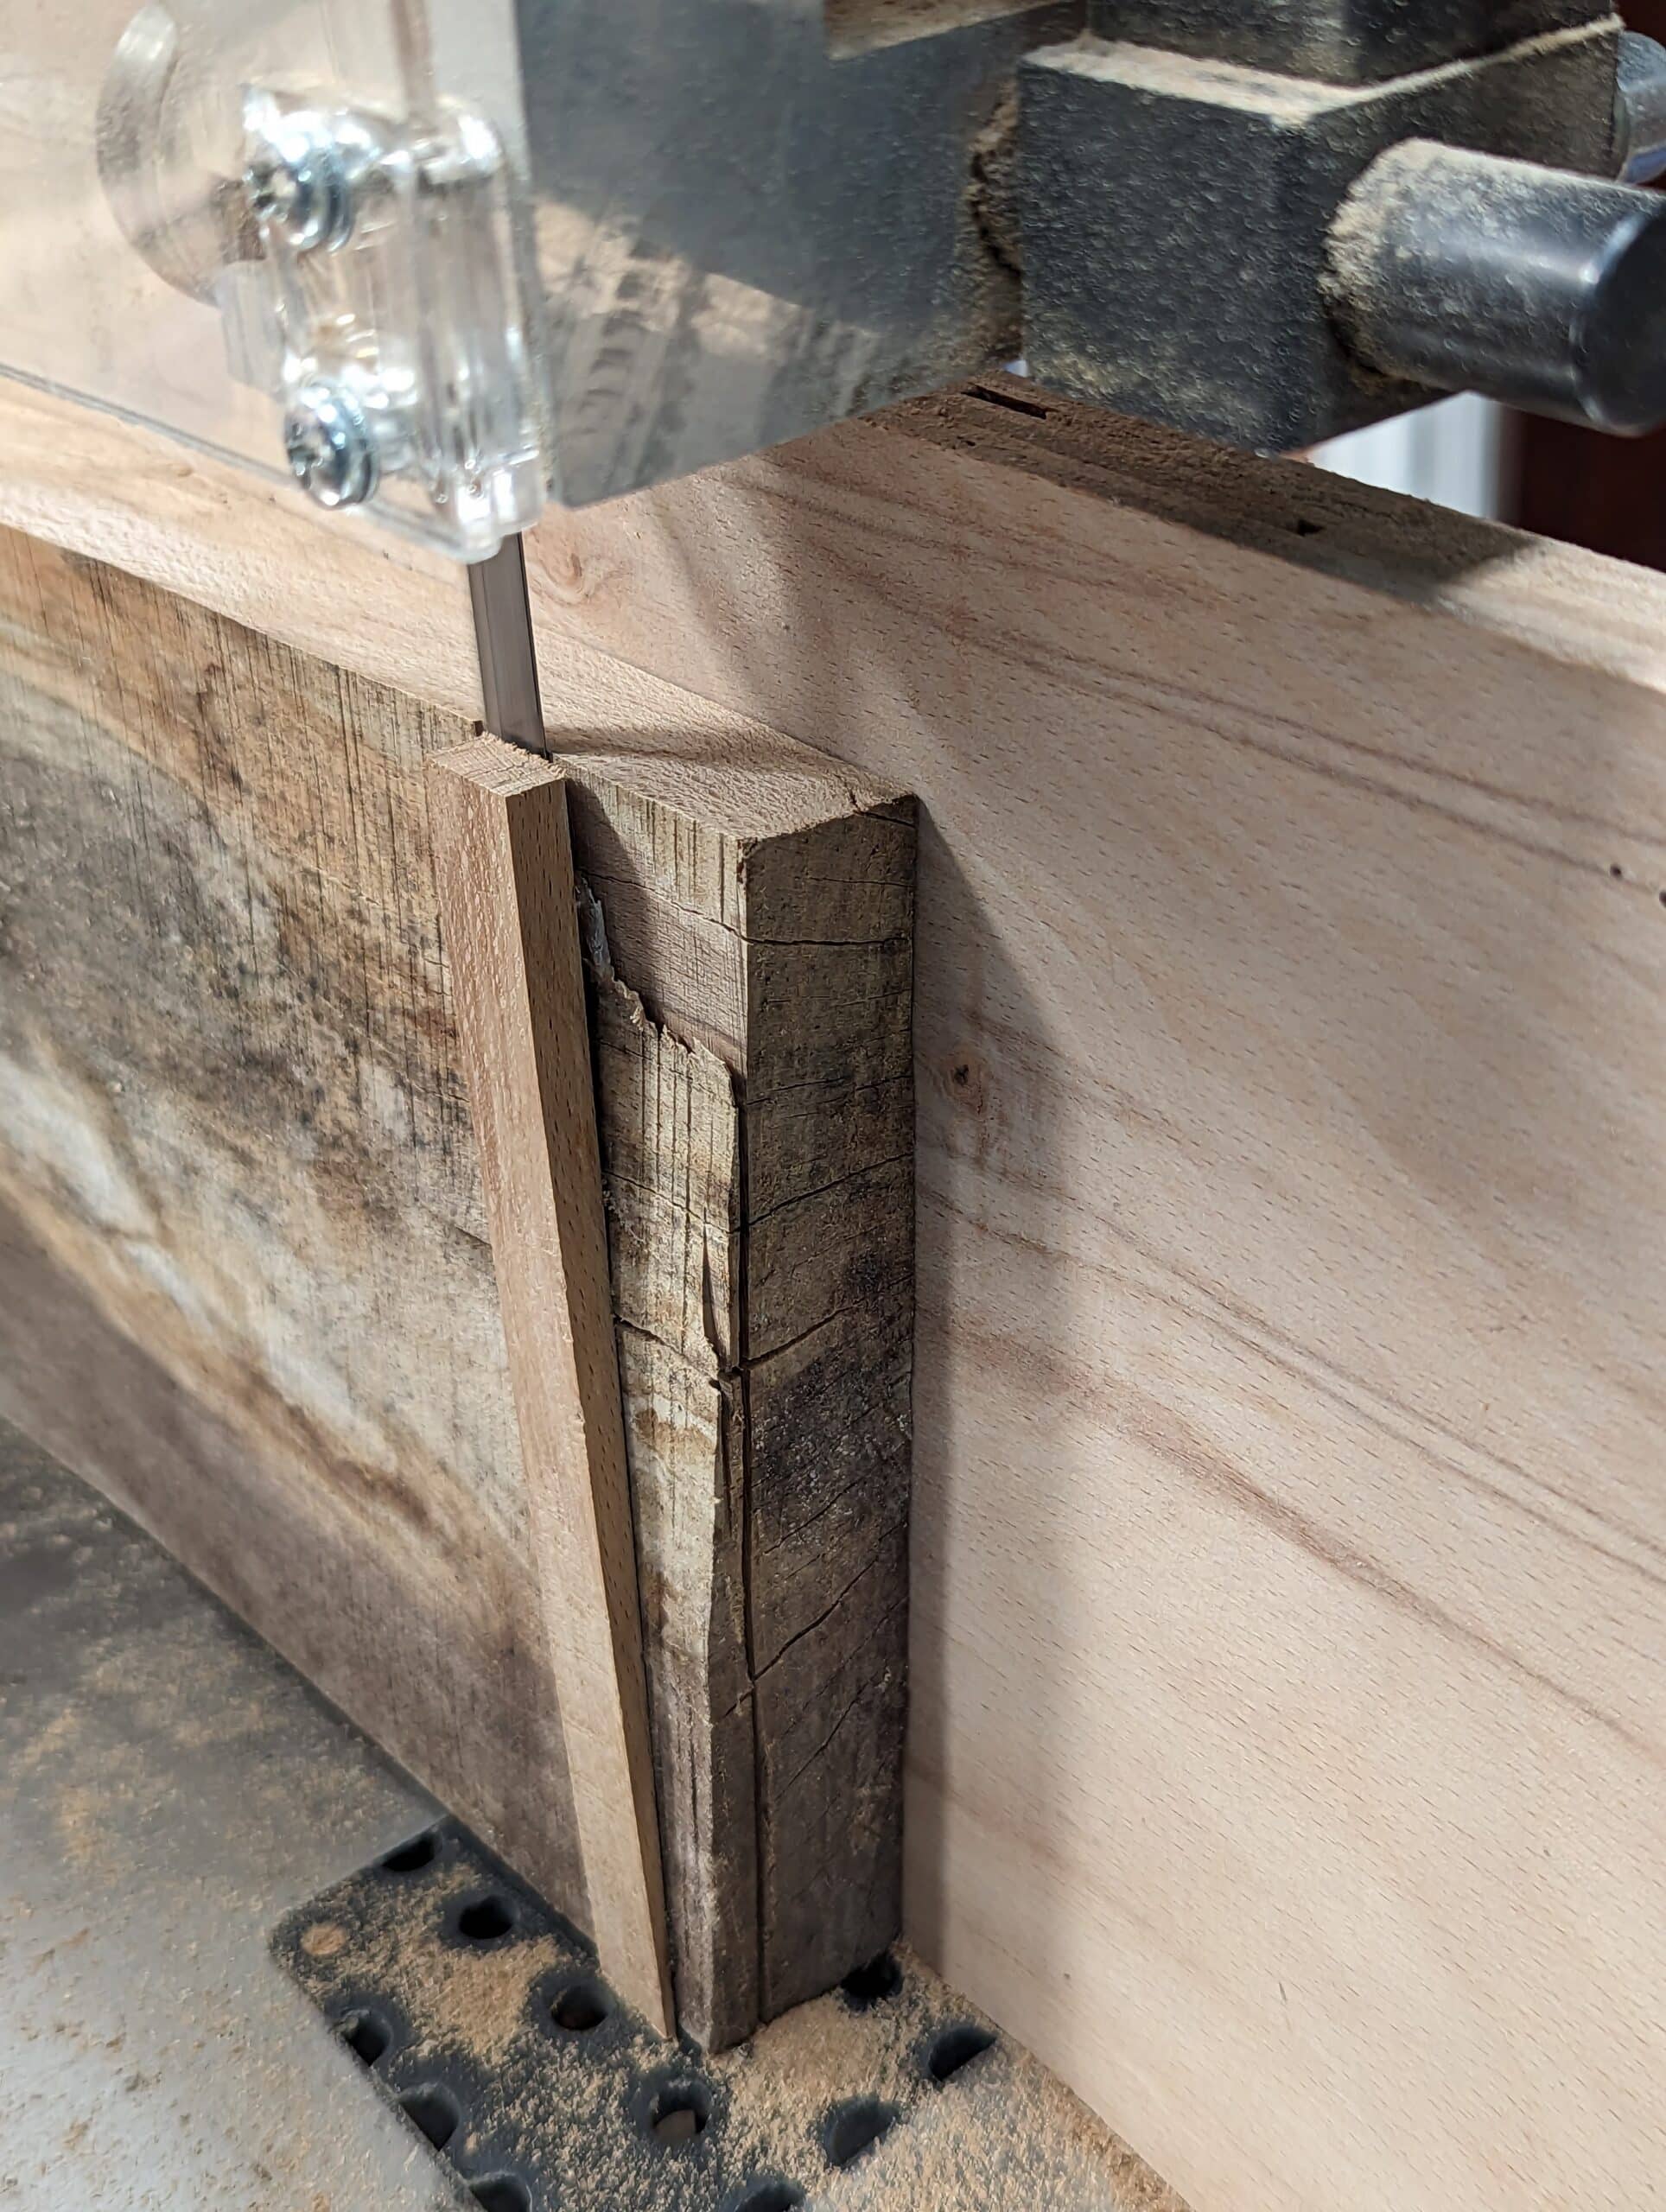
To make a bookmatch I simply cut down dead centre.

Remember that this piece of wood was pure scrap and of no real value until…

The outer face is on the left, the outcome on the right.

It’s critical, obviously, that the new highrise fence is square and straight and that the blade of the bandsaw runs parallel to the blade vertically. Tilt the table to establish this if necessary and you can check by measuring top and bottom from fence to blade.

Wonderful!
That’s amazing. Hoping you’ve got a video coming out of this process.
Are there any affordable bandsaws that you would recommend?
Not really. The majority are now made in Taiwan no matter the brand on the outside they will often be the one maker who’s name will likely be anonymous.
Nice! Thank you.
Hi Paul,
How is the plywood fence attached to the saw?
Thanks, Jon
Just bumped up against the usual fence and a clamp at the back to keep it aligned and stop it sliding with the push
I’m sorry but I didn’t understand. Won’t the clamp get in the way of the board to be sawn? How can you “hide” the clamp, so that you can have the board against the plywood fence without the clamp geting in the way? 🤔
The original fence is used as a backer and locked in place so that the plywood fence rests tight up against it. This plywood fence is then clamped at the appropriate distance from the blade to the bandsaw table at the back of the bandsaw only and half way along the length of the fence. Then the wood to be bandsaw passes along the fixed fence.
I’m sorry, but it must be my fault. I still can’t visualize how can you clamp the plywood fence with a clamp to the original fence, and leaving room for the wood to be bandsaw without the clamp get in the way. I hope you include it in one of the episodes 🙂
There is no clamp on the original fence. Only the table. The ply fence is L shape.
For this sort of purpose, I bought some clamps that are designed to slide into a drilled hole (e.g. in the side of the plywood). This might work fo you. But I have not used them yet, for various reasons. 😉
Great instruction, thanks. One thing I wasn’t sure about was the back stick. How does it rest against the plywood fence? If the board (and those the back stick) extends beyond the fence when you’re cutting, does this not effect the cut? Would the front edge not begin to pull away from the fence once through the blade, unless that back stick is making reference to the fence?
Thanks,
Rico
The plywood fence has to be at least twice the length of the wood being cut. I have a six-foot plywood fernce and that does 95% of all I need.
it’s been in intriguing in that spelled wood, in so much as here in the States sells at a premium price. The other week I went to a big box store for some plain pine to use as inexpensive shop shelves, And was a third more than nice clean boards.
Don’t get me wrong, I feel in some instances Spalling adds to the look of the piece.
Most, if not all spalling is do the climate change.
Thanks Paul, much appreciated.
Rico,
As I understood Paul’s description, the reason that he used a plywood fence (other than stability) is that the fence has to be at least 2 times the length of the board that you are flattening plus about an inch. That way, both of the attached wedges are always against the fence. It does seem like it would be the case that the longer the plywood fence is, the thicker it would need to be to prevent bowing when some of us noobs are pushing the work piece too hard against the fence.
Thinking about it, for very long boards, one could add additional wedges along the length. I would definitely put a good chamfer on any wedges that are not touching the fence when the cut starts.
Thanks Ivan, makes sense
stunning bookmatch.
Never thought of the bandsaw that way; taking a twist or thinned out rough cut out . I do a lot of resawing. That will be something I try. Thanks.
Paul,
we are of similar vintage. I’m 70.
I have 4 grandkids, the oldest is 7.
what age is it appropriate to start teaching them woodworking?
Have you thought of doing a piece on what projects might be good to teach kids about woodworking and that will keep their interest?
Hi Mark I have spent 2years developing projects for 12 year old upwards all homeschooled. Paul’s spatula is the first project and his hand methods are adhered to throughout. You’re welcome to see them.
Not sure how you can contact me on this platform.
Trevor, I was seven years old when I started woodworking. It was hand tools only of course and it was inspired by my grandmother who had raised two cabinet makers. I might add that I was a bit advanced for my age although it never occurred to me until I got much older. I have never done woodworking for a living but did some carpentry for money on a few occasions. I think that if you start them with simple tools it will improve their hand coordination.
Whatever is goof for an adult starting out works for kids.
Whatever is goof for an adult starting out works for kids Just follow our commonwoodworking.com site for beginners..
I started at age 4. I was handed a rasp and a file by Pop Carlson, the Swedish cabinetmaker in my father’s shop who taught me the basics of hand tools and woodworking. By age 8 (or maybe 9) I was allowed to use the table saw. I’ll be 81 next week, so I’ve been at this a while.
Kim Kardashian called herself a flexitarian recently. Meaning that she was sometimes a vegetarian, and sometimes a meat eater. Which means that she is not a vegetarian. Same with you and your power tools. If you weren’t so pretentious about the hand tools, you would probably have even more followers. You do make significant contributions to all woodworkers, but seriously you need some perspective.
I think Paul has been very upfront about his use of machines. I’m not Paul, but I think he encourages folks to limit machines to decrease the upfront costs associated with building furniture.
It’s kind of hard for some hobbyist to justify (expensive Jointer, Thickness Planer, Tablesaw/bandsaw) just to make some furniture.
I went the hand tool route because of cost and enjoyment. Then I got a nice bandsaw to speed up things along. Eventually, I’ll probably get a jointer and Thickness planer. I’ve enjoyed not having to rely on these machines though.
He has mentioned that most people making a living off furniture probably need to use machines for the donkey work.
I have noticed in my limited experience woodworking with hand tools, I seem to know a lot more about how wood works compared to others I know who have only used machines.
Kind of seems like you woke up on the wrong side of the bed. The internet makes people brave and you don’t have to be here.
Nah!
Paul is the least pretentious person that I know of and he tries to make woodworking affordable for people. Thank you Paul for what you have been doing. You have been a blessing to many people, myself included.
Why? Paul’s a woodworker, not a machinist.
I have been a woodworker for more than 75 years and still prefer using hand tools when making furniture (except for what Paul calls donkey work) I did use machinery doing cabinet and millwork.
I’m disabled now so I use some machinery if what I’m doing takes more than a few minutes., but I no longer even own a jointer because it’s so easy to use a Stanley No. 7. I do use a planer, mostly because my bandsaw won’t cut wide enough BTW, if you resharpen a bandsaw blade AFTER setting the teeth, the saw will cut straight and true. I’ve cut a fat 1/32″ veneer with a properly sharpened bandsaw blade and only had to lightly scrape it to get it ready for gluing.
Work which will be finished with lacquer or varnish doesn’t care much if you sand it with power tools, but man o man does a planed and/or scraped surface just bring out the beauty of a piece of wood which will be finished with oil and wax. There is no comparison.
I feel sorry for Held, having to be With someone so respectful and understanding. Thanks for the good vibes though.
Machine tools are good if you have a use for them. If you don’t, they take up space you could use for other crap, probably more useful crap. Most sane woodworkers are going to use a mixed strategy of machine tools and hand tools, with varying emphasis based on personal preferences. There’s also trade-offs like machine setup vs layout time. Repetitive work highlights machines. Precise, one of a kind work highlights hand tools. Paul’s a pro helping hobbyists.
Oh wow Paul! That is indeed a clever trick. I bought a band saw last year when there was a 10 percent off sale. Saved up get electrical work done in garage. Now, almost ready to purchase appropriate dust collection. I will definitely be using this method in the in future.
Thank you for sharing your experience and skills. What a gift you were bequeathed, the ability to problem solve and create. Nice!
Thank you Paul. This is a great technique..
I take great pleasure in knowing how to sharpen a piece of steel and plane an unusable piece of wood into a beautiful usable one. Even more satisfaction comes as I watch my fourteen year old grandson do the same. I have bought all the power tools and still have them and use them when I choose, but they don’t give me the sence of accomplishment that the hand tools do. I thank you Paul for sharing your knowledge and experiences with so many, I think your perspective is spot on!
I’m an older retired carpenter. Over the years I’ve loved using hand tools, but mostly machine tools for at work for speed. For personal at-home work I’ve mostly used hand tools for the pleasure of using older tools (mine), keeping them sharp and enjoying the work for the sake of it. Now getting older I enjoy the band saw, thicknesser/planer, table saw for laborious work. I enjoy setting the tools to fine tolerances, maintaining them and keeping them sharp also. While I’m not a vegetarian, I consider myself a woodworker using hand and machines et al. With you all the way Paul.
Wow that is a great tip!
Do you recommend a bandsaw using 220 vs 110 outlet…..especially for the wide cuts you take?
I realize your in England so the power limits are different.
I don’t know if this will help you, but I run a 14″ bandsaw on 120V. This is a Laguna 14/12 saw, typically with a 3/4″ blade, but I’ll be switching to a 1/2″ blade when this one wears out in order to get some experience based on Paul’s earlier blogs. I have never had trouble resawing and have done resaws up to the capacity of the saw. I’m not a commercial shop, so it is possible that my feed rate is slower than it ought to be, which reduces power demand, but I’ve never had a problem and don’t feel like I am accommodating the saw. The difference between 120 and 240 is that the 120V setup will require twice the current. This can be an electrical consideration if there isn’t adequate ampacity in the circuit, whether in terms of rating or in terms of shared load. You can consult with an electrician to make sure. A 2 HP motor equates to 1.5 kW, which requires 12.5A at 120V, which is 83% of 15A. So, a 20A circuit would be best (but check the manufacturer’s instructions). So, I am comfortable with my 14/12 saw, although I have some headroom via a 20A branch. Larger saws, though, will require larger motors that will draw enough current, including startup surge, that 240V will make sense. I’m not an electrician and am just trying to share that I’ve done will with my particular saw on 120V.
I am definitely the same vintage as Paul Sellers. 73 Years.
When I had my small carpentry business in San Francisco, the bandsaw was my first machine purchase. A very well made American make, Delta, 14″. Later I purchased the 6″ riser block.
I was able to do nearly everything with that saw. One main issue was staircaseing work with the first treads and a curved riser. Also the hand railing starting volute, sawing closely prior to carving.
When I proceeded into furniture work it was for resawing and profiling bracket feet and such.
I still prefer sawing my dovetails by hand with a fine 13 point sash saw .077 pitch.
I prefer pins first. As a patternmaker and modelmaker a bandsaw is most indispensable.
Paul, Thank you so much for your knowledge, not one advanced woodworker, I count myself, knows every aspect of woodworking!
Thank you, Paul for a wonderful tip. I’m getting into woodworking now at 64 y.o. I was able to get a great 14″ bandsaw from the shop I worked at for free. I did order a planer, but I sent it back box un-opened. I’m going to try my hand at doing it all by hand, except as you say, the donkey work. I have a long, long way to go to learn sawing (by hand. I’m not good at that yet.) and all other aspects of wood working. Thank you for your videos and your willingness to teach. Knowing and doing is one thing. Being able to and wanting to teach is a totally different thing. Thank you again for your teaching.
Nicely done.
Paul,
That piece of wood was amazing inside. Talk about hidden beauty.
You might have already done this, if not, I’d love to see a detailed article by you on how to set up a band saw. You tend to be very practical when it comes to advice and I suspect your way of setting up a bandsaw would be quite helpful.
For air dried wood, I worry about some sort of bug infestation starting from a single air dried board. Are there practical precautions one can take in order to avoid problems?
Sincerely,
Joe
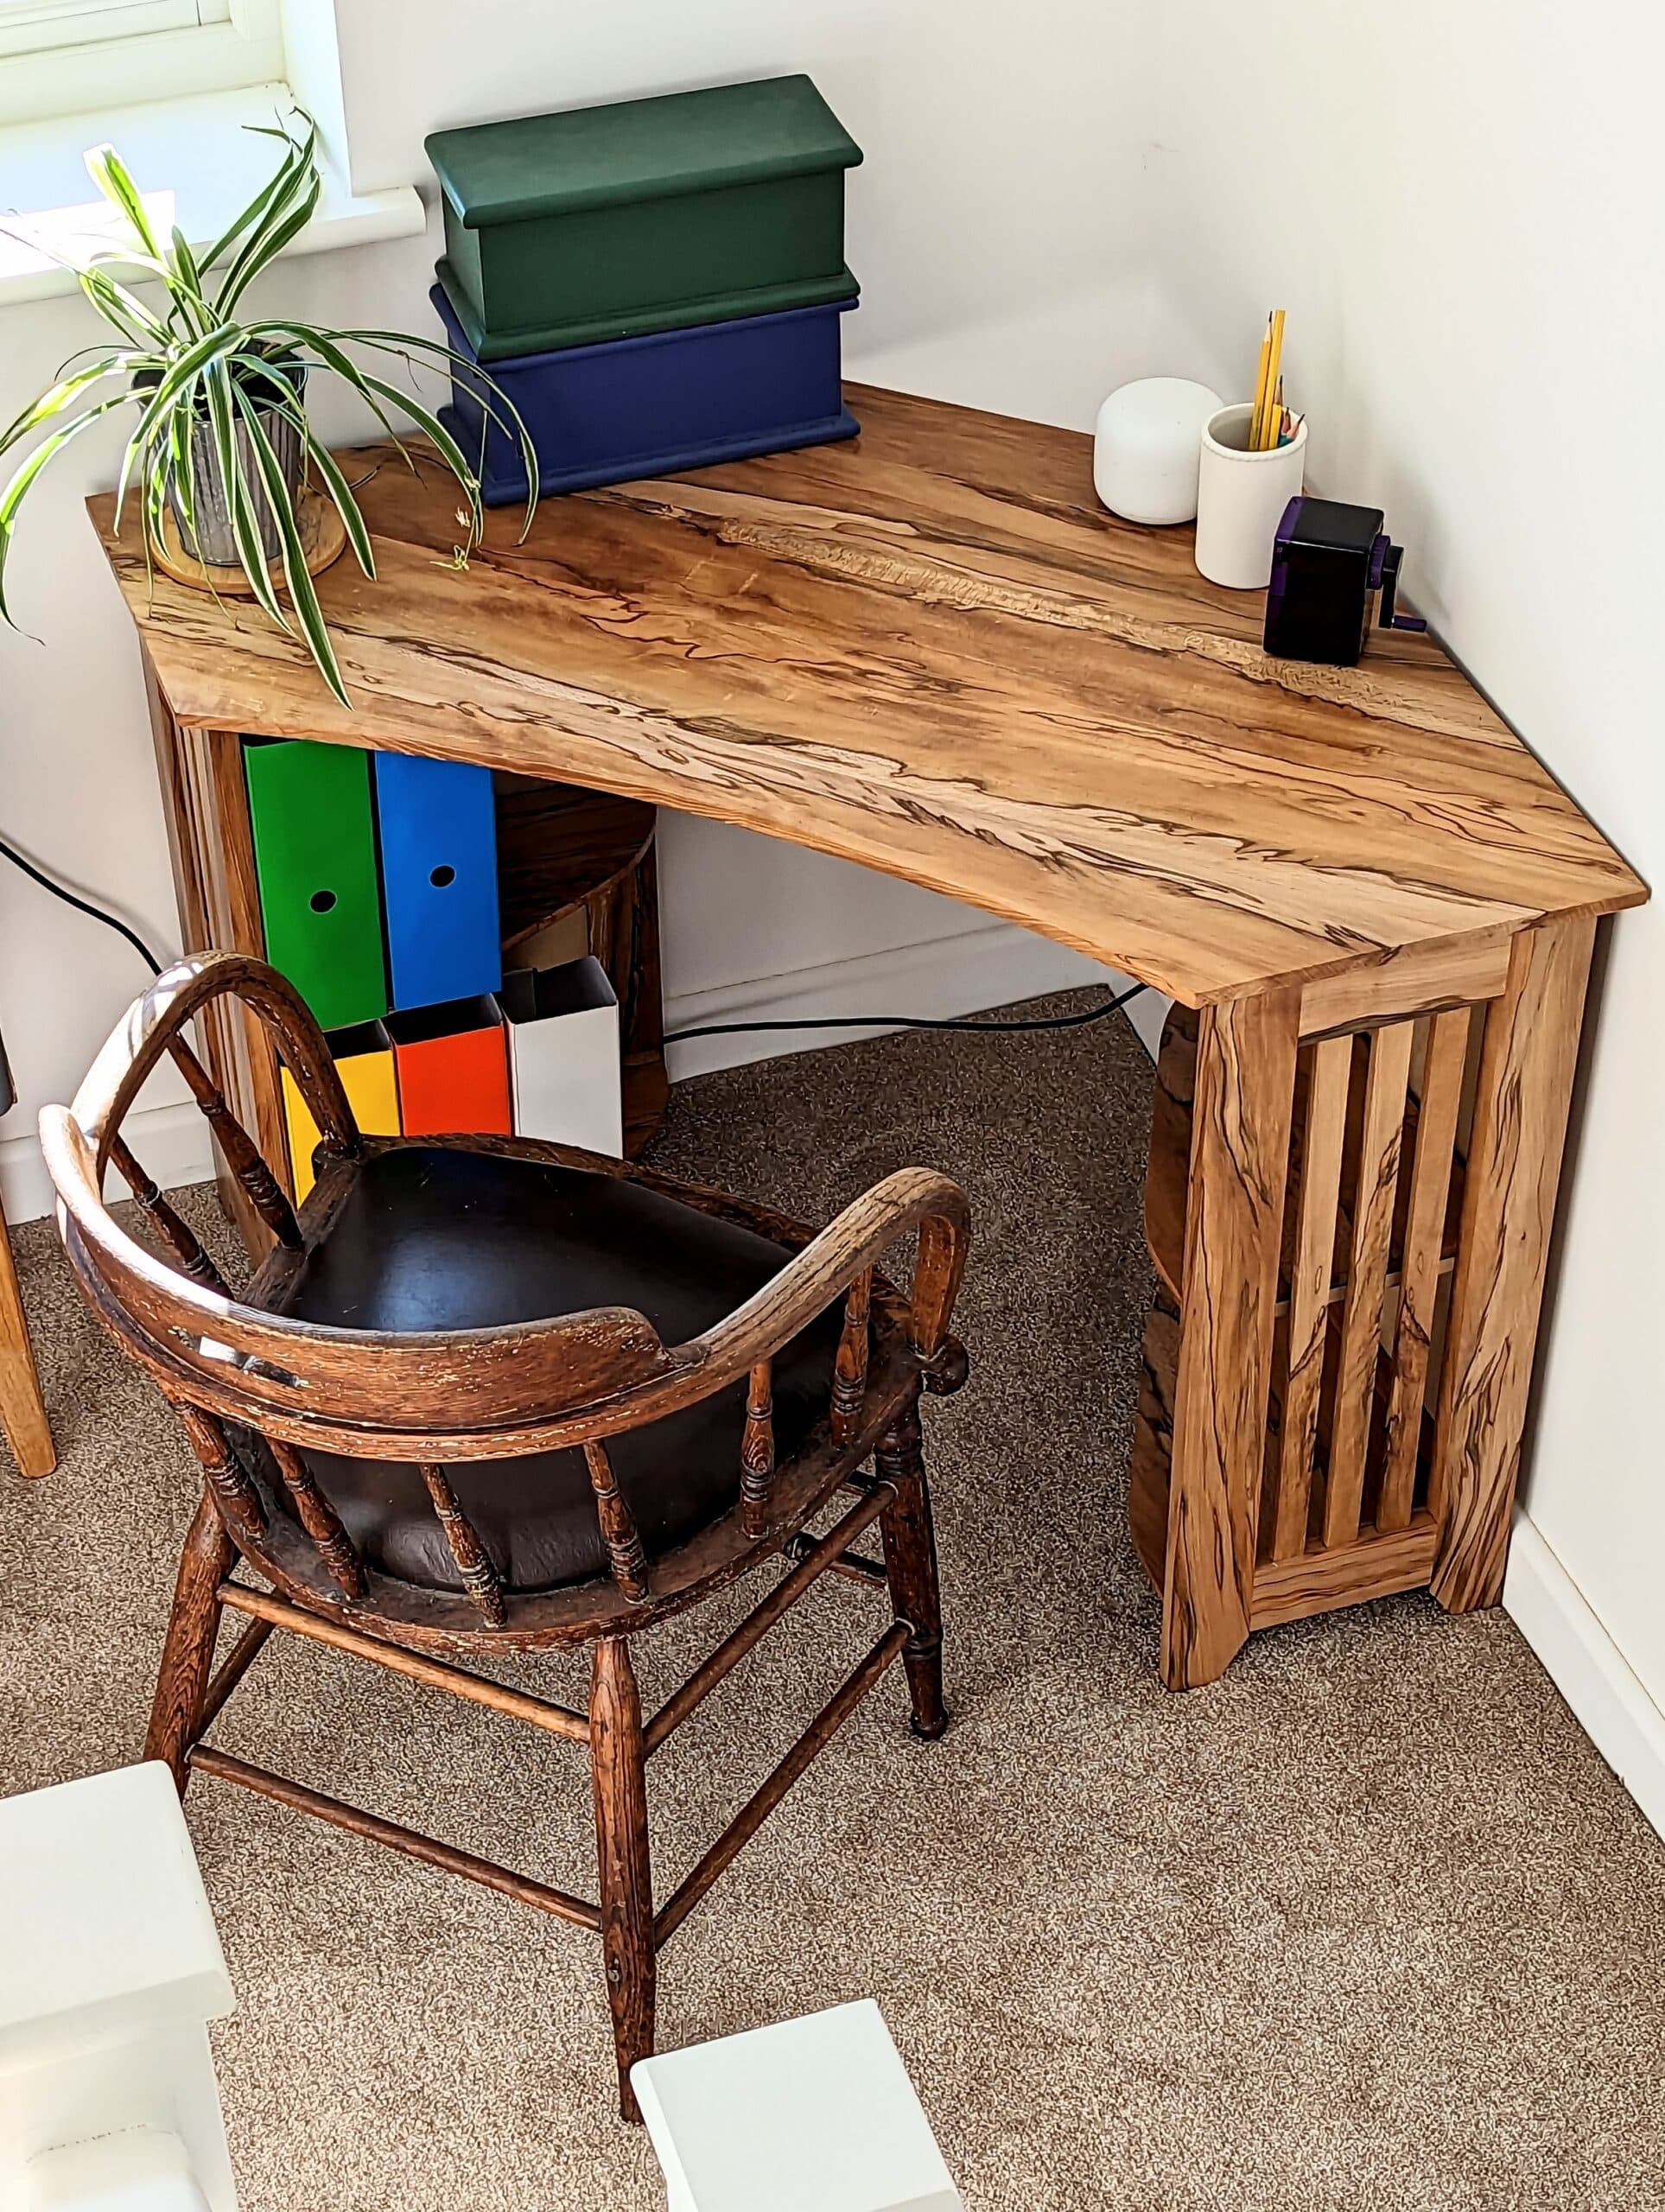
I have written enough for a decent book on the bandsaw through the years and who knows if I will ever find time to move that forward. That might be sad because of how I use it rather than how people think it should be used. In my book there is no such thing as bandsaw drift just bad bandsaw set up. In 58 years of using one I have never had a bandsaw that drifted unless it was owned by someone else and I couldn’t get to it to fix it. Currently I am hoping to finish my biography covering the life I have lived in its entirety. Hence my trip to write in Texas next April. I am mastering the drone to get the fuller expanse of my life and encounters in Texas starting with my first home built in the Hill Country North of Uvalde and on up through my home in Kerrville, Fredericksburg, then Willow City and on up 200 miles north. I have three books I must finish before I am too old. And i do hope for a couple more. Thus far, Texas will be something of a tour in a campervan meeting me from the airport in San Antonio or Austin and April is my Texas dream month when the cold weather is done, the sun shines most days, but doesn’t peak beyond 30C. It’s also the best wildflower month when I can immerse myself in beauty and meet up with some of my now older Texas friends. The purpose is to write. My memory is good but the pictures are missing. Re bugs in wood: Yes, this is true. You are possibly going to have worms and bugs somewhere in your wood depending on where you are and where you dry it out. That said, for any bad bits you will also get good ones. Right next to the sections shown was a section two foot long with worm holes filled with the powder let behind. i couldn’t use that for much of anything without some real creativity. I got ten 8′ long 12″ wide boards from my spalted beech and made the desk and there is enough left for another similar sized piece. I lost about a tenth of this to bugs so nothing really lost. Also, remember some beetles only lay eggs in the bark and the worms only eat into the sapwood for its nutrition. The heartwood might well be great.
Thanks, Paul, for the reply.
I would love to see something consolidated by you regarding bandsaw set ups for the reason you mentioned. You’ve been using one for 58 years. You are pragmatic and practical when it comes to woodworking. I really like that approach. Probably because it mirrors how I did chemistry lab work; I needed to make stuff, not talk about making stuff. Maybe film a video on the most critical stuff? A book would certainly be nice but you have a lot of them already. A video series on bandsaw set up (similar to your foundational joint videos from 10 years ago) would be very helpful.
Thanks for the feedback on air dried wood. Sounds as if bark and sapwood are the most likely problematic portions of the wood. I didn’t know that. It helps quite a bit.
Paul, will you be making any speaking engagements on your tour through South Central Texas? I would love to attend one and see you in person if not meet you also.
I will be retracing my steps from my arrival in Texas in 1985 to live and work there and then the final steps that led to my sad departing in 2009. This missing period needs some early recapture in the formative years but then too questions the latter part of my life there. Perhaps there will be an open space for something but that is not really part of my plan.
Paul this may be the best bandsaw hack I’ve ever seen. Never would have thought of it. It’s not pretentious to promote hand tool mastery over dependency on machines. Machines often limit what you can do. When I was trained 56 years ago you had to demonstrate adequate skills with hand tools or you never got to touch the power tools. As boys we thought it was nuts when machines could be used to do so much. When we got into more complex projects we discovered that our hard earned hand tool skills allowed us to build outside the box. (Pun intended)
I don’t really get why there seems to always be coments in many of the blogs here where those that prefer power tools seem agressive to those that prefer hand tools. When my son (in his 40’s) stops by to help me (in my 60’s) with something he looks for tools ‘to get the job done’
I reach for a handsaw he turns on the miter saw… We still manage to work together and learn from each other..it’s our respect for each others preference, working together and enjoying process.
Paul, do you have any tricks that allow you to not need an outfeed table when working alone on longer material? I don’t cut very long stuff very often so I don’t want to spend space on an outfeed table. On the other hand, I’m not entirely comfortable with what I do. Maybe I should comment that my saw is in the garage, but my bench is in the basement, so the obvious solution isn’t an option for me.
Hey Ed, I bought one of those rolling outfeed rollers from the orange big box store in the US. It’s worked really well and folds up when not in use. The specialty woodworking stores have them as well but it was much cheaper at the big box store. Quality is “Okay” but it works really well.
It was not my idea, but I saw a guy use one and got one myself from a hospital. It was an older tray table that they put your food on above your bed. Most hospitals have some lying aroud that need repair so you need to contact maint. They move up and down with a pull on side and have wheels . Small footprint, mine is tucked under my tablesaw extension.
Mostly I do work alone so it can be a problem. I found the benefit of an outfeed roller is soon extinguished by them getting in the way in a tiny space but I do have one hung up that I will use on heavier sections. Other than that I just muddle through with inexplicable balancing and transferring of what are critical tipping points to find a balance or tolerable weight control where I end up standing behind the bandsaw pulling.
The muddling through and balancing sounds like what I am doing. In your videos, I sometimes see you feed a longer piece to about half way, then back out, flip the board, and cut from the other direction. Was that done to deal with length and tipping?
More likely because I hit the glass wall as in ‘glass ceiling‘; not wanted to spoil the illusion of my confined garage space which I always stick to even thought that side of the wall is the filming studio side. But you are right also–when I am on my own I do do such things.
Speaking of the illusion, Paul, I have really liked when you have finished a project and stepped out of your studio woodshop and the next camera cut is to you coming out of your home garage with the piece to bring it in the home. The first time, I had to think about it as I was confused but then smiled. It’s a nice touch on the videos.
Having said that, I still think my favorite video was the one you filmed in your literal backyard when you were making a workbench and you had seagulls and children playing in recess in the background noises.
With respect to 120v compared to 240v there is much false information, the truth is that in a 120/240 motor the windings where the work is done only receive 120v. Plug a motor wired for 120v into a 240v outlet and it will burn up in less than a minute unless you first open the connection box and swap the wires around to change the windings from Parallel to Series wiring so that there continue to receive the 120v they must have.
Brian(J)
That is certainly not valid in my home in the country where I live.
Thanks for another great idea.
What a wonderful use of the bandsaw. Definitely going to use this technique!
I can’t believe someone called Mr Sellers pretentious! Have they not watched his wonderful videos that he provides Free of charge for anyone to use and learn from? He is such a generous person, passing on his knowledge and skills.
I grew up learning mostly power tool woodworking. Thanks to Mr Sellers and a few other wonderful teachers online I’ve become what I call a hybrid woodwood worker. Power tools for somethings and hand tools for others. My handcut dovetails look so much nicer than my machine cut ones thanks to his teachings! Plus for me more satisfying in the feelings of accomplishment.