Making My Box
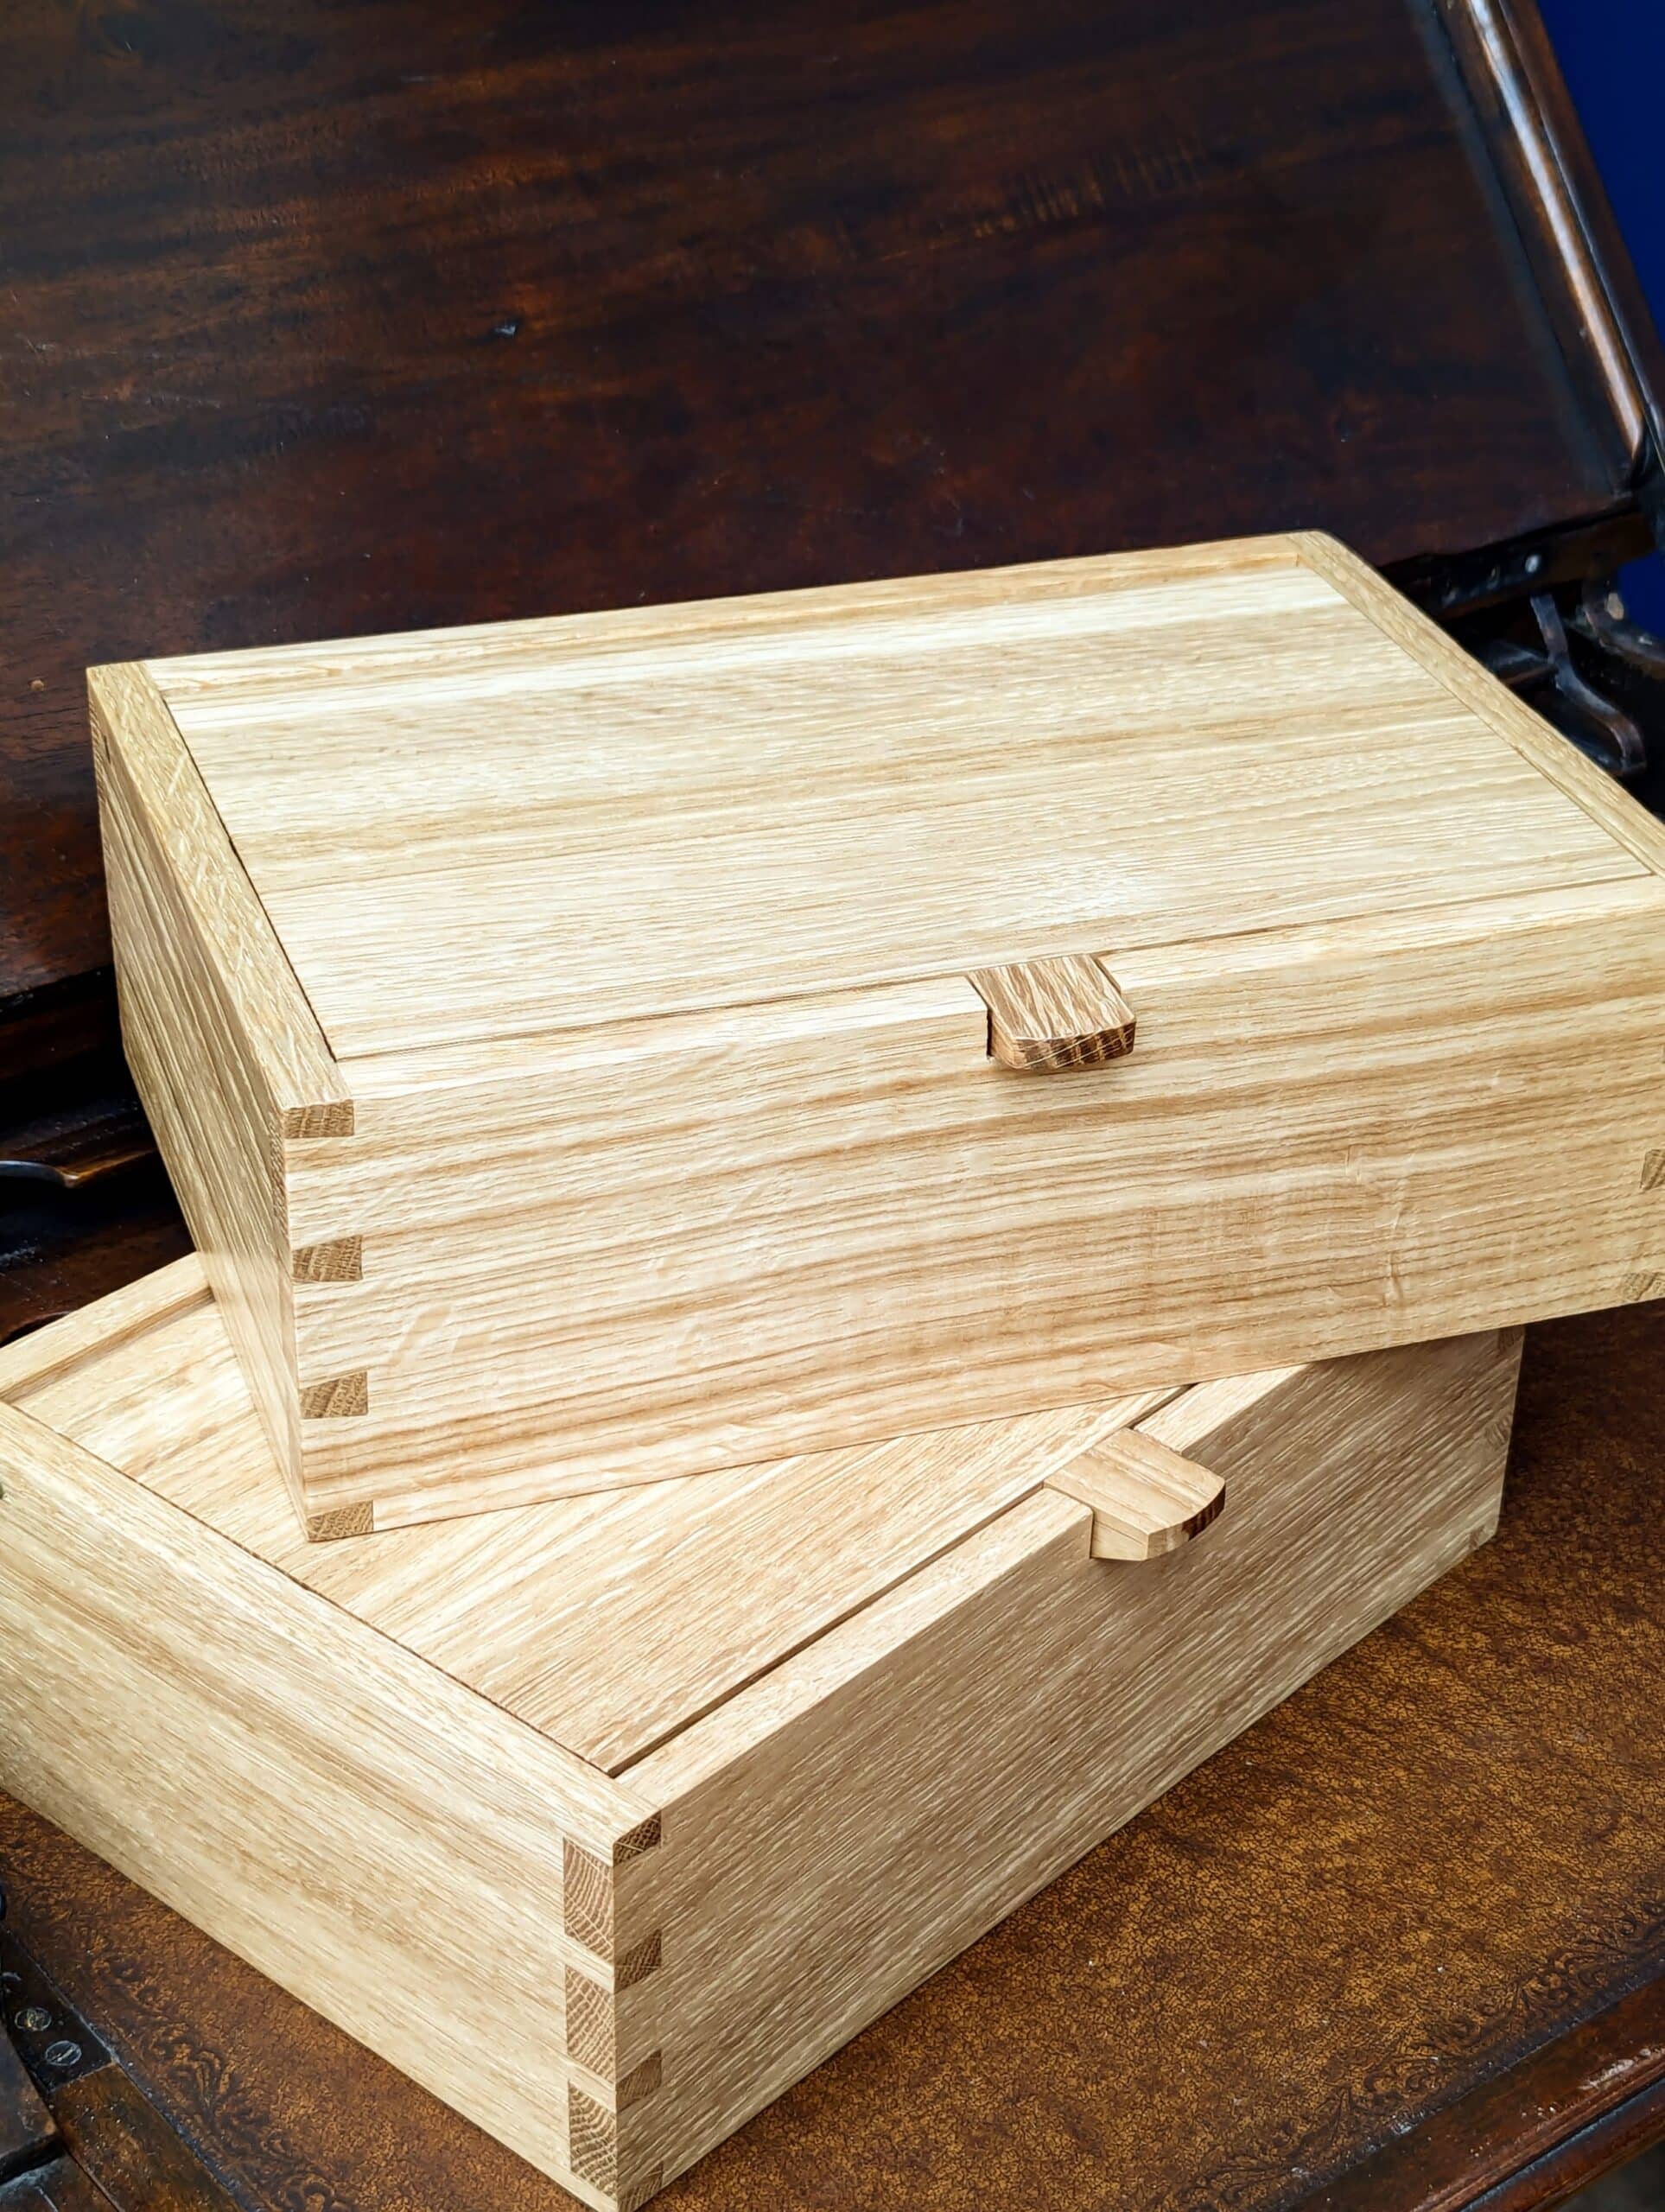
It was the thought of Christmas that did it—that and the fact that I love my box design for several reasons. I have made half a dozen of the designs without the idea of personally making money from them or future ones. I’m thinking this to be a benevolent piece. I want to give them away or if they are sold then it must be for me to give the box to organisations to make money and support their work. But I don’t mind any individual making one or two for their own personal use or a gift for another. It shouldn’t be for someone to make it as a production piece. The design remains mine. I own it and it is my copyright and my intellectual property.
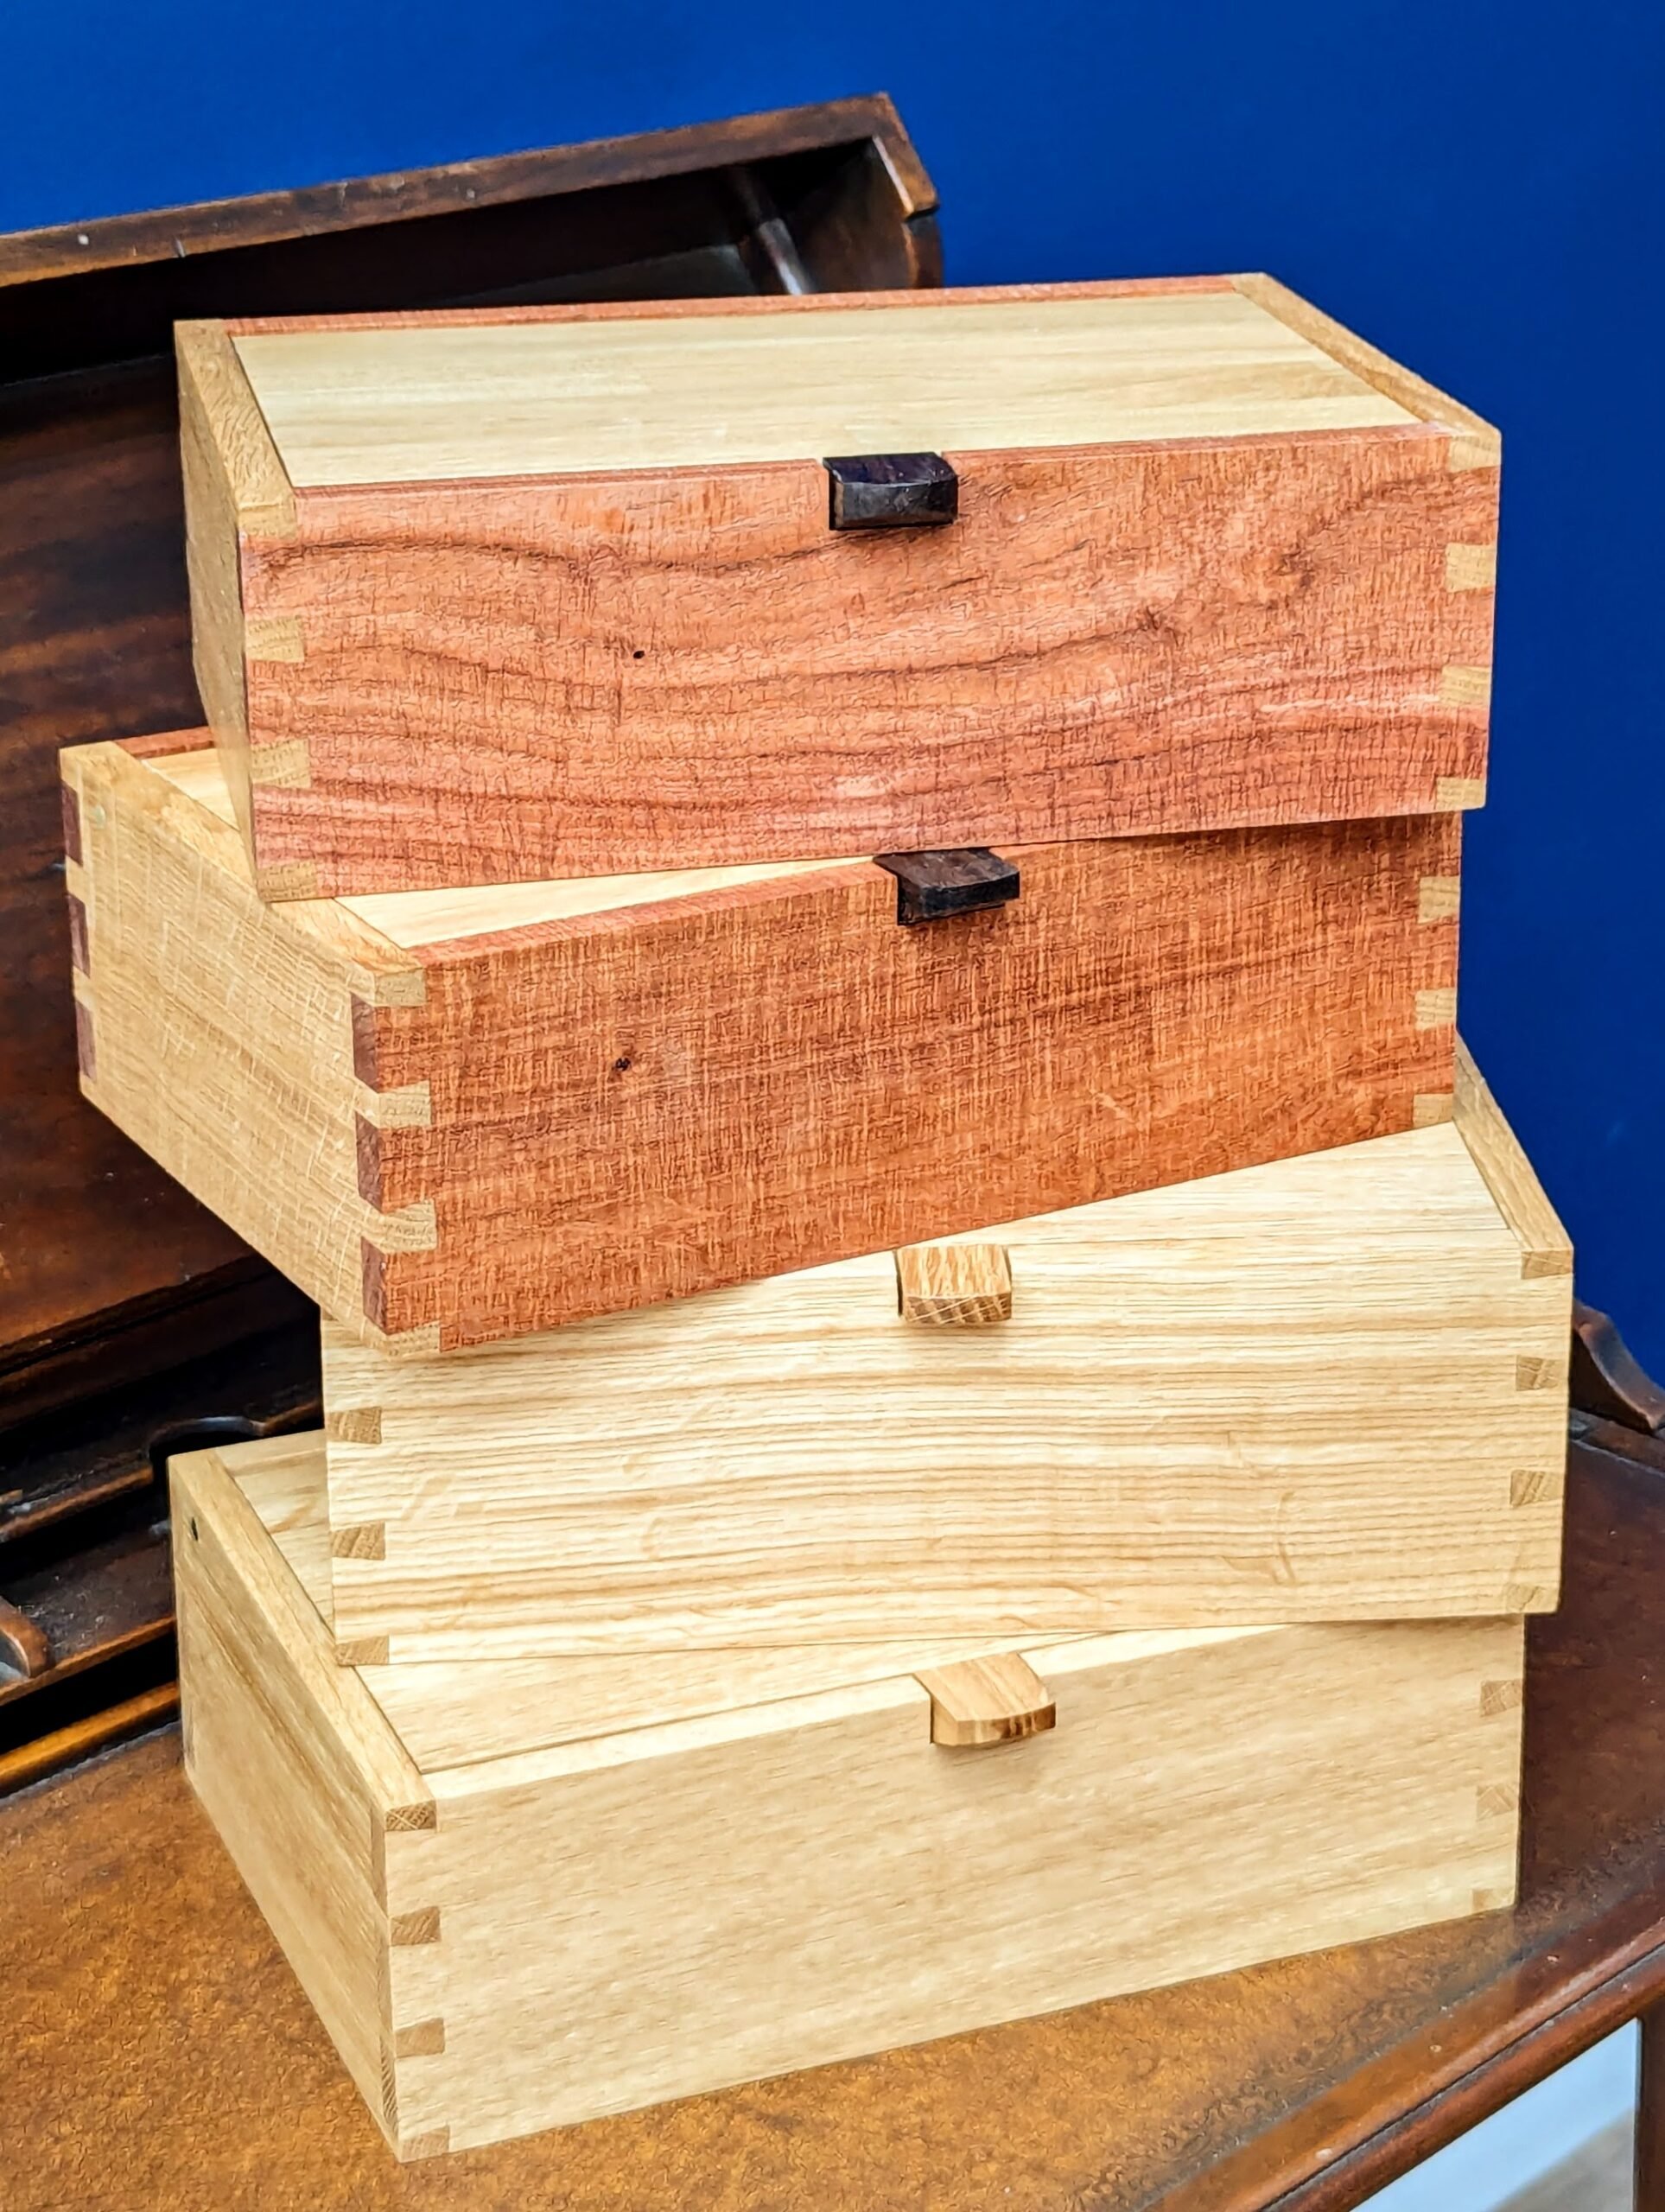
The wood choices can be just about any. I tend to not combine softwoods with hardwoods and then too I consider the density of the different woods because different woods expand at different rates and super absorbers will super shrink too. Maple is for instance one of the worst. That covers the gamut of acres, a range of medium-density hardwoods, mostly relatively characterless with minor grain contrast ranging from white to cream with some brownish tint. In my boxes, I used just oak as well as oak and mesquite.
Your cutting list will be as follows:
Long sides 11 1/2″ X 4 1/8″” X 1/2″
Short sides 7 3/4″ X 4 1/8″ X 1/2″
Lid 10 1/2″ X 6 3/4″ X 3/4″
Bottom 10 1/2″ X 6 3/4″ X 1/4″
Handle 2″ X 1″ X 3/4″
Seven linear feet of 1/4″ X 3/16″
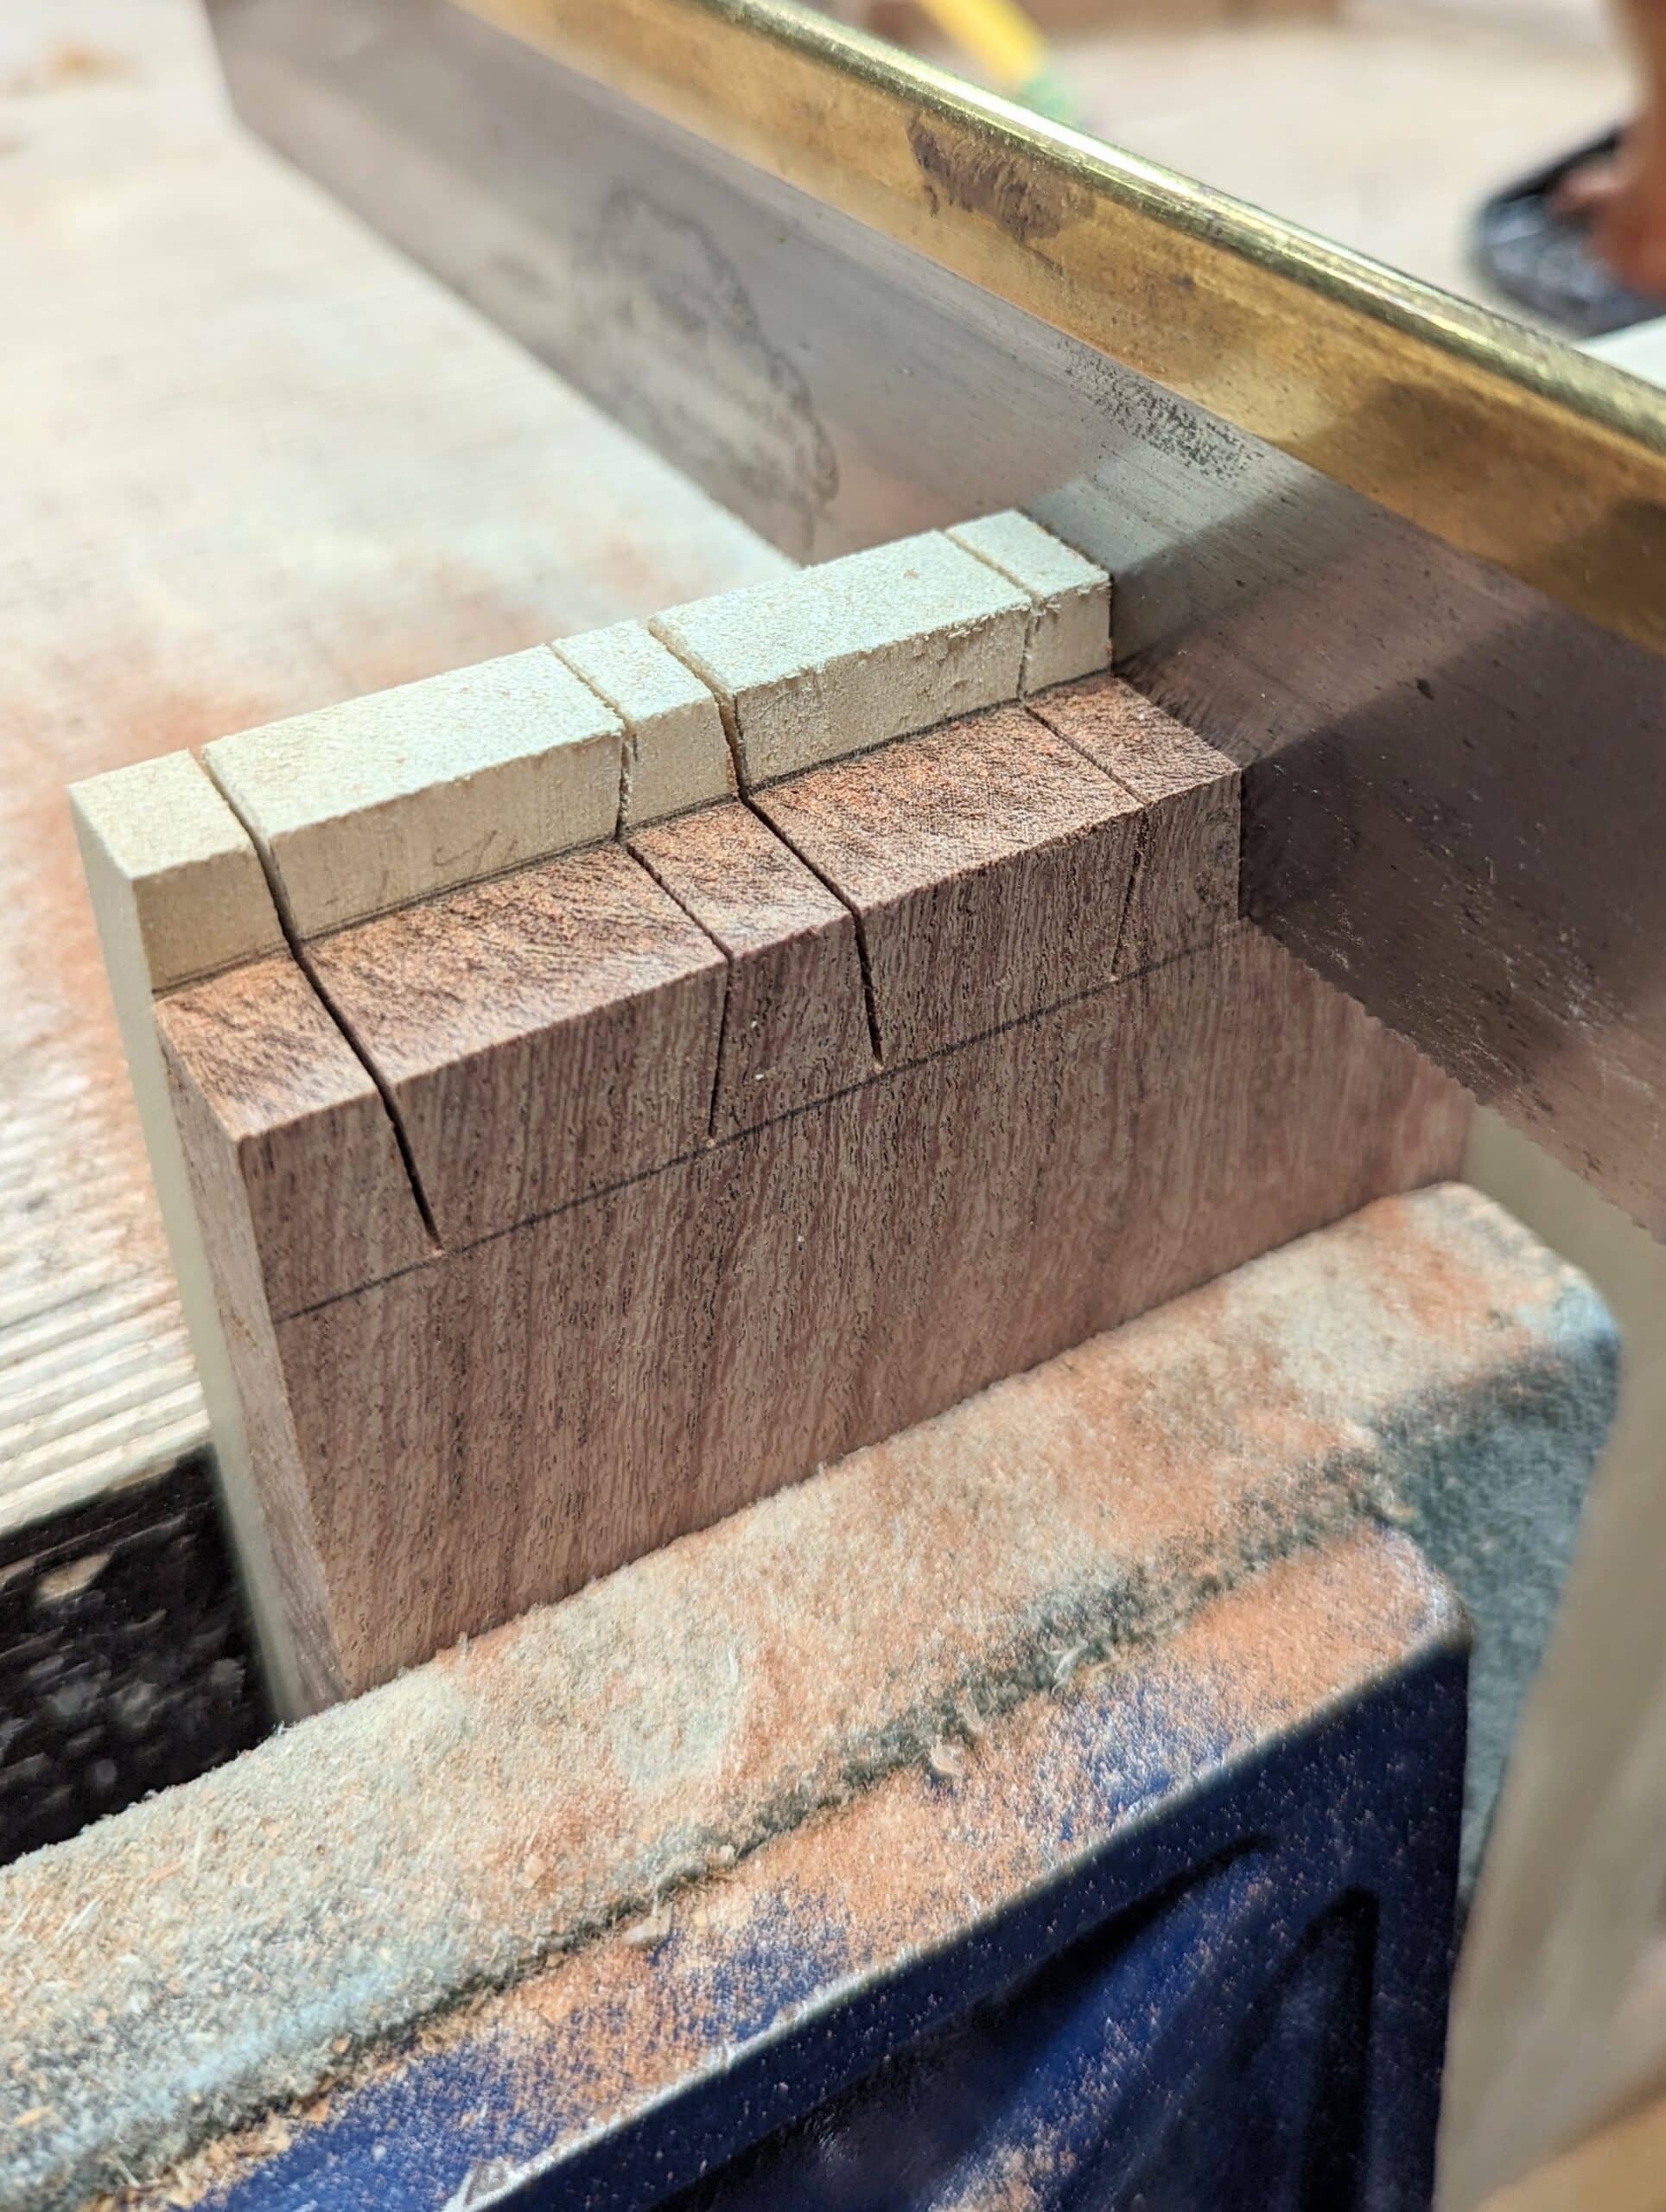
With the four sides planed, trued and squared, I focus on making a template guide to run the saw through. Any scrap will usually do but I chose poplar because of its relative softness and even texture. Growth rings in some woods can divert the saw cut and as this will be a guide used over a number of pieces or boxes I want a wood suitable for both accuracy and quality in precise cuts in continued future use.
I lay out the position of the start points fro my dovetails on the clear scrap of poplar. I should say that to make the box as a one-off you do not have to do this, but it saves time and increases accuracy if it is done right and indeed you want to make more than one box either all at once or over the coming future.

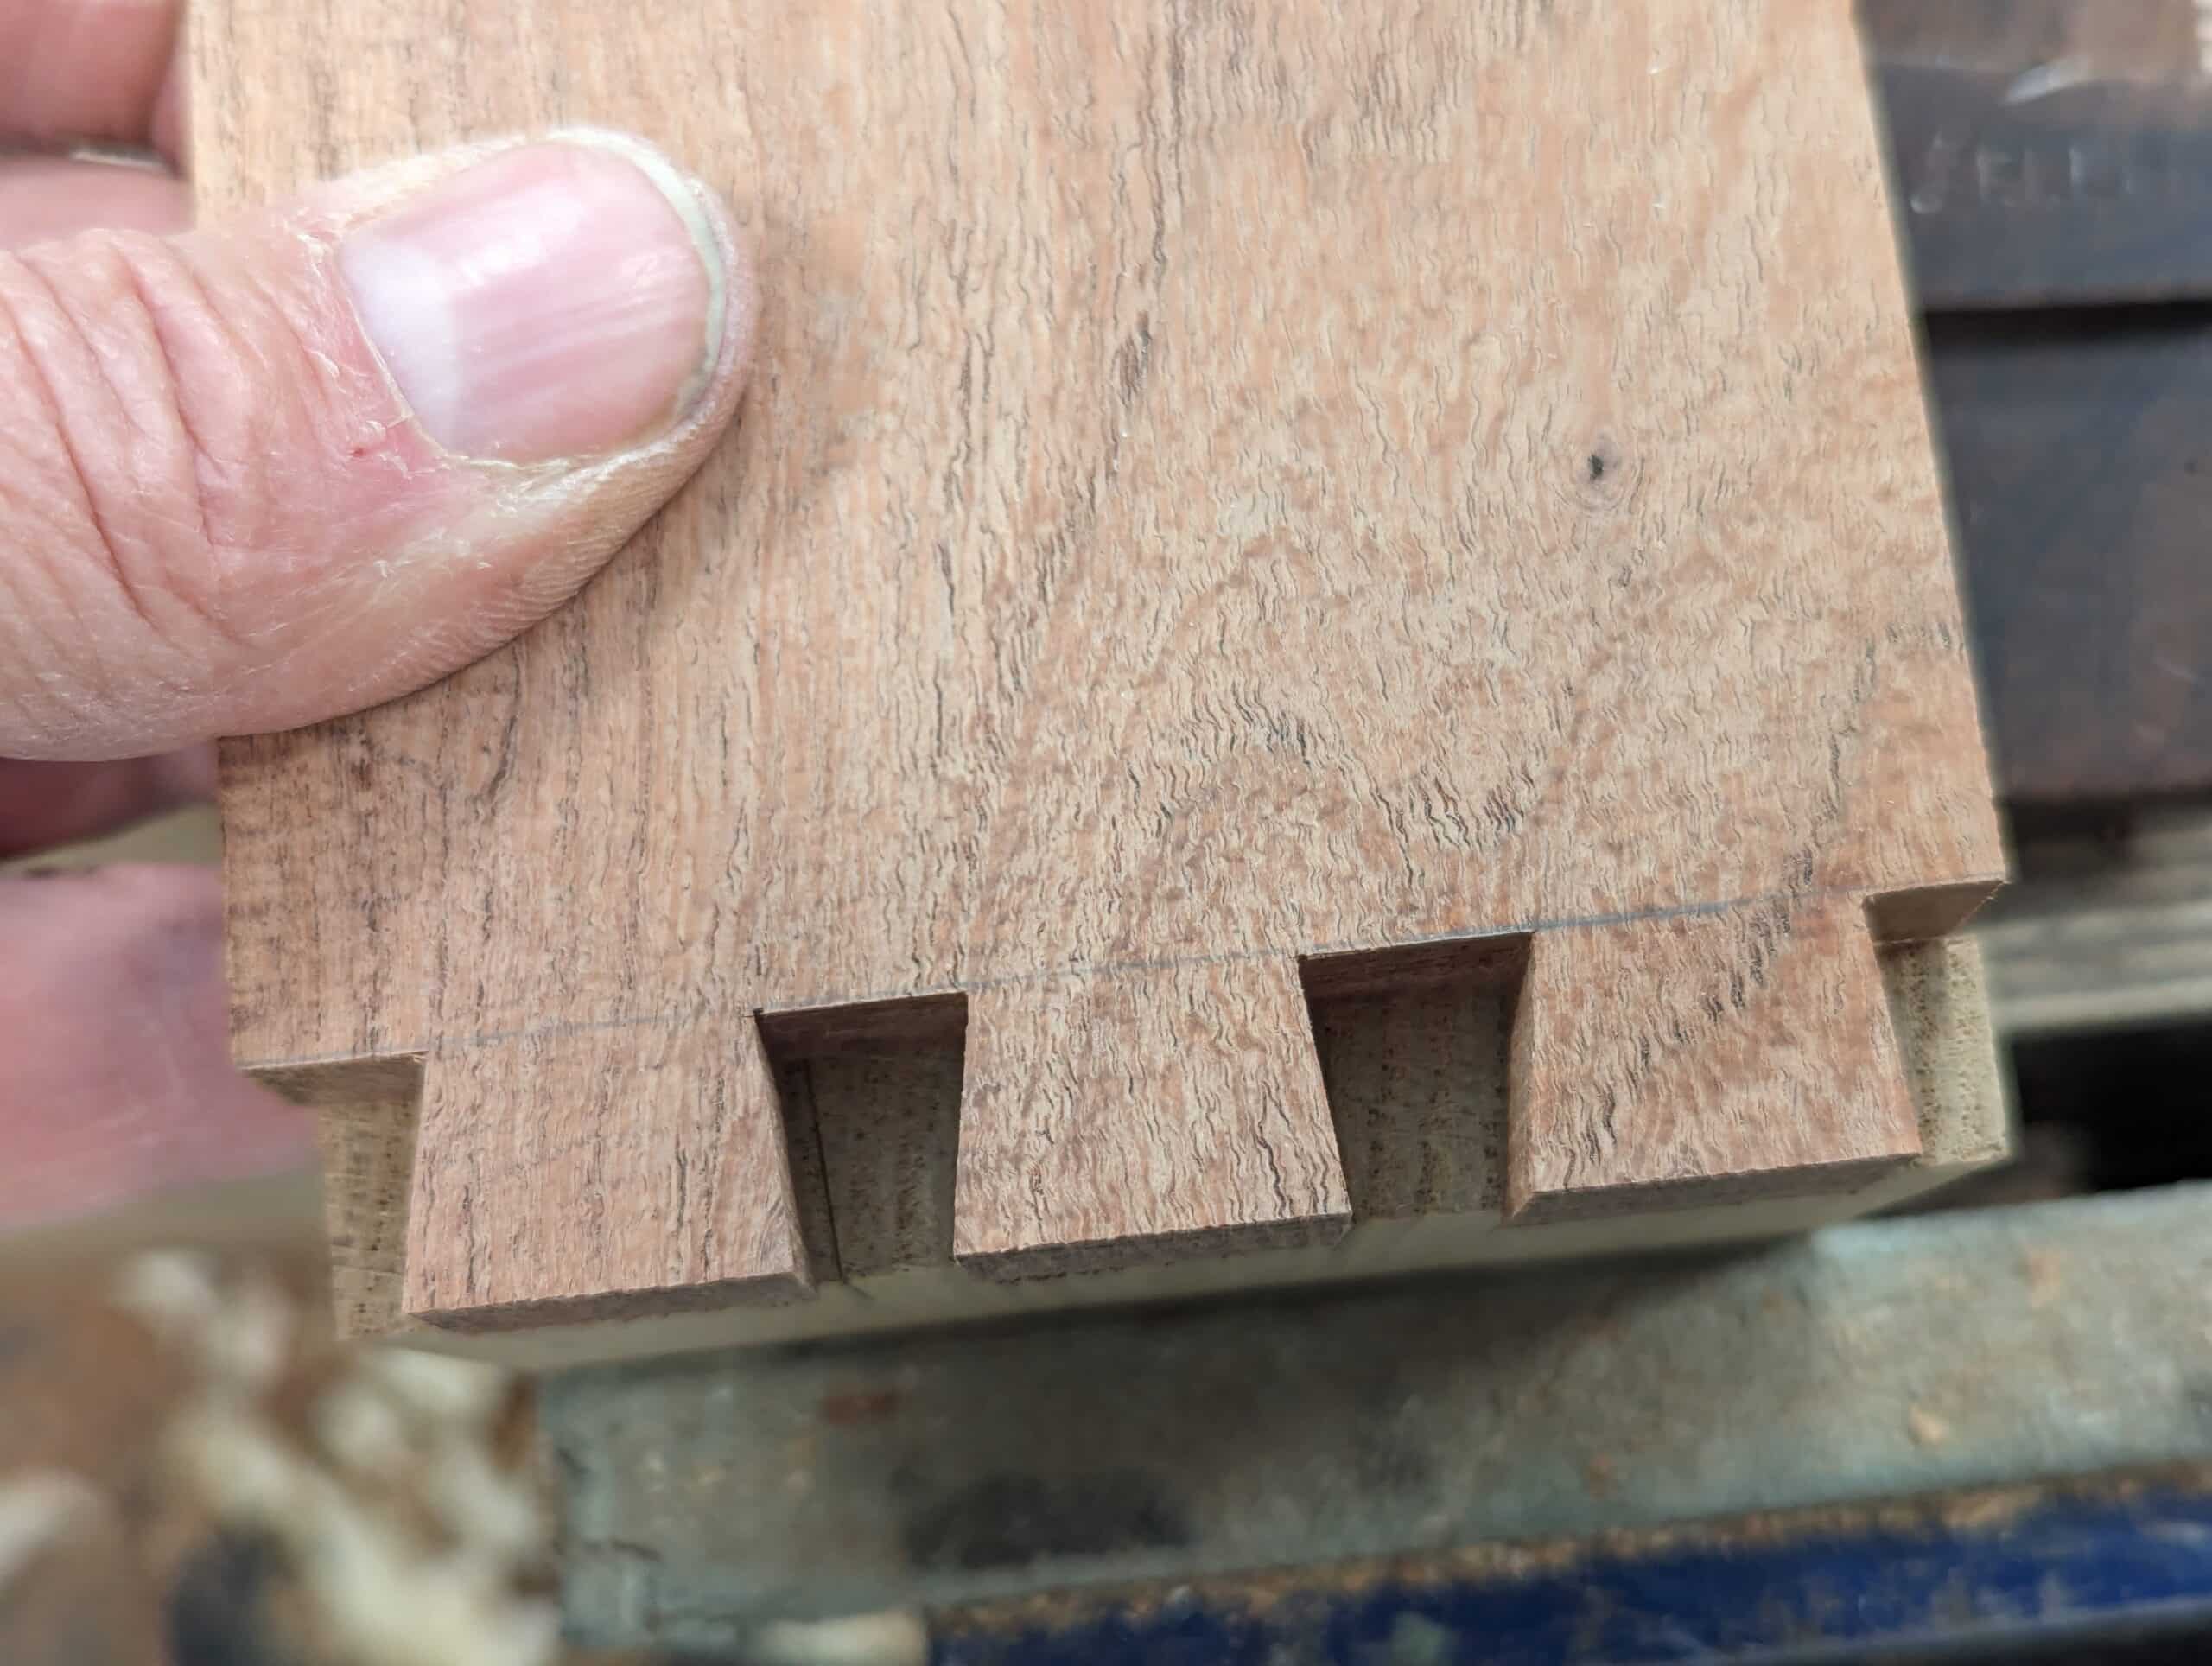
The dovetail details are simple enough if you use something like 3/8″ pins (no half pins) then your tails can be equisized at 7/8″ according to how your eye feels in the look of it before the cuts become permanent. look at what you have laid out in pencil. take your time. A nice balance without fussiness and fancyier distractions suits most of us as makers. Of course, you must remember that taking the cuts on the outsides of the dovetail lines will make the pins smaller than the 3/8″ because you have reduction-extra by the thickness of the saw kerf. The tails will be smallerif you take the other side of the line. Some say split the lines. That’s a silly idea. Not practical if you are losing your line with each stroke..

To create the guide, start any short distance from the end of the blank. In my case, I went 3/8″ but half an inch or a little more is good if you have the length in your scrap.
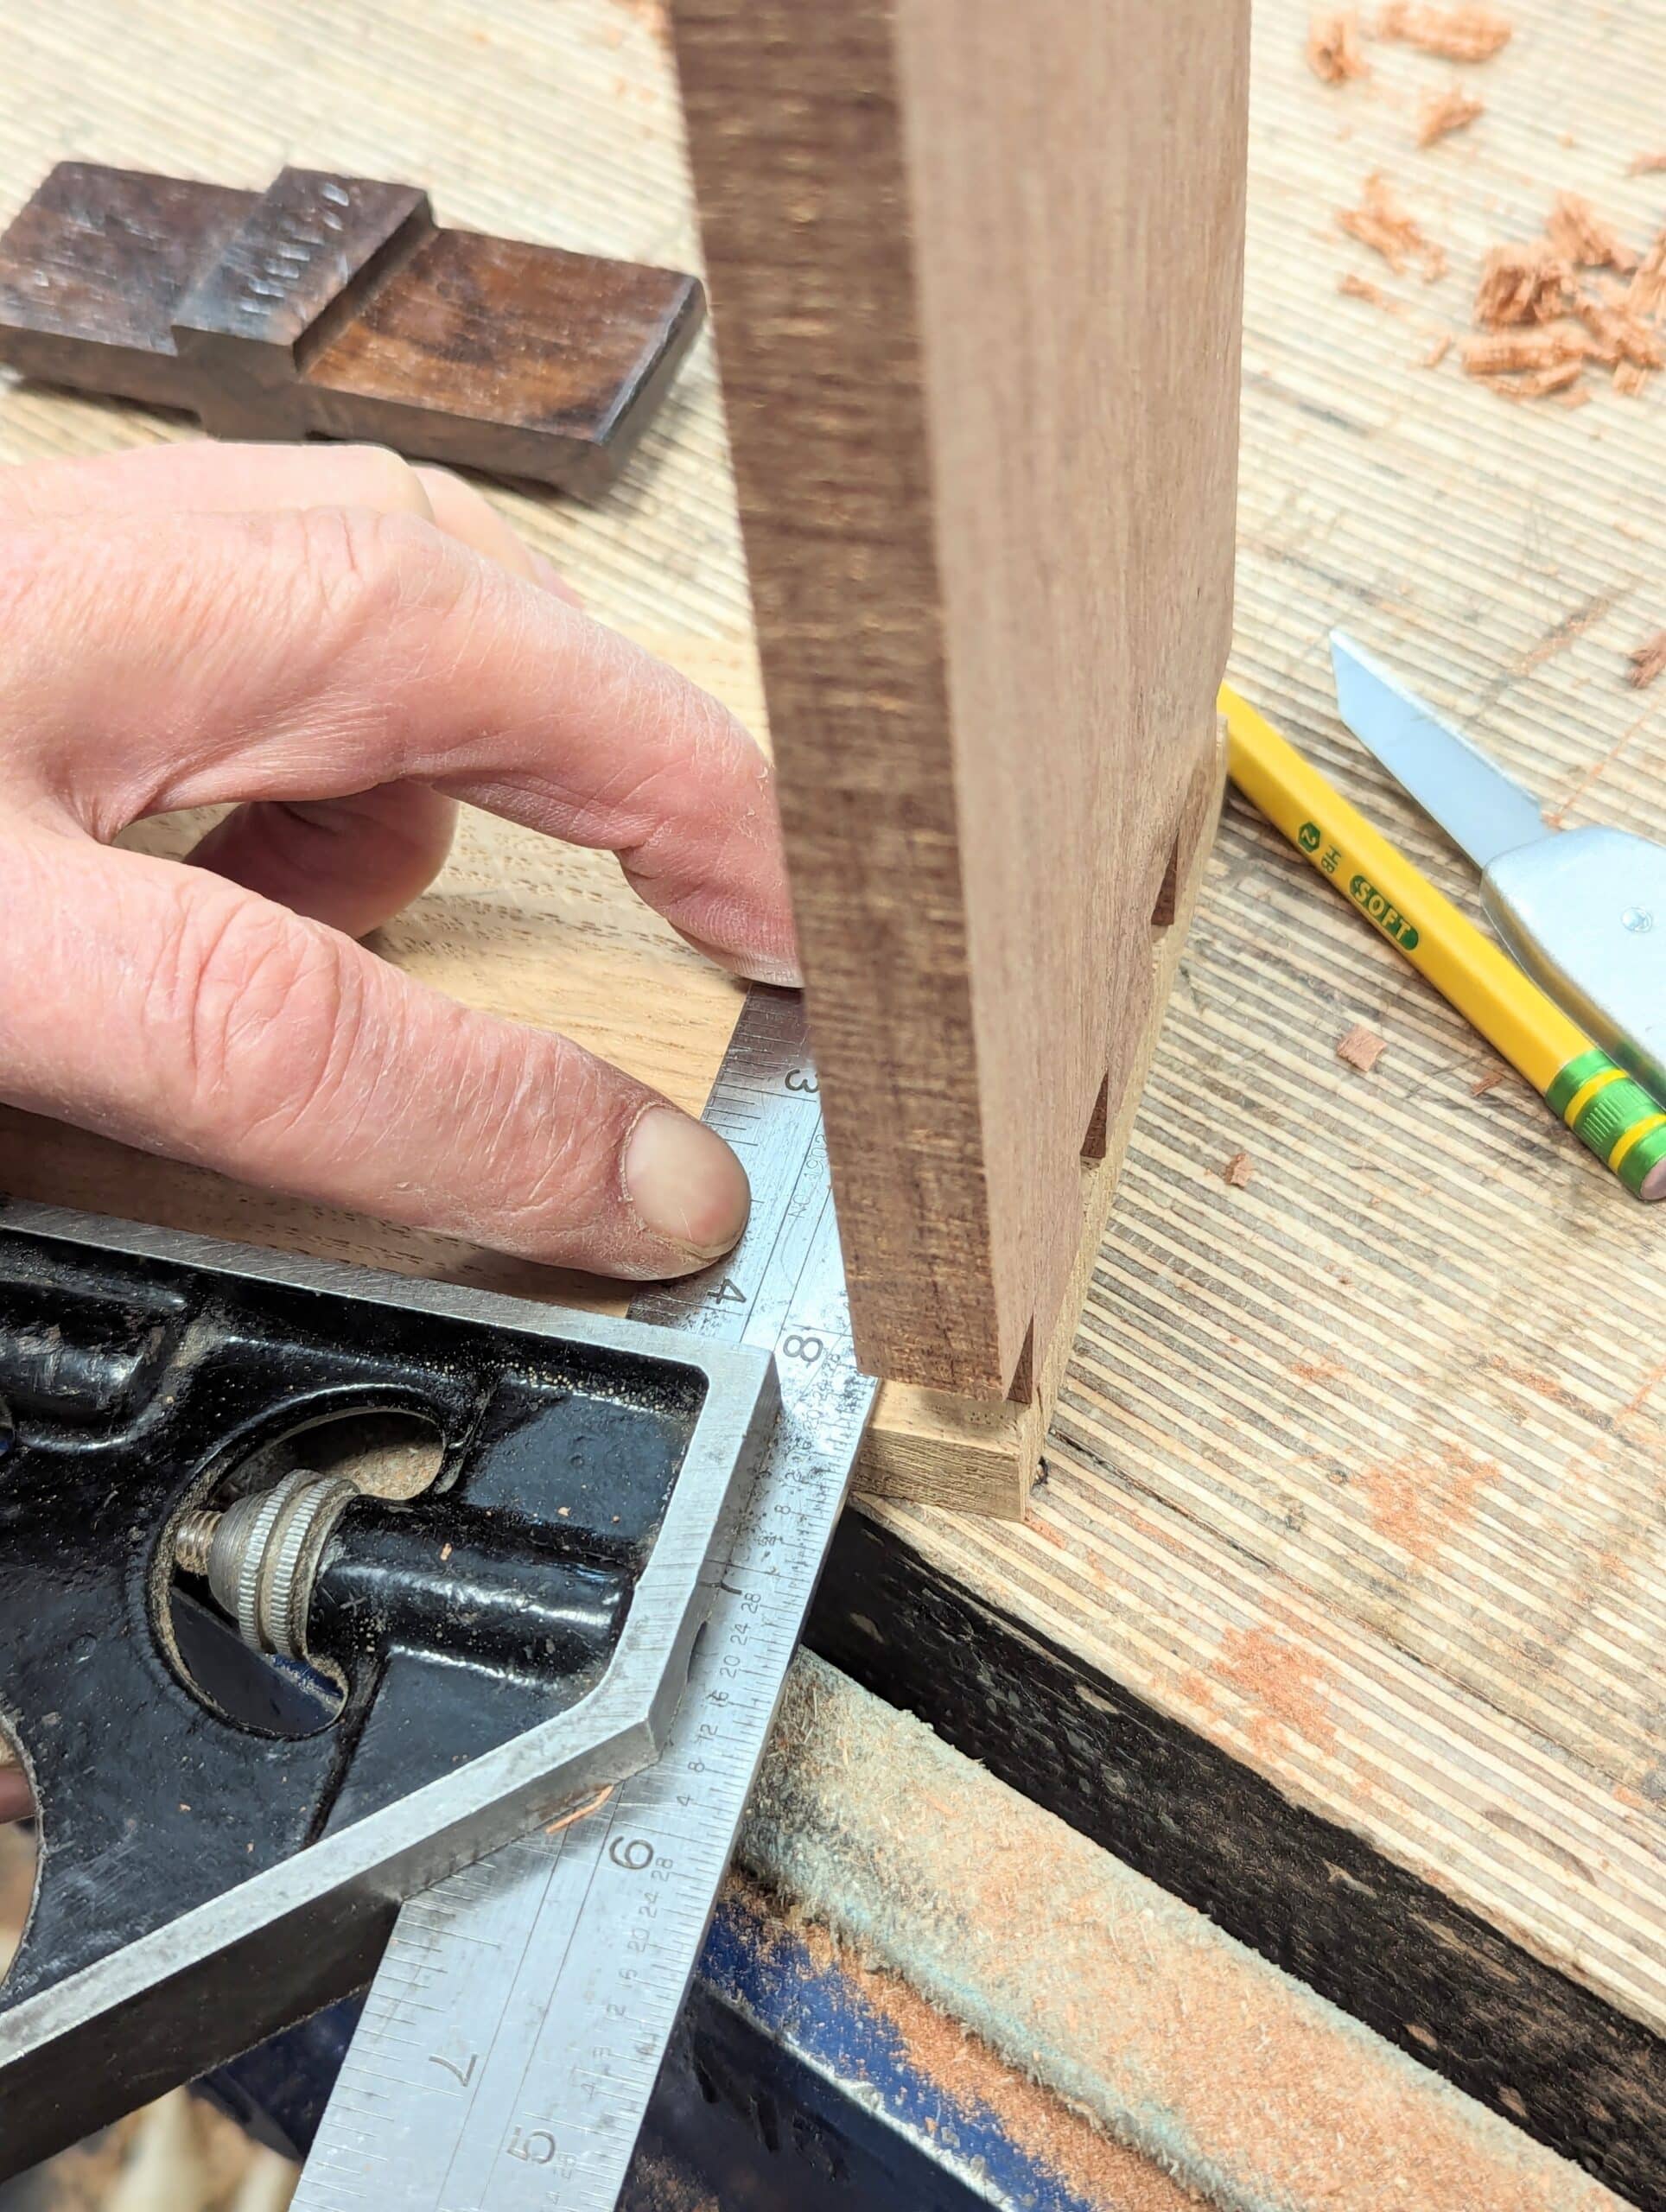
Square a first baseline across. This will be the actual point at which your dovetails will begin.
Now mark the crosshairs for the dovetails onto the line. By this, I mean from one edge measure in 3/8″, then 7/8″, 3/8″, 7/8″, 3/8″, 7/8″ and that will leave 3/8″.

Now use either your dovetail template or a sliding bevel set to one-in-seven for the dovetail angles. The dovetails will intersect these crosshairs.
NOTE: Often we think that the angle is more important than the square-across lines on the end of the wood but in reality, any inaccuracy in the end-grain crosscutting will reflect in the quality of the final fir; out of square one way will leave gaps on the outer aspect of the joint, out of square the other way will mean the joint will tighten and something will have to give: end result, a split somewhere.

For square-across accuracy, add a backer section of wood from a scrap that will then extend the distance. An inch-thick piece should be enough.

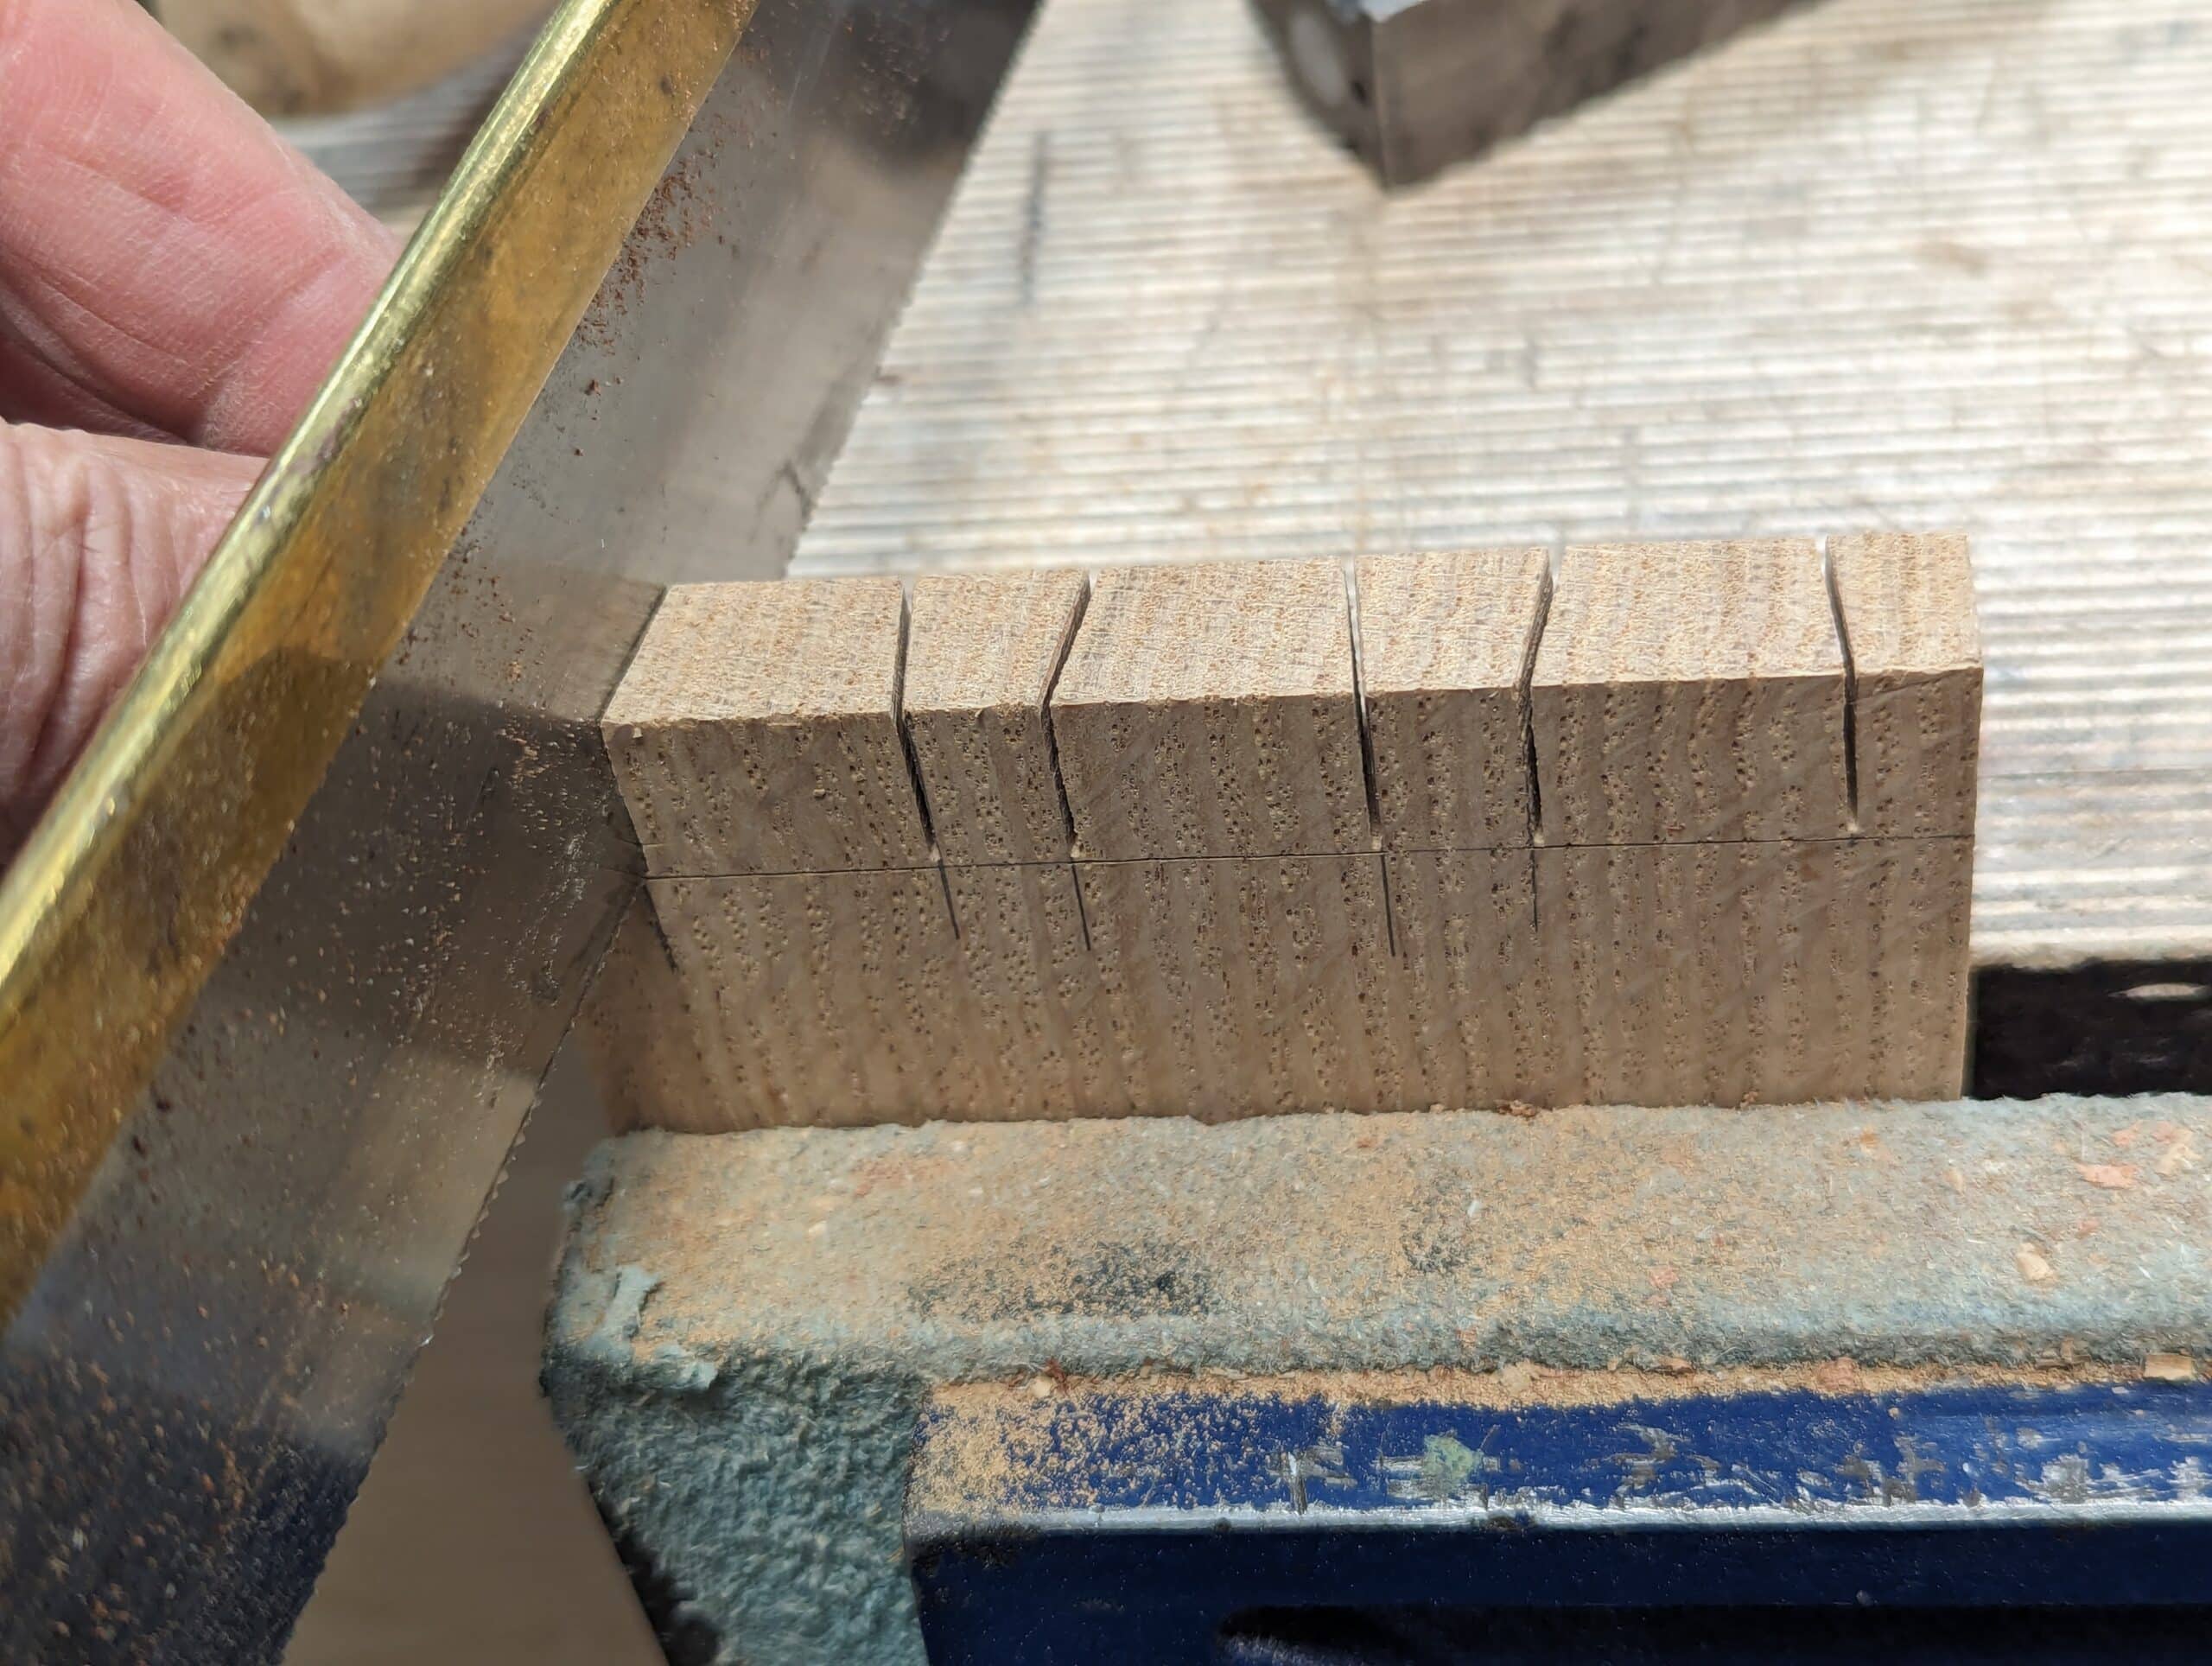
Use a knife to cross-cut the end as shown.

On the waste side of the knifewall make a square-across saw cut to establish the kerf on the waste side of the line and after a couple of strokes angle the saw to follow the angled pencil line.
The kerfs you are creating should be as close as possible to dead on, otherwise, any inaccuracy will telegraph into each subsequent dovetail set you create. You now have your final guide. As long as you are careful not to allow the saw to wallow the sides in the cuts, the guide will make many sets of dovetails.

The line on the guide is the line you will place your dovetail piece to and you will clamp these vertically in the vise, lined up on that line. The depth you will cut to on the dovetail piece will be marked on the dovetail piece.
Cutting the dovetails
With the guide and the dovetail piece clamped firmly together in the vise, you can now follow the guide with your dovetail saw with confidence.
Stop just above the depth line.
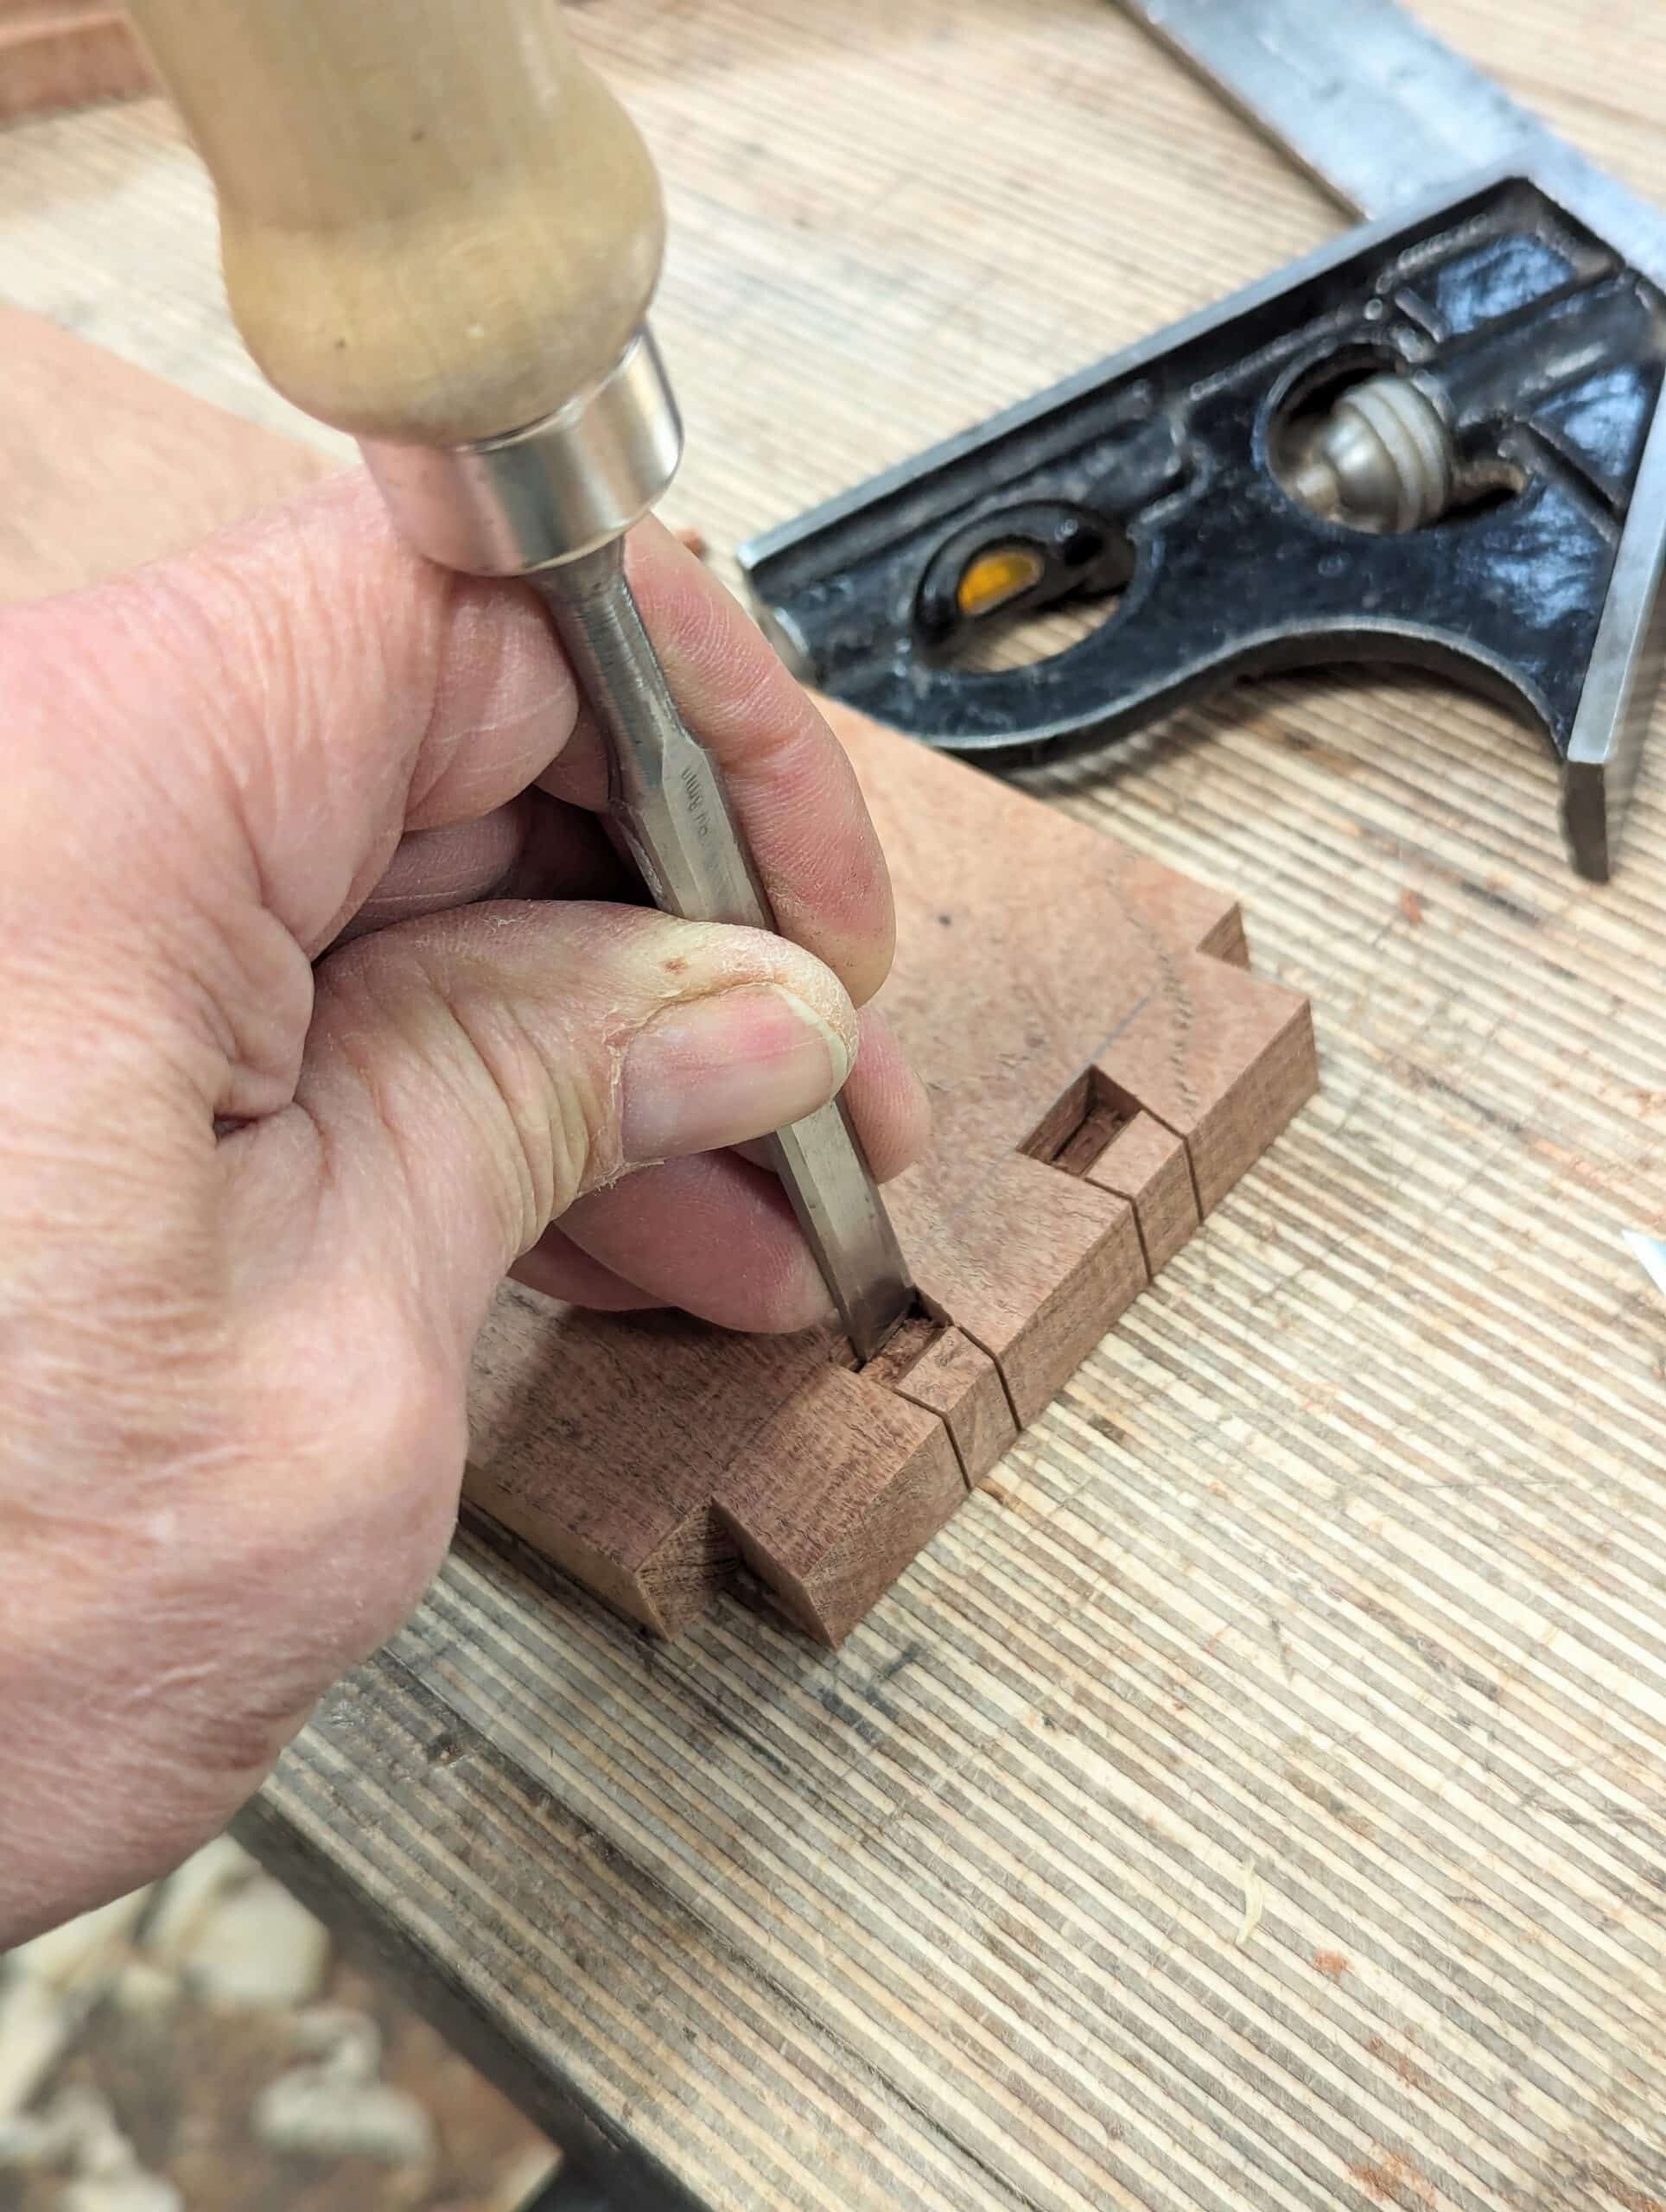
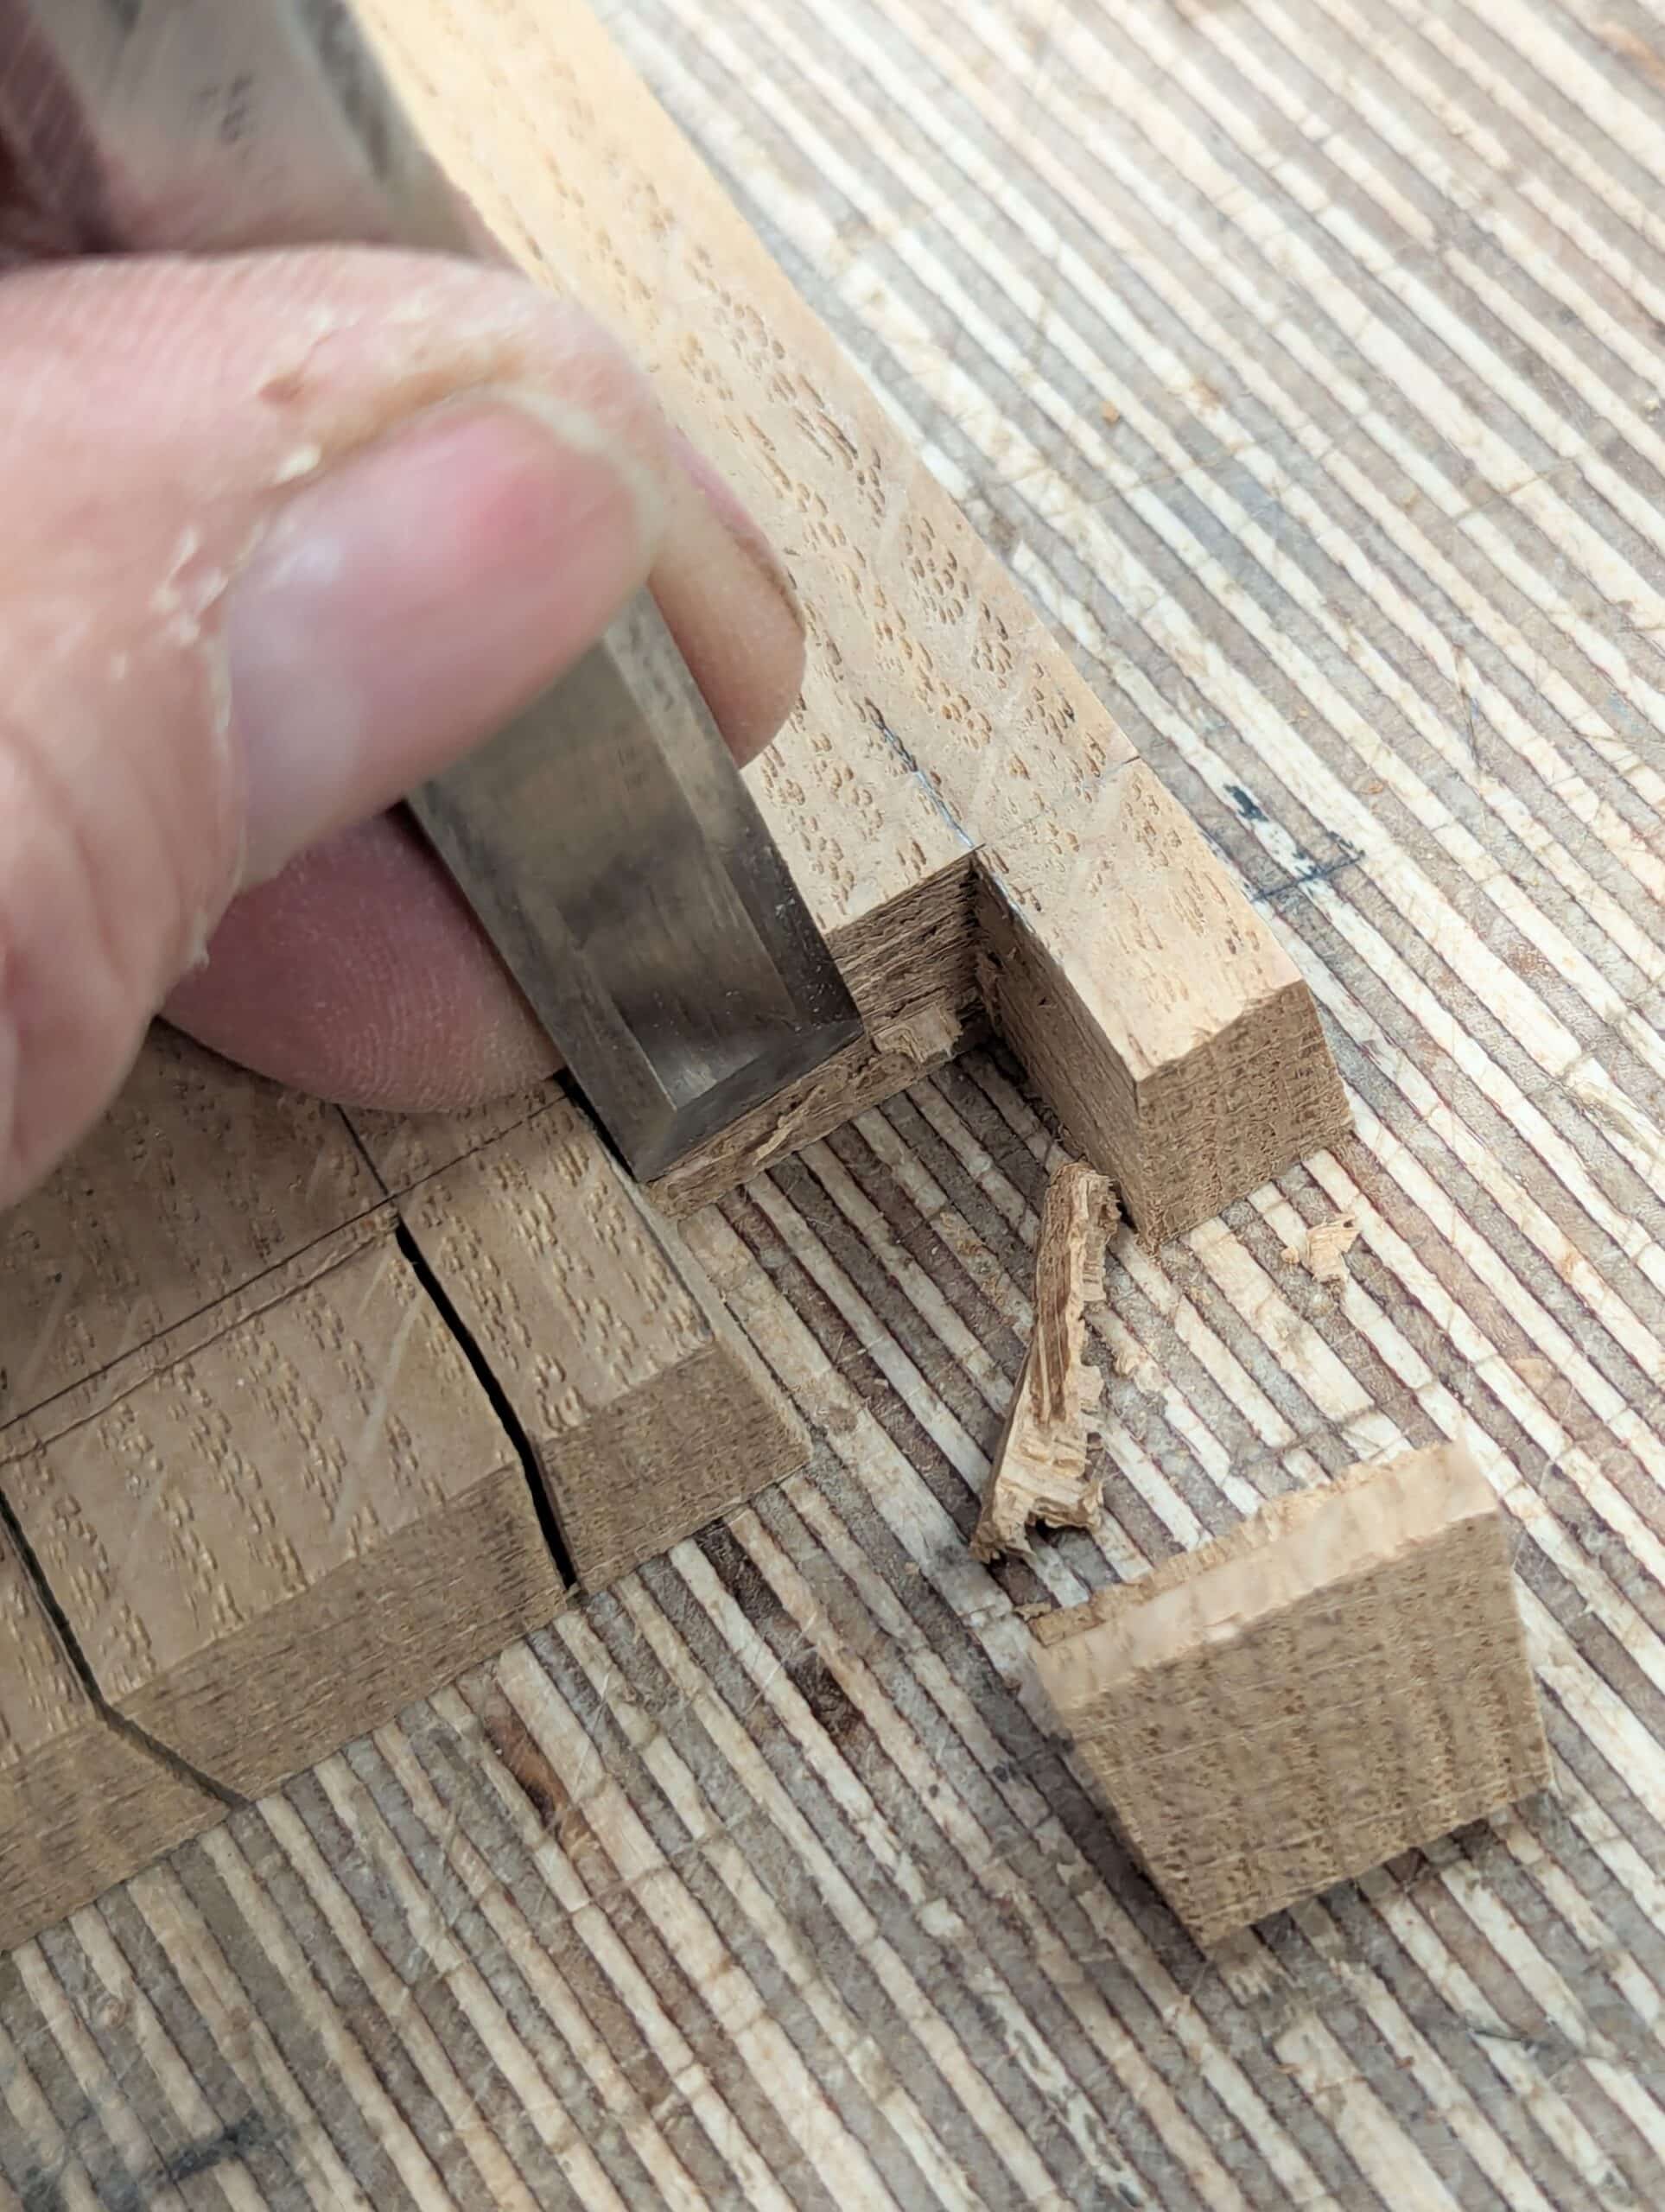
Removing the waste follows a distinct pattern. I prefer to remove my waste with chisel chop cutting from both sides of the workpiece so that the finished cut meets midway in the section. This then requires a knifewall transferring all the way around the end. Establish the distance by lining up the adjacent workpiece with the end of the dovetail piece and lining the square up to run your knifewall between and either side of the saw kerfs.

Alternate between vertical and angled horizontal cuts from each side until the big meet in the midsection.
It’s up to you whether you complete all of the dovetail pieces or complete each individual as you go.
Mark the depth of the pin-piece cuts the thickness of the dovetail piece. Use pencil for this. the knifewall comes after the saw kerfs are made shortly.

With the tailpiece held securely in the vise, use the knife to trace around the dovetails for that specific joint taking care to reach tightly into the corners and align the edges with both pieces.
Use a pencil to square down from the end. There is no need for a knifewall as this is along the grain and the knifewall is usually, but not always, used for cross-grain and end-grain cuts only.

On the waste sides of the lines, saw down to just a fraction above the cut line.
With the tailpiece lined up with the end and the square situated to that piece, use the knife to establish the final cut line for chopping out the waste.
Now remove the waste as you did with the tailpiece, alternating between vertical chop and horizontal cuts working from both sides.
After a dry fit to ensure all of the joints seat well with no gapping, you are ready to glue up the box. Use clamps or, if your vise is big enough, clamp the box until the glue drys enough not to turn loose. Usually this will be a round an hour or so. I usually save gluing up until the end pf the day and then leave it in the vise overnight.
When the glue is full set, plane up the outside taking care not to plane through but from each end towards the centre, otherwise you unsupported fibres will splinter off. Taking shallow-set passes always works best for this.
Part two to follow
I have wanted to try dovetails for some time now and these instructions are great. I plan to make a box similar to yours(for my use only). As usual Paul thank you for your concise instructions.
Beautiful Paul! I always appreciate your work and thank you for sharing!! Cheers!
Thanks for this. I really enjoyed the ones in masterclasses.
I know they are in common woodworking but it’s nice to get one occasionally on here or the home video series.
Thank you so much Paul, I will be working towards this soon as i have been wanting to do the dove tails for sometime now. ive did one to Date and destroyed it, it still worked out. I pick up the stanely knife you use and tied it on one piece and do like it’s feel compared to the couple I have here. with arthritis it keeps me to a couple hrs aday that I can do some wood working, currently get garage a little more efficient for me, thank you again.
Several years ago I made six or seven of the desktop organizers that you designed. As I progressed, my dovetails improved. Most of them went to family members, but the one with the best dovetails went to my neurosurgeon.
Since then I have made many boxes with dovetails I learned to do from your videos.
I like the box you have designed and will make several of them. I may vary the dimensions based on the pieces of wood in my inventory from trees that fallen in my neighborhood – lots of cherry and some maple and some discarded bed frames.
Thank you.
Question: On the lid, you show the dimensions to fit just inside the wall frame. How is it hinged? Does it have a dowel sticking out the side or is the pin of the lid part of the lid itself and then cut to length to fit inside as shown. If that were the case, then the lid would have to be installed at the same time as the sides.
The answers will be in an upcoming episode. But I will say, ‘None of the above.’
Hello Paul. I love the design of your wooden box. I would like to make one and add a system to prevent the lid from opening when the box is turned. Do you have any design suggestions to secure the box’s opening?
If I had to guess, same method as used in the dresser mirror project. At least that is what I thought when I saw the image above. Complete speculation on my part.
Thank you for all you have given me over the years
I believe I first came across Paul’s video some six or seven years ago with a video demonstrating this technique. That was my first exposure to hand tools, and I’ve been fascinated since.
Regarding “Making my box”….
you didn’t have to, but I’m sure glad you did, TY.
Paul:
I’m a big fan of yours and believe you have been a major positive influence within the woodworking community. However I don’t see how you can claim ownership of this box design when over the last 40 plus years I have seen boxes presented in various woodworking magazines very similar to this one. Given the large body of work out there it is very difficult to come up with something that hasn’t already been done. Case in point, back in 2000 I saw a picture of an old Roman handplane from 2,000 years ago that had a metal sole and incorporated a metal crosspin to wedge the iron. I thought, wow, I could make one all out of wood. I made a few prototypes before I figured out where to place crosspin, the best angle for the wedge, etc. I took the working plane to show a friend thinking I had come up with something new. First words out of his mouth were, “nice Krenov plane”. So much for thinking I had come up with something original and unique. It’s a beautiful, simple box design that lends itself to lots of uses. It is a great project for all those cutoffs that accumulate in the shop. I appreciate you sharing it with us.
My thoughts exactly! Beautiful in its simplicity, but this design would not hold up in court.
I think that you are missing the point. Paul very kindly shares his woodworking skill and design knowledge built up over a lifetime. He is giving this box design away for free, but requesting that it is not used for commercial gain, this seems a fair exchange.
If it did come to a court case, which I don’t believe it would, if you used it commercially you would need to show that you or someone else has used the same design previously.
I for one am very grateful that Paul shares his knowledge with us amateurs.
Thanks Paul.
I haven’t missed the point at all. The general design of this box has been out in the public domain for decades. At this point no one can claim ownership of it. What’s really important are Paul’s methods which are often times quite unique and original, yet he freely shares them. Which is why I’m such a fan of Paul’s. I’ve been at this for over 50 years myself and am familiar with most of the woodworking gurus out there, as well as having taught woodworking classes myself. Paul’s knowledge, methods, and problem solving skills put him well above of the rest of us in my book. Paul’s design for a wooden router plane is a perfect example of the man’s genius and yes, he owns it. Paul’s approach to this box is another great example of his skill, knowledge, and insights. No one does it better.
You really did miss the whole point and that beyond measure. Oh well! No matter. Additionally though, I don’t see proof in what you say. I did answer the reality of ownership of intellectual property as below somewhere here that should help. And, too, I do not ever read any woodworking magazines nor look at any design books or read things or watch things elsewhere any more, otherwise I would not only be influenced by others, as you infer, I would not have the time to do my full-time job nudging the misconceptions that if it doesn’t have electricity to it it doesn’t work.
Actually, it’s obvious Stijn Bossuyt may not fully understand intellectual property or copyright laws. so I would be both happy and advantaged in a court case. Tell two people to write about how to make a common cup of tea with a teabag independently of one another and though they may use the exact same words and composition they both own their individual intellectual property. That said, my personal design in this box is not copied or seen before by me so I do own it and did give it to a hundred thousand if not more in the articles I just wrote here on my blog. When the video is released shortly a million woodworkers will see it in a few short months because the box itself will be auctioned on YouTube and every penny from the sale will go to a charity through the poper and appropriate channels for charitable fund raising of this kind. The gain from my free gift is for everyone around the world too and really not for my personal gain. We are momentarily hung up with YT technical glitch and YT are at the moment working on it so very soon (hopefully) it will be an hour or so long video for everyone to watch. It is funny though how people perceive things thinking they know what’s going on. But I designed what was in my heart and mind and hands were more than willing to do. I feel content with that.
Paul, I do understand intellectual property, and IP law is necessary to protect ideas and designs and therefore drive innovation. Gregory and I were merely stating that your claim of owning this box design is too bold. Yes, it originated from your mind and is therefore your IP. But claiming no one else can use it for mass production is stretching it too far, in the same way an architect designing a simple rectangular house cannot prevent others from building rectangular houses. It’s a fine balance, and sometimes IP law gets abused e.g. when researchers start patenting microorganisms found in nature.
Anyway, that said, I’m very grateful that you are sharing this box with us, and I’m looking forward to the video.
Paul:
Nowhere in my statement did I infer that you draw on the work or methods of others. You are an original and your methods and designs are your own. Some are original and some have been around for decades.
There is such a vast body of work out there, even if you’re unaware of it, it is extremely difficult to produce something that is truly new in woodworking. As with my “Krenov Plane” example, up to that point I had never heard of James Krenov nor was I familiar with his body of work. The plane I made was entirely of my own creation, it sprang from my own mind without being influenced by others. However, In the world of design, Krenov beat me to the punch, had already published articles about his plane, and taught others to make planes using the same methods. The fact that you were unaware of other boxes of the same design, which have already been published, doesn’t give you ownership of the design of your box. That doesn’t diminish your work in any way. As I stated, your generous presentation of this project and the methods you used to create it are marvelous and demonstrate your advanced knowledge and skill. Like everyone else, I greatly appreciate your ongoing contribution to the craft and I readily admit to being influenced by your methods. Like you, my designs are my own. As a general rule I don’t copy anyone’s work. It’s their methods of work that interests me and allow me to continue to advance in the craft. Thank you for putting yourself out there. we are all better off for it.
Excellent, Paul. A concise, yet comprehensive guide.
I just wanted to thank you for these wonderful box designs. I made one of your shaker candle boxes for my mom over the holidays and I’ve never seen her enjoy a gift so much. Thought of her the whole time I made it and she could feel how special the gift was. I’m going to make one of these for my dad next!
Hi Paul, Many thanks for sharing your knowledge and leading me away from noisy, dusty power tools. I have made several of your pieces from the master class series with reasonable results.
I have just made some raised panel doors, similar to the ones on your tool cabinet and I need some advise. When I mounted them they all spring back approx 1/8″ from the closed position. Any help would be much appreciated.
Peter,
When you say that they spring back, I assume you mean that the door opens a touch when you close it? I mean, you’re not referring to wood movement or other such thing? If so, I’m guessing it has something to do with the hinges. Perhaps they’ve been recessed too deep? To test, you could remove the doors, and shim the hinges with something like a playing card, or a folded bit of paper and see if that makes a difference. If it does then you’ll know if it is the hinge on the door, or on the cabinet that is the issue, and plane down slightly (unless you just keep the card/paper if you don’t mind it) to reduce the recess.
Actually, if you check there is no twist in the door or the frame first too, that could also be the issue, but spring back sounds like hinge recessing in my limited experience (having made that mistake before, basically!).
Peter, There are several reasons for the door to spring open by tiny and large amounts. The most common is that one or both hinge recesses are a little too deep. It doesn’t need to be much, just a hair really. This is easily resolved by a card shim beneath one of the hinge flaps. Another reason can be the door edge is slightly or majorly out of square so that the inside edge of the door binds on the inside of the cabinet. Another is the screws or a screw is not lying flush if it went in at a slight angle or the screw head is too big for the countersink. Is there a rebate the door sits into? That can be tight on the inside face of the door and so the door springs off under the pressure. All doors will try to find the path of least resistance.
Ooh, I hope this will be a Masterclass project! Just beautiful, can’t wait for part II.
It is a video, Lisa. And out very soon.
As always very impressed with your craftsmanship as well as teachings and the detail focus as well as your efforts to make all of it accessible to everyone without telling anyone you need this or that expensive tool.
I noticed here that you use a gents saw that testifies this.
My question is do you sharpen it with a hybrid cross cut like I believe it was designed or do you use a rip cut tooth for this particular use?
Great instructions. I am very new to this and my dovetails leave much to be desired at this time. My question concerns a comment you made about maple. Does it expand and contract a lot with temperature and humidity? Will I run into trouble if I combine maple and cherry in my projects? Thanks
How is the bottom attached? Plowed grooves? I ask because the top and bottom are shown as the same length and width.
I suppose the top could be sitting on a ledge …
A lovely box, to be sure!
Thanks.
Brilliant! I was admiring this design when I first saw a photo on this blog – even downloaded the image for inspiration.
The proportions as well as the lid caught my eye
Many thanks Paul for these great, concise instructions.
It is a nice design and very similar to a few others I’ve seen over the years but I would imagine dust to eventually build up inside the box as it settles down the insides of the lid. Something about the way the lid fits inside just doesn’t seem right to me. But I do love the dovetails and the way you’ve shown how to cut them using the guide, although I usually don’t make them in batches so I hardly ever bother with a guide. This way I can get better practice and each corner is a unique fit, I can fine-tune as I go rather than reproduce any errors or end up with a sloppy fitting saw cut in the guide.
This seems a bit pedantic to me. I mean, dust building up inside, etc, “settles down inside.” I have one that’s been sat there in a dusty workshop/office for six months and there’s no dust there yet. Even so, don’t you just, well, dust it out now and then? Then the guide comment. I did point out that for a one off you most likely don’t need the guide anyway. Hmm.
Paul, thanks for the response and also thank you for everything you have taught me over the years. Learning how and using hand tools has made woodworking MUCH more fun!!!!!!
Beautiful job Paul, I always loved contrasting woods in pieces .
Paul,
If your interpretation of intellectual property protections bore any weight, Mira and Kevin Nakashima would incredibly wealthy now, which they aren’t.
It wasn’t my “interpretation of intellectual property” but a direct quote of my lawyer and then too the London barristers when they fought to defend my copyright and intellectual property with the publishers of my first book 12 years ago when they tried to rob me of 20 years work. This was their trying to explain to a rough carpenter the finer points of what intellectual property was. Some things (especially the law) just have to be dumbed down for some people.
Well said Paul!!
Goodness Paul…how some people like to nitpick and love the sound of their voice
You have given so much of your time and skill to us all…..thank you
John2V
I agree with Paul