Coping With Coping Saws
For more information on saws, see our beginner site Common Woodworking.
Coping saws are so named because of their function. Fret saws because of the theirs, and of course key hole saws and table saws too. First, lets look at some differences.
Table saws are a 1 1/4” wide saw blade long and slender with a pistol-grip handle. The blade varied in length but generally, around 18″ long was fairly standard. These saws were considerably thicker along the tooth edge than the back edge and tapered from tooth edge to back edge along the whole length of the saw. In fact the kerf was surprisingly wider than any other conventional made. Perhaps 3mm (3/32”). The back was drawn out thinner to maybe 2mm (1/16”) and less and after many years of use could be near a knife edge on the back. Table saws were made this way because they were used to cut round and oval tables, mostly in hardwoods such as oak, ash and chestnut. The wider kerf opened the passage and the tapered thinner transition from kerf to back edge allowed the saw to readily follow the curve shape without binding. Very simple. Of course bandsaws replaced these and we rarely if ever see them anywhere, even on eBay. When I was younger, as an apprentice, many of the men had a table saw and I bought my own when in my 20’s.
Keyhole saws are obvious. These saws are interchangeably called pad saws also.There are all types of jobs that need a keyhole saw to cut into and through stock without starting from an outside edge and marring the material surrounding the intended hole. Even these saws tapered from tooth to back edge on the better quality pad saw blades, which were replaceable. keyhole saw blades usually retract into the handle so you can adjust the saw blade length to suit openings and depths that might be limited by some obstruction. The older saw blades can be sharpened like any other traditional saw blade, so they did last for several years of use. I used them a lot in my early woodworking days. Most kitchen sink insets in my day were cut with a keyhole saw. Eventually the jigsaws improved and Bosch came out with their jigsaw to beat all others.
A specialty saw of course is the fretsaw. Tiny teeth and thinness allow the saw to cut about the smallest kerfs of any saws. The saws is used for very fine work ranging from fretwork to cutting layered veneers for intarsia, inlay and other decorative work. This saw works with an underhand pull stroke with the work supported on a wooden platform held in a vise. Pulling the saw in this way means you can see the course of the cut from a above while pulling the saw to follow any guide lines. The material is almost always thin, so the blade works well on the pull. The spring tension in the steel frame keeps the blade taught. This rigidity allows the blade to travel on the up and downward stroke, but the down stroke is when the blade actually cuts. Because the fretsaw looks like the coping saw, there is an assumption that this saw cuts the same way as the fret saw – on the pull stroke. Generally, this is incorrect. In practical terms, the coping saw will give you the cleaner and more effective cuts. Let’s look at coping with the coping saw.
Coping saws
A cope is a method we use to shape one molded piece of wood over an adjacent corresponding mould. This always occurs where the internal corners meet. Often people think that the reason for the need for a coped interconnection is that the internal corners may not be at an exact 90-degree corner. This might help in certain situations, but the real reason is to do with shrinkage. Because the wood is fixed to the wall, all shrinkage must shrink in from the outer face toward the wall. Because of this, an internal mitre would shrink, leaving a gap at the meeting corner. A coped joint at the end of a length of wood does not shrink from the meeting surface on the adjacent piece because wood shrinks in its width and not by any noticeable amount in its length. Hence we use a coping saw to make the shaped coping we call a coped joint. We use coped joints in other areas of woodworking too, but only where we use some kind of moulding or shaped components.
It is partly because of this that the coping saw is used on the push stroke. This may seem controversial, and many people, woodworkers, defend the position that coping saws are best used on the pull stroke, but the main reason is that coping cuts are usually through thicker sections of wood such as skirting boards and not the thin stock used say in fretsaw work. Cutting on the pull stroke is more difficult to control and flipping long lengths of skirting board and supporting it for pull cuts is much more problematic too. A coping saw with the teeth facing away from the handle and toward the work means you can see the whole of the work from above. You then have all of the upper body weight and upper arm strength to work the saw very directly into the cut. The reason I say that this is the main reason though is this, working the saw teeth forward into the cut from the face means that you are pushing the teeth into a body of support or backup wood that is therefor ensuring that the prime face has no visual tear-out when done. When I was a young apprentice working with men I never once saw a coping saw with the teeth house on the pull stroke. Just because manufacturers house the teeth in the wrong way doesn’t mean that we have to follow suit. I never saw a saw maker use a saw in the every day of life yet. I likely never will.
Steps to making a coped joint
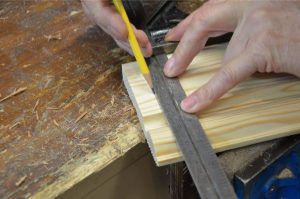
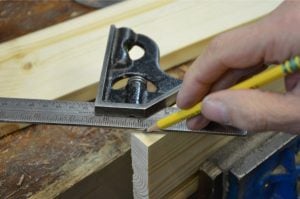
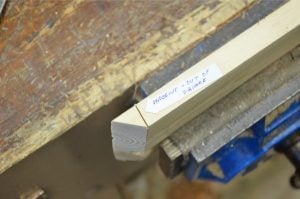
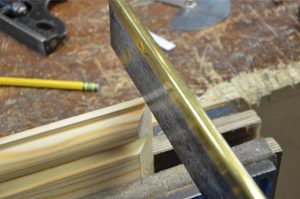
First of all you must make a near 45-degree cut. Two or three degrees either way makes little difference to the profile of a coping so you can actually eyeball if need be. Here I am using a combination square to layout for the mitre as it’s too big for a mitre box and a chopsaw.
Cut down the angled line following the square line until you come to the opposite side and complete the cut as shown. You can plane the cut for clarity if needed too.
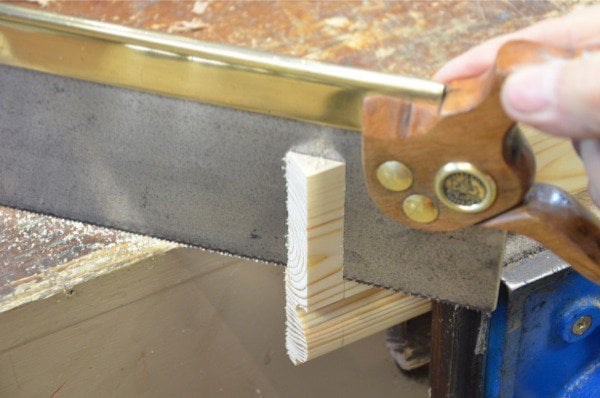
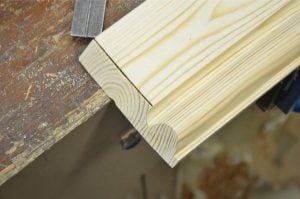
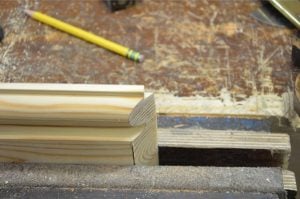
Cut along the line of the mitre to the first mould line as seen using either a tenon saw or a panel (smaller handsaw) saw. I tend to back cut the cut slightly out of square to ensure the front edge is not compromised at all.
Remove the square corner at the top edge of the skirting board as there is no mould here.
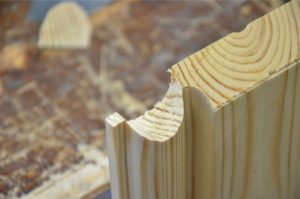
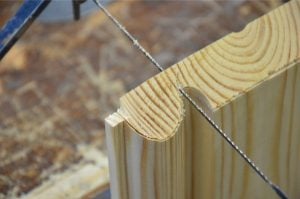
Use the coping saw to cut out the shaped cope. Follow the line carefully and undercut slightly as you did with the previous cut.
Offer the coped cut to the counter-piece and check the profile fit. Wrap sandpaper around a chisel handle to further fit if necessary or use a rasp.



Paul,
Can you post a photo of the table saw you are describing for clarity’s sake? Thanks.
Sorry, Joe, my table saw is in storage in the US with some of my other tools.
The lower half of the base appears to be a standard miter joint. It’s easier to back bevel the first piece, cope the top and then fit it against the untouched second piece. You show a forward bevel requiring an accompanying bevel on the second piece lower half. Seems odd and will open in the lower half.
Mark, I think if you take a look the picture 6th up from the bottom. It shows where the shoulder line will be cut and there is no internal miter. It is also proposed to be slightly undercut which I think is perfect. The 45 is to allow a guide for the scribe/cope. This joint has been done correctly and to a high standard (IMO)
Thanks,
I agree makes more sense now.
I think GS answered this perfectly, Mark. The mitre is temporary guide to saw to. Cutting the mitre gives the profile. It’s easier to use a saw of some type, and on a site I would use a fine toothed panel saw, to cut the longer square cut and then of course the coping saw to cut out the cope.
Mark – Paul describes the cut on the lower part (“Cut along the line of the mitre to the first mould line ..”) and the start of it is shown in the picture 6th up from the bottom. However, there is no picture of the workpiece after completion of that cut.
I just posted two pictures on my blog to clear up this.
Use your coping saw how you like, it’s the results that count which seem rather good by the way. I’ve always, and so do 80% of woodworkers I have worked with, cut on the pull stroke and I’ve rarely found it controversial. It’s not often you can scribe skirting boards on the bench in a vice. I’ve normaly done this on trestles, with the skirting board facing mould side up, the pull stroke of the coping saw pulls it tight to the trestle. If you’re working from a vice like the photos the push stroke prevents any breakout as you follow the line. Like many things in life and woodworking a pragmatic rather than dogmatic approach can often get the best results.
Mr. Haydon is exactly right. The pull is not up, it is down. As in your hand and handle are below the work with the face side up. The pull cut tears out on the backside of the work leaving a clean face. This also results in adding more tension to the blade, while a push-stroke does the opposite. This method is best used on a saw bench with your work higher, say around mid-stomach. JMHO
It really has nothing to do with the bench or the bench vise. I still find it best to cut on the push stroke when I use trestles. I think the information I gave is correct with regard to craftsmen using the push stroke. That does not mean people can’t use either method. The problem comes when everyone says there is only one way.
I was always told to use it on a pull stroke, I remember when I was younger, I put my blade in “the wrong way round” and used it, I found it worked for me better this way, but others kept on telling me that’s not the way to use it! but I do agree with Paul; better on push stroke for easier control, and less break out on your facing work.
paul this is a great post. I have done a lot of reading about saws and had never came across a hand saw that was identified as a table saw. This was wonderful information to learn about. As one of your previous replies mentioned I would love to see a picture of your table saw if you still have it or even a picture of someone eles. Thanks for teaching a old guy a new trick.
David
Hey all went digging around and found this blog about table saws. Thought other might be interested.
http://thesawblog.com/?p=803
David
Paul, I really appreciate your work, you are the patron saint of woorworkers!
I do want to raise a general point though and it is that in your writing I feel as though you are constantly walking on eggsheels, trying not to offend this person or that, the machine tool lobbyists, push stroke pull stroke, opinions always humbly offered. There are opinions obviously, but I think when one is advocating a method, tool, technique, they can be based on quality of outcome, which is not based on opinion. A technique that prevents tear out on the face is better than one that doesn’t, and so is a good technique that contributes to good work, not subject to opinion. I was struck by mr haydon ( who clearly knows what he is talking about) saying it is high standard joint IMO. Why should that be a humble opinion? Go further and point out why it is a high standard. I think all of us should be able to say that something gives a good result, irrespective of opinion. There may be other ways to achieve equally good or better results, but that does not take the away the method being described and written about.
So please less treading on eggshells and more what’s so good about it.
Fair point Tom, let me put it a different way, Pauls scribe joint is awesome! The undercut he uses on the striaght cut is perfect and typical of best practice, I was shown this method during my apprenticeship as I’m sure Paul was. The quality of the scribe on the torus moulding is first rate. I might cut my skirting scribes using a coping saw in a different way but I’m not really fussed how the saw is used or which way the blade is used. Thing is just because I think it’s done right the next guy might not, that’s why I add the caveat of opinion. I’m not walking on eggshels, I’m just polite, slightly reserved, kinda British I guess :-). I just wanted to share my two cents that I pull more than I push, no biggy.
Surely you mean ‘my 2d worth’ Graham. After all we are British.
And the face of the cut is just as clean on the pull stroke as STR points out.
Speaking of more than one way: when I did carpentry, I worked with a guy who coped all his moldings with a belt sander. He just held it in his lap (or brought it to the piece, depending on the size) and worked from different angles, using the round end to get into curves. I thought he was crazy the first time I saw it, but you can’t argue with results–his corners were perfect every time. Quick, too.
I can’t imagine that being a better way but I guess what you are saying is there is more than one way, which is what has been said here earlier. I hope I am never left with just a belt sander though.
We have several table saws at work, sadly gathering dust at the moment, but the one on my tool cupboard is nice and sharp so I may have a go: I’d often wondered why they have such a fat kerf. I’m used to Japanese saws these days for hand work so going back to cutting on the push stroke will be interesting. Worth a try though.
The reason there were so many table saws is because round tables were very common and especially for the millions of pubs in the UK during the 1700-1800s.
You should consider making the leap to push strokes all the way. Running both pull and push strokes alongside each other for different tasks. I find that there are many really good reasons for owning western saws. Occasionally I find myself reaching for a pull stroke saw.
I don’t think that table saws are the best saws to “have a go” with but there is something special about cutting your first round cuts for a tabletop with one instead of a jig saw or band saw.
I am currently renovating a house & also getting into woodworking (I just did a short but intensive 4 day course at Bristol Womens Workshop which taught me 3 basic joints and some tool skills)
I am intrigued by the discovery of old moulding planes & there seem to be some that look similar to the victorian torus profile skirting boards in my house. I am wondering whether it is possible to create your own skirting boards & what the best process might be – these moulding planes look complicated to sharpen for starters but it seems a shame if they are just sitting in collections, never to be used again!
There seem to be people asking if they can create their own skirting boards to save money or replicate a complex design on various forums, but the only suggestions include expensive, noisy and dangerous machinery – of course those hand tools still exist & presumably this method could be documented to encourage people to try things the traditional way again.
Hello Paul,
thank you for the great resource of information provided on coping saws. I` d like to ask about something slightly different.
Speaking of blades: can I make my own pad saw blade? I` m not worried about cutting the tooth since they can be fairly coarse (9tpi or so) but do they need a special hardening or treatment? Isn` t it that great, old saws are made of fine steel but have not undergone any hardening at all so that we can re-sharpen them?