Understanding the frog in your throat—Part II
Looking at the two frog types—the art and sole of the plane
Now that we may have established that adjustable throats are perhaps more a less necessary feature rather than a necessity, let’s take a more educated look at the two throat types to consider how we evaluate their pros and cons.
Using the two plane types, regardless of maker, you must first ask yourself how the contrasts between the two plane types has been framed over recent decades. Remember that craftsmen in the late 1800’s and early 1900’s rejected the Bed Rock almost out of hand, but they did gradually accept the Bailey-pattern model as a viable replacement for their wooden counterparts. The Bailey-pattern predates the Bed Rock by a couple of decades of course, but the big question for me still remains as a capital Why?
In my view it wasn’t that the Bailey-pattern actually failed in any way in creating an adjustable throat to a plane and yet perhaps there was something in the naming of the alternative offering of what became known as the ‘Bed Rock’ plane that suggests the name went to bedrock in resolving a perceived problem. Personally I think this comes back to the issue of framing the issue. Having any frog, no matter the plane type or maker, builds something into the chain of command and so any such link more introduces a problem rather than resolves it. That said, it wasn’t really a problem not having any such adjustment for prior centuries of hand work before its invention, but once invented, no one wanted not to have some kind of throat closing capability. To me this starts to feel a bit like the emperor’s clothes, but non the less people did seem to want the ability to open and close the throat. It doesn’t seem to me back then that the frog type was really an issue at all either. I know that the Bed Rock only became more popular when it was revived in the latter quarter of the 1900’s when woodworkers were looking for something more refined and of better quality. I think Lie Nielsen succeeded in producing one of the finest planes available and provided an alternative quality that countered the mediocrity resulting from the complacency in western tool making by the big entities of the era. I would that a tool maker would revive the lightweight # 4 to the same standard size but with the added quality. A plane like that hitting the market at around £125 would be wonderful for those looking for a topnotch new plane. I have a few features of my own that I would like to add to the design too.
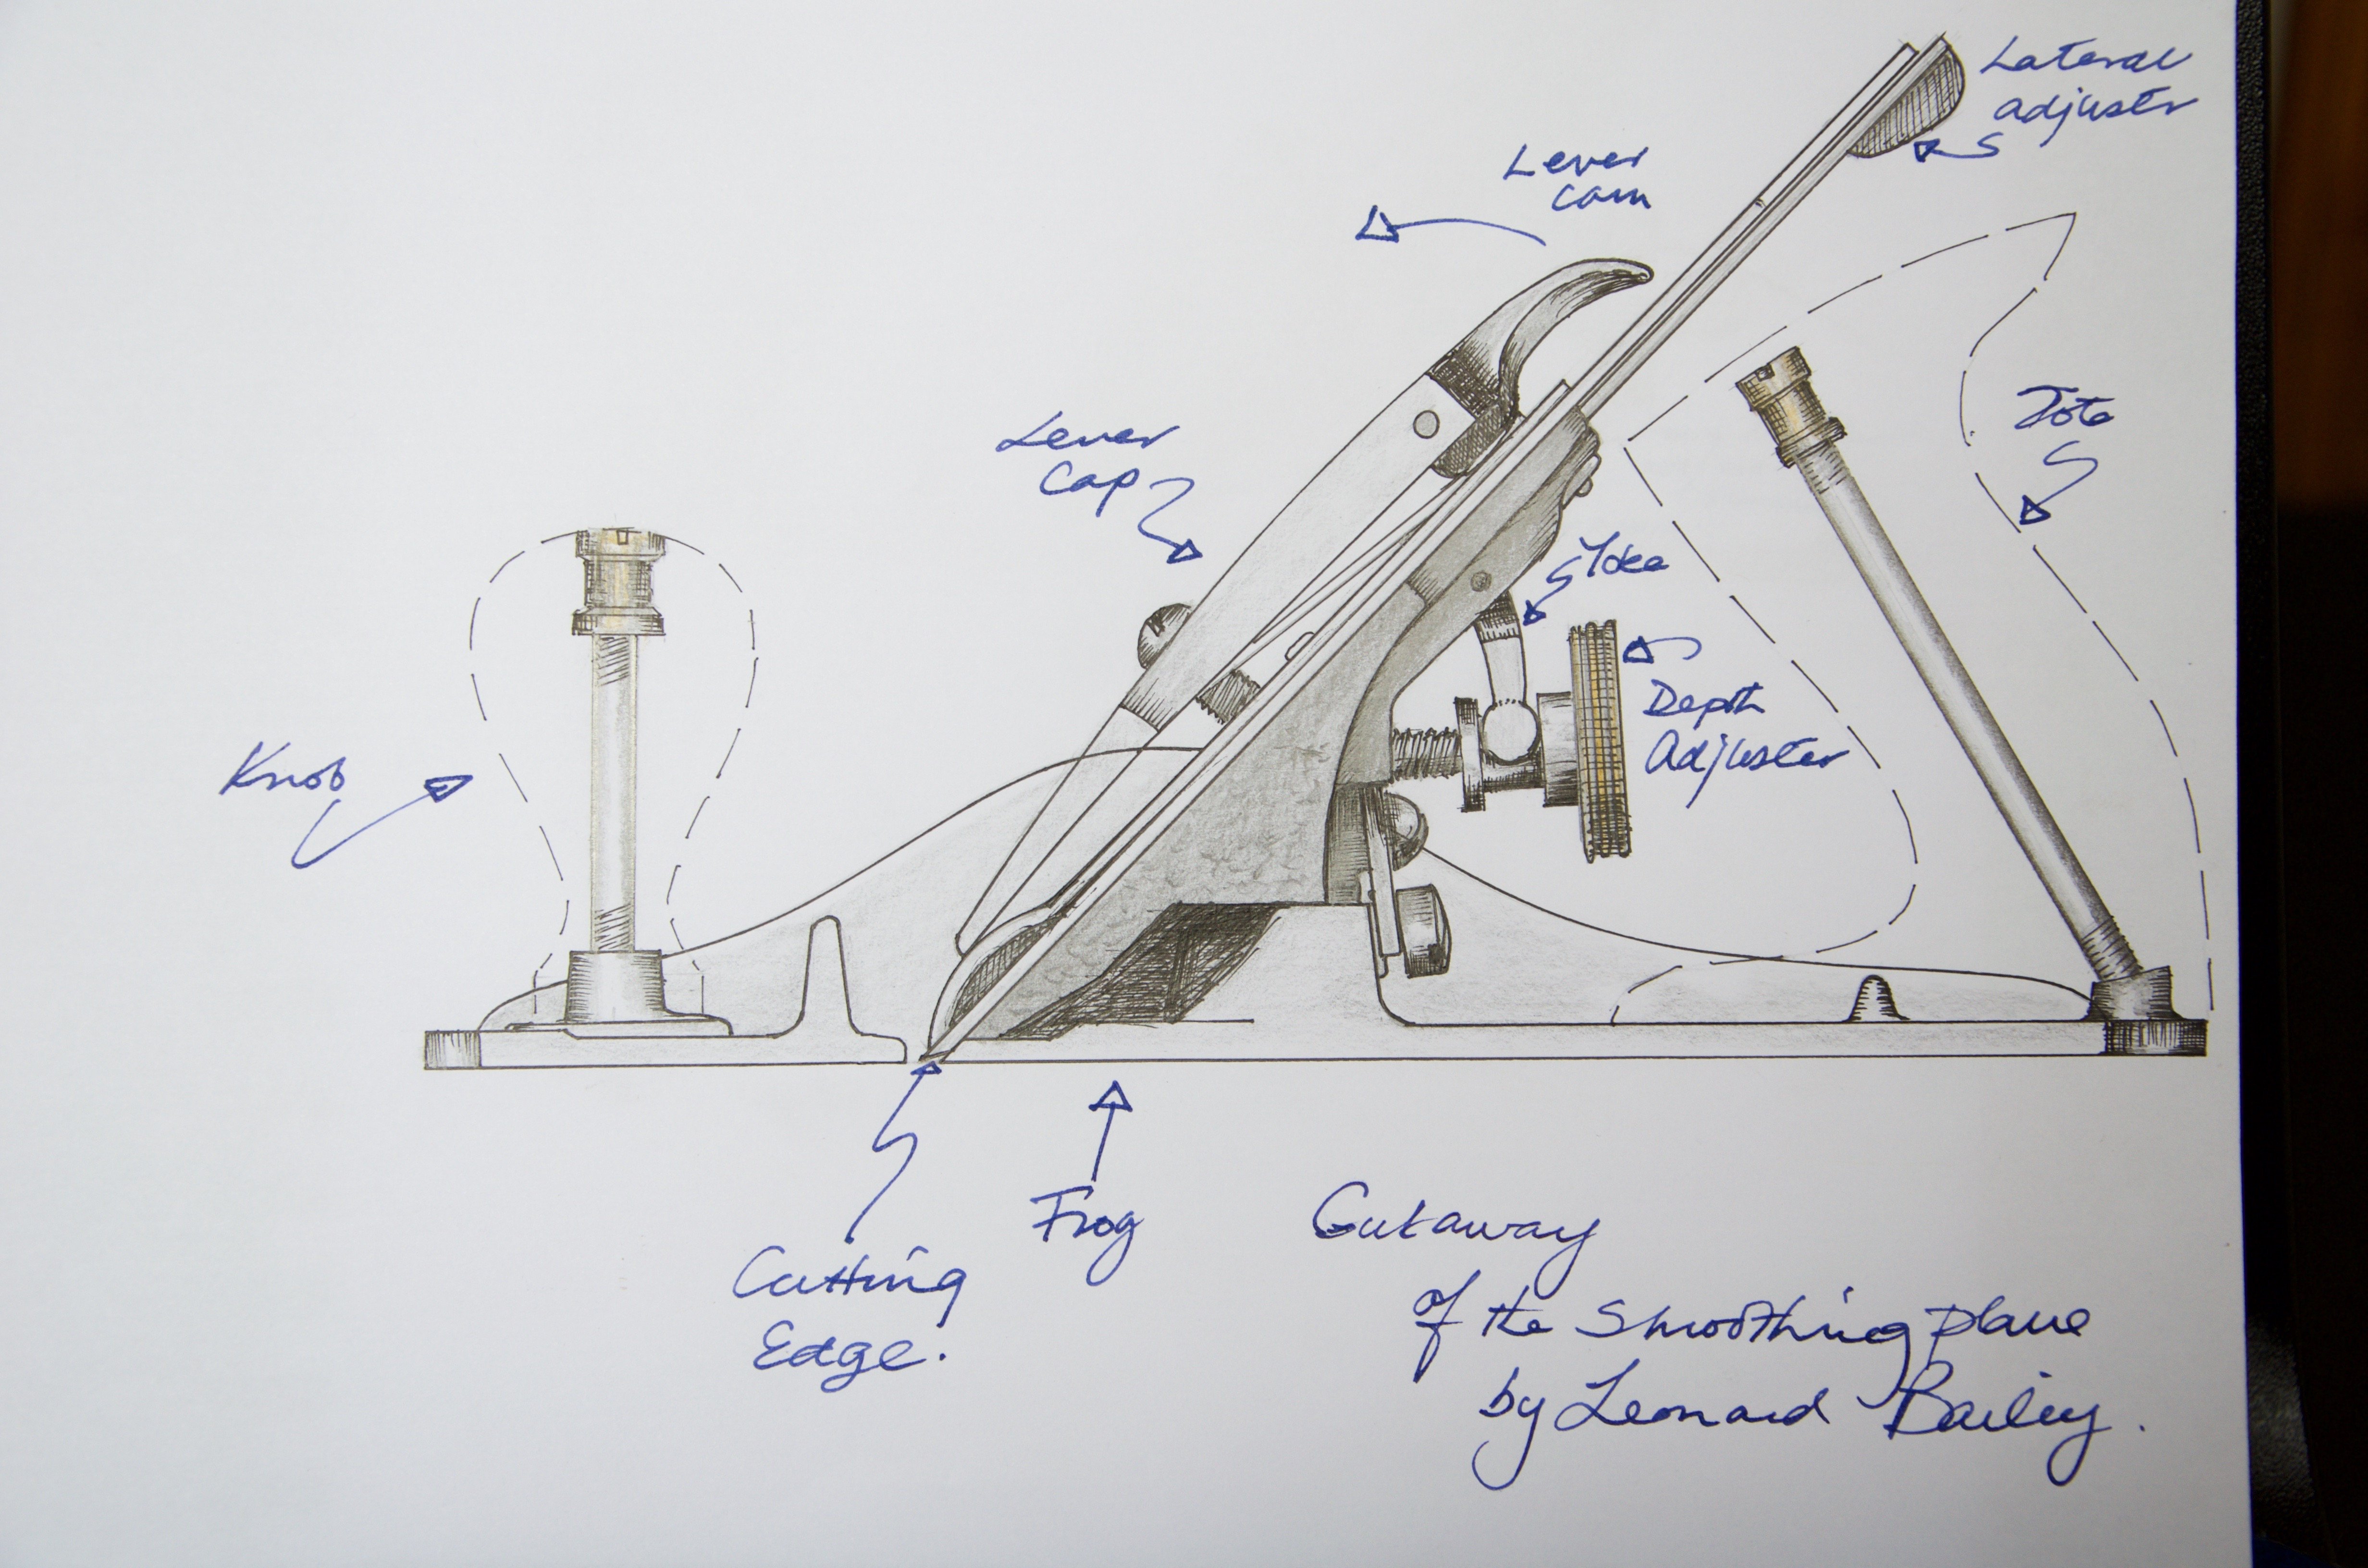
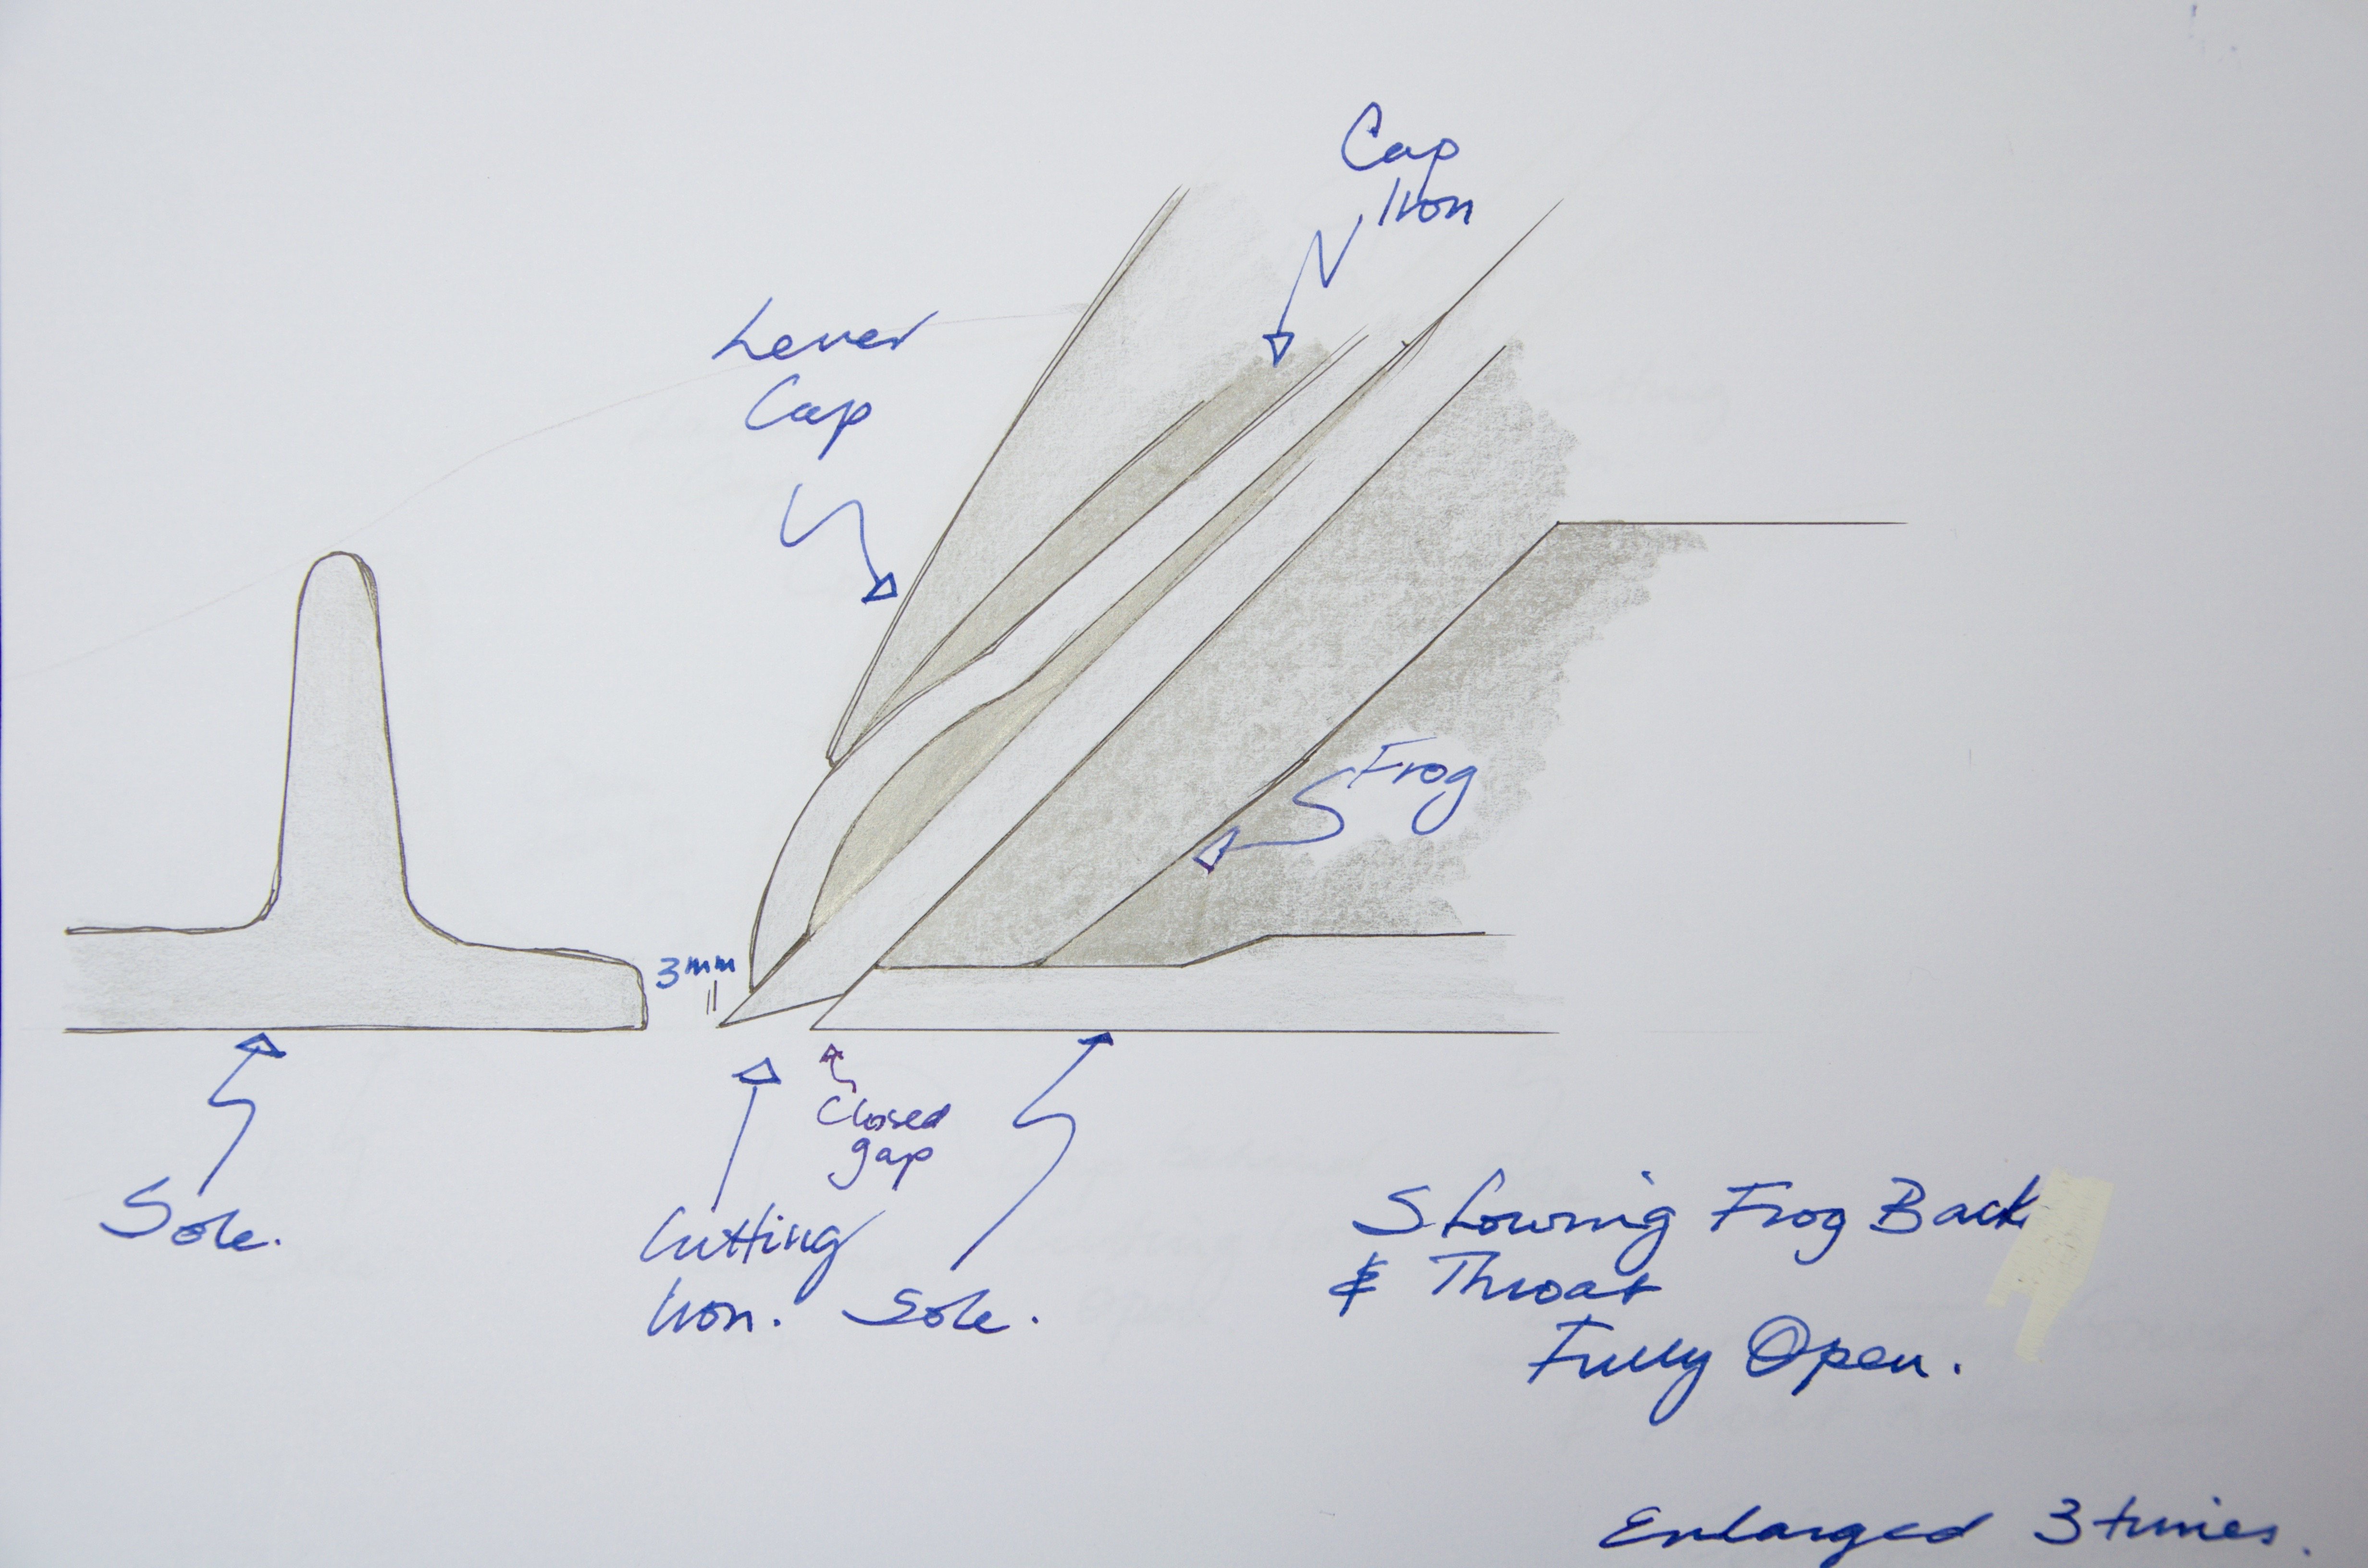
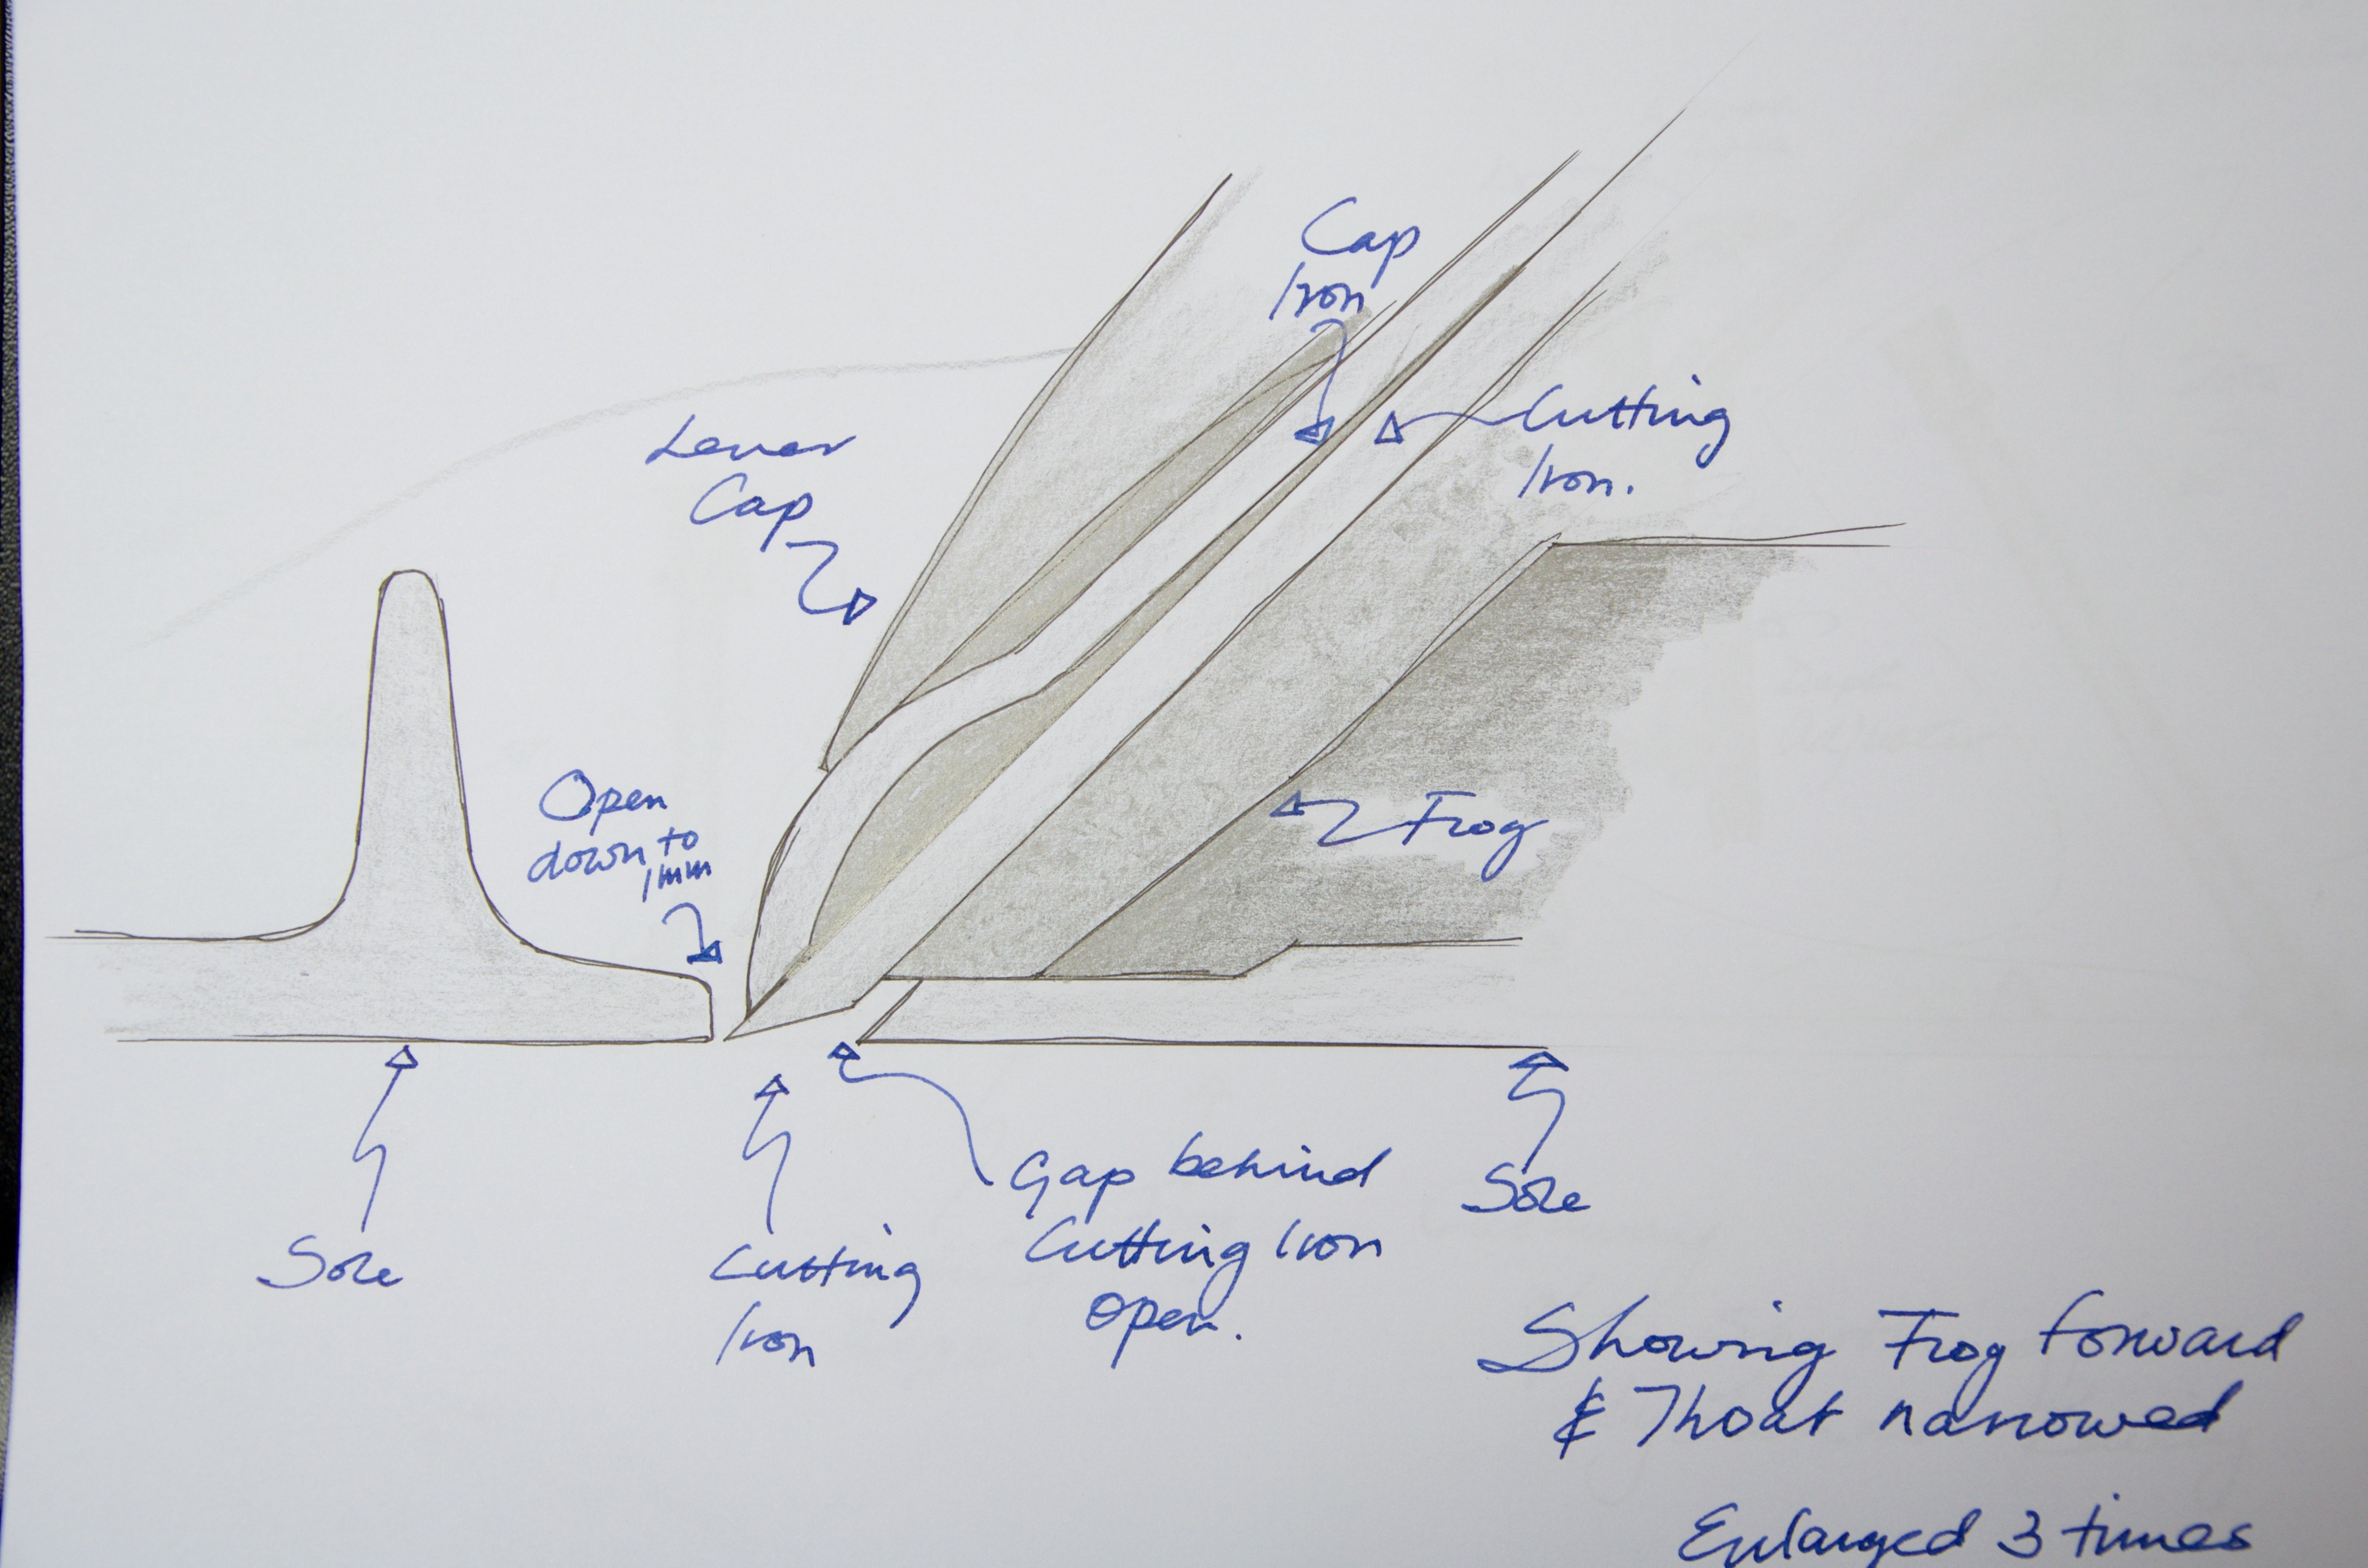
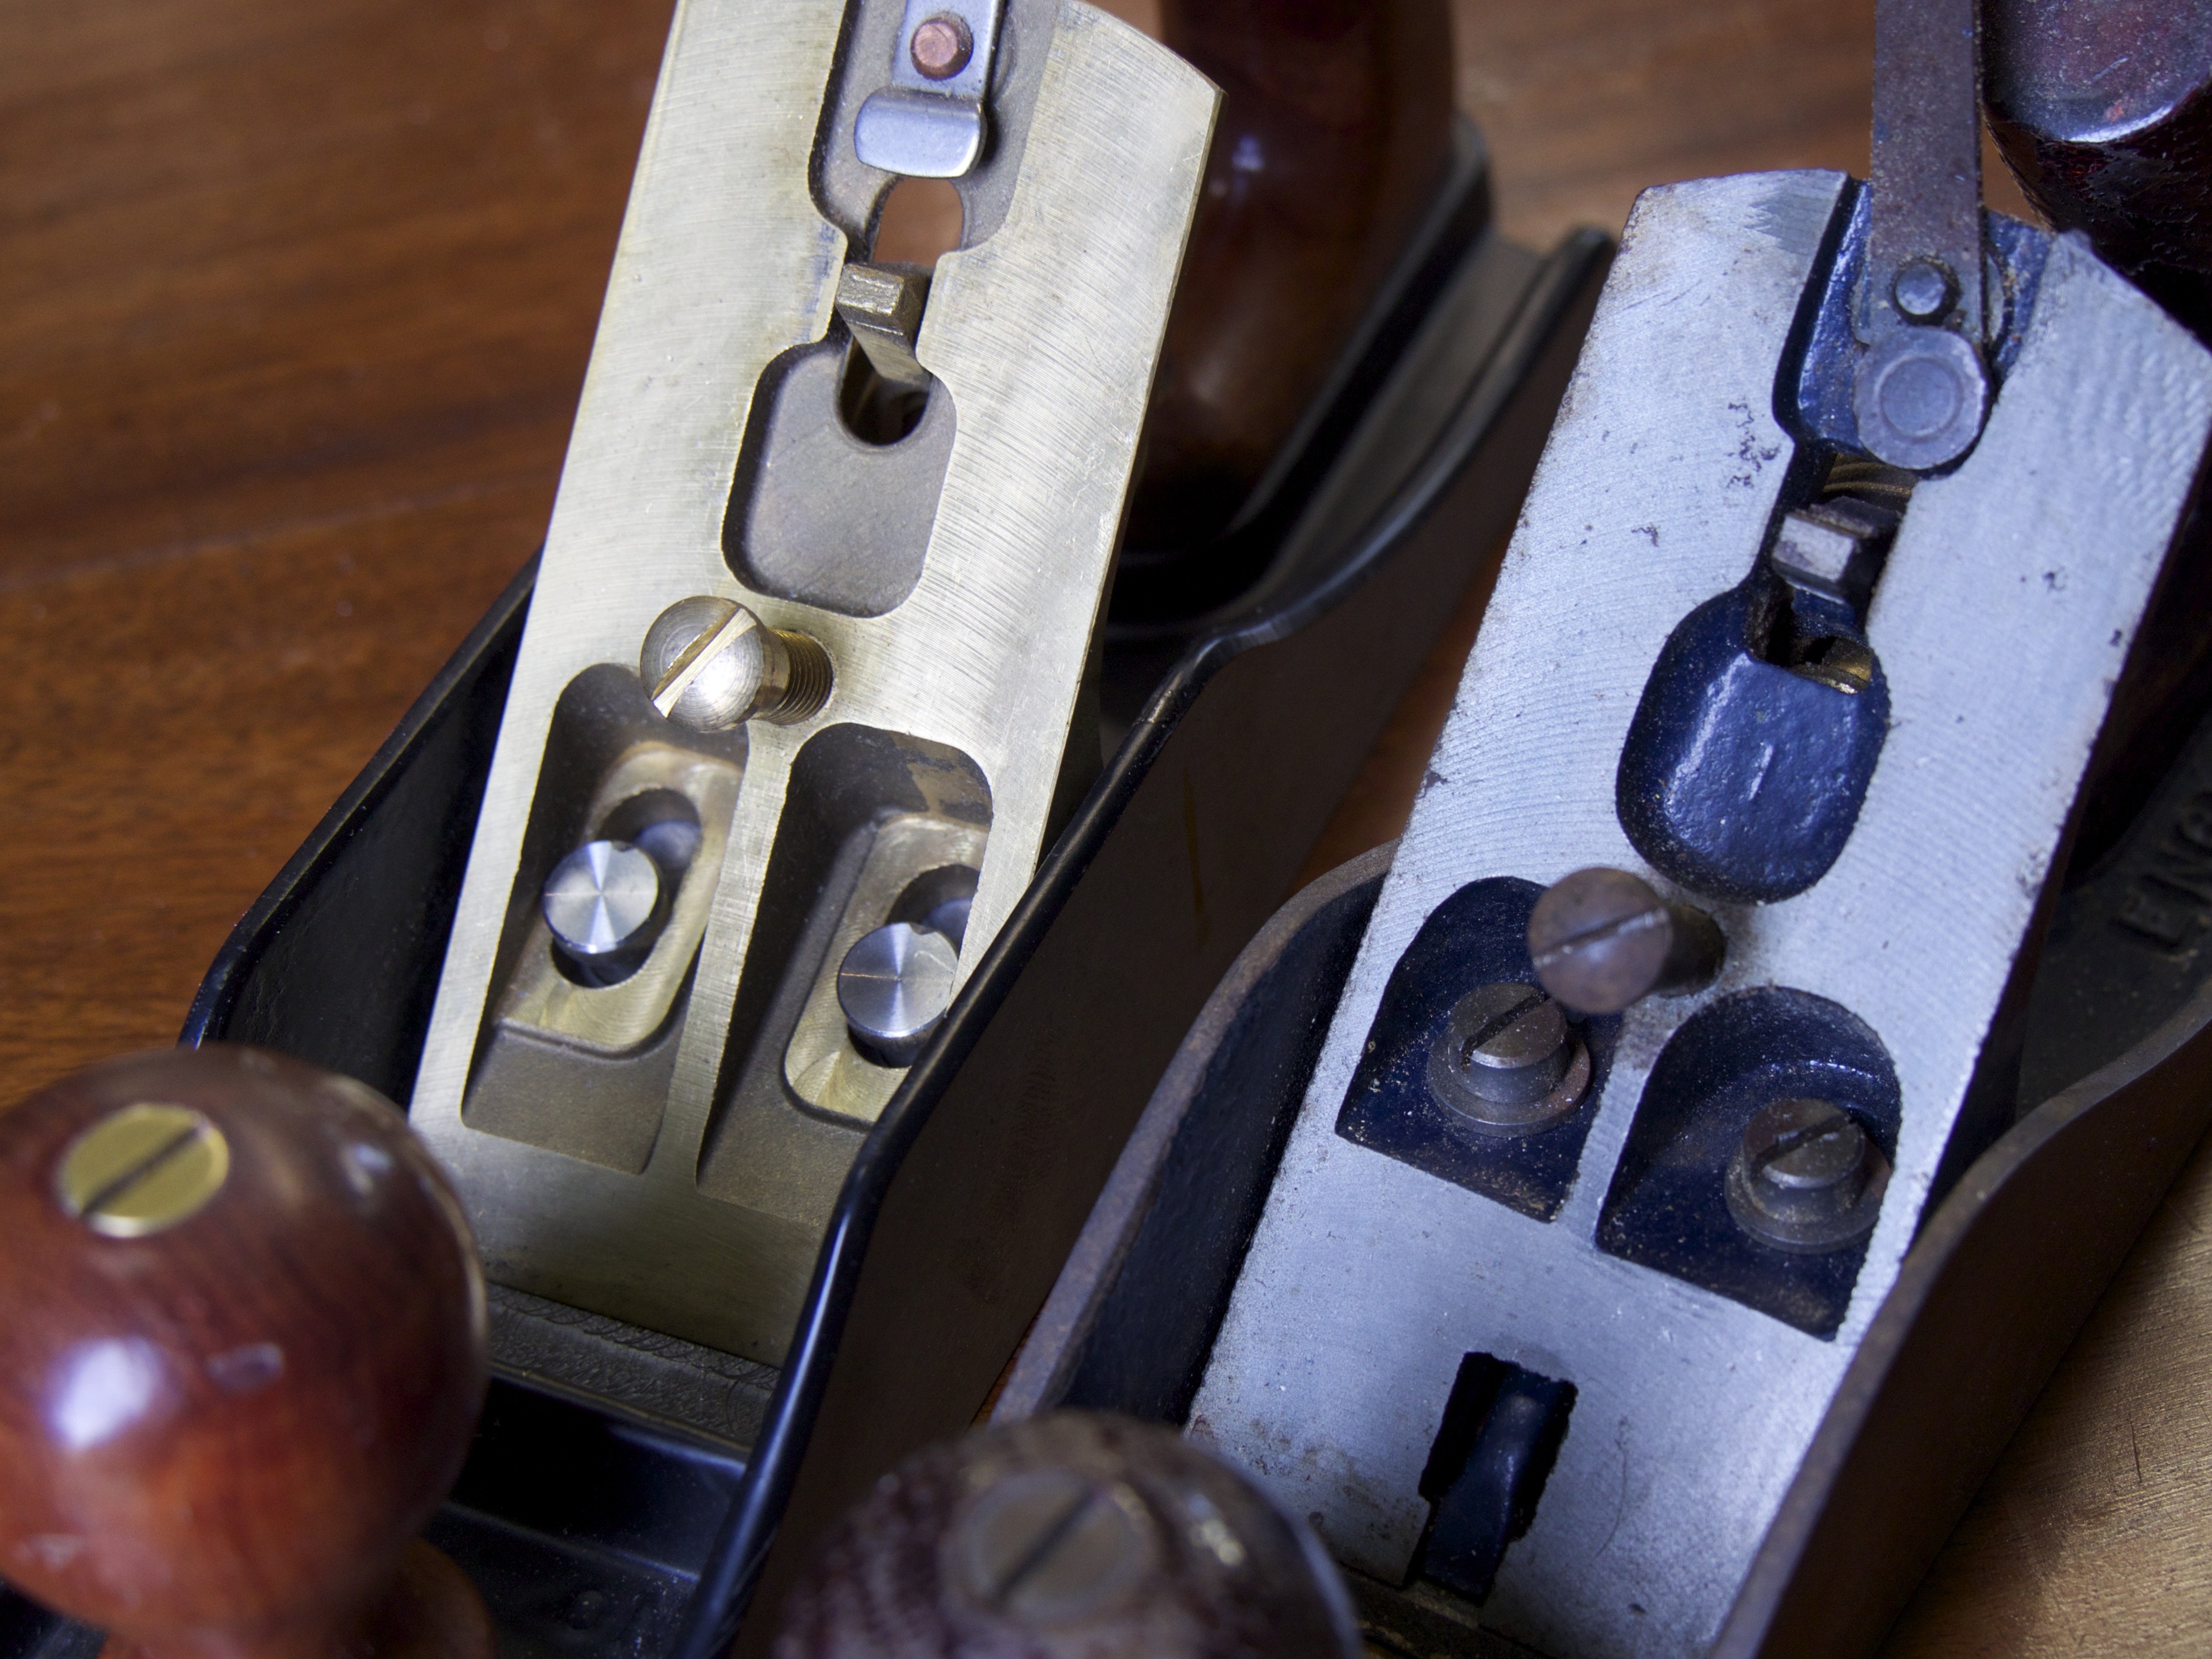
If we examine the Leonard Bailey-pattern plane we see two set screws that lock the frog to the main body of the plane quite solidly. An adjustment screw sits directly below the adjustment wheel at the rear aspect of the frog that facilitates changes to the throat opening (shown below). 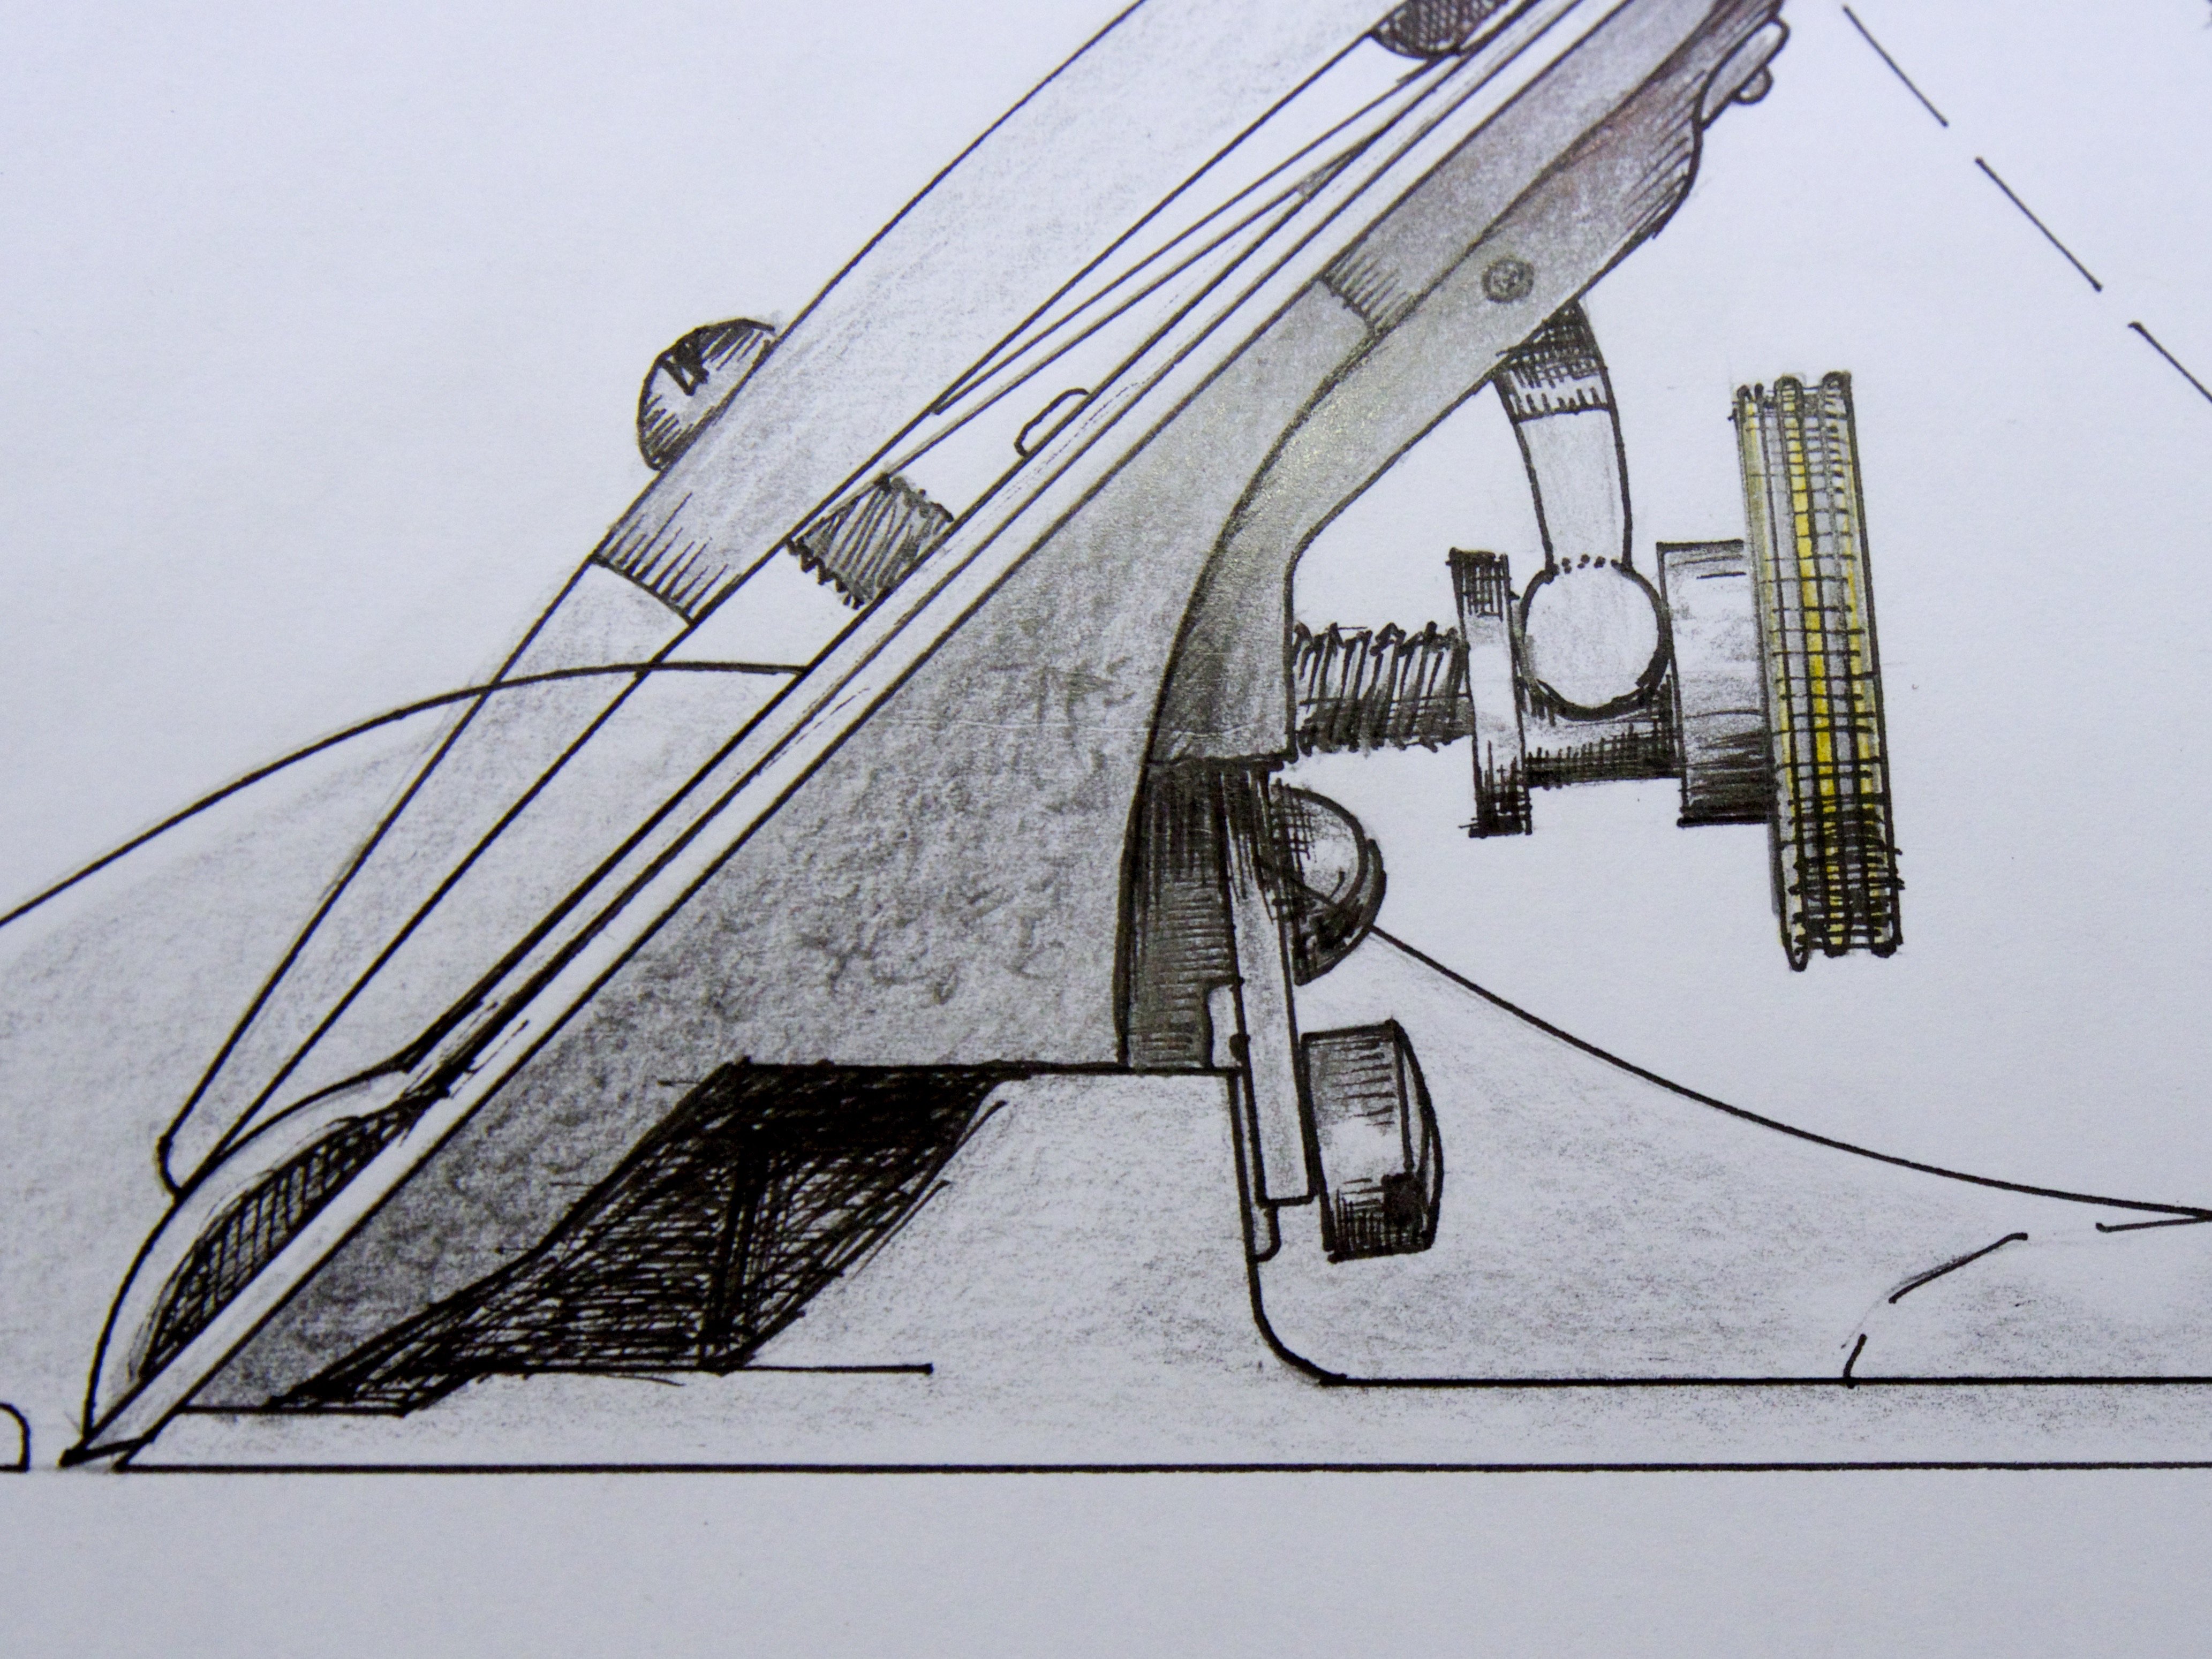 Notice in the drawing that the frog rests on two levels, an upper level to the top and rear of the frog rise, and then to the lower edge at the forepart of the frog and directly onto the sole of the plane itself. This forepart of the frog divides into a spit section so the frog actually sits on three points, two at the front and one at the rear.
Because the Bailey frog basically sits on two flat plateaued levels, the frog actually moves perfectly parallel to the sole of the plane. This is a definite advantage to the plane and frog type because moving the frog back and forth does not generally affect the depth of cut.
The Bed Rock plane adjustment relies on two opposite or counterpoised inclines; opposing wedges that adjust the frog in relation to the throat opening by the one block of metal sliding up and down according to the desired opening size. Herein then lies the first chief difference between the Bailey-pattern frog and the Bed Rock frog. Not only does the Bed Rock frog move backwards and forwards to alter the distance establishing the throat opening according to need, but, because it does slide up and down to make such adjustments, it also changes the depth of cut dramatically and in an uncontrolled way too. That being so, you must always remember to withdraw the cutting iron back up the incline before presenting it to the work otherwise you will find the plane can gouge and tear the surface of the wood.
What may not be noticed or generally addressed anywhere is that the fore edge of the frog itself can protrude through the throat ahead of the cutting edge and the frog can thereby damage the work. This is not generally a problem because when the cutting iron assembly is housed on the frog it disallows moving the frog too far down. On some imported plane models it is necessary to file the fore-edge part of the frog back a little.
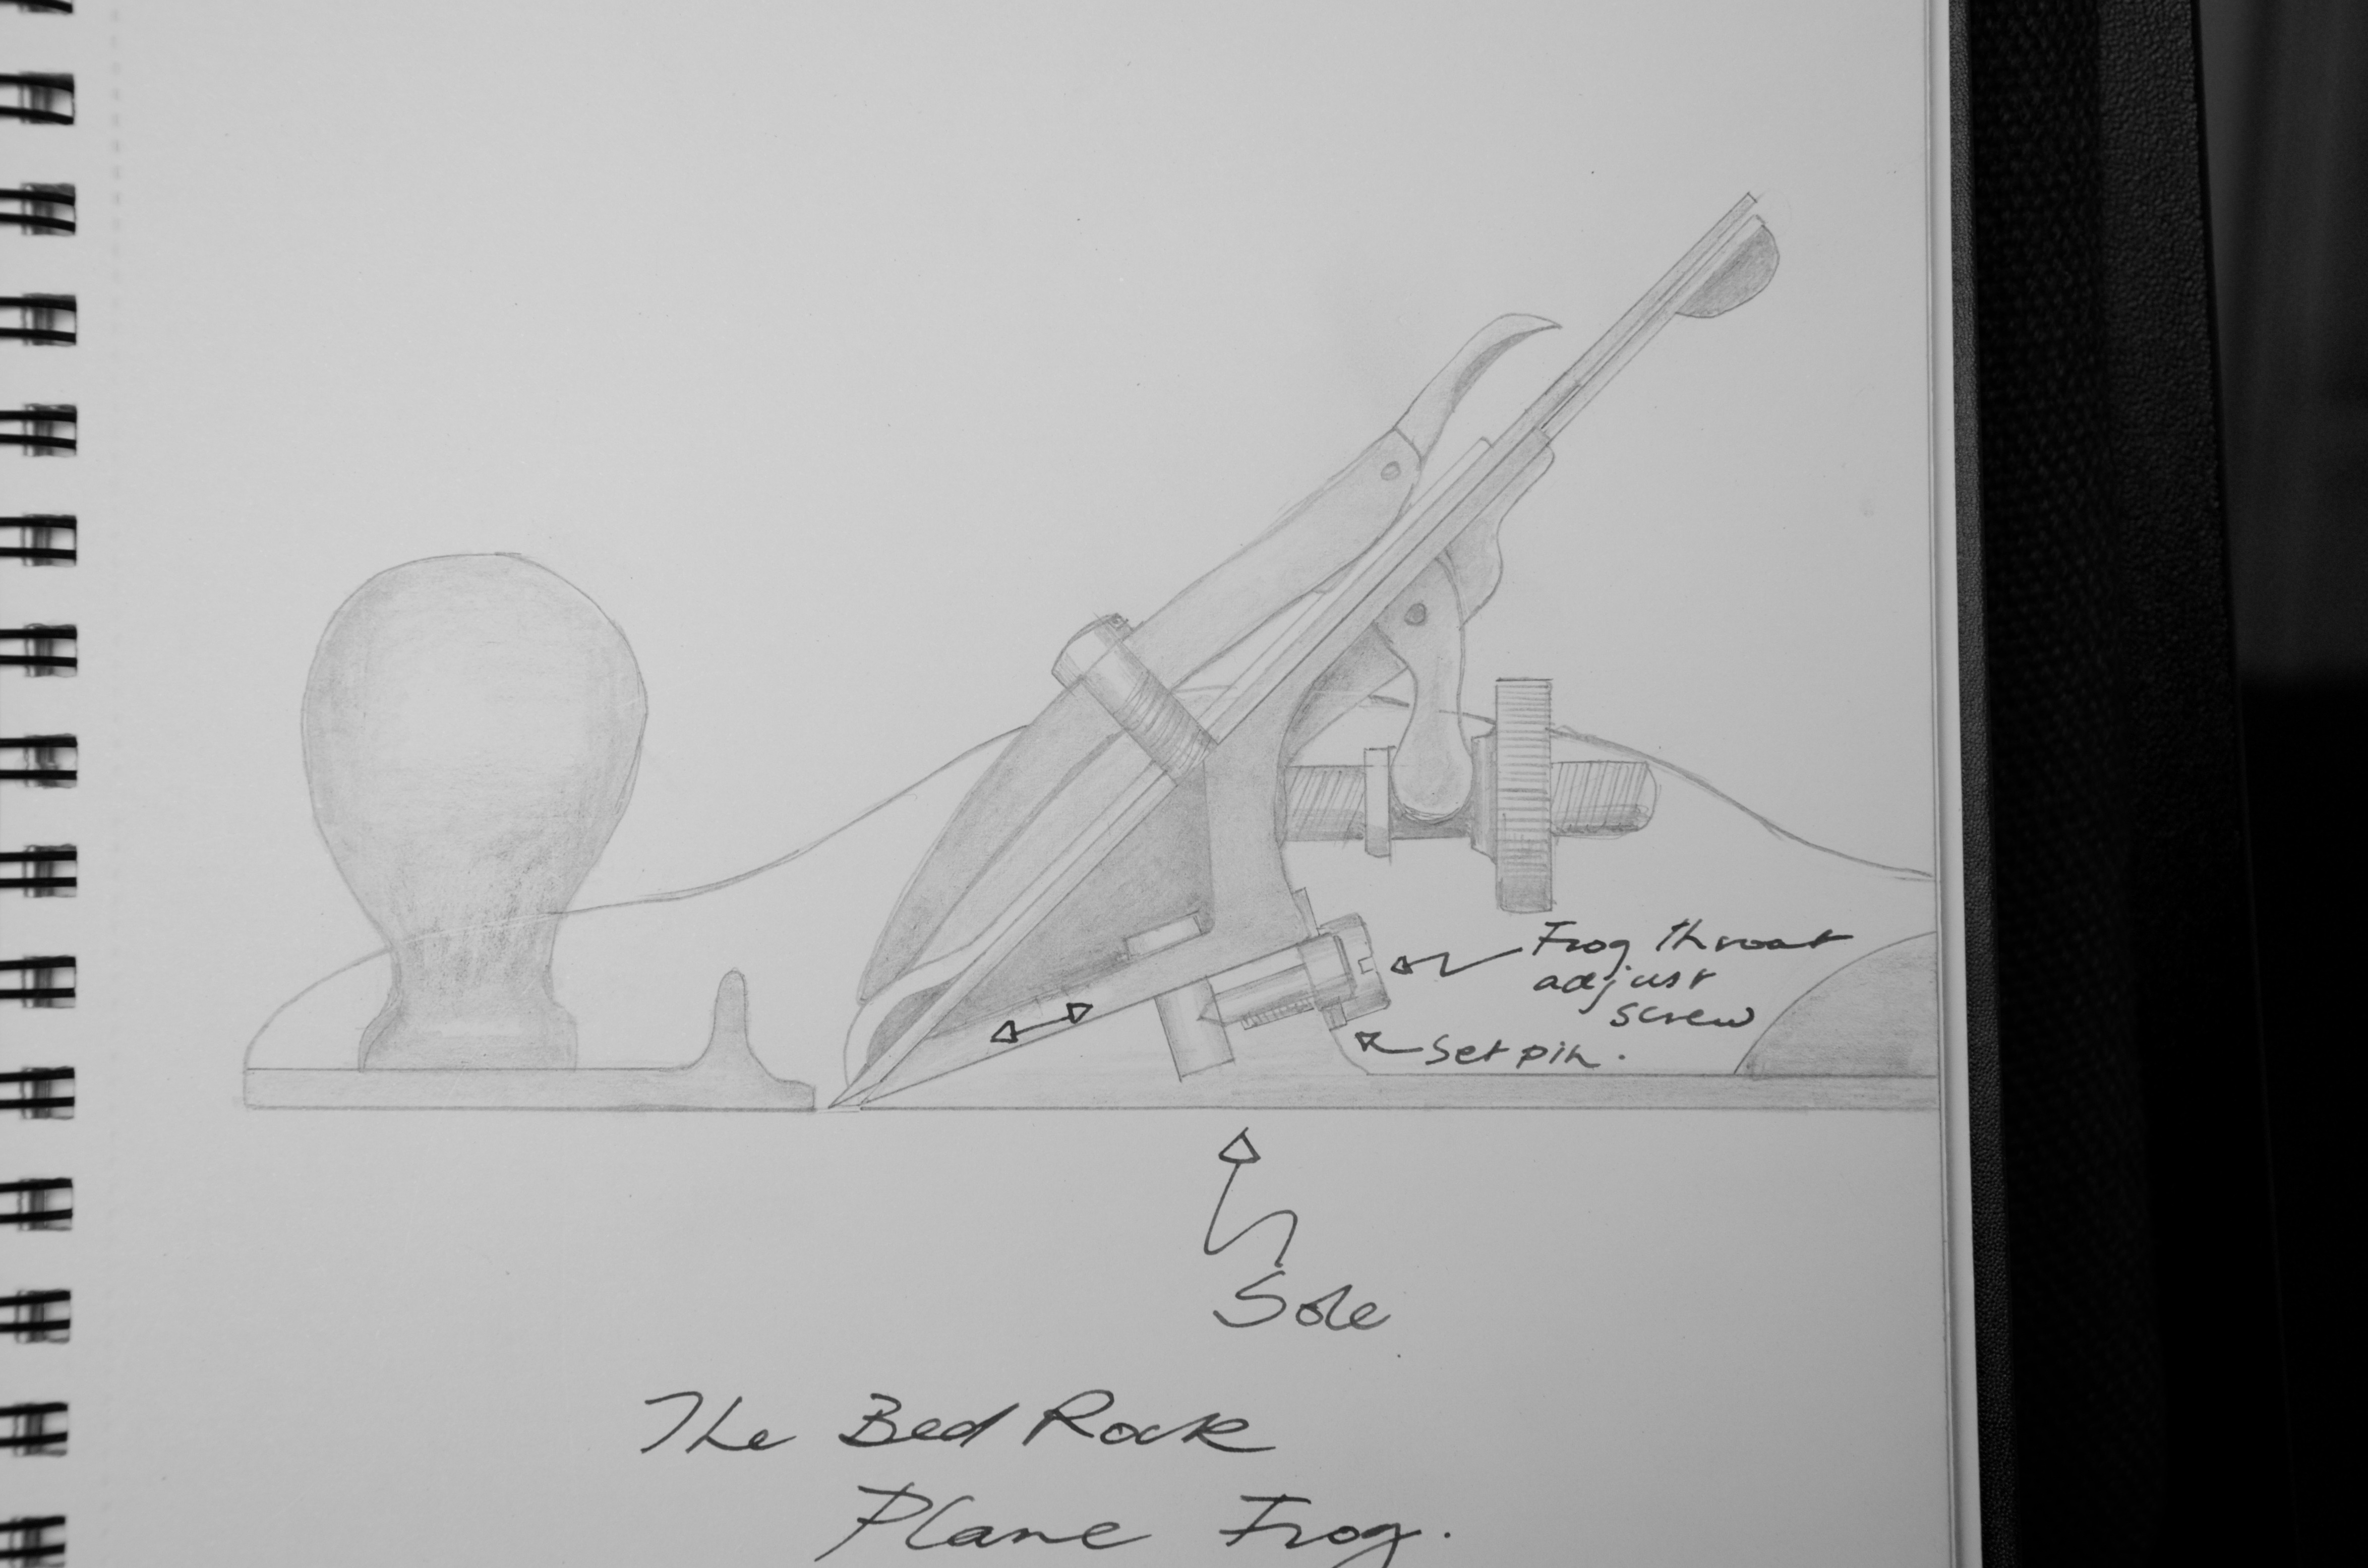
The frog adjustment on the Bailey-pattern plane frog relies on a centre screw thread to move the frog backwards and forwards. This threaded mechanism is actually tapped into the sole and not the frog but an adjustment screw-feed transfers feed to a ‘U’ shaped yoke that facilitates direct adjustment to the frog. The screw-feed adjuster has a channel that generally prevents the frog from moving backwards and forwards once the screw-feed screw is distance set to throat size. Without a screwdriver turning this screw-feed screw the frog is pretty much distance set and so prevented from moving backwards or forwards. Two setscrews inside the frog itself actually serve to lock down the frog immovably to the sole. If these two setscrews are indeed locked they disallow any movement in any direction and so we see that these two setscrews are designed maintain frog alignment square to the throat and the long axis of the plane length.
No, you do not have to dismantle the cutting iron assembly of a Bailey-pattern plane
This is what everyone says you must do, but you don’t need to at all usually. I was taught a different method fifty years ago and I have used it throughout those fifty years without flaw or failure. Try it for yourself and see how you feel. remember though, that you may find you won’t change your frog setting but every few years. It may not be an issue at all.
In my work I set the frog alignment and distance in relation to the fore part of the sole as needed. Usually in its back position. Regardless of the frog position the setscrews lock down the frog to the sole, but here’s the difference between me and modern-day woodworkers. I tighten down the screws fully and then back turn the setscrews a bare fraction of a turn; perhaps an eight of a turn, no more. This allows me to readily change the feed screw backwards and forwards at will without further touching the two setscrews. In turn this means that I can fully adjust the frog without removing any of the cutting iron assembly or loosening the lever cap. So what everyone should hear here is that you do not need to remove anything to adjust the frog of a Bailey-pattern plane. This then is often the very thing anyone selling Bed Rock pattern planes states makes the difference advantaging the Bed Rock plane over the Bailey-pattern plane.
Now for the Bed Rock pattern plane adjuster
The Bed Rock adjustment is more complex in engineering and yet simple in functionality. Three screw threads at three points of contact lock the frog to the inclined slope. This three-point contact allows the frog to be adjusted forwards and backwards and up and down synonymously, even though the up and down movement disadvantages the functionality of the adjustment. 
 A ‘U’ shaped yoke, the same as the one on the Bailey-pattern plane frog adjustment, serves to then move the frog as a feed screw and so the actual adjustment method is identical to the Bailey-pattern frog adjuster. Here, then, the main difference in locking the two component parts down are the twin pins. It’s very solid. Whether this validly betters the plane over the Bailey-pattern is debatable for me.
Concluding
Beyond this then I feel the two planes need periodic frog adjustment about every year or two in general depending on the nature of some of your work. If you are a fine woodworker thinning fine parts or refining fine surfaces and feel the need for a closed throat most of the time then both planes do give you the same optional adjustability.
 I have considered this subject carefully because it’s important to me and to others. I own or have owned every type of Bailey-pattern and Bed Rock-pattern plane for over 50 years. Being on an inclined plane alters the set of the iron markedly using any of the Bed Rock planes regardless of the maker and so needs immediate adjustment beyond altering the frog to compensate for the additional depth of cut. This is not particularly a big thing but it’s also rarely ever mentioned because the benefit of not having to remove the iron is often espoused as a virtue yet you cannot use the plane as a result of the benefit straightway because the plane iron is altered every time you make the adjustment. That being so, the benefit of being able to adjust the plane externally is disadvantaged by the need to reset the plane every time the frog is adjusted. If, as is a fact, you do not need to remove the cutting iron assembly of the Bailey pattern plane, then the Bailey-pattern plane remains a coequal contender and might even be considered the more general practical all rounder.
Remember though, I have woven throughout this article the reconsideration of whether throat openings and the ability to adjust them is as critical as we have been led to believe in the recent decades or, for most woodworking, are they merely just another add on. I know I consider myself a fine woodworker and and fine furniture maker specialising in hand work. I generally don’t adjust the frog in my throat.
I may have too many planes if that is possible. I keep one set up for general use with a slightly crowned cutting edge and the frog set as you suggest with the iron lying on the back of the throat. The second plane is set with the frog moved forward, the cutting edge straight across with only the corners relieved. On this plane I keep the cap iron very close to the cutting edge. For most planing I use the first plane and with tough grain I switch to the second plane. The downside is having two planes to keep sharp.
I also set my newer Bailey planes with the iron fully supported on both frog and sole, and never change this setting. When confronted with a squirilly bit of wood that wants to tearout, I move the chipbreaker very close to the edge, which is a much more powerfull way to prevent tearout then a close mouth anyway. To get any decent result in difficult wood with a tight mouth, it should be in the range of 0.1 to 0.2 mm wide and absolutely no wear in the sole in front of the mouth is allowed either.
I have now also some very early (pre 1900) Stanleys. They have a different kind of frog and the support from the sole doesn’t play a role in these.
I also set my plane blades this way, but when I try to do the 0.1mm thing with the chip breaker to prevent tearout all I get is dust and a clogged mouth, and a really ragged surface… I’d love to know what I am doing wrong.
Dennis, You most likely know this but setting the cap iron too close does cause the plane to tear, resulting mostly in a scraped and ragged surface as you describe and then just dust in the mouth. There are advocates saying as close to the edge as possible, but I have never really felt that that worked too well at all. 1/16″ works fine and slightly less or more works as fine too, depending on the work you are doing with it. I never much consider this setting any more but just set it,cinch it, load it, adjust it and plane it. Practising perfects this and soon you are moving in a zone that defies measurement. That’s a great place to be all round.
Now here’s a thing. I always assumed that the ‘Bedrock’ style of plane (which I’ve never seen) was being sold as some kind of improvement on the Bailey design, based on how solidly the frog is connected to the sole. This infers that the Bailey design of frog permits a less solid connection to the sole, so I have been under the impression that the two machine screws holding the frog down need to be super tight and solid.
Now, Paul tells me he loosens the screws on his planes slightly, so that the frog can be moved if necessary without having to remove the iron/cap iron assembly first.
That completely shoots a hole through the reason for having the Bedrock design at all!
Just to affirm something here. I’m not saying loose, but a very slight back turn of say 1/8th or less of a turn, that’s all. It would not be moveable by hand pressure so still quite solidly attached.
Yes… A light has switched on.
Understood. Thank you. But not, then, ‘rock solid’, which is what I thought they should be, if the Bed Rock advantage was to be believed.
I have an old stanley baily. There is no throat adjustment on the frog. The screw holes are longer so when the frog is loosened, you can close the throat that way. Was that an added feature? If so, when was it added.
The adjusting screw thread in back did more to prevent slippage than adjust the throat opening really, so it was a good addition. There were many developments in the developing years of both Bedrock and Bailey, lots of them and far too many for someone like me to know because I am just a user and not really one who has studied Stanley’s progression through those developments. I am sure someone out there will know though???
You may find more information here:
http://supertool.com/StanleyBG/stan1.htm
Additional to that from Seekalot?
The frog adjustment screw was added from type 10 onwards, that’s after 1907. They also made a new frog, starting from type 9, which was used all the way up to WWII. This has a rib which holds the frog square on the body. The earlier types are a real nuisance to set the mouth. Better to set them once and then forget that they are adjustable. I have some of these old ones, and apart from the frog adjustment they are great planes and look much nicer to my eye then the newer ones.
You can read all about Stanley plane devellopment when googling for “Stanley type study”.
I just purchased and cleaned a new york tool works plane from ebay without an adjusting screw for the frog. How does one adjust the frog then? when I loosen the screws a little bit the whole frog becomes loose and moves like no screws are holding it down, leaving me frustrated because I don’t know where it was previously set.
Many planes were made without adjuster screws, mostly because craftsmen rarely adjust them at all and when they do it’s to close the mouth down. For general work in the everyday of life the fore part of the frog aligns with the leading edge of the rear aspect of the sole so that the back of the plane iron is tight against both the sole edge and the bed of the frog. Once every few years, when you feel you might benefit from a closed mouth, you slacken the screws and guesstimate its second position, which is always forward of its current position by maybe 3mm or so. The adjuster screw is just another 1st world luxury we didn’t altogether need.
Paul, I notice that the fancy £100+ Stanley Sweetheart Planes have a non-adjustable frog cast into the sole.
I inherited a #4 plane from my father but couldn’t get it to work for me. I was trying to use it more as a Jack plane I suppose, taking the rough face of large, split green wood logs down to a flat surface (I carve bowls). When I discovered “the frog” and that it could be adjusted, I opened up the mouth and suddenly it started working beautifully for me. So perhaps the designer was just trying catering for a range of users/uses and made it versatile. I don’t think I’ve adjusted it since, it is rather aggressive though, not for fine cabinet making I dare say!
I have now restored what was a badly rusted #3 old Record plane to be my smoothing plane. To get the blade positioned so it can be used at all, (again) I had to set the frog back a little from the mouth – which was a surprise.
“Ain’t nothin’ new under the sun”: I also now have a slightly smaller (#2 size?) non-Bailey style Kunz plane. It uses a short spokeshave-type blade and it’s frog is not adjustable, it is cast into the base – just like the Stanley Sweetheart – but this one cost only £2 used, non-working. Works fine now.
I have a Bedrock plane Paul and I recently did a full overhaul of it .The frog was set with the bottom most part of it 2 mm BACK from the rear of the mouth .That is to say it was UP the incline .When I put the frog LEVEL with the sole then the blade would not fully go down .There was not enough clearance .I think it very important for you to tell people this as if they take their planes apart and do not notice ,it will then render the plane unworkable.That is number 3 drawing where you show the frog fully DOWN the incline which in practice will NOT work .I also tried this on 2 other bedrocks and ALL had the same clearances .Best regards Christopher.
Hi Paul. I recently bought a secondhand Lie Nielsen no.4 for half price. Seems well made, but I discovered a huge problem with it. The blade and chip breaker are so ridiculously thick, that they don’t fit into the mouth. I have to put the frog way back, which means the cutting iron assembly rests on the bottom lip of the body (at the rear of the mouth), instead of being fully supported on the frog. Surely, this can’t be the intention? Only way I can think of to remedy this, is to file the mouth opening wider. Seems like a drastic measure for a premium plane. Any thoughts?
Afraid I must ask the obvious. Have you got the cutting iron the right way up with the bevel facing down?
Yes, I’ve put it bevel down. I have some experience with Stanley no.4, which works great. This Lie Nielsen just doesn’t seem to have enough clearance, unless the frog is put way back. But then the cutting iron is not fully supported onto the frog. I should also mention that the cap iron is set about 1.5 mm from the cutting edge. Seems strange for a premium plane, doesn’t it? Any more thoughts?
Then in that case consider this: At least on Stanley planes the frog should be set back from the leading edge of the sole at that point. People often line it up and it will indeed work but better to leave it slightly back. The bevel on the cutting iron does not touch the sole per se, until it is way back. That’s because the sole is thinner than the height of the installed plane iron’s bevel when set in the plane. This could be the same with the Nielsen plane.
Thanks, Paul! I hadn’t considered that the bevel creates some negative space, so that the cutting iron is still fully seated onto the frog when it’s set further backwards. I was probably creating an issue where there wasn’t any.