My #50 plane moves over in steps–Help!
For more information on planes, see our beginner site Common Woodworking.
Question:
Hello Mr Sellers,
I began woodworking as a passion two years ago after watching some famous american woodworking shows. This is the reason I first bought (cheap) power tools: a router, a planer and a table saw, to realise my first wooden objects (Picture frames, games, furniture, Christmas tree decoration, boxes…) . I quickly realised how annoying the noise and the dust were, and the dangerousity of the machines.
Then I discovered your work and your philosophy about woodworking and life, thanks to your videos and your blog.
Now, I’m still considering myself as a beginner, maybe even an apprentice and I’m trying to find the balance between the use of power tools and hand tools.
Thanks to your numerous articles, I recently purchased some Stanley planes: a #4, #5½ , a #71 router, and a #50 combination plane.
I write this mail, because I’m disappointed with the results with my #50. When I try to make a rabbet, the first cut is good, then the blade goes to the exterior of the workpiece despite the guide. So the rabbet is not square but there are a succession of layers more and more to the outside. I can send a picture.
Is it possible for you to explain, in an article or maybe a video, the “magic tricks” to work a combination plane well and get good results please?
I thank you for all your work, the message you send, the philosophy you have. It’s priceless, really inspirational and encouraging for a beginner.
Best regards, 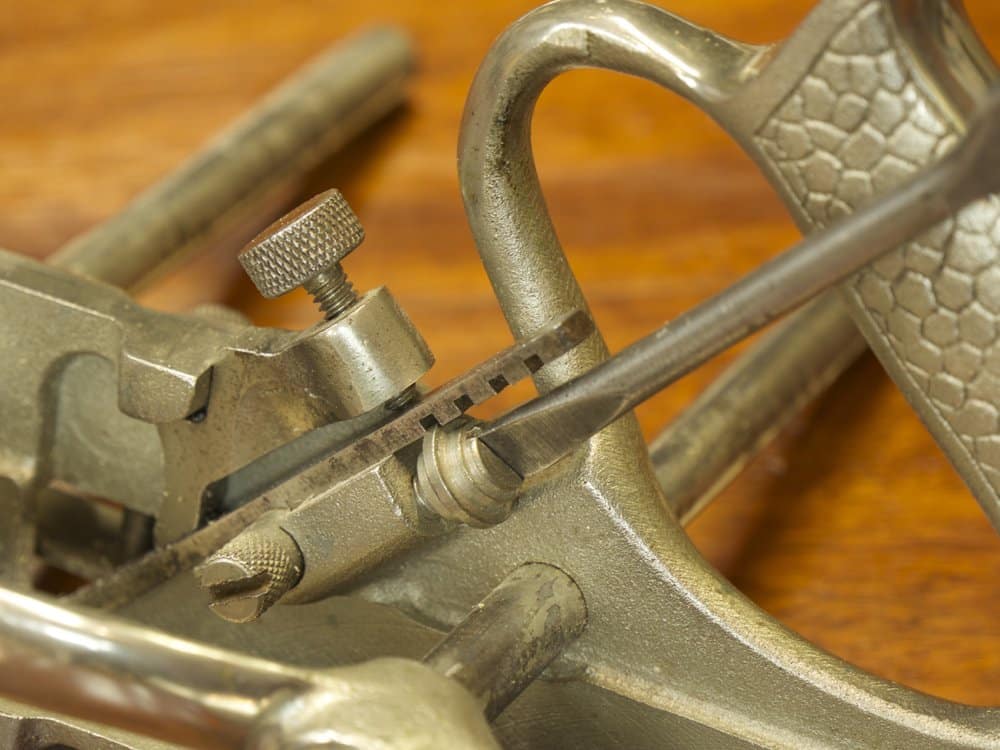
Florian, from south of France
Answer:
Don’t get discouraged, Florian, such issues are easily corrected.
The first place you must check will depend on the cutter you are using and its alignment inside the blade recess and the skate and then how these align with the sole. If the blade overhangs too much the fence alignment pivots around the side of the blade, even a small amount matters, and instead of the fence guiding and aligning the plane the blade does it but it doesn’t do it well. Another area to look at is the cutting edge of the blade and especially whichever side is forming the inside corner of the rebate. If the corner is even slightly rounded each cut pushes the blade from the corner. This causes a stepping away with each level you take. Third possibility; if the blade is fractionally less than the corner of the sole corner of the plane the blade will cut but the sole then causes the plane to move over with every stroke. The result is the same as the last issue.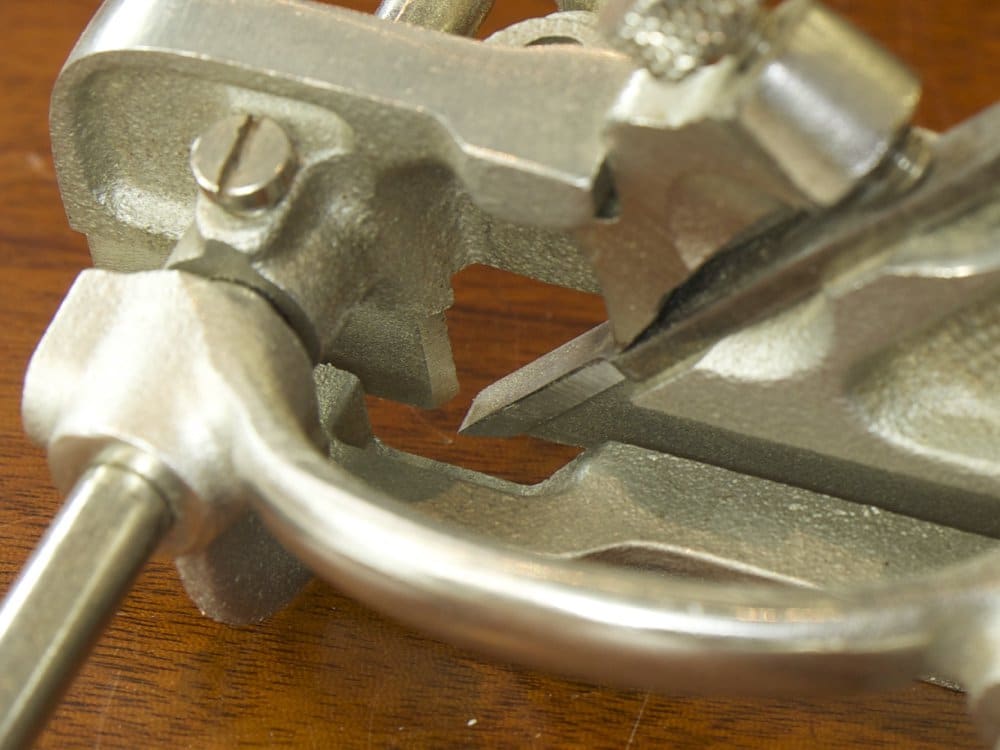
Check on these first.
Another issue is to relax when you use the plane. Do not rigidly bulldog the plane to the work. It takes a much more loose hand to work these plane types.
Let me know,
Paul

Florian, to add to what Paul has said. I have had the same problems in the past. After you have checked the alignment of the blade etc. I have found that the best trick is to concentrate on holding the fence against the wood with my left hand, and only gently pushing the plane along with the right. As Paul says, you must not try to force it into the wood, but gently stroke the wood with the blade while pressing firmly against the fence.
Incidentally, even though I freehand sharpen most blades, I always use a honing guide for the plough plane cutters, to ensure that the edge is square to the blade and absolutely very flat. You will have difficulty if the blade is not square and straight at the sharp end.
Happened to me all the time when I started using these planes, too. The problem was that the iron wasn’t flush to the skate and bed of the plane on the inside edge, if that makes sense. The blade was cutting outside the edge, so the skate would fractionally move outwards with each pass or just get caught up on the step and not cut any more if it was inside a groove.
Hi there, I also have a Stanley #50 and a Record #50
They are great planes, all of them. They just need setting up flawlessly. They don’t like anything being even slightly off, but once you understand them they are wonderful and that’s either Stanley or Record.
I to would love to see a good in depth video on this as well. I have a #45 combination plane and for the life of me can not get it to perform well at all. I have tried to no avail, I don’t have a problem with any other plane or spoke shave but this one has got me beat.
Steve
Florian,
I think this is a common problem.
You are using your plow plane as a Rebate plane and as such the blade needs to be set SLIGHTLY proud of the plane body. This is true for Rebate and Filister (same thing) planes but also works for shoulder planes.
By slightly I mean about the thickness of an index card or less….just enough to catch your fingernail…too much and the plane will pivot as Paul described above.
This will also reduce the side force required to maintain good tracking.
Here’s a link where Chris Schwarz describes the setup used by Veritas in their skew rebate plane.
http://www.wkfinetools.com/contrib/cSchwarz/vSkewRabbet/vSkewRabbet-2.as
All this assumes your blade bevel is square to the blade edge and with sharp corners.
The plane pictured ( Record 043,044 etc.) has a machined flat that indexes the right edge of the blade-this may not allow you to set the blade proud of the surface and would need to be filed down a little to allow the protrusion. I used an Auger file with a safe face..doesn’t take much.
Best,
Craig
I have the Stanley 55 and would also appreciate a video on using these types of plane. I would also like to see a video on how to sharpen the curved blades without altering the shape of the blade.
Rob
These planes were referred to as multiplanes and were kinda sorta popular but had very short lived lives because the experience of using them fell so far short of their wooden counterparts in the reality at the bench, they came on the cusp of machine development and the preempted the router machine which could do what they couldn’t. They are not really one and the same as say the simpler versions like the plough planes and filletster and rebate planes. The claims were that they basically worked to do a million mouldings by changing out cutters and manipulating them but they couldn’t really be manipulated like we do moulding planes combined with ploughs and filletster planes. In general they tear the grain surrounding any and all awkward grain and even with straight grain they are generally problematic.
For straight cuts like ploughing, rabbeting, tongue and grooving however they do work just fine though always a little fiddly compared to dedicated planes like I but tongue and groove planes as matched pairs in the various sizes and they always work to give me T&G in a matter of minutes–far faster than any of the machines if as is always the case I only want a few feet.
This is why I love this site, This make two times in a row someone wrote about a problem That I’m currently having at this very moment.
Just a couple days ago I broke out a Record o44 I purchased this past summer.It had never been used before ever, Bought it from the Blood and Gore Man. lol
My neighbor bought a old Ottoman from a Antique store and the lid that the cushion is attached to , needed replacing . There’s a 1/4″ panel inside that the foam sits on so out came the 044 and I had the exact same issue the plane was moving away from the side as I was coming back in my cut. I was getting so frustrated. I will say this that little blade will cut the stew out of your fingers, so you have to be careful where you put your fingers as you hold the Fence tight to the sides.
So Paul ,
Just so I understand you correctly The inside corner of the rabbet ?
that’s on the side of the Fence. right?
Cause unless your using a very small blade less than 2.8mm it would have to be protruding on that side.I think,.
or, are you talking about the side that the depth stop is on.
I just checked mine and its dead even with the Skate and If what I understand someone to say here is that It needs to protrude say .004″ past the skate in order for it to work correctly Correct.
Just like my Veritas Skewed rabbet fillister planes.,
On my plane that little machined step that the blade rest against is right at 2mm away from the main body so that need to be filed down just enough so that the blade protrudes past the skate.
If so what would you use to remove some of that with?
I made a second fence and attached it to the primary fence and notched out that area that goes directly up under the blade.
Also, I made this Fence using nothing but hand tools.
It felt so good to be able to do that. I planed the sides down to within about a 1/4 thou of parallel . so I thought that was really cool.
and I was able to do this because Of what I learned on the Masterclass site. And no, I am most certainly not sucking up. I’m to old for that.
Just telling you it like it is, That’s all , and I think its important that you know what all you are accomplishing with your teaching especially folks like me that’s intelligently challenged.
So back to the Plane.
On making your grooves you start at the front and make a pass say about three inches or so and then move back progressively , do you go all the way to depth in that first series before you come all the way back or do You just make a shallow depth until you get all the way back and then make full passes until you get to full depth? , how does that work.
I still need to do mine on the ottoman, I was in the process of trying to figure this out when I saw this Blog.
That’s what I meant by this topic couldn’t have come at a better time. Thanks for sharing this trade with us. One day I would like to tell you a story about me trying to get a teacher over here in the US to help with my woodworking. Its quite an amazing story.
Cheers
Christopher
I too was having this problem just yesterday trying to plane a groove for drawer bottoms in its sides. I had the blade extending ever so slightly beyond the skate and it was still stepping over. I took everything apart trying to figure things out. I put a straight edge along the skate front to back and noticed that it wasn’t true. The very back end of the skate was further out than the edge of the skate at the blade opening. I moved the blade put past this point and voila – nice shavings and no stepping.
Thanks again for all you and your crew do Paul. It is making my hand tool learning experience exciting and very satisfying when I get something like this worked out.
Cheers, Dave
Dave, How did you get the blade to move out far enough to clear the part of the skate that was causing the problem. Which plane are you using? Thanks Chris
Whats the best way to set the depth of the blade on the 044?
Sorry Chris I think I have confused things by using the term skate. I was working with the small Record plough plane, the 043 if I am not mistaken. I should have been saying the sole was not true front to back and I had to extend the blade a little bit further past the sole at the blade opening.
Dave
Dave, I have the little Rapier version of the Record 043. Of the five plough planes I have so far tried, that is my favourite, but limited in applications.
Do you mean the lower edge of the sole/skate is not flat? If so, then it could simply be flattened on whatever sharpening system you use, diamond plate/stone/paper on plate.
However, if it is not straight in the vertical plane, I’m not sure if that could be fixed.
Good to hear – I just bought a Rapier version of the 43. It looks and feels good but I have yet to try it out. I want to make a drawer for my bench with it.
rapiers are just as fine as any other.
Gotcha, thanks I was wondering cause Im using my 044 , I took some .40mil lapping film and attached a strip about 1/16″ x 4″ long to a strip of wood and then I cleaned up that little step that the blade rest against and It was just enough to get the blade slightly proud of the skate. It worked much better but Its still stepping over just a tad. I keep getting mixed stories on how to use the plane . from my understanding you start the cut at the very front and then move backwards but do you go to full depth on the first few passes before moving back or what.
I saw in a woodworking video a woodworker using the Veritas small plow and he started his cut at the back and moved forward just like you would using a hand Plane so I/m not really sure your suppose to use it. I have a book called” Planecraft” Thats a really good book on vintage planes and it has some info on these ploughs. But I would like to know more. Thanks for your reply. Chris
You start at the front with all planing and work backwards. With the plough you take half a dozen strokes and move back, back back until the channel has cut all of the walls to both sides and then go back to the front and work backwards to the other end again.
Thanks Paul, I’m embarrassed , I didn’t know that in fact This is the first I heard. I was aware I thought I was anyway about the plough and the skewed fillister but not regular bench planes.
Would you mind explaining to me why you do it this way. I’m sure there is a good reason why you do it this way. Thank you
Chris
You shouldn’t be embarrassed at all. Lots of people don’t know. Even experts. I see it all the time. I will explain soon.
Thank you again for your answer, Paul, and more generaly your work, vision of woodworking and lifestyle, and pedagogy.
Thanks to the woodworking community who added details. I will apply those advices and do my best to improve my skills and solve this problem.
Best regards,
Florian
I spent three entire days trying to clean up, sharpen and use the #45 combination plane. I decided to try the rabbet first. I didn’t even get to the phase described of “stepping”. I could not get it to work, or to stay in place even. I then read that Chris Schwartz (I think I have the name right) who uses rabbet planes for everything advised that the multi-planes were just a gimmick and always fussy to use. Another hand tool woodworker I know confirmed that. I don’t have the patience for tools that don’t work right. I enjoy fixing them up and using them, but they must work well after that. So, my 45 sits in its box and I am now looking at wooden rabbet planes instead, hoping I can find a moment to clean one up and try it instead. At least, the blade sits securely in the plane! Am I missing something by not using the 45? Meanwhile, I put the dado cutter in the table saw and finished up my project in about 20 minutes, and was satisfied that I finished what I set out to do, even if I didn’t use hand tools. I use a combination of power and hand tools, switching out one to another without thinking of whether I used electricity or not.That to me is satisfying. Fussing with the 45 is not. I use hand tools for projects that are not flat, square, straight etc., so that is why I still want to try a hand rabbet plane. Electricity driven tools have their limits.
If the 45 is a good choice for rabbets, or anything else, then I will need a lot more information on how to use it.
I don’t share some of the views of others in my assessment of the 45 for several reasons. One thing I do know is that this was a serious Stanley Rule and Level attempt to corner the market and replace about a hundred or so wooden planes with a plane that offered a space-saving cost-cutting alternative to those who most likely would otherwise never own a hundred or more wooden moulding planes and plough and rebate planes. It was probably naive to think that a single metal cast plane with cutters could replace such a thing and of course it didn’t because it never could. The plane was never popular with carpenters and joiners, woodworkers making their living from woodworking, because at about the time of its inception machines also paralleled the same path to progress machine woodworking that would ultimately oust all hand planes in favour of mass-manufacturing. That is why there are so many of these planes (here in the UK at least) in such good condition available secondhand. Now then, all of that said, using the plane just for ploughing and some rebating the plane works as well as other plough planes and rebating planes. Record 043, 044, and then some Stanley planes like the 50 types all work well for ploughing and whereas some have expressed difficulties using theirs, once you fettle them and understand the issues surrounding them you have a good plane that functions just fine.
I don’t really think the issue of accessing machines is an option for everyone actually. Most woodworkers around the world do not have access to any type of machine nor the space to house them either. The catalog companies we might be used to in the US and to a lesser degree here in the UK and Europe are not there in all or even many of the other 200 countries making up the world. Sometimes even I have difficulty thinking that way after living for so long in the US but if I ask a thousand students who owns or has access to a tablesaw here in the UK the hands up will be less than 30.
Hmm. I wonder if there is a variation in quality, or perhaps finish, with these planes. I used to own a Stanley 13-050 combination plane with the twenty or so blades which I found to be wonderful. After using it for ploughing grooves, rebates and housings (plow, rabbets and dados) for a few years it became my favourite tool despite the awful plastic handle. One day, my workshop was broken into and I lost both that plane and many more valuable tools including all those passed on to me by my father. I moved to a power router at that point, and my woodworking skills atrophied for a long time.
Later I bought (cheap on eBay) the three blade version of the same Stanley plane, and after using it a few times decided that it was not as nice to use as my old one, and I wondered if I had been mistaken in thinking they were any good at all. I had meanwhile bought my Rapier version of the Record 043 (or Stanley 43?). This is a lovely tool that does everything I want as a plough plane, and can be pressed into service for the narrower blades left over from the stolen Stanley Combination Plane. Not so good as a rebate plane.
I have since bought a Record 044C which I’ve used for tonguing, beading and small rebates. I can’t say that I’m very happy with it, although it does work. It too has a plastic handle and also a nylon collar in the depth stop adjustment, which does not work very well and that offends me.
I now also have a Record 078 which I would use for preference on any larger rebates (rabbets), as it is a joy to use and very precise.
I would no longer make housings with a plane anyway, preferring to cut with saw, chisels and hand router.
So, maybe these multi-planes vary in how good they are even within the same model? One thing I will say is that the blades need to be very sharp, very square (or correctly shaped) and the tool clean and true in all aspects. Also, the fence should have an added wooden part to increase the length and depth to suit your work, and this also needs to be accurate. Never trust the fence to be parallel, always check with a steel rule at both ends.
One last thing, the beading cutters always seem to have a flat section narrower than the thickness of the skate, which means the skate stops the beading cutter from working. I haven’t yet figured out why, but my answer is to sharpen the cutter until the width of the off-side flat is the same as the skate thickness. This reduces the size of the bead a little, but I can accept that.
Sorry to hear of the disappointment. I do know things can be wrong with planes, especially the more complicated ones. That said, I bought about ten of the Stanley plough planes over the past few months, some with 10 cutters, some with 3 and some with 20 and they all work fine. I like the plastic handles mostly because they feel as solid as any I have used so I wouldn’t want anyone put off if all they want to do is plough their grooves. They have always worked after a little thought and some added tweaks here or there. I am surprised how well they do work because I admit they do have the modern day look of utilitarianism.
Hello Mr. Sellers,
I’ve recently acquired an early version of a Stanley #50 (US made, all metal body, no blade adjustment lever). The plane is in a very good shape. However,I can’t find any cutters for it at a decent price on the web. These cutters seem to be rare, and the ones available are sold in complete sets, which can be very expensive.
Do you know of any other cutters that will fit this model of Stanley #50?
Best Regards!
I bought a Stanley #45 about 5 or 6 months ago and then spent 10-12 hrs. playing with it to learn it’s foibles,really no different than any plane I’ve acquired over the las 25 yrs. or so. I enjoy using this plane but I did very quickly discover 2 things that were critical to performance. First, the fence needs to be perfectly square to the plane body or it just doesn’t work at all. I’ve even made up some set-up blocks for common thicknesses. Second, friction is your enemy with these planes. Steel simply builds more friction than wooden bodied planes. I use candle wax, same as all my other planes, but I’ve found that I use it more often with this plane. Also, as mentioned above, when rabbeting, make sure that the blade is protruding slightly (I use the thickness of a utility knife blade) from the body on the inside corner.
I don’t believe this tool is different from any other. You need to dedicate some time to learning what it does and how it does it. My first experiences with Stanley style bench planes were horrific until I learned how to tune them and how grain works, I couldn’t tune a wooden plane at all when I got my first one, I couldn’t get a #78 to cut a rabbet that looked like a rabbet, and my first router plane was about as useful as an egg beater for getting any acceptable work accomplished until I learned that you had to work from both sides of a recess to prevent tear-out.
Spend some time with the tool, working on scrap pieces of different species and you’ll soon find you have a wonderful addition to your plane well.