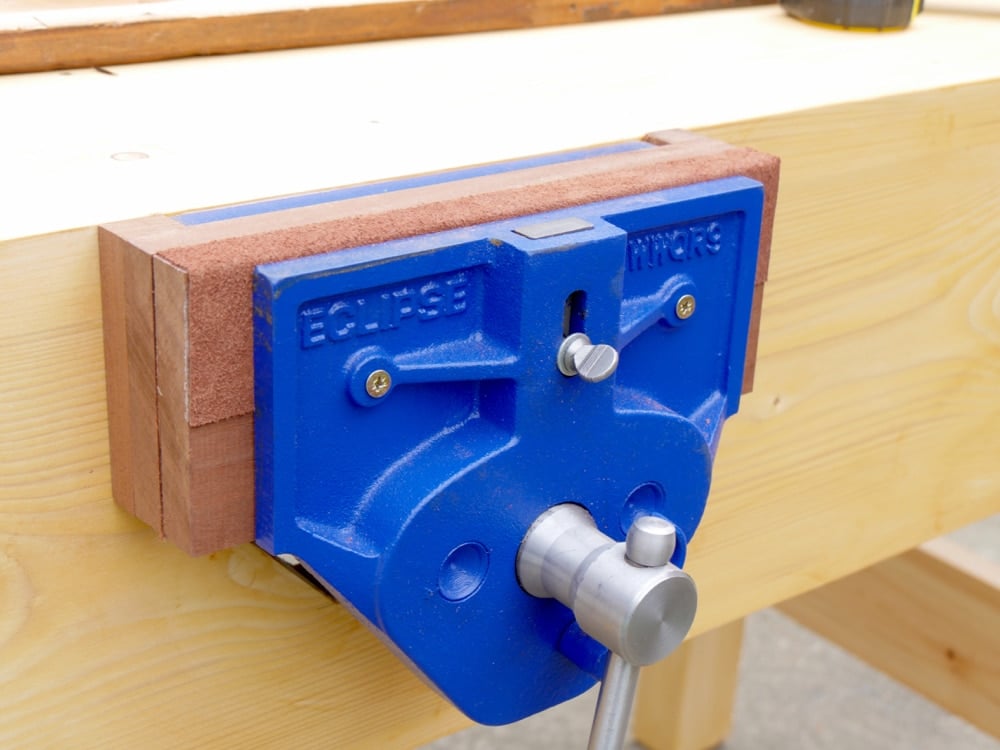
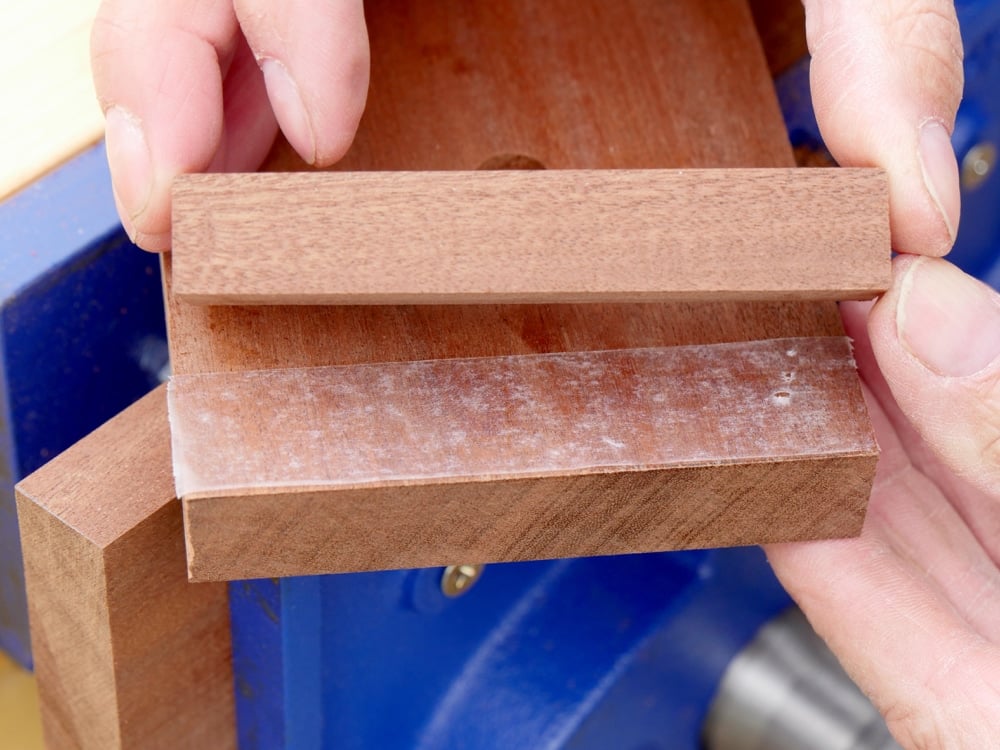
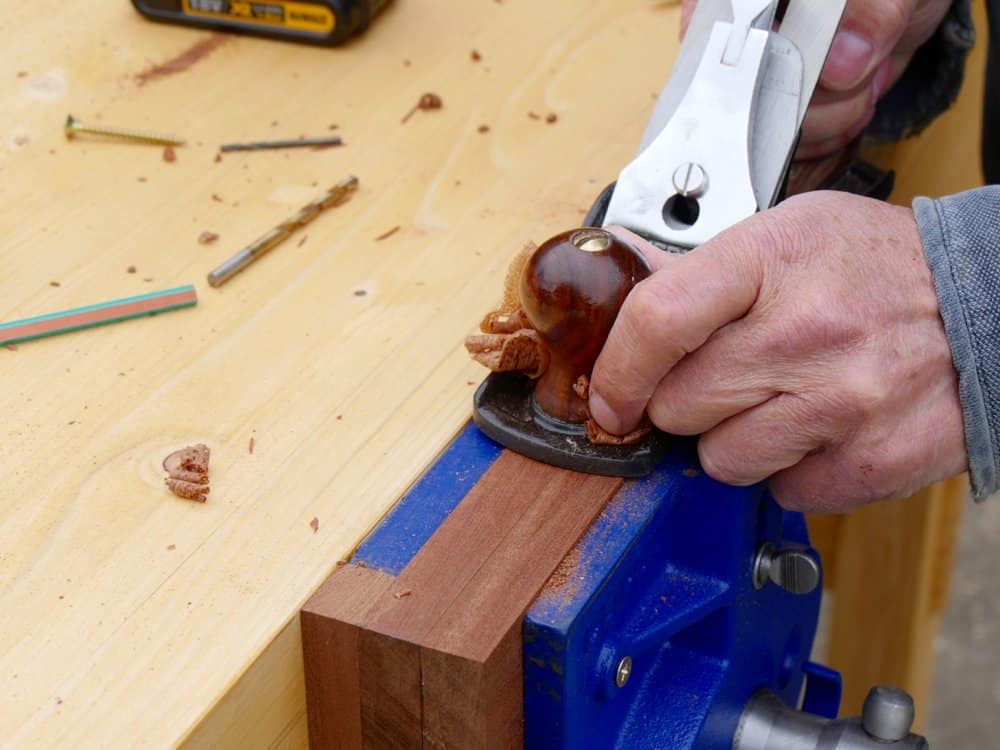
You can use plywood, a good grade, or solid wood, even pine, if that’s what you have, to line the jaws of your vise. In this case I’ve chosen sapele, an african hardwood with perfect hardness and compression for this work. I’ve used it before and it’s one of the best. Better than oak and comparable to ash. Ash works well too.
With the vise fully fitted and locked down, cut the jaw pieces 2″ longer than the width of the metal jaws. This allows for a 1″ overhang each side which I like. When I am done my jaws will be 11″ overall and this suits all of my joinery work perfectly and so too just the general holding ability. The width of the jaw linings is established by the jaws lining up with the top of the benchtop and then stopping 1/8″ or so from the bars that guide the vise closing. In my case 4″. Remember that my vise jaws are set 1/8″ down below the benchtop for plane safety when planing. the last thing you want is for the plane to catch metal jaws. Some people encase the jaw on the top edge by recessing the whole jaw and having a lip to the top but these often break off because of the pressure so I don’t do that.
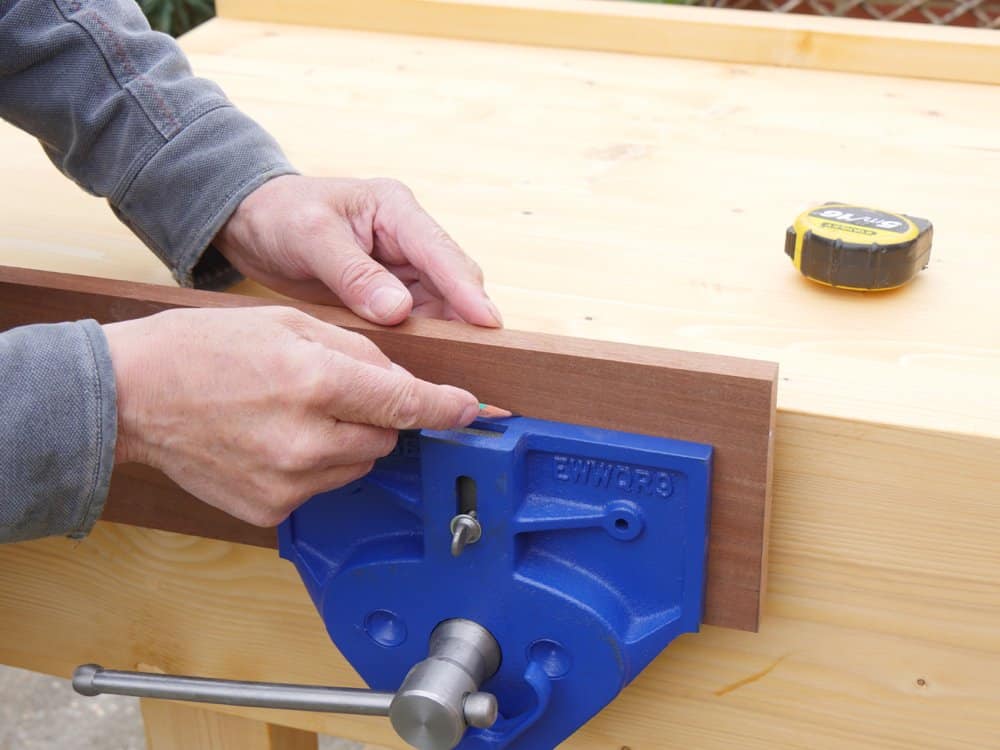
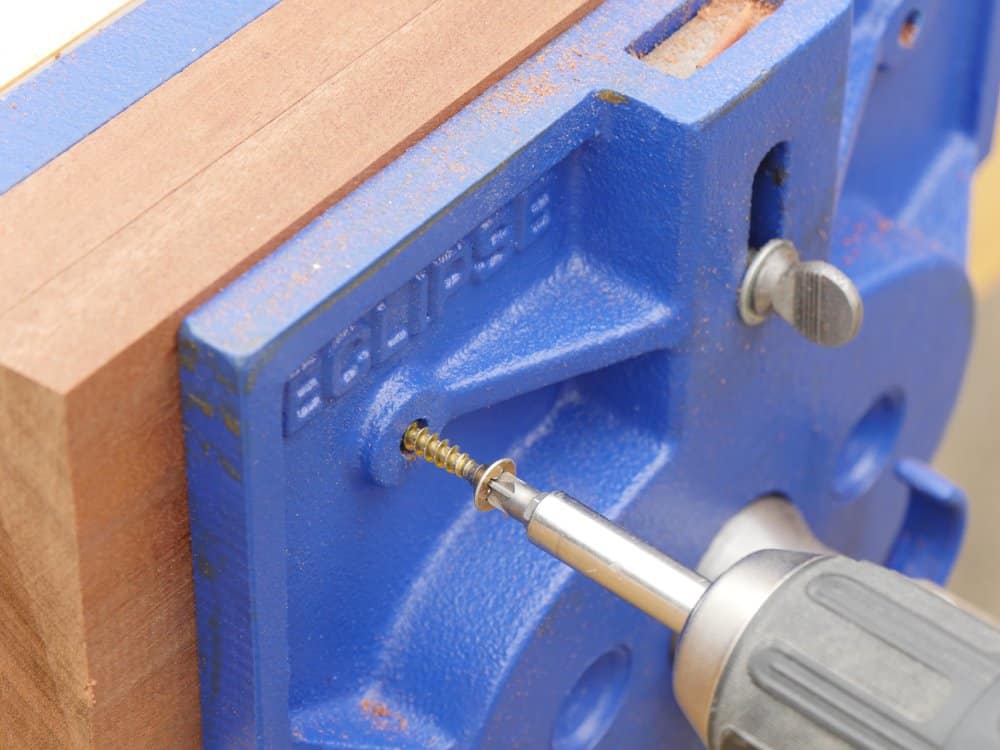
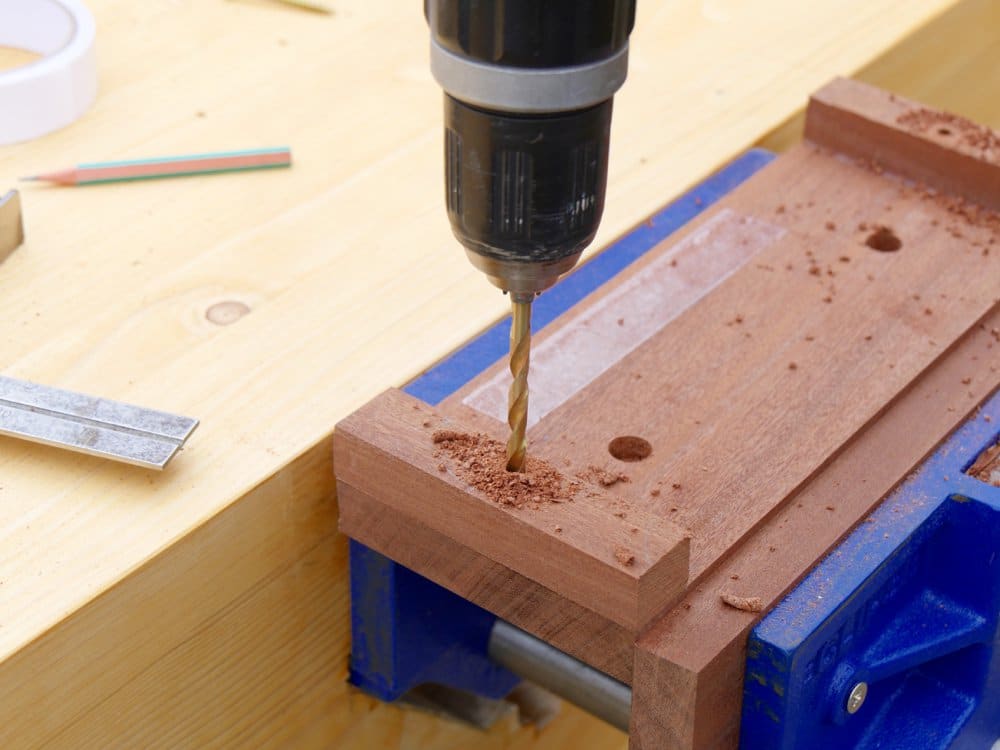
Place the front jaw liner in the vise and clamp with the jaw liner level or slightly above the benchtop and evenly across from side to side. Also centre the liner on the jaw so that the distance is equal either side; 1″ overhangs. Close the front jaw onto the liner and pre-drill a hole sized to receive the shank of the screw; so that the threads bite into the walls of the hole. In my case I used a 1/8″ drill. squeeze it tight between the jaws. Screw through the two holes with appropriate sized screws. You might want to consider a layer of non-slip shelf liner between the jaw and the liner. This stops any possibility of slippage and lasts long term.
Fitting the rear jaw liner
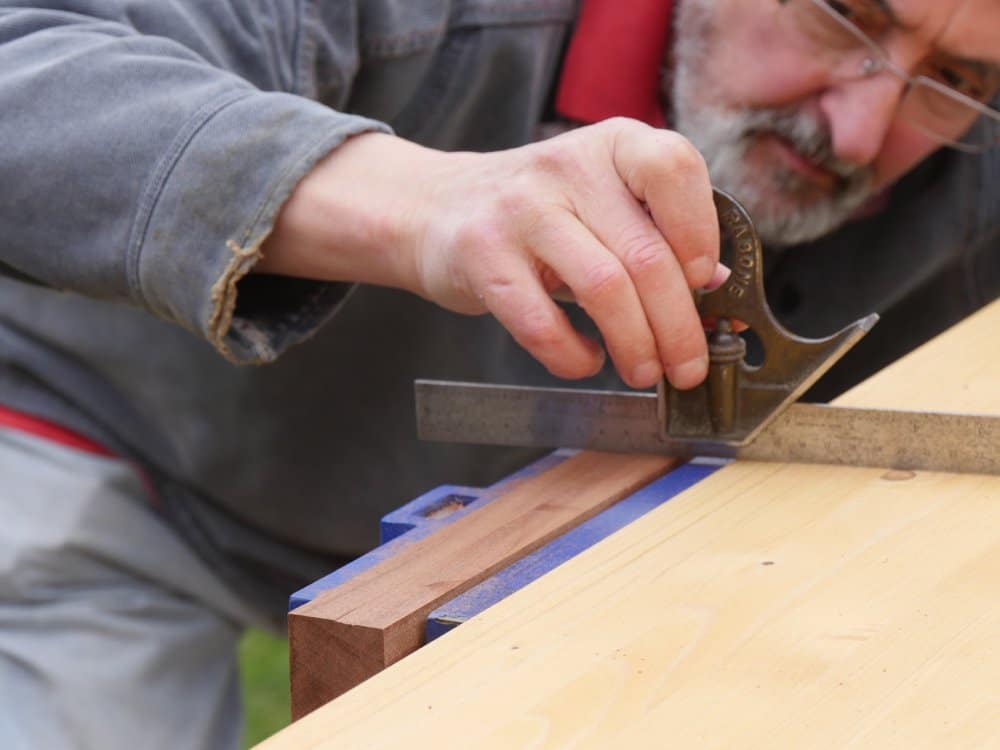
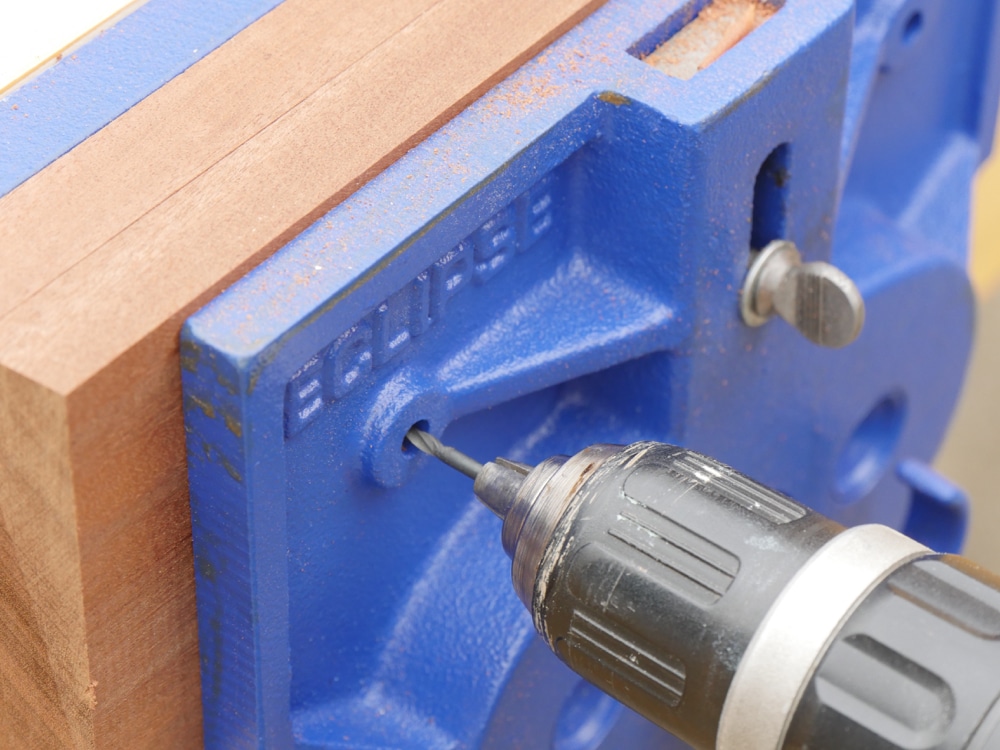
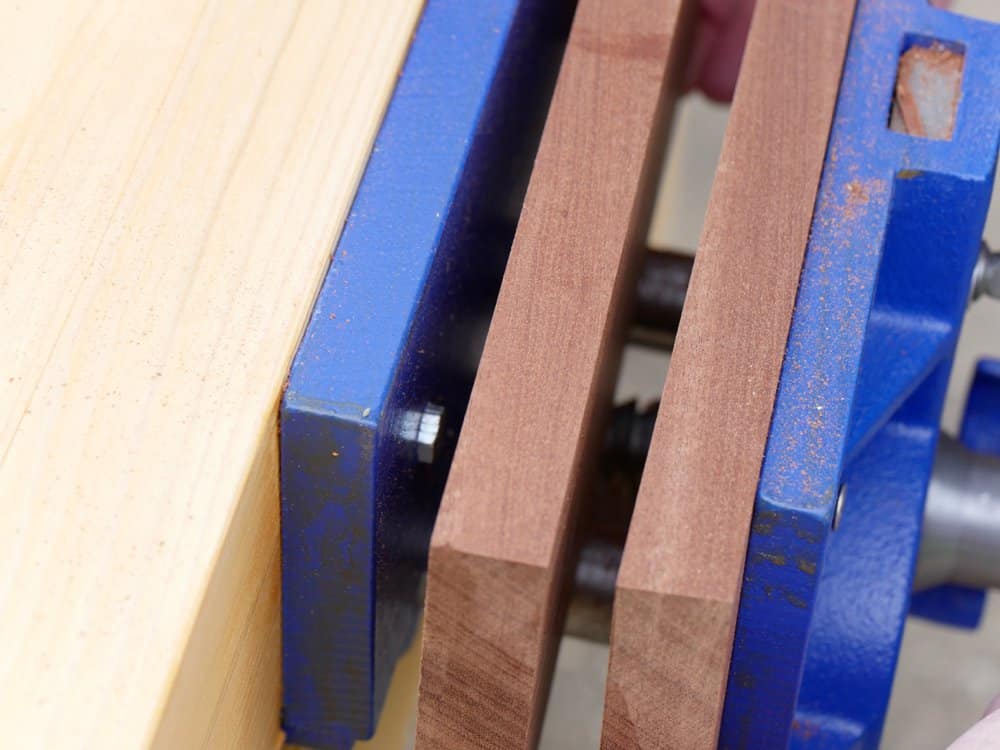
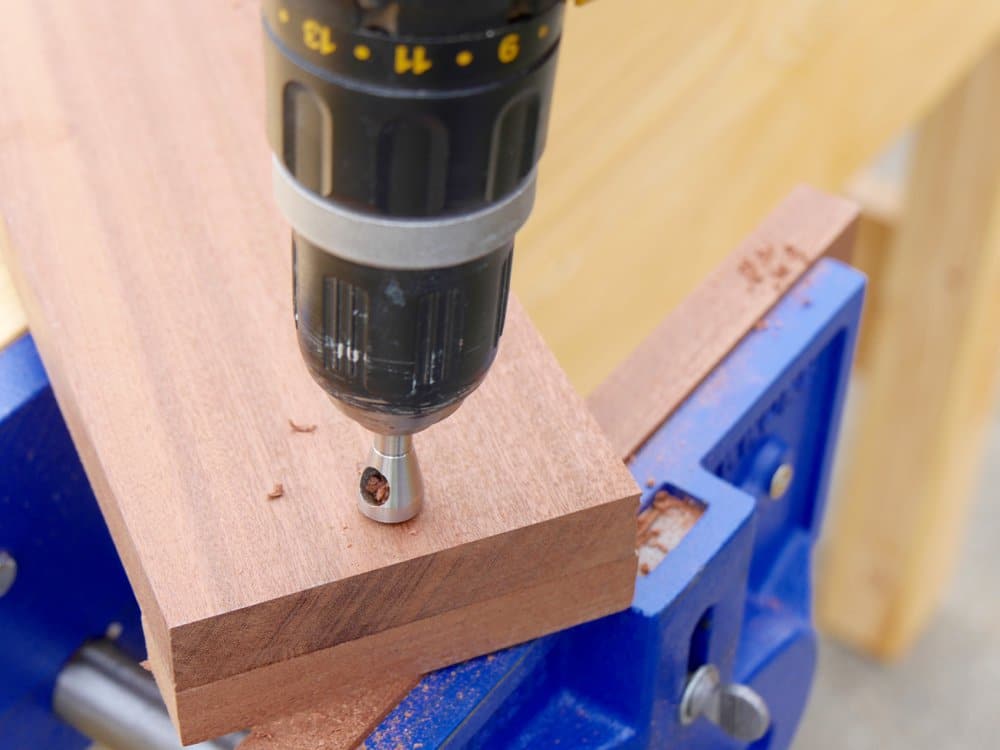
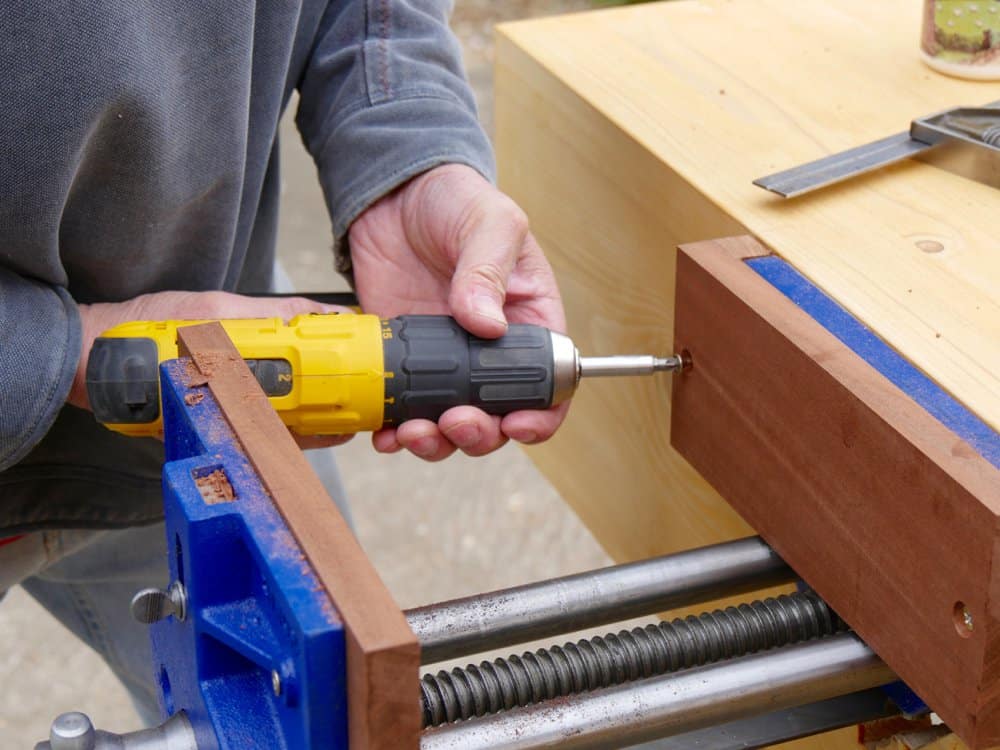
Align the rear jaw with the front and close the front jaw onto the rear one. Cinch tight. This will impress the two heads of the coach screws into the rear face of the rear liner to show where to drill a recess hole to receive the heads of the coach screws. Make sure you have aligned the rear jaw with the front one on either side and along the top edge too. Remove the jaw and bore a hole sufficiently large enough to receive the head and as near as you can to the depth of the head. Relocate the liner and close the front jaw onto it. Now measure the distance between the benchtop front edge and the back face of the rear jaw liner. In my case it was a dead 1/2″. Cut two long grain strips 1/2″ (or to suit your vise jaw) by 1″ wide to slide between the jaw liner and the benchtop. We will call these infills. Use two sided tape to stick the infills to the rear jaw liner making sure the distance between them allows a good fit over the fixed vise jaw. Drill 3/16″ holes through the jaw liner and the infills centred between the top and bottom of the liner and 3/4″ in from the outer edges. Countersink the holes. Line the inside top edge of the rear liner with two sided tape also. This will hold the jaw in place while you screw it to the bench top. Insert the rear liner and cinch tight. Open the front jaw and screw the rear liner in place. Now plane the liners to finished height with the bench top.
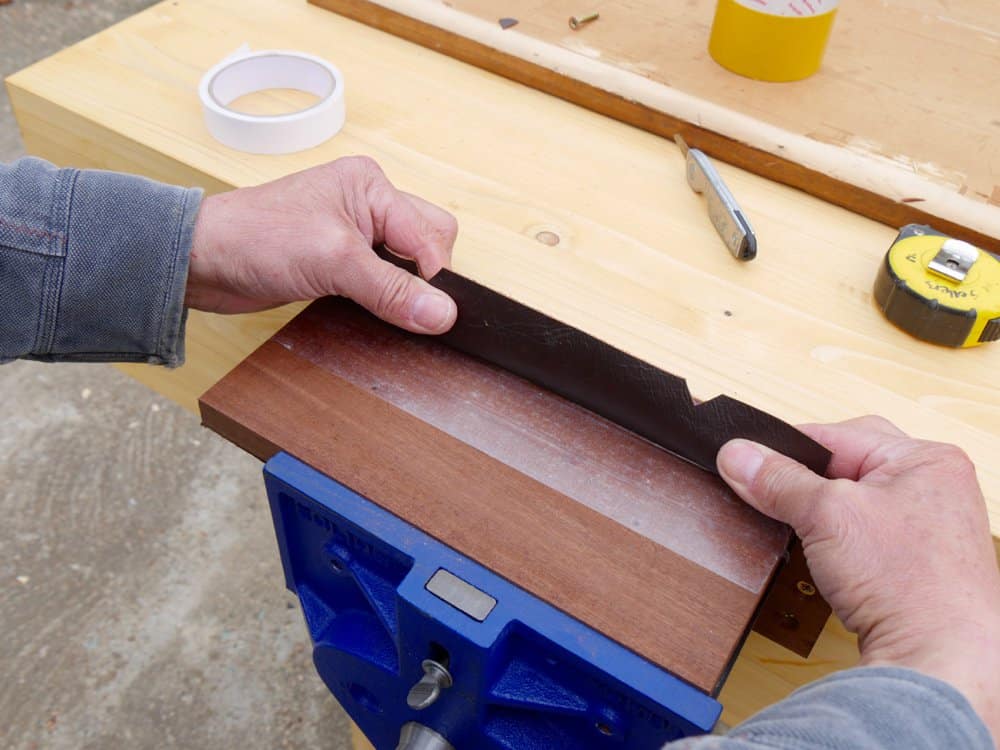
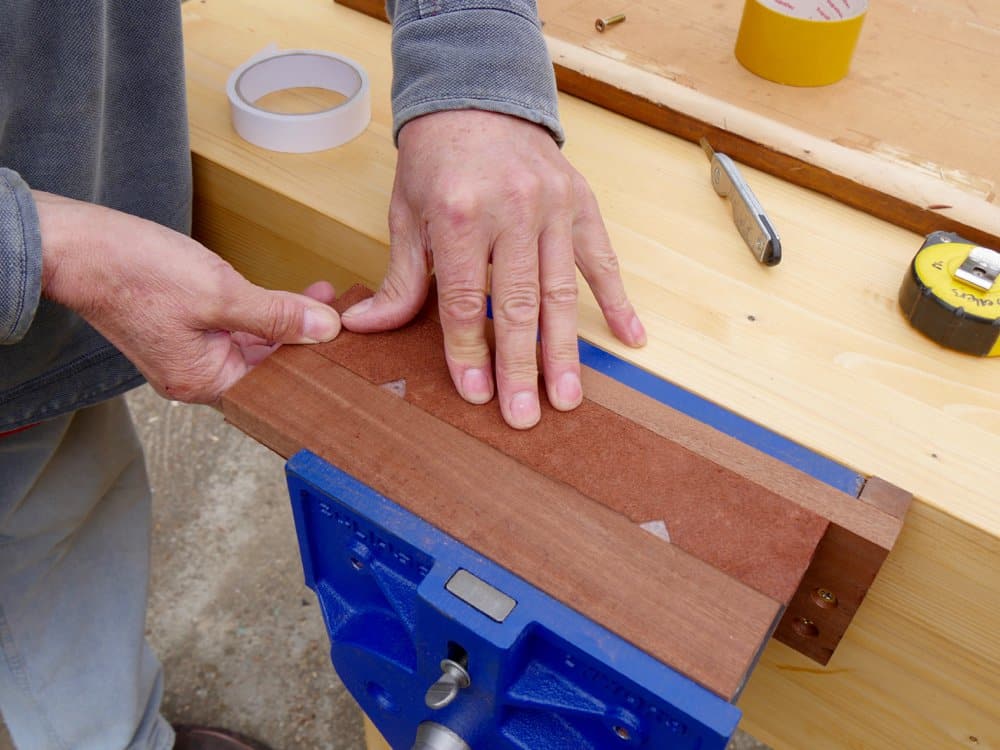
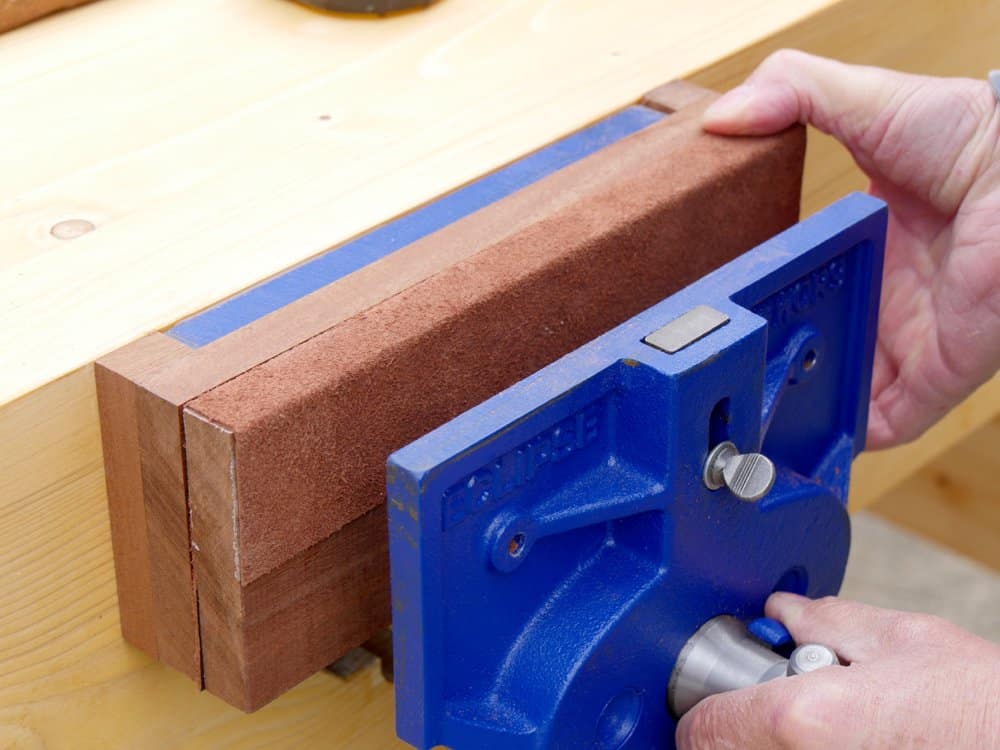
Installing the leather liner
I use leather on one vise liner face only. This is enough to hold the work and stop it from sliding or slipping in the vise. It provides just enough cushioning and compressibility to hold but not mar too. Keeping one jaw wood only has always seemed best to me. The leather lasts longer than say cork and and doesn’t crumble away either.
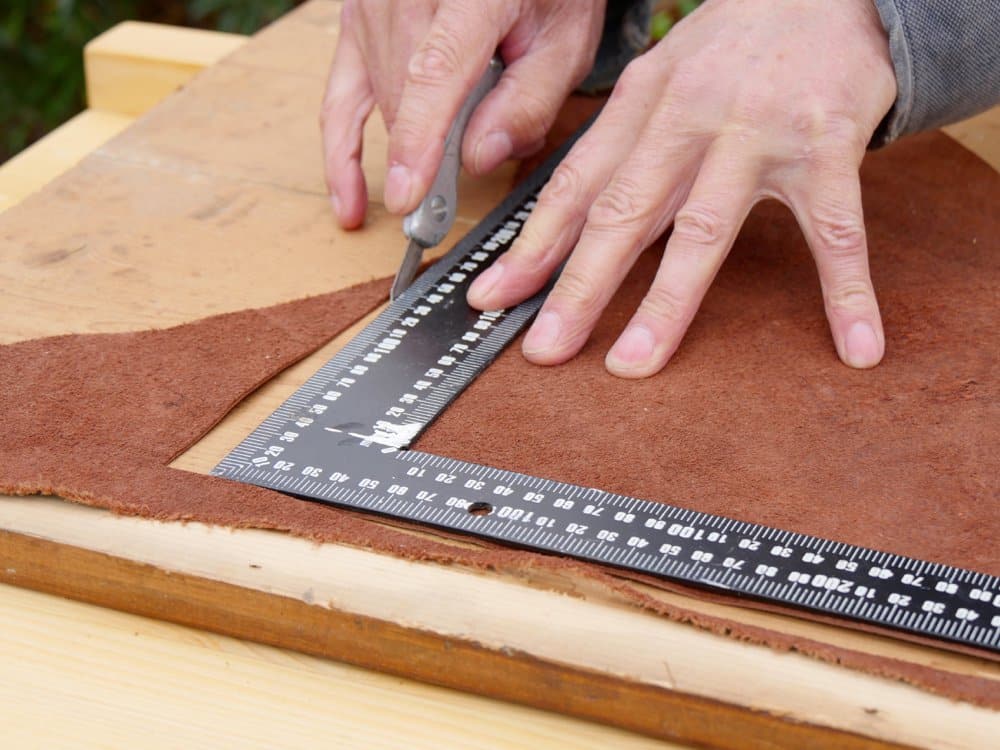
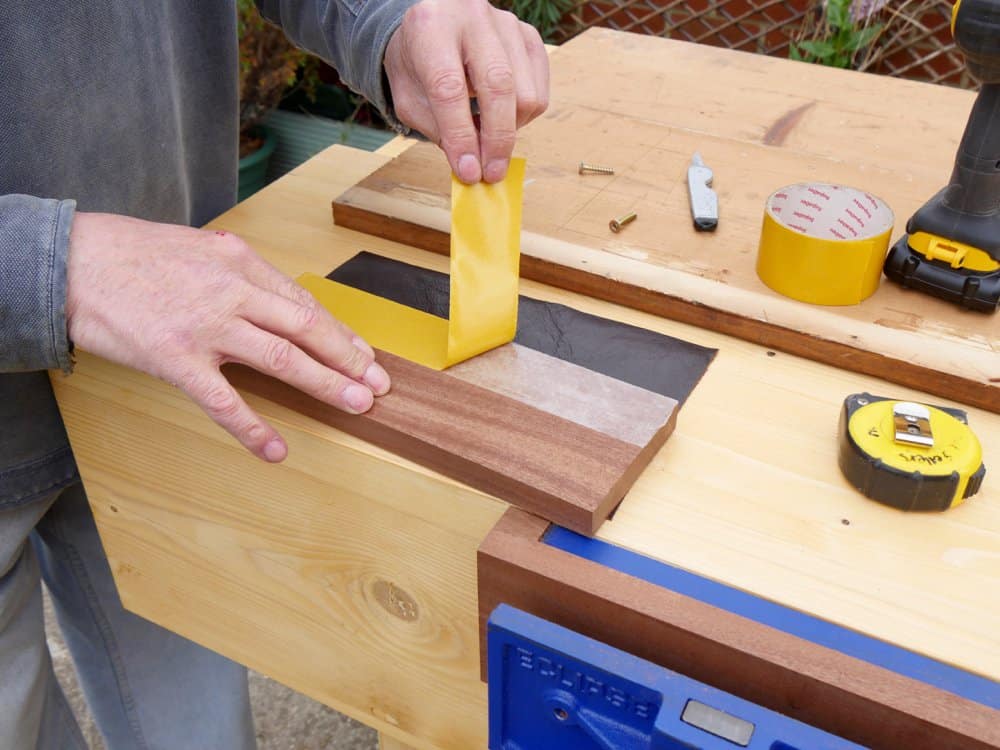
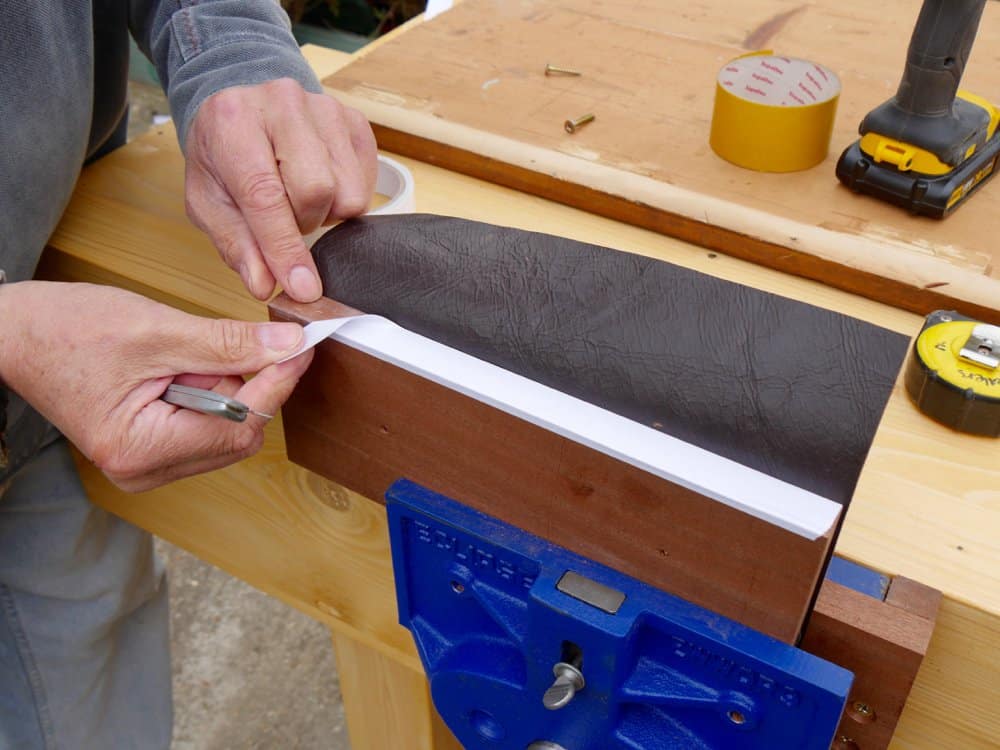
It is best to secure the top edge of leather between the actual vise jaw and the wooden liner. I have found that the leather curls away at the corner quite soon after attaching if we rely on glue or two-sided tape alone. Cut the leather to the size of the vise jaw liner face plus the thickness of the wood and an added 2″. This allows the leather to cover the face and top edge of the liner and then to be anchored between the vice jaw and the jaw liner. Remove the jaw liner from the moving vise jaw. Cover the wooden liner face with two-sided tape. Attach the leather, stretching it as much as possible. Add additional tape to the top edge of the jaw liner and stretch the leather over the top edge. Finally add 2″ of two sided tape to the opposite face, starting at the top edge and down onto the inside face. Stretch the leather over and down onto this face. Secure the vise jaw liner back in place with the two screws.
This is it. The finished vise installed. Now, go make!
34 Comments
Great! Mine was originally placed flush with my bench, but I now understand the advantage to have a gap which allows for easier clamping and handling of the work piece. Thank you so much!
Could you point me in the right direction for the 2″ wide double sided tape? I am am finding carpet tape in the 2″ widths here in the States but not sure that is the same thing? Wonderful post as always!! Thanks!
Try Crafts Etc. Or AC Crafts. They use it for picture mount and often it’s called mounting tape. Carpet tape is single side not double.
In Germany the “carpet tape” is double sided sticking tape. Popular brand is e.g. tesa
Could you comment on the amount of pinch or tilt of the jaws you like. The few Record vises that I have dealt with have varied quit a bit. Do you like the fixed jaw vertical with a certain amount of tilt to the moving jaw. I have seen both jaws tilted and another with most of the tilt on the moving jaw and as little as 1/16″ up to 3/16″. What do you like to have?
The rear jaw is the fixed jaw in which there is no flex this jaw, being cast at a 90-degree angle to the main undercarriage aspect of the casting. It’s the front jaw that flexes under clamping pressure because the bars themselves bend in some measure depending on diameter, extension, applied pressure, location and size of workpiece and more. The toe-inas, it’s commonly called,does not need to be great. 1/8″ is good.
Hi Paul,
I noticed in your last post that you were using a Sandvik saw. This reminded me of the panel saw I have and have tried to straighten. It still has a bit of a crook to it, and a very small twist also. I wonder if you have considered creating a video on straightening handsaws. It seems the majority of used saws have been abused and the straight saws command exorbitant prices.
Thank you
Hi Paul, a while back I was showing your presentation on how to sharpen chisels to a fellow novice wood worker like myself and in it you were sharpening a set of “ALDI” chisels. Is there any chance you can steer me to getting a set of these here in the U.S. or in England.
Respectfully yours
Tom Dowling
The Chisels are not permanently on sale…
They have also been sold in Lidl. In both 2015 and 2014 they were on sale in Lidl for a week or so. In both years it was aprox mid October, if I remember correctly.
Good luck,
Regards,
Simsy
Here in the US (Michigan) Aldis carried the chisels right around Father’s day for both 2015 and 2016. Bought a set last year and have been pleased with them. Thanks for the heads up, Paul!
-Tom Stenzel
Tom, Aldi has a website for US stores, and they advertise what is selling on Special at each store one or two weeks ahead. I think you can set a Google search to run and look for “Aldi” AND “Chisel” and notify you. If not, the old fashioned manual search also works, and if you have an Aldi nearby, you may pick up bargains in produce and vegetables also.
Good hunting.
I cut a piece of leather for my front jaw and included ‘ears’ that fold across the top of the front jaw and down either side of the front of the jaw, where I secured them with screws into the outside of the wooden jaw liner. I soaked the leather in alcohol where it went over the top of the jaw, then closed the vise and clamped a board across the top of the front jaw to hold the leather flat while it dried. Now, the leather is formed to the jaw and I can flip it out of the way if I desire. You can see a few photos on my website link.
Paul: I have a Sjoberg bench, with wood vise faces. I’d like to protect them. Sjoberg sells cork liners which will need relatively frequent replacement. I found sapele in thin wood at Woodcraft. I’d have to screw on the sapele from the inside face of the vice. I’d appreciate knowing what thickness sapele you would recommend (taking in consideration the depth I’d need for a flathead screw and its countersink. I want to keep the screw head away from the workpiece when and if the sapele lining compresses. (I have to assume that everything compresses, especially if the vise racks [it does] and workpieces have irregular shapes.)
RESEARCH: Sapele has a Janka Hardness of 1,410 pounds, and the European Beech Sjoberg lists as their wood has a Janka Hardness of 1,450 pounds (I’d consider the difference trivial). Bubinga (at a 12% higher price) has a Janka Hardness of 1,980) pounds. Not so trivial. So, my obsessive/compulsive analysis has bubinga at a 12% price premium, providing a 40% increase in hardness.
CONCLUSION: Bubinga is harder than sapele at a nominal price increase, but is that a good thing? I want to protect the workpiece, which is more important than the vise. And I want to keep those screw heads away from the workpiece.
Whew! Please remind me not to do this again.
QUESTION: How thick should the liner be, at minimum, and is the “Good Enough” standard applicable here?
Hello Paule,
where can I buy same vice in Europe (Czech Republic) please.
I am apologize, I found answer on part one.
Great.
Thank you so much Paul. It’s amazing how often you seem to blog about things I am wondering about. I’m half-way through a bench project, so this business of fixing vices is very valuable information.
Dear Paul,
What is the advantage to putting the vise closer to the left-hand leg? Is it stability and ergonomics? I apologize if this question has been asked and answered; I’ve looked but haven’t found it yet.
Best,
Steve
It has been answered many times but it is so that any work on the bench top employing the use of hammering or malleting has the solid return of the log and so too chopping in the vise as in mortising. We are mostly right handed so all of the tools we are using are comfortably placed to the right of the bench out of the way until needed. If you use the search button there is more. Just put in workbench vises position and there will many articles I’ve written.
Thank you for your answer; I will certainly put the “search” button to better use in the future, lol.
Paul, I purchased the same vise you have above, Eclipse 9″ EWWQR9, but mine came with “toe in jaws”- about 5-6mm worth! The box says “to equalize clamping pressure across the whole of the workpiece”. This seems like marketing hype and I’d like to have it work like my other vise, an old Record 52 1/2D. Is there a way to fix this? I can’t return it because I’m past my 30 days with Amazon. I spent the time making my bench.
It also came with a bent plate at the back of the Tommy bars (the plate is half the thickness of my Record). I was able to remove it and hammer it straight.
It is really disappointing to get everything almost 100% complete and the vise is holding up the whole thing.
I really appreciate all your articles and videos. I have false started at woodworking many times over the last 40 years because of things I didn’t know how to do correctly and know I am starting to get it. It is amazing how the power machines seem to be gathering dust now when It used to be my hand tools that always had the dust on them.
It’s a quick fix for excessive toe-in which does happen I know. You can plan a compensatory face on the vise jaw liner to reduce the toe-in in the same way you can create toe-in when the jaws have none.
Thanks for the quick response. I planed the back of the offending face and put the leather on it today. The bench is now 100% complete.
I can’t thank you enough for your efforts to pass on your talents.
BTW, I meant to say rails instead of Tommy bar above. It is really too bad that to save a couple pennies they cheapen the quality of the materials.
Great article. I’ve seen 2 approaches to using the 2 holes in the bench-side of the vice but you demonstrate a 3rd approach! 🙂
1. Use the 2 holes only for short screws attaching the bench-side liner from behind before installing vice. The vice then relies entirely on the 4 bolts underneath to hold it to the bench.
2. Use longer screws sunk into the the lining then through the vice holes into the side of the bench.
3. Paul’s approach: use the holes to screw the vice to the side of the bench and then screw the inner line to the bench via the extended sides of the liner!
Hi Paul! Really enjoying your content, thank you for the great instruction. A question regarding vises, in my haste to get started on my bench I ended up purchasing a record vise that I thought was a vintage 53 quick release on an auction site, turns out it is a vintage 52D with quick release. (my mistake not the sellers) Would you recommend installing such a vise on my bench or should a new woodworker like myself sell it off and get say a 9” eclipse or the like? Thanks for your feedback.
It seems that having the leather only going halfway down the space were it is secured between the pad and the outside face of the vice might cause a bit of, possibly undesirable, toe-in. It must just not be an issue, huh? Just curious why one wouldn’t cut a piece of leather that would fill the whole space where it will be sandwiched between metal and wood?
Tom
On the seventh picture from the top, you show how to make the indentions of the inner jaw bolt heads on the back side of the inner jaw liner. I understand that. What I don’t understand is how you got the liner flush with the face of the inner jaw in the pictures above the seventh one when the liner should have been held away from the inner jaw face by those bolt heads. Am I missing something????
Hi Paul,
You mentioned that the leather would not hod with glue or double sided tape alone, in the commentary and photos it looks like you only used double sided tape? Or did I miss something?
I like watching your vids , I have all my Great Grandfathers, Grandfather and Fathers old tools, sadly they have passed on (my generation was the the only one not to go into the wood work trades, I would have liked to have spent time with them learning. At least there are highly skilled people like you sharing on how to use and take care of the hand. tools, also the “how to” skills to go out and make projects.
I think I was referring to the fact that I trap the upper edge between the vice jaw and the jaw liner rather than glue or tape alone.
My bench apron is made of the 2X6 inch doug fir, and I’m afraid it is not beefy enough to manage that vice. Does one double up the thickness of the apron where the vice is to be mounted?
Six inches is not really wide enough so it needs more depth, somewhere around 11″ is good but less works too. N0 less than 9″??? Doubling thickness as in two 2×6 side by side to make it 4×6 isn’t really of value.
Hi Paul, does it matter which kind of leather to use or how thick the leather should be? What do you usually use? Thanks for all your great stuff you are pulishing.
3-4mm upholstery hide will work fine. It’s inexpensive as offcuts and can be easily had. Suede side out gives better grip and more cushioning.
Comments are closed.
Privacy Notice
You must enter certain information to submit the form on this page. We take the handling of personal information seriously and appreciate your trust in us. Our Privacy Policy sets out important information about us and how we use and protect your personal data and it also explains your legal rights in respect of it. Please click here to read it before you provide any information on this form.


Great! Mine was originally placed flush with my bench, but I now understand the advantage to have a gap which allows for easier clamping and handling of the work piece. Thank you so much!
Could you point me in the right direction for the 2″ wide double sided tape? I am am finding carpet tape in the 2″ widths here in the States but not sure that is the same thing? Wonderful post as always!! Thanks!
Try Crafts Etc. Or AC Crafts. They use it for picture mount and often it’s called mounting tape. Carpet tape is single side not double.
In Germany the “carpet tape” is double sided sticking tape. Popular brand is e.g. tesa
Could you comment on the amount of pinch or tilt of the jaws you like. The few Record vises that I have dealt with have varied quit a bit. Do you like the fixed jaw vertical with a certain amount of tilt to the moving jaw. I have seen both jaws tilted and another with most of the tilt on the moving jaw and as little as 1/16″ up to 3/16″. What do you like to have?
The rear jaw is the fixed jaw in which there is no flex this jaw, being cast at a 90-degree angle to the main undercarriage aspect of the casting. It’s the front jaw that flexes under clamping pressure because the bars themselves bend in some measure depending on diameter, extension, applied pressure, location and size of workpiece and more. The toe-inas, it’s commonly called,does not need to be great. 1/8″ is good.
Hi Paul,
I noticed in your last post that you were using a Sandvik saw. This reminded me of the panel saw I have and have tried to straighten. It still has a bit of a crook to it, and a very small twist also. I wonder if you have considered creating a video on straightening handsaws. It seems the majority of used saws have been abused and the straight saws command exorbitant prices.
Thank you
Hi Paul, a while back I was showing your presentation on how to sharpen chisels to a fellow novice wood worker like myself and in it you were sharpening a set of “ALDI” chisels. Is there any chance you can steer me to getting a set of these here in the U.S. or in England.
Respectfully yours
Tom Dowling
The Chisels are not permanently on sale…
They have also been sold in Lidl. In both 2015 and 2014 they were on sale in Lidl for a week or so. In both years it was aprox mid October, if I remember correctly.
Good luck,
Regards,
Simsy
Here in the US (Michigan) Aldis carried the chisels right around Father’s day for both 2015 and 2016. Bought a set last year and have been pleased with them. Thanks for the heads up, Paul!
-Tom Stenzel
Tom, Aldi has a website for US stores, and they advertise what is selling on Special at each store one or two weeks ahead. I think you can set a Google search to run and look for “Aldi” AND “Chisel” and notify you. If not, the old fashioned manual search also works, and if you have an Aldi nearby, you may pick up bargains in produce and vegetables also.
Good hunting.
I cut a piece of leather for my front jaw and included ‘ears’ that fold across the top of the front jaw and down either side of the front of the jaw, where I secured them with screws into the outside of the wooden jaw liner. I soaked the leather in alcohol where it went over the top of the jaw, then closed the vise and clamped a board across the top of the front jaw to hold the leather flat while it dried. Now, the leather is formed to the jaw and I can flip it out of the way if I desire. You can see a few photos on my website link.
Here is the link, sorry.
http://michael-parrish.com/2016/06/08/craftsman-506-51890-woodworkers-vise-restoration/
Paul: I have a Sjoberg bench, with wood vise faces. I’d like to protect them. Sjoberg sells cork liners which will need relatively frequent replacement. I found sapele in thin wood at Woodcraft. I’d have to screw on the sapele from the inside face of the vice. I’d appreciate knowing what thickness sapele you would recommend (taking in consideration the depth I’d need for a flathead screw and its countersink. I want to keep the screw head away from the workpiece when and if the sapele lining compresses. (I have to assume that everything compresses, especially if the vise racks [it does] and workpieces have irregular shapes.)
RESEARCH: Sapele has a Janka Hardness of 1,410 pounds, and the European Beech Sjoberg lists as their wood has a Janka Hardness of 1,450 pounds (I’d consider the difference trivial). Bubinga (at a 12% higher price) has a Janka Hardness of 1,980) pounds. Not so trivial. So, my obsessive/compulsive analysis has bubinga at a 12% price premium, providing a 40% increase in hardness.
CONCLUSION: Bubinga is harder than sapele at a nominal price increase, but is that a good thing? I want to protect the workpiece, which is more important than the vise. And I want to keep those screw heads away from the workpiece.
Whew! Please remind me not to do this again.
QUESTION: How thick should the liner be, at minimum, and is the “Good Enough” standard applicable here?
Hello Paule,
where can I buy same vice in Europe (Czech Republic) please.
I am apologize, I found answer on part one.
Great.
Thank you so much Paul. It’s amazing how often you seem to blog about things I am wondering about. I’m half-way through a bench project, so this business of fixing vices is very valuable information.
Dear Paul,
What is the advantage to putting the vise closer to the left-hand leg? Is it stability and ergonomics? I apologize if this question has been asked and answered; I’ve looked but haven’t found it yet.
Best,
Steve
It has been answered many times but it is so that any work on the bench top employing the use of hammering or malleting has the solid return of the log and so too chopping in the vise as in mortising. We are mostly right handed so all of the tools we are using are comfortably placed to the right of the bench out of the way until needed. If you use the search button there is more. Just put in workbench vises position and there will many articles I’ve written.
Thank you for your answer; I will certainly put the “search” button to better use in the future, lol.
Paul, I purchased the same vise you have above, Eclipse 9″ EWWQR9, but mine came with “toe in jaws”- about 5-6mm worth! The box says “to equalize clamping pressure across the whole of the workpiece”. This seems like marketing hype and I’d like to have it work like my other vise, an old Record 52 1/2D. Is there a way to fix this? I can’t return it because I’m past my 30 days with Amazon. I spent the time making my bench.
It also came with a bent plate at the back of the Tommy bars (the plate is half the thickness of my Record). I was able to remove it and hammer it straight.
It is really disappointing to get everything almost 100% complete and the vise is holding up the whole thing.
I really appreciate all your articles and videos. I have false started at woodworking many times over the last 40 years because of things I didn’t know how to do correctly and know I am starting to get it. It is amazing how the power machines seem to be gathering dust now when It used to be my hand tools that always had the dust on them.
It’s a quick fix for excessive toe-in which does happen I know. You can plan a compensatory face on the vise jaw liner to reduce the toe-in in the same way you can create toe-in when the jaws have none.
Thanks for the quick response. I planed the back of the offending face and put the leather on it today. The bench is now 100% complete.
I can’t thank you enough for your efforts to pass on your talents.
BTW, I meant to say rails instead of Tommy bar above. It is really too bad that to save a couple pennies they cheapen the quality of the materials.
Great article. I’ve seen 2 approaches to using the 2 holes in the bench-side of the vice but you demonstrate a 3rd approach! 🙂
1. Use the 2 holes only for short screws attaching the bench-side liner from behind before installing vice. The vice then relies entirely on the 4 bolts underneath to hold it to the bench.
2. Use longer screws sunk into the the lining then through the vice holes into the side of the bench.
3. Paul’s approach: use the holes to screw the vice to the side of the bench and then screw the inner line to the bench via the extended sides of the liner!
Hi Paul! Really enjoying your content, thank you for the great instruction. A question regarding vises, in my haste to get started on my bench I ended up purchasing a record vise that I thought was a vintage 53 quick release on an auction site, turns out it is a vintage 52D with quick release. (my mistake not the sellers) Would you recommend installing such a vise on my bench or should a new woodworker like myself sell it off and get say a 9” eclipse or the like? Thanks for your feedback.
It seems that having the leather only going halfway down the space were it is secured between the pad and the outside face of the vice might cause a bit of, possibly undesirable, toe-in. It must just not be an issue, huh? Just curious why one wouldn’t cut a piece of leather that would fill the whole space where it will be sandwiched between metal and wood?
Tom
On the seventh picture from the top, you show how to make the indentions of the inner jaw bolt heads on the back side of the inner jaw liner. I understand that. What I don’t understand is how you got the liner flush with the face of the inner jaw in the pictures above the seventh one when the liner should have been held away from the inner jaw face by those bolt heads. Am I missing something????
Hi Paul,
You mentioned that the leather would not hod with glue or double sided tape alone, in the commentary and photos it looks like you only used double sided tape? Or did I miss something?
I like watching your vids , I have all my Great Grandfathers, Grandfather and Fathers old tools, sadly they have passed on (my generation was the the only one not to go into the wood work trades, I would have liked to have spent time with them learning. At least there are highly skilled people like you sharing on how to use and take care of the hand. tools, also the “how to” skills to go out and make projects.
I think I was referring to the fact that I trap the upper edge between the vice jaw and the jaw liner rather than glue or tape alone.
My bench apron is made of the 2X6 inch doug fir, and I’m afraid it is not beefy enough to manage that vice. Does one double up the thickness of the apron where the vice is to be mounted?
Six inches is not really wide enough so it needs more depth, somewhere around 11″ is good but less works too. N0 less than 9″??? Doubling thickness as in two 2×6 side by side to make it 4×6 isn’t really of value.
Hi Paul, does it matter which kind of leather to use or how thick the leather should be? What do you usually use? Thanks for all your great stuff you are pulishing.
3-4mm upholstery hide will work fine. It’s inexpensive as offcuts and can be easily had. Suede side out gives better grip and more cushioning.