Educating Lazy Owners . . .
. . . or more likely those whose lives are simply super-busy ones.
Owning handmade furniture is not to just buy the piece we make but to educate owners as to the best way to treat it when it arrives so that they own it well. Our work is not mass-made for masses to own so much as customised work we make to specs owners cannot often get anywhere else. The woods used, the sizing and then the methods by which we make can not readily be bought in the day-to-day. We make not competitively but individually according to various dynamics. Someone once said to me, “You can’t compete with Walmart!” I waited for a few seconds, looked them in the eye and said, “You’ve got that wrong. Walmart cannot compete with me because Walmart cannot make what I make.” The discussion ended with the wisdom in my answer. There was nothing more to be said.
Wisdom comes to us in many ways if we do but recognise it. I decided 30 or so years ago not to work for money knowing that as long as I was willing and able to work my income would come automatically. That left me in greater freedom than ever before and I was much more able to focus on what I was good at, making.
Not all people are used to owning fine furniture and especially handmade work that’s a lot more costly. Over the generations, manufacturers have presented no-need-for-care products as the easy way for customers. The finishes they use are extremely low maintenance and highly sophisticated. No maker in commerce would ever use shellac as a finish even though it is one of the most beautiful finishes there is. Their lacquers spray well and cure in seconds. Speed is of the essence. Longevity is guaranteed and five decades is nothing these days. if your customers own furniture polish it’s mostly to make them feel good. They can always says it “nourishes the wood.” Of, course it doesn’t, we woodworkers know there is no such thing. It might clean off fingerprints and dust, nothing else.

Bridging the gap between a maker and an owner will be a new concept for both. How to move pieces, sit in them, clean them and maintain them for long-term ownership is a much-needed thing and no one else does it better than us. Did you ever tell your customers that leaning back in any chair other than a rocking chair is really bad for the chair and that you cannot guarantee that something is very likely to break and that if they do that you will not stand by a guarantee?
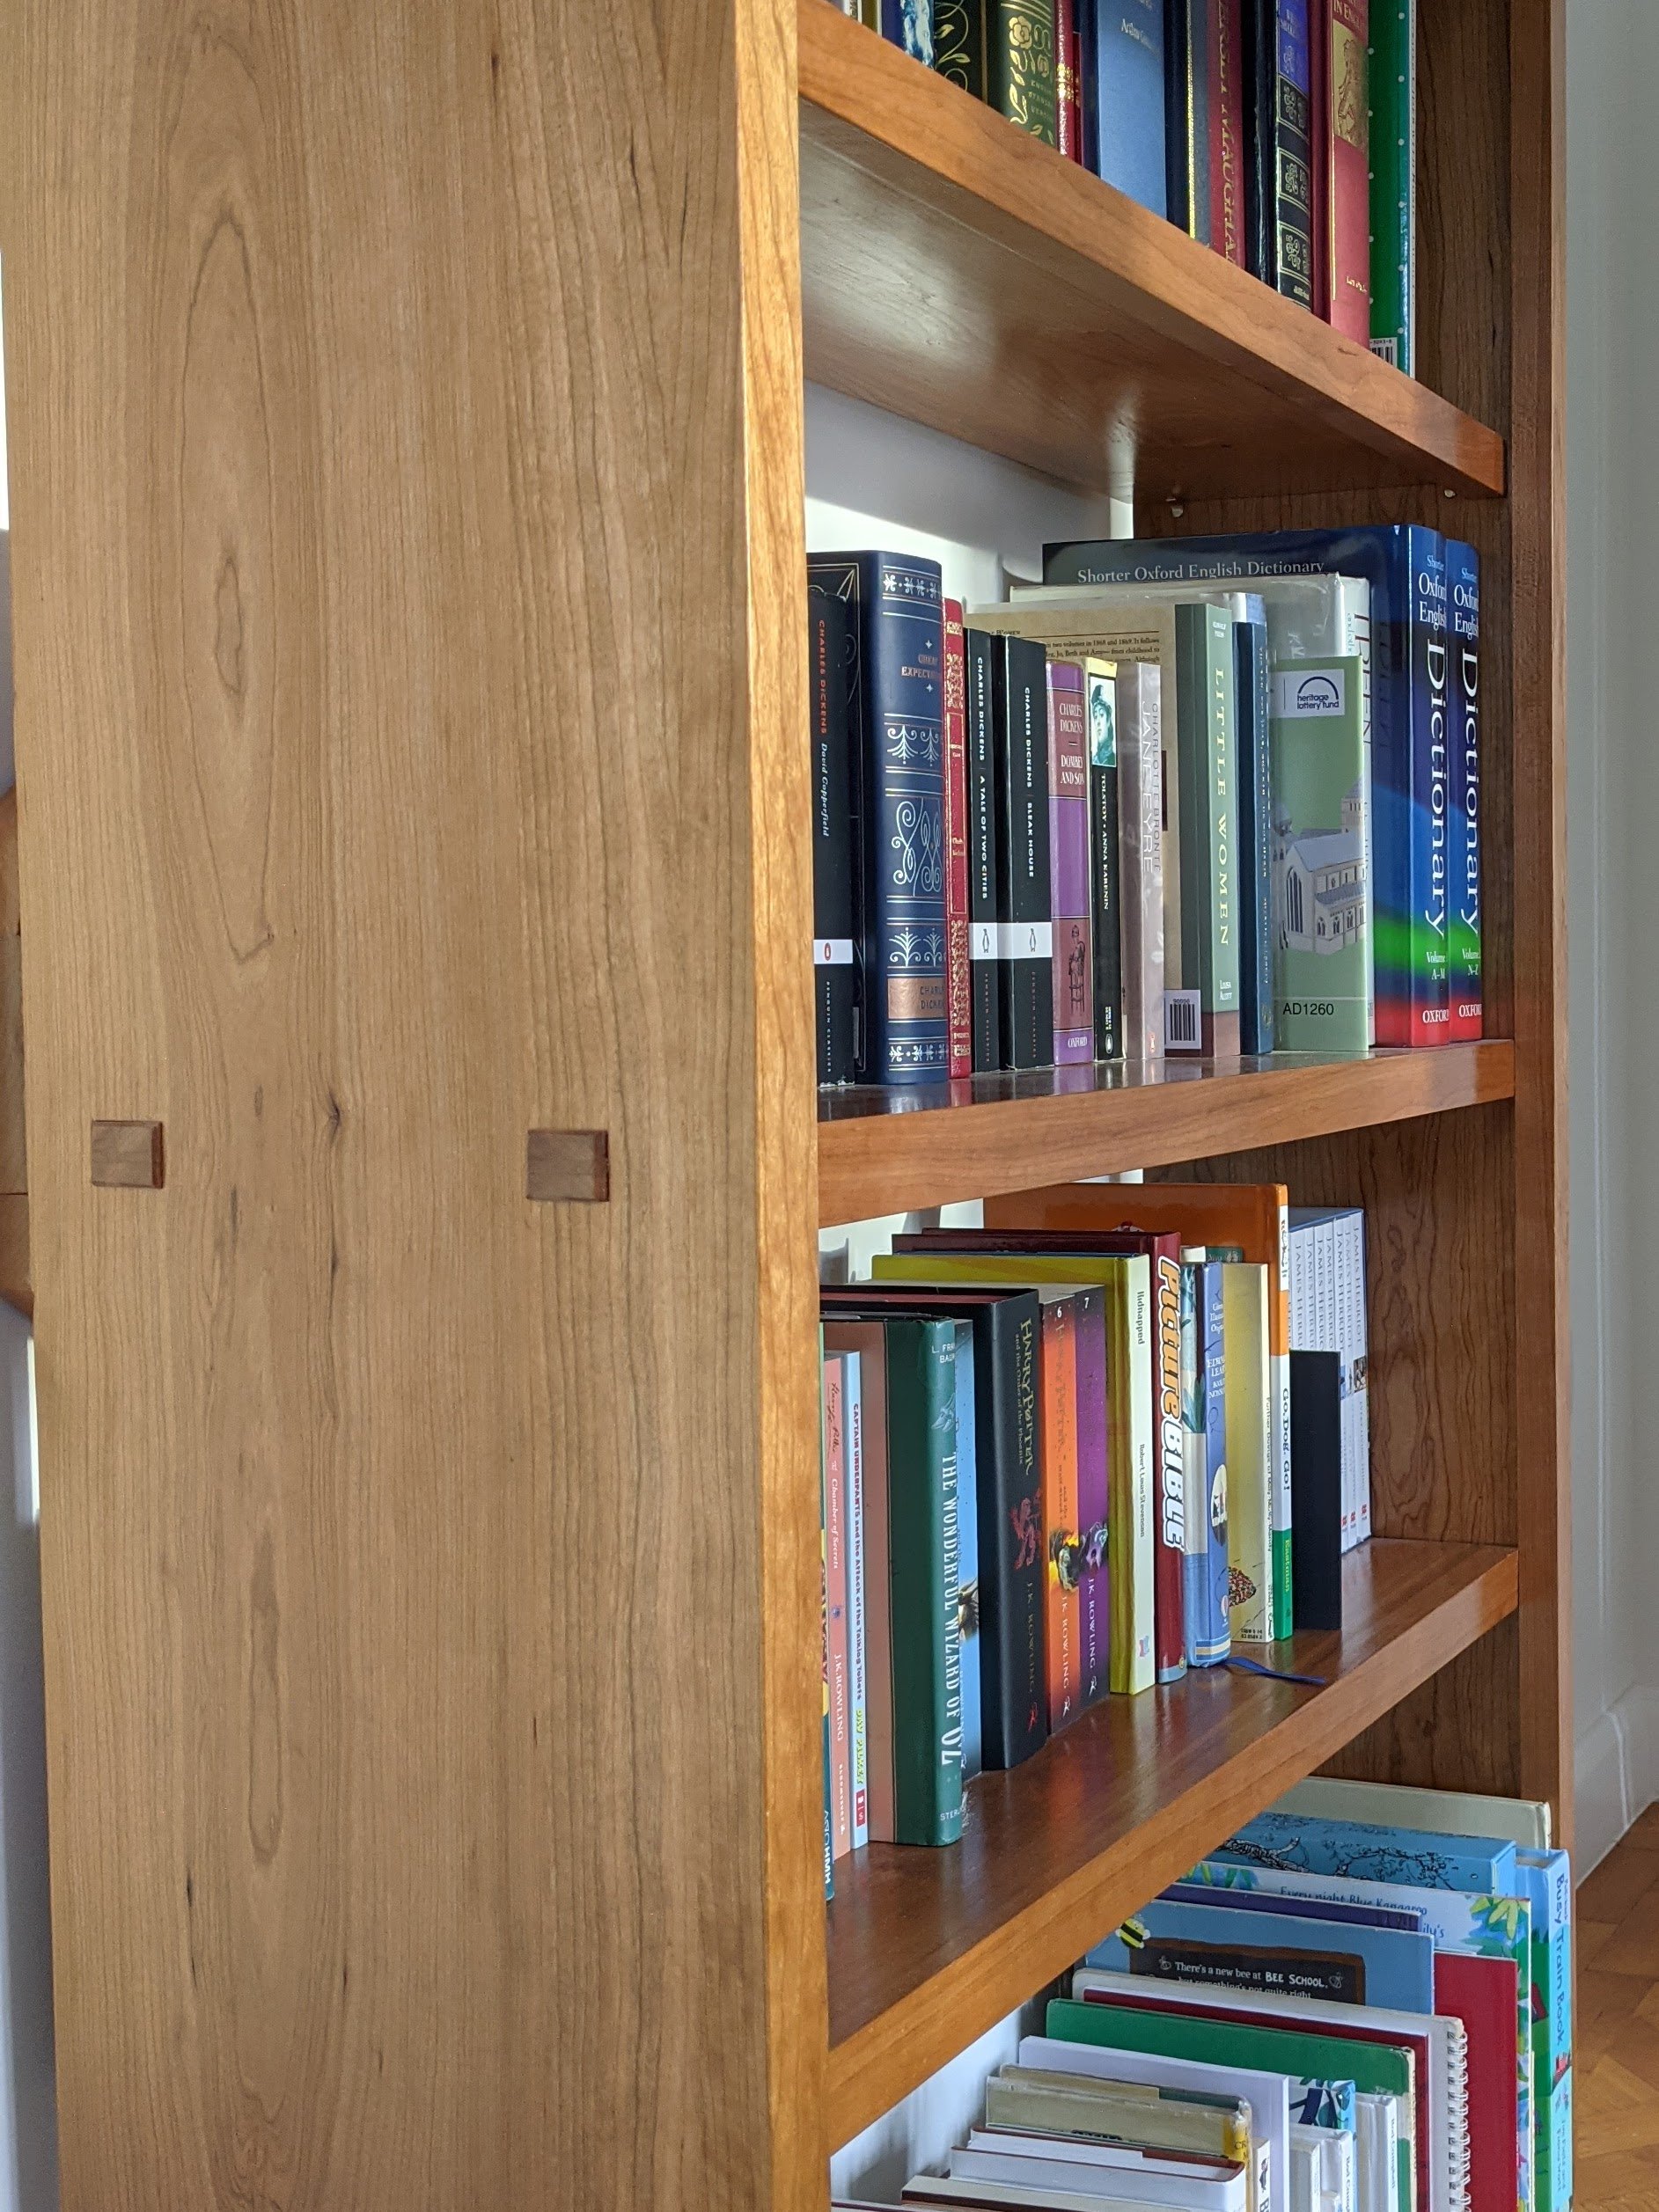
I know that 90% of bookcase owners will definitely not empty the bookcase of books if they feel it will shove along the carpeted floor. If this doesn’t break the glue lines and rack every joint I don’t know what will. And then there is the dragging of beds and long dining tables where leverage is massively increased against the mortise and tenons. Better for two people to lift and move rather than just one giving a good shove against a rucked-up and wrinkling carpet. What about stowage when out of use or travelling from one place to another or even one continent to another? A printed sheet will do this. On the point of handover, a nice After-delivery care note will never offend the new owner. Spilt spirit alcohol on a certain finish will destroy the appearance. tablemats are essential, inexpensive and easy to explain.
In the age when polyurethane was making its mark in wood finishing the TV sales pitch for the “housewife” was the ease of cleaning and the no need for placemats and such ever again. The idea was to sell their idea that finishes just lasted forever and kept their shine no matter how the furniture was treated or mistreated and, in reality, polyurethane is a hard-to-beat finish or durability. On some pieces, this can be overkill. Some furniture is only minimally touched by what usually causes the serious breakdown issues, the oils from human hands and forearms. On dining tables, the hands and arms are always in contact with the table and this is usually where the finish breaks down. The chairs that go with them are barely touched by hands unless the chairs have arms. So, my advice to new owners is to use placemats and drink coasters. They aren’t for everyone but I doubt that any of my customers through the years were likely DIY refinishers.
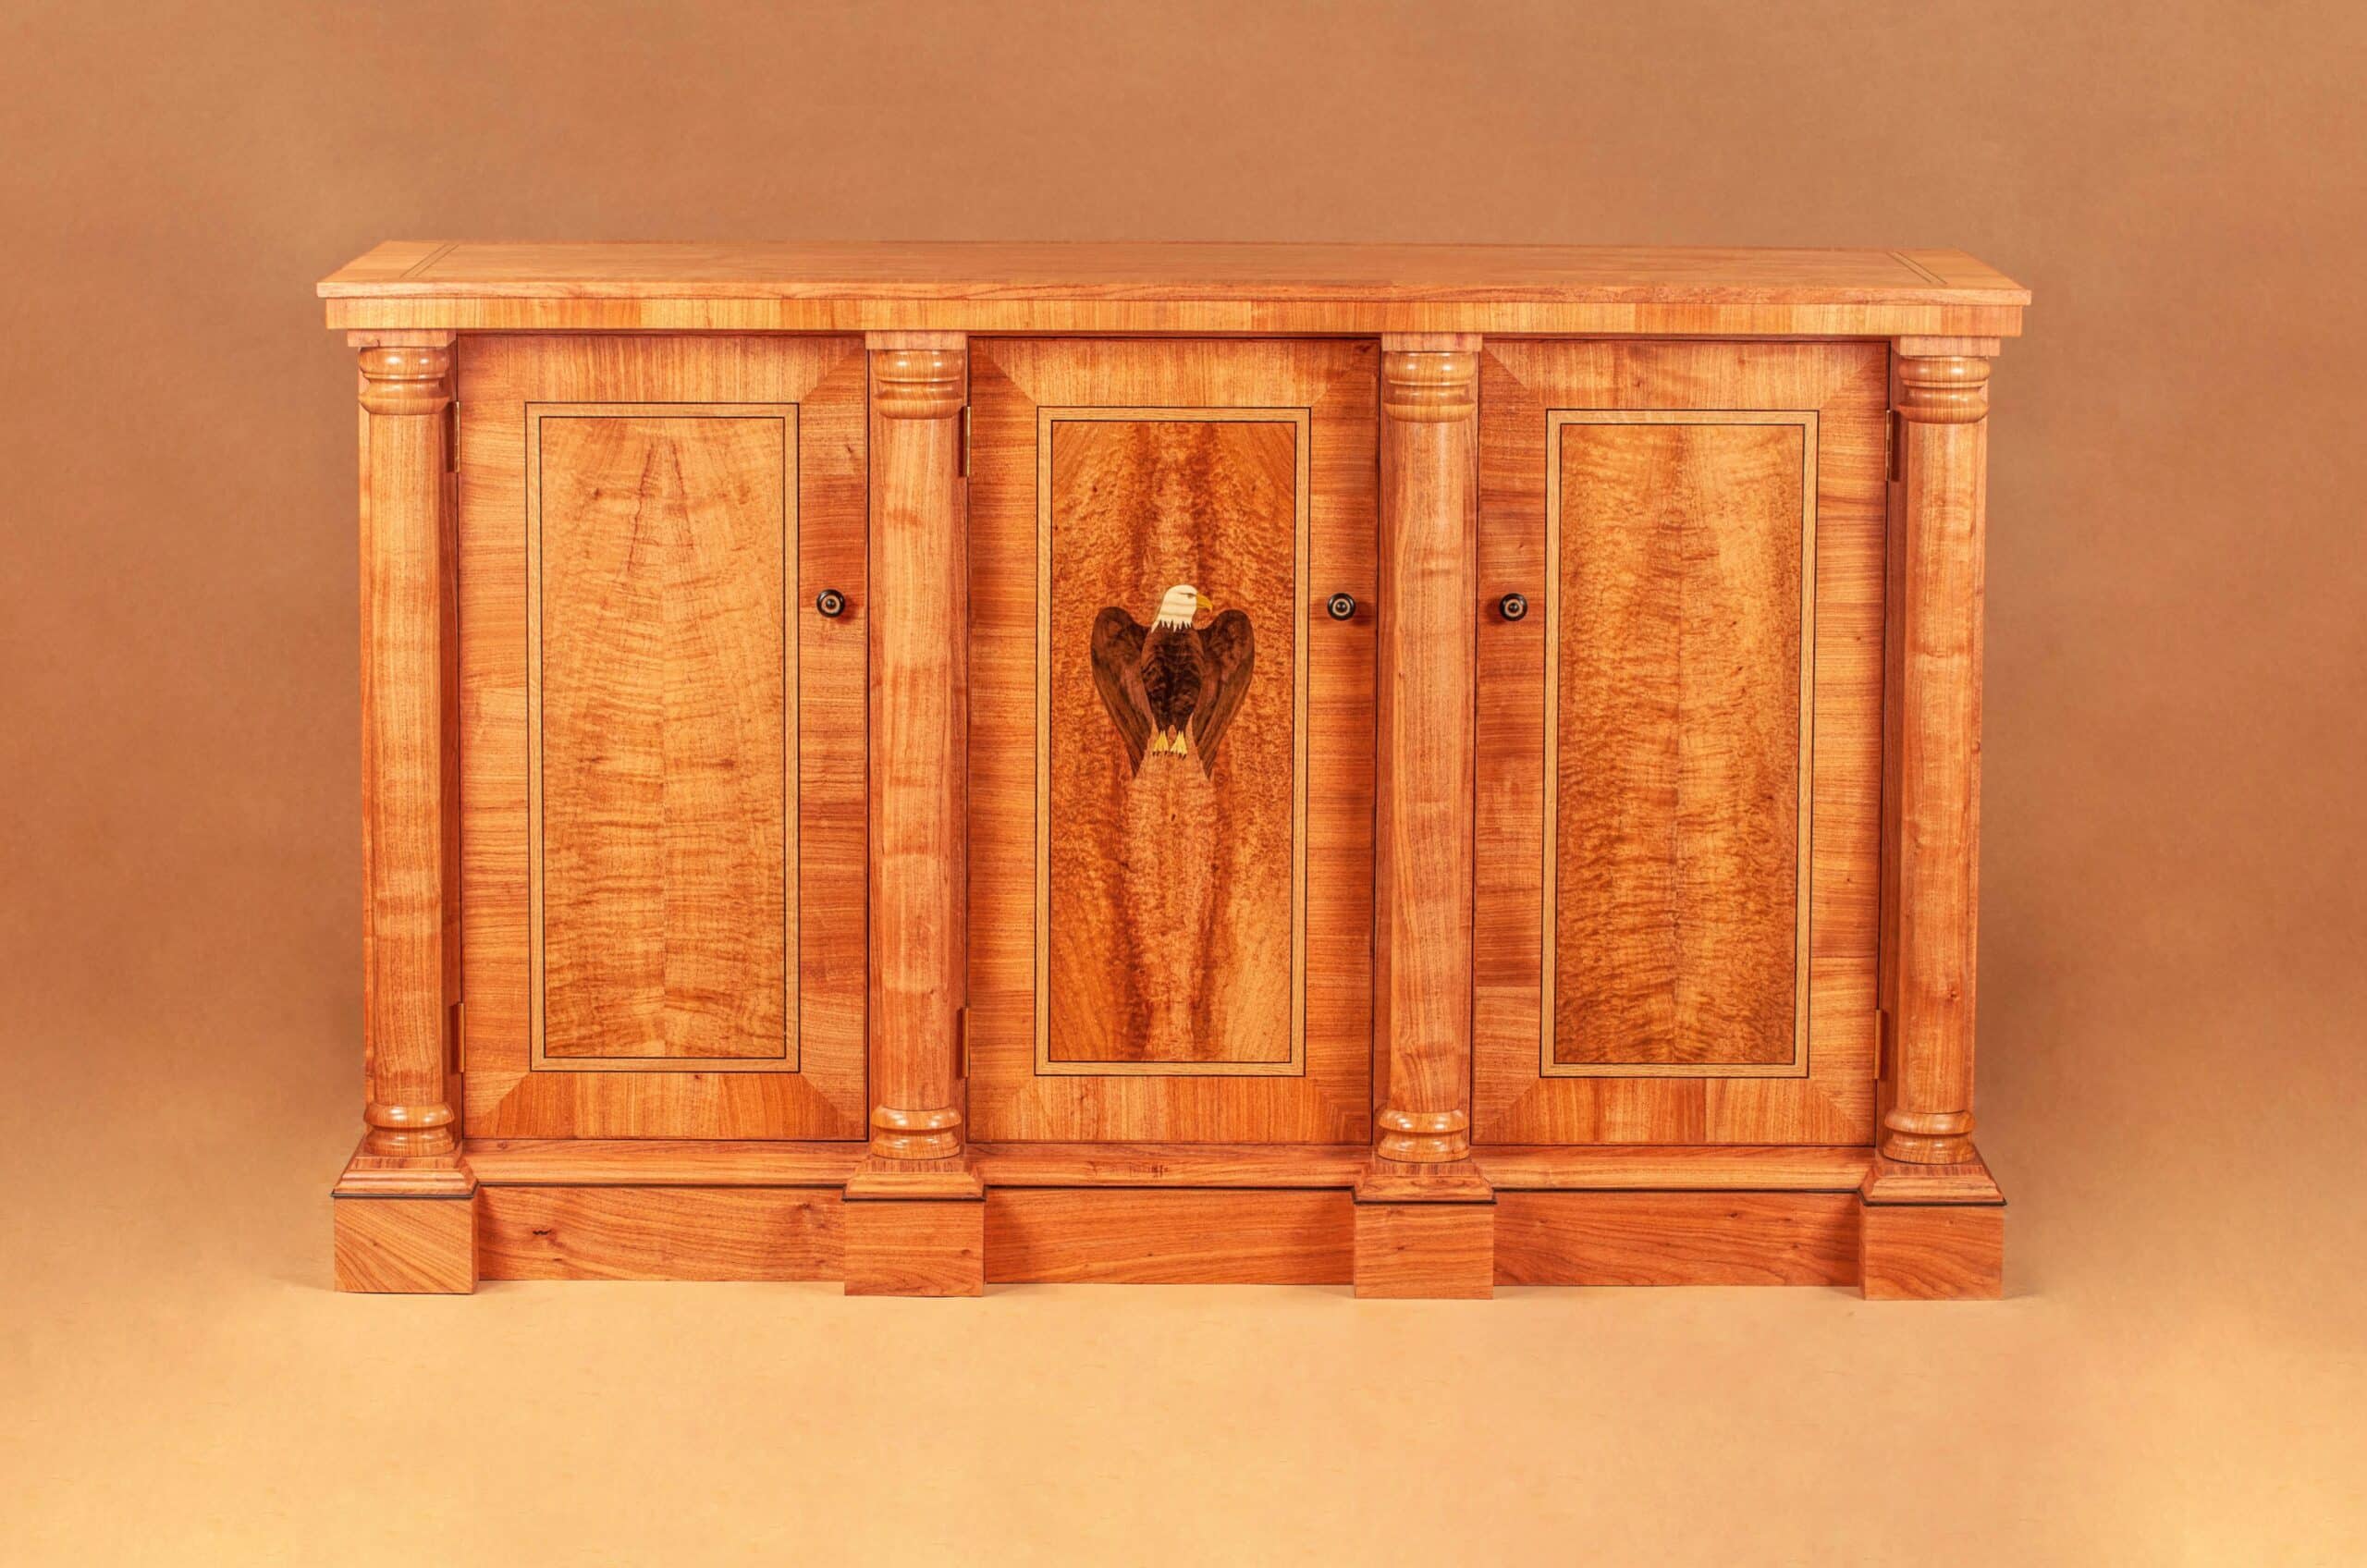
Shellac is one of those few most remarkable finishes no one ever invented but more discovered centuries ago. French polish is not a substance but an act though brands sell it as a finish and that’s because these companies invented nothing but were advantaged by nature. Shellac is the substance of a natural finish we call French polishing. It’s so safe and natural, commercial candy makers actually coat many types with it to make them shiny. It’s the primary coating on fingernail polish. Put shellac in Google and you will find more fingernail suppliers selling shellac than you can shake a stick at and a million times less supplying it for woodworking. But the art we now know as French polishing is a skill fewer and fewer will ever actually master or come across as progress undermines its value in our day because as amateurs we most likely will never have enough work to require our gaining competency and skill to any level of the master deserved of the title, ‘French Polisher’. French polishing is one of those skills that needs total rote practice over a number of years to truly settle it an acquired and mastered skill. When we completed the two White House credenzas for the Cabinet Room of the White House we were applying two extra coats in a hotel to give them that final lustrous shine.
That said, shellac brushes on well but you must work fast and apply subsequent coats even faster. Why? Because the denatured alcohol we use to resolve the brittle shellac flakes into a liquid for application begins to dissolve and soften any previous coats within seconds. So, when we brush it on, these coats can drag into ripples as we pull the brush over the surface. The art with brushing on shellac is to load the brush, apply to the surface and do successive pulls along the grain with no fuss and no second strokes as you might with surface finishes like polyurethane which might give you ten minutes. With shellac, you have literally seconds, no more. Working quickly defies the softening period. Shellac repairs easily but what I like best about it is how well it sprays with an HVLP spray rig. Four or five thin coats followed by one fuller coat will give you a high gloss that buffs out beautifully. Because nothing touches sprayed shellac beyond the air it’s transferred from cup to wood these coats can go on in fairly quick succession. Three to five minutes between coats if the atmosphere is dry and warm and then leave untouched for a couple of hours. No matter how many coats of shellac you apply you end up with just one. Unlike all other surface-coating finishes, subsequent coats of shellac dissolve into the previous coats whereas all the other finishes sit one on top of the other and in some cases these ‘skins’ separate and peel apart over time. And that is any of them including water-based versions. This is why when refinishing we sand between coats to give ‘tooth‘ to the previous finish and indeed between coats of new finish too.
We don’t always realise that many finishes now are little more than plastic coats going under the banner of water-based or water-bourne acrylic. It’s too complicated to get into here but many of the liquid finishes we use are little more than plastic as is the case with our favoured glue, PVA. Washing out our brushes and surfaces with water down the drain is added to our plastics contamination of every waterway, lake and ocean we care to name
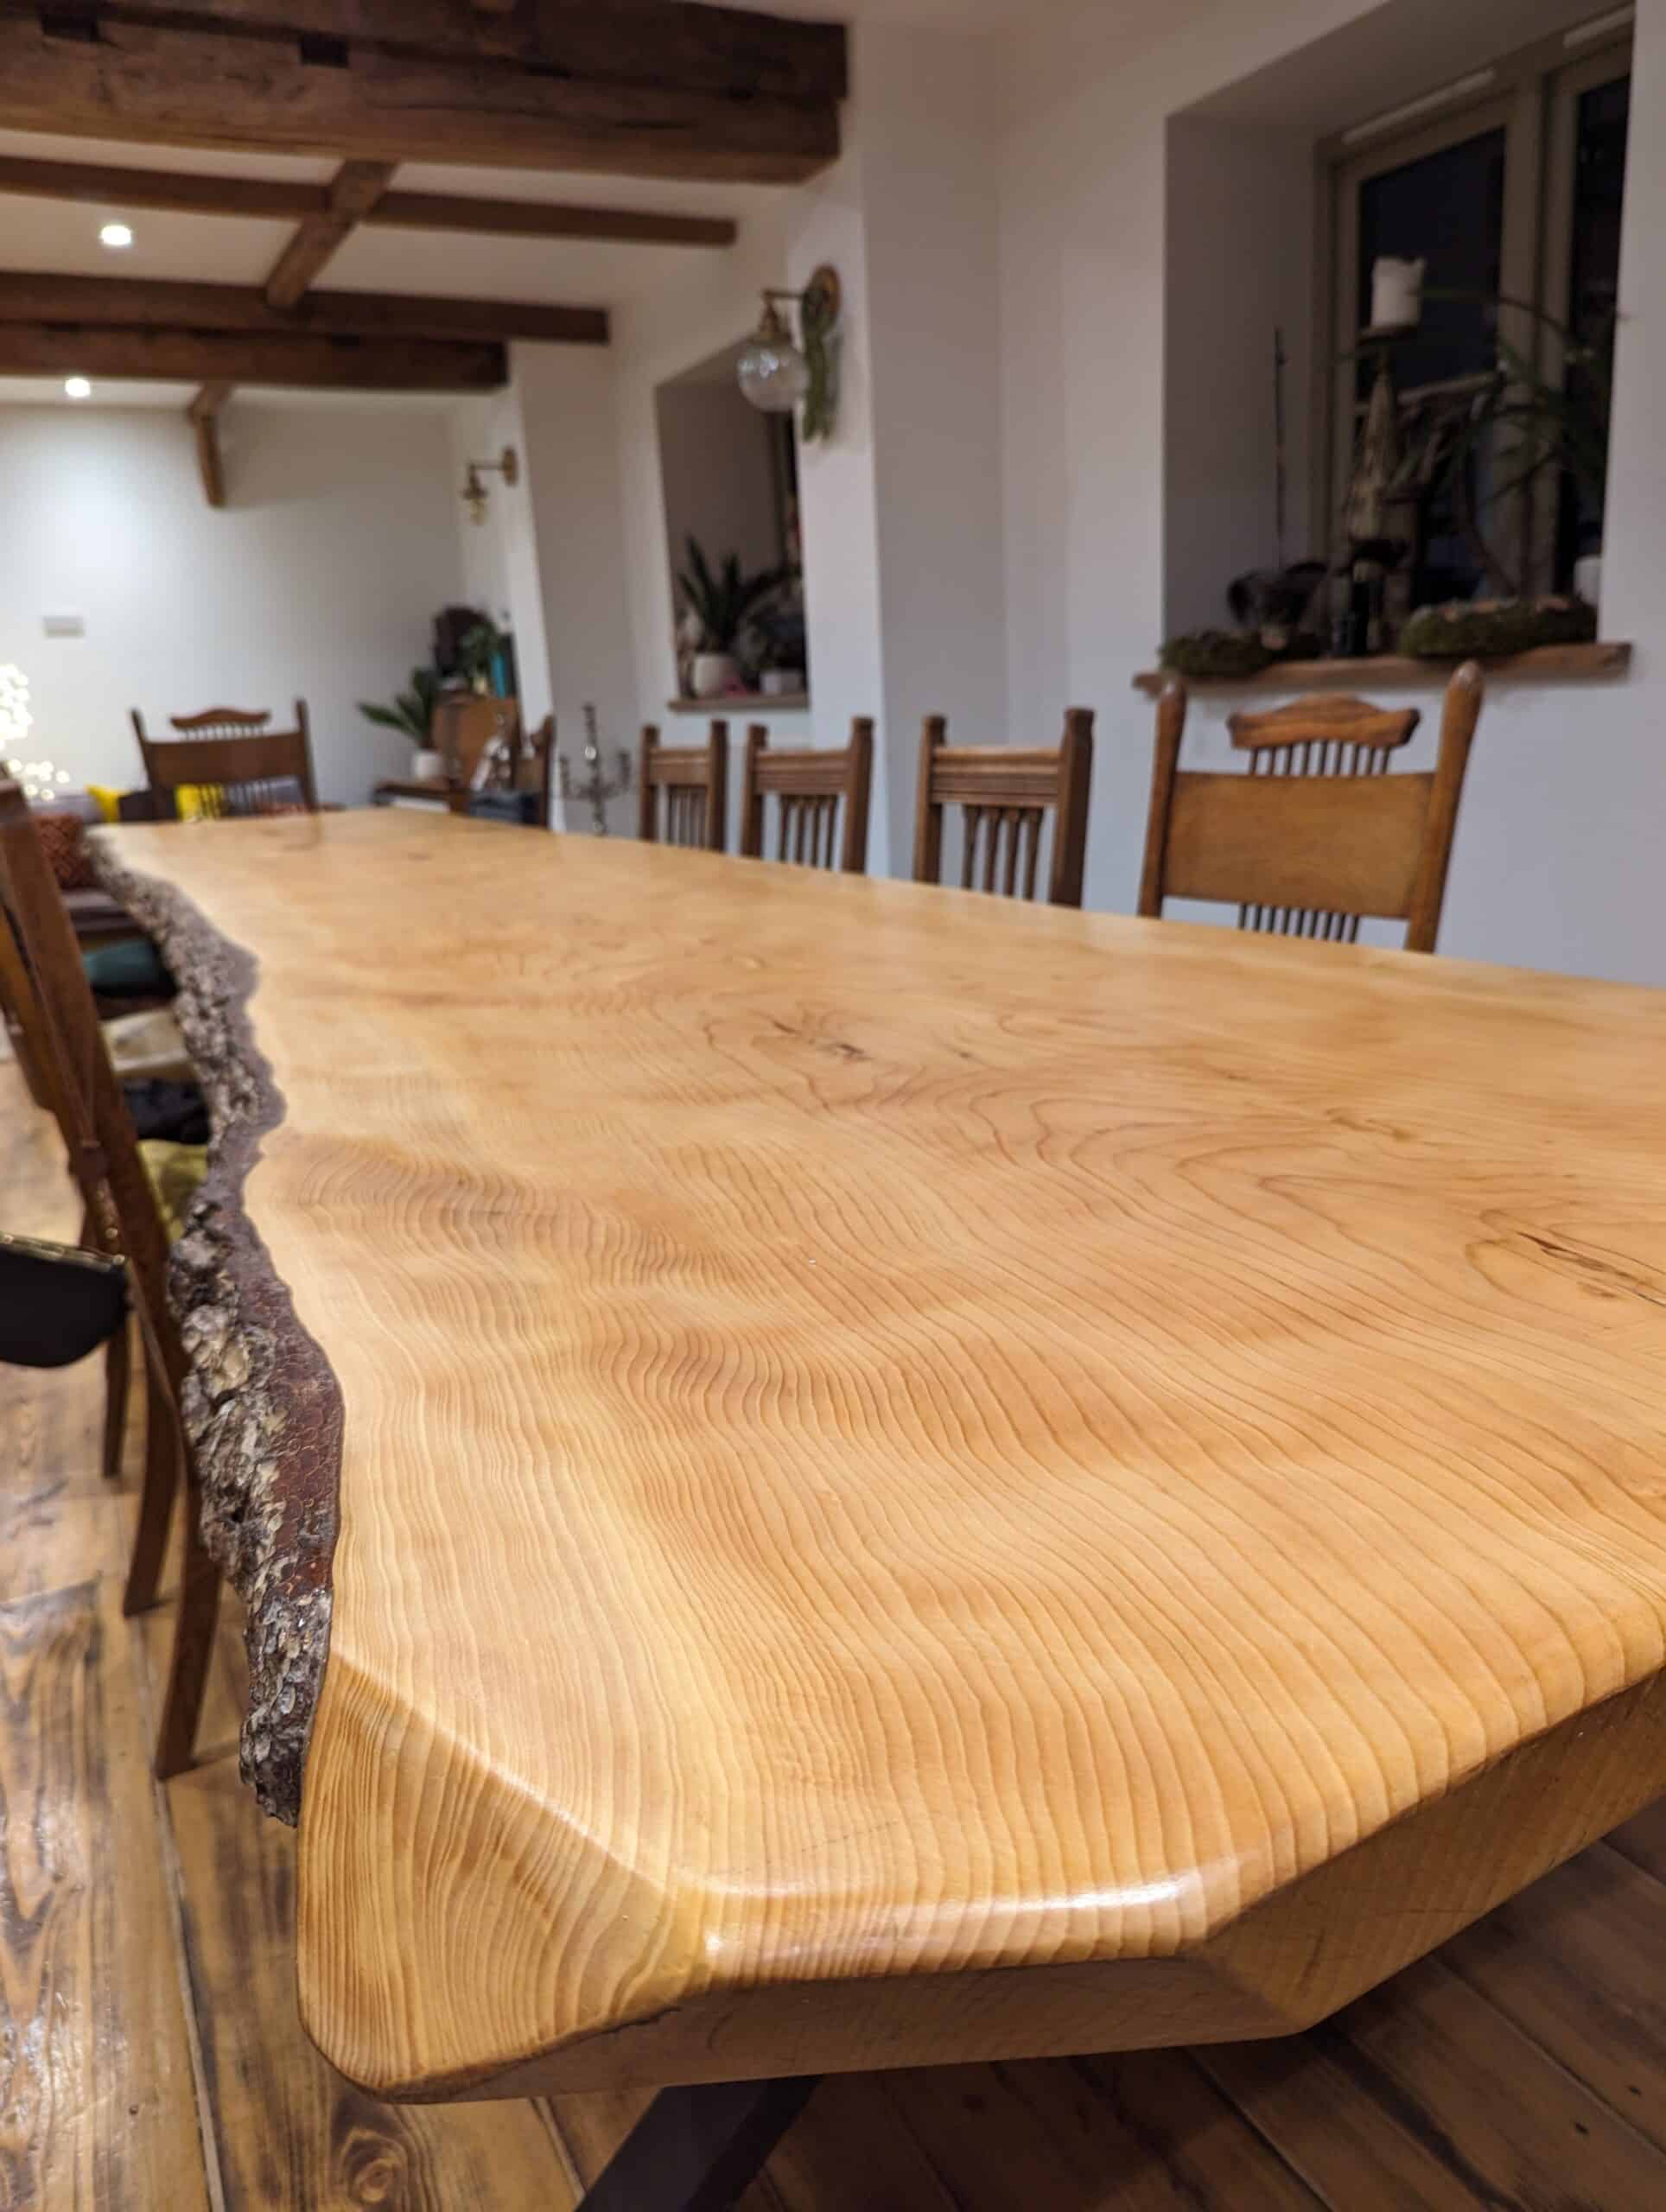
Further proof comes when we try sanding many of the waterborne finishes off a tabletop and the finish globs up en mass to defy the abrasive. On my recent tabletop task of stripping and refinishing, I used two ever faithful #80 cabinet scrapers and two card scrapers to get me from beginning to end without having to resharpen. All the material used could be swept into a bag and disposed of safely with no powder or dust. This removed both the finish and the thinnest surface of the wood itself. Minor sanding gave me the tooth for the first coat of finish and from there I applied new and thin coats to build up the surface finish. The finish I chose is easily repaired and recoated and my friends now know how to take care of and repair the finish in the future as they worked with me through the whole process. I am not looking for future work!
love your work paul I’m always watching you I have some hand tools nothing to work on or any space I’m doing level 1 joinery diploma and I’m dreding power tools I want chance to use my tools evan got brand new chissels and Japanese saw I love your boxes paul can u please send some sonple box making pictures and plans please I’m a massive fan I’m in hull iv never gone and bought timber I need someone to take me on n teach me what they no I’m after been a bench joiner can u help me get of my feet paul or can u just send pictures of some nice but simple anough for me to start then I’ll try some harder ones thank you scott
Have you seen our common woodworking site at commonwoodworking.com? You’ll get more in a weekend from studying there than two years on a college course. Start there first then get back to me. Oh, and plan on dumping the ~japanese saw eventually. It might seem easier in the start but you need saws you can sharpen yourself if you are serious about hand work.
I believe you can sharpen quality Japanese saws that don’t have factory hardened teeth. A number 3 feather file for a dozuki, and a 4 for a ryoba perhaps. These will basically be more expensive saws and may not be available in people’s local woodworking store. I could be wrong of course – you’re the expert.
Oh and I love shellac. I’ll have to try spraying it.
It’s funny how everyone says that as though you can just walk into a hardware store and buy a Japanese saw that doesn’t have impulse hardened teeth and then too the uniquely angled file to sharpen it. I know that at one time they were somewhat like western saws but those days are long gone. All saws in the big box stores and beyond, western or Japanese have unsharpenable hard-point teeth that are too hard to sharpen. Of course, you can find what are now specialist saws that could be resharpened as needed but this is far from common any more.
“…….Owning handmade furniture is not to just buy the piece we make but to educate owners as to the best way to treat it when it arrives so that they own it well…..” !!!
You know, Paul, I do think that if peoples spare and throw the hard-earned money to buy the hand-made furniture, they must already have the proper knowledge for the bests ways to threat it well upon arrival !?! This is my thinking so far !! Best Regards.
I don’t understand the logic here `t all Robert. We’ve had well over half a century of super hard and durable finishes telling people of all groups and classes that furniture does not need to be highly regarded p[rimarily because the goods accessible tp the majority have been cheapened in attitude and cost. Basically, furniture has become a fashion decision and people change their coffee tables like they change their shirt. In other words fashion means made for disposal. We in general do not have access to the finishes used in industry. These finishes in general are remarkable finishes that do withstand wear and tear more than say boiled linseed oil and water-based finishes. we need to inform our customers that they need to treat our ours differently where necessary even if and when we do have a good finish.
Okay Paul, I now get the idea having received this clearer explanation. Regards,
I agree on the Japanese saws. They are good to have around for a specific purpose but overall the Western saws are better to use as you can give them a tune-up when needed. Also, if you have a Japanese saw I recommend that you wear a thick glove on your weak hand when in use. I have nicked myself numerous times as they are razor sharp. JRW
It’s too late to remove the polyurethane I’ve applied. So can shellac be coated over the finish I’ve already applied? I wish I had used shellac as I used to do in my high school shop class long ago. Thank you for informing me about shellac . I love your articles .
Thanks Paul. I have used shellac more than any finish on the projects I have been making. Your work, along with some of Don William’s writings, really helped. With a little practice, it’s easy to apply. What really helped me was to switch to the mopped artist brush Don Williams talks about. The curvature feathers in the edges of the shellac and helps reduce potential for tracks in the shellac finish. I can get same quality of finish without a mop brush but it helps.
Lately I’ve been playing with linseed oil (Tried and True brand with is partially polymerized – something I know a fair bit about due to a consulting job I did with natural oil 20 years ago before I was a woodworker). Christian Becksvoort really uses it on his cherry furniture. I’ve tried it on a few pieces and really like the way it looks and feels.
Is there any upside or down side to using linseed oil rather than shellac.
i have also tried linseed oil. my findings are while it looks ok when first applied, the finish loses its appeal fairly quickly when it ages.
Thanks Tayler.
Hi Paul…as usual I read with interest your very interesting knowledgeable writings.
I’ve just made a picture frame out of ceder cladding removed from a local house. Cut to size using my 1870 3/16″ edge bead plane on both front face corners. rebate from my own made rebate plane…from scrap beech..using a 3/4″ firmer chisel….used shellac for a low sheen finish.
frame was for a friends sons order of service. he died 2 months ago.
I know she will be pleased… I really enjoyed making for her.
Isn’t that the Joy! I’m presently making a bow for my granddaughter aged five to shoot arrows with at Christmas. I’ve a few things on the go but I am so looking forward to a break now that I have the prototype of my first project of the new year down. This alone is relaxing. My recovery period for my hands was literally almost non-existent and I lost no time at all. I am almost shutting down for Christmas this soon though I can’t just yet..
Hi Paul
I get a little confused about “Shellac”, Is this the same as sanding sealer?
I am relatively new to the hand working process and would welcome and guidance on this and what “shellac” you use.
PS I have dumped my router and electric planer and invested in an old No5 and 4 which I restored following your guidance, just got to get the sharpening technique sorted, I just cant get my blades as sharp as your video!
Thank you
Sanding sealer is the product supplier making money out of ignorance. Instead of educating their buyers and saying thine regular shellac to make the mix thinner for a sanding sealer they rename shellac and sell a separate product to make twice as much money. Sanding sealer is shellac thinned down by 20%. This thinning with denatured alcohol, the fluid you mix with shellac flakes to make the flakes of shellac liquid and transferable as a finish, is nothing more than shellac. I tend to use premade or should I say premixed shellac by Liberon and I buy it by the five litre jug or gallon version in the USA. This is ready to go and when I’m about to apply the first coat I just glug in some meths which is denatured alcohol in sales form. re sharpening: though I freehand my sharpening, I do recommend honing guides for new people until they bget used to the angle and the energy needed. The best one is the Stanley version 16-050. It’s often sold as a kit with a stone and oil but this is still usually the cheapest way.
Hi Paul, am I right in thinking that the Liberon sanding sealer contains wax?
I remember using this before applying water based paint top coats over it, but I think it was the wax in the Liberon that prevented the top coat taking properly. Since then I’ve always mixed my own Shellac from flakes. I’d never mixed my own before, but it wasn’t difficult and it’s another interesting thing I’ve how to do since following your teachings.
Thank you for sharing this one. A must read article!
Hi Paul
Love the article. I have read most of your posts and watched most of your video’s. As a avid hand tool hobbyist and always end up battling with the finish. Do you have a series just on different finishes and two to apply them correctly?
Shaun, It is less complicated today than in times past. The issue, now, as is more common and usual, is choices. It is harder to know just what to buy and use in this age of the pluralistic illusion where we think we have choices when what’s in the can is a mix of the same materials but under different brand names. Wipe on finishes are the easiest to apply and deliver a nice finish. They can be oil-based and water-based but as I pointed out, claims of being environmentally friendly is not always the case because, as in water-washable finishes like paints and varnishes, etc, washing them out is washing plastic into the water courses and then ultimately the oceans of the world. Ideally, a charcoal or sand bed would give a filter to dispose of our cleaning agents and water through before it enters the watercourses but who is going to do that? The best advice I can offer without giving out the names of manufacturers is to try different types. Shellac is the safest of all finishes. It’s supremely natural.Denatured alcohol is alcohol that has been made unsuitable for drinking by the addition of approved denaturants. Here in the UK there are 3 classes of denatured alcohol: completely denatured alcohol (CDA); industrial denatured alcohol (IDA), trade specific denatured alcohol (TSDA). Our way of acquiring our denatured alcohol is to simply buy Methylated Spirits from the hardware shop. I do use waterbased clear wood finishes but have had mixed results. Once you find one that satisfies your work, stick to it for a season. I used one on my dining table and it has worked well. Shellac works well on pieces that do not have to hang out with spirit alcohol and I am a believer in using coasters or mats for protection. Polyurethane is a good finish for high work areas like dining tables, etc.
Here is a good Paul Seller’s YouTube video on applying shellac. It is fairly comprehensive. Paul has on occasion used some other finishes but I don’t know where to find them. For a water born finish, this video series on the plywood workbench might have that.
https://www.youtube.com/watch?v=UssYj-98oCg
It may be of interest to some that in the US a product named Royal-Lac is available that addresses some of the “short comings” of shellac such as alcohol resistance, damage due to heat or water damage. https://www.shellacfinishes.com/product/royal-lac/
The website includes all the products as well as videos showing how to apply it as well as tests for durability. I have used this product for a dining table, a desk, a coffee table and TV table. From my experience it goes on and cleans up the same as traditional shellac and promises a much more durable surface. So far I’m not disappointed with it at all.
Shellac is by far my favorite finish here in the US premixed shellac is most commonly available in hardware and big box stores as Zinsser brand. It’s a 3 pound cut and is not de-waxed. They also offer a de-waxed product called Zinsser Seal Coat which is a pre-mixed de-waxed shellac in a two pound cut. I have used both products as finish coats on multiple projects with excellent results.
De-waxed shellac (Seal Coat) is recommended as a base coat under polyurethane because the wax in regular shellac impedes adhesion to the polyurethane. I can’t personally verify that as I very seldom use polyurethane. It’s very smelly and I don’t like the yellow color or the appearance.
Regards to all
You can buy a hardener for shellac that it hardens like poly, but it still allows the glass like appearance that only shellac can offer.
Thanks Paul. Since learning about shellac from you some years ago, it has become my finish of choice for indoor finishing. I double distill my own alcohol in order to get a pure unadulterated solvent. I live in inland southern California where it gets extremely hot and dry much of the time. Dealing with shellac’s fast drying time can be quite challenging. By adding small amounts of 90%+ isopropyl alcohol to the cut, I have had success in slowing the drying down somewhat without compromising the final results. Do you have any other methods for dealing with this issue?
Paul, have you ever presented ways to reduce the gloss of shellac if one wants a more satin sheen rather than gloss? I’m curious about this especially when dealing with something more complicated than a flat table top. The Wall Clock might be a good example, since it has inside corners, a raised panel, and some roundovers. Wishing you, your family, and your crew the happiest of holidays!
Just dug up the old Wall Clock video and see that it is just the same, even with the quirked beads and inside corners: 0000 steel wool and wax.
Paul, If you had to repair a shellac finish for a customer, how would you clean off any wax or who-knows-what polish that might have been applied over the years, perhaps even building up in corners, before doing the shellac repair?
“It’s too complicated to get into here but many of the liquid finishes we use are little more than plastic as is the case with our favoured glue, PVA. Washing out our brushes and surfaces with water down the drain is added to our plastics contamination of every waterway, lake and ocean we care to name”…
Which was the motivation behind my recent question on the forums about glue…
https://woodworkingmasterclasses.com/discussions/topic/types-of-glue/
I’m still pondering!
Matt
Try hide glue you won’t be disappointed! Liquid hide glue is my choice, no glue pots and it’s readily available. It has a longer open time, and should remain clamped overnight. It also doesn’t seem to swell the wood fibers like PVA. Dovetails are amazingly easy to assemble with hide glue, the joint just slips together! Regards.
Thanks Eugene. I bought some inexpensive “pearls” of animal hide glue a few years ago. Mainly to fix a pretty, broken antique chair that a neighbor sold me cheap at their garage sale, when they moved to NZ (or Australia?).
I was indeed impressed and pleased with hide glue, both it’s use and the result. 🙂 FYI I also used a tiny amount of thin superglue to strengthen a couple of small, thin cracks.
I also bought a cheap electric double pot warmer (oddly cheaper than the simpler, smaller single one I would have preferred or an old vintage/antique hot water heated glue pot that I first looked for) to create and maintain the warmth of the hide glue while in use.
Happily the warmer is also great for making my homemade beeswax polish (originally just beeswax and raw linseed oil but am currently experimenting with adding a small amount of artists’ turpentine – carefully, as it’s now considered toxic but I suspect less so than the modern replacement, white spirit, which seems to badly effect the painters that use it most :(. )
Adding more linseed oil and/or turps softens the wax. I believe turps has some preservative properties too (although beeswax, like honey, seems quite inert and I think the linseed oil polymerizes over several months).
So, I too like animal hide glue :), although I have only tried the traditional warmed variety. Which is admittedly less convenient than the ubiquitous PVA wood glue.
BTW I occasionally use some cheap secondhand sanding sealer (car boot sale find) on tool handles as a shellac finish or touch up. It seems to be French polish or similar enough for my needs.
Believe me I never read such a detailed review ever. Worth reading indeed. I second it that Shellac is an awesome finish with amazing smell. I bought it from https://www.theindustreebar.com.au/waxes-polishes. You may also give them a try, they are trustworthy from my end.